
- Introduction
- What is WebSocket?
- Why use WebSockets?
- Why build an ESP32 robot car?
- Design Diagram of our ESP32 Robot Car Using Websockets
- Why use PlatformIO?
- Component List
- Schematic Diagram
- Code
- D-Pad/O-Pad Controller
- Complete Code of our ESP32 Websockets Car Controller
- main.cpp
- ESP32 Websockets Server
- Deploying our ESP32 Robot Car Websockets Server
- Wrap Up
Introduction
In this post, I am going to share how I created my own ESP32 Car using WebSockets. Websockets is a full duplex communication protocol over a single TCP connection making it ideal to control our robot car with minimal delay due to latency. I have used PlatformIO IDE in developing this project as it simplifies the development of the Internet of Things (IoT) project due to numerous code assist features.
We are going to control our robot car using our mobile phones. I have forked the following DPad and OPad controllers to make them suitable for controlling the movement of our ESP32-based Robot Car.
If you want to see this project in a video format then please see below. You can also watch this on my YouTube channel.
What is WebSocket?
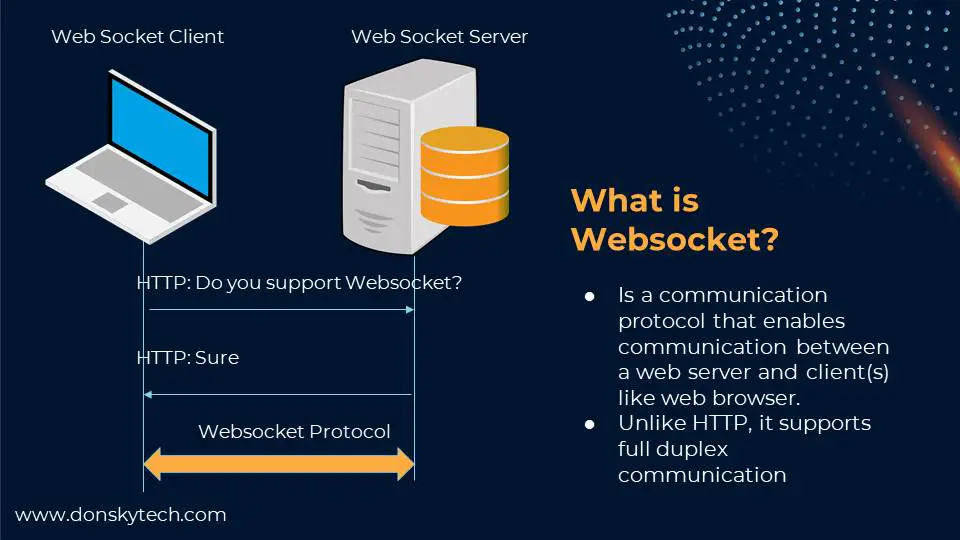
Before we move forward, let’s discuss a little bit what Websockets is. Websockets are communication protocols between a web server and clients like browsers. But other clients can be used like python or c++ clients. In this post, we are going to use Javascript in programming our client. The WebSocket server publishes an endpoint that the WebSocket clients use to connect. Typically the endpoint is in this format
“ws://host:port/path?query”The client initiates a connection and when a connection is established then communication can start. But unlike HTTP, WebSockets supports bidirectional full duplex sending and receiving of messages. So both the client and server can send messages to each other. We can also have multiple clients but that is beyond the scope of this post.
The ESP32 will act as our Websockets server that will receive WebSocket messages coming from our robot car that is sending WebSocket messages thru Javascript in our browser.
Why use WebSockets?
Why are WebSockets ideal for this type of Internet of Things(IoT) applications? It’s because of the less latency offered by our WebSockets. So if a message is sent from our mobile phone that the car should stop then it should stop “real-time” or else it would crash.
As mentioned before, WebSockets supports full duplex bidirectional communication where messages are sent back and forth between server and client. But in this project, we are not going to use it as messages are sent back from our client only (browser) and our ESP32 Microcontroller (server) responds to it only.
There are other options like using Bluetooth or the XMLHttpRequest(AJAX) or long polling but this is beyond the scope of this post.
Related Content:
Using WebSocket in the Internet of Things (IoT) projects
Why build an ESP32 robot car?
Building a robot car is cool! Period! And it is way cooler if we are going to use our ESP32 MCU as our Websockets server because of its built-in wifi capability feature.
We have different options to control our robot car like using Bluetooth or Web Server using the usual XMLHTTPRequest or AJAX.
But using Websockets is a preferred option due to the almost “real-time” response and the possibility of “duplex” communication between our robot car and our controller. Websockets is often used in a chat application or streaming dashboards due to their nature of being “two-way/ bidirectional” between a server and a web browser.
In this post, we are going to use our mobile phone browser to control the direction of our ESP32 robot car.
In future posts, we will be exploring WebSockets further in our future Internet of Things (IoT) project.
Design Diagram of our ESP32 Robot Car Using Websockets
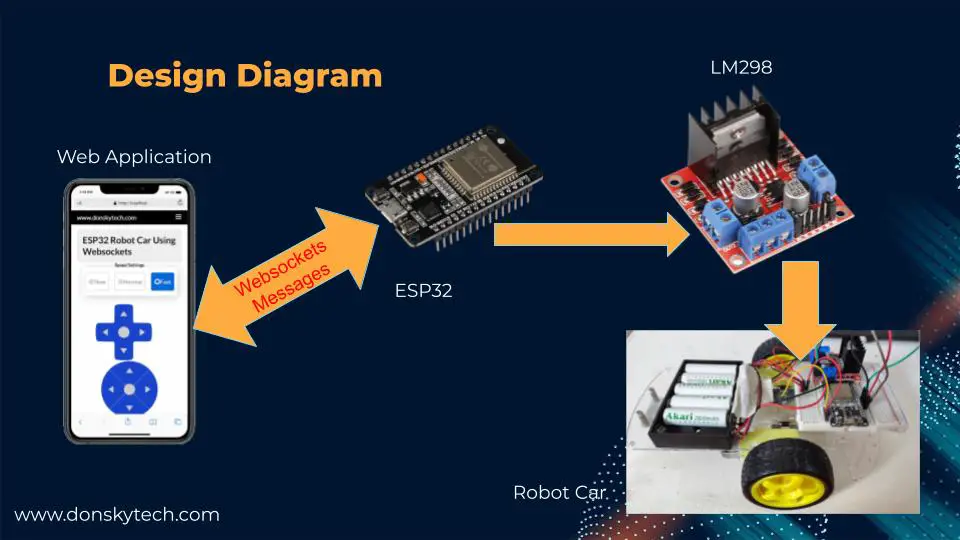
In the diagram above, the ESP32 act as our WebSockets server. The browser in our mobile phone acts as the WebSocket client. Websockets messages coming from our browser are processed by our ESP32 Microcontroller. It then sends control messages to our LM298 motor driver to control the rotation of our robot car wheels. In addition to direction controls, we are going to control the speed of our robot car by using Pulse Width Modulation (PWM).
Whenever we click or touch the up, down, left, or right in our smartphone then a WebSocket message is sent to our robot car and the ESP32 will control the direction. The speed settings like “Slow”, “Normal” or “Fast” controls the speed of how our robot car moves.
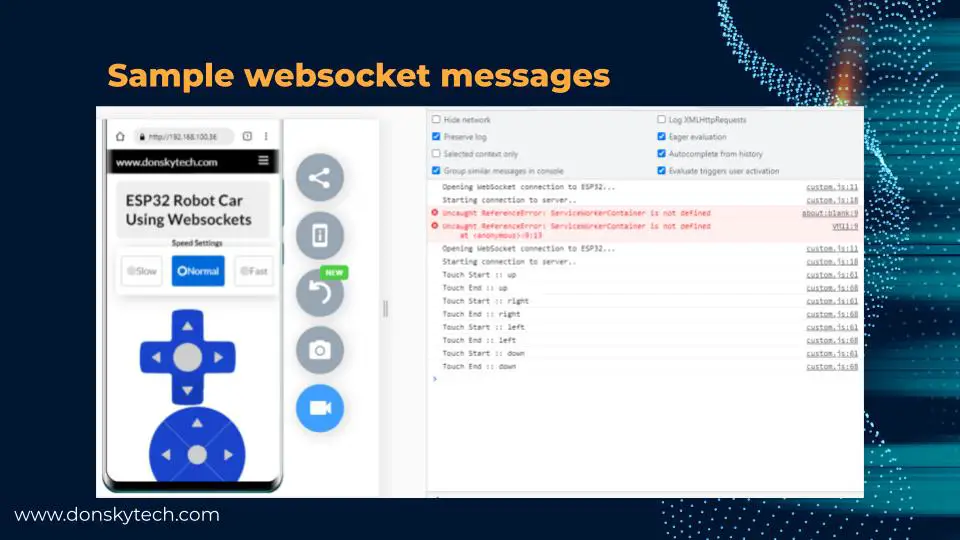
In the image above, you would see that when I click any of the direction buttons then we are sending WebSocket messages thru javascript. Note that these are not the actual “WebSocket messages” but just console logs so when we click something and stop clicking then two messages are sent to the ESP32 Websocket server.
Why use PlatformIO?
I started exploring the Internet of Things (IOT) project using Arduino IDE but I have a bit of a problem using it if you are going to use it in serious development.
First of all, Arduino IDE does not have “IntelliSense” support so it is much better if your code gets highlighted when something is wrong or has an autocomplete option.
Also, in Arduino IDE you have to manually configure all the libraries that you need. On the other hand, in PlatformIO IDE you will just need to edit the platform.ini file and all libraries will be downloaded automatically for you.
I have coded lots of programs in C++/Javascript/HTML/CSS in this ESP32 Robot car project using WebSockets and PlatformIO IDE really helped me code it faster because of its smart features.
Lastly, if your IoT project requires a lot of user interface then you need to create pages using HTML/CSS/Javascript. Sadly, Arduino IDE fails in this category so I highly suggest that you explore PlatformIO IDE. In the future, I will create my own post on how to get started with PlatformIO IDE.
If you are not familiar with PlatformIO then please read this PlatformIO Tutorial for Arduino Development where I detailed how to get started with development using the PlatformIO IDE extension
Component List
To follow along with this project, you need to have the following parts and tools.
For the parts:
- An ESP32 Microcontroller. (I used a 30Pin ESP32 generic board here) – Amazon | AliExpress | Bangood
- An LM298 Motor driver to control the two wheels of our robot car. – Amazon | AliExpress | Bangood
- A robot car chassis. – Amazon | AliExpress | Bangood
For the Tools:
- Battery pack to power our ESP32 and drive our motors – Amazon | AliExpress | Bangood
- Breadboard – Amazon | AliExpress | Bangood
- Connecting wires. – Amazon | AliExpress | Bangood
Disclosure: These are affiliate links and I will earn small commissions to support my site when you buy through these links.
Schematic Diagram
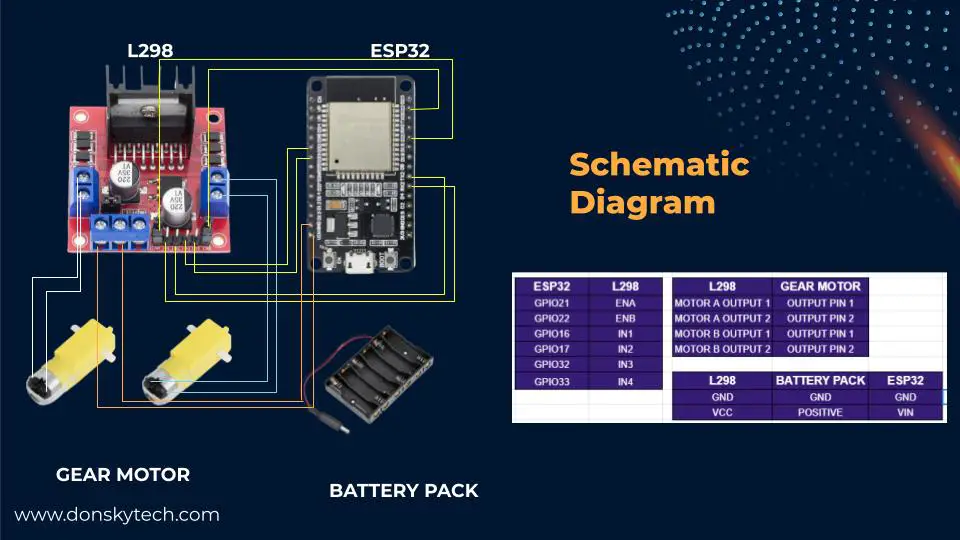
The image above is the schematic diagram of our ESP32 Robot Car using WebSockets.
The ESP32, L298, and TT motor gear should be connected according to the pin configuration in the table. Make sure that the grounds are connected accordingly.
We used the same battery pack in powering our ESP32 MCU so the Vin should be connected to it as well. But it is possible to have external power for both the ESP32 and the L298.
For the robot car chassis, I just purchased a common robot car chassis that you can purchase on the internet. Just follow the direction on how to assemble it.
Code
The whole code is available on my GitHub page in https://github.com/donskytech/platformio-projects/tree/main/esp32-projects/esp32-robot-car-websockets. You can either download the code as a zip file and unzip it in your local directory or if you are familiar with git then you can clone it in your local directory.
Open up your visual studio code and make sure that the PlatformIO extension is installed. In a new Visual Studio Code window, you can either Open Folder or Git Clone my repository.
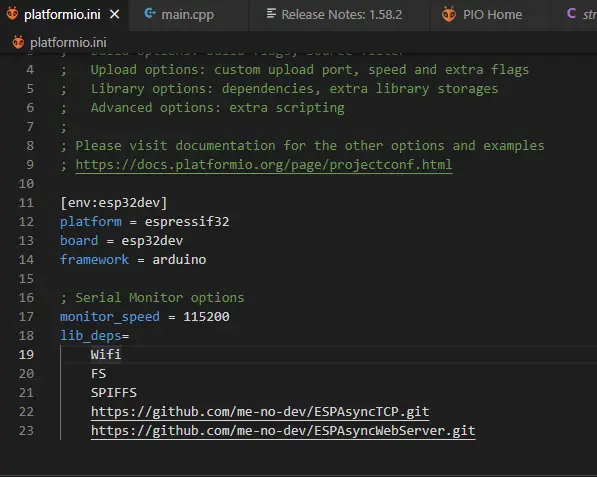
Let us walk through the important stuff in the code. The first thing to look into is the platform.ini file. This is where we declare the required libraries used by our project. We only need the following libraries:
We also set the board to esp32dev and use the Arduino framework in programming. Also, we set the monitor_speed to 115200 so that we could see the messages in our serial monitor.
Let us subdivide the code into several sections as it will be hard to explain it in one go. We will need to code in the following languages
- D-Pad/O-Pad Controller – HTML/CSS/Javascript
- Websockets Server/Motor Control – C++ Arduino Code.
D-Pad/O-Pad Controller
Next, we discuss the important parts of our program. We will start with the user interface that we are using to control our robot car. For a complete demo of how I created my user interface then look at the following codepen. I have shared my whole HTML/CSS/javascript setup at this codepen that I have forked also. Thanks to the guy who created that very nice D-Pad and O-Pad controller!
First, we looked at the HTML code. You need to be familiar with how to structure the user interface with HTML. We define our wrapper divs and created options for controlling our speed settings like “slow”, “normal” or “fast”.
Next, we set up our controllers like the D-Pad or the O-Pad. These are just links that get styled using our Cascading Style Sheets (CSS). I won’t be discussing much the CSS sections as these would need specialized discussions and this post would not be able to cover everything. I suggest you look into the internet for some information on how this works.
The most important thing to look at in the HTML is the “data-direction” attribute as we will be manipulating this one in our javascript code.
<div class="parent">
  <div class="speed-settings">Speed Settings</div>
  <div class="wrapper">
    <input type="radio" name="speed-settings" id="option-1" value="slow">
    <input type="radio" name="speed-settings" id="option-2" value="normal">
    <input type="radio" name="speed-settings" id="option-3" value="fast">
    <label for="option-1" class="option option-1">
      <div class="dot"></div>
      <span>Slow</span>
    </label>
    <label for="option-2" class="option option-2">
      <div class="dot"></div>
      <span>Normal</span>
    </label>
    <label for="option-3" class="option option-3">
      <div class="dot"></div>
      <span>Fast</span>
    </label>
  </div>

  <div class="set blue">
    <nav class="d-pad">
      <a class="up control" data-direction="up"></a>
      <a class="right control" data-direction="right"></a>
      <a class="down control" data-direction="down"></a>
      <a class="left control" data-direction="left"></a>
    </nav>
    <nav class="o-pad">
      <a class="up control" data-direction="up"></a>
      <a class="right control" data-direction="right"></a>
      <a class="down control" data-direction="down"></a>
      <a class="left control" data-direction="left"></a>
    </nav>
  </div>

</div>
Next, we look at our javascript code. The goal of this post is to use our mobile phones in controlling our robot car so I created two functions to respond to those events. The touchStartHandler and touchEndHandler functions respond to a click in the link of our controller.
After which, we attached the two functions above the event handler for each of the links. Same also with the speed settings radio button as we need to respond to “changes” in the speed settings
As mentioned above, we use the data-direction attribute of the link and send those directions as WebSocket messages so that we can control the direction of our robot car.
// Prevent scrolling on every click!

// super sweet vanilla JS delegated event handling!
document.body.addEventListener("click", function (e) {
  if (e.target && e.target.nodeName == "A") {
    e.preventDefault();
  }
});

function touchStartHandler(event) {
  console.log(event.target.dataset.direction);
  console.log("Touch Start!");
  // alert("Click!")
}

function touchEndHandler(event) {
  console.log(event.target.name);
  console.log("Touch End!");
  // alert("Click!")
}

document.querySelectorAll(".control").forEach((item) => {
  item.addEventListener("touchstart", touchStartHandler);
});

document.querySelectorAll(".control").forEach((item) => {
  item.addEventListener("touchend", touchEndHandler);
});

var speedSettings = document.querySelectorAll(
  'input[type=radio][name="speed-settings"]'
);
speedSettings.forEach((radio) =>
  radio.addEventListener("change", () => alert(radio.value))
);
Complete Code of our ESP32 Websockets Car Controller
The section above serves as the baseline of how our D-Pad and O-Pad controllers will work. However, that is not complete as we need a way to send messages to our ESP32 Websockets Server from our browser.
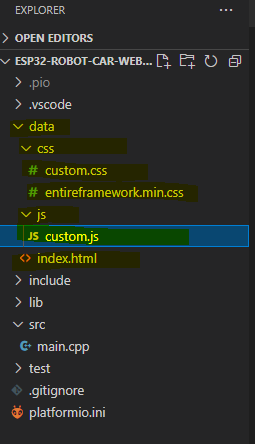
Open your Visual Studio Code and locate the “data” folder. This is the direct link in my GitHub account also.
The CSS folder contains our styles such as the min.css and our custom CSS. The js folder contains our custom.js which we will be used in creating our WebSocket client.
index.html
The index.html contains the code for the user interface of our controller. This is almost similar to the codepen that I have shared above. The only major difference is that it contains the necessary links for our custom.css and custom.js in the head and body sections.
<!DOCTYPE html>
<html>

<head>
    <meta charset="UTF-8">
    <meta name="viewport" content="width=device-width, initial-scale=1">

    <title>ESP32 Robot Car Using Websocket</title>

    <link href="css/entireframework.min.css" rel="stylesheet" type="text/css">
    <link href="css/custom.css" rel="stylesheet" type="text/css">

</head>

<body>
    <nav class="nav" tabindex="-1" onclick="this.focus()">
        <div class="container">`
            <a class="pagename current" href="#">www.donskytech.com</a>
            <a href="#">One</a>
            <a href="#">Two</a>
            <a href="#">Three</a>
        </div>
    </nav>
    <button class="btn-close btn btn-sm">×</button>
    <div class="container">
        <div class="hero">
            <h2>ESP32 Robot Car Using Websockets</h2>
        </div>

        <div class="parent">
            <div class="speed-settings">Speed Settings</div>
            <div class="wrapper">
                <input type="radio" name="speed-settings" id="option-1" value="slow-speed" %SPEED_SLOW_STATUS%>
                <input type="radio" name="speed-settings" id="option-2" value="normal-speed" %SPEED_NORMAL_STATUS%>
                <input type="radio" name="speed-settings" id="option-3" value="fast-speed" %SPEED_FAST_STATUS%>
                <label for="option-1" class="option option-1">
                    <div class="dot"></div>
                    <span>Slow</span>
                </label>
                <label for="option-2" class="option option-2">
                    <div class="dot"></div>
                    <span>Normal</span>
                </label>
                <label for="option-3" class="option option-3">
                    <div class="dot"></div>
                    <span>Fast</span>
                </label>
            </div>

            <div class="set blue">
                <nav class="d-pad">
                    <a class="up control" data-direction="up"></a>
                    <a class="right control" data-direction="right"></a>
                    <a class="down control" data-direction="down"></a>
                    <a class="left control" data-direction="left"></a>
                </nav>
                <nav class="o-pad">
                    <a class="up control" data-direction="up"></a>
                    <a class="right control" data-direction="right"></a>
                    <a class="down control" data-direction="down"></a>
                    <a class="left control" data-direction="left"></a>
                </nav>
            </div>

        </div>
    </div>
    <script src="js/custom.js"></script>
    </div>
    </div>
</body>

</html>
The ESP32 Async WebServer resolves also the following “template” string. This is so that we would know which among the radio buttons we are going to select or “checked“.
<input type="radio" name="speed-settings" id="option-1" value="slow-speed" %SPEED_SLOW_STATUS%>
<input type="radio" name="speed-settings" id="option-2" value="normal-speed" %SPEED_NORMAL_STATUS%>
<input type="radio" name="speed-settings" id="option-3" value="fast-speed" %SPEED_FAST_STATUS%>
custom.js
The code below is our custom.js whose main function is to initiate a WebSocket client and send messages to our ESP32 WebSocket Server.
The onLoad function is called when our web page is loaded and its job is to initialize a WebSocket client from our browser to our ESP32 Websocket server.
The functions initializeSocket, onOpen, onClose, onMessage, and sendMessage are used to log messages coming and going from our WebSocket client to the browser console. Also, it is used to send WebSocket messages to our WebSocket server also.
var targetUrl = `ws://${window.location.hostname}/ws`;
var websocket;
window.addEventListener('load', onLoad);


function onLoad() {
  initializeSocket();
}

function initializeSocket() {
  console.log('Opening WebSocket connection to ESP32...');
  websocket = new WebSocket(targetUrl);
  websocket.onopen = onOpen;
  websocket.onclose = onClose;
  websocket.onmessage = onMessage;
}
function onOpen(event) {
  console.log('Starting connection to server..');
}
function onClose(event) {
  console.log('Closing connection to server..');
  setTimeout(initializeSocket, 2000);
}
function onMessage(event) {
  console.log("WebSocket message received:", event)
}

function sendMessage(message) {
  websocket.send(message);
}

/*
Speed Settings Handler
*/
var speedSettings = document.querySelectorAll(
  'input[type=radio][name="speed-settings"]'
);
speedSettings.forEach((radio) =>
  radio.addEventListener("change", () =>
  {
    var speedSettings = radio.value;
    console.log('Speed Settings :: ' + speedSettings)
    sendMessage(speedSettings);
  }
));


/*
O-Pad/ D-Pad Controller and Javascript Code
*/
// Prevent scrolling on every click!
// super sweet vanilla JS delegated event handling!
document.body.addEventListener("click", function (e) {
  if (e.target && e.target.nodeName == "A") {
    e.preventDefault();
  }
});

function touchStartHandler(event) {
  var direction = event.target.dataset.direction;
  console.log('Touch Start :: ' + direction)
  sendMessage(direction);
}

function touchEndHandler(event) {
  const stop_command = 'stop';
  var direction = event.target.dataset.direction;
  console.log('Touch End :: ' + direction)
  sendMessage(stop_command);
}


document.querySelectorAll('.control').forEach(item => {
  item.addEventListener('touchstart', touchStartHandler)
})

document.querySelectorAll('.control').forEach(item => {
  item.addEventListener('touchend', touchEndHandler)
})
A WebSocket message is sent also whenever we clicked the speed settings radio button.
/*
Speed Settings Handler
*/
var speedSettings = document.querySelectorAll(
  'input[type=radio][name="speed-settings"]'
);
speedSettings.forEach((radio) =>
  radio.addEventListener("change", () =>
  {
    var speedSettings = radio.value;
    console.log('Speed Settings :: ' + speedSettings)
    sendMessage(speedSettings);
  }
));
Lastly, the following functions send out the messages to our WebSocket server and also whenever we click the up, down, left, and right buttons of our O-Pad and D-Pad.
/*
O-Pad/ D-Pad Controller and Javascript Code
*/
// Prevent scrolling on every click!
// super sweet vanilla JS delegated event handling!
document.body.addEventListener("click", function (e) {
  if (e.target && e.target.nodeName == "A") {
    e.preventDefault();
  }
});

function touchStartHandler(event) {
  var direction = event.target.dataset.direction;
  console.log('Touch Start :: ' + direction)
  sendMessage(direction);
}

function touchEndHandler(event) {
  const stop_command = 'stop';
  var direction = event.target.dataset.direction;
  console.log('Touch End :: ' + direction)
  sendMessage(stop_command);
}
That is all for the code in our O-Pad or D-Pad controller. This will serve as our WebSocket client that will send messages to our ESP32 Websocket Server to control our Robot Car.
main.cpp
The code below is our ESP32 program written in the Arduino framework that will control our robot car. It contains the Websocket server that will respond to WebSocket messages coming from our browser.
#include <Arduino.h>
#include <WiFi.h>
#include <AsyncTCP.h>
#include <ESPAsyncWebServer.h>
#include "SPIFFS.h"

/*
  The resolution of the PWM is 8 bit so the value is between 0-255
  We will set the speed between 200 to 255.
*/
enum speedSettings
{
  SLOW = 200,
  NORMAL = 225,
  FAST = 255
};

class Car
{
private:
  // Motor 1 connections
  int in1 = 16;
  int in2 = 17;
  // Motor 2 connections
  int in3 = 32;
  int in4 = 33;

  // PWM Setup to control motor speed
  const int SPEED_CONTROL_PIN_1 = 21;
  const int SPEED_CONTROL_PIN_2 = 22;
  const int freq = 30000;
  const int channel_0 = 0;
  const int channel_1 = 1;
  const int resolution = 8;

  speedSettings currentSpeedSettings;

public:
  Car()
  {
    // Set all pins to output
    pinMode(in1, OUTPUT);
    pinMode(in2, OUTPUT);
    pinMode(in3, OUTPUT);
    pinMode(in4, OUTPUT);
    pinMode(SPEED_CONTROL_PIN_1, OUTPUT);
    pinMode(SPEED_CONTROL_PIN_2, OUTPUT);

    // Set initial motor state to OFF
    digitalWrite(in1, LOW);
    digitalWrite(in2, LOW);
    digitalWrite(in3, LOW);
    digitalWrite(in4, LOW);

    //Attach Pin to Channel
    ledcAttachPin(SPEED_CONTROL_PIN_1, channel_0);
    ledcAttachPin(SPEED_CONTROL_PIN_2, channel_1);

    //Set the PWM Settings
    ledcSetup(channel_0, freq, resolution);
    ledcSetup(channel_1, freq, resolution);

    // initialize default speed to SLOW
    setCurrentSpeed(speedSettings::NORMAL);
  }
  void turnLeft()
  {
    Serial.println("car is turning left...");
    digitalWrite(in1, LOW);
    digitalWrite(in2, HIGH);
    digitalWrite(in3, LOW);
    digitalWrite(in4, LOW);

    setMotorSpeed();
  }
  void turnRight()
  {
    Serial.println("car is turning right...");
    digitalWrite(in1, LOW);
    digitalWrite(in2, LOW);
    digitalWrite(in3, LOW);
    digitalWrite(in4, HIGH);
    setMotorSpeed();
  }
  void moveForward()
  {
    Serial.println("car is moving forward...");
    digitalWrite(in1, LOW);
    digitalWrite(in2, HIGH);
    digitalWrite(in3, LOW);
    digitalWrite(in4, HIGH);
    setMotorSpeed();
  }
  void moveBackward()
  {
    setMotorSpeed();
    Serial.println("car is moving backward...");
    digitalWrite(in1, HIGH);
    digitalWrite(in2, LOW);
    digitalWrite(in3, HIGH);
    digitalWrite(in4, LOW);

  }
  void stop()
  {
    Serial.println("car is stopping...");
    // Turn off motors
    digitalWrite(in1, LOW);
    digitalWrite(in2, LOW);
    digitalWrite(in3, LOW);
    digitalWrite(in4, LOW);
  }

  void setMotorSpeed()
  {
    // change the duty cycle of the speed control pin connected to the motor
    Serial.print("Speed Settings: ");
    Serial.println(currentSpeedSettings);
    ledcWrite(channel_0, currentSpeedSettings);
    ledcWrite(channel_1, currentSpeedSettings);
  }

  void setCurrentSpeed(speedSettings newSpeedSettings)
  {
    Serial.println("car is changing speed...");
    currentSpeedSettings = newSpeedSettings;
  }

  speedSettings getCurrentSpeed()
  {
    return currentSpeedSettings;
  }
};

// Change this to your network SSID
const char *ssid = "<CHANGE THIS TO YOUR SSID>";
const char *password = "<CHANGE THIS TO YOUR PASSWORD>";

// AsyncWebserver runs on port 80 and the asyncwebsocket is initialize at this point also
AsyncWebServer server(80);
AsyncWebSocket ws("/ws");

// Our car
Car car;

void sendCarCommand(const char *command)
{
  // command could be either "left", "right", "forward" or "reverse" or "stop"
  // or speed settingg "slow-speed", "normal-speed", or "fast-speed"
  if (strcmp(command, "left") == 0)
  {
    car.turnLeft();
  }
  else if (strcmp(command, "right") == 0)
  {
    car.turnRight();
  }
  else if (strcmp(command, "up") == 0)
  {
    car.moveForward();
  }
  else if (strcmp(command, "down") == 0)
  {
    car.moveBackward();
  }
  else if (strcmp(command, "stop") == 0)
  {
    car.stop();
  }
  else if (strcmp(command, "slow-speed") == 0)
  {
    car.setCurrentSpeed(speedSettings::SLOW);
  }
  else if (strcmp(command, "normal-speed") == 0)
  {
    car.setCurrentSpeed(speedSettings::NORMAL);
  }
  else if (strcmp(command, "fast-speed") == 0)
  {
    car.setCurrentSpeed(speedSettings::FAST);
  }
}

// Processor for index page template
String indexPageProcessor(const String &var)
{
  String status = "";
  if (var == "SPEED_SLOW_STATUS")
  {
    if (car.getCurrentSpeed() == speedSettings::SLOW)
    {
      status = "checked";
    }
  }
  else if (var == "SPEED_NORMAL_STATUS")
  {
    if (car.getCurrentSpeed() == speedSettings::NORMAL)
    {
      status = "checked";
    }
  }
  else if (var == "SPEED_FAST_STATUS")
  {
    if (car.getCurrentSpeed() == speedSettings::FAST)
    {
      status = "checked";
    }
  }
  return status;
}

void onWsEvent(AsyncWebSocket *server, AsyncWebSocketClient *client, AwsEventType type,
               void *arg, uint8_t *data, size_t len)
{
  switch (type)
  {
  case WS_EVT_CONNECT:
  {
    Serial.printf("ws[%s][%u] connect\n", server->url(), client->id());
    // client->printf("Hello Client %u :)", client->id());
    // client->ping();
  }

  case WS_EVT_DISCONNECT:
  {
    Serial.printf("ws[%s][%u] disconnect\n", server->url(), client->id());
  }

  case WS_EVT_DATA:
  {
    //data packet
    AwsFrameInfo *info = (AwsFrameInfo *)arg;
    if (info->final && info->index == 0 && info->len == len)
    {
      //the whole message is in a single frame and we got all of it's data
      if (info->opcode == WS_TEXT)
      {
        data[len] = 0;
        char *command = (char *)data;
        sendCarCommand(command);
      }
    }
  }

  case WS_EVT_PONG:
  {
    Serial.printf("ws[%s][%u] pong[%u]: %s\n", server->url(), client->id(), len, (len) ? (char *)data : "");
  }

  case WS_EVT_ERROR:
  {
    // Serial.printf("ws[%s][%u] error(%u): %s\n", server->url(), client->id(), *((uint16_t *)arg), (char *)data);
  }
  }
}

void notFound(AsyncWebServerRequest *request)
{
  request->send(404, "text/plain", "Not found");
}

void setup()
{
  Serial.begin(115200);
  Serial.println("Connecting to ");
  Serial.println(ssid);
  WiFi.mode(WIFI_STA);
  WiFi.begin(ssid, password);
  if (WiFi.waitForConnectResult() != WL_CONNECTED)
  {
    Serial.printf("WiFi Failed!\n");
    return;
  }

  Serial.print("IP Address: ");
  Serial.println(WiFi.localIP());

  // Initialize SPIFFS
  if (!SPIFFS.begin(true))
  {
    Serial.println("An Error has occurred while mounting SPIFFS");
    return;
  }

  ws.onEvent(onWsEvent);
  server.addHandler(&ws);

  server.on("/", HTTP_GET, [](AsyncWebServerRequest *request)
            {
              Serial.println("Requesting index page...");
              request->send(SPIFFS, "/index.html", "text/html", false, indexPageProcessor);
            });

  // Route to load entireframework.min.css file
  server.on("/css/entireframework.min.css", HTTP_GET, [](AsyncWebServerRequest *request)
            { request->send(SPIFFS, "/css/entireframework.min.css", "text/css"); });

  // Route to load custom.css file
  server.on("/css/custom.css", HTTP_GET, [](AsyncWebServerRequest *request)
            { request->send(SPIFFS, "/css/custom.css", "text/css"); });

  // Route to load custom.js file
  server.on("/js/custom.js", HTTP_GET, [](AsyncWebServerRequest *request)
            { request->send(SPIFFS, "/js/custom.js", "text/javascript"); });

  // On Not Found
  server.onNotFound(notFound);

  // Start server
  server.begin();
}

void loop()
{

}
We need to edit the following lines of code before we deploy this to our ESP32 MCU. Change this according to your Wifi setup so that your ESP32 could connect to your network.
// Change this to your network SSID
const char *ssid = "<CHANGE THIS TO YOUR SSID>";
const char *password = "<CHANGE THIS TO YOUR PASSWORD>";
Let us go to each line of code to discuss what it is doing.
#include <Arduino.h>
#include <WiFi.h>
#include <AsyncTCP.h>
#include <ESPAsyncWebServer.h>
#include "SPIFFS.h"
The code above contains the necessary include statements. The ESPAsyncWebServer contains a WebSocket server that runs on the same port 80 of our Web Server without additional code.
/*
  The resolution of the PWM is 8 bit so the value is between 0-255
  We will set the speed between 200 to 255.
*/
enum speedSettings
{
  SLOW = 200,
  NORMAL = 225,
  FAST = 255
};
These are enumerations that we assign for the speed settings. We are using PWM in ESP32 and we have set the resolution to 8-bit. The values are between 0 to 255. We have set the minimum speed to 200 as the robot car wheels will not move if the duty cycle is below these values.
class Car
{
private:
  // Motor 1 connections
  int in1 = 16;
  int in2 = 17;
  // Motor 2 connections
  int in3 = 32;
  int in4 = 33;

  // PWM Setup to control motor speed
  const int SPEED_CONTROL_PIN_1 = 21;
  const int SPEED_CONTROL_PIN_2 = 22;
  const int freq = 30000;
  const int channel_0 = 0;
  const int channel_1 = 1;
  const int resolution = 8;

  speedSettings currentSpeedSettings;
Car class
We have declared a C++ class to represent our car and is being used in Object Oriented programming per se. Think of a class as a blueprint of a housing unit. We can use the class to create several houses using the same blueprint. Also, we can hide all functionality in this object so that our code would be easier to read. The “private” marker means that the following attributes are accessible only from this class.
We have defined several pin connections here including the frequency, channel, and resolution for the Pulse Width Modulation of our robot car speed. Controlling the ENA and ENB pin of the L298 motor driver thru PWM will slow down or speed up our car.
public:
  Car()
  {
    // Set all pins to output
    pinMode(in1, OUTPUT);
    pinMode(in2, OUTPUT);
    pinMode(in3, OUTPUT);
    pinMode(in4, OUTPUT);
    pinMode(SPEED_CONTROL_PIN_1, OUTPUT);
    pinMode(SPEED_CONTROL_PIN_2, OUTPUT);

    // Set initial motor state to OFF
    digitalWrite(in1, LOW);
    digitalWrite(in2, LOW);
    digitalWrite(in3, LOW);
    digitalWrite(in4, LOW);

    //Attach Pin to Channel
    ledcAttachPin(SPEED_CONTROL_PIN_1, channel_0);
    ledcAttachPin(SPEED_CONTROL_PIN_2, channel_1);

    //Set the PWM Settings
    ledcSetup(channel_0, freq, resolution);
    ledcSetup(channel_1, freq, resolution);

    // initialize default speed to NORMAL
    setCurrentSpeed(speedSettings::NORMAL);
  }
The code above with the public marker is called the constructor of our Car object. In this part of the code, we initialize the necessary pins for the pinMode and set up the PWM settings of the ENA and ENB pins of our L298 Motor Driver module.
Also, we have initialized the speed settings to normal.
void turnLeft()
  {
    Serial.println("car is turning left...");
    digitalWrite(in1, LOW);
    digitalWrite(in2, HIGH);
    digitalWrite(in3, LOW);
    digitalWrite(in4, LOW);

    setMotorSpeed();
  }
  void turnRight()
  {
    Serial.println("car is turning right...");
    digitalWrite(in1, LOW);
    digitalWrite(in2, LOW);
    digitalWrite(in3, LOW);
    digitalWrite(in4, HIGH);
    setMotorSpeed();
  }
  void moveForward()
  {
    Serial.println("car is moving forward...");
    digitalWrite(in1, LOW);
    digitalWrite(in2, HIGH);
    digitalWrite(in3, LOW);
    digitalWrite(in4, HIGH);
    setMotorSpeed();
  }
  void moveBackward()
  {
    setMotorSpeed();
    Serial.println("car is moving backward...");
    digitalWrite(in1, HIGH);
    digitalWrite(in2, LOW);
    digitalWrite(in3, HIGH);
    digitalWrite(in4, LOW);

  }
  void stop()
  {
    Serial.println("car is stopping...");
    // Turn off motors
    digitalWrite(in1, LOW);
    digitalWrite(in2, LOW);
    digitalWrite(in3, LOW);
    digitalWrite(in4, LOW);
  }

  void setMotorSpeed()
  {
    // change the duty cycle of the speed control pin connected to the motor
    Serial.print("Speed Settings: ");
    Serial.println(currentSpeedSettings);
    ledcWrite(channel_0, currentSpeedSettings);
    ledcWrite(channel_1, currentSpeedSettings);
  }

  void setCurrentSpeed(speedSettings newSpeedSettings)
  {
    Serial.println("car is changing speed...");
    currentSpeedSettings = newSpeedSettings;
  }

  speedSettings getCurrentSpeed()
  {
    return currentSpeedSettings;
  }
This part of the code is where we set how our car class will move. Think of it like this, we have created a new datatype or structure in C++ that is customized for our car object. A car object can move forward or turn left or right and even can move backward. We have set the movement of our motors in each of the following methods turnLeft, turnRight, moveForward, moveBackward, stop, setMotorSpeed. We are also able to set the speed of our car using the setCurrentSpeed and getCurrentSpeed method.
When we click the up button on our mobile phone then we are going to call car.moveForward() and if we stop clicking then we will call car.stop(). Think of how much better we have arranged our code this way rather than creating multiple unrelated functions.
// Our car
Car car;
This is the line of code where we define our class to represent our car object.
ESP32 Websockets Server
We are going to discuss how we have set up our WebSocket server in the following code.
// AsyncWebserver runs on port 80 and the asyncwebsocket is initialize at this point also
AsyncWebServer server(80);
AsyncWebSocket ws("/ws");
We have defined an AsyncWebServer and AsyncWebSocket running in the same port. The WebSocket server runs in the same port as our web server without additional code.
void sendCarCommand(const char *command)
{
  // command could be either "left", "right", "forward" or "reverse" or "stop"
  // or speed settingg "slow-speed", "normal-speed", or "fast-speed"
  if (strcmp(command, "left") == 0)
  {
    car.turnLeft();
  }
  else if (strcmp(command, "right") == 0)
  {
    car.turnRight();
  }
  else if (strcmp(command, "up") == 0)
  {
    car.moveForward();
  }
  else if (strcmp(command, "down") == 0)
  {
    car.moveBackward();
  }
  else if (strcmp(command, "stop") == 0)
  {
    car.stop();
  }
  else if (strcmp(command, "slow-speed") == 0)
  {
    car.setCurrentSpeed(speedSettings::SLOW);
  }
  else if (strcmp(command, "normal-speed") == 0)
  {
    car.setCurrentSpeed(speedSettings::NORMAL);
  }
  else if (strcmp(command, "fast-speed") == 0)
  {
    car.setCurrentSpeed(speedSettings::FAST);
  }
}
The function above sends out a command to our car object. The command comes from the WebSocket messages coming from our WebSocket client running in our browser. As I have mentioned above, whatever WebSocket message we received then we just forward it to our car object.
// Processor for index page template
String indexPageProcessor(const String &var)
{
  String status = "";
  if (var == "SPEED_SLOW_STATUS")
  {
    if (car.getCurrentSpeed() == speedSettings::SLOW)
    {
      status = "checked";
    }
  }
  else if (var == "SPEED_NORMAL_STATUS")
  {
    if (car.getCurrentSpeed() == speedSettings::NORMAL)
    {
      status = "checked";
    }
  }
  else if (var == "SPEED_FAST_STATUS")
  {
    if (car.getCurrentSpeed() == speedSettings::FAST)
    {
      status = "checked";
    }
  }
  return status;
}
The templating engine of the ESP32 Websocket server uses the function above. Remember in the index.html section I have discussed the following section. This function will return either a “checked” attribute to our radio button to set the value of our speed settings.
<input type="radio" name="speed-settings" id="option-1" value="slow-speed" %SPEED_SLOW_STATUS%>
<input type="radio" name="speed-settings" id="option-2" value="normal-speed" %SPEED_NORMAL_STATUS%>
<input type="radio" name="speed-settings" id="option-3" value="fast-speed" %SPEED_FAST_STATUS%>
void onWsEvent(AsyncWebSocket *server, AsyncWebSocketClient *client, AwsEventType type,
void *arg, uint8_t *data, size_t len)
{
switch (type)
{
case WS_EVT_CONNECT:
{
Serial.printf("ws[%s][%u] connect\n", server->url(), client->id());
// client->printf("Hello Client %u :)", client->id());
// client->ping();
}
case WS_EVT_DISCONNECT:
{
Serial.printf("ws[%s][%u] disconnect\n", server->url(), client->id());
}
case WS_EVT_DATA:
{
//data packet
AwsFrameInfo *info = (AwsFrameInfo *)arg;
if (info->final && info->index == 0 && info->len == len)
{
//the whole message is in a single frame and we got all of it's data
if (info->opcode == WS_TEXT)
{
data[len] = 0;
char *command = (char *)data;
sendCarCommand(command);
}
}
}
case WS_EVT_PONG:
{
Serial.printf("ws[%s][%u] pong[%u]: %s\n", server->url(), client->id(), len, (len) ? (char *)data : "");
}
case WS_EVT_ERROR:
{
// Serial.printf("ws[%s][%u] error(%u): %s\n", server->url(), client->id(), *((uint16_t *)arg), (char *)data);
}
}This is our callback function that will receive messages coming from our O-Pad and D-Pad controllers in our mobile phones. As you can see in the WS_EVT_DATA case, we send a car command here by calling the sendCarCommand(command) function. Command could either be “left”, right”, “stop” etc.
void setup()
{
  Serial.begin(115200);
  Serial.println("Connecting to ");
  Serial.println(ssid);
  WiFi.mode(WIFI_STA);
  WiFi.begin(ssid, password);
  if (WiFi.waitForConnectResult() != WL_CONNECTED)
  {
    Serial.printf("WiFi Failed!\n");
    return;
  }

  Serial.print("IP Address: ");
  Serial.println(WiFi.localIP());

  // Initialize SPIFFS
  if (!SPIFFS.begin(true))
  {
    Serial.println("An Error has occurred while mounting SPIFFS");
    return;
  }

  ws.onEvent(onWsEvent);
  server.addHandler(&ws);

  server.on("/", HTTP_GET, [](AsyncWebServerRequest *request)
            {
              Serial.println("Requesting index page...");
              request->send(SPIFFS, "/index.html", "text/html", false, indexPageProcessor);
            });

  // Route to load entireframework.min.css file
  server.on("/css/entireframework.min.css", HTTP_GET, [](AsyncWebServerRequest *request)
            { request->send(SPIFFS, "/css/entireframework.min.css", "text/css"); });

  // Route to load custom.css file
  server.on("/css/custom.css", HTTP_GET, [](AsyncWebServerRequest *request)
            { request->send(SPIFFS, "/css/custom.css", "text/css"); });

  // Route to load custom.js file
  server.on("/js/custom.js", HTTP_GET, [](AsyncWebServerRequest *request)
            { request->send(SPIFFS, "/js/custom.js", "text/javascript"); });

  // On Not Found
  server.onNotFound(notFound);

  // Start server
  server.begin();
}
The next part is the setup() function where we initialize our web server and does the following things:
Lines:
- 4-8 – Initialize our serial monitor with the correct baud rate as we have configured in our platform.ini.
- 9-16 – Connect to our wifi.
- 19-24 – Initialize SPIFFS to load our files.
- 25-26 – Initializes our WebSocket server and adds the onWsEvent as the event handler.
- 28-44 – Configures our routing to our static assets like our javascript and custom CSS files
- 47-50 – Start our server
void loop()
{

}
The loop method does not have any method in it as our web server is running in asynchronous mode.
Deploying our ESP32 Robot Car Websockets Server
Now that I have explained the program on how we are going to control our robot car using ESP32 Websockets then let’s explain how to deploy it to our ESP32 memory. Make sure that you have followed the wiring diagram that I have created above. You can disconnect first the battery connection from the Vin of the ESP32 while we are deploying it.
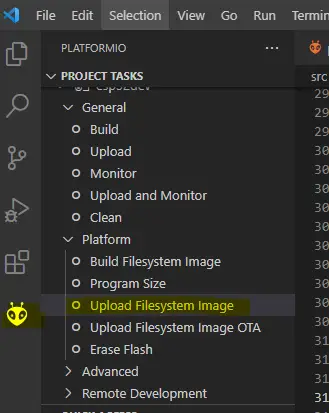
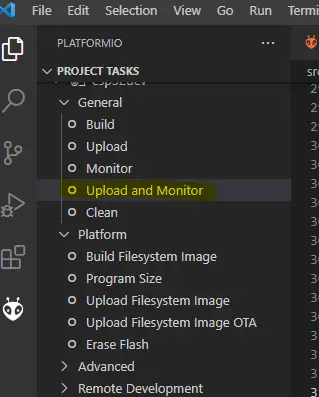
First, open up your Visual Studio Code and click the PlatformIO extension link at the side then click the Upload File System Image link. This will upload our HTML/CSS/javascript files located in our “data” folder. Click the boot button on the ESP32 if you see that it is not uploading.
Secondly, when the previous step is successful then click the “Upload and Monitor” link. This will upload our main.cpp program to the ESP32 file system also.
Finally, if everything goes well then you would see on your monitor the IP address of your ESP32. If it says, “Wifi Failed” then just click the reset button. Open up the web browser on your mobile phone and type in the assigned IP address. You would see our D-Pad and O-Pad controllers and see if you are able to control your robot car.
Wrap Up
In this post, I have described how I created and designed my ESP32 Robot Car using Websockets. I have described what WebSocket is and how it differs from the normal HTTP protocol. We have taken advantage of its almost “low latency” response time in controlling our robot car. If for example, you have an Internet of Things (IoT) project that needs real-time delivery of information like sensor data then I highly suggest using WebSocket.
I really enjoyed working on this project so I have shared everything about it. Hope you find something of value here. If you have any comments or suggestions then please consider connecting with me on any of my social media channels.
Happy Exploring!
Related Next:
Create your own ESP32 Wifi Car using the library esp32-wifi-car
ESP32 Home Automation Project
Leave a Reply