Introduction
Are you here to learn how awesome the ESP32 Microcontroller Unit is? Start by learning how to do some basic Light Emitting Diode (LED) blinking sketches. In this post, we are going to show how to program our ESP32 to blink LED by using the Arduino framework.
Prerequisite
The following are the materials/components needed so that you follow this post.
- ESP32 (I used NodeMCU ESP32s) – Amazon | AliExpress | Bangood
- Light Emitting Diode (Any color) – Amazon | AliExpress | Bangood
- Resistor (220 Ohms) – Amazon | AliExpress | Bangood
- Breadboard – Amazon | AliExpress | Bangood
- Connecting Wires – Amazon | AliExpress | Bangood
Disclosure: These are affiliate links and I will earn small commissions to support my site when you buy through these links.
You can use Arduino IDE or PlatformIO IDE extension in Visual Studio Code to upload the following sketches to your ESP32 Microcontroller unit.
How to blink built-in internal LED?
Some ESP32 boards have a built-in internal LED wired to its GPIO (General Purpose Input Output) pin 2 while some do not. For those boards that have this built-in LED then the sketch below will do this for you.
// Define the Pin
#define LED_BUILTIN 2;

// Set our LED Pin to the LED_BUILTIN definition
const int ledPin = LED_BUILTIN;

void setup()
{
  // setup LED_BUILTIN AS output
  pinMode(ledPin, OUTPUT);
}

void loop()
{
  // Turn on our LED
  digitalWrite(ledPin, HIGH);
  // Delay for some time
  delay(500);
  // Turn off our LED
  digitalWrite(ledPin, LOW);
  // Delay for some time
  delay(500);
}
Upload this sketch using Arduino IDE or using PlatformIO IDE. You should be able to see you’re built-in LED blinking like the image below.
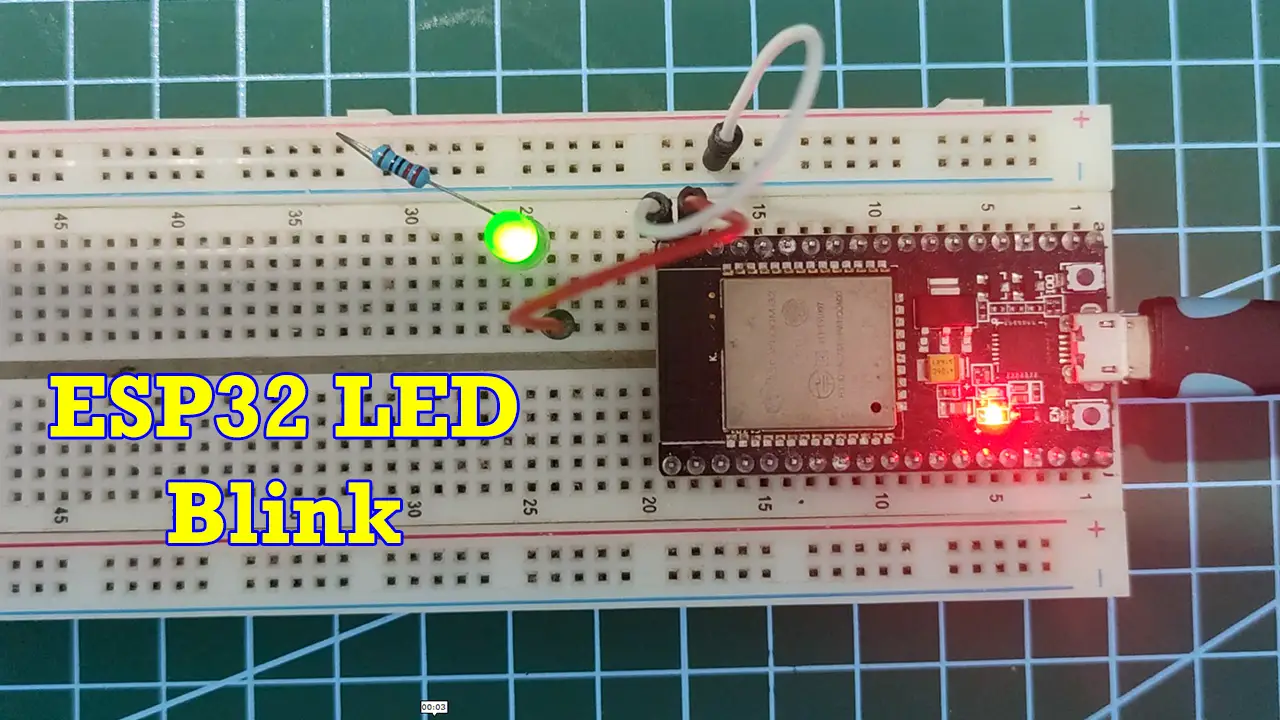
How to blink an external LED?
To blink an external LED with our ESP32 we need to follow the following schematic diagram.
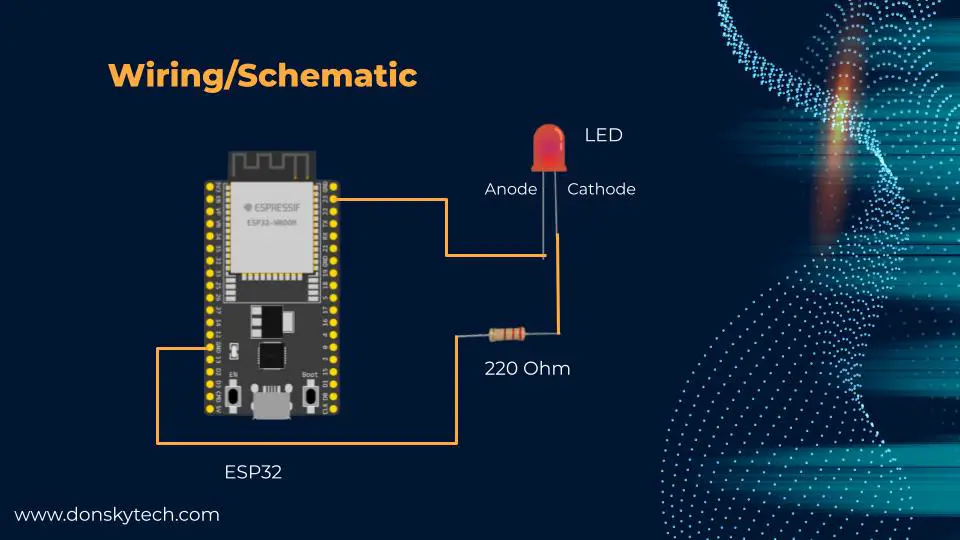
| ESP32 | LED |
|---|---|
| GND | Resistor to Cathode of LED |
| GPIO23 | Anode |
Take note of the Anode and Cathode pins of the LED and don’t forget to add the 220 Ohm current limiting resistor to prevent our LED from being busted.
donsky
The code for the ESP32 is below.
// Set our LED Pin to the GPIO Pin
const int ledPin = 23;

void setup()
{
  // setup ledPin AS output
  pinMode(ledPin, OUTPUT);
}

void loop()
{
  // Turn on our LED
  digitalWrite(ledPin, HIGH);
  // Delay for some time
  delay(500);
  // Turn off our LED
  digitalWrite(ledPin, LOW);
  // Delay for some time
  delay(500);
}
We define our LED pin to one of the GPIO pins of the ESP32 and set the mode to output in the setup function. In the loop, we turn on and off the LED by calling the Arduino digitalWrite function. We added a delay of 500 milliseconds to see the output much better.
Upload this sketch using Arduino IDE or PlatformIO IDE and see the result below.
Wrap up
We have created sketches here to blink the LED with your ESP32. You are now ready to explore complex projects. 🙂
Happy Exploring!
Support Me!
I love sharing what I know and hopefully, I was able to help you. Writing helpful content takes so much time and research. If you think you like my work and I have managed to help you then please consider supporting my channel. I would be very grateful and would boost my confidence that what I am doing is making a big change in the world. (No Pun Intended!) 😉
Become a Patron!
Leave a Reply