Introduction
Radio-frequency identification (RFID) is a technology that uses electronic tags and RFID readers for the purpose of identification. This technology is widely used in e-Commerce, transportation, logistics, securities, and access control among others. In this post, we are gonna be exploring how to interface our ESP32 Microcontroller Unit (MCU) to the RFID reader MFRC522.
How do RFID works?
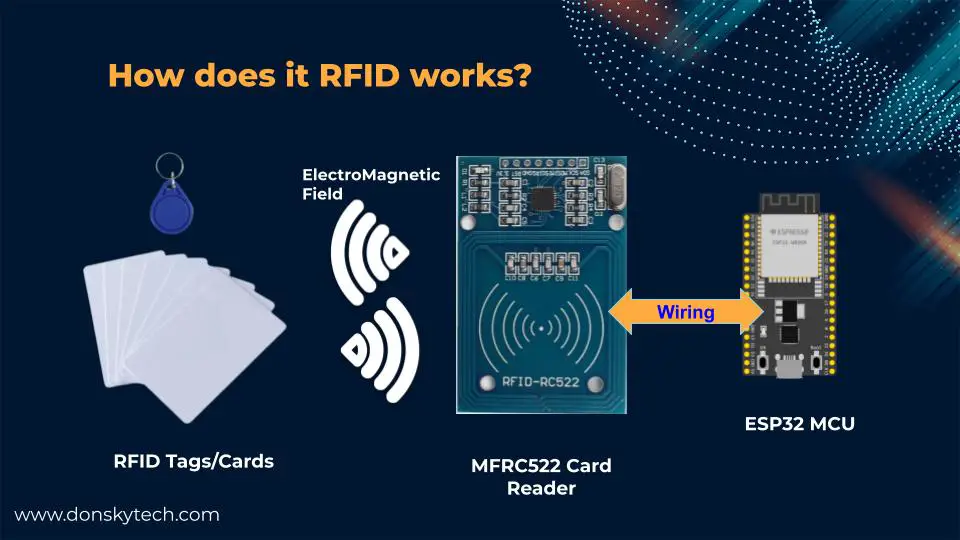
The image above shows how the RFID system works and how our project is going to function. The ESP32 MCU is powering the RFID MFRC522 card reader.
The reader has an RF module and antenna module that generates an electromagnetic field around it. The RFID tags/cards can be either called active or passive. Active RFID tags/cards contain a battery while passive does not. The difference between the two is the range at which the card reader could read it with the active tags/cards having a greater range.
When the RFID tags/cards get in the range of the MFRC522 then the microchip gets activated sending its content and information in the form of a radio signal back to the reader.
The ESP32 MCU communicates with the RFID MFRC522 card reader to gather the tags/card information.
Prerequisites
We need the following component to follow along with this post.
- ESP32 (I used NodeMCU ESP32s) – Amazon | AliExpress | Bangood
- MFRC522 Card Reader and some RFID Cards – Amazon | AliExpress | Bangood
- Breadboard – Amazon | AliExpress | Bangood
- Connecting Wires – Amazon | AliExpress | Bangood
Disclosure: These are affiliate links and I will earn small commissions to support my site when you buy through these links.
We will be using Visual Studio Code with the PlatformIO extension installed in this post. if you are using Windows and have not installed Visual Studio Code yet then follow along with my Install Visual Studio Code or VSCode in Windows.
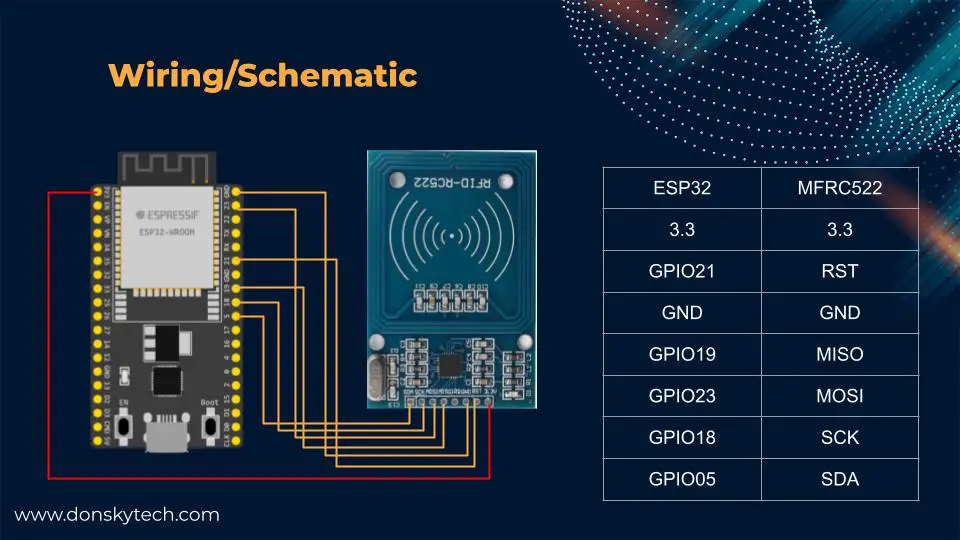
Schematic/Wiring
Code
The code for this project is available on my GitHub repository which you can access from here.
You can either download the project as a zip file or clone it using Git.
The code for this project is shown below. We are using the following library Arduino_MFRC522v2 and we have taken the code below from the example section.
#include <MFRC522v2.h>
#include <MFRC522DriverSPI.h>
//#include <MFRC522DriverI2C.h>
#include <MFRC522DriverPinSimple.h>
#include <MFRC522Debug.h>

MFRC522DriverPinSimple ss_pin(5); // Configurable, see typical pin layout above.

MFRC522DriverSPI driver{ss_pin}; // Create SPI driver.
// MFRC522DriverI2C driver{}; // Create I2C driver.
MFRC522 mfrc522{driver}; // Create MFRC522 instance.

String tagContent = "";

void setup()
{
  Serial.begin(115200); // Initialize serial communications with the PC for debugging.
  while (!Serial)
    ;                                                     // Do nothing if no serial port is opened (added for Arduinos based on ATMEGA32U4).
  mfrc522.PCD_Init();                                     // Init MFRC522 board.
  MFRC522Debug::PCD_DumpVersionToSerial(mfrc522, Serial); // Show details of PCD - MFRC522 Card Reader details.
  Serial.println(F("Scan PICC to see UID, SAK, type, and data blocks..."));
}

void loop()
{
  // Reset the loop if no new card present on the sensor/reader. This saves the entire process when idle.
  if (!mfrc522.PICC_IsNewCardPresent())
  {
    return;
  }

  // Select one of the cards.
  if (!mfrc522.PICC_ReadCardSerial())
  {
    return;
  }

  // Dump debug info about the card; PICC_HaltA() is automatically called.
  MFRC522Debug::PICC_DumpToSerial(mfrc522, Serial, &(mfrc522.uid));

  Serial.println("Printing only the Card ID:");
  Serial.println("--------------------------");
  for (byte i = 0; i < mfrc522.uid.size; i++)
  {
    tagContent.concat(String(mfrc522.uid.uidByte[i] < 0x10 ? " 0" : " "));
    tagContent.concat(String(mfrc522.uid.uidByte[i], HEX));
  }

  tagContent.toUpperCase();

  Serial.println(tagContent);
}
Let us go over each line of the code to discuss what it does.
#include <MFRC522v2.h>
#include <MFRC522DriverSPI.h>
//#include <MFRC522DriverI2C.h>
#include <MFRC522DriverPinSimple.h>
#include <MFRC522Debug.h>
Import the necessary header files for the library.
MFRC522DriverPinSimple ss_pin(5); // Configurable, see typical pin layout above.

MFRC522DriverSPI driver{ss_pin}; // Create SPI driver.
// MFRC522DriverI2C driver{}; // Create I2C driver.
MFRC522 mfrc522{driver}; // Create MFRC522 instance.
Configure the pin layout needed by the library.
String tagContent = "";This will hold the RFID tag content ID.
void setup()
{
  Serial.begin(115200); // Initialize serial communications with the PC for debugging.
  while (!Serial)
    ;                                                     // Do nothing if no serial port is opened (added for Arduinos based on ATMEGA32U4).
  mfrc522.PCD_Init();                                     // Init MFRC522 board.
  MFRC522Debug::PCD_DumpVersionToSerial(mfrc522, Serial); // Show details of PCD - MFRC522 Card Reader details.
  Serial.println(F("Scan PICC to see UID, SAK, type, and data blocks..."));
}
Set the Serial Monitor baud rate and initialize our RFID card reader. We print the RFID version to Serial monitor.
void loop()
{
  // Reset the loop if no new card present on the sensor/reader. This saves the entire process when idle.
  if (!mfrc522.PICC_IsNewCardPresent())
  {
    return;
  }

  // Select one of the cards.
  if (!mfrc522.PICC_ReadCardSerial())
  {
    return;
  }

  // Dump debug info about the card; PICC_HaltA() is automatically called.
  MFRC522Debug::PICC_DumpToSerial(mfrc522, Serial, &(mfrc522.uid));
Check if an RFID is placed near our MFRC522 reader and if so then read the card details. Print everything into the Serial monitor.
  Serial.println("Printing only the Card ID:");
  Serial.println("--------------------------");
  for (byte i = 0; i < mfrc522.uid.size; i++)
  {
    tagContent.concat(String(mfrc522.uid.uidByte[i] < 0x10 ? " 0" : " "));
    tagContent.concat(String(mfrc522.uid.uidByte[i], HEX));
  }

  tagContent.toUpperCase();

  Serial.println(tagContent);
Take note of the RFID card ID and print it to the Serial monitor also. We will use this in future projects.
That is all for the code!
Wrap up
We have discussed how to interface our ESP32 MCU to our RFID card reader (MFRC522) in this post. I have shared with you the wiring/schematic diagram and the library to use the read the RFID contents. We will use this post in future projects.
Stay tuned! Happy Exploring!
Read Next:
Arduino RFID Database Security System: Designing the Project
ESP32 Robot Car Using Websockets
Leave a Reply