Introduction
This article discusses how we can program the ESP8266 ESP-01 module using the Arduino IDE.
The ESP8266 ESP-01 microcontroller module is a low-cost WIFI Enabled module developed by the Espressif System that has the capability to execute TCP IP Connections. This MCU contains a lot of “punch” for its size and has GPIO ports in itself that you can use to control simple projects and is ideal for Internet of Things (IOT) Applications.
AT Commands and the ESP8266 Arduino library
When you buy this module it comes pre-installed with its own firmware and is able to execute TCP/IP commands thru what we call AT Commands. However, I find these AT commands a little bit “cumbersome” to execute in the code so we will be using an alternative “firmware“.
You will often see the following commands in different tutorials
AT
AT+RST
AT+CWMODE=1
AT+CWLAP
AT+CWJAP="SSID","PASSWORD"
AT+CIFSR
Luckily the ESP8266 community released a companion project for the Arduino as an Add-On and can be found here https://github.com/esp8266/Arduino. We will be using this library in this article.
How to install ESP8266 library in Arduino IDE
We will follow the instructions for this library by following this link.
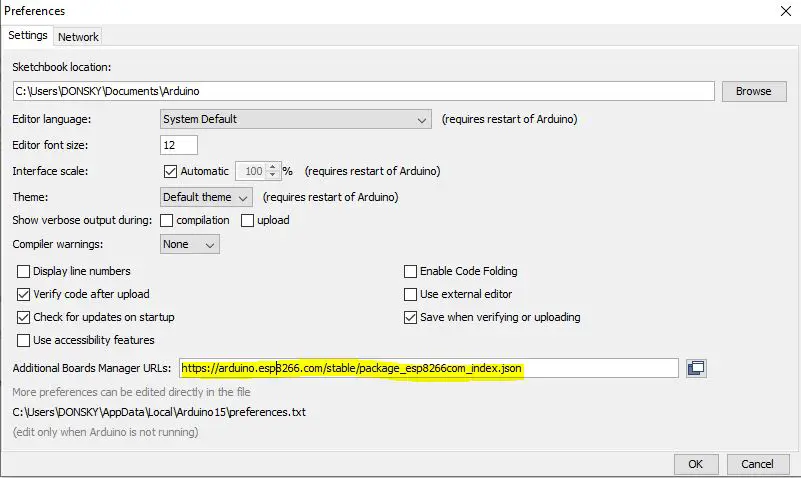
- In your Arduino, click File then Preferences
- Add the following https://arduino.esp8266.com/stable/package_esp8266com_index.json to your Additional Board Manager URL. Use a comma if there is another URL there already.
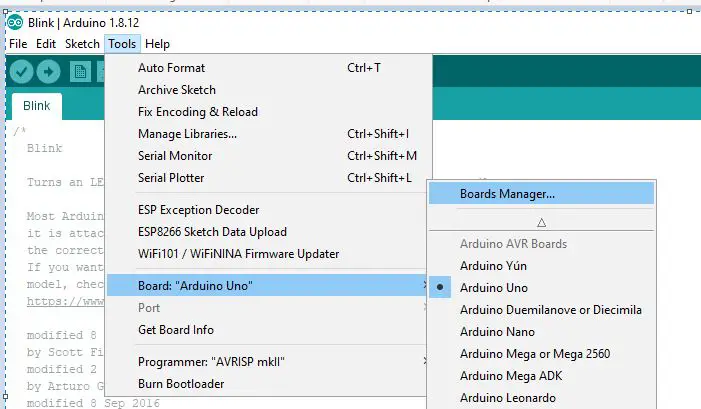
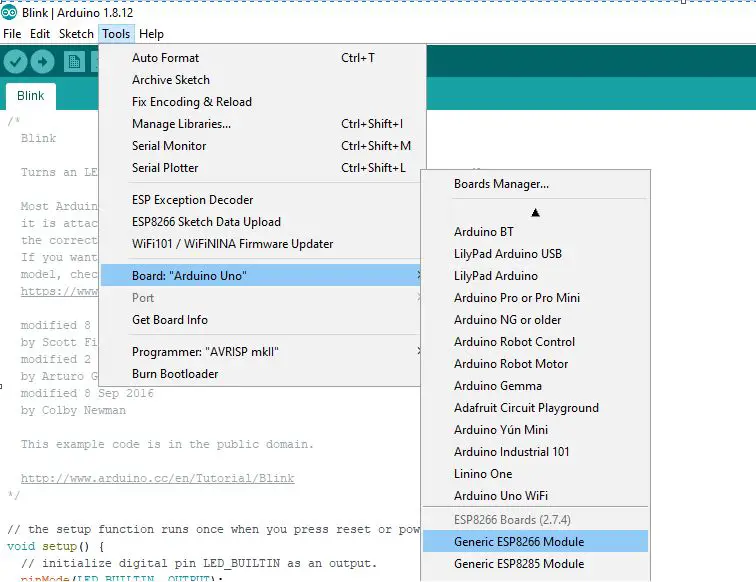
3. Open Boards Manager from Tools > Board menu and find esp8266 platform
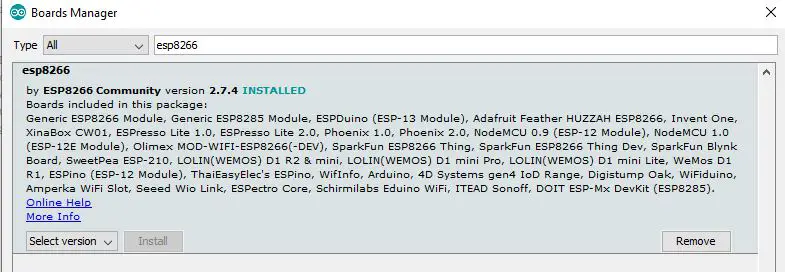
4. Click Install
5. After which Select your board as “Generic ESP8266 Module“
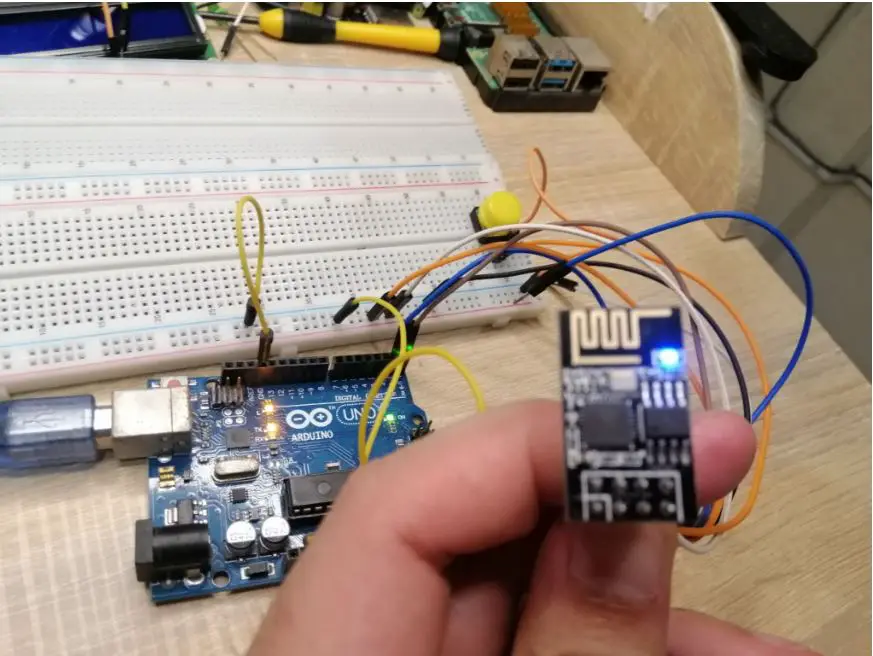
Wiring Diagram
One quick solution to load programs in the ESP-01 is to use the ESP-01 programmer which you can source online. We will discuss this in a separate article.
But in this article, we will be using the Arduino to program our ESP8266 ESP-01 module in this article if you don’t have the programmer above.
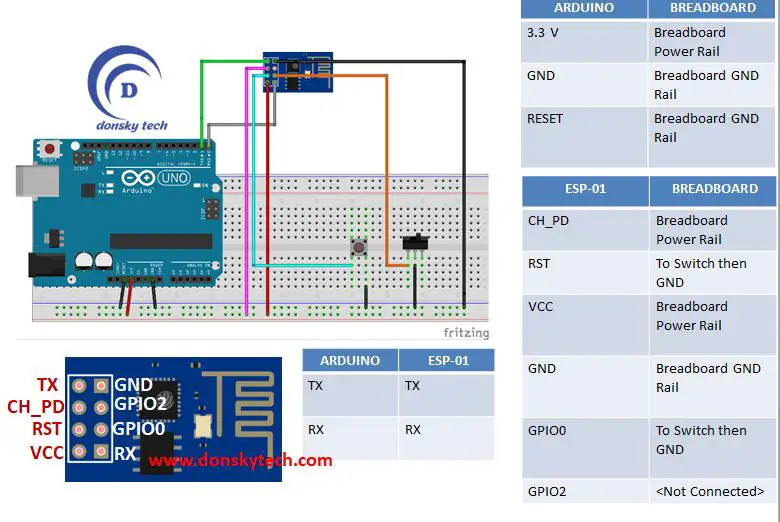
Understanding Boot Mode
ESP-01 has two modes
- Normal Mode
- Bootloader Mode
In order to load new firmware then we have to set it in Bootloader Mode. To set it to bootloader CH_PD should be set to HIGH and the GPIO0 connected to GND. That is the reason we have an SPST switch between GPIO0 and the GND.
The same applies also when we want to create our program and load it into the ESP-01 flash memory.
Installing the Arduino ESP8266 Firmware
Once you are done with the wiring, we will just need to replace the firmware with the Arduino ESP8266. Note that once we have changed the firmware then we cannot execute AT commands anymore into the ESP-01.
To load the firmware we just need to upload the Blink Sketch. To do this just click File -> Examples -> Basics -> Blink
Make sure that your Board is set to “Generic ESP8266 Module” and the Toggle Switch connected in GPIO0 is connected to GND.
Click upload and when you see the following message click the momentary switch connected to the RST for about 1 second so that we could reset the ESP-01

Afterward, we would see the following success message.

To see the ESP-01 built-in LED blink then make sure that the toggle button connected to GPI0 is not connected to GND. Click the momentary switch in RST and then check if the LED is blinking.
Troubleshooting
You sometimes will encounter the following problem so it could be that you might not have pressed the reset button enough. When the “connecting” message starts showing then click the momentary switch connected to RST for about a second.
Connecting........_____....._____....._____....._____....._____....._____.....____Traceback (most recent call last):
  File "C:\Users\DONSKY\AppData\Local\Arduino15\packages\esp8266\hardware\esp8266\2.7.4/tools/upload.py", line 65, in <module>
    esptool.main(cmdline)
  File "C:/Users/DONSKY/AppData/Local/Arduino15/packages/esp8266/hardware/esp8266/2.7.4/tools/esptool\esptool.py", line 2890, in main
    esp.connect(args.before)
  File "C:/Users/DONSKY/AppData/Local/Arduino15/packages/esp8266/hardware/esp8266/2.7.4/tools/esptool\esptool.py", line 483, in connect
    raise FatalError('Failed to connect to %s: %s' % (self.CHIP_NAME, last_error))
esptool.FatalError: Failed to connect to ESP8266: Timed out waiting for packet header
_
the selected serial port _
 does not exist or your board is not connected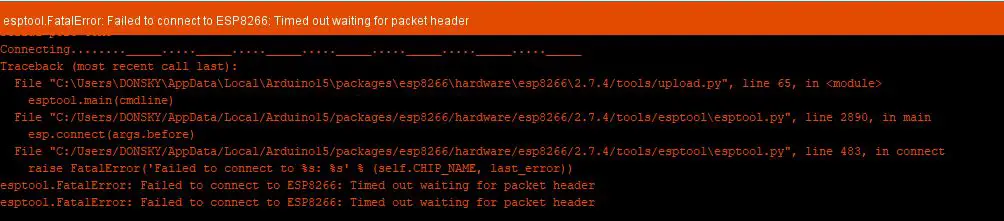
Demo
Watch the following demo on how I did it.
That’s it!
Happy Exploring!
Leave a Reply