In the previous post we discussed how we have created our database that will contain the list of RFID codes in our Arduino RFID Database Security System. In this article we are going to discuss how we create the application that would interact with the database.
This is the 3rd part of our Arduino RFID Database Security System where we create a database backed RFID system. List of valid RFID Codes are stored in the database. We used the Arduino and the MFRFC 522 Reader in checking if the RFID tag is valid or not with the help of the ESP8266 ESP-01.
Watch the following video demonstration on how to create a Python Application that can connect with the database and return a JSON object to your Arduino
Arduino RFID Database Application
We discussed briefly in the designing section of our Arduino RFID Database Security System the role of the application is in the overall system. The application is our “entrypoint” to our database.
Databases have their own language called Structured Query Language or SQL for short to access the details of the data stored in our tables object in our database. We only have one table in our Arduino RFID Database Security System and that is the Students table. A table is consist of rows and columns.
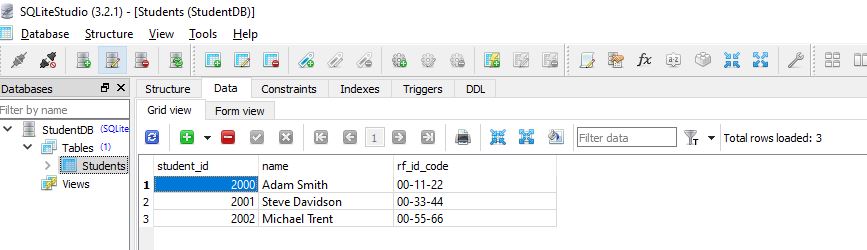
To access these data we need the SQL like the one we are gonna be using below. We are “querying” the table to check if there is (or there are) student that has the following RFID code.
"SELECT COUNT(*) FROM STUDENTS WHERE RF_ID_CODE=?", (rf_id_code,)
The following query will return data to the Application and the application will use the following information to decide if the following RFID has access or not.
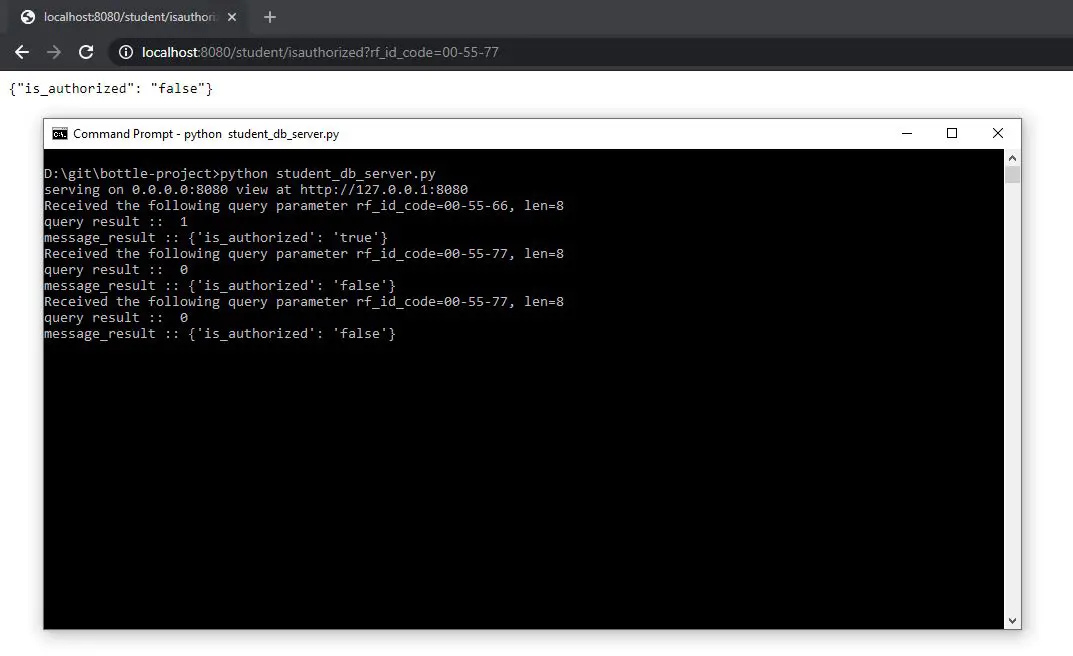
The application should expose an “interface” for the Arduino to call and that interface is sending back a Javascript Object Notation (JSON) to the Arduino. The “http://<IP Address>:8080/student/isauthorized?rf_id_code=00-55-66” is an endpoint resource that we can call from the Arduino.

The image above shows that if we pass in an RFID Code like “A9 33 26 B5” from the Arduino to the Application then it would return a JSON object saying if it is authorized or not (“true” or “false”). We will used that information in our Arduino program to process if we will allow the user access or not.
How to create our Application?
We are gonna be using Python in creating our application to be use by our Arduino RFID Database Application. This is similar to how we have created our database without installing any database server like MySQL or PostgreSQL.
I highly recommend learning Python as this is one of the popular language nowadays. We will be using Python as well in Programming our Raspberry Pi or ESP32/ESP8266 (MicroPython) in future articles.
We will be using 2 Python modules here called Bottle and Paste to host our Application.
Bottle is a micro web framework and is able to serve http request. The good thing about this module is that it does not need any other dependencies and relies only on the Python Standard Library. We will be using this to query our database and return a JSON Object to our request. In our project the ESP8266 ESP-01 will request for a HTTP GET request passing the RFID code.
The Paste module will serve as our deployment server. The Bottle module comes with its own Non-Threading server but we will use Paste to act as our multi-threaded http server. In simple terms, this will allow our application to serve multiple request if we wanted to expand our project later.
Follow the steps in this README.md on how you can run this application on your own workstation. I used Windows 10 in here so your setup might change if you are running Mac or Linux.
Code
The following is the code of our Application.
#!/usr/bin/env python3

"""
    Author: donsky
    For: www.donskytech.com
    Purpose: Create a REST Server Interface using Bottle for future IOT Projects
"""

from bottle import route, run, request, get, response, default_app
from paste import httpserver
import sqlite3
import json
from pathlib import Path

#NOTE: CHANGE THIS TO WHERE YOU DOWNLOAD YOUR GIT REPO
db_folder = Path("D:/git/database-project/StudentDB.db")

application = default_app()

@get('/student/isauthorized')
def message():

    rf_id_code = request.query.rf_id_code.lstrip().rstrip()
    length = len(rf_id_code)
    print(f"Received the following query parameter rf_id_code={rf_id_code}, len={length}")

    conn = sqlite3.connect(db_folder)
    cursor = conn.cursor()

    cursor.execute("SELECT COUNT(*) FROM STUDENTS WHERE RF_ID_CODE=?", (rf_id_code,))
    result = cursor.fetchone()
    row_count = result[0]
    print(f"query result :: ", row_count);
    cursor.close()

    #Set Response Header to JSON
    response.headers['Content-Type'] = 'application/json'
    response.headers['Cache-Control'] = 'no-cache'

    if(row_count > 0):
        message_result = {"is_authorized" : "true"}
    else:
        message_result = {"is_authorized": "false"}
    print(f"message_result :: {message_result}")
    return json.dumps(message_result)

httpserver.serve(application, host='0.0.0.0', port=8080)
Let us discuss each line of the code
#NOTE: CHANGE THIS TO WHERE YOU DOWNLOAD YOUR GIT REPO
db_folder = Path("D:/git/database-project/StudentDB.db")
As I have mentioned before, you need to point this to where you have created your SQLLite database in an earlier post about Create database to store our RFID code using SQLLite . This is required as we are going to query our database for valid RFID code.
application = default_app()

@get('/student/isauthorized')
def message():
We create a default Bottle application and created a Request Routing for an HTTP GET. From the Arduino we need to call the GET request and supply the needed parameters.
rf_id_code = request.query.rf_id_code.lstrip().rstrip()
    length = len(rf_id_code)
    print(f"Received the following query parameter rf_id_code={rf_id_code}, len={length}")
We extract the query parameter from our Arduino code. Example we passed in the following GET request http://localhost:8080/student/isauthorized?rf_id_code=00-55-66. The rf_id_code is extracted and is asssigned to a python variable to be used in later part of the code.
conn = sqlite3.connect(db_folder)
    cursor = conn.cursor()

    cursor.execute("SELECT COUNT(*) FROM STUDENTS WHERE RF_ID_CODE=?", (rf_id_code,))
    result = cursor.fetchone()
    row_count = result[0]
    print(f"query result :: ", row_count);
    cursor.close()
We create a connection to our SQLLite database and issue a query request. In this case we are checking our Students table if there are any Student with that passed RFID code.
#Set Response Header to JSON
    response.headers['Content-Type'] = 'application/json'
    response.headers['Cache-Control'] = 'no-cache'
This line of code tells the browser that our response is a JSON object and instructed it not to cache the response in its browser cache.
if(row_count > 0):
        message_result = {"is_authorized" : "true"}
    else:
        message_result = {"is_authorized": "false"}
    print(f"message_result :: {message_result}")
    return json.dumps(message_result)
If our query returns a number greater than zero then it means that the passed RFID code is present in one of our rows in our Students table. We set the JSON response as either {“is_authorized” : “true”} or {“is_authorized”: “false”}. We used the json module of the Python Library to dump a JSON object back to the requester.
httpserver.serve(application, host='0.0.0.0', port=8080)
This tells our Bottle application to use the httpserver of the Paste module and run in at TCP Port 8080 and the IPAddress ‘0.0.0.0’ means that we are able to use the following endpoint to reach our server:
- http://localhost:8080/student/isauthorized?rf_id_code=00-55-66
- http://<IP Address>:8080/student/isauthorized?rf_id_code=00-55-66 (e.g. 192.168.100.1)
In our project the ESP8266 ESP-01 is assigned its own IP so we need to use the IP of our laptop to connect to our application.
In the next post of this project series we will be creating and tying all the components in our project. We will be programming our Arduino, the ESP8266 ESP-01 and you will see how each components like the Database and the Application are being called. Watch out for that next article!
That’s it
Happy Exploring!
Leave a Reply