- Introduction
- Video
- Special Notes Before You Proceed
- Prerequisites
- Design
- Steps
- Create our Express Applications
- Install Dependencies
- Configure our scripts
- Add .gitignore to our project
- Coding our REST API Server
- Add JSON Parsing Support (body-parser)
- Connecting to our MongoDB Atlas Cluster
- Save credential in .env config files
- Create Mongoose Database Model
- Creating REST API routes
- Create Controller Objects
- Perform CRUD(Create, Retrieve, Update, Delete) Operation
- Final Code
- Wrap Up
Introduction
In this post, we are going to build a REST API using Node.js, Express, and MongoDB. These APIs will be called by our Internet of Things(IOT) projects.
REST (Representation State Transfer) or RESTful API architectural style uses HTTP requests to manipulate any server resources. In this tutorial, we are building our own RESTful application that will allow us to initiate a CRUD (Create/Read/Update/Delete) operation with our database. We are using Node.js, Express, and MongoDB Atlas in creating our REST API server.
We are building an application to manipulate keycodes in our MongoDB Atlas database. These keycodes are entered thru our Keypad electronic components that are being read by our Microcontroller(MCU) unit. As an IOT developer, knowledge about how to create or interface with RESTful API web service will help expand your experience in creating more creative projects.
This post is part of the following tutorial series that uses it as part of the IOT project.
Let’s get on with it!
Video
The following video shows how I did the setup and testing if you want to see it in actuality.
Special Notes Before You Proceed
The following sections will discuss how to set up your own REST API Server using Node.js, Express, and MongoDB Atlas step by step. It involves lots of javascript programming and if you are not comfortable working with these technologies then you can skip this part.
You can just set up your MongoDB cluster by following this post as we need this to store our keycodes. But I highly suggest that you work your way into these steps so that you would learn how to set up your own REST API Server. This skill will widen your knowledge as an IOT developer.
Proceed to the next part of your series which it will discuss how to run the applications
Prerequisites
I am using a Windows workstation and have installed git bash shell as well. In addition, you need to have a working knowledge of Javascript and Node.js.
Design
Let’s discuss first a brief overview of our REST API Server before we go a deep dive into how we start coding it.
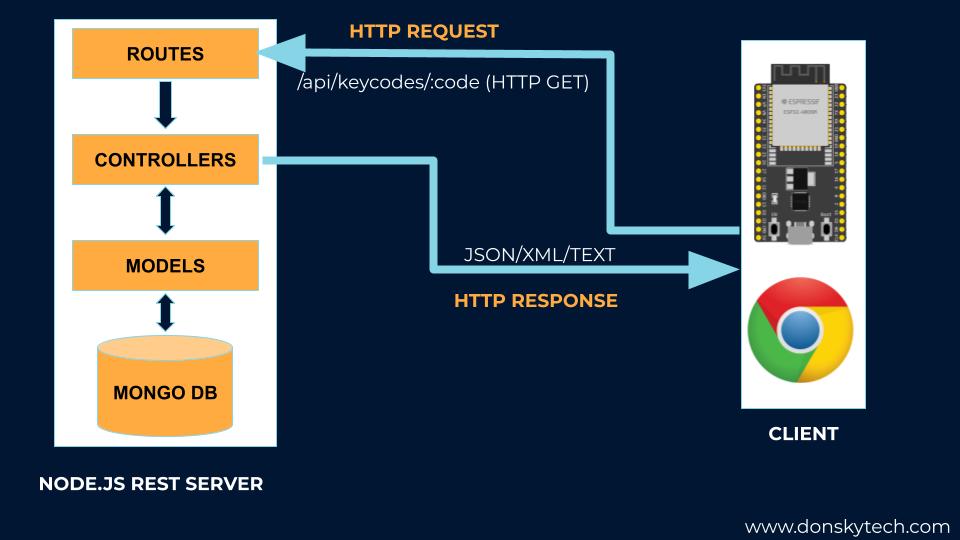
- HTTP requests come in from different clients. It could be coming from our browsers, command line calls (e.g curl), or even from our Internet of Things Devices (e.g. Arduino, ESP32, Raspberry Pi).
- HTTP requests usually come with two important components that we care about. One is the HTTP Methods (e.g. GET, POST, PUT, DELETE, etc.) and the other is the path (e.g. ‘/api/keycodes/:code’). For our diagram above the HTTP, Method is GET and the path is “/api/keycodes/:code”.
- All these HTTP requests are being handled by our Node.js server and assigned specific routes. Each route uses a controller object to handle the request.
- Controllers communicate with our backend database using Models or what they call an Object Modelling tool (e.g. Mongoose) that communicates with our database which is MongoDB in this case.
- Data that is being retrieved from our backend database is then processed by the controllers and then send it back to our calling client usually in JSON format.
- The Routes, Controllers, and Models are coded using the Javascript programming language.
And that is all for a high-level overview of what we are trying to do. The next sections will discuss each of the components we have discussed above. We will be diving deeper into how to create our REST API server using Node.js, Express, and MongoDB Atlas.
Steps
Create our Express Applications
Create a directory in your workstation and name it accordingly as ‘keypads-iot-rest-applications‘
mkdir keypads-iot-rest-applicationsThen, cd into that directory
cd keypads-iot-rest-applicationsThen, run the following commands to initiate our Node.js application
$ npm init -y
Wrote to C:\git\nodejs-projects\keypads-iot-rest-applications\package.json:

{
  "name": "keypads-iot-rest-applications",
  "version": "1.0.0",
  "description": "",
  "main": "index.js",
  "scripts": {
    "test": "echo \"Error: no test specified\" && exit 1"
  },
  "keywords": [],
  "author": "",
  "license": "ISC"
}
Install Dependencies
Now we can begin installing the required npm package dependencies for our application. Let’s begin by installing the following node.js libraries.
- express – will serve as our framework for our backend
- body-parser – is a middleware function to allow us to read the body of our incoming JSON request
npm install --save express body-parserThen install the dependencies that are to be useful only during the development process.
- nodemon – will assist us during development as we won’t be needing to restart our server whenever we do changes.
npm install --save-dev nodemonWe will be adding more dependencies as we go along with the post.
Configure our scripts
To run our application then we need to configure several scripts in our package.json file. During development, we are gonna be doing several code changes at the same time and that is where nodemon package will help us. But during the production run then it is required that we run the normal node runtime script. To do that open your package.json file and add the following entries.
The “dev” script will run our code using nodemon
The “start” script will run our code using the normal node.js runtime
  "scripts": {
    "dev": "nodemon index.js",
    "start": "node index.js"
  }
Afterwhich, your package.json should look like the following.
{
  "name": "keypads-iot-rest-applications",
  "version": "1.0.0",
  "description": "",
  "main": "index.js",
  "scripts": {
    "dev": "nodemon index.js",
    "start": "node index.js"
  },
  "keywords": [],
  "author": "",
  "license": "ISC",
  "dependencies": {
    "body-parser": "^1.20.0",
    "express": "^4.18.1"
  },
  "devDependencies": {
    "nodemon": "^2.0.18"
  }
}
Once you are done, then you could open Visual Studio Code by dragging the folder into it or you could execute the below command to open it as well.
code .Add .gitignore to our project
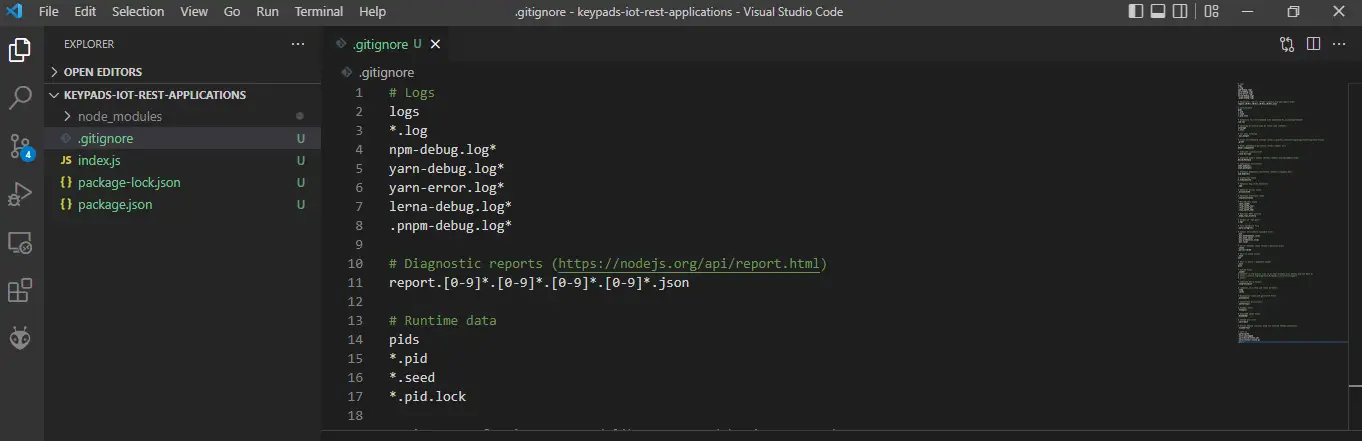
Before we start coding our server let us first create a .gitignore file so that we will skip files or directories not meant to be committed to our git repository. Examples of these are configuration files, database credentials, or log files generated by our application.
In Visual Studio code, add a new file called .gitignore then copy the content coming from this gitignore link.
Coding our REST API Server
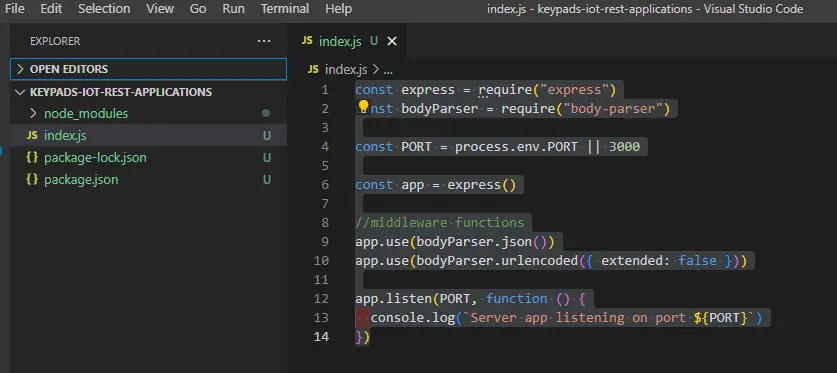
Next, open the index.js file and paste the following code.
const express = require("express")

const PORT = process.env.PORT || 3000

const app = express()

app.listen(PORT, function () {
  console.log(`Server app listening on port ${PORT}`)
})
The code above will import the required express dependency, open a TCP port and listen for the connection and then log the welcome message.
To run our server application then you can open a terminal inside visual studio code or open it in an external command or git-shell. If everything goes well then you should see the following message logged at your console “Server app listening on port 3000”
$ npm run dev

> keypads-iot-rest-applications@1.0.0 dev C:\git\nodejs-projects\keypads-iot-rest-applications
> nodemon index.js

[nodemon] 2.0.18
[nodemon] to restart at any time, enter `rs`
[nodemon] watching path(s): *.*
[nodemon] watching extensions: js,mjs,json
[nodemon] starting `node index.js`
Server app listening on port 3000
Add JSON Parsing Support (body-parser)
We will be adding additional middleware to handle the parsing of the request body into JSON format. We will use the body-parser npm package to do this.
const bodyParser = require("body-parser")

//middleware functions
app.use(bodyParser.json())
app.use(bodyParser.urlencoded({ extended: false }))
The first function will handle the incoming request and convert it to JSON. The second one will take care of any URL encoded request for us. Our index.js will now look like this.
const express = require("express")
const bodyParser = require("body-parser")

const PORT = process.env.PORT || 3000

const app = express()

//middleware functions
app.use(bodyParser.json())
app.use(bodyParser.urlencoded({ extended: false }))

app.listen(PORT, function () {
  console.log(`Server app listening on port ${PORT}`)
})
Now that we have a working server then we can begin connecting to our cloud database cluster using Mongo Atlas.
Connecting to our MongoDB Atlas Cluster
In our previous post, we set up our own MongoDB Atlas cluster and connected to it using MongoDB Compass. If you have not set up your own MongoDB Atlas cluster then now is the best time to do that.
We will be needing as well the connection string to our MongoDB Atlas cluster in the following format:
Format
mongodb+srv://<USER_NAME>:<YOUR_PASSWORD>@<CLUSTER_NAME>.attzkit.mongodb.net/<DATABASE>
e.g.
mongodb+srv://<USER_NAME>:<YOUR_PASSWORD>@cluster0.attzkit.mongodb.net/keypadsdb
cluster0 – is the name of the cluster that I created
keypadsdb – is the name of the database where our data will be placed
In order for our REST API Application to connect to the cluster that we have created in our MongoDB Atlas then we will be using the Mongoose npm package. Mongoose is an object modeling tool that will make it easy for us to interact with our MongoDB database.
npm install --save mongooseTo use the mongoose package then we will just need to add the following entry to our index.js file.
const mongoose = require("mongoose")

//setup mongoose
const mongodbConnString = "YOUR_CONNECTION_STRING"

mongoose.connect(mongodbConnString)

mongoose.connection.on("error", function(error) {
  console.log(error)
})

mongoose.connection.on("open", function() {
  console.log("Successfully connected to MongoDB Atlas database.")
})
Your index.js should now look like this
const express = require("express")
const bodyParser = require("body-parser")
const mongoose = require("mongoose")

const PORT = process.env.PORT || 3000

const app = express()

//middleware functions
app.use(bodyParser.json())
app.use(bodyParser.urlencoded({ extended: false }))

//setup mongoose
const mongodbConnString = "<YOUR_CONN_STRING>"

mongoose.connect(mongodbConnString)

mongoose.connection.on("error", function(error) {
  console.log(error)
})

mongoose.connection.on("open", function() {
  console.log("Successfully connected to MongoDB Atlas database.")
})

app.listen(PORT, function () {
  console.log(`Server app listening on port ${PORT}`)
})
We set the values of our connection string in our mongodbConnString variable then we pass it to our mongoose object during the call to the connect function. We added two listeners on the mongoose object during “error” and “open”
If things go well then you should be able to see the following messages being displayed in your terminal.
[nodemon] restarting due to changes...
[nodemon] starting `node index.js`
[nodemon] restarting due to changes...
[nodemon] starting `node index.js`
Server app listening on port 3000
Successfully connected to MongoDB Atlas database.
Save credential in .env config files
As you can see from the index.js above, we have hardcoded our username, password, cluster name, and database into our connection string variable. When we commit our code into our GitHub repository then everybody will know this sensitive information.
To fix this issue we can use a package called dotenv that will read our configuration file named .env and put it in the process.env runtime variable. Note that this .env file is not committed to our repository as it is part of the files in our .gitignore that we created earlier.
First, we install the dotenv npm package by executing this in a terminal.
npm install --save dotenvThen, we populate our .env file with the following entry
USER_NAME=testuser
PASSWORD=TestPassword!
CLUSTER_NAME=cluster0
DB_NAME=keypadsdb
Afterwhich, we add the following in our index.js file. Using template literals, we resolved the connection string and replace the values coming from our .env file by using the process.env.<VARIABLE_NAME>.
const dotenv = require("dotenv")
//setup dotenv
dotenv.config()

//setup mongoose
const mongodbConnString = `mongodb+srv://${process.env.USER_NAME}:${process.env.PASSWORD}@${process.env.CLUSTER_NAME}.attzkit.mongodb.net/${process.env.DB_NAME}`
If no error is encountered then we should be able to see the message “Successfully connected to MongoDB Atlas database.” to be displayed in our console log.
The following is our index.js at this point.
const express = require("express")
const bodyParser = require("body-parser")
const mongoose = require("mongoose")
const dotenv = require("dotenv")

const PORT = process.env.PORT || 3000

const app = express()

//setup dotenv
dotenv.config()

//middleware functions
app.use(bodyParser.json())
app.use(bodyParser.urlencoded({ extended: false }))

//setup mongoose
const mongodbConnString = `mongodb+srv://${process.env.USER_NAME}:${process.env.PASSWORD}@${process.env.CLUSTER_NAME}.attzkit.mongodb.net/${process.env.DB_NAME}`


mongoose.connect(mongodbConnString)

mongoose.connection.on("error", function(error) {
  console.log(error)
})

mongoose.connection.on("open", function() {
  console.log("Successfully connected to MongoDB Atlas database.")
})

app.listen(PORT, function () {
  console.log(`Server app listening on port ${PORT}`)
})
Create Mongoose Database Model
We need to create a model to represent our record in our MongoDB Atlas database. To do this let’s create a directory to hold our model object.
From Visual Studio Code, we can create a new directory and name it “models“
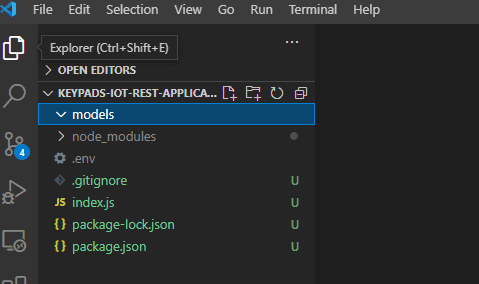
Inside our models folder, let’s create a file called keycode.js
const mongoose = require("mongoose")

const KeyCodeSchema = new mongoose.Schema({
  keyCode: {
    type: String,
    unique: true,
    required: true
  },
  active: {
    type: Boolean
  },
  description: {
    type: String
  }
}, { timestamps: true })

KeyCodeSchema.index({keyCode: 1}, {unique: true})

module.exports = mongoose.model("KeyCode", KeyCodeSchema)
We create a mongoose.schema and initialize it with several properties namely:
- keyCode – will represent the keycode that is going to be saved in our database. The type is a string and has a unique property.
- active – will represent if this variable is still active or not. Type is a boolean variable.
- description – will represent the description for this keycode or whoever owns this keycode. The type is a string and does not need to be required.
We are creating a mongoose.model from this schema and exporting it. An instance of a model is called a document and it is responsible for creating and reading documents from the underlying MongoDB database.
Creating REST API routes
Now we will begin creating specific routes for our application and how we are going to respond to those requests.
These are the routes that we are going to build:
| HTTP METHOD | PATH | DESCRIPTION |
|---|---|---|
| GET | /api/keycodes/:keycode | Get specific Key Code record in the database |
| GET | /api/keycodes | Get all key codes records in the database |
| POST | /api/keycodes | Add new key code record |
| PUT | /api/keycodes/:keycode | Update key code record |
| DELETE | /api/keycodes/:keycode | Delete specific key code record |
The syntax for routes follows the following format below. The callback functions can be separated into different entities that we can call our Controller object.
// Syntax
router.method('<path>', callbackFunction)

// Example
router.get("/", function (req, res) {
  res.json({message: "Hello world!"});
});
To do this, let us create a directory called “routes” in Visual Studio Code. For better practice, we are going to create another subdirectory called “keycodes” inside it. Our app is only serving keycodes information for now but in the future will have others so it’s a good idea to separate it by functionality.
Create a file called keycode.js inside the router/keycodes folder and paste the following code. We have added all routes from our table above but it is not doing anything yet.
const express = require("express")

const router = express.Router()

/* Router functions here */
router.get('/api', (req, res) => {
    res.send('hello REST API')
})

//Get specific Key Code record in the database
router.get('/api/keycodes/:keycode',(req, res) => {

})

//Get all key codes records in the database
router.get('/api/keycodes',(req, res) => {

})

//New Key Code Route
router.post('/api/keycodes/newKeyCode',(req, res) => {

})

//Update key code record
router.put('/api/keycodes/:keycode',(req, res) => {

})

//Delete specific key code record
router.delete('/api/keycodes/:keycode',(req, res) => {

})

module.exports = router
To explain the code above, let’s take one route and explain it a little bit.
const express = require("express")

const router = express.Router()

/* Router functions here */
router.get('/api', (req, res) => {
    res.send('hello REST API')
})- We import the express object and then create an instance of express.Router()
- We create a “route” to an HTTP method with GET and have a path of ‘/api’. A callback function with a request and response object is passed in to handle the HTTP request and HTTP response processing.
- We then write a plain text with a message ‘hello REST API’
- We finished by exporting this router object
In order to use this router object then we need to tell our Express Server to use this. To do that we should edit our index.js and add the following line of code. This tells our express server to use the middleware functions and add the routing functionality that we have added.
//middleware function
app.use(require("./routes/keycodes/keycode"))
Our index.js should now look like this:
const express = require("express")
const bodyParser = require("body-parser")
const mongoose = require("mongoose")
const dotenv = require("dotenv")

const PORT = process.env.PORT || 3000

const app = express()

//setup dotenv
dotenv.config()

//middleware functions
app.use(bodyParser.json())
app.use(bodyParser.urlencoded({ extended: false }))

//setup mongoose
const mongodbConnString = `mongodb+srv://${process.env.USER_NAME}:${process.env.PASSWORD}@${process.env.CLUSTER_NAME}.attzkit.mongodb.net/${process.env.DB_NAME}`


mongoose.connect(mongodbConnString)

mongoose.connection.on("error", function(error) {
  console.log(error)
})

mongoose.connection.on("open", function() {
  console.log("Successfully connected to MongoDB Atlas database.")
})

//middleware function
app.use(require("./routes/keycodes/keycode"))

app.listen(PORT, function () {
  console.log(`Server app listening on port ${PORT}`)
})
Now we are all set, to test our routes, open a browser and input the following url http://localhost:3000/api. You should be able to see the following message printed.

Create Controller Objects
Controllers are basically callback functions that mostly handle the interface to our database using the Model objects that we created (e.g Schema) and the business logic related to it also like additional validation. As we add more routes to our application then it becomes important that we separate the logic into a separate module rather than putting everything in our routes object.
Let’s create the controller for our application, in Visual Studio Code create a directory called “controllers” in our root project and add a new file called “keycode.js“. This will serve as the controller of our keypads/keycode application.
// Import our keyCode schema
const KeyCodeModel = require("../models/keycode");

module.exports = {
  //call back function to create our new key code
  createNewKeyCode: function (keyCode, active, description, callback) {
    // More code to follow here
  },

  // Get specific Key Code record
  getKeyCode: function (keyCode, callback) {
    // More code to follow here
  },

  // Get all key codes records
  getAllKeyCodes: function (callback) {
    // More code to follow here
  },

  //Update key code record
  updateKeyCodeRecord: function (keyCode, active, description, callback) {
    // More code to follow here
  },

  //Delete key code record
  deleteKeyCodeRecord: function (keyCode, callback) {
    // More code to follow here
  },
};
- We import our schema object
- We export several functions that will handle the business logic of our interaction with our MongoDB Atlas database.
We will continue to build on this controller object in the next section.
Perform CRUD(Create, Retrieve, Update, Delete) Operation
Add Key Code Record
We start by adding key code records to our database. To do that open your controller\keycode.js file and add the following lines of code in the createNewKeyCode function.
// Import our keyCode schema
const KeyCodeModel = require("../models/keycode");

module.exports = {
  //call back function to create our new key code
  createNewKeyCode: function (keyCode, active, description, callback) {
    const newKeyCode = new KeyCodeModel({
      keyCode: keyCode,
      active: active,
      description: description,
    });
    newKeyCode.save(function (error, newKeyCode) {
      if (error) {
        callback({ success: false, message: "Unable to create new key code!" });
      } else {
        console.log(newKeyCode);
        callback({
          success: true,
          message: "Successfully created new key code records",
        });
      }
    });
  },
};- We import our schema from the models directory
- We export a function called createNewKeyCode. This function is expecting the following parameters keyCode, active, description, callback. They are to be supplied by the calling client.
- We create a sample KeyCodeModel from our schema and populate it with the values that we passed in and then call the save function.
- If an error is encountered then the callback is called and passing success=false else if it was successful then success=true.
In our /routes/keycode.js then we need to add the following lines of code.
const keyCodeController = require("../../controllers/keycode");

//New Key Code Route
router.post("/api/keycodes/newKeyCode", (req, res) => {
  if (!req.body.keyCode || !req.body.active || !req.body.description) {
    res.json({ error: true });
  } else {
    keyCodeController.createNewKeyCode(
      req.body.keyCode,
      req.body.active,
      req.body.description,
      function (result) {
        res.json(result);
      }
    );
  }
});- We validate if the required parameters are passed in by the client, if not then we return a JSON message with error=true.
- We call the controller function createNewKeyCode and passed in the required parameters.
To test this API, open Postman and send in the following parameters. Verify the response message as well.
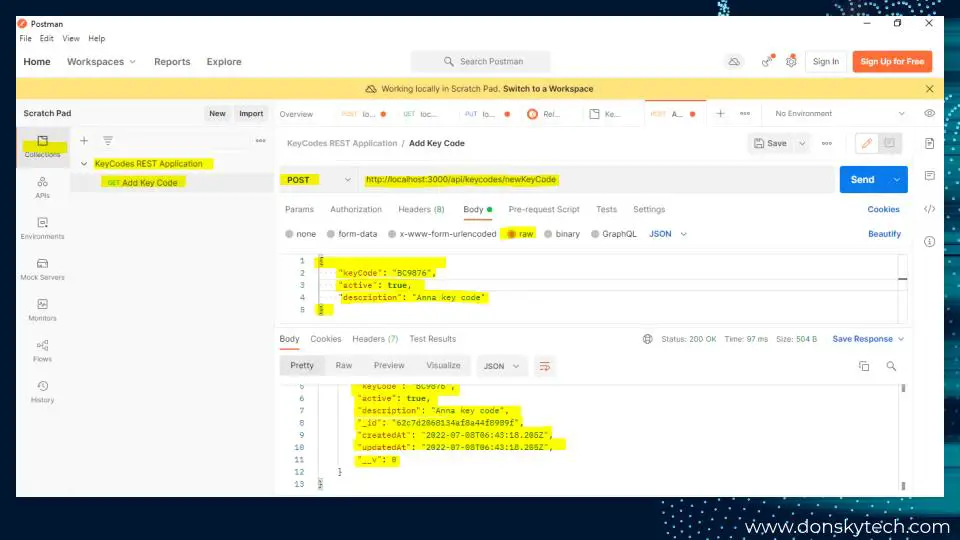
Verify also that it is saved in our MongoDB Atlas database. To do that open Compass and find the keycode that we passed in.
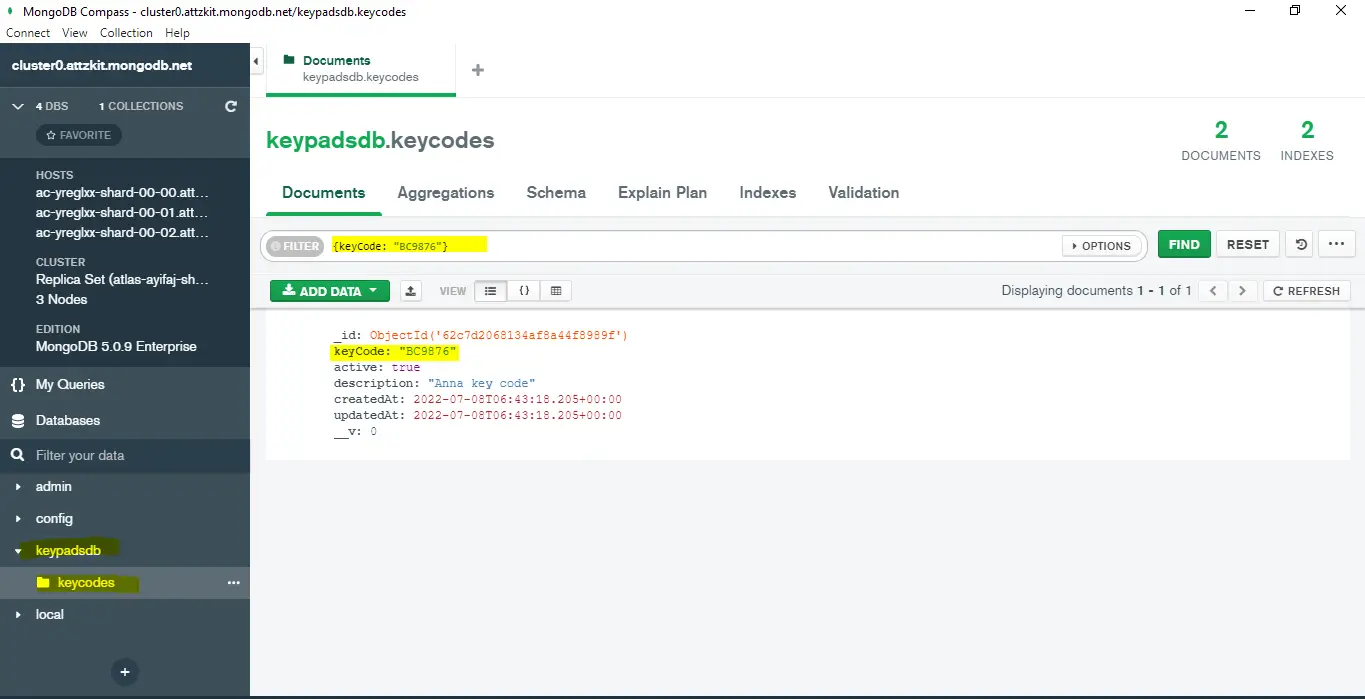
If it is there then hooray! We were able to create our first API.
Get a specific Key Code record
To get a specific key code record then we need to a new function to our controllers\keycode.js. Add the following code to that file.
  // Get specific Key Code record
  getKeyCode: function (keyCode, callback) {
    KeyCodeModel.findOne({ keyCode: keyCode }, (err, record) => {
      if (err || !record) {
        callback({ success: false, message: "Unable find keycode record!" });
      } else {
        //console.log(record); -- show record on log
        callback({
          success: true,
          message: "Successfully retrieved keycode record",
        });
      }
    });
  },
Then in our routes\keycode.js, we call the function above.
//Get specific Key Code record in the database
router.get("/api/keycodes/:keyCode", (req, res) => {
  let keyCode = req.params.keyCode;
  keyCodeController.getKeyCode(keyCode, function (result) {
    res.json(result);
  });
});
We extract the keycode parameter and then call our controller object. Supply the following information in Postman to test this API.

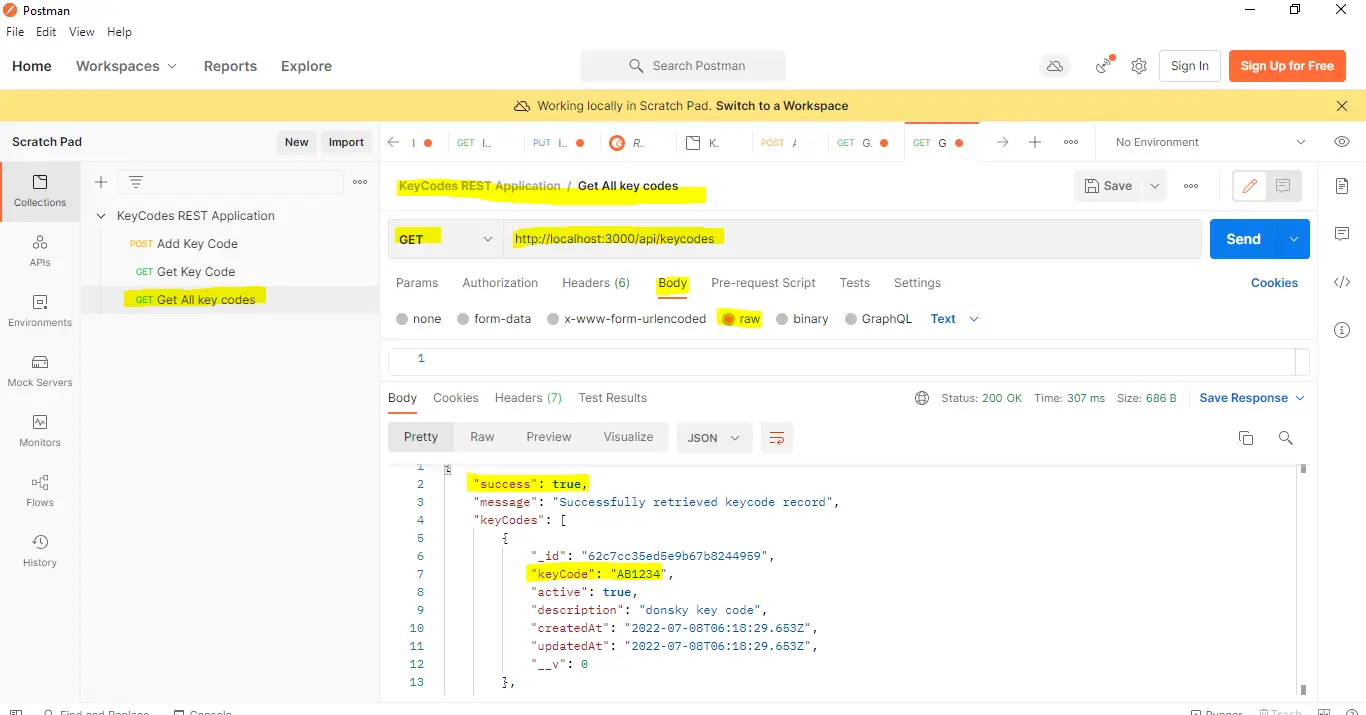
Get All Key Codes Record
To get all keycodes stored in the database then we can add the following function in our keycode controller controller\keycode.js file.
    // Get all key codes records
    getAllKeyCodes: function (callback) {
      KeyCodeModel.find({}, (err, keyCodes) => {
        if (err) {
          callback({ success: false, message: "Unable find keycode records!" });
        } else {
          callback({
            success: true,
            message: "Successfully retrieved keycode record",
            keyCodes: keyCodes
          });
        }
      });
    },
Then call this function in our routes\keycode.js.
//Get all key codes records in the database
router.get("/api/keyCodes", (req, res) => {
  keyCodeController.getAllKeyCodes(function (result) {
    res.json(result);
  });
});ode.js
To test this in Postman just follow the below steps:
Delete Key Code Record
Let us start developing logic on how to delete Key Code records in our MongoDB Atlas database.
Edit your controller\keycode.js and put the following code.
  //Delete key code record
  deleteKeyCodeRecord: function (keyCode, callback) {
    KeyCodeModel.findOne({ keyCode: keyCode }, (err, record) => {
      if (err || !record) {
        callback({
          success: false,
          message: "Unexpected error encountered or keycode record not found while deleting keycode!",
        });
      } else {
        record.remove(function (error) {
          if (error) {
            callback({
              success: false,
              message: "Failed to delete keycode record!",
            });
          } else {
            callback({
              success: true,
              message: "Successfully deleted keycode record!",
            });
          }
        });
      }
    });
}- The controller will query our MongoDB Atlas database and find a key code that is matching our pass parameter.
- If nothing is found then it just returns a message that “Unexpected error encountered or keycode record not found while deleting keycode!”
- If a record is found then we execute a delete of the record by calling remove on our model.
- If something goes wrong during deletion then an error message is sent back to the calling client else the success message is called.
Let us now edit our routes\keycode.js to use our new controller logic. Update your file and put the following entry.
//Delete specific key code record
router.delete("/api/keycodes", (req, res) => {
  if (!req.body.keyCode) {
    res.json({ error: true });
  } else {
    keyCodeController.deleteKeyCodeRecord(
      req.body.keyCode,
      function (result) {
        res.json(result);
      }
    );
  }
});
First, we extract the key code from the request body and then call the deleteKeyCodeRecord from our keyCodeController.
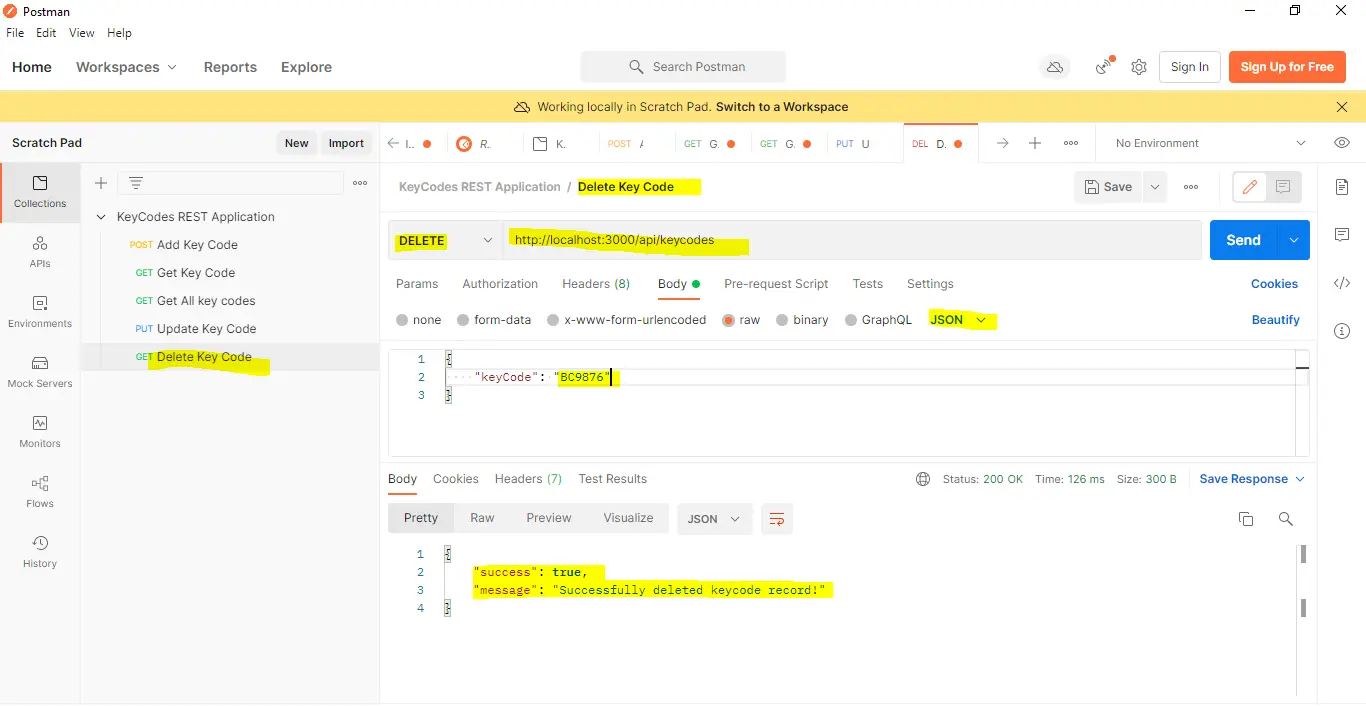
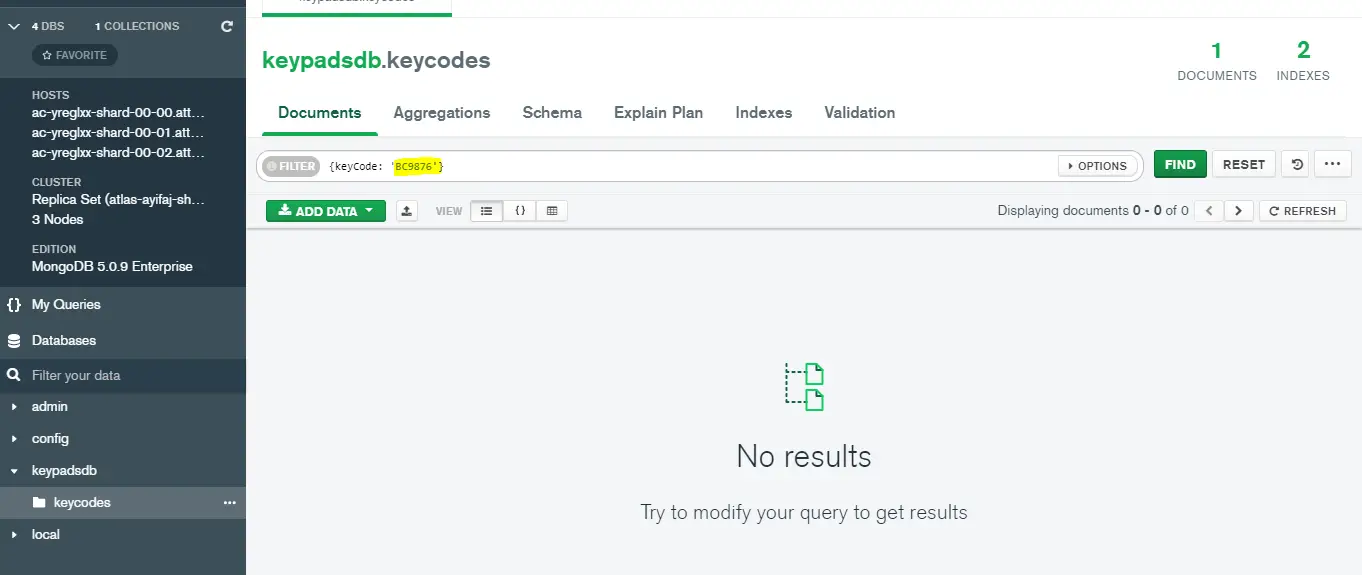
Verify that it is deleted in our MongoDB using Compass.
Final Code
This is the final code for each of our modules.
controller\keycode.js:
// Import our keyCode schema
const KeyCodeModel = require("../models/keycode");

module.exports = {
  //call back function to create our new key code
  createNewKeyCode: function (keyCode, active, description, callback) {
    KeyCodeModel.findOne({ keyCode: keyCode }, (err, record) => {
      // Key code is not in the database
      if (!record) {
        const newKeyCode = new KeyCodeModel({
          keyCode: keyCode,
          active: active,
          description: description,
        });
        newKeyCode.save(function (error, newKeyCode) {
          if (error) {
            callback({
              success: false,
              message: "Unable to create new key code!",
            });
          } else {
            console.log(newKeyCode);
            callback({
              success: true,
              message: "Successfully created new key code records",
            });
          }
        });
      } else {
        if (err) {
          callback({
            success: false,
            message: "Unexpected error when querying for new key code!",
          });
        }
        callback({
          success: false,
          message: `${keyCode} already exists in database`,
        });
      }
    });
  },

  // Get specific Key Code record
  getKeyCode: function (keyCode, callback) {
    KeyCodeModel.findOne({ keyCode: keyCode }, (err, record) => {
      if (err || !record) {
        callback({ success: false, message: "Unable find keycode record!" });
      } else {
        //console.log(record); -- show record on log
        callback({
          success: true,
          message: "Successfully retrieved keycode record",
        });
      }
    });
  },

  // Get all key codes records
  getAllKeyCodes: function (callback) {
    KeyCodeModel.find({}, (err, keyCodes) => {
      if (err) {
        callback({ success: false, message: "Unable find keycode records!" });
      } else {
        callback({
          success: true,
          message: "Successfully retrieved keycode records",
          keyCodes: keyCodes,
        });
      }
    });
  },

  //Update key code record
  updateKeyCodeRecord: function (keyCode, active, description, callback) {
    KeyCodeModel.findOne({ keyCode: keyCode }, (err, record) => {
      if (err || !record) {
        callback({
          success: false,
          message:
            "Unexpected error encountered or keycode record not found while updating keycode record!",
        });
      } else {
        record.active = active;
        record.description = description;

        record.save(function (error) {
          if (error) {
            callback({
              success: false,
              message: "Failed to update keycode record!",
            });
          } else {
            callback({
              success: true,
              message: "Successfully updated record!",
            });
          }
        });
      }
    });
  },

  //Delete key code record
  deleteKeyCodeRecord: function (keyCode, callback) {
    KeyCodeModel.findOne({ keyCode: keyCode }, (err, record) => {
      if (err || !record) {
        callback({
          success: false,
          message:
            "Unexpected error encountered or keycode record not found while deleting keycode!",
        });
      } else {
        record.remove(function (error) {
          if (error) {
            callback({
              success: false,
              message: "Failed to delete keycode record!",
            });
          } else {
            callback({
              success: true,
              message: "Successfully deleted keycode record!",
            });
          }
        });
      }
    });
  },
};
routes\keycode.js:
const express = require("express");

const router = express.Router();

const keyCodeController = require("../../controllers/keycode");

/* Router functions here */
router.get("/api", (req, res) => {
  res.send("hello REST API");
});

//Get specific Key Code record in the database
router.get("/api/keycodes/:keyCode", (req, res) => {
  let keyCode = req.params.keyCode;
  keyCodeController.getKeyCode(keyCode, function (result) {
    res.json(result);
  });
});

//Get all key codes records in the database
router.get("/api/keyCodes", (req, res) => {
  keyCodeController.getAllKeyCodes(function (result) {
    res.json(result);
  });
});

//New Key Code Route
router.post("/api/keycodes/newKeyCode", (req, res) => {
  if (!req.body.keyCode || !req.body.active || !req.body.description) {
    res.json({ error: true });
  } else {
    keyCodeController.createNewKeyCode(
      req.body.keyCode,
      req.body.active,
      req.body.description,
      function (result) {
        res.json(result);
      }
    );
  }
});

//Update key code record
router.put("/api/keycodes/", (req, res) => {
  console.log(req.body);
  if (!req.body.keyCode || !req.body.active || !req.body.description) {
    res.json({ error: true });
  } else {
    keyCodeController.updateKeyCodeRecord(
      req.body.keyCode,
      req.body.active,
      req.body.description,
      function (result) {
        res.json(result);
      }
    );
  }
});

//Delete specific key code record
router.delete("/api/keycodes", (req, res) => {
  if (!req.body.keyCode) {
    res.json({ error: true });
  } else {
    keyCodeController.deleteKeyCodeRecord(
      req.body.keyCode,
      function (result) {
        res.json(result);
      }
    );
  }
});

module.exports = router;
models\keycode.js:
const mongoose = require("mongoose")

const KeyCodeSchema = new mongoose.Schema({
  keyCode: {
    type: String,
    unique: true,
    required: true
  },
  active: {
    type: Boolean
  },
  description: {
    type: String,
    required: true
  }
}, { timestamps: true })

KeyCodeSchema.index({keyCode: 1}, {unique: true})

module.exports = mongoose.model("KeyCode", KeyCodeSchema)index.js:
const express = require("express")
const bodyParser = require("body-parser")
const mongoose = require("mongoose")
const dotenv = require("dotenv")

const PORT = process.env.PORT || 3000

const app = express()

//setup dotenv
dotenv.config()

//middleware functions
app.use(bodyParser.json())
app.use(bodyParser.urlencoded({ extended: false }))

//setup mongoose
const mongodbConnString = `mongodb+srv://${process.env.USER_NAME}:${process.env.PASSWORD}@${process.env.CLUSTER_NAME}.attzkit.mongodb.net/${process.env.DB_NAME}`


mongoose.connect(mongodbConnString)

mongoose.connection.on("error", function(error) {
  console.log(error)
})

mongoose.connection.on("open", function() {
  console.log("Successfully connected to MongoDB Atlas database.")
})

//middleware function
app.use(require("./routes/keycodes/keycode"))

app.listen(PORT, function () {
  console.log(`Server app listening on port ${PORT}`)
})
Wrap Up
We have discussed how to create our own REST API Server using Node.js, Express, and MongoDB Atlas in this post.
We will be using the same application in the future Internet of Things (IOT) projects.
Happy Exploring!
Leave a Reply