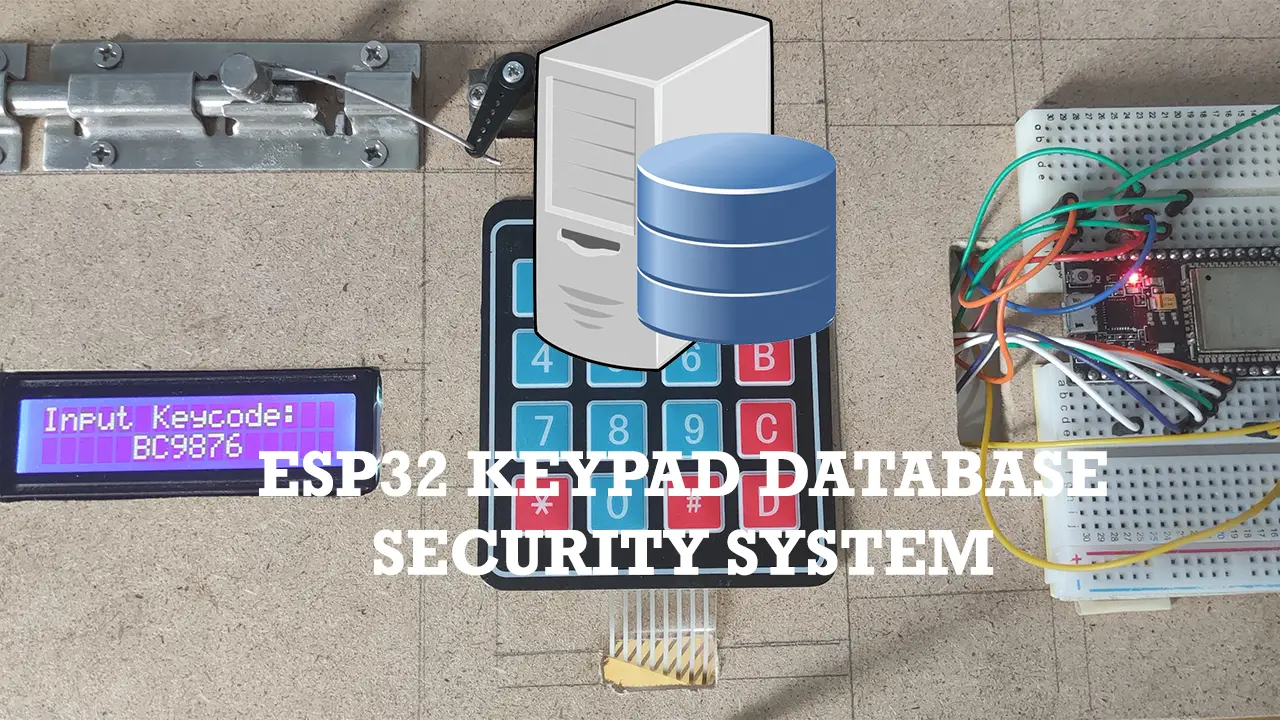
Overview
In this article, I am going to show you how I created my ESP32-based door lock mechanism using a keypad and a database to store my valid list of keycodes. The ESP32 board interfaces with a keypad, an I2C LCD display, and my manual door lock which is controlled by my servo motor. It then connects to my Representation State Transfer API (REST) web service built using Node.js. The keycodes entered by the user thru my keypad are then validated to the list of valid keypads stored in my MongoDB database.
If you like watching this project in action including the assembly then please see the below video or watch it on my YouTube channel.
Project Roadmap
As it would be impossible to discuss everything in one post so I have decided to split the discussion into three parts series.
- Part 1 – ESP32 Keypad Database Security System – Design
- Part 2 – ESP32 Keypad Database Security System – Build REST API Using Node.js, Express and MongoDB
- Part 3 – ESP32 Keypad Database Security System – Code
This post is part 1 of the series where we discuss the overall design of our ESP32 Keypad Doorlock with Database Interface. We will talk about the overview, design, and schematic wiring diagram of how I created this project.
Design
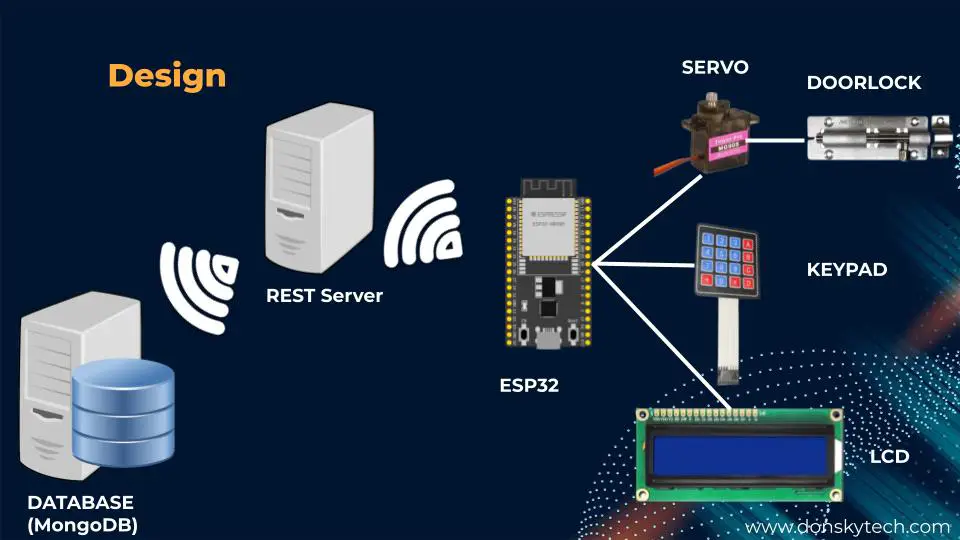
The following diagram illustrates the overall design of our ESP32 Keypad door locks with a database interface.
There are three major components that we need to take a look at.
- ESP32 and the hardware interfaces
- REST API Server
- MongoDB Database server
The ESP32 and the Hardware Interfaces
The ESP32 Microcontroller handles the bulk of the processing in this Internet of Things project. First, it connects to the hardware components needed to retrieve the keypad codes and then displays them thru the LCD. It then calls the REST Server and then passes the inputted keycodes to validate if this is present in the database. From the result of the validation, it then handles the locking and opening of the door lock thru the servo mechanism.
The ESP32 is connected with the following components.
- Keypad
- LCD Display
- Servo Motor
The keypad connection retrieves the keycodes inputted by the user. In this project, we are creating the following business rules for our keypads’ keycode input
- restricting the length of the keycodes to be 6 and any combinations of Letters and numbers are allowed
- The “*” (asterisk) character is used to clear our input
- the “#” (pound) sign is used to validate our keycodes with that of our database
The LCD is used to display information content to the user and also show the user the keycode that he/she entered.
The servo motor interfaces with our door lock mechanism. It handles the opening and closing of the lock thru a simple linkage that we have used. By moving the servo to some distinct position then we are able to open or close the door lock.
The REST API Server
The REST API Server is a web service built using Node.js and it defines several endpoints that our ESP32 can call to pass in the keycode entered by the user and then validate it if it is present in our database.
We have deployed this REST API server locally on our laptop but we are able to deploy it thru other cloud solutions like AWS, Azure, etc.
MongoDB Database:
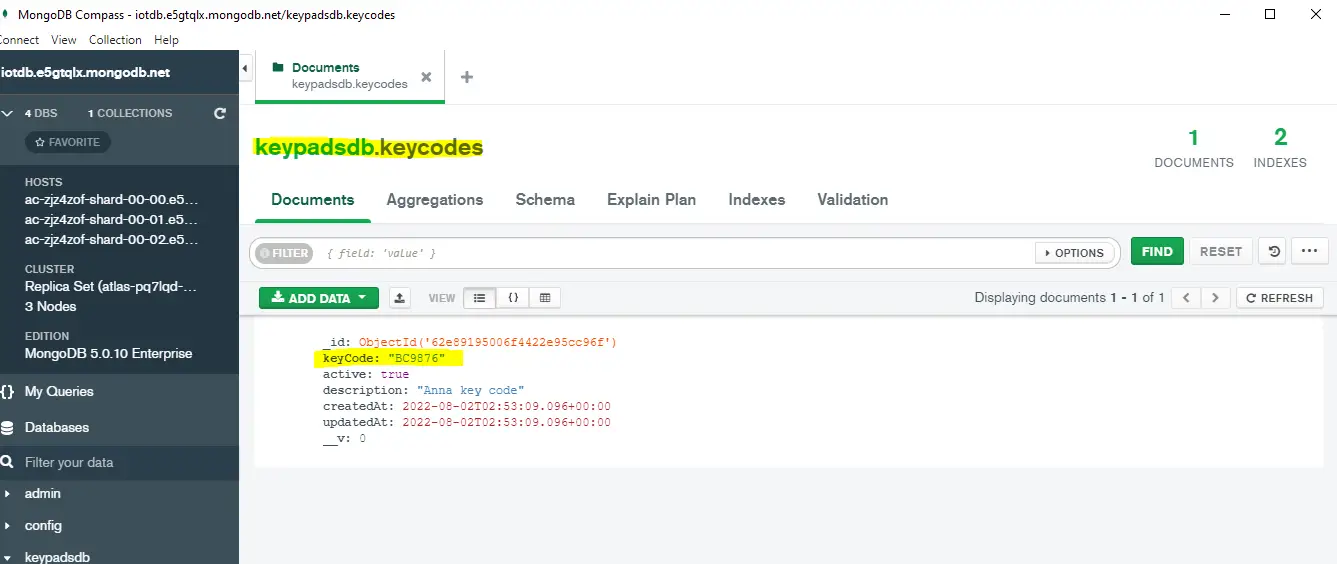
The last component of our project is our database which stores the list of our valid keycodes. We are using MongoDB Atlas as our database here to store our list of keycodes.
MongoDB Atlas is a cloud database as a service database that is both known for its scalability and flexibility. MongoDB stores data in flexible, JSON-like documents and is free to use for small applications.
The image below is a sample of how our keycodes are stored in MongoDB Atlas. If you want to learn more and get started with MongoDB Atlas then click this post that I have written about it.
ESP32 Keypad Database Message Exchange
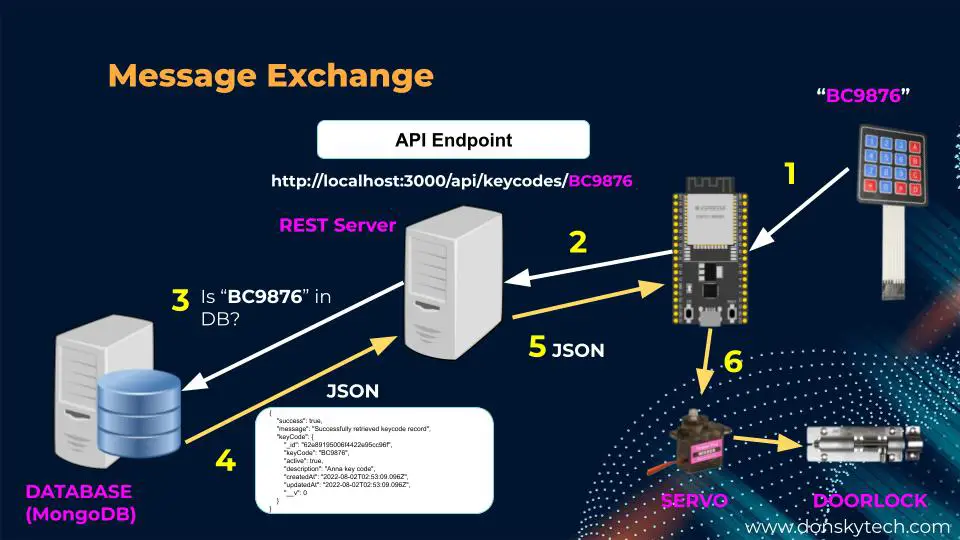
The illustration above will explain how messages flow thru the different components of our project.
So the message flows something like this.
- A user inputs a keycode thru the keypad
- ESP32 receives the keycode and calls the REST API server endpoint passing in the keycode
- The REST API Server queries the MongoDB database to check if that keycode is present in our database
- The MongoDB database returns a Javascript Object Notation (JSON) response that includes the keycode details and sends it back to the REST API server
- The REST API server returns a response or error back to the ESP32
- The ESP32 will parse the JSON response and will check if the keycode is allowed or not then it tells the servo to open or remain closed.
An example endpoint that our REST API server is exposing is like this and this is used to check if the keycode is valid or not.
http://localhost:3000/api/keyCodes/BC9876
The endpoint above is an example of how we passed in a user inputted keycodes (e.g “BC9876“) and then our REST API server will query our MongoDB Database. The result which is usually in JSON format is then passed back to our ESP32 microcontroller for processing.
There are several other API endpoints that are being exposed by our REST API server like how to add/edit/delete keycodes but in the case of our project, we are interested in querying the keycode only.
The following is the sample JSON result being received by our ESP32 microcontroller. If the success is “true” then the servo will open the door lock but if the success is “false” then it remains closed.
{
    "success": true,
    "message": "Successfully retrieved keycode record",
    "keyCode": {
        "_id": "62e89195006f4422e95cc96f",
        "keyCode": "BC9876",
        "active": true,
        "description": "Anna key code",
        "createdAt": "2022-08-02T02:53:09.096Z",
        "updatedAt": "2022-08-02T02:53:09.096Z",
        "__v": 0
    }
}
We will discuss the REST API Server at length in the next part of this series.
Component List/Software
In order to follow along with this project then you need to have the following components.
- ESP32 MCU ( I used NodeMCU ESP32S) – Amazon | AliExpress | Bangood
- LCD 16 X 2 (I2C) – Amazon | AliExpress | Bangood
- Servo Motor – Amazon | AliExpress | Bangood
- Latch Door Lock – Amazon | AliExpress
- Breadboard – Amazon | AliExpress | Bangood
- Connecting Wires – Amazon | AliExpress | Bangood
Disclosure: These are affiliate links and I will earn small commissions to support my site when you buy through these links.
Prerequisites
I have used PlatformIO IDE in developing this project as it makes the development relatively faster and easier.
Related Content:
PlatformIO Tutorial for Arduino Development
Install Visual Studio Code or VSCode in Windows
Wiring Diagram
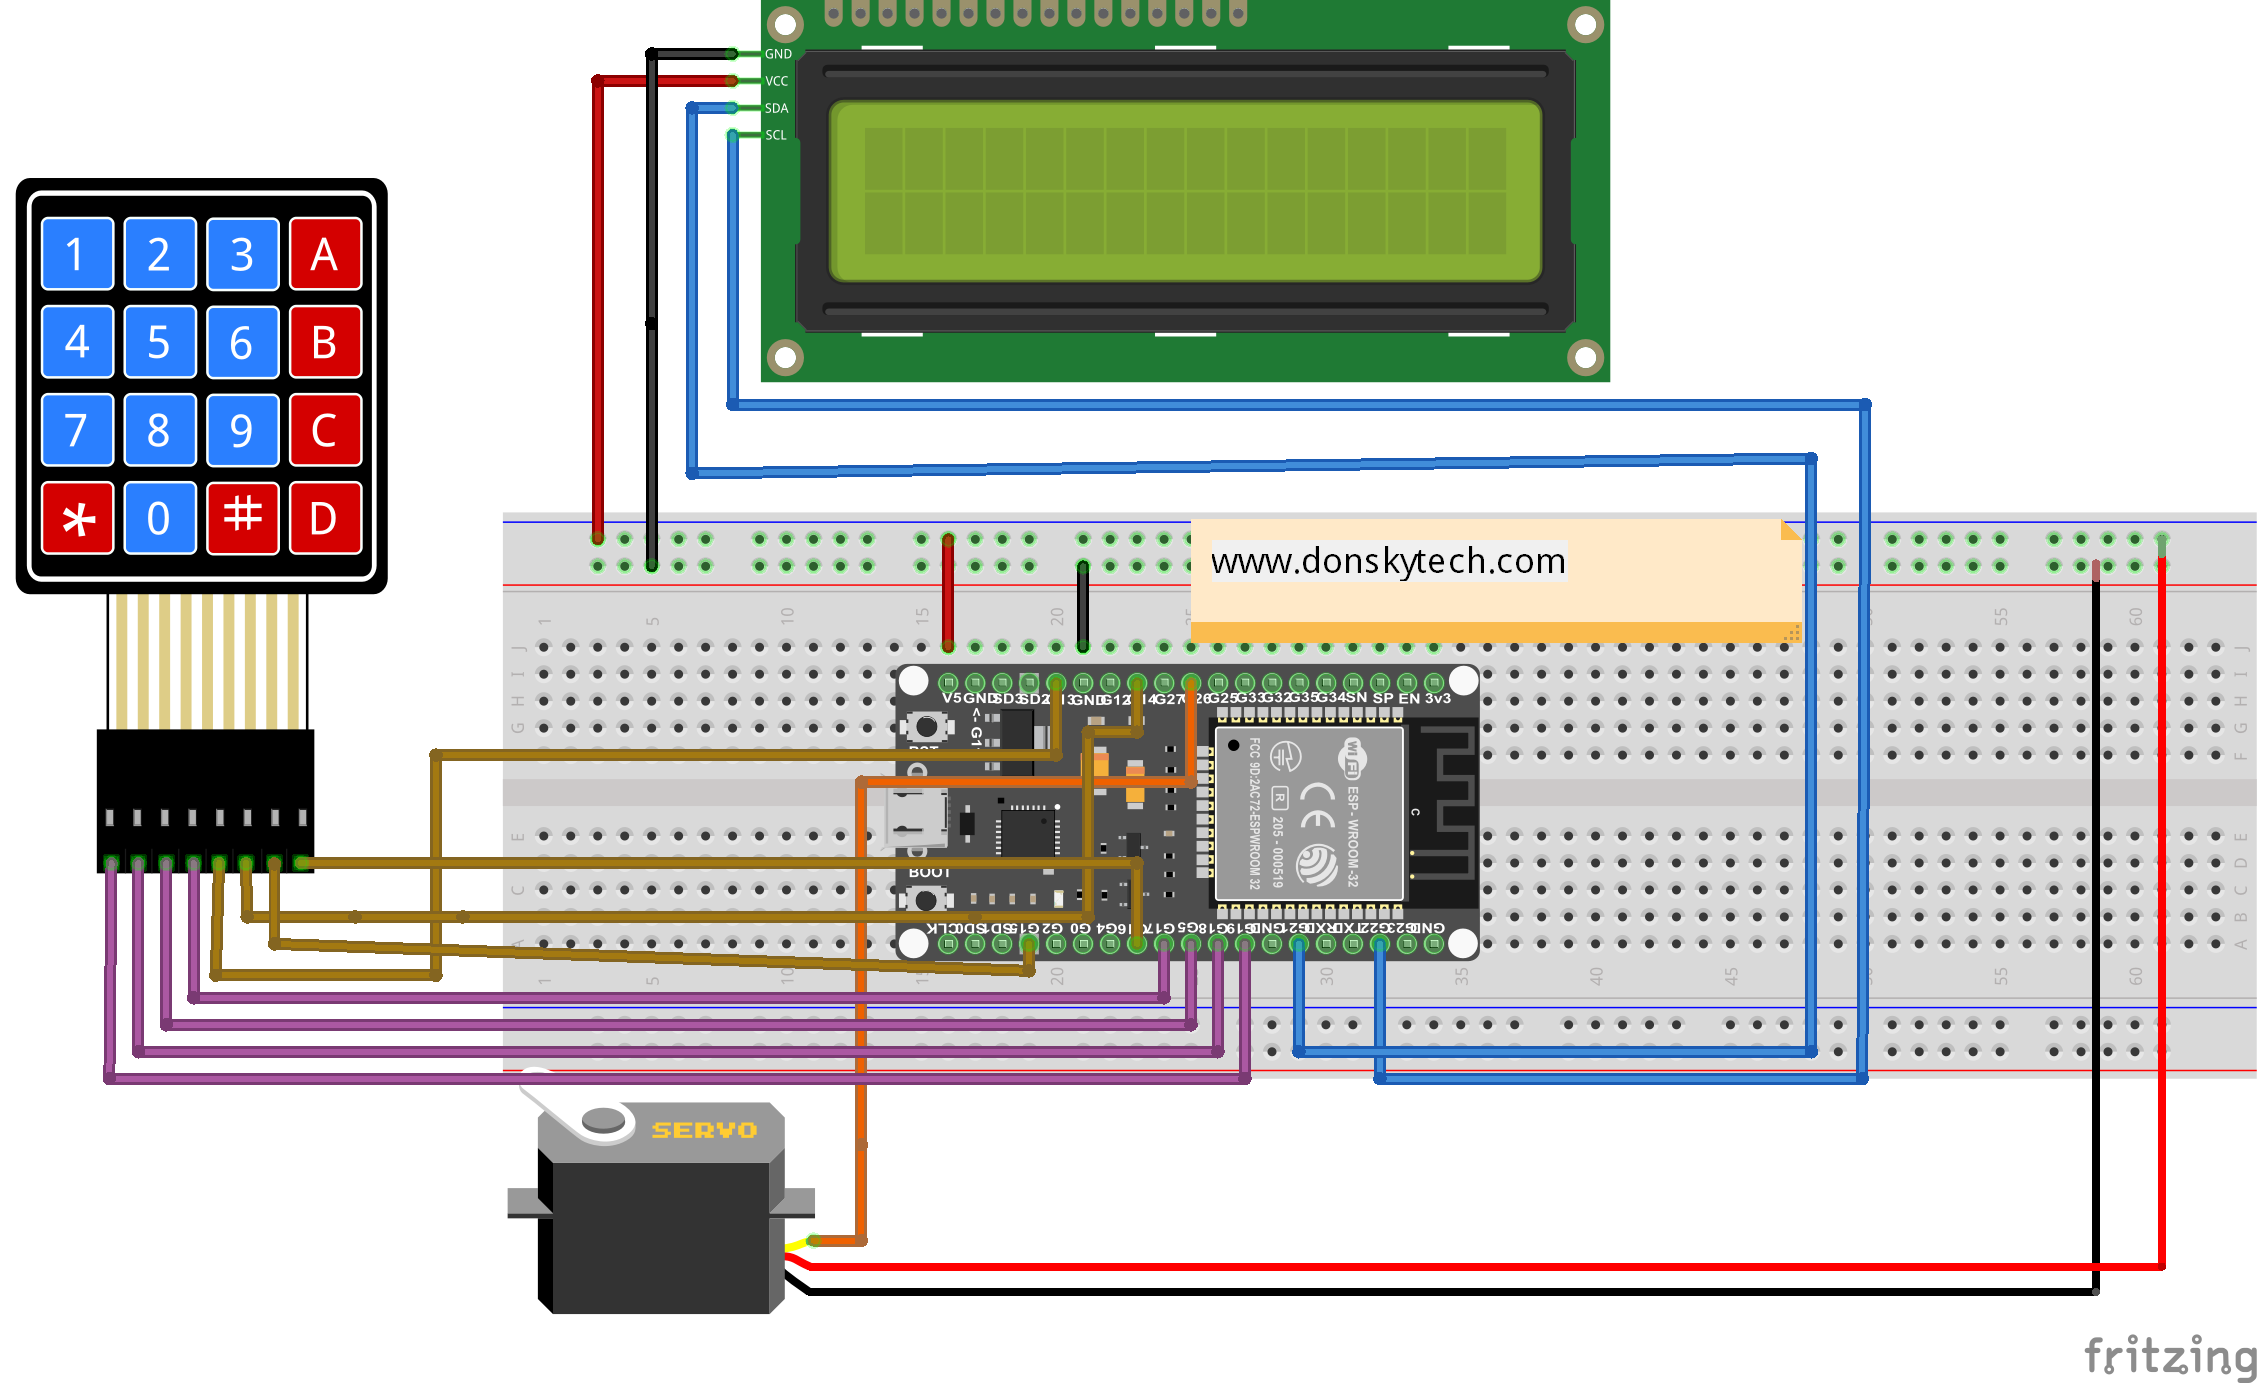
The fritzing diagram above displays the overall connection of all of our electronic components.
In summary, the following is the table of the connections for your reference.
LCD to ESP32
| LCD 16 X 2 | ESP32 |
|---|---|
| VCC | Vin |
| GND | GND |
| SDA | GPIO21 |
| SCL | GPIO22 |
Keypad to ESP32
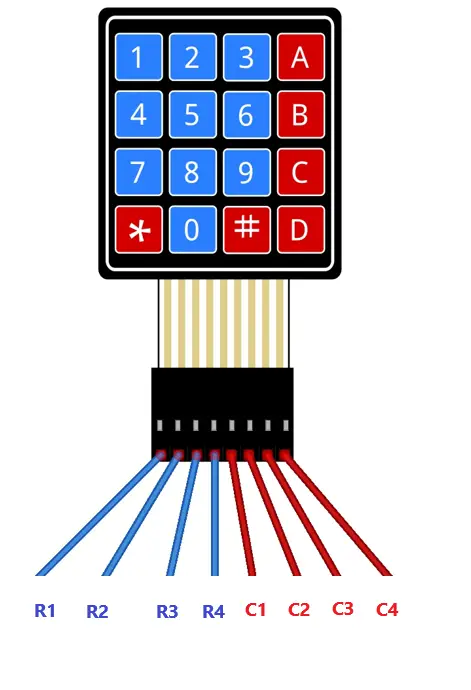
| Keypad | ESP32 |
|---|---|
| R1 | GPIO19 |
| R2 | GPIO18 |
| R3 | GPIO5 |
| R4 | GPIO17 |
| C1 | GPIO13 |
| C2 | GPIO14 |
| C3 | GPIO15 |
| C4 | GPIO16 |
Servo to ESP32
| Servo | ESP32 |
|---|---|
| VCC | Vin |
| GND | GND |
| PWM Wire (Data) | GPIO26 |
Wrap Up
I have discussed the design of my ESP32 Keypad Doorlock with a database interface in this post. I have included all the necessary components and a wiring diagram for you to follow along. We have explored how messages are being transferred from our ESP32 into our REST API Server. In the following parts of this series, we will dig deeper into how I created my REST API Server using Node.js and how we communicate with our database using the MongoDB Atlas cloud server.
That’s it. Happy Exploring!
Read Next:
Part 2 – ESP32 Keypad Database Security System – Build REST API Using Node.js, Express, and MongoDB
Leave a Reply