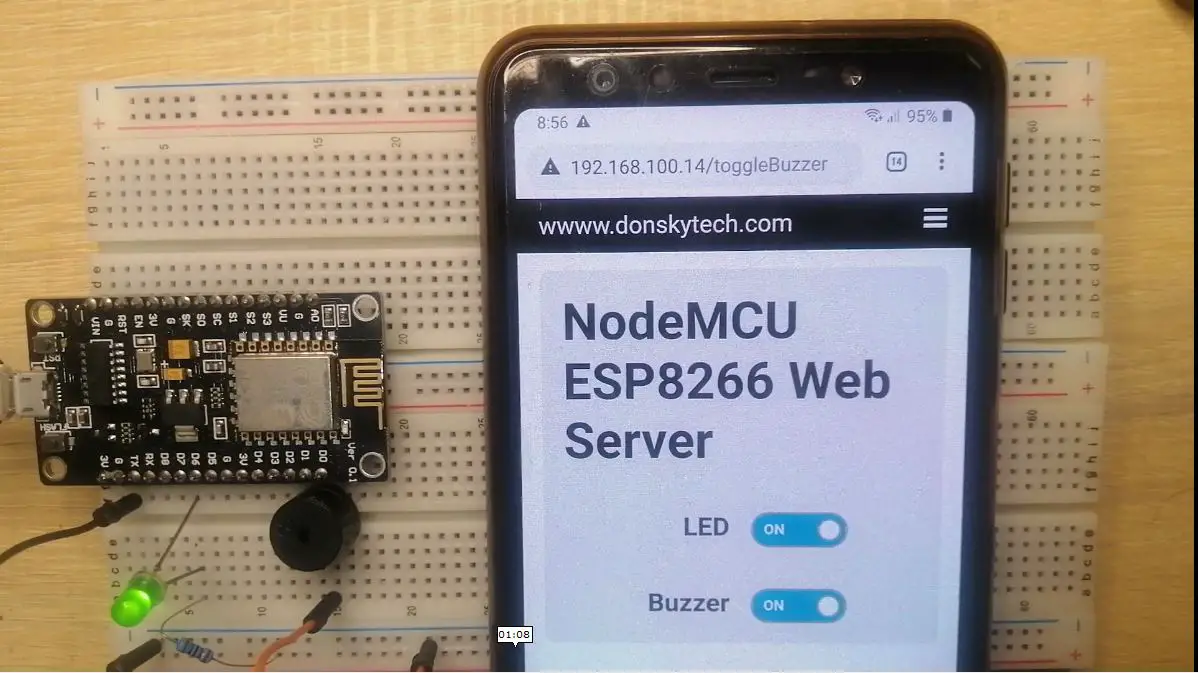
In this post we are going to discuss how we can control our electronic components using our mobile phone thru the use of the ESP8266 NodeMCU Web Server. We connect to our web server thru our mobile phones browser and control whatever components we like. In this post we are using an LED and a passive buzzer but this could be extended to control High Voltage appliances thru relays.
Please see the following video for a Demo of what we are going to do in this post.
What is an ESP8266 NodeMCU Web Server?
Let us discuss a bit first what is a web server before we go deep dive on how we can control our components from our mobile phones.
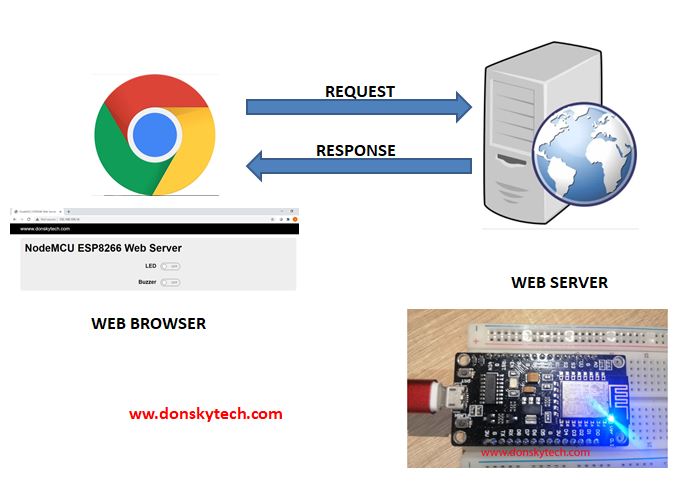
From wikipidea, “A web server is server software, or hardware dedicated to running this software, that can satisfy client requests on the World Wide Web.
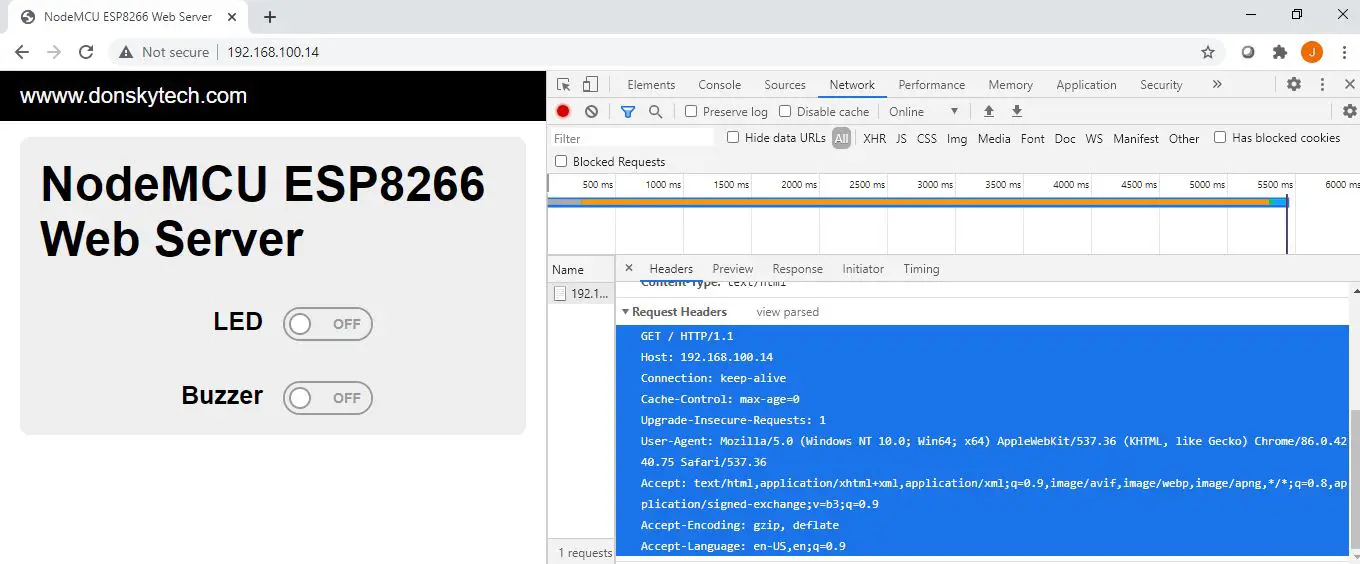
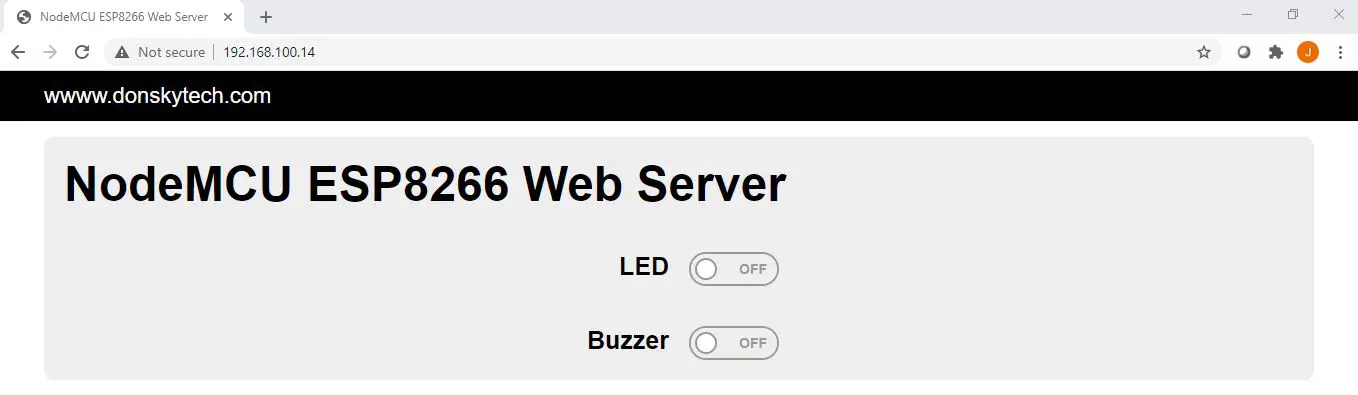
In our case here we use the capability of the NodeMCU ESP8266 to act as our web server and host our website. We issue a “request” in typing the address of our web server in our browser and we received a “response” in the form of html markup. The image below is a sample of an HTTP GET request that our browser is sending to our web server.
The NodeMCU ESP8266 Web Server receives this request and replies with an HTML response. It handles as well the interface to our components so it inspects the request coming in from the web browser and acts accordingly.
The ESP8266 chip and its latest ESP32 chips are all about wifi and connectivity. This makes it perfect for our Internet Of Things (IOT) projects.
Wiring Diagram
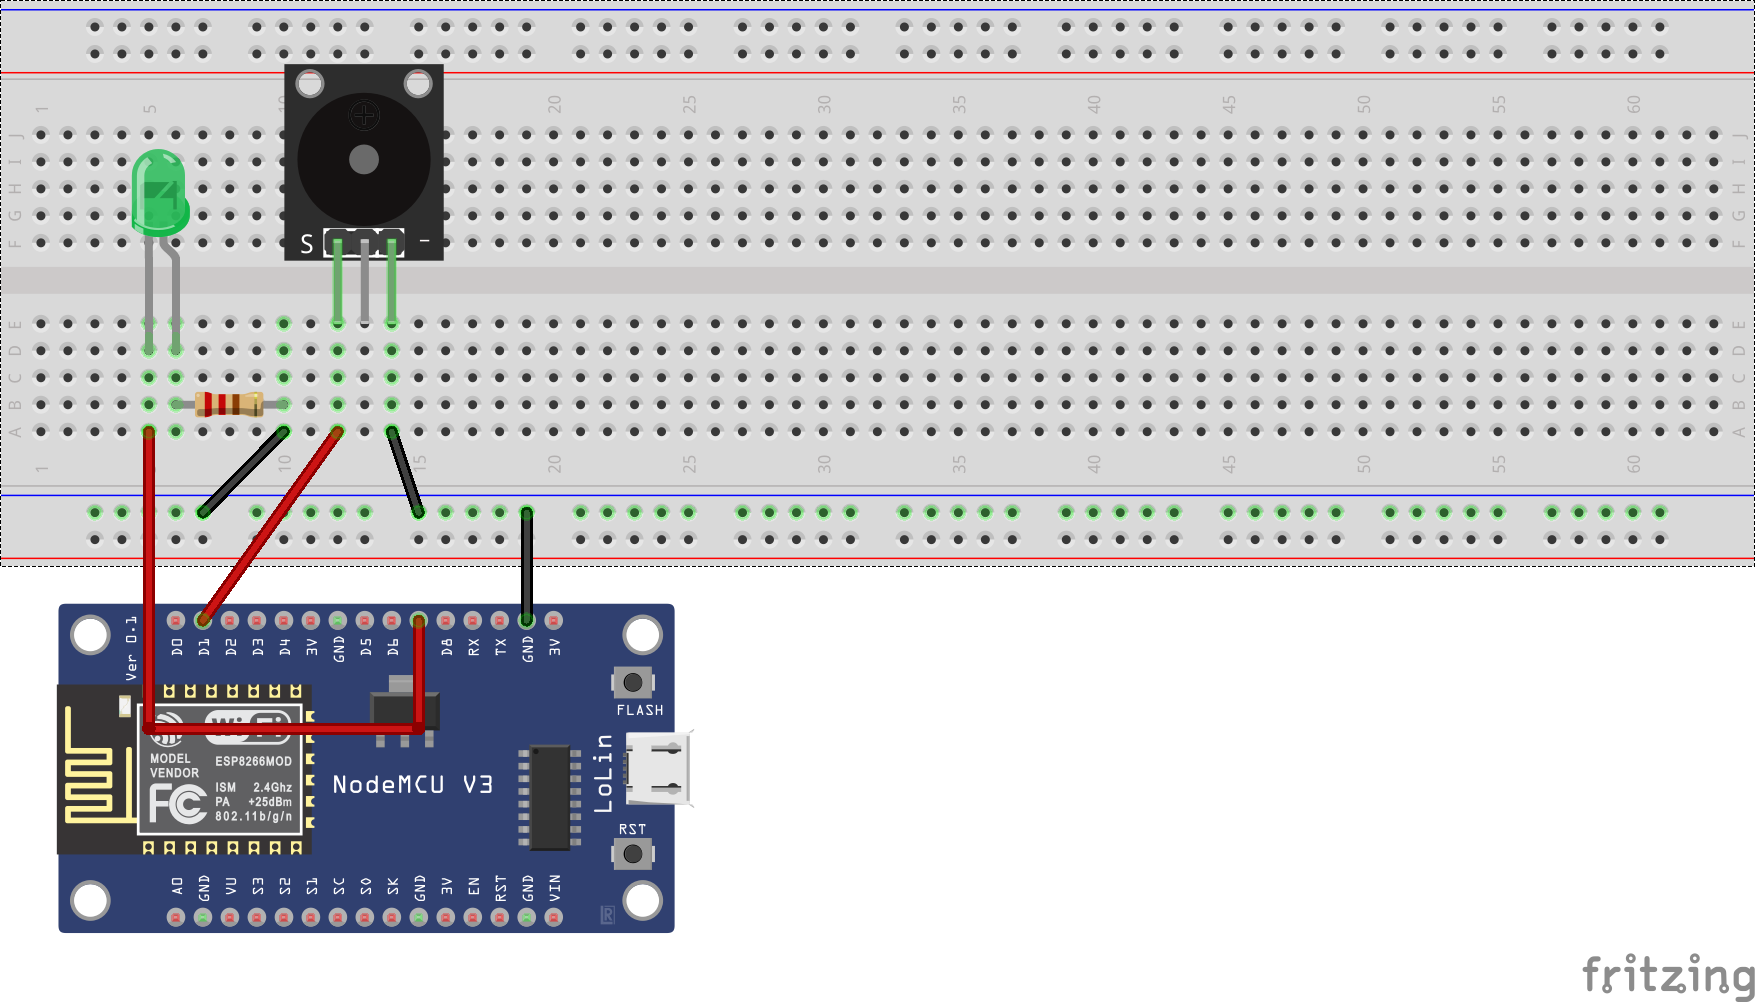
| NodeMCU ESP8266 | Components |
|---|---|
| D1 | Passive Buzzer Signal Pin |
| D7 | LED Anode |
| GND | Breadboard GND Rail |
Note: Add a 220 ohm Current Limiting resistor to the LED and make sure to ground both the buzzer and led to the breadboard rail.
Code
The code for this project is in my github account and is shown below.
#include <ESP8266WiFi.h>
#include <ESP8266WebServer.h>


/********** PLEASE CHANGE THIS *************************/
const char* ssid     = "<ENTER YOUR WIFI SSID>";
const char* password = "<ENTER YOUR PASSWORD>";

ESP8266WebServer server(80);

uint8_t LEDPin = D7;
bool LEDStatus = LOW;

uint8_t buzzerPin = D1;
bool buzzerStatus = LOW;

void setup() {
  Serial.begin(115200);
  pinMode(LEDPin, OUTPUT);
  pinMode(buzzerPin, OUTPUT);

  Serial.println("Connecting to ");
  Serial.println(ssid);

  //connect to your local wi-fi network
  WiFi.begin(ssid, password);

  //check wi-fi is connected to wi-fi network
  while (WiFi.status() != WL_CONNECTED) {
    delay(1000);
    Serial.print(".");
  }
  Serial.println("");
  Serial.println("WiFi connected..!");
  Serial.print("Got IP: ");  Serial.println(WiFi.localIP());

  server.on("/", handleRoot);
  server.on("/toggleLED", updateLED);
  server.on("/toggleBuzzer", updateBuzzerSound);
  server.onNotFound(handleNotFound);

  server.begin();
  Serial.println("HTTP server started");
}
void loop() {
  server.handleClient();
}

void handleRoot() {
  server.send(200, "text/html", prepareHTML());
}

void updateLED() {
  Serial.println("Updating LED Status....");
  LEDStatus = !LEDStatus;
  digitalWrite(LEDPin, LEDStatus);
  server.send(200, "text/html", prepareHTML());
}

void updateBuzzerSound() {
  Serial.println("Updating Buzzer Status....");
  buzzerStatus = !buzzerStatus;
  if (buzzerStatus)
    tone(buzzerPin, 1200);
  else
    noTone(buzzerPin);

  server.send(200, "text/html", prepareHTML());
}

void handleNotFound() {
  server.send(404, "text/plain", "Not found");
}

String prepareHTML() {
  String html  = "<!DOCTYPE html>"
                 "<html>"
                 "<head>"
                 "<meta charset=\"UTF-8\">"
                 "<meta name=\"viewport\" content=\"width=device-width, initial-scale=1\">"
                 "<title>NodeMCU ESP8266 Web Server</title>"
                 "<style>"
                 "/* Copyright 2014 Owen Versteeg; MIT licensed */body,textarea,input,select{background:0;border-radius:0;font:16px sans-serif;margin:0}.smooth{transition:all .2s}.btn,.nav a{text-decoration:none}.container{margin:0 20px;width:auto}label>*{display:inline}form>*{display:block;margin-bottom:10px}.btn{background:#999;border-radius:6px;border:0;color:#fff;cursor:pointer;display:inline-block;margin:2px 0;padding:12px 30px 14px}.btn:hover{background:#888}.btn:active,.btn:focus{background:#777}.btn-a{background:#0ae}.btn-a:hover{background:#09d}.btn-a:active,.btn-a:focus{background:#08b}.btn-b{background:#3c5}.btn-b:hover{background:#2b4}.btn-b:active,.btn-b:focus{background:#2a4}.btn-c{background:#d33}.btn-c:hover{background:#c22}.btn-c:active,.btn-c:focus{background:#b22}.btn-sm{border-radius:4px;padding:10px 14px 11px}.row{margin:1% 0;overflow:auto}.col{float:left}.table,.c12{width:100%}.c11{width:91.66%}.c10{width:83.33%}.c9{width:75%}.c8{width:66.66%}.c7{width:58.33%}.c6{width:50%}.c5{width:41.66%}.c4{width:33.33%}.c3{width:25%}.c2{width:16.66%}.c1{width:8.33%}h1{font-size:3em}.btn,h2{font-size:2em}.ico{font:33px Arial Unicode MS,Lucida Sans Unicode}.addon,.btn-sm,.nav,textarea,input,select{outline:0;font-size:14px}textarea,input,select{padding:8px;border:1px solid #ccc}textarea:focus,input:focus,select:focus{border-color:#5ab}textarea,input[type=text]{-webkit-appearance:none;width:13em}.addon{padding:8px 12px;box-shadow:0 0 0 1px #ccc}.nav,.nav .current,.nav a:hover{background:#000;color:#fff}.nav{height:24px;padding:11px 0 15px}.nav a{color:#aaa;padding-right:1em;position:relative;top:-1px}.nav .pagename{font-size:22px;top:1px}.btn.btn-close{background:#000;float:right;font-size:25px;margin:-54px 7px;display:none}@media(min-width:1310px){.container{margin:auto;width:1270px}}@media(max-width:870px){.row .col{width:100%}}@media(max-width:500px){.btn.btn-close{display:block}.nav{overflow:hidden}.pagename{margin-top:-11px}.nav:active,.nav:focus{height:auto}.nav div:before{background:#000;border-bottom:10px double;border-top:3px solid;content:'';float:right;height:4px;position:relative;right:3px;top:14px;width:20px}.nav a{padding:.5em 0;display:block;width:50%}}.table th,.table td{padding:.5em;text-align:left}.table tbody>:nth-child(2n-1){background:#ddd}.msg{padding:1.5em;background:#def;border-left:5px solid #59d}"
                 ".hero {"
                 "background: #eee;"
                 "padding: 20px;"
                 "border-radius: 10px;"
                 "margin-top: 1em;"
                 "}"
                 ".hero h1 {"
                 "margin-top: 0;"
                 "margin-bottom: 0.3em;"
                 "}"
                 ".c4 {"
                 "padding: 10px;"
                 "box-sizing: border-box;"
                 "}"
                 ".c4 h3 {"
                 "margin-top: 0;"
                 "}"
                 ""
                 "// Code from https://proto.io/freebies/onoff/"
                 ".c4 a {"
                 "margin-top: 10px;"
                 "display: inline-block;"
                 "}"
                 ""
                 ".onoffswitch {"
                 "position: relative; width: 90px;"
                 "-webkit-user-select:none; -moz-user-select:none; -ms-user-select: none;"
                 "}"
                 ".onoffswitch-checkbox {"
                 "position: absolute;"
                 "opacity: 0;"
                 "pointer-events: none;"
                 "}"
                 ".onoffswitch-label {"
                 "display: block; overflow: hidden; cursor: pointer;"
                 "border: 2px solid #999999; border-radius: 20px;"
                 "}"
                 ".onoffswitch-inner {"
                 "display: block; width: 200%; margin-left: -100%;"
                 "transition: margin 0.3s ease-in 0s;"
                 "}"
                 ".onoffswitch-inner:before, .onoffswitch-inner:after {"
                 "display: block; float: left; width: 50%; height: 30px; padding: 0; line-height: 30px;"
                 "font-size: 14px; color: white; font-family: Trebuchet, Arial, sans-serif; font-weight: bold;"
                 "box-sizing: border-box;"
                 "}"
                 ".onoffswitch-inner:before {"
                 "content: \"ON\";"
                 "padding-left: 10px;"
                 "background-color: #34A7C1; color: #FFFFFF;"
                 "}"
                 ".onoffswitch-inner:after {"
                 "content: \"OFF\";"
                 "padding-right: 10px;"
                 "background-color: #EEEEEE; color: #999999;"
                 "text-align: right;"
                 "}"
                 ".onoffswitch-switch {"
                 "display: block; width: 18px; margin: 6px;"
                 "background: #FFFFFF;"
                 "position: absolute; top: 0; bottom: 0;"
                 "right: 56px;"
                 "border: 2px solid #999999; border-radius: 20px;"
                 "transition: all 0.3s ease-in 0s;"
                 "}"
                 ".onoffswitch-checkbox:checked + .onoffswitch-label .onoffswitch-inner {"
                 "margin-left: 0;"
                 "}"
                 ".onoffswitch-checkbox:checked + .onoffswitch-label .onoffswitch-switch {"
                 "right: 0px;"
                 "}"
                 ""
                 ".grid-container {"
                 "display: grid;"
                 "grid-template-columns: 1fr 1fr;"
                 "grid-gap: 20px;"
                 "}"
                 ""
                 ".flex-container {"
                 "display: flex;"
                 "margin-top: 40px;"
                 "}"
                 ".flex-child {"
                 "flex: 1;"
                 "//border: 2px solid yellow;"
                 "}"
                 ".flex-child:first-child {"
                 "margin-right: 20px;"
                 "}"
                 ""
                 ".component-label{"
                 "float: right;"
                 "font-weight: bold;"
                 "font-size: 25px;"
                 "}"
                 "</style>"
                 "</head>"
                 "<body>"
                 "<nav class=\"nav\" tabindex=\"-1\" onclick=\"this.focus()\">"
                 "<div class=\"container\">"
                 "<a class=\"pagename current\" href=\"#\">wwww.donskytech.com</a>"
                 "</div>"
                 "</nav>"
                 ""
                 "<div class=\"container\">"
                 "<div class=\"hero\">"
                 "<h1>NodeMCU ESP8266 Web Server</h1>"
                 "<div class=\"flex-container\">"
                 "  <div class=\"flex-child magenta\">"
                 "<span class=\"component-label\">LED</span>"
                 "  </div>"
                 "  <div class=\"flex-child green\">"
                 "<div class=\"grid-child green\">"
                 "<div style=\"display: inline\">"
                 "<div class=\"onoffswitch\">";
  if (LEDStatus)
    html = html + "<input type=\"checkbox\" name=\"onoffswitch\" class=\"onoffswitch-checkbox\" id=\"ledSwitch\" tabindex=\"0\" checked onclick=\"window.location.href='toggleLED'\">";
  else
    html = html + "<input type=\"checkbox\" name=\"onoffswitch\" class=\"onoffswitch-checkbox\" id=\"ledSwitch\" tabindex=\"0\" onclick=\"window.location.href='toggleLED'\">";

  html = html +
         "<label class=\"onoffswitch-label\" for=\"ledSwitch\">"
         "<span class=\"onoffswitch-inner\"></span>"
         "<span class=\"onoffswitch-switch\"></span>"
         "</label>"
         "</div>"
         "</div>"
         "</div>"
         "  </div>"
         "</div>"
         "<div class=\"flex-container\">"
         "  <div class=\"flex-child magenta\">"
         "<span class=\"component-label\">Buzzer</span>"
         "  </div>"
         "  <div class=\"flex-child green\">"
         "<div class=\"grid-child green\">"
         "<div style=\"display: inline\">"
         "<div class=\"onoffswitch\">";
  if (buzzerStatus)
    html = html + "<input type=\"checkbox\" name=\"onoffswitch\" class=\"onoffswitch-checkbox\" id=\"buzzerSwitch\" tabindex=\"0\" checked onclick=\"window.location.href='toggleBuzzer'\">";
  else
    html = html +     "<input type=\"checkbox\" name=\"onoffswitch\" class=\"onoffswitch-checkbox\" id=\"buzzerSwitch\" tabindex=\"0\" onclick=\"window.location.href='toggleBuzzer'\">";

  html = html +
         "<label class=\"onoffswitch-label\" for=\"buzzerSwitch\">"
         "<span class=\"onoffswitch-inner\"></span>"
         "<span class=\"onoffswitch-switch\"></span>"
         "</label>"
         "</div>"
         "</div>"
         "</div>"
         "  </div>"
         "</div>"
         "</div>"
         "</div>"
         "</body>"
         "</html>";

  return html;
}
Lets discuss the code line by line.
#include <ESP8266WiFi.h>
#include <ESP8266WebServer.h>


/********** PLEASE CHANGE THIS *************************/
const char* ssid     = "<ENTER YOUR WIFI SSID>";
const char* password = "<ENTER YOUR PASSWORD>";
The necessary header files are included. We are using the ESP8266 Core for Arduino in programming our NodeMCU. If you don’t know how this is done then please check out my other post on the steps on how to install this Add On. Please change the ssid and password to match your wifi setup.
ESP8266WebServer server(80);

uint8_t LEDPin = D7;
bool LEDStatus = LOW;

uint8_t buzzerPin = D1;
bool buzzerStatus = LOW;
We are making an ESP8266 NodeMCU Web Server here so we defined a server that that can handle one simultaneous client. For additional details please see the following link on the ESP8266 Arduino Core github project. We defined our LED Pin and Buzzer Pin and setup the status to be initially low for both components.
void setup() {
  Serial.begin(115200);
  pinMode(LEDPin, OUTPUT);
  pinMode(buzzerPin, OUTPUT);

  Serial.println("Connecting to ");
  Serial.println(ssid);

  //connect to your local wi-fi network
  WiFi.begin(ssid, password);

  //check wi-fi is connected to wi-fi network
  while (WiFi.status() != WL_CONNECTED) {
    delay(1000);
    Serial.print(".");
  }
  Serial.println("");
  Serial.println("WiFi connected..!");
  Serial.print("Got IP: ");  Serial.println(WiFi.localIP());

  server.on("/", handleRoot);
  server.on("/toggleLED", updateLED);
  server.on("/toggleBuzzer", updateBuzzerSound);
  server.onNotFound(handleNotFound);

  server.begin();
  Serial.println("HTTP server started");
}
We first setup our pin as both output and then we connect to our Wifi. After which we setup the url target for our web server. We defined three url links which we are going to use to access our web server. For each link we set a function that will be called once that url is requested.
- http://<IP>/ -> displays our root page
- http://<IP>/toggleLED -> toggles our LED values
- http://<IP>/toggleBuzzer -> toggles our buzzer on and off.
void loop() {
  server.handleClient();
}
The server waits for any GET request from our mobile phone. It only accepts one simultaneous client. Later we will create an article to make it more dynamic and handle more request.
void handleRoot() {
  server.send(200, "text/html", prepareHTML());
}

void updateLED() {
  Serial.println("Updating LED Status....");
  LEDStatus = !LEDStatus;
  digitalWrite(LEDPin, LEDStatus);
  server.send(200, "text/html", prepareHTML());
}

void updateBuzzerSound() {
  Serial.println("Updating Buzzer Status....");
  buzzerStatus = !buzzerStatus;
  if (buzzerStatus)
    tone(buzzerPin, 1200);
  else
    noTone(buzzerPin);

  server.send(200, "text/html", prepareHTML());
}

void handleNotFound() {
  server.send(404, "text/plain", "Not found");
}
The functions that are called when a specific url in our web server is called. Each function calls the prepareHTML() method which renders back an HTML markup.
The handleRoot functions creates the initial html and is shown when client calls our default web server IP address and port.
The updateLED is called when we slide the LED toggle button. It sets the output of the LED to either HIGH or LOW
The updateBuzzerSound is called when we slide the Buzzer toggle button. It calls the tone and noTone function to control the passive buzzer.
The handleNotFound is called when a url is hit that is not equal to our root page, toggleLED or toggleBuzzer and just returns a text message in our browser.
String prepareHTML() {
  String html  = "<!DOCTYPE html>"
                 "<html>"
                 "<head>"
                 "<meta charset=\"UTF-8\">"
                 "<meta name=\"viewport\" content=\"width=device-width, initial-scale=1\">"
                 "<title>NodeMCU ESP8266 Web Server</title>"
.
.
.
The function prepareHTML() is the interesting part as this is where we create our html page and use Cascading Style Sheet (css) and Javascript to create the user interface. If you want to take a look at the raw code then please click this link. I used the mincss framework to style our page so that it might look good in our mobile phone. To create the sliding toggle button I used the https://proto.io/freebies/onoff/ which is kind a nice of an html user interface using pure CSS. All rights belongs to them for coming up with such nice tools and html UI. No copyright infringement intended as I googled for this!
The interesting part in this function is in this lines.
if (LEDStatus)
    html = html + "<input type=\"checkbox\" name=\"onoffswitch\" class=\"onoffswitch-checkbox\" id=\"ledSwitch\" tabindex=\"0\" checked onclick=\"window.location.href='toggleLED'\">";
  else
    html = html + "<input type=\"checkbox\" name=\"onoffswitch\" class=\"onoffswitch-checkbox\" id=\"ledSwitch\" tabindex=\"0\" onclick=\"window.location.href='toggleLED'\">";

if (buzzerStatus)
    html = html + "<input type=\"checkbox\" name=\"onoffswitch\" class=\"onoffswitch-checkbox\" id=\"buzzerSwitch\" tabindex=\"0\" checked onclick=\"window.location.href='toggleBuzzer'\">";
  else
    html = html +     "<input type=\"checkbox\" name=\"onoffswitch\" class=\"onoffswitch-checkbox\" id=\"buzzerSwitch\" tabindex=\"0\" onclick=\"window.location.href='toggleBuzzer'\">";
Notice the “checked” attribute. When this attribute is present then it means that the toggle slider button is ON else it is OFF.
We added an “onclick” attribute and used javascript to issue a GET request to our predefined toggleLED and toggleBuzzer url endpoint.
Future Improvements
We are able to control our electronic components using our mobile phone if you follow the steps in this post. However, you would notice sometimes that our browser “flickers” when we click the toggle buttons for both the led and the buzzer. That is because the page is actually refreshing and you are beind redirected to a new url. To know how to fix this then read the next article on how we can use AJAX and Javascript so that no page refresh is happening.
Thats It!
Happy Exploring!
Leave a Reply