Introduction
Our Microcontrollers Units (MCU) especially the ESP8266 and ESP32 modules are capable of hoisting their own Webserver which you can use in your Internet of Things (IoT) projects. In this post, we will be creating our own ESP8266 Webserver using the LittleFS Filesystem that will serve web content to the calling client. I will show you how easy and simple your code will be by using the LittleFS in your program.
This post is the 2nd part of my ESP8266 LittleFS Tutorial Series where we try to explore the use cases in which knowledge of this feature will greatly help your project.
- Part 1 – ESP8266 LittleFS Tutorial Series – Overview
- Part 2 – ESP8266 LittleFS Tutorial Series – Using LittleFS to serve web content in ESP8266 Webserver
- Part 3 – ESP8266 LittleFS Tutorial Series – Using LittleFS to save configurations in ESP8266
If you don’t have an idea of what LittleFS or SPIFFS Filesystem is then please read through Part 1 of this series.
Prerequisites
We will only need the following components in this project to follow along.
- ESP8266 (I used NodeMCU ESP12E) – Amazon | AliExpress | Bangood
- Breadboard – Amazon | AliExpress | Bangood
- Connecting Wires – Amazon | AliExpress | Bangood
Disclosure: These are affiliate links and I will earn small commissions to support my site when you buy through these links.
I used Visual Studio Code with the PlatformIO extension installed in developing this project. If you are in Windows and have not yet installed Visual Studio Code then you can check my post about how to Install Visual Studio Code or VSCode in Windows. If you are not familiar with PlatformIO then please read this PlatformIO Tutorial for Arduino Development where I detailed how to get started with development using the PlatformIO IDE extension
I am using the mincss stylesheet in this program so that it would render better on a mobile phone. When you see the file entireframework.min.css then it refers to the mincss. You can take a look at the example there to know more about this awesome small library.
What we are building?
We are building our own ESP8266 Webserver that will turn on or off the onboard LED of our NodeMCU ESP8266 using our mobile phone. To do this, we will be creating our own NodeMCU ESP8266 Webserver using LittleFS Filesystem.
We will first explore creating a Webserver without using LittleFS and point out the issues then we will show how using LittleFS (or SPIFFS) will solve those issues.
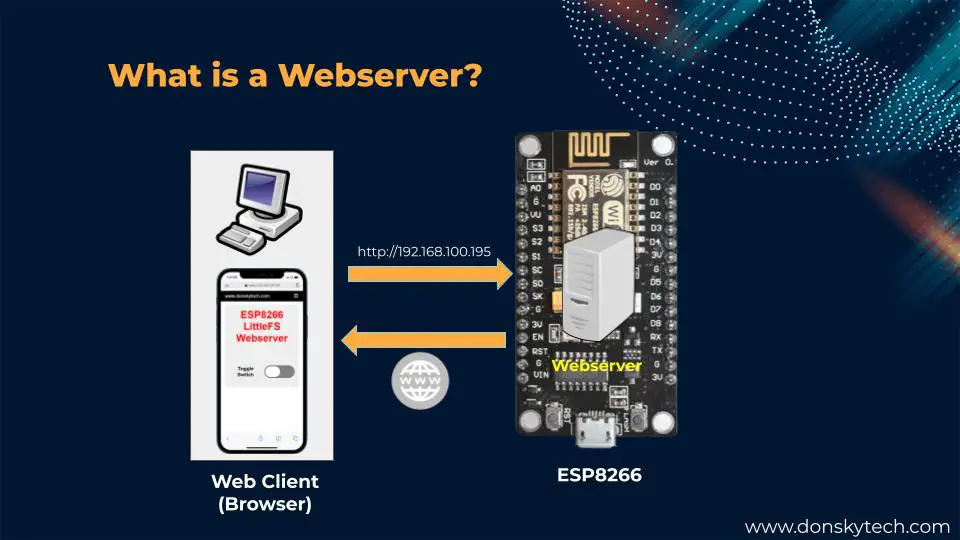
What is a Webserver?
A Webserver is both hardware and software that responds to client requests using HTTP (Hypertext Transfer Protocol). In our case below, a Web server serves a webpage whenever a client like a web browser on your laptop or your mobile phone types in the address of the Webserver.
The NodeMCU ESP8266 is capable of running a Webserver and at the same time controls sensors connected through it by responding to requests coming from our webpage.
ESP8266 Webserver – No LittleFS/SPIFFS
The following is the code for our ESP8266 Webserver with no Filesystem like LittleFS or SPIFFS involved. This is the only code in our project that powers our project and it includes the Webserver code and the logic to turn on the built-in LED.
The code for my project is available on my GitHub page which you can access from here. Let’s go over the code for you to understand.
/*
  Title:  ESP8266 Webserver - No Filesystem
  Description:  An ESP8266 webserver that hardcodes all web content and not using any file system
  Author: donsky
  For:    www.donskytech.com
  Date:   September 14, 2022
*/

#include <Arduino.h>
#ifdef ESP32
#include <WiFi.h>
#include <AsyncTCP.h>
#elif defined(ESP8266)
#include <ESP8266WiFi.h>
#include <ESPAsyncTCP.h>
#endif
#include <ESPAsyncWebServer.h>

/*
  Replace the SSID and Password according to your wifi
*/
const char *ssid = "<REPLACE_WITH_YOUR_WIFI_SSID>";
const char *password = "<REPLACE_WITH_YOUR_WIFI_PASSWORD>";

// Webserver
AsyncWebServer server(80);

String PARAM_MESSAGE = "status";

const int LED_PIN = LED_BUILTIN;

void notFound(AsyncWebServerRequest *request)
{
  request->send(404, "text/plain", "Not found");
}

// Prepare the HTML String
String prepareHTML()
{
  return "<!DOCTYPE html>"
         "<html>"
         "  <head>"
         "    <meta charset=\"UTF-8\" />"
         "    <meta name=\"viewport\" content=\"width=device-width, initial-scale=1\" />"
         "    <title>ESP8266 LittleFS Webserver</title>"
         "    <link rel=\"stylesheet\" href=\"index.css\" />"
         "    <link rel=\"stylesheet\" href=\"entireframework.min.css\" />"
         "    <script src=\"index.js\"></script>"
         "  </head>"
         "  <body>"
         "    <nav class=\"nav\" tabindex=\"-1\" onclick=\"this.focus()\">"
         "      <div class=\"container\">"
         "        <a class=\"pagename current\" href=\"#\">www.donskytech.com</a>"
         "        <a href=\"#\">One</a>"
         "        <a href=\"#\">Two</a>"
         "        <a href=\"#\">Three</a>"
         "      </div>"
         "    </nav>"
         ""
         "    <div class=\"container\">"
         "      <div class=\"hero\">"
         "        <h1 class=\"title\">ESP8266 LittleFS Webserver</h1>"
         "        <div class=\"toggle-div\">"
         "            <p class=\"label\">Toggle Switch</p>"
         "            <input type=\"checkbox\" id=\"switch\" onclick=\"toggleButtonSwitch()\"/><label for=\"switch\">Toggle</label>"
         "        </div>"
         "      </div>"
         "    </div>"
         "  </body>"
         "</html>";
}

// Prepare the index.css
String prepareIndexCSS()
{
  return "/******** mincss **********/"
         ".hero {"
         "    background: #eee;"
         "    padding: 20px;"
         "    border-radius: 10px;"
         "    margin-top: 1em;"
         "    text-align: center;"
         "}"
         ".hero h1 {"
         "    margin-top: 0;"
         "    margin-bottom: 0.3em;"
         "    color: red;"
         "}"
         "/****** Custom toggle Switch**********/"
         "/* https://codepen.io/alvarotrigo/pen/abVPyaJ */"
         "/*********************/"
         ".toggle-div{"
         "    display: flex;"
         "    justify-content: center;"
         "    align-items: center;"
         "    margin-top: 5em;"
         "}"
         ".label{"
         "    font-size: 1.5em;"
         "    font-weight: bolder;"
         "    margin-right: 0.5em;"
         "    /* color: blue */"
         "}"
         "/* Styles for the toggle switch */"
         "input[type=checkbox] {"
         "    height: 0;"
         "    width: 0;"
         "    visibility: hidden;"
         "  }"
         "  "
         "  label {"
         "    cursor: pointer;"
         "    text-indent: -9999px;"
         "    width: 150px;"
         "    height: 60px;"
         "    background: grey;"
         "    display: block;"
         "    border-radius: 100px;"
         "    position: relative;"
         "  }"
         "  "
         "  label:after {"
         "    content: \"\";"
         "    position: absolute;"
         "    top: 5px;"
         "    left: 5px;"
         "    width: 70px;"
         "    height: 50px;"
         "    background: #fff;"
         "    border-radius: 90px;"
         "    transition: 0.3s;"
         "  }"
         "  "
         "  input:checked + label {"
         "    background: #bada55;"
         "  }"
         "  "
         "  input:checked + label:after {"
         "    left: calc(100% - 5px);"
         "    transform: translateX(-100%);"
         "  }"
         "  "
         "  label:active:after {"
         "    width: 130px;"
         "  }";
}

// Prepare the entireframework.min.css
String prepareIndexMinCSS()
{
  return "/* Copyright 2014 Owen Versteeg; MIT licensed */body,textarea,input,select{background:0;border-radius:0;font:16px sans-serif;margin:0}.smooth{transition:all .2s}.btn,.nav a{text-decoration:none}.container{margin:0 20px;width:auto}label>*{display:inline}form>*{display:block;margin-bottom:10px}.btn{background:#999;border-radius:6px;border:0;color:#fff;cursor:pointer;display:inline-block;margin:2px 0;padding:12px 30px 14px}.btn:hover{background:#888}.btn:active,.btn:focus{background:#777}.btn-a{background:#0ae}.btn-a:hover{background:#09d}.btn-a:active,.btn-a:focus{background:#08b}.btn-b{background:#3c5}.btn-b:hover{background:#2b4}.btn-b:active,.btn-b:focus{background:#2a4}.btn-c{background:#d33}.btn-c:hover{background:#c22}.btn-c:active,.btn-c:focus{background:#b22}.btn-sm{border-radius:4px;padding:10px 14px 11px}.row{margin:1% 0;overflow:auto}.col{float:left}.table,.c12{width:100%}.c11{width:91.66%}.c10{width:83.33%}.c9{width:75%}.c8{width:66.66%}.c7{width:58.33%}.c6{width:50%}.c5{width:41.66%}.c4{width:33.33%}.c3{width:25%}.c2{width:16.66%}.c1{width:8.33%}h1{font-size:3em}.btn,h2{font-size:2em}.ico{font:33px Arial Unicode MS,Lucida Sans Unicode}.addon,.btn-sm,.nav,textarea,input,select{outline:0;font-size:14px}textarea,input,select{padding:8px;border:1px solid #ccc}textarea:focus,input:focus,select:focus{border-color:#5ab}textarea,input[type=text]{-webkit-appearance:none;width:13em}.addon{padding:8px 12px;box-shadow:0 0 0 1px #ccc}.nav,.nav .current,.nav a:hover{background:#000;color:#fff}.nav{height:24px;padding:11px 0 15px}.nav a{color:#aaa;padding-right:1em;position:relative;top:-1px}.nav .pagename{font-size:22px;top:1px}.btn.btn-close{background:#000;float:right;font-size:25px;margin:-54px 7px;display:none}@media(min-width:1310px){.container{margin:auto;width:1270px}}@media(max-width:870px){.row .col{width:100%}}@media(max-width:500px){.btn.btn-close{display:block}.nav{overflow:hidden}.pagename{margin-top:-11px}.nav:active,.nav:focus{height:auto}.nav div:before{background:#000;border-bottom:10px double;border-top:3px solid;content:'';float:right;height:4px;position:relative;right:3px;top:14px;width:20px}.nav a{padding:.5em 0;display:block;width:50%}}.table th,.table td{padding:.5em;text-align:left}.table tbody>:nth-child(2n-1){background:#ddd}.msg{padding:1.5em;background:#def;border-left:5px solid #59d}";
}

// Prepare the index.js
String prepareIndexJS()
{
  return "function toggleButtonSwitch(e) {"
         "  var switchButton = document.getElementById(\"switch\");"
         "  "
         "  var toggleValue = \"\";"
         "  if (switchButton.checked) {"
         "    console.log(\"On!\");"
         "    toggleValue = \"ON\";"
         "  } else {"
         "    console.log(\"Off!\");"
         "    toggleValue = \"OFF\""
         "  }"
         "  fetch( `/toggle?status=${toggleValue}`)"
         "  .then( response => {"
         "    console.log(response);"
         "  } )"
         "}";
}

void toggleLED(String status)
{
  if (status == "ON")
    digitalWrite(LED_PIN, LOW);
  else
    digitalWrite(LED_PIN, HIGH);
}

void setup()
{

  Serial.begin(115200);

  // Connect to WIFI
  WiFi.mode(WIFI_STA);
  WiFi.begin(ssid, password);
  if (WiFi.waitForConnectResult() != WL_CONNECTED)
  {
    Serial.printf("WiFi Failed!\n");
    return;
  }

  Serial.print("IP Address: ");
  Serial.println(WiFi.localIP());

  // LED PIN
  pinMode(LED_PIN, OUTPUT);
  digitalWrite(LED_PIN, HIGH);

  // Route for root index.html
  server.on("/", HTTP_GET, [](AsyncWebServerRequest *request)
            { request->send(200, "text/html", prepareHTML()); });

  server.on("/index.css", HTTP_GET, [](AsyncWebServerRequest *request)
            { request->send(200, "text/css", prepareIndexCSS()); });

  server.on("/entireframework.min.css", HTTP_GET, [](AsyncWebServerRequest *request)
            { request->send(200, "text/css", prepareIndexMinCSS()); });

  server.on("/index.js", HTTP_GET, [](AsyncWebServerRequest *request)
            { request->send(200, "text/javascript", prepareIndexJS()); });

  // Respond to toggle event
  server.on("/toggle", HTTP_GET, [](AsyncWebServerRequest *request)
            {
        String status;
        if (request->hasParam(PARAM_MESSAGE)) {
            status = request->getParam(PARAM_MESSAGE)->value();
            if(status == "ON"){
              toggleLED("ON");
            }else{
              toggleLED("OFF");
            }
        } else {
            status = "No message sent";
        }
        request->send(200, "text/plain", "Turning Built In LED : " + status); });

  server.onNotFound(notFound);

  server.begin();
}

void loop()
{
}
#include <Arduino.h>
#ifdef ESP32
#include <WiFi.h>
#include <AsyncTCP.h>
#elif defined(ESP8266)
#include <ESP8266WiFi.h>
#include <ESPAsyncTCP.h>
#endif
#include <ESPAsyncWebServer.h>Include all the header files necessary to run this project.
/*
Replace the SSID and Password according to your wifi
*/
const char *ssid = "<REPLACE_WITH_YOUR_WIFI_SSID>";
const char *password = "<REPLACE_WITH_YOUR_WIFI_PASSWORD>";Replace this with your own Wi-Fi credentials.
// Webserver
AsyncWebServer server(80);
String PARAM_MESSAGE = "status";
const int LED_PIN = LED_BUILTIN;
void notFound(AsyncWebServerRequest *request)
{
request->send(404, "text/plain", "Not found");
}We define our Webserver here and our built in LED pin. We also define a notFound() function here that gets called when you request resources from our ESP8266 WebServer that is not present.
// Prepare the HTML String
String prepareHTML()
{
return "<!DOCTYPE html>"
.
. // More Code
}
// Prepare the index.css
String prepareIndexCSS()
{
return "/******** mincss **********/"
.
. // More Code
}
// Prepare the entireframework.min.css
String prepareIndexMinCSS()
{
return "/*
.
. // More Code
}
// Prepare the index.js
String prepareIndexJS()
{
.
. // More Code
}The functions prepareHTML(), prepareIndexCSS(), prepareIndexMinCSS() and the prepareIndexJS() returns a String representation of our web content. As you can see, we have coded our HTML, CSS (Cascading Stylesheets), and Javascript inside our Arduino Sketch. Yikes!
Isn’t this code very easy and lovely to read? You can imagine the nightmare of what will happen if we need to change this code.
void toggleLED(String status)
{
if (status == "ON")
digitalWrite(LED_PIN, LOW);
else
digitalWrite(LED_PIN, HIGH);
}Toggle the LED status by calling this function.
void setup()
{
Serial.begin(115200);
// Connect to WIFI
WiFi.mode(WIFI_STA);
WiFi.begin(ssid, password);
if (WiFi.waitForConnectResult() != WL_CONNECTED)
{
Serial.printf("WiFi Failed!\n");
return;
}
Serial.print("IP Address: ");
Serial.println(WiFi.localIP());
// LED PIN
pinMode(LED_PIN, OUTPUT);
digitalWrite(LED_PIN, HIGH);Initialize our Serial monitor baud rate then connect to our Wifi and then configure our LED pin.
// Route for root index.html
server.on("/", HTTP_GET, [](AsyncWebServerRequest *request)
{ request->send(200, "text/html", prepareHTML()); });
// Route for root index.css
server.on("/index.css", HTTP_GET, [](AsyncWebServerRequest *request)
{ request->send(200, "text/css", prepareIndexCSS()); });
// Route for root entireframework.min.css
server.on("/entireframework.min.css", HTTP_GET, [](AsyncWebServerRequest *request)
{ request->send(200, "text/css", prepareIndexMinCSS()); });
// Route for root index.js
server.on("/index.js", HTTP_GET, [](AsyncWebServerRequest *request)
{ request->send(200, "text/javascript", prepareIndexJS()); });
// Respond to toggle event
server.on("/toggle", HTTP_GET, [](AsyncWebServerRequest *request)
{
String status;
if (request->hasParam(PARAM_MESSAGE)) {
status = request->getParam(PARAM_MESSAGE)->value();
if(status == "ON"){
toggleLED("ON");
}else{
toggleLED("OFF");
}
} else {
status = "No message sent";
}
request->send(200, "text/plain", "Turning Built In LED : " + status); });
server.onNotFound(notFound);
server.begin();For every route or request from our browser, we respond here by using the code above. So for example,
- if the browser request for “/”, we respond by calling our
prepareHTML() - if the browser request for “/index.css”, we respond by calling our
prepareIndexCSS() - if the browser request for “/entireframework.min.css”, we respond by calling our
prepareIndexMinCSS() - if the browser request for “/index.js”, we respond by calling our
prepareIndexJS() - if the browser request for “/toggle”, then we extract the status if it will be on or off then we call the
toggleLED()function
We then start the Webserver by calling the server.begin();
Can you now see the problem? We are coding our HTML/CSS/Javascript inside our Arduino sketches then it would be hard to maintain later. Please see the following image for a better representation of what is happening.
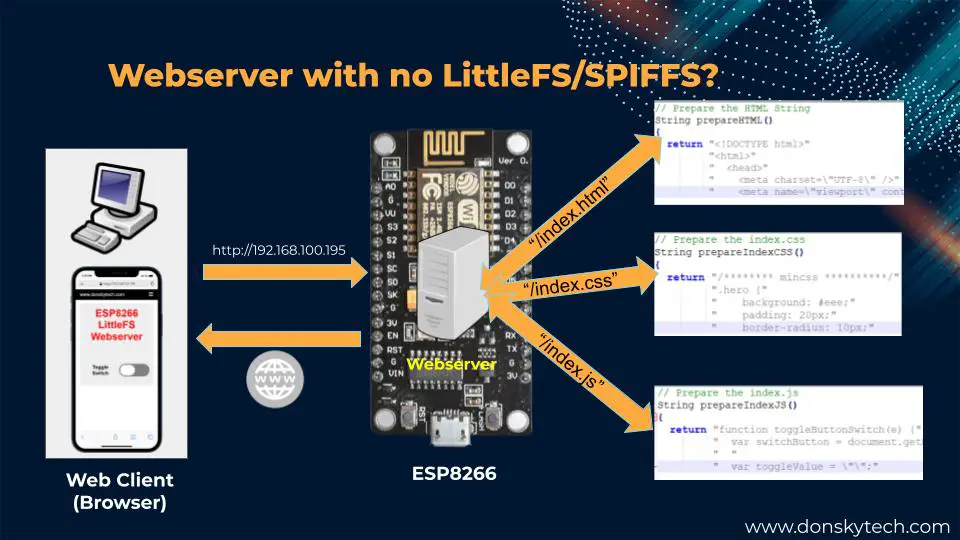
It would be hard to do it this way so we needed a way to work around this.
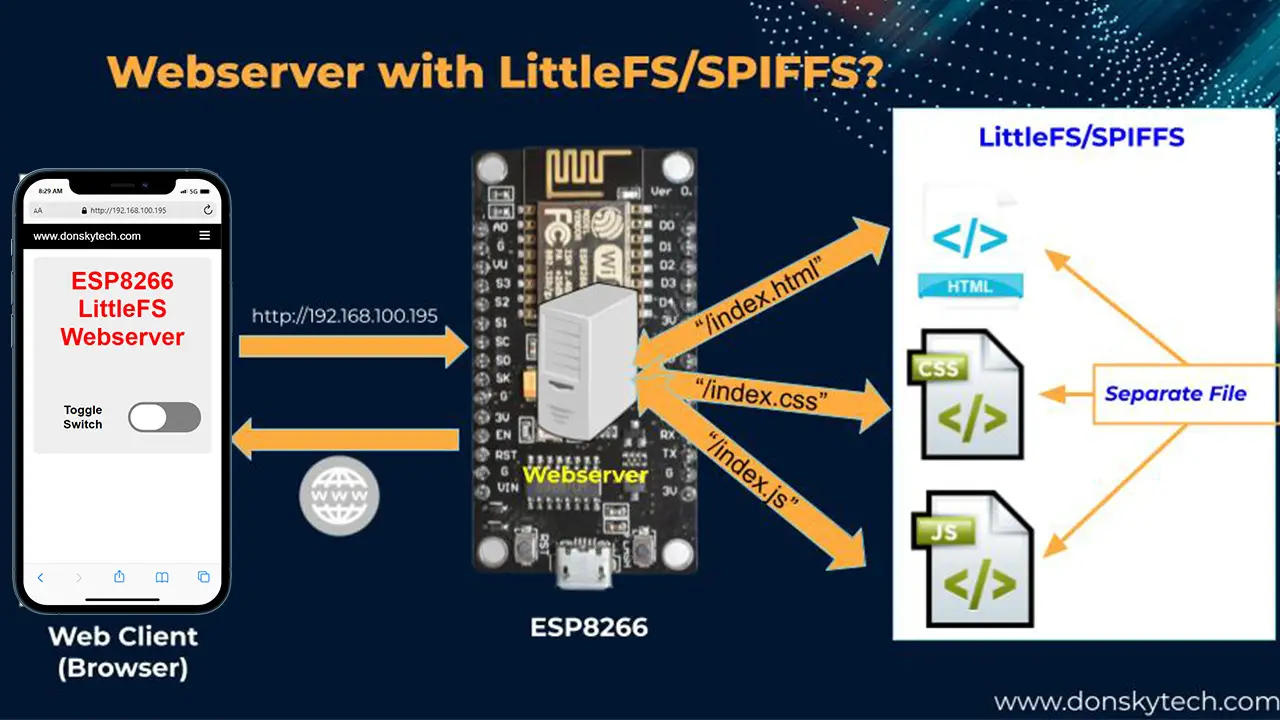
ESP8266 Webserver – Using LittleFS/SPIFFS
To work around the problem above we can leverage the power of LittleFS or SPIFFS. Let us look at the diagram below for you to see better.
We have separately coded our HTML/CSS/Javascript in separate files. After which, we upload those files into our LittleFS or SPIFFS filesystem. We are using LittleFS in this post.

The code for this is available on my Github page. We have created separate files for our web content so that it would be easier to make the changes.
- index.html
- index.css
- index.js
- entireframework.min.css

The data folder will then need to be uploaded to the NodeMCU ESP8266 Filesystem.
What changed in the code?
/*
Title: ESP8266 Webserver - No Filesystem
Description: An ESP8266 webserver that uses LittleFS to load web content
Author: donsky
For: www.donskytech.com
Date: September 14, 2022
*/
#include <Arduino.h>
#ifdef ESP32
#include <WiFi.h>
#include <AsyncTCP.h>
#elif defined(ESP8266)
#include <ESP8266WiFi.h>
#include <ESPAsyncTCP.h>
#endif
#include <ESPAsyncWebServer.h>
#include <LittleFS.h>
/*
  Replace the SSID and Password according to your wifi
*/
const char *ssid = "<REPLACE_WITH_YOUR_WIFI_SSID>";
const char *password = "<REPLACE_WITH_YOUR_WIFI_PASSWORD>";
// Webserver
AsyncWebServer server(80);

String PARAM_MESSAGE = "status";

const int LED_PIN = LED_BUILTIN;

void notFound(AsyncWebServerRequest *request)
{
  request->send(404, "text/plain", "Not found");
}
void toggleLED(String status)
{
  if (status == "ON")
    digitalWrite(LED_PIN, LOW);
  else
    digitalWrite(LED_PIN, HIGH);
}
void setup()
{
Serial.begin(115200);
Serial.println("Starting the LittleFS Webserver..");
  // Begin LittleFS
  if (!LittleFS.begin())
  {
    Serial.println("An Error has occurred while mounting LittleFS");
    return;
  }
// Connect to WIFI
WiFi.mode(WIFI_STA);
WiFi.begin(ssid, password);
if (WiFi.waitForConnectResult() != WL_CONNECTED)
{
Serial.printf("WiFi Failed!\n");
return;
}
Serial.print("IP Address: ");
Serial.println(WiFi.localIP());
// LED PIN
pinMode(LED_PIN, OUTPUT);
digitalWrite(LED_PIN, HIGH);
  // Route for root index.html
  server.on("/", HTTP_GET, [](AsyncWebServerRequest *request)
            { request->send(LittleFS, "/index.html", "text/html"); });

  // Route for root index.css
  server.on("/index.css", HTTP_GET, [](AsyncWebServerRequest *request)
            { request->send(LittleFS, "/index.css", "text/css"); });

  // Route for root entireframework.min.css
  server.on("/entireframework.min.css", HTTP_GET, [](AsyncWebServerRequest *request)
            { request->send(LittleFS, "/entireframework.min.css", "text/css"); });

  // Route for root index.js
  server.on("/index.js", HTTP_GET, [](AsyncWebServerRequest *request)
            { request->send(LittleFS, "/index.js", "text/javascript"); });
// Respond to toggle event
server.on("/toggle", HTTP_GET, [](AsyncWebServerRequest *request)
{
String status;
if (request->hasParam(PARAM_MESSAGE)) {
status = request->getParam(PARAM_MESSAGE)->value();
if(status == "ON"){
toggleLED("ON");
}else{
toggleLED("OFF");
}
} else {
status = "No message sent";
}
request->send(200, "text/plain", "Turning Built In LED : " + status); });
server.onNotFound(notFound);
server.begin();
}
void loop()
{
}It’s almost similar to the earlier code except that we are not coding the HTML/CSS/Javascript files inside our main.cpp.
#include <LittleFS.h>Import the header file for LittleFS.
// Begin LittleFS
if (!LittleFS.begin())
{
Serial.println("An Error has occurred while mounting LittleFS");
return;
}Start the LittleFS filesystem.
// Route for root index.html
server.on("/", HTTP_GET, [](AsyncWebServerRequest *request)
{ request->send(LittleFS, "/index.html", "text/html"); });
// Route for root index.css
server.on("/index.css", HTTP_GET, [](AsyncWebServerRequest *request)
{ request->send(LittleFS, "/index.css", "text/css"); });
// Route for root entireframework.min.css
server.on("/entireframework.min.css", HTTP_GET, [](AsyncWebServerRequest *request)
{ request->send(LittleFS, "/entireframework.min.css", "text/css"); });
// Route for root index.js
server.on("/index.js", HTTP_GET, [](AsyncWebServerRequest *request)
{ request->send(LittleFS, "/index.js", "text/javascript"); });We have removed all those functions that return a string (e.g. prepareHTML()). We are loading now the web contents (HTML/CSS/Javascript) from the LittleFS filesystem. Isn’t this much better than coding those long strings?
Once you understand the code start uploading it to the NodeMCU ESP8266 Filesystem.
Changes to platform.ini
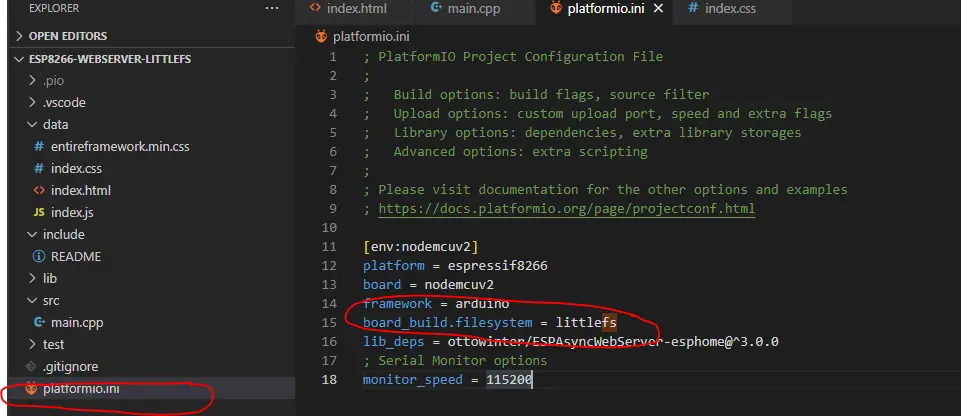
We need to set the platform.ini filesystem to use LittleFS.
Wrap up
I have discussed how to create your own NodeMCU ESP8266 Webserver using the LittleFS filesystem in this post. I have shown how using LittleFS in serving your web content such as HTML/CSS/Javascript would make your code readable and easier to maintain.
In the last part of this series, we will discuss how LittleFS could help you save configurations or settings in your IOT projects.
Stay Tuned! Happy Exploring!
Support Me!
I love sharing what I know and hopefully, I was able to help you. Writing helpful content takes so much time and research. If you think you like my work and I have managed to help you then please consider supporting my channel. I would be very grateful and would boost my confidence that what I am doing is making a big change in the world. (No Pun Intended!) 😉
Become a Patron!
Leave a Reply