- Introduction
- What are we building?
- Prerequisites
- Running the project
- Create a root project directory
- Bootstrap backend server
- Bootstrap frontend server
- Wrap up
Introduction
I am sharing with you the full-stack web application that I have created using the MongoDB-Express-React-Node (MERN) stack in this tutorial. In this post, I am creating a Students Radio Frequency Identification (RFID) Management system where we could execute a Create-Read-Update-Delete (CRUD) operation on our MongoDB database. I hope this tutorial would help you create your own application using the MERN technology stack as the use of Node.js and React greatly helps in the development process.
The steps outlined here are based on my research about using the MERN stack based on the available information on the internet so if you encounter any issues or see any room for improvement then just let me know. 🙂
What are we building?
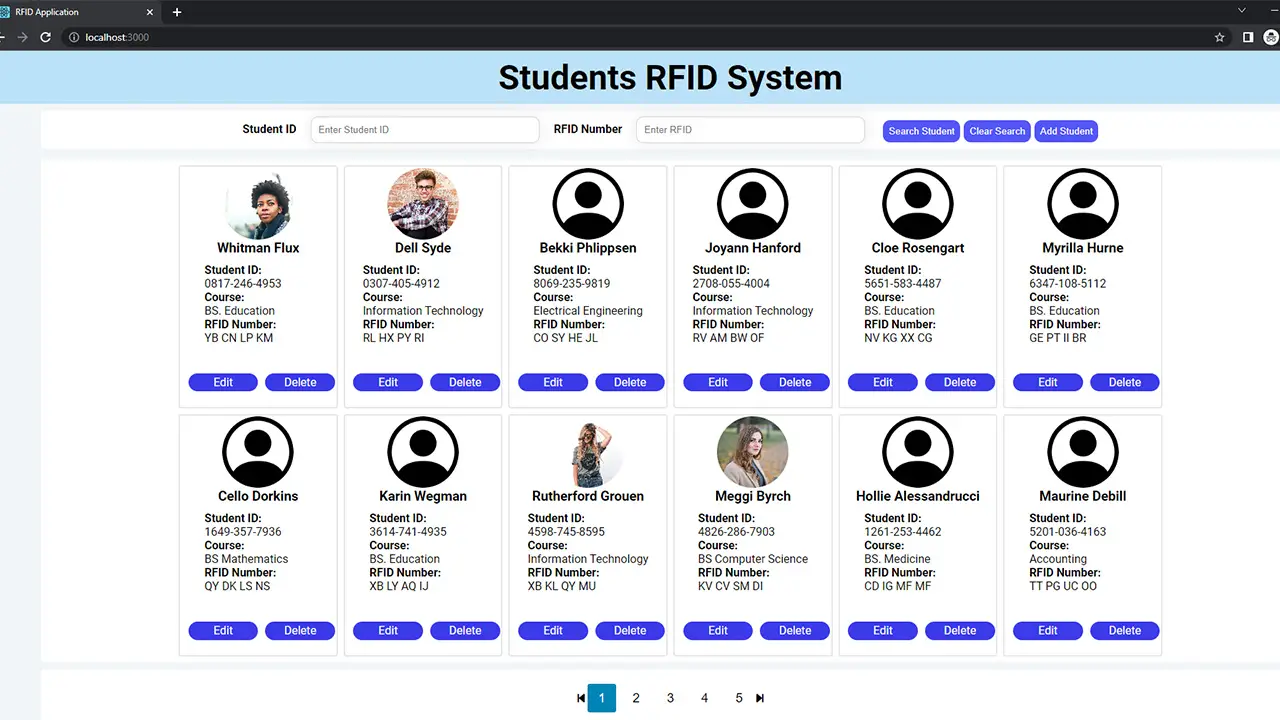
We are creating a full-stack web application that displays the Student’s information including their RFID tags. The Student information is displayed as “cards” rather than in table format and you can execute CRUD operations on it. Our Student information is stored in our MongoDB Atlas database and we are using the MERN stack in executing CRUD operation in this tutorial.
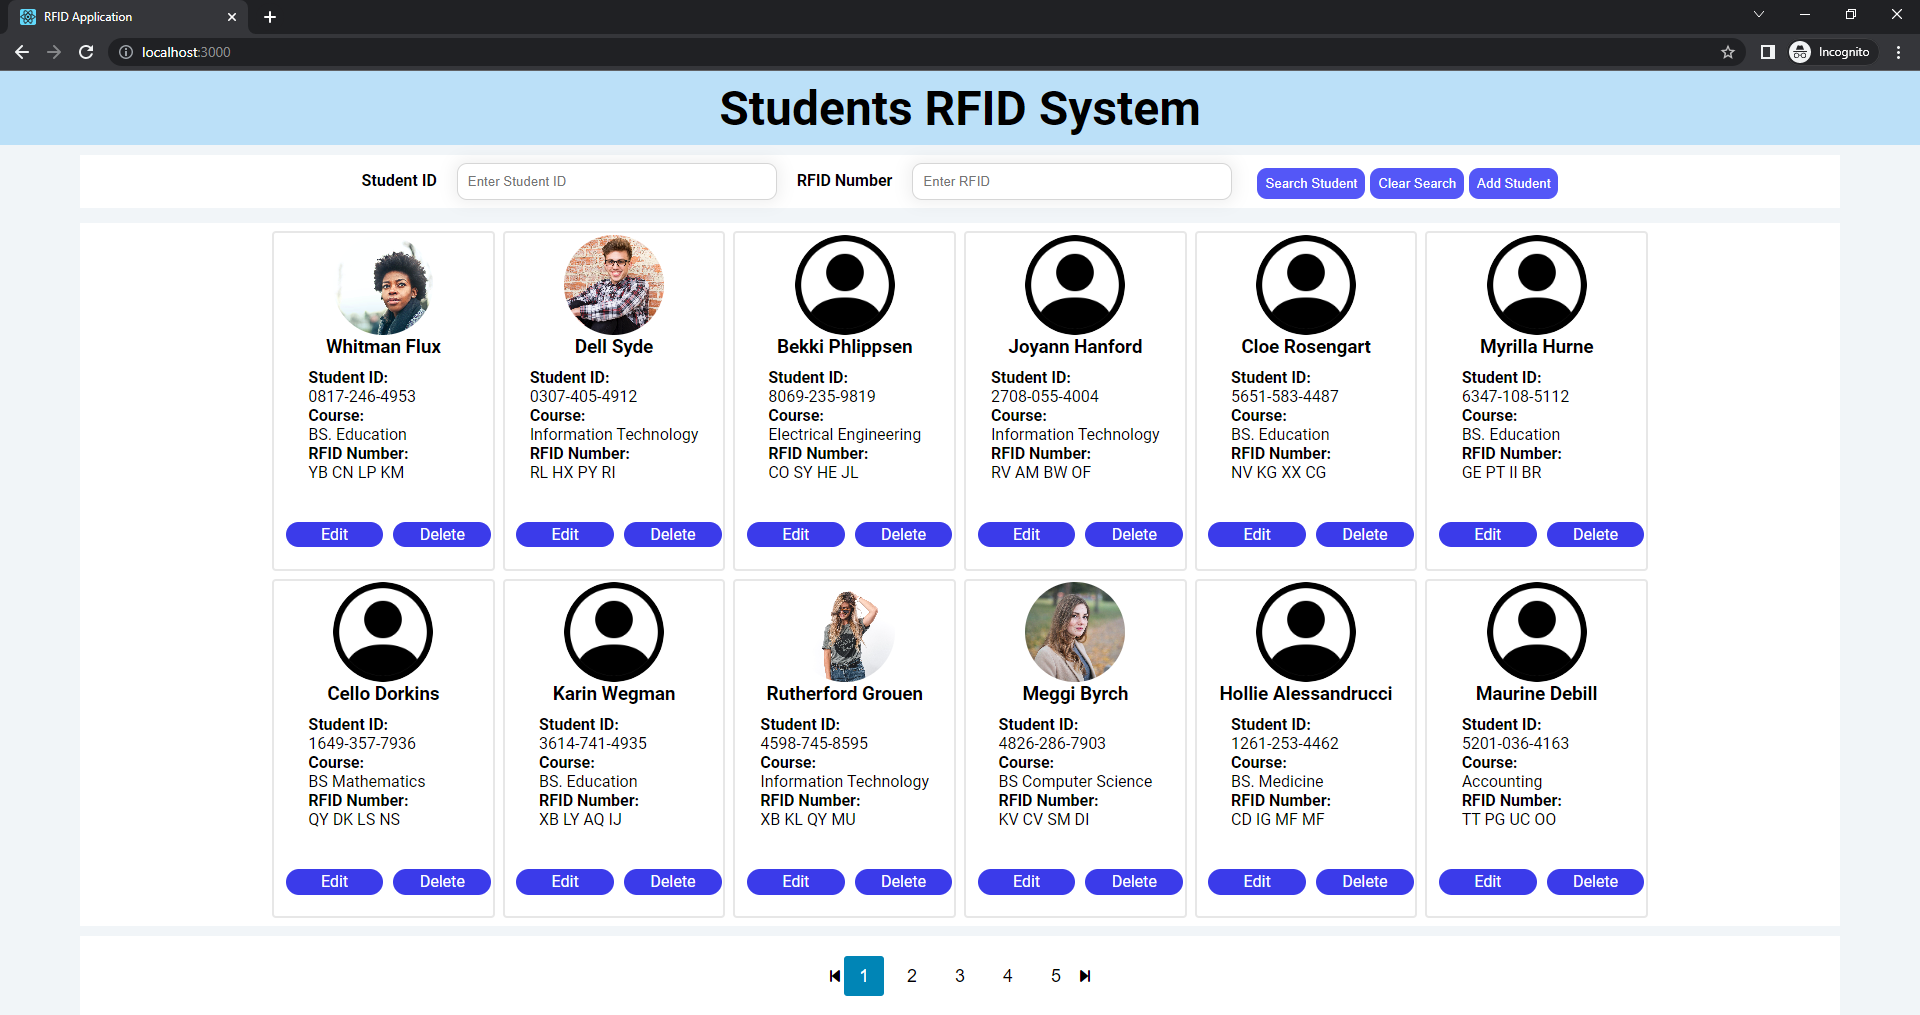
We are also able to upload our profile images and saved them in our images folder. Also, we can scan thru our list of students by using client-side pagination.
If you want to see this project in a demo video then please see below.
Prerequisites
You should have a working knowledge of the following technologies:
- Node.js
- React.js
- MongoDB
- Express
- HTML/CSS/Javascript
I used Visual Studio Code in developing this application and set up a free tier version of MongoDB Atlas to serve as my database. Visual Studio Code is an excellent IDE for any MERN Stack development and I have used it fully in this tutorial.
Also, you should have installed Node.js in your workstation.
Read Next:
Pico W -MicroPython MQTT – BMP/BME 280 Weather Station
Control DS18B20 using MicroPython with a Weather Station Project
Running the project
The code for this project is available for you to see in my GitHub repository. The steps on how to run it are in the README.md file. Follow everything there once you have set up your own MongoDB Atlas database cluster.
So that is all that is required and let us start building the project in this MERN Stack tutorial.
Create a root project directory
Create a directory where you would like to create your application
mkdir rfid-security-appcd into the project folder. This will serve as the root directory of our project where we will create the backend and frontend applications.
cd rfid-security-app/In this MERN stack tutorial, we will be programming the backend application and the frontend application separately.
Bootstrap backend server
We will first begin creating the backend server of our application using Node.js and Express. Several HTTP endpoints will be exposed in a REST interface format.
Setup the backend project
Create the directory where we will install our backend Node.js REST API Server
mkdir -p backend
cd backend
Initialize our backend folder using the command below. This will create the package.json files that will help us in maintaining our project.
npm init -yInstall the following dependencies that we are going to need.
npm install express mongoose dotenv multer cors path uuidCreate the index.js and add the following minimal code below. This will create an express server and start listening at port 5000.
const express = require("express");
const app = express();

app.listen("5000", () => {
  console.log("RFID backend API server is running.");
});
Run the project by executing the below command.
node index.jsOpen your browser and then type in “localhost:5000”

We now have our initial REST API Server running. How easy is that? We will improve this project as we go on.
Nodemon development setup
Nodemon is a tool that automatically restarts our development server whenever we change something in our files. This will help us a lot in the development phase as we don’t need to restart the server manually.
To install this package as a development dependency then execute the below command.
npm install nodemon --save-devEdit the package.json file and replace the scripts section with the following.
  "scripts": {
    "start": "nodemon index.js"
  },
Now start our REST API backend server by executing the below command.
npm startYou would see the following messages displayed on the console. Right now, whenever we do some changes to our project then our backend server will automatically restart to reflect our changes.
C:\git\rfid-security-app\backend>npm start

> backend@1.0.0 start C:\git\rfid-security-app\backend
> nodemon index.js

[nodemon] 2.0.20
[nodemon] to restart at any time, enter `rs`
[nodemon] watching path(s): *.*
[nodemon] watching extensions: js,mjs,json
[nodemon] starting `node index.js`
RFID backend API server is running.
Setup Middleware functions
Add cors support so that we could call our REST API from our frontend application.
const express = require("express");
const cors = require("cors");
const app = express();

//setup cors for our project
app.use(cors());

app.listen("5000", () => {
  console.log("RFID backend API server is running.");
});
We will also add serving static files from our server and to do that just add the following lines of code.
const express = require("express");
const cors = require("cors");
const path = require("path");

const app = express();
//setup cors for our project
app.use(cors());
//load static files
app.use("/images", express.static(path.join(__dirname, "/images")));

app.listen("5000", () => {
  console.log("RFID backend API server is running.");
});
We can now access our image files by typing this in our browser URL.
http://localhost:5000/images/defaultPic.pngNote: This file is not yet present in your project so this may result in an error when you put this in your browser. We will create this file later in the steps.
Connect to our MongoDB Atlas database
Before that, let’s first place our connection string in a “.env” so that it will not be included in our code and our GitHub repository. This connection string will be loaded thru the dotenv package. Create a .env file in the root of your project. Replace the username and password including the connection string to your MongoDB Atlas cluster.
MONGO_DB_URL=mongodb+srv://<USERNAME>:<PASSWORD>@iotdb.e5gtqlx.mongodb.net/rfiddb?retryWrites=true&w=majorityEdit your index.js and add the following lines of code.
const express = require("express");
const mongoose = require("mongoose");
const cors = require("cors");
const path = require("path");
const dotenv = require("dotenv");

const app = express();

//setup cors for our project
app.use(cors());
//load static files
app.use("/images", express.static(path.join(__dirname, "/images")));

//load the .env file
dotenv.config();
//parse the json request and put it in the req.body
app.use(express.json());

//connect to our mongodb atlas database
mongoose
  .connect(process.env.MONGO_DB_URL)

//start the server
app.listen("5000", () => {
  console.log("RFID backend API server is running.");
});
If no error is displayed in the Visual Studio Code terminal then it means that we were able to connect to our MongoDB Atlas cluster.
Setup our Mongoose Schema
Create a new folder called model and inside it create a new file called Student.js. Inside Student.js, we will create the schema of our project. This will represent the details of our students.
const mongoose = require("mongoose");

const StudentSchema = new mongoose.Schema({
    studentId: {
        type: String,
        required: true,
        unique: true
    },
    firstName: String,
    lastName: String,
    course: String,
    address: String,
    rfidBadgeNumber: {
        type: String,
        unique: true
    },
    imagePic: String
});


module.exports = mongoose.model("Student", StudentSchema);
Create routes for our project
We will set up next the routes needed for our application and to do that let us create a folder called routes and create a file student.js inside it.
The following are the REST API endpoints that we are going to need in our project.
| HTTP Method | HTTP Endpoint | Description |
|---|---|---|
| POST | http://localhost:5000/api/students | Create Student |
| GET | localhost:5000/api/students?rfid=123456&studentId=2022-01138 | Get all students list or get student by RFID badge number or studentId |
| GET | localhost:5000/api/students/:id | Get student by ObjectId |
| PUT | localhost:5000/api/students | Update student info |
| DELETE | localhost:5000/api/students | Delete student |
We will bootstrap our routes by listing first all the needed API routes.
const router = require("express").Router();
const Student = require("../model/Student")

// Create Student

// Get Student list or Search Student by rfid or studentid query parameters

// Get Student by ID

// Update Student

// Delete Student

module.exports = router;
Edit your index.js file also and load these routes.
const express = require("express");
const app = express();
const cors = require("cors");
const path = require("path");
const mongoose = require("mongoose");
const dotenv = require("dotenv");
const studentRoute = require("./routes/students");

//setup cors for our project
app.use(cors());
//load static files
app.use("/images", express.static(path.join(__dirname, "/images")));

//load the .env file
dotenv.config();
//parse the json request and put it in the req.body
app.use(express.json());

//connect to our mongodb atlas database
mongoose
  .connect(process.env.MONGO_DB_URL)

//load our rest api routes
app.use("/api/students", studentRoute);

//start the server
app.listen("5000", () => {
  console.log("RFID backend API server is running.");
});
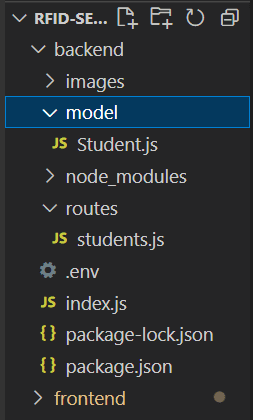
Create also the images folder where we will place the profile images of our Students. At the end of this step, your backend project should now look like the following.
Create a Student
In order for us to handle the profile image upload of our students then we will be using multer package to handle the “multipart/form-data” upload. Add the following lines of code in your student.js route. I have commented on each line for your reference.
const router = require("express").Router();
const Student = require("../model/Student");
const multer = require("multer");
const path = require("path");
const { v4: uuidv4 } = require("uuid");
const fs = require('fs');

// Upload profile image directory
const IMAGE_DIR = "./images/";

// set multer disk storage
const storage = multer.diskStorage({
  destination: (req, file, cb) => {
    cb(null, IMAGE_DIR);
  },
  filename: (req, file, cb) => {
    //generate random uuid
    const fileName = uuidv4() + path.extname(file.originalname);
    cb(null, fileName);
  },
});

// Limit file upload only to images
const upload = multer({
  storage: storage,
  fileFilter: (req, file, cb) => {
    if (
      file.mimetype == "image/png" ||
      file.mimetype == "image/jpg" ||
      file.mimetype == "image/jpeg"
    ) {
      cb(null, true);
    } else {
      cb(null, false);
      return cb(new Error("Only .png, .jpg and .jpeg format is allowed!"));
    }
  },
});

// Create Student
router.post("/", upload.single("file"), async (req, res) => {
  const newStudent = new Student(req.body);
  try {
    // save the generated filename in our MongoDB Atlas database
    newStudent.imagePic = req.file.path;
    const savedStudent = await newStudent.save();
    res.status(200).json(savedStudent);
  } catch (error) {
    res.status(500).json({ error: error });
  }
});
Test: Create a Student
We will use the Postman application in testing our REST API Endpoints.
Related Content:
Install Postman Windows
Open your Postman application and place the following entries.

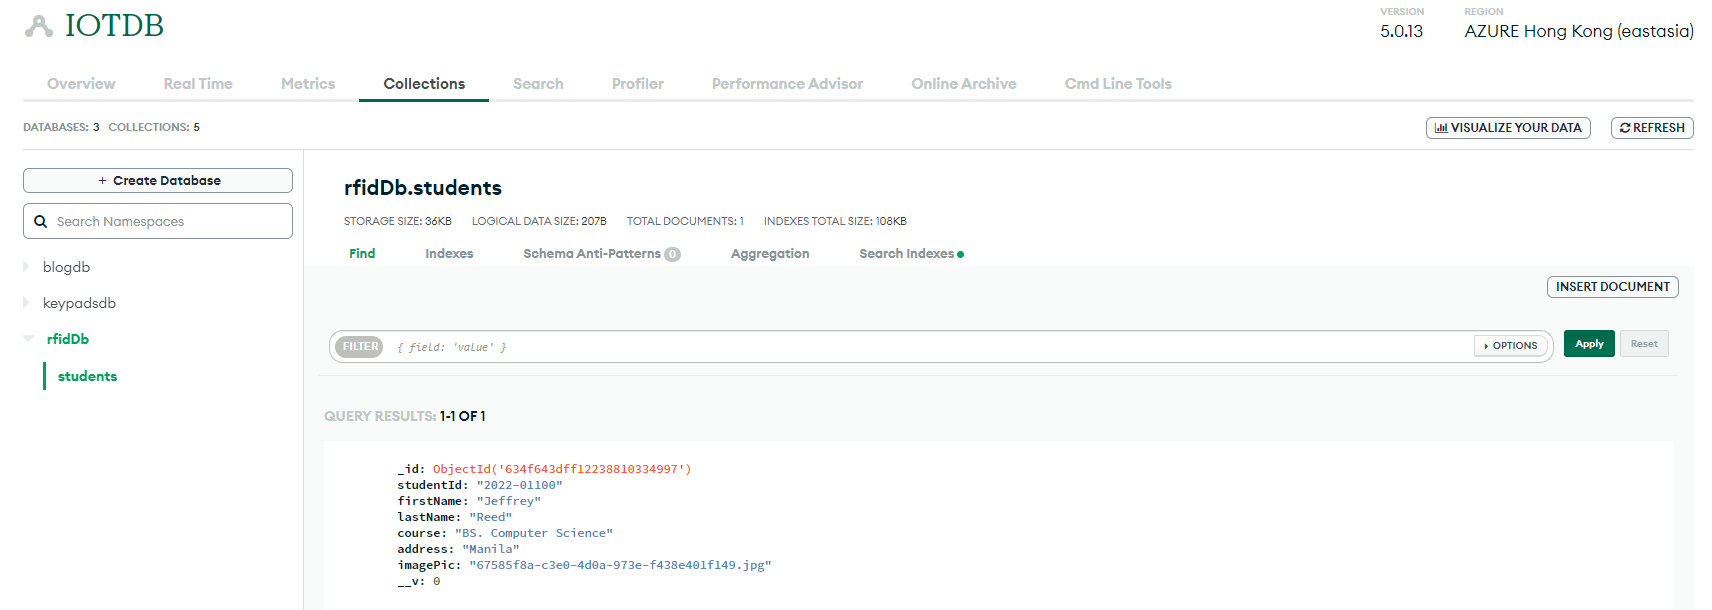
If no error is encountered then the following data should be available in our MongoDB Atlas database.
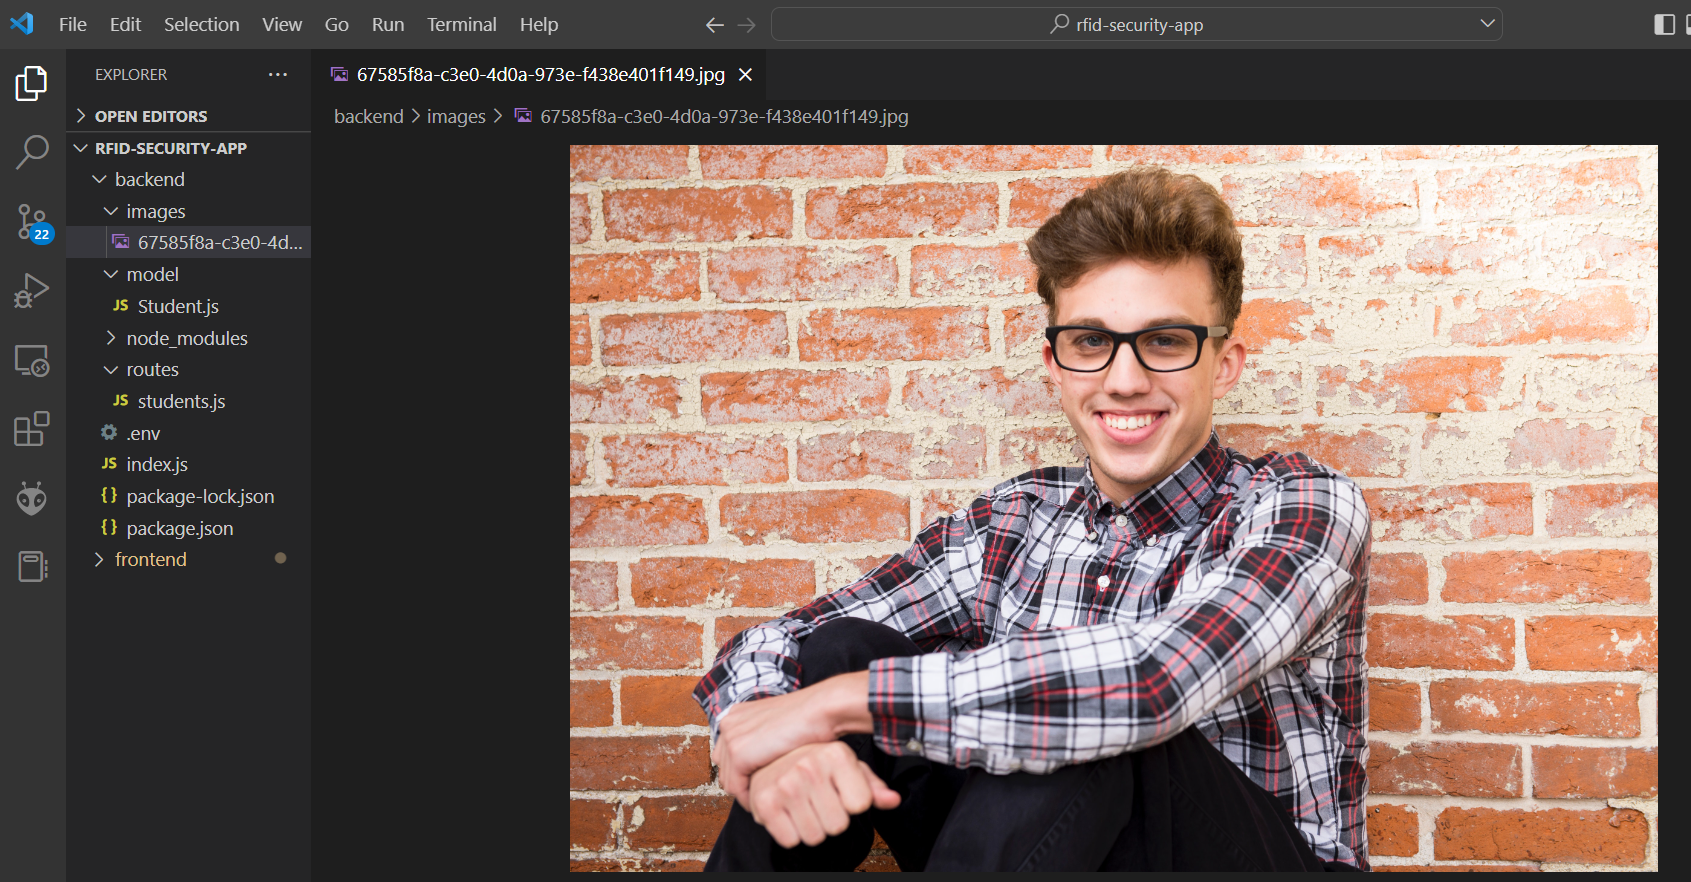
Also, the profile image that we have uploaded should be placed in our images folder.
Get Student List or Search Student by RFID or StudentId
To get the list of students or search students by RFID or StudentId then we can add the following route in our student.js route.
// Get Student list or Search Student by rfid or studentid query parameters
router.get("/", async (req, res) => {
  const studentId = req.query.studentId;
  const rfId = req.query.rfId;

  // if either studenId or rfId query parameters is present
  if (studentId || rfId) {
    try {
      let student;
      if (studentId && rfId) {
        student = await Student.find({
          studentId: studentId,
          rfidBadgeNumber: rfId,
        });
      } else if (studentId) {
        student = await Student.find({ studentId });
      } else if (rfId) {
        student = await Student.find({ rfidBadgeNumber: rfId });
      }
      return res.status(200).json(student);
    } catch (error) {
      return res.status(500).json({ error: error });
    }
  }
  // else return the whole Student list
  try {
    const studentList = await Student.find();
    res.status(200).json(studentList);
  } catch (error) {
    res.status(500).json({ error: error });
  }
});
Test: Get Student List
Using Postman, issue a GET request at the following endpoint
localhost:5000/api/students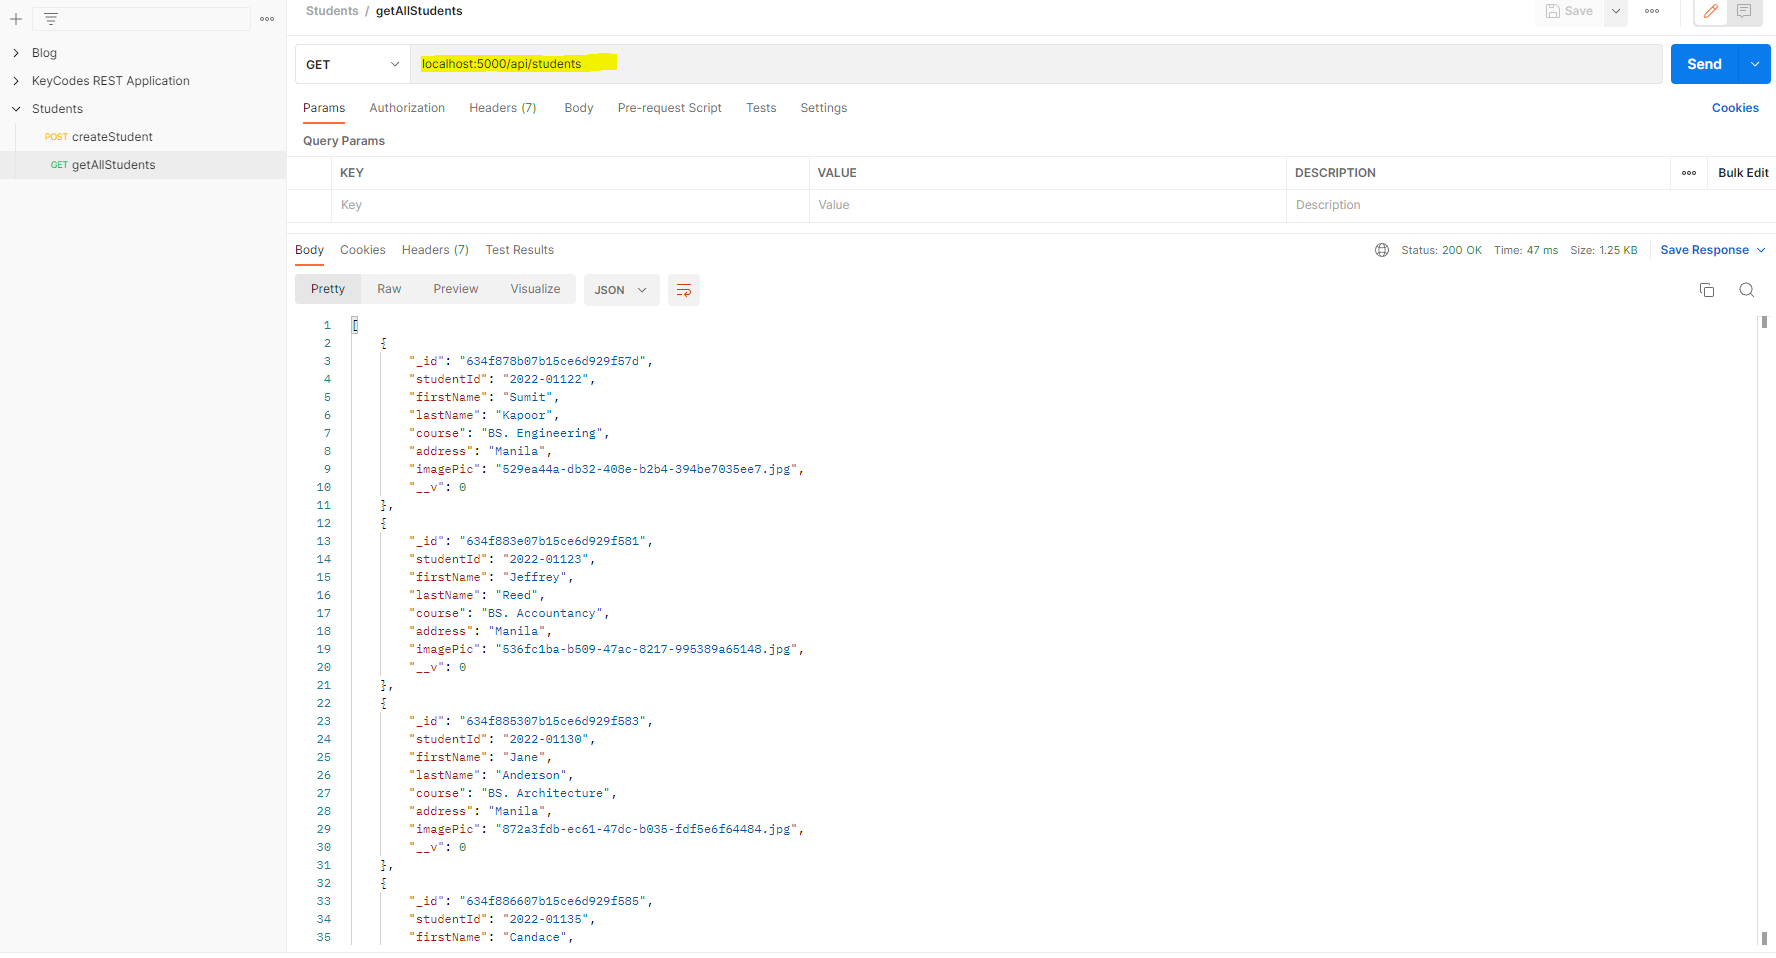
Test: Search Student by RFID or StudentId
To search for a student by either RFID badge number or studentId then we can pass it in as query parameters like this:
localhost:5000/api/students?studentId=2022-01138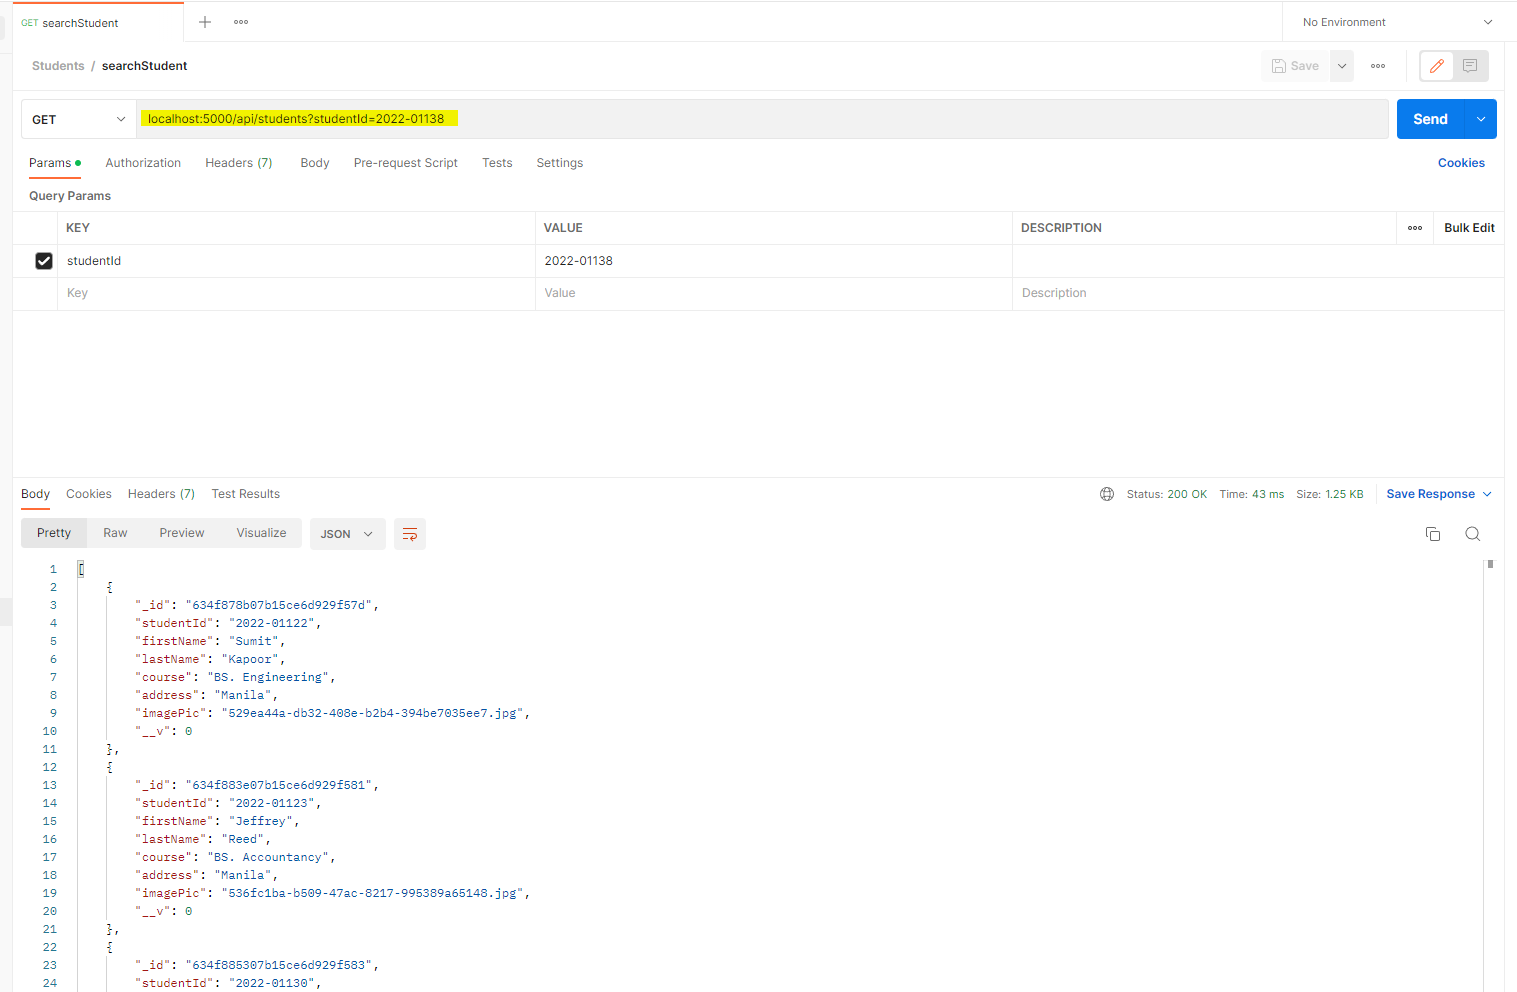
Get Student By Id (ObjectId)
To get Student information by passing the MongoDB automatically assigned ObjectID then we can add the following code.
router.get("/:id", async (req,res) =>{
try {
const student = await Student.findById(req.params.id)
res.status(200).json(student);
} catch (error) {
res.status(500).json({ error: error });
}
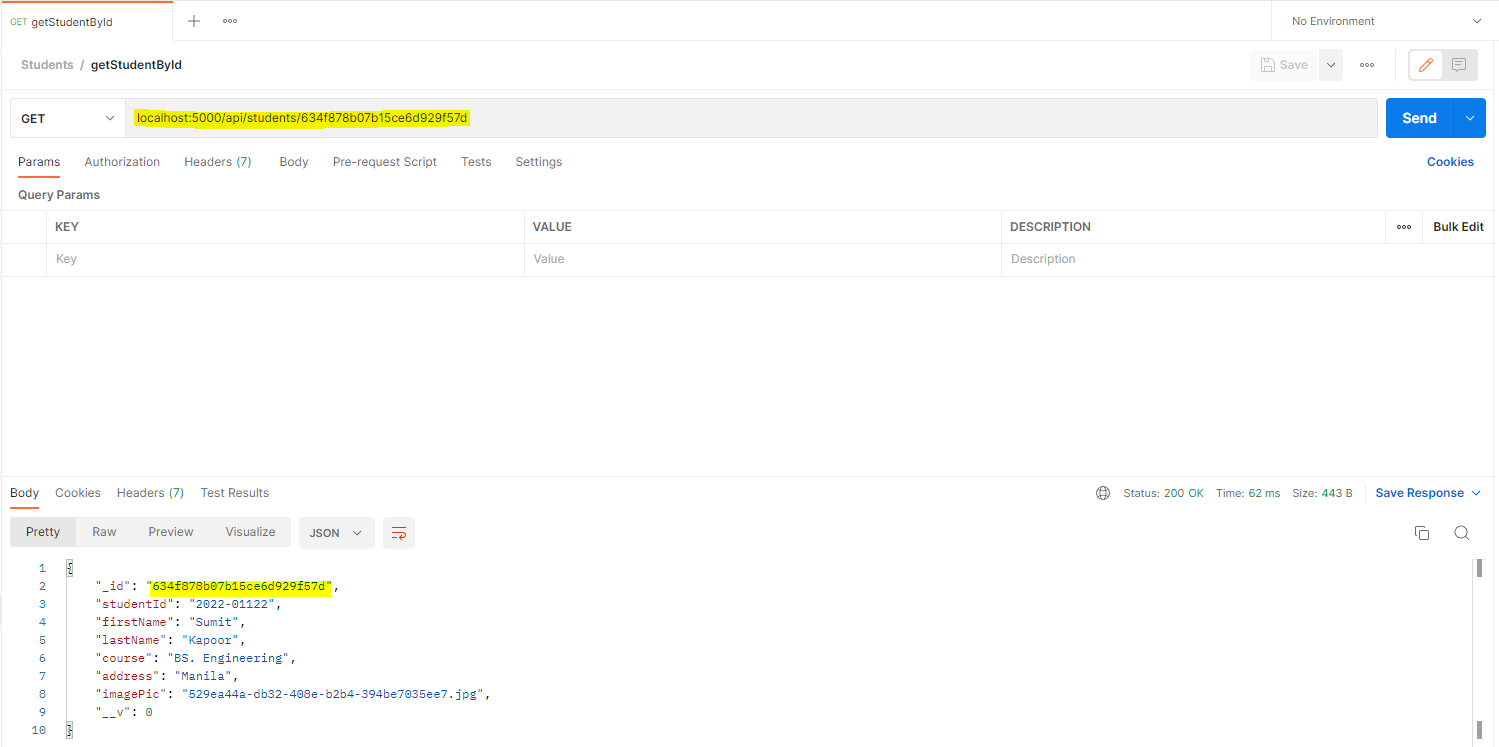
})Test: Get Student By Id (ObjectId)
Using Postman, we can send in the following parameters.
Update Student
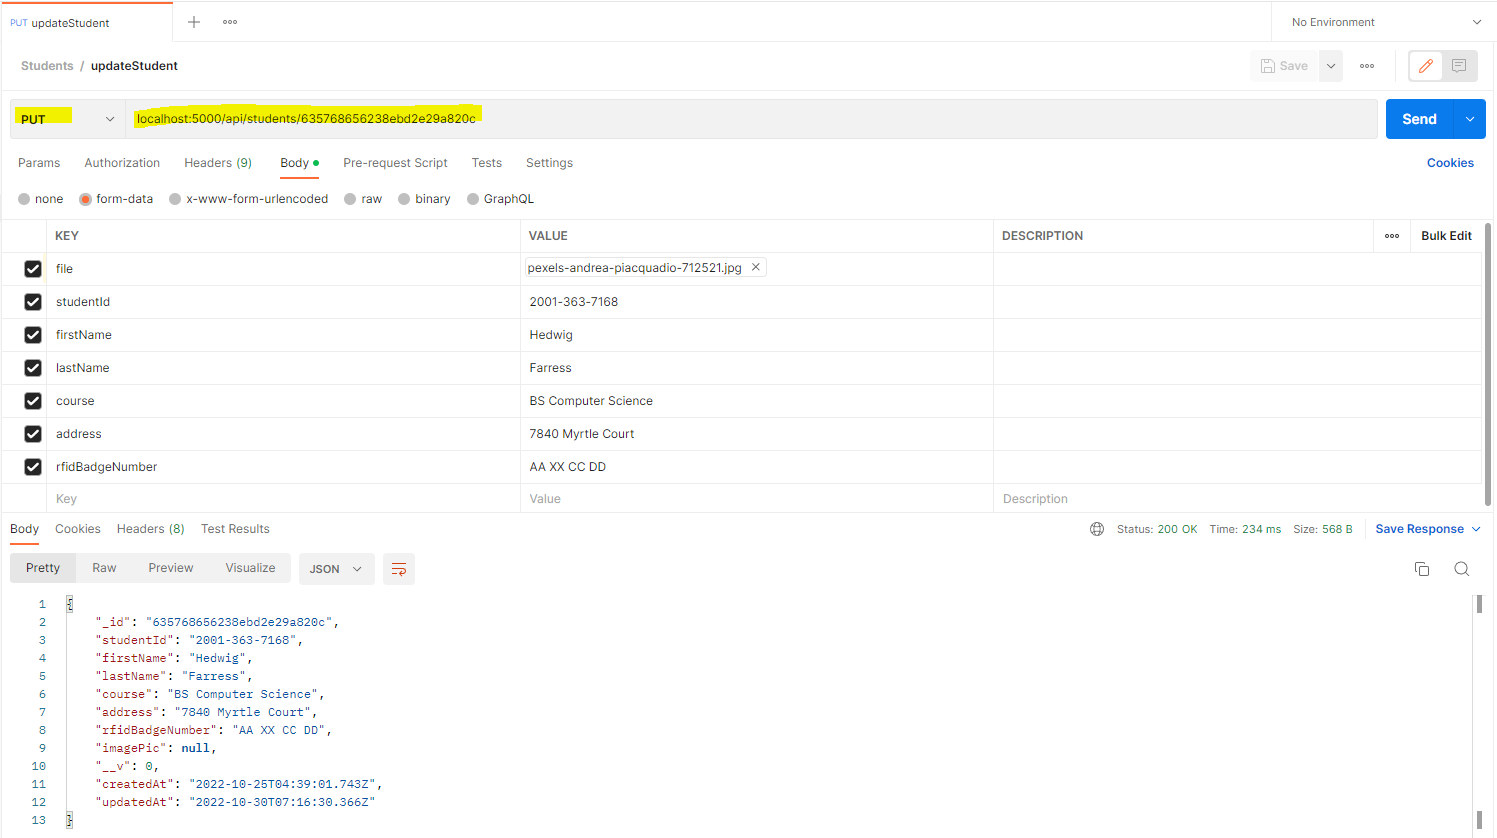
To update student information then we would need the following code.
// Update Student
router.put("/:id", upload.single("file"), async (req, res, next) => {
  //If a new profile pic is uploaded then process it first by deleting the old image file from disk
  if (req.file) {
    try {
      //find by id
      const oldStudentDetails = await Student.findById(req.params.id);
      if (!oldStudentDetails) {
        throw new Error("Student not found!");
      }

      //if old image file exist then the delete file from directory
      if (fs.existsSync(oldStudentDetails.imagePic)) {
        fs.unlink(oldStudentDetails.imagePic, (err) => {
          if (err) {
            throw new Error("Failed to delete file..");
          } else {
            console.log("file deleted");
          }
        });
      }
    } catch (error) {
      res.status(500).json({ error: error });
    }
  }
  // Update the database with new details
  try {
    const updatedStudent = await Student.findByIdAndUpdate(
      req.params.id,
      {
        $set: req.body,
        imagePic: req.file?.path,
      },
      { new: true }
    );
    res.status(200).json(updatedStudent);
  } catch (error) {
    res.status(500).json({ error: error });
  }
});
Test: Update Student
Send the following parameters in Postman.
Delete Student
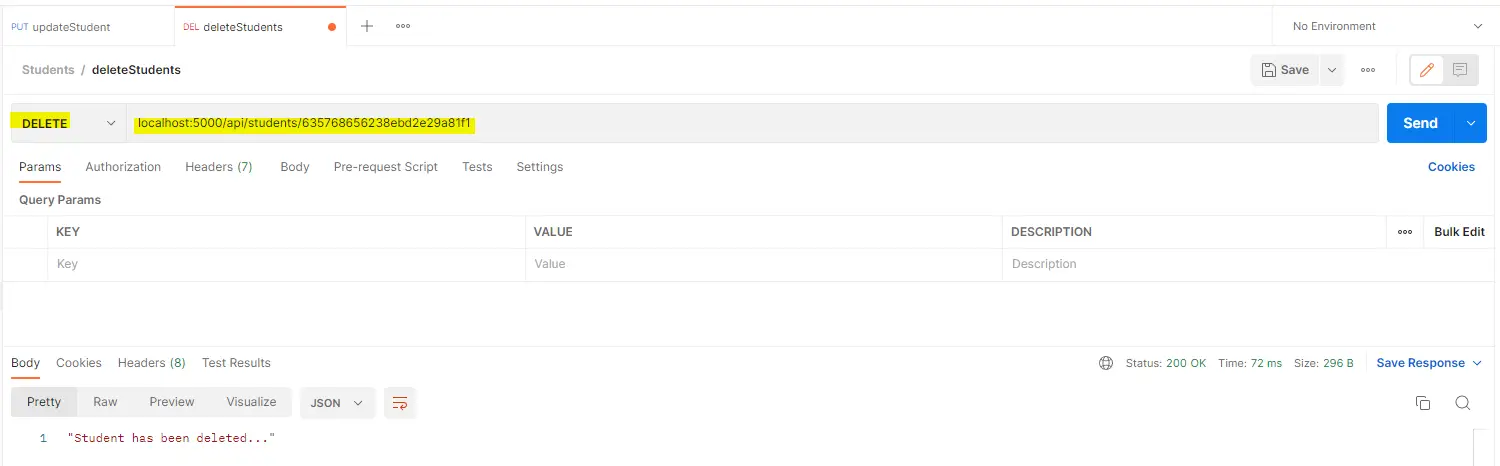
Perform delete by adding the following code.
// Delete Student
router.delete("/:id", async (req, res) => {
  try {
    await Student.findByIdAndDelete(req.params.id);
    res.status(200).json("Student has been deleted...");
  } catch (error) {
    res.status(500).json(error);
  }
});
Test: Delete Student
Using Postman then we can execute the following test.
That is all there is for the backend part of our application. We have coded the REST API endpoints that will handle the interaction with our database. All these endpoints are called by the frontend application that we will be creating next.
The next section of this MERN stack tutorial will feature how we could create the user interface part of our project using React.js
Bootstrap frontend server
Now that we have created our backend application then we could start working on the frontend side of our application. To do that, go into the root directory and execute the below command. This might take some time so please be patient.
npx create-react-app frontendNow that we have bootstrapped the front end and the back end of our application then we will continue programming this in Visual Studio Code. To open up this project in VS Code enter the following code.
code .We will be using the functional style of coding of our React components and pages in this post.
Install the dependencies for our frontend project
npm install axios react-router-domWe will use Axios when calling our backend REST API endpoint and the react-router-dom for routing our pages.
Cleanup the project folder
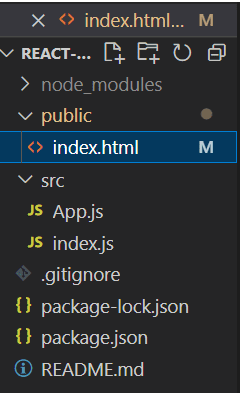
The “create-react-app” creates several files we won’t need at the moment, so we will clean up everything first.
In the public folder, delete everything except the index.html file. We will clean up also the index.html file so that it will just look like this by removing all the comments.
<!DOCTYPE html>
<html lang="en">
  <head>
    <meta charset="utf-8" />
    <link rel="icon" href="%PUBLIC_URL%/favicon.ico" />
    <meta name="viewport" content="width=device-width, initial-scale=1" />
    <meta name="theme-color" content="#000000" />
    <meta
      name="description"
      content="RFID Application"
    />
    <link rel="stylesheet" href="https://cdnjs.cloudflare.com/ajax/libs/font-awesome/6.2.0/css/all.min.css" integrity="sha512-xh6O/CkQoPOWDdYTDqeRdPCVd1SpvCA9XXcUnZS2FmJNp1coAFzvtCN9BmamE+4aHK8yyUHUSCcJHgXloTyT2A==" crossorigin="anonymous" referrerpolicy="no-referrer" />
    <link href="https://fonts.googleapis.com/css2?family=Anton&family=Josefin+Sans:wght@100;200;300;500;600;700&family=Roboto:wght@400;700&display=swap" rel="stylesheet">
    <title>RFID Application</title>
    <style>
    </style>
  </head>
  <body>
    <noscript>You need to enable JavaScript to run this app.</noscript>
    <div id="root"></div>
  </body>
</html>
I have added a link to the font-awesome CDN and downloaded some fonts from Google fonts as well.
In the src folder, delete everything except the index.js and the App.js file.
We will clean up the index.js file also by editing it and making it look like this.
import React from 'react';
import ReactDOM from 'react-dom/client';
import App from './App';

const root = ReactDOM.createRoot(document.getElementById('root'));
root.render(
  <React.StrictMode>
    <App />
  </React.StrictMode>
);
The App.js will now look like this also.
function App() {
  return (
    <div className="App">
      Students RFID App
    </div>
  );
}

export default App;
At the end of this step, your project should look like this.
You can now run the application by executing the following commands.
npm startCreate the pages
I will need 4 pages for our project.
| Page | Description |
|---|---|
| /home | Home Page |
| /edit | Edit Page |
| /add | Add Page |
| /delete | Delete Page |
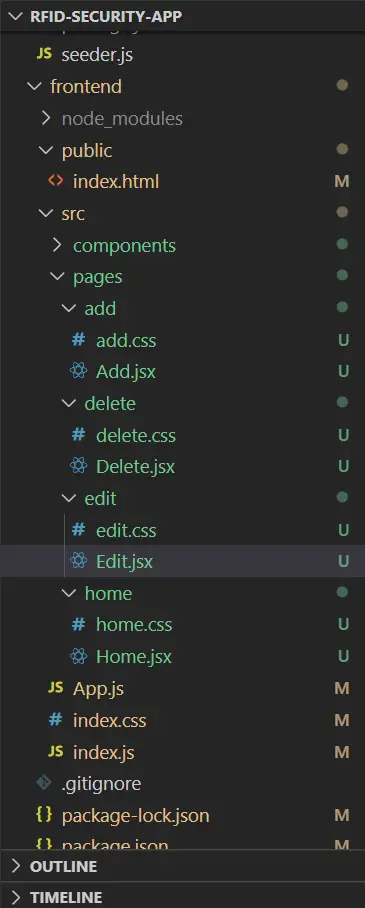
Create a folder called page and create the following files. I have created specific css files for styling purposes for each page.
You can initialize each page file by doing the following.
import React from 'react'
import "./home.css"

export default function Home() {
  return (
    <div>Home Page</div>
  )
}
Setup the router
We can now edit the App.js to set up the routing of our pages using the following code. This will set up each path to the pages that we have created above. Our root page will render the Home page.
import Home from "./pages/home/Home";
import Edit from "./pages/edit/Edit";
import { BrowserRouter, Routes, Route } from "react-router-dom";
import Delete from "./pages/delete/Delete";
import Add from "./pages/add/Add";

function App() {
  return (
    <main className="App">
      <BrowserRouter>
        <Routes>
          <Route path="/" element={<Home />} />
          <Route path="/add" element={<Add />} />
          <Route path="/edit/:id" element={<Edit />} />
          <Route path="/delete/:id" element={<Delete />} />
        </Routes>
      </BrowserRouter>
    </main>
  );
}

export default App;
Setup the components
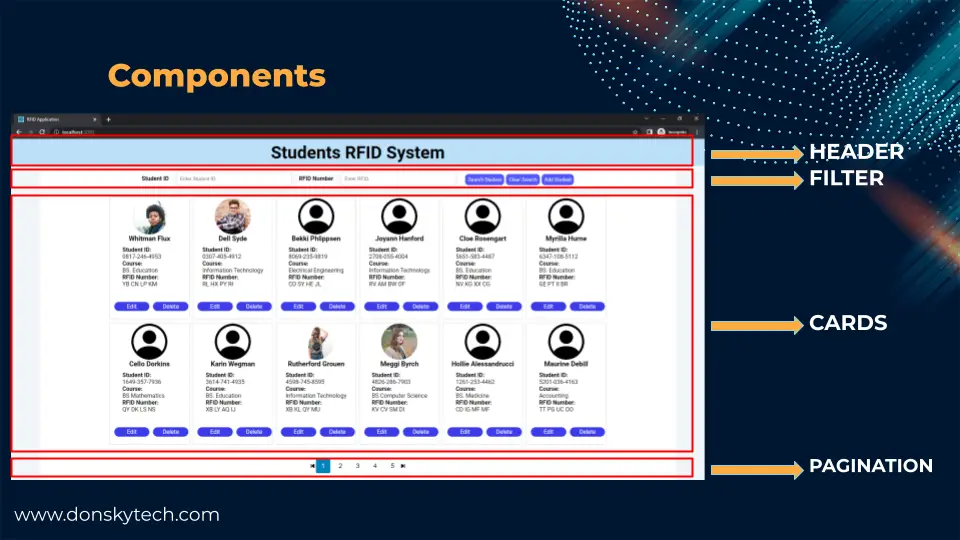
The power of React is the ability to divide part of your pages into components so I have thought of doing the following divisions in this post. We will create a separate React Components for each division.
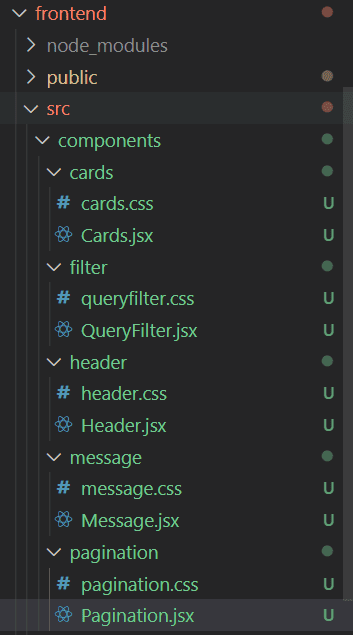
Create the React components/pages
In your src folder, create a folder called components and create the following files respectively. Each of these *.jsx files is a functional React component that represents each division of our user pages.
The Message component is just used to display information or error messages to the user.
The example code for the “Header.jsx” is like below. We will code each part of the components in the succeeding sections.
import React from "react";
import "./header.css";

export default function Header() {
  return (
    <div className="projectHeader">
      <h1>Students RFID System</h1>
    </div>
  );
}
Let us start coding our pages.
Home page
The Home page contains the entry point of our project. It contains the other components that we have outlined above including the QueryFilter, the Cards, and the Pagination component.
The pagination logic that I have implemented here is taken from the following post which uses client-side pagination. As mentioned in that article, this may not be optimal if the number of records grows.
It calls the REST API endpoint that retrieves the list of students during the initial load by using the useEffect.
import React, { useState, useEffect } from "react";
import QueryFilter from "../../components/filter/QueryFilter";
import Pagination from "../../components/pagination/Pagination";
import Cards from "../../components/cards/Cards";
import axios from "axios";
import "./home.css";
import Header from "../../components/header/Header";

export default function Home() {
  // state variables
  const [students, setStudents] = useState([]);
  const [loading, setLoading] = useState(true);
  const [currentPage, setCurrentPage] = useState(1);
  const [recordsPerPage] = useState(12);

  // Pagination logic
  const indexOfLastRecord = currentPage * recordsPerPage;
  const indexOfFirstRecord = indexOfLastRecord - recordsPerPage;
  const currentRecords = students.slice(indexOfFirstRecord, indexOfLastRecord);
  const nPages = Math.ceil(students.length / recordsPerPage);

  // Get Students on initial load
  useEffect(() => {
    getStudents();
  }, []);

  const getStudents = async () => {
    const res = await axios.get("http://localhost:5000/api/students");
    setStudents(res.data);
    setLoading(false);
  };

  // function called to search for student
  const searchStudent = async (studentId, rfId) => {
    let url;
    if (studentId && rfId) {
      url = `http://localhost:5000/api/students?studentId=${studentId}&rfId=${rfId}`;
    } else if (studentId) {
      url = `http://localhost:5000/api/students?studentId=${studentId}`;
    } else if (rfId) {
      url = `http://localhost:5000/api/students?rfId=${rfId}`;
    }
    const res = await axios.get(url);
    setStudents(res.data);
  };

  // the jsx code that contains our components
  return (
    <section className="main">
      {loading && <div>Loading page....</div>}
      <Header />
      <QueryFilter searchStudent={searchStudent} getStudents={getStudents} />
      <Cards students={currentRecords} />
      <Pagination
        nPages={nPages}
        currentPage={currentPage}
        setCurrentPage={setCurrentPage}
      />
    </section>
  );
}
The styling for our page is in the home.css file and I would not be diving so much into this as this is purely CSS.
.main{
  display: flex;
  flex-direction: column;
  width: 100%;
}
Add student page
The Add.jsx page contains the logic that will add student information to our database. The profile image picture is passed into the Axios using programmatic Formdata. The styling for this page is powered by the add.css file. You can check out the file in my GitHub repository if you want to know how it is set up.
This page is called when the user clicks the Add Student in the query filter component. I have added several comments for each line of code for you to understand what it does.
import axios from "axios";
import React, { useState } from "react";
import { useNavigate } from "react-router-dom";
import Header from "../../components/header/Header";
import Message from "../../components/message/Message";
import "./add.css";

export default function Add() {
  // For navigation during button click
  const navigate = useNavigate();
  // State object of our student
  const [student, setStudent] = useState({
    studentId: "",
    firstName: "",
    lastName: "",
    course: "",
    address: "",
    rfidBadgeNumber: "",
    imagePic: "",
  });

  // represents the profile picture uploaded
  const [file, setFile] = useState(null);
  const [message, setMessage] = useState({
    show: false,
    msg: "",
    type: "",
  });

  // Used for updating our state object
  const updateStudent = (e) => {
    const fieldName = e.target.name;
    setStudent((currentStudent) => ({
      ...currentStudent,
      [fieldName]: e.target.value,
    }));
  };

  // Show info or error message during calling of the Axios REST API
  const showMessage = (show = false, type = "", msg = "") => {
    setMessage({ show, type, msg });
  };

  // Handle form submit and using FormData API
  const handleSubmit = async (e) => {
    e.preventDefault();
    const studenData = new FormData();
    studenData.append("studentId", student.studentId);
    studenData.append("firstName", student.firstName);
    studenData.append("lastName", student.lastName);
    studenData.append("course", student.course);
    studenData.append("address", student.address);
    studenData.append("rfidBadgeNumber", student.rfidBadgeNumber);
    if (file) {
      studenData.append("file", file);
    }
    try {
      await axios.post("http://localhost:5000/api/students", studenData);
      showMessage(true, "info", "Successfully added student information");
    } catch (error) {
      showMessage(true, "error", error);
    }
  };

  // Displays the form for Adding
  return (
    <>
      <Header />
      <div className="header">
        <h1>Add Student</h1>
      </div>
      <section className="managePage">
        <form className="editForm" onSubmit={handleSubmit}>
          <div className="fields">
            <div className="imgColumn">
              <img
                src={
                  file
                    ? URL.createObjectURL(file)
                    : "http://localhost:5000/images/defaultPic.png"
                }
                alt="Profile Pic"
              />
              <label htmlFor="fileInput" className="fileUploadLabel">
                <i className="fa-solid fa-circle-plus addProfileIcon">
                  Add Profile Pic
                </i>
              </label>
              <input
                type="file"
                id="fileInput"
                onChange={(e) => setFile(e.target.files[0])}
                style={{ display: "none" }}
              />
            </div>
            <div className="fieldsColumn">
              <div className="fieldRow">
                <label htmlFor="studentId" className="fieldLabel">
                  Student ID
                </label>
                <input
                  type="text"
                  name="studentId"
                  id="studentId"
                  value={student.studentId}
                  onChange={updateStudent}
                  className="addInputs"
                />
              </div>
              <div className="fieldRow">
                <label htmlFor="firstName" className="fieldLabel">
                  First Name
                </label>
                <input
                  type="text"
                  name="firstName"
                  id="firstName"
                  value={student.firstName}
                  onChange={updateStudent}
                  className="addInputs"
                />
              </div>
              <div className="fieldRow">
                <label htmlFor="lastName" className="fieldLabel">
                  Last Name
                </label>
                <input
                  type="text"
                  name="lastName"
                  id="lastName"
                  value={student.lastName}
                  onChange={updateStudent}
                  className="addInputs"
                />
              </div>
              <div className="fieldRow">
                <label htmlFor="course" className="fieldLabel">
                  Course
                </label>
                <input
                  type="text"
                  name="course"
                  id="course"
                  value={student.course}
                  onChange={updateStudent}
                  className="addInputs"
                />
              </div>
              <div className="fieldRow">
                <label htmlFor="address" className="fieldLabel">
                  Address
                </label>
                <input
                  type="text"
                  name="address"
                  id="address"
                  value={student.address}
                  onChange={updateStudent}
                  className="addInputs"
                />
              </div>
              <div className="fieldRow">
                <label htmlFor="rfidBadgeNumber" className="fieldLabel">
                  RFID Badge Number
                </label>
                <input
                  type="text"
                  name="rfidBadgeNumber"
                  id="rfidBadgeNumber"
                  value={student.rfidBadgeNumber}
                  onChange={updateStudent}
                  className="addInputs"
                />
              </div>
            </div>
          </div>

          <div className="btnContainer">
            <button type="submit" className="bottomButton">
              Add
            </button>
            <button
              type="button"
              className="bottomButton"
              onClick={() => navigate("/")}
            >
              Back
            </button>
          </div>
          <div>
            {message.show && (
              <Message {...message} removeMessage={showMessage} />
            )}
          </div>
        </form>
      </section>
    </>
  );
}
Edit student
The Edit.jsx page contains the logic on how you can edit Student information and call the necessary backend REST API. The edit.css does the styling for this page.
import axios from "axios";
import React from "react";
import { useState, useEffect } from "react";
import { useNavigate, useParams } from "react-router-dom";
import "./edit.css";
import Message from "../../components/message/Message";
import Header from "../../components/header/Header";

export default function Edit() {
  // For navigation during button click
  const navigate = useNavigate();
  // Extract the ID from the browser url
  const { id } = useParams();
  // Our student state information
  const [student, setStudent] = useState({
    studentId: "",
    firstName: "",
    lastName: "",
    course: "",
    address: "",
    rfidBadgeNumber: "",
    imagePic: "",
  });
  // The profile picture file
  const [file, setFile] = useState(null);
  // Messages used to display if successful or error during updating
  const [message, setMessage] = useState({
    show: false,
    msg: "",
    type: "",
  });

  // Get the student information by passing the ID into our MongoDB Atlas database
  useEffect(() => {
    const getStudent = async () => {
      const res = await axios.get("http://localhost:5000/api/students/" + id);
      setStudent(res.data);
    };
    getStudent();
  }, []);

  // Update our state object
  const updateStudent = (e) => {
    const fieldName = e.target.name;
    setStudent((currentStudent) => ({
      ...currentStudent,
      [fieldName]: e.target.value,
    }));
  };

  // Function to show or hide messages
  const showMessage = (show = false, type = "", msg = "") => {
    setMessage({ show, type, msg });
  };

  // Handle form submit
  const handleSubmit = async (e) => {
    e.preventDefault();
    const studenData = new FormData();
    studenData.append("studentId", student.studentId);
    studenData.append("firstName", student.firstName);
    studenData.append("lastName", student.lastName);
    studenData.append("course", student.course);
    studenData.append("address", student.address);
    studenData.append("rfidBadgeNumber", student.rfidBadgeNumber);
    if (file) {
      studenData.append("file", file);
    }
    try {
      await axios.put(
        "http://localhost:5000/api/students/" + student._id,
        studenData
      );
      showMessage(true, "info", "Successfully edited student information");
    } catch (error) {
      showMessage(true, "error", error);
    }
  };

  // The user interface for the Edit page
  return (
    <>
      <Header />
      <div className="header">
        <h1>Edit Student</h1>
      </div>
      <section className="managePage">
        <form className="editForm" onSubmit={handleSubmit}>
          <div className="fields">
            <div className="imgColumn">
              <img
                src={
                  file
                    ? URL.createObjectURL(file)
                    : student.imagePic
                    ? `http://localhost:5000/${student.imagePic}`
                    : "http://localhost:5000/images/defaultPic.png"
                }
                alt="Profile Pic"
              />
              <label htmlFor="fileInput" className="fileUploadLabel">
                <i className="fa-solid fa-circle-plus addProfileIcon"></i>Add
                Profile Pic
              </label>
              <input
                type="file"
                id="fileInput"
                onChange={(e) => setFile(e.target.files[0])}
                style={{ display: "none" }}
              />
            </div>
            <div className="fieldsColumn">
              <div className="fieldRow">
                <label htmlFor="studentId" className="fieldLabel">
                  Student ID
                </label>
                <input
                  type="text"
                  name="studentId"
                  id="studentId"
                  value={student.studentId}
                  onChange={updateStudent}
                  className="editInputs"
                />
              </div>
              <div className="fieldRow">
                <label htmlFor="firstName" className="fieldLabel">
                  First Name
                </label>
                <input
                  type="text"
                  name="firstName"
                  id="firstName"
                  value={student.firstName}
                  onChange={updateStudent}
                  className="editInputs"
                />
              </div>
              <div className="fieldRow">
                <label htmlFor="lastName" className="fieldLabel">
                  Last Name
                </label>
                <input
                  type="text"
                  name="lastName"
                  id="lastName"
                  value={student.lastName}
                  onChange={updateStudent}
                  className="editInputs"
                />
              </div>
              <div className="fieldRow">
                <label htmlFor="course" className="fieldLabel">
                  Course
                </label>
                <input
                  type="text"
                  name="course"
                  id="course"
                  value={student.course}
                  onChange={updateStudent}
                  className="editInputs"
                />
              </div>
              <div className="fieldRow">
                <label htmlFor="address" className="fieldLabel">
                  Address
                </label>
                <input
                  type="text"
                  name="address"
                  id="address"
                  value={student.address}
                  onChange={updateStudent}
                  className="editInputs"
                />
              </div>
              <div className="fieldRow">
                <label htmlFor="rfidBadgeNumber" className="fieldLabel">
                  RFID Badge Number
                </label>
                <input
                  type="text"
                  name="rfidBadgeNumber"
                  id="rfidBadgeNumber"
                  value={student.rfidBadgeNumber}
                  onChange={updateStudent}
                  className="editInputs"
                />
              </div>
            </div>
          </div>

          <div className="btnContainer">
            <button type="submit" className="bottomButton">
              Edit
            </button>
            <button
              type="button"
              className="bottomButton"
              onClick={() => navigate("/")}
            >
              Back
            </button>
          </div>
          <div>
            {message.show && (
              <Message {...message} removeMessage={showMessage} />
            )}
          </div>
        </form>
      </section>
    </>
  );
}
Delete student
The “Delete.jsx” page handles the deletion of student information.
import axios from "axios";
import React from "react";
import { useState, useEffect } from "react";
import { useNavigate, useParams } from "react-router-dom";
import "./delete.css";
import Message from "../../components/message/Message";
import Header from "../../components/header/Header";

export default function Delete() {
  // For navigation during button click
  const navigate = useNavigate();
  // Extract the ID from the browser url
  const { id } = useParams();
  // Our student state information
  const [student, setStudent] = useState({
    studentId: "",
    firstName: "",
    lastName: "",
    course: "",
    address: "",
    rfidBadgeNumber: "",
    imagePic: "",
  });

  const [message, setMessage] = useState({
    show: false,
    msg: "",
    type: "",
  });

  // Get the student information by passing the ID into our MongoDB Atlas database
  useEffect(() => {
    const getStudent = async () => {
      const res = await axios.get("http://localhost:5000/api/students/" + id);
      setStudent(res.data);
    };
    getStudent();
  }, []);

  // Function to show or hide messages
  const showMessage = (show = false, type = "", msg = "") => {
    setMessage({ show, type, msg });
  };

  // Handle form submit
  const handleSubmit = async (e) => {
    e.preventDefault();
    try {
      await axios.delete("http://localhost:5000/api/students/" + student._id);
      showMessage(true, "info", "Successfully deleted student information");
      clearStudentInfo();
    } catch (error) {
      showMessage(true, "error", error);
    }
  };

  // Clear student info after deletion
  const clearStudentInfo = () => {
    setStudent({
      studentId: "",
      firstName: "",
      lastName: "",
      course: "",
      address: "",
      rfidBadgeNumber: "",
      imagePic: "",
    });
  };

  // The user interface for the Delete page
  return (
    <>
      <Header />
      <div className="header">
        <h1>Delete Student</h1>
      </div>
      <section className="managePage">
        <form className="editForm" onSubmit={handleSubmit}>
          <div className="fields">
            <div className="imgColumn">
              <img
                src={
                  student.imagePic
                    ? `http://localhost:5000/${student.imagePic}`
                    : "http://localhost:5000/images/defaultPic.png"
                }
                alt="Profile Pic"
              />
            </div>
            <div className="fieldsColumn">
              <div className="fieldRow">
                <label htmlFor="studentId" className="fieldLabel">
                  Student ID
                </label>
                <input
                  type="text"
                  name="studentId"
                  id="studentId"
                  value={student.studentId}
                  readOnly={true}
                  className="deleteInputs"
                />
              </div>
              <div className="fieldRow">
                <label htmlFor="firstName" className="fieldLabel">
                  First Name
                </label>
                <input
                  type="text"
                  name="firstName"
                  id="firstName"
                  value={student.firstName}
                  readOnly={true}
                  className="deleteInputs"
                />
              </div>
              <div className="fieldRow">
                <label htmlFor="lastName" className="fieldLabel">
                  Last Name
                </label>
                <input
                  type="text"
                  name="lastName"
                  id="lastName"
                  value={student.lastName}
                  readOnly={true}
                  className="deleteInputs"
                />
              </div>
              <div className="fieldRow">
                <label htmlFor="course" className="fieldLabel">
                  Course
                </label>
                <input
                  type="text"
                  name="course"
                  id="course"
                  value={student.course}
                  readOnly={true}
                  className="deleteInputs"
                />
              </div>
              <div className="fieldRow">
                <label htmlFor="address" className="fieldLabel">
                  Address
                </label>
                <input
                  type="text"
                  name="address"
                  id="address"
                  value={student.address}
                  readOnly={true}
                  className="deleteInputs"
                />
              </div>
              <div className="fieldRow">
                <label htmlFor="rfidBadgeNumber" className="fieldLabel">
                  RFID Badge Number
                </label>
                <input
                  type="text"
                  name="rfidBadgeNumber"
                  id="rfidBadgeNumber"
                  value={student.rfidBadgeNumber}
                  readOnly={true}
                  className="deleteInputs"
                />
              </div>
            </div>
          </div>

          <div className="btnContainer">
            <button type="submit" className="bottomButton">
              Delete
            </button>
            <button
              type="button"
              className="bottomButton"
              onClick={() => navigate("/")}
            >
              Back
            </button>
          </div>
          <div>
            {message.show && (
              <Message {...message} removeMessage={showMessage} />
            )}
          </div>
        </form>
      </section>
    </>
  );
}
Card display of student Information
The Card.jsx component handles the display of user information in a card-like manner. It is configured to display at least 12 student information per page. It uses Grid CSS Styling to display the student information.
You can check out the card.css on how this is styled.
import React from "react";
import "./cards.css";
import { Link } from "react-router-dom";

export default function Cards({ students }) {
  return (
    <div className="cardsWrapper">
      <div className="cards">
        {students.length === 0 && <p>No student(s) found</p>}
        {students.map((student) => {
          return (
            <div key={student._id} className="card">
              <img
                src={
                  student.imagePic
                    ? "http://localhost:5000/" + student.imagePic
                    : "http://localhost:5000/images/defaultPic.png"
                }
                alt="profile pic"
              />
              <h3>{`${student.firstName} ${student.lastName}`}</h3>
              <div className="text">
                <p>
                  <span className="label">Student ID:</span>
                </p>
                <p>
                  <span className="info">{student.studentId}</span>
                </p>
                <p>
                  <span className="label">Course:</span>
                </p>
                <p>
                  <span className="info">{student.course}</span>
                </p>
                <p>
                  <span className="label">RFID Number:</span>
                </p>
                <p>
                  <span className="info">{student.rfidBadgeNumber}</span>
                </p>
              </div>
              <div className="btnContainer">
                <Link to={`edit/${student._id}`} className="cardBtn m-top">
                  Edit
                </Link>
                <Link to={`delete/${student._id}`} className="cardBtn m-top">
                  Delete
                </Link>
              </div>
            </div>
          );
        })}
      </div>
    </div>
  );
}
Filter students by Student ID or RFID tag
The QueryFilter.jsx component displays search boxes where you can filter the list either by Student Id or by RFID tag or both. It calls the REST API endpoint that we created earlier by passing the query parameters when we call the REST API endpoint thru Axios.
import React from "react";
import { useState } from "react";
import { useNavigate } from "react-router-dom";
import "./queryfilter.css";

export default function QueryFilter({ searchStudent, getStudents }) {
  // State information for the filter by StudentId or RFID or both
  const [studentId, setStudentId] = useState("");
  const [rfid, setRfId] = useState("");
  // For page navigation during button click
  const navigate = useNavigate();

  // Clear the input text
  const clearSearch = () => {
    setStudentId("");
    setRfId("");
    getStudents();
  };

  // Display the filter jsx
  return (
    <div className="filter">
      <div className="filterFields">
        <label htmlFor="studentId" className="filterLabel">
          Student ID
        </label>
        <input
          name="studentId"
          className="filterInputs"
          type="text"
          placeholder="Enter Student ID"
          value={studentId}
          onChange={(e) => setStudentId(e.target.value)}
        />
      </div>
      <div className="filterFields">
        <label htmlFor="rfid" className="filterLabel">
          RFID Number
        </label>
        <input
          name="rfid"
          className="filterInputs"
          type="text"
          placeholder="Enter RFID"
          value={rfid}
          onChange={(e) => setRfId(e.target.value)}
        />
      </div>
      <div className="filterFields">
        <div className="btn-container">
          <button
            type="button"
            className="queryBtn"
            onClick={() => searchStudent(studentId, rfid)}
          >
            Search Student
          </button>
          <button type="button" className="queryBtn" onClick={clearSearch}>
            Clear Search
          </button>
          <button
            type="button"
            className="queryBtn"
            onClick={() => navigate("/add")}
          >
            Add Student
          </button>
        </div>
      </div>
    </div>
  );
}
Pagination Component
The Pagination.jsx handles the pagination of our Students list. The logic is taken completely from this post.
import React from "react";
import "./pagination.css";

export default function Pagination({ nPages, currentPage, setCurrentPage }) {
  // Display the numbers in between
  const pageNumbers = [...Array(nPages + 1).keys()].slice(1);

  // Set the page number when next page is clicked
  const nextPage = () => {
    if (currentPage !== nPages) setCurrentPage(currentPage + 1);
  };

  // Set the page number when previous page is clicked
  const prevPage = () => {
    if (currentPage !== 1) setCurrentPage(currentPage - 1);
  };

  // Pagination buttons
  return (
    <div className="pagination-container">
      <i
        className="fa-solid fa-backward-step"
        id="prev-button"
        aria-label="Previous page"
        title="Previous page"
        onClick={prevPage}
      ></i>
      {pageNumbers.map((pgNumber, index) => {
        return (
          <button
            key={index}
            className={`pagination-number ${
              currentPage === pgNumber ? "active" : ""
            } `}
            onClick={() => setCurrentPage(pgNumber)}
          >
            {pgNumber}
          </button>
        );
      })}

      <i
        className="fa-solid fa-forward-step"
        id="next-button"
        aria-label="Next page"
        title="Next page"
        onClick={nextPage}
      ></i>
    </div>
  );
}
Display message information
The Message.jsx shows the display of successful or in-error information whenever we execute CRUD operations. It automatically closes itself upon display after several seconds.
import React from "react";
import { useEffect } from "react";
import "./message.css"

export default function Message({ msg, type, removeMessage }) {
  useEffect(() => {
    const timeout = setTimeout(() => {
      removeMessage();
    }, 2000);
    return () => clearTimeout(timeout);
  }, []);
  return <p className={`message message-${type}`}>{msg}</p>;
}
Display heading for our project
The Header.jsx displays the title of our project.
import React from "react";
import "./header.css";

export default function Header() {
  return (
    <div className="projectHeader">
      <h1>Students RFID System</h1>
    </div>
  );
}
That is all for all the pages and components in our web application using the MERN Stack in this tutorial
Wrap up
In this MERN StackTutorial, I have shown you the steps on how I was able to create my own full-stack web application using Node.js and React, and using MongoDB Atlas to store the information. We have executed CRUD operations on our database and applied pagination of our data.
I hope you have learned something! Happy exploring!
Leave a Reply