
Introduction
QR or Quick Response code is very much in use nowadays whether in retail, manufacturing, or security systems to track certain objects such as parts, website URLs, or even personal information. In this post, I am going to show you how you can use OpenCV for QR Code detection and reading and display real-time results using your web browser.
If you want to see a demo of this project then please see the below video or watch it on my YouTube channel.
OpenCV QR Code Attendance/Security System
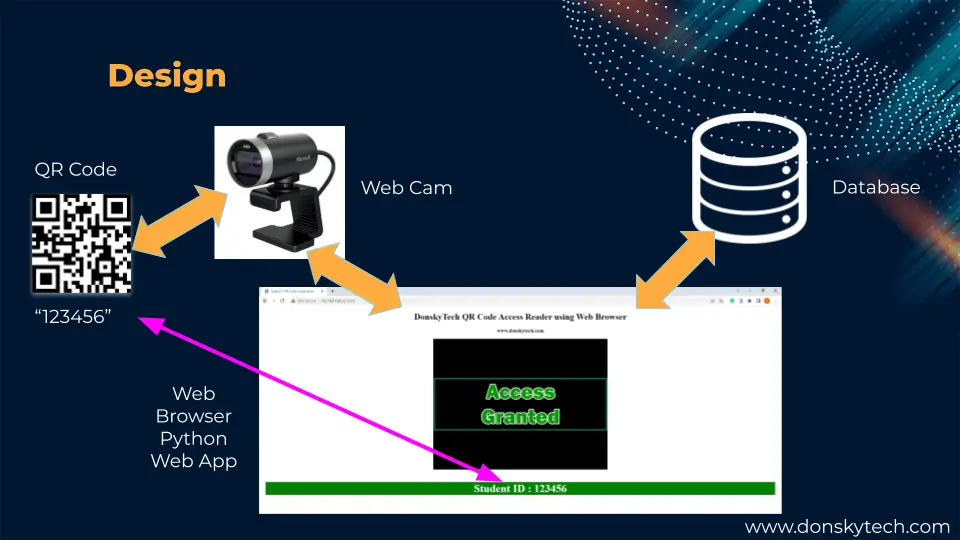
I will be creating a security/attendance system powered by OpenCV where you need to scan your QR Code to gain access to a fictitious facility. We will be storing a list of valid QR codes in-memory for now (database in the future) and then using the web browser to display the result of the validation in real time.
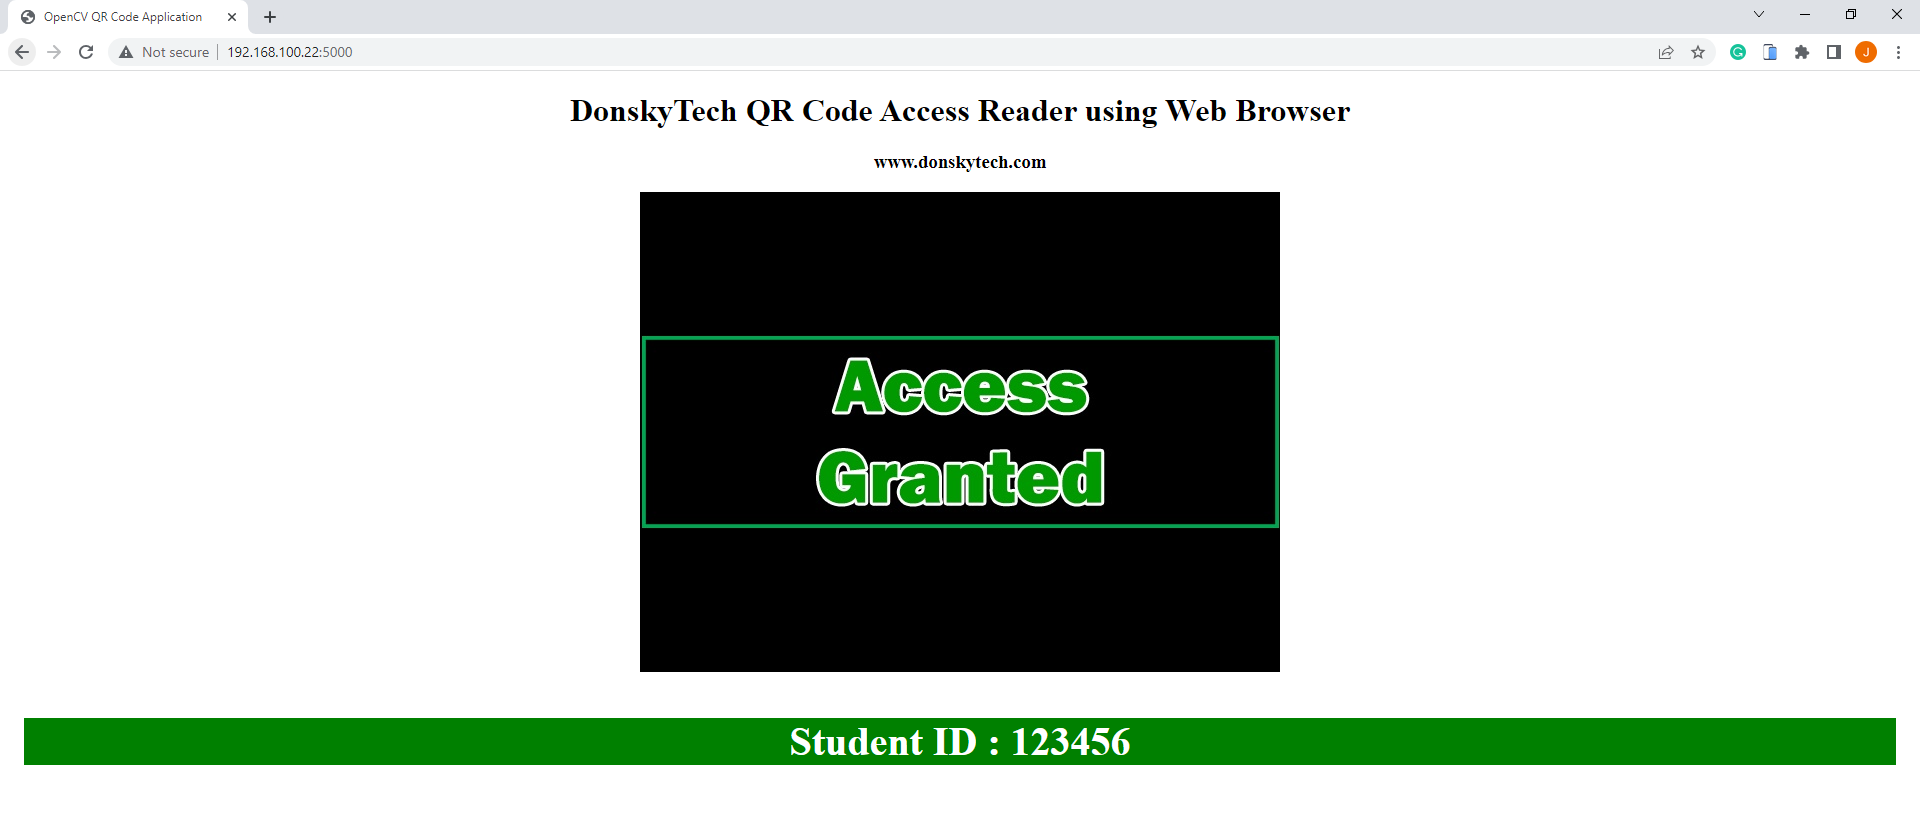
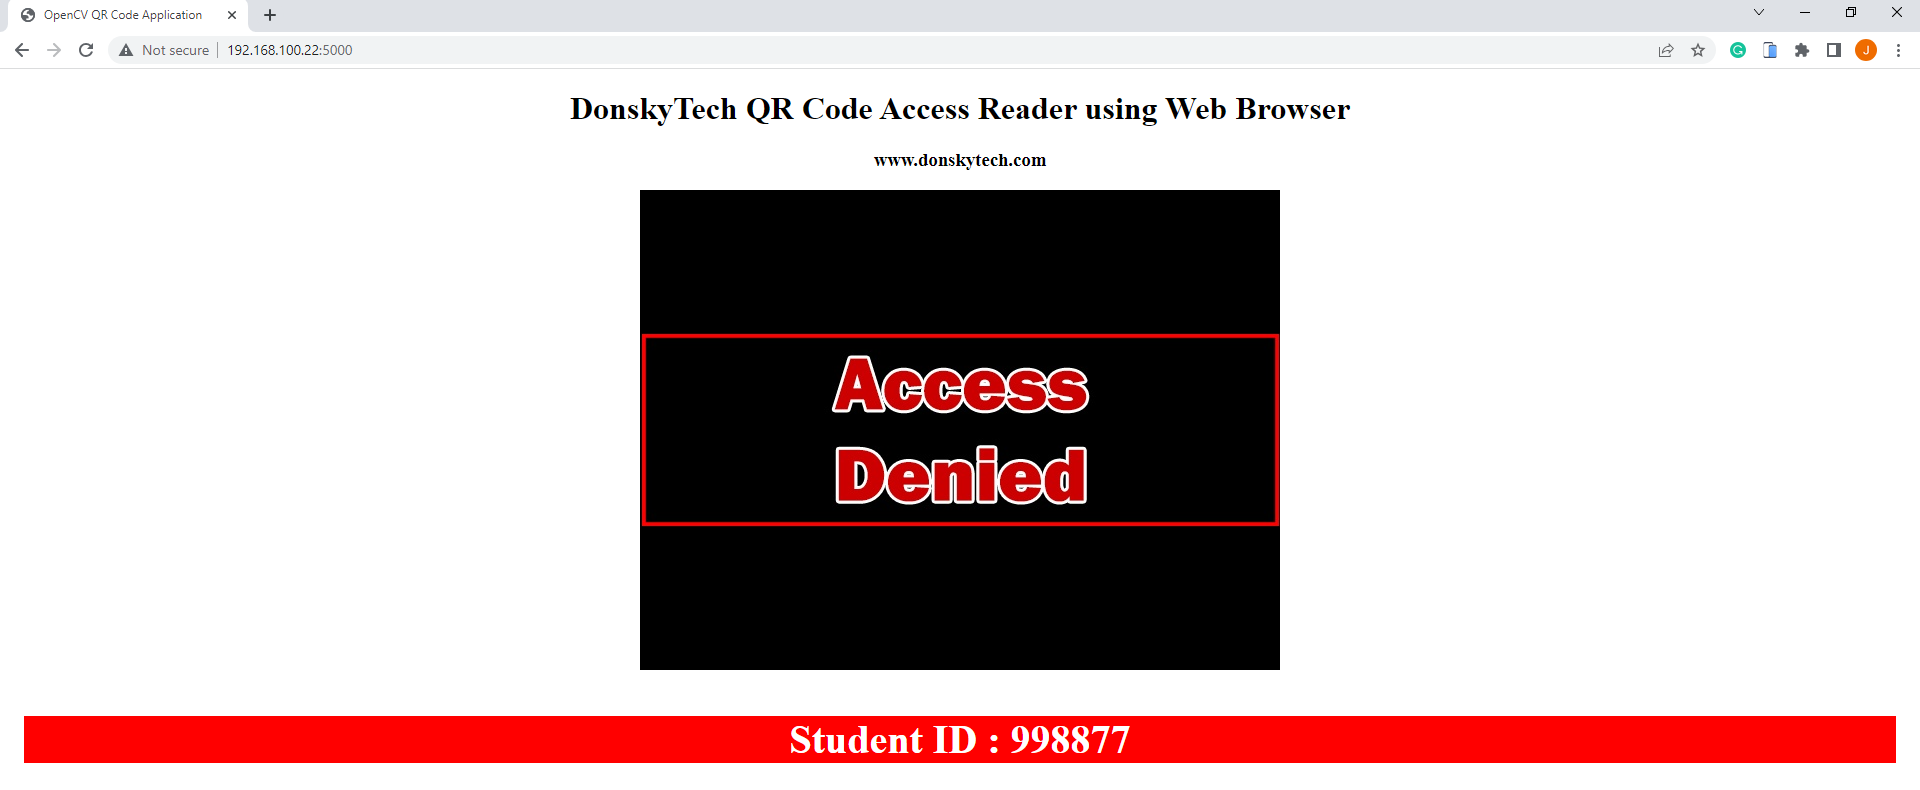
We will be streaming the video captured by your webcam on your web browser using the Flask microweb framework and if a QR Code is detected then we would decode it and display the validation result to your web application. It is either you are shown an “Access Granted” or “Access Denied” message.
So why have I chosen the web browser to display the QR Scan reading?
Why use a web browser for QR Code reading using OpenCV?
OpenCV by default has no native support for web browsers.
However, I have worked personally on one Internet of Things (IoT) project wherein I needed to create an IoT web application that will authenticate users by scanning their auto-generated QR code. The requirement is for them to be able to execute CRUD (Create-Read-Update-Delete) operations using a MongoDB database to manage the students.
Also, they wanted to scan the QR code on the same web application and do the validation on the same database, and display the result of the validation in real time (whether “access denied” or “access granted”). I tried googling for a solution to this problem and I found this Video Streaming with Flask article by Miguel Grinberg to be the appropriate solution for this.
Before you proceed, I highly suggest that you read the following post I mentioned above as it serves as the backbone for this project.
How to stream video in Flask using your web browser?
The idea is really simple.
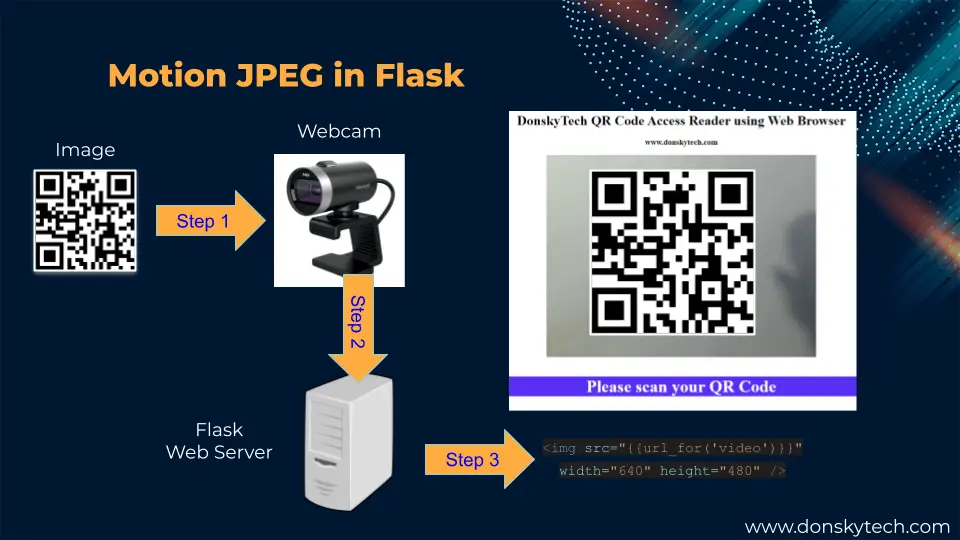
- You create an HTML page with an image tag whose source attribute is not fixed or dynamic in nature
- This HTML page is served by the Flask web server
- A webcam is attached to the same Flask web server
- When the webcam captures an image then it sends it back to the Flask web server
- The Flask web server would do some processing like encoding it to make it suitable for HTTP streaming and send it back to the HTML page to display it in an image tag replacing the original image.
- The process will continually loop and it will never stop.
This would imitate the concept of video streaming whereas what is happening under the hood is that we are just replacing the image shown on the web page.
Prerequisites
In order to follow along with this post then you need to have some basic knowledge of the following programming languages and libraries
Python is a general-purpose language that we will use all throughout this post. OpenCV is a computer vision library that will allow us to capture videos coming from our webcam while the pyzbar library would help us read and decode the QR code.
Flask is a micro web framework for developing the web application that will display the images captured by our web camera.
We will be using Flask-SocketIO also to display the real-time validation of our QR Code. Flask-SocketIO is a library that enables low-latency, bidirectional and event-based communication between a client and a server. It uses WebSocket under the hood which is ideal for our project as we want our browser to display the validation result in real time as soon as we scan our QR Code. If you do not know what WebSocket or Flask-SocketIO is then please see the two posts below.
Related Content:
Using WebSocket in the Internet of Things (IoT) projects
Display Real-Time Updates Using Python, Flask, and Websocket
I used Visual Studio Code in developing this project and I have installed Python on my Windows/PC laptop.
Related Content:
How to install Python on Windows
Install Visual Studio Code or VSCode in Windows
Parts/Components Required
You can choose any external web camera or your built-in laptop camera to follow along with this post as long as the resolution is high enough. You can choose from any of the following external web cameras here as I found them to be really good. I am using the A4Tech Web Camera here as I found the images to be crisp and clear.
- A4Tech Web Camera – Amazon | AliExpress
- EMEET Web Camera – Amazon | AliExpress
- Logitech Web Camera – Amazon | AliExpress
Disclosure: These are affiliate links and I will earn small commissions to support my site when you buy through these links.
Code
The code for this project is available on my GitHub account and you can either download it as a zip file or clone it using Git by executing the below commands.
git clone https://github.com/donskytech/opencv-projects.git
cd qr-code-browser
Open the project using your Visual Studio Code. Next, we would create a Python virtual environment to install our library dependencies.
Create a Python virtual environment
Open a terminal once inside your Visual Studio Code and execute the below commands.
python -m venv .venv Activate the virtual environment by executing the below commands
# Windows or PC
.venv\Scripts\bin\activate
# Linux Mac
source .venv/bin/activate
Install the dependencies by executing the below command
pip install -r requirements.txtThree libraries are required for this project and they are the following:
- Flask – for creating the web application
- OpenCV – for capturing the images and feed for our video source
- pyzbar – for decoding the QR code
Project Files
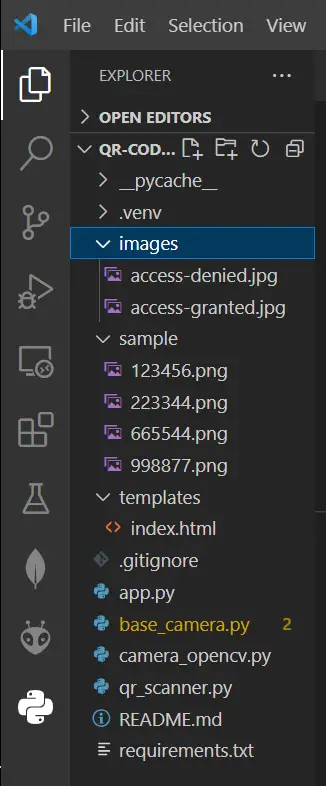
The following image above shows the project files for this OpenCV QR Code detection using our web browser. Let us try to scan through what each file does on our project.
- images – contains the images that will show if a QR Code is valid or not
- sample – these files are the sample QR code that we will be using in this project
- templates/index.html – the web application that will display and detect our QR Code
- app.py – our Flask web application which will display our index.html and read the barcode detected by the camera using the OpenCV and pyzbar library.
- base_camera.py and camera_opencv.py – these two files were taken from the post created by Miguel Grinberg
- qr_scanner.py – parses the barcode and the access denied and access granted images
- requirements.txt – contains all the dependencies needed by this project.
Let us try to walk thru what each line of code does.
index.html
<!DOCTYPE html>
<html lang="en">
  <head>
    <meta charset="UTF-8" />
    <meta name="viewport" content="width=device-width, initial-scale=1.0" />
    <meta http-equiv="X-UA-Compatible" content="ie=edge" />
    <title>OpenCV QR Code Application</title>
    <!-- <link rel="stylesheet" href="./style.css" />
    <link rel="icon" href="./favicon.ico" type="image/x-icon" /> -->
    <script
      src="https://cdnjs.cloudflare.com/ajax/libs/socket.io/3.0.4/socket.io.js"
      integrity="sha512-aMGMvNYu8Ue4G+fHa359jcPb1u+ytAF+P2SCb+PxrjCdO3n3ZTxJ30zuH39rimUggmTwmh2u7wvQsDTHESnmfQ=="
      crossorigin="anonymous"
    ></script>
    <style>
      .center {
        text-align: center;
      }
      .status {
        color: #fff;
        padding: 1rem;
      }
      .message {
        font-size: 2.5rem;
      }
      .message-info {
        background-color: rgb(89, 46, 245);
      }
      .message-allowed {
        background-color: green;
      }
      .message-denied {
        background-color: red;
      }
    </style>
  </head>
  <body>
    <main class="center">
      <h1>DonskyTech QR Code Access Reader using Web Browser</h1>
      <h3>www.donskytech.com</h3>
      <div>
        <img src="{{url_for('video')}}" width="640" height="480" />
      </div>
      <div class="status">
        <h1 id="message" class="message message-info">SCAN YOUR QR CODE</h1>
      </div>
    </main>
    <script>
      window.addEventListener("DOMContentLoaded", (event) => {
        console.log("DOM fully loaded and parsed");
        const message = document.querySelector("#message");
        var socket = io.connect();

        //receive details from server
        socket.on("scan_result", function (msg) {
          if (msg.status === "denied") {
            console.log("Access Denied");
            message.innerHTML = msg.message;
            message.classList.remove("message-allowed");
            message.classList.remove("message-info");
            message.classList.add("message-denied");
          } else if (msg.status === "granted") {
            console.log("Access Granted");
            message.innerHTML = msg.message;
            message.classList.remove("message-denied");
            message.classList.remove("message-info");
            message.classList.add("message-allowed");
          } else {
            message.innerHTML = msg.message;
            message.classList.remove("message-denied");
            message.classList.remove("message-allowed");
            message.classList.add("message-info");
          }
        });
      });
    </script>
  </body>
</html>
This index.html will show the images captured by our web camera and display the validation result.
<!DOCTYPE html>
<html lang="en">
  <head>
    <meta charset="UTF-8" />
    <meta name="viewport" content="width=device-width, initial-scale=1.0" />
    <meta http-equiv="X-UA-Compatible" content="ie=edge" />
    <title>OpenCV QR Code Application</title>
    <!-- <link rel="stylesheet" href="./style.css" />
    <link rel="icon" href="./favicon.ico" type="image/x-icon" /> -->
    <script
      src="https://cdnjs.cloudflare.com/ajax/libs/socket.io/3.0.4/socket.io.js"
      integrity="sha512-aMGMvNYu8Ue4G+fHa359jcPb1u+ytAF+P2SCb+PxrjCdO3n3ZTxJ30zuH39rimUggmTwmh2u7wvQsDTHESnmfQ=="
      crossorigin="anonymous"
    ></script>
    <style>
      .center {
        text-align: center;
      }
      .status {
        color: #fff;
        padding: 1rem;
      }
      .message {
        font-size: 2.5rem;
      }
      .message-info {
        background-color: rgb(89, 46, 245);
      }
      .message-allowed {
        background-color: green;
      }
      .message-denied {
        background-color: red;
      }
    </style>
  </head>
The HEAD section imports the socket.io.js file which we would be needing to handle the WebSocket message exchange. The <style></style> section is needed to change the color of our HTML div element used to display the result of the validation process.
  <body>
    <main class="center">
      <h1>DonskyTech QR Code Access Reader using Web Browser</h1>
      <h3>www.donskytech.com</h3>
      <div>
        <img src="{{url_for('video')}}" width="640" height="480" />
      </div>
      <div class="status">
        <h1 id="message" class="message message-info">SCAN YOUR QR CODE</h1>
      </div>
    </main>
The BODY tag will display a series of images coming from our Flask web application. These images are captured by our OpenCV. The <div class="status"> is what we are going to use to display the result of our QR Code validation.
    <script>
      window.addEventListener("DOMContentLoaded", (event) => {
        console.log("DOM fully loaded and parsed");
        const message = document.querySelector("#message");
        var socket = io.connect();

        //receive details from server
        socket.on("scan_result", function (msg) {
          if (msg.status === "denied") {
            console.log("Access Denied");
            message.innerHTML = msg.message;
            message.classList.remove("message-allowed");
            message.classList.remove("message-info");
            message.classList.add("message-denied");
          } else if (msg.status === "granted") {
            console.log("Access Granted");
            message.innerHTML = msg.message;
            message.classList.remove("message-denied");
            message.classList.remove("message-info");
            message.classList.add("message-allowed");
          } else {
            message.innerHTML = msg.message;
            message.classList.remove("message-denied");
            message.classList.remove("message-allowed");
            message.classList.add("message-info");
          }
        });
      });
    </script>
  </body>
</html>
This inline javascript file is needed to change the color of our status Div element by parsing the messages received from our SocketIo events.
base_camera.py
import time
import threading
try:
    from greenlet import getcurrent as get_ident
except ImportError:
    try:
        from thread import get_ident
    except ImportError:
        from _thread import get_ident


class CameraEvent(object):
    """An Event-like class that signals all active clients when a new frame is
    available.
    """
    def __init__(self):
        self.events = {}

    def wait(self):
        """Invoked from each client's thread to wait for the next frame."""
        ident = get_ident()
        if ident not in self.events:
            # this is a new client
            # add an entry for it in the self.events dict
            # each entry has two elements, a threading.Event() and a timestamp
            self.events[ident] = [threading.Event(), time.time()]
        return self.events[ident][0].wait()

    def set(self):
        """Invoked by the camera thread when a new frame is available."""
        now = time.time()
        remove = None
        for ident, event in self.events.items():
            if not event[0].isSet():
                # if this client's event is not set, then set it
                # also update the last set timestamp to now
                event[0].set()
                event[1] = now
            else:
                # if the client's event is already set, it means the client
                # did not process a previous frame
                # if the event stays set for more than 5 seconds, then assume
                # the client is gone and remove it
                if now - event[1] > 5:
                    remove = ident
        if remove:
            del self.events[remove]

    def clear(self):
        """Invoked from each client's thread after a frame was processed."""
        self.events[get_ident()][0].clear()


class BaseCamera(object):
    thread = None  # background thread that reads frames from camera
    frame = None  # current frame is stored here by background thread
    last_access = 0  # time of last client access to the camera
    event = CameraEvent()

    def __init__(self):
        """Start the background camera thread if it isn't running yet."""
        if BaseCamera.thread is None:
            BaseCamera.last_access = time.time()

            # start background frame thread
            BaseCamera.thread = threading.Thread(target=self._thread)
            BaseCamera.thread.start()

            # wait until first frame is available
            BaseCamera.event.wait()

    def get_frame(self):
        """Return the current camera frame."""
        BaseCamera.last_access = time.time()

        # wait for a signal from the camera thread
        BaseCamera.event.wait()
        BaseCamera.event.clear()

        return BaseCamera.frame

    @staticmethod
    def frames():
        """"Generator that returns frames from the camera."""
        raise RuntimeError('Must be implemented by subclasses.')

    @classmethod
    def _thread(cls):
        """Camera background thread."""
        print('Starting camera thread.')
        frames_iterator = cls.frames()
        for frame in frames_iterator:
            BaseCamera.frame = frame
            BaseCamera.event.set()  # send signal to clients
            time.sleep(0)

            # if there hasn't been any clients asking for frames in
            # the last 10 seconds then stop the thread
            if time.time() - BaseCamera.last_access > 10:
                frames_iterator.close()
                print('Stopping camera thread due to inactivity.')
                break
        BaseCamera.thread = None
The base_camera.py file is taken directly from the Flask video streaming post by Miguel Grinberg which you can find here. What this file is doing is continually retrieving images taken from our web camera in a background thread.
I highly suggest that you read the informative post of Miguel Grinberg as this is the basis of this project that I am doing.
camera_opencv.py
import os
import cv2
from base_camera import BaseCamera


class Camera(BaseCamera):
    video_source = 0

    def __init__(self):
        if os.environ.get('OPENCV_CAMERA_SOURCE'):
            Camera.set_video_source(int(os.environ['OPENCV_CAMERA_SOURCE']))
        super(Camera, self).__init__()

    @staticmethod
    def set_video_source(source):
        Camera.video_source = source

    @staticmethod
    def frames():
        camera = cv2.VideoCapture(Camera.video_source)
        if not camera.isOpened():
            raise RuntimeError('Could not start camera.')

        while True:
            # read current frame
            _, img = camera.read()

            # return the image
            yield img
This is a subclass of our class BaseCamera that is oriented toward using the OpenCV library in capturing continuous images from our web camera. Again, this file is taken also from the project files of Miguel Grinberg.
qr_scanner.py
from pyzbar.pyzbar import decode
import cv2
import numpy as np

class QRScanner:
    def __init__(self) -> None:
        self.img_granted = cv2.imread("images/access-granted.jpg", cv2.IMREAD_COLOR)
        self.img_denied = cv2.imread("images/access-denied.jpg", cv2.IMREAD_COLOR)

    @staticmethod
    def read_qr_code(image):
        return decode(image)

    @staticmethod
    def add_box_to_qr_code(image, barcode):
        pts = np.array([barcode.polygon], np.int32)
        pts = pts.reshape((-1, 1, 2))
        cv2.polylines(image, [pts], True, (128, 0, 128), 5)

    @staticmethod
    def encode(image):
        ret, buffer = cv2.imencode(".jpg", image)
        return buffer.tobytes()

    def get_access_granted_img(self):
        return self.img_granted

    def get_access_denied_img(self):
        return self.img_denied
The class QRScanner is our utility class that will handle the images taken by our web camera.
from pyzbar.pyzbar import decode
import cv2
import numpy as np
First, we import the pyzbar, OpenCV, and numpy for our digital image processing.
class QRScanner:
    def __init__(self) -> None:
        self.img_granted = cv2.imread("images/access-granted.jpg", cv2.IMREAD_COLOR)
        self.img_denied = cv2.imread("images/access-denied.jpg", cv2.IMREAD_COLOR)
Our class constructor (__init__)QRScanner will have instance variables pointing to our access-granted and access-denied images.
    @staticmethod
    def read_qr_code(image):
        return decode(image)

    @staticmethod
    def add_box_to_qr_code(image, barcode):
        pts = np.array([barcode.polygon], np.int32)
        pts = pts.reshape((-1, 1, 2))
        cv2.polylines(image, [pts], True, (128, 0, 128), 5)

    @staticmethod
    def encode(image):
        ret, buffer = cv2.imencode(".jpg", image)
        return buffer.tobytes()
The function read_qr_code() will check the image captured by our web camera and verify if a QR code is detected using the pyzbar decode function.
Function add_box_to_qr_code() will highlight our QR code by adding a bounding box when it is detected using the OpenCV polylines function.
The function encode() will encode the captured images into a buffer using the OpenCV imencode() function and return a byte object suitable to be sent over HTTP.
    def get_access_granted_img(self):
        return self.img_granted

    def get_access_denied_img(self):
        return self.img_denied
The functions get_access_granted_img() and get_access_denied_img() is used to return our access-granted.jpg and access-denied.jpg images.
app.py
from importlib import import_module
from flask import Flask, render_template, Response
from flask_socketio import SocketIO, emit
from qr_scanner import QRScanner
from camera_opencv import Camera

myDataDB = ["123456", "223344"]

app = Flask(__name__)
app.config["SECRET_KEY"] = "DonskyTech Rocks!"
socketio = SocketIO(app, cors_allowed_origins="*")

qr_code_scanner = QRScanner()

def generate_frames(camera):
    while True:
        is_granted, is_denied = False, False
        image = camera.get_frame()

        result = QRScanner.read_qr_code(image)
        if len(result) == 0:
            socketio.emit(
                "scan_result",
                {"status": "scan", "message": "Please scan your QR Code"},
            )

        for barcode in result:
            myData = barcode.data.decode("utf-8")
            if myData in myDataDB:
                socketio.emit(
                    "scan_result",
                    {"status": "granted", "message": f"Student ID : {myData}"},
                )
                is_granted = True
            else:
                print("Not found in the database!")
                socketio.emit(
                    "scan_result", {"status": "denied", "message": f"Student ID : {myData}"}
                )
                is_denied = True
            QRScanner.add_box_to_qr_code(image, barcode)

        if is_granted:
            image = qr_code_scanner.get_access_granted_img()
        elif is_denied:
            image = qr_code_scanner.get_access_denied_img()


        frame = QRScanner.encode(image)

        if is_granted or is_denied:
            for _ in range(2):
                yield (b"--frame\r\n" + b"Content-Type: image/jpeg\r\n\r\n" + frame + b"\r\n")
        else:
            yield (b"--frame\r\n" + b"Content-Type: image/jpeg\r\n\r\n" + frame + b"\r\n")


@app.route("/")
def index():
    return render_template("index.html")


@app.route("/video")
def video():
    return Response(
        generate_frames(Camera()), mimetype="multipart/x-mixed-replace; boundary=frame"
    )


if __name__ == "__main__":
    app.run(debug=True)
The app.py is our Flask web server which handles several functionalities such as displaying our index.html pages, sending the images captured by our web camera, and performing QR code reading and validation.
Import libraries
from importlib import import_module
from flask import Flask, render_template, Response
from flask_socketio import SocketIO, emit
from qr_scanner import QRScanner
from camera_opencv import Camera
First, we import the necessary files and classes in order for us to create a web application, process images using OpenCV, read QR codes, and send WebSocket messages.
myDataDB = ["123456", "223344"]

app = Flask(__name__)
app.config["SECRET_KEY"] = "DonskyTech Rocks!"
socketio = SocketIO(app, cors_allowed_origins="*")

qr_code_scanner = QRScanner()
The variable myDataDB contains the list of valid QR codes for our system.
In addition, we declare our Flask application, SocketIO, and an instance of our QRScanner class.
Generate image frames using OpenCV
def generate_frames(camera):
    while True:
        is_granted, is_denied = False, False
        image = camera.get_frame()

        result = QRScanner.read_qr_code(image)
        if len(result) == 0:
            socketio.emit(
                "scan_result",
                {"status": "scan", "message": "Please scan your QR Code"},
            )

        for barcode in result:
            myData = barcode.data.decode("utf-8")
            if myData in myDataDB:
                socketio.emit(
                    "scan_result",
                    {"status": "granted", "message": f"Student ID : {myData}"},
                )
                is_granted = True
            else:
                print("Not found in the database!")
                socketio.emit(
                    "scan_result", {"status": "denied", "message": f"Student ID : {myData}"}
                )
                is_denied = True
            QRScanner.add_box_to_qr_code(image, barcode)

        if is_granted:
            image = qr_code_scanner.get_access_granted_img()
        elif is_denied:
            image = qr_code_scanner.get_access_denied_img()


        frame = QRScanner.encode(image)

        if is_granted or is_denied:
            for _ in range(2):
                yield (b"--frame\r\n" + b"Content-Type: image/jpeg\r\n\r\n" + frame + b"\r\n")
        else:
            yield (b"--frame\r\n" + b"Content-Type: image/jpeg\r\n\r\n" + frame + b"\r\n")
In order for us to continually generate images for our web application then we need the logic behind the Python generator function generate_frames(). Using OpenCV, we capture each image from our webcam video source and do some processing.
First, we check if a QR code is detected using our function QRScanner.read_qr_code(image). If the returned list length is zero then it means that no QR code is detected so we send a WebSocket message to tell the user to “Please scan your QR Code“.
However, if a QR Code is detected then we validate if it is in the list of valid QR codes then we send a WebSocket message that it is “access granted” and we set the variable is_granted to True. Otherwise, we send an “access denied” WebSocket message and set the is_denied variable to True.
We add a box to our QR code to highlight the position of the QR code using the function QRScanner.add_box_to_qr_code(image, barcode).
If either the is_granted or is_denied variables are true then we return either the “access-denied.jpg” or “access-granted.jpg” file otherwise we just return the image captured by our web camera. We then need to encode the image into a bytes object that we could send over HTTP.
We return all the images using the yield generator function and wrapping it in a frame.
Flask Web Routes
@app.route("/")
def index():
    return render_template("index.html")


@app.route("/video")
def video():
    return Response(
        generate_frames(Camera()), mimetype="multipart/x-mixed-replace; boundary=frame"
    )


if __name__ == "__main__":
    app.run(debug=True)
The last part of app.py declares the different routes needed to display our index.html page and our “/video” route. As we are generating a continuous stream of images from our webcam then we set the mime type to a “multipart/x-mixed-replace” and use our generator function generate_frames().
Sample QR Code
The sample QR codes used in this project can be found in the sample folder of my GitHub repository.
Future OpenCV Improvements
Right now we have hard-coded the list of valid QR codes in a Python list but we can extend it in the future by:
- Saving the list of valid QR Codes in a database such as a MongoDB or FireBase database
- Log the list of QR codes validation in Google Sheets or in the database
Wrap Up
We have discussed in detail how we can utilize OpenCV in reading QR Code validation in this post. In addition, I have shown you how we can use your web browser in displaying the images captured by your web camera. With the help of Python, Flask, and Flask-SocketIO then we can display in real-time the result of the QR Code validation.
I hope you learned something! Happy exploring!
Leave a Reply