Introduction
Do you need to monitor the temperature or humidity of your surroundings then I highly suggest that you use the DHT22 sensor for this. This sensor is cheap and easy to connect to any Microcontrollers and it boasts high accuracy and stable readings. This post will show you how to interface your Raspberry Pi Single Board Computer (SBC) with your DHT22 temperature sensor.
If you want to see a demo of this project in video format then watch below or on my YouTube channel.
What is DHT22?

The DHT22 sensor is the upgraded version of the original DHT11 sensor and it may come as a standalone component or the module type. I am using a module type in this post with a pull-up resistor and a filtering capacitor included so that I won’t need to add any external components to it. It comes with 3 pins with a single data line and the power pins GND and VCC. The single data line outputs both the temperature and humidity readings.
Below are the specifications for this component:
| Operating Voltage | 3.3 – 5.5 V |
| Protocol/Output | Serial Data |
| Temperature Range | -40 to 80 °C |
| Humidity Range | 0 to 100% |
| Accuracy | ±0.5 °C and ±1% |
Prerequisites
The following are the components needed to follow along with this post.
- Raspberry Pi ( I used Raspberry Pi Zero W) – Amazon | AliExpress
- or Raspberry Pi Zero 2 W – Amazon | AliExpress
- or Raspberry Pi 4 – Amazon | AliExpress
- DHT22 – Amazon | AliExpress
- DHT11 – Amazon | AliExpress | Bangood
- Breadboard – Amazon | AliExpress | Bangood
- Connecting Wires – Amazon | AliExpress | Bangood
Disclosure: These are affiliate links and I will earn small commissions to support my site when you buy through these links.
You should have installed the latest Raspberry Pi OS on your Raspberry Pi Device. I have installed mine using a “headless” setup so that I will not need any external keyboard or monitor.
Related Content:
Setup Raspberry Pi Headless No Monitor
Wiring/Schematic
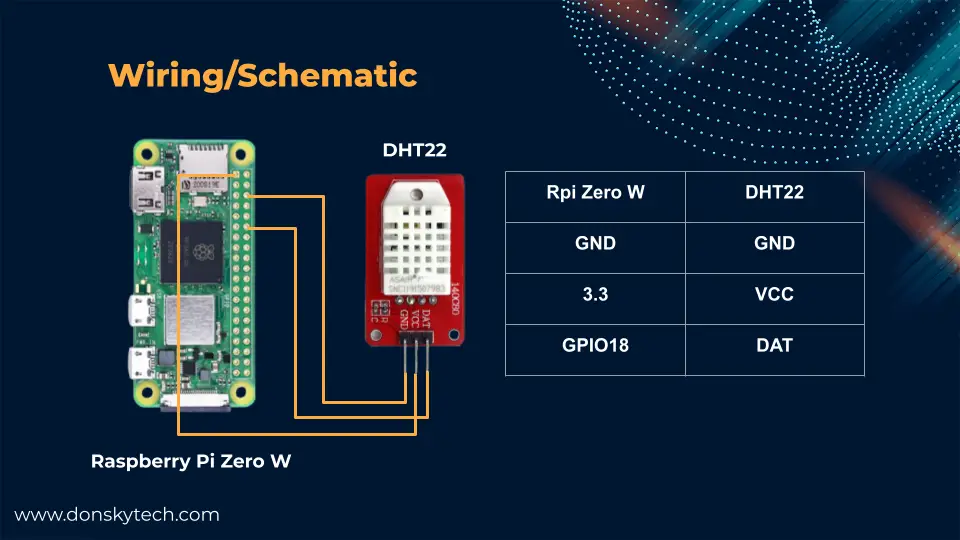
The image above will show you how you can wire your Raspberry Pi with your DHT22 sensor. Any digital pin can be used to communicate with this sensor.
Once you have finished wiring your Raspberry Pi then we could now proceed with the process of reading the temperature and humidity values from our DHT sensor.
Update your Raspberry Pi
Before we proceed to create the program that will communicate with our DHT22 sensor then it is a good idea to update our Raspberry Pi device to retrieve the latest firmware and library updates.
Connect to your Raspberry Pi thru SSH or Putty. Execute the following script to prepare and update your Raspberry Pi.
sudo apt update
sudo apt full-upgrade
sudo apt install python3-pip
sudo pip3 install --upgrade setuptools
sudo reboot
Choose your project root directory
Select a directory where you want to create your project. This directory will then serve as the root of our project.
cd /home/pi/Projects
mkdir -p dht22_test
cd dht22_test
How to interface Raspberry Pi with DHT22?
We can use two libraries in interfacing our Raspberry Pi with our DHT22 temperature sensor and using Python as our programming language. We can either use the latest adafruit-circuitpython-dht or the old and deprecated Adafruit_DHT from AdaFruit.
When you search online for a library to be used for your DHT22 or DHT11 sensor then you would still come across the old library. It still works and is easy to install but you won’t get any updates from them anymore as it is already deprecated.
The latest library installation is a little bit involved but we are seeing regular updates from the AdaFruit company so we can be assured that the development is live and we can raise any issues should we encounter one.
In this post, I will walk you through the two libraries so that you could decide which one to choose. The code for this project is also available in my GitHub repositories for you to check out and you can either download it as a zip file or clone it using Git.
git clone https://github.com/donskytech/raspberrypi-projects
cd dht22
adafruit-circuitpython-dht
This library uses some of the CircuitPython libraries so we need to install its dependencies. If you are not familiar with CircuitPython then it is Adafruits’ own implementation of the MicroPython language used in Microcontroller boards.
Installing CircuitPython Libraries on Raspberry Pi
The latest library uses the Adafruit CircuitPython libraries so we need to prepare our Raspberry Pi first. The complete Adafruit documentation can be found here but in summary, we just need to execute the commands below.
sudo pip3 install --upgrade adafruit-python-shell
wget https://raw.githubusercontent.com/adafruit/Raspberry-Pi-Installer-Scripts/master/raspi-blinka.py
sudo python3 raspi-blinka.py
This might take some time so please be patient and let the installation finish. After which, it will ask if you would like to reboot so select ‘Y’ or Yes.
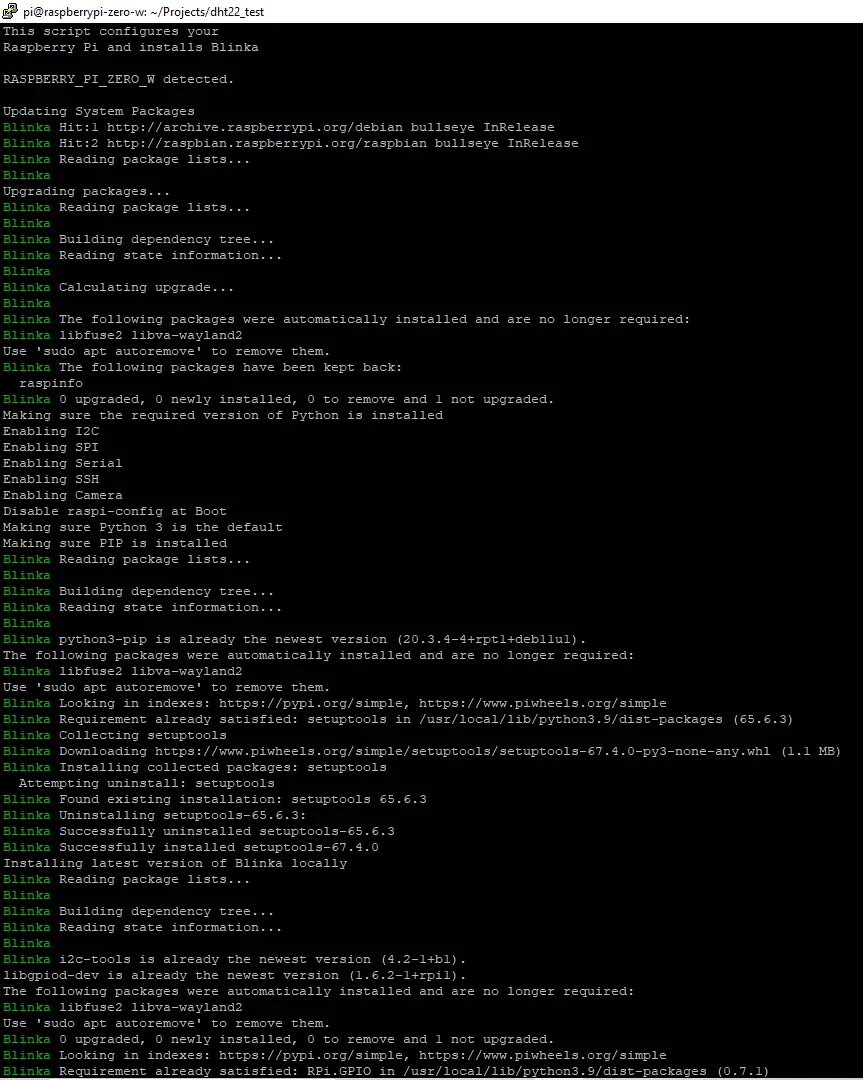
The image above shows a sample of the execution and what this script will do is update the latest libraries and also enable the I2C and SPI protocol of your Raspberry Pi device. To validate if the I2C or SPI is enabled then execute the below command.
pi@raspberrypi-zero-w:~/Projects/dht22_test $ ls /dev/i2c* /dev/spi*
/dev/i2c-1  /dev/spidev0.0  /dev/spidev0.1
Install the adafruit-circuitpython-dht
Next, we install this library by executing the below command.
pip3 install adafruit-circuitpython-dht How to test adafruit-circuitpython-dht?
Follow the schematic above and create a file called new_dht_simpletest.py and paste the below code. This code was taken from the examples folder of this library.
nano new_dht_simpletest.py # SPDX-FileCopyrightText: 2021 ladyada for Adafruit Industries
# SPDX-License-Identifier: MIT
import time
import board
import adafruit_dht
# Initial the dht device, with data pin connected to:
dhtDevice = adafruit_dht.DHT22(board.D18)
# you can pass DHT22 use_pulseio=False if you wouldn't like to use pulseio.
# This may be necessary on a Linux single board computer like the Raspberry Pi,
# but it will not work in CircuitPython.
# dhtDevice = adafruit_dht.DHT22(board.D24, use_pulseio=False)
while True:
try:
# Print the values to the serial port
temperature_c = dhtDevice.temperature
temperature_f = temperature_c * (9 / 5) + 32
humidity = dhtDevice.humidity
print(
"Temp: {:.1f} F / {:.1f} C Humidity: {}% ".format(
temperature_f, temperature_c, humidity
)
)
except RuntimeError as error:
# Errors happen fairly often, DHT's are hard to read, just keep going
print(error.args[0])
time.sleep(2.0)
continue
except Exception as error:
dhtDevice.exit()
raise error
time.sleep(2.0)Execute the below command and you should be seeing the below messages.
pi@raspberrypi-zero-w:~/Projects/dht22_test $ python new_dht_simpletest.py
A full buffer was not returned. Try again.
Temp: 89.8 F / 32.1 C    Humidity: 59.4%
Temp: 89.8 F / 32.1 C    Humidity: 59.3%
Temp: 89.8 F / 32.1 C    Humidity: 58.7%
Temp: 89.8 F / 32.1 C    Humidity: 58.8%
Temp: 89.8 F / 32.1 C    Humidity: 59.3%
Temp: 89.8 F / 32.1 C    Humidity: 59.2%
Temp: 89.8 F / 32.1 C    Humidity: 59.1%
A full buffer was not returned. Try again.
A full buffer was not returned. Try again.
A full buffer was not returned. Try again.
A full buffer was not returned. Try again.
Just ignore the message “A full buffer was not returned. Try again.” as the adafruit-circuitpython-dht library could not read the latest readings so it would retry. Let us go over what each line of the code does.
# SPDX-FileCopyrightText: 2021 ladyada for Adafruit Industries
# SPDX-License-Identifier: MIT

import time
import board
import adafruit_dht
Import the necessary library needed to communicate with a DHT22 or a DHT11 sensor with your Raspberry Pi.
# Initial the dht device, with data pin connected to:
dhtDevice = adafruit_dht.DHT22(board.D18)

# you can pass DHT22 use_pulseio=False if you wouldn't like to use pulseio.
# This may be necessary on a Linux single board computer like the Raspberry Pi,
# but it will not work in CircuitPython.
# dhtDevice = adafruit_dht.DHT22(board.D18, use_pulseio=False)
If you are connecting a DHT11 then you could replace the code to dhtDevice = adafruit_dht.DHT11(board.D18). Ignore for now the commented code as this is just used for CircuitPython.
while True:
    try:
        # Print the values to the serial port
        temperature_c = dhtDevice.temperature
        temperature_f = temperature_c * (9 / 5) + 32
        humidity = dhtDevice.humidity
        print(
            "Temp: {:.1f} F / {:.1f} C    Humidity: {}% ".format(
                temperature_f, temperature_c, humidity
            )
        )

    except RuntimeError as error:
        # Errors happen fairly often, DHT's are hard to read, just keep going
        print(error.args[0])
        time.sleep(2.0)
        continue
    except Exception as error:
        dhtDevice.exit()
        raise error

    time.sleep(2.0)
This is a loop that will read the temperature and humidity. If the library cannot read the latest sensor readings then it will just print it and continue the call again.
That is all for the code and how easy it is to interface your Raspberry Pi with a DHT22 or DHT11 sensor and retrieve the temperature and humidity values.
We will discuss next the use of the old and the deprecated Adafruit_DHT library.
Adafruit_DHT
Execute the below script to install the Adafruit_DHT library. As mentioned above, the installation is really simple as there is no other dependency library needed to be installed.
pip3 install Adafruit_DHTTesting Adafruit_DHT Code
Below is a sample code that you can use to test out your DHT22 or DHT11 sensor.
import Adafruit_DHT

# Sensor should be set to Adafruit_DHT.DHT11,
# Adafruit_DHT.DHT22, or Adafruit_DHT.AM2302.
sensor = Adafruit_DHT.DHT22


# Example using a Raspberry Pi with DHT sensor
# connected to GPIO18.
pin = 18

while True:
    # Try to grab a sensor reading.  Use the read_retry method which will retry up
    # to 15 times to get a sensor reading (waiting 2 seconds between each retry).
    humidity, temperature = Adafruit_DHT.read_retry(sensor, pin)

    # Note that sometimes you won't get a reading and
    # the results will be null (because Linux can't
    # guarantee the timing of calls to read the sensor).
    # If this happens try again!
    if humidity is not None and temperature is not None:
        print('Temp={0:0.1f}*C  Humidity={1:0.1f}%'.format(temperature, humidity))
    else:
        print('Failed to get reading. Try again!')
The code is heavily commented so it would be easier for you to understand how it works. I have taken this from the examples folder of the library and have just edited it to match my wiring or schematic.
Run the sample program by executing the below command.
pi@raspberrypi-zero-w:~/Projects/dht22_test $ python3 old_dht_simpletest.py
Temp=32.1*C  Humidity=59.5%
Temp=32.1*C  Humidity=60.1%
Temp=32.1*C  Humidity=60.0%
Temp=32.2*C  Humidity=60.0%
Temp=32.2*C  Humidity=60.0%
Wrap up
I have shown you how to connect your Raspberry Pi with a DHT22 or a DHT11 sensor to retrieve temperature and humidity readings in this post. Also, I presented to you the two libraries that you can use to interface with this sensor. We will use this project in future Internet of Things (IoT) applications.
I hope you learned something, happy exploring!
Leave a Reply