Introduction
Do you want to know how to set up your Raspberry Pi to control those 12V solenoid door locks then this post is for you. Solenoid door locks are excellent components used in security systems such as locking doors, gates, or cabinets. The Raspberry Pi GPIO pins can drive these components with little code.
If you want to see a demo of this project then please see the video below or watch it on my YouTube channel.
Prerequisites
The following components are needed to follow along with this post:
- Raspberry Pi (I used Raspberry Pi Zero W) – Amazon | AliExpress
- Relay – Amazon | AliExpress | Bangood
- Solenoid Lock – Amazon | AliExpress
- Breadboard – Amazon | AliExpress | Bangood
- Connecting Wires – Amazon | AliExpress | Bangood
- External power supply (with 12V and high current) – Amazon | AliExpress | Bangood
Disclosure: These are affiliate links and I will earn small commissions to support my site when you buy through these links.
I installed the latest Raspberry Pi OS in headless mode.
Related Content:
Setup Raspberry Pi Headless No Monitor
How does 12V solenoid work?

The solenoid door lock is a locking mechanism triggered to open or close when an appropriate voltage is applied. The voltage range is usually from 9V to 12V and uses a considerable amount of current.
It is consist of a big coil of wire with a slug in the middle such that when the coil is energized then it gets pulled in the middle unlocking the whole system. On the other hand, the door lock reverts to its original position when power is not applied. A metal casing encloses the whole parts and has holes on the sides that can be fixed to the door.
The whole solenoid door lock mechanism exposes two external wires connected to the internal circuitry. The red wire is for the positive side and the other color is for the negative side.
How to connect Raspberry Pi with the Solenoid Lock?
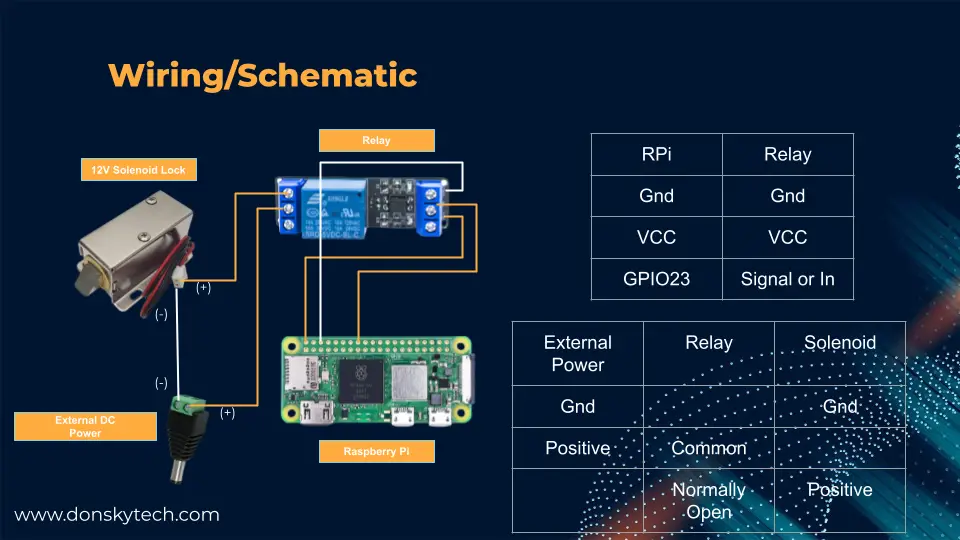
An external power is needed to control our 12V solenoid door lock as the voltage and current requirement of it is beyond what our Raspberry Pi is capable of. We will use a relay to separate the circuitry powering the signal door lock and control the behavior of the relay using its input pins from the GPIO of our Raspberry Pi.
Please take a look at the image below for you to have an idea of how it will work. Note that we are connecting the 5V pin of the Raspberry Pi to the VCC of our relay and not the 3.3V.
Coding
The code below is how we will control our solenoid lock using the Raspberry Pi. This is also available in my GitHub repository.
import RPi.GPIO as GPIO
from time import sleep

RELAY_PIN = 23

GPIO.setwarnings(False)
GPIO.setmode(GPIO.BCM)
GPIO.setup(RELAY_PIN, GPIO.OUT)

try:
    while (True):
        print("Turning on...")
        GPIO.output(RELAY_PIN, 1)
        sleep(1)
        print("Turning off...")
        GPIO.output(RELAY_PIN, 0)
        sleep(1)
finally:
    GPIO.cleanup()
Let us go over what each line of code does.
import RPi.GPIO as GPIO
from time import sleep
Import the necessary packages for driving the Raspberry Pi GPIO, especially the RPi.GPIO package.
RELAY_PIN = 23

GPIO.setwarnings(False)
GPIO.setmode(GPIO.BCM)
GPIO.setup(RELAY_PIN, GPIO.OUT)
Declare our GPIO pin that will serve as the signal pin to our relay. We then configure several Rpi.GPIO setup and set the relay pin as an output pin.
try:
    while (True):
        print("Turning on...")
        GPIO.output(RELAY_PIN, 1)
        sleep(1)
        print("Turning off...")
        GPIO.output(RELAY_PIN, 0)
        sleep(1)
finally:
    GPIO.cleanup()
In a continuous loop, we toggle the relay pin output from high to low so that we could drive our solenoid door lock. In case of failure, we have a try-finally block to clean up the GPIO setup.
Wrap up
We have successfully discussed how we can control our solenoid lock using your Raspberry Pi in this post.
I hope you have learned something. Happy Exploring!
Leave a Reply