Introduction
Infrared (IR) sensors are electronic devices mainly used for detecting the presence or proximity of objects with regard to their placements. This is very useful for Internet of Things (IoT) projects that check for any object in the front, side, or back of where this sensor is placed. In this post, we will explore how to use the Infrared Sensor with our Raspberry Pi and how to create the program to process the digital signal output of this component.
If you have done any robot car (like my ESP32 Robot Car Using Websockets) before then you might have used this component to avoid any obstacle for your robot car. We can use the following sensor as well to count how many loads have passed into our Conveyor System.
Infrared (IR) Sensor
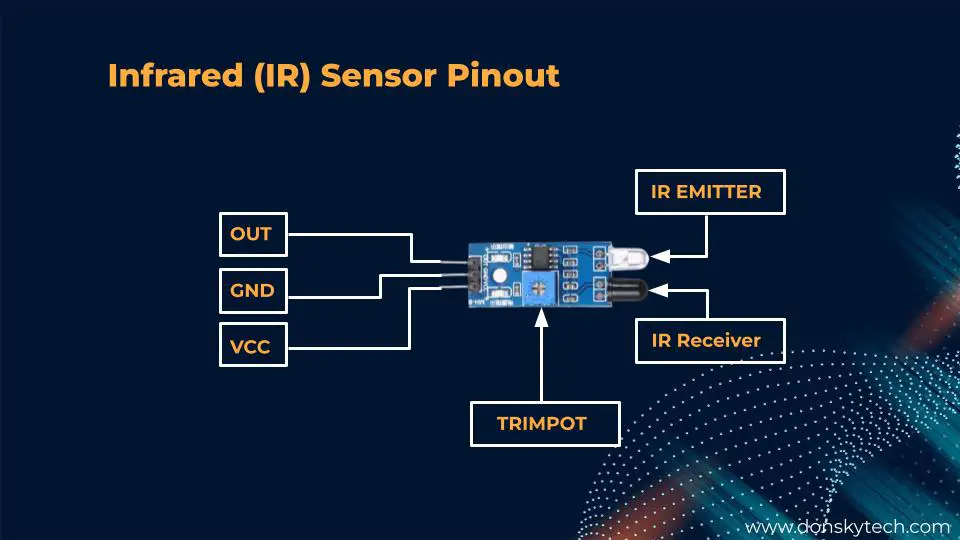
The Infrared (IR) sensor contains three pins for connections mainly the VCC, GND, and the Output pin. The VCC is attached to the 5V, the GND is to the GND, and the Output pin is to the GPIO of the Raspberry Pi.
Most modules come with an Infrared (IR) Emitter, an IR Receiver, and a Trimpot potentiometer to adjust the distance sensitivity between it and the objects being detected. It also contains a power LED (Light Emitting Diode) and a Signal LED to display the status.
How does it work?

Power is applied to the Infrared (IR) Emitter diode to emit infrared light and if an object or load is near then it gets reflected back to the Infrared (IR) receiver which is usually a Photodiode. The nearer the object the stronger the signal is captured. A LOW signal is returned by our Infrared (IR) sensor to our Raspberry Pi which can be detected by any of its GPIO.
Can you see infrared light?
I often get asked if I can see the Infrared Light being emitted by the Infrared (IR) sensor. Unfortunately, you cannot see it with your naked eye but if you video it with your mobile phone then you would see the pinkish glow. If you are curious then please see this video below. 🙂
Prerequisites
The following components are needed to follow along with this tutorial.
- Infrared (IR) Sensor – Amazon | AliExpress
- Raspberry Pi (I used Raspberry Pi W Zero) – Amazon | AliExpress
- or Raspberry Pi Zero 2 W – Amazon | AliExpress
- or Raspberry Pi 4 8GB – Amazon | AliExpress
- LED – Amazon | AliExpress | Bangood
- Resistor (220 Ohms) – Amazon | AliExpress | Bangood
- Breadboard – Amazon | AliExpress | Bangood
- Connecting Wires – Amazon | AliExpress | Bangood
Disclosure: These are affiliate links and I will earn small commissions to support my site when you buy through these links.
I have installed the latest Raspberry Pi OS on my Raspberry Pi. If you have not done so, then please take a look at my Setup Raspberry Pi Headless No Monitor.
Wiring/Schematic
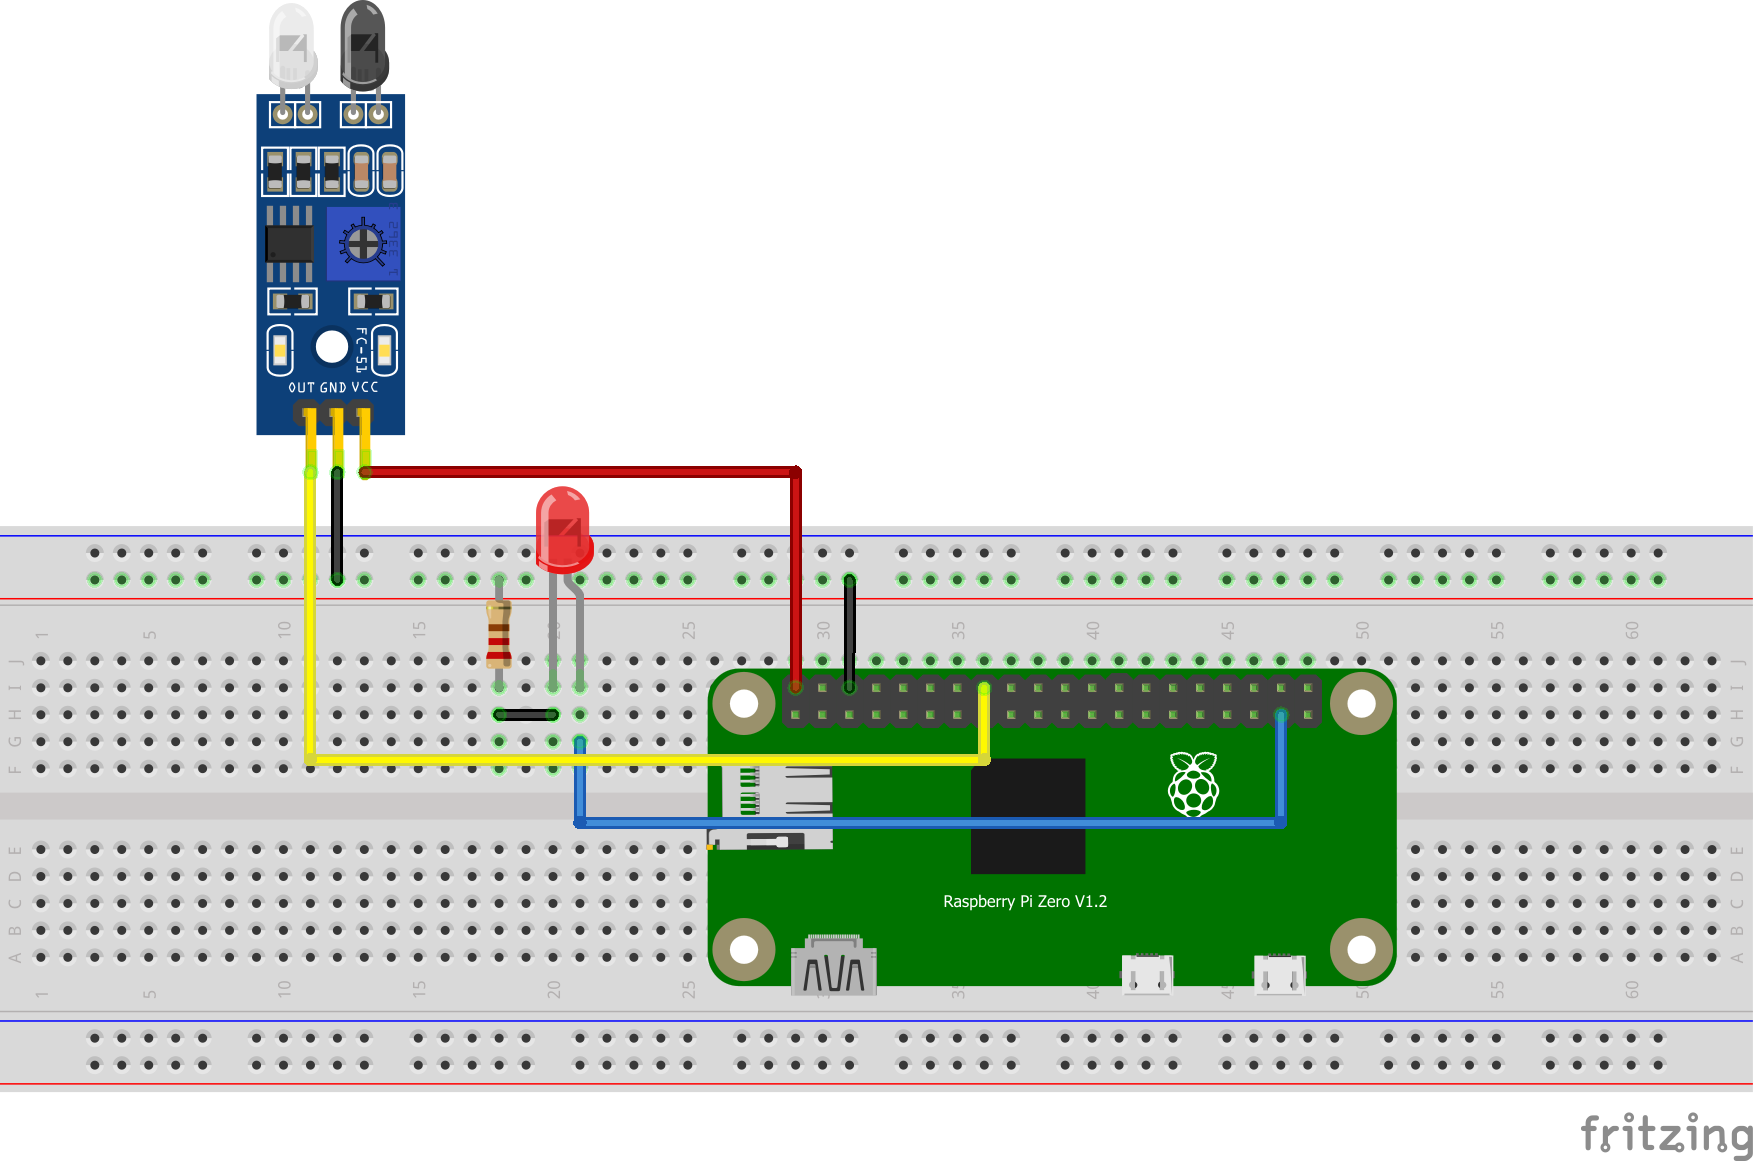
| Infrared (IR) Sensor | Raspberry Pi | LED |
|---|---|---|
| VCC | VCC | |
| GND | GN | |
| OUT | GPIO23 | |
| GPIO26 | ANODE |
Note: Place a 220 Ohm resistor between your LED cathode to the ground to limit the amount of current drawn or we risk destroying our Raspberry Pi device.
Code
The code for this project is available in my Github account which you can access from here. You can either download the whole project or clone it if you know Git.
It only contains one Python file which is shown below.
import RPi.GPIO as GPIO
import time

# declare the sensor and led pin
sensor_pin = 23
led_pin = 26

# GPIO setup
GPIO.setwarnings(False)
GPIO.setmode(GPIO.BCM)
GPIO.setup(sensor_pin, GPIO.IN)
GPIO.setup(led_pin, GPIO.OUT)

try:
    while True:
        if GPIO.input(sensor_pin):
            # If no object is near
            GPIO.output(led_pin, False)
            while GPIO.input(sensor_pin):
                time.sleep(0.2)
        else:
            # If an object is detected
            GPIO.output(led_pin, True)
except KeyboardInterrupt:
    GPIO.cleanup()
Let us go over the code to explain what it does.
import RPi.GPIO as GPIO
import time
Import the necessary RPi.GPIO package and the time module for sleep purposes.
# declare the sensor and led pin
sensor_pin = 23
led_pin = 26
Declare the sensor and LED pin which maps to the GPIO23 and GPIO26 of our Raspberry Pi.
# GPIO setup
GPIO.setwarnings(False)
GPIO.setmode(GPIO.BCM)
GPIO.setup(sensor_pin, GPIO.IN)
GPIO.setup(led_pin, GPIO.OUT)
Set up the GPIO pins as needed and set the pins as either input or output pins.
try:
    while True:
        if GPIO.input(sensor_pin):
            # If no object is near
            GPIO.output(led_pin, False)
            while GPIO.input(sensor_pin):
                time.sleep(0.2)
        else:
            # If an object is detected
            GPIO.output(led_pin, True)
except KeyboardInterrupt:
    GPIO.cleanup()
We declare an infinite loop to periodically check the status of our Infrared (IR) sensor pin. If no object is near or not detected then a HIGH value is registered. We sleep for some time until the reading in the GPIO pins becomes LOW. We turn off the LED since nothing is detected.
If an object is near then the reading will become LOW and it will remain so. We turn on the LED in this case.
Wrap up
We have explored the Infrared Sensor using the Raspberry Pi in this project. It actually is much simpler to interface with this component than you might have expected.
If your projects require object and proximity detection then this is an ideal electronic component to use. We will use the code that we have outlined here in future posts.
Stay tuned and Happy Exploring!
Support Me!
I love sharing what I know and hopefully, I was able to help you. Writing helpful content takes so much time and research. If you think you like my work and I have managed to help you then please consider supporting my channel. I would be very grateful and would boost my confidence that what I am doing is making a big change in the world. (No Pun Intended!) 😉
Become a Patron!
Leave a Reply