In this article we are going to program our Arduino RFID Database Security System. We will configure the Arduino to read the MFRC522 RFID Reader and retrieve the RFID code. The RFID code is then sent thru the ESP8266 ESP-01 through serial communication. The ESP-01 will then talk to the Application which we have developed in a previous article.
The Javascript Object Notation (JSON) response is then sent back to the arduino and will be parsed if an RFID code is present in the database or not.
This is the last part of our Arduino RFID Database Security System where we create a database backed RFID system. List of valid RFID Codes are stored in the database. We used the Arduino and the MFRC 522 Reader in checking if the RFID tag is valid or not with the help of the ESP8266 ESP-01.
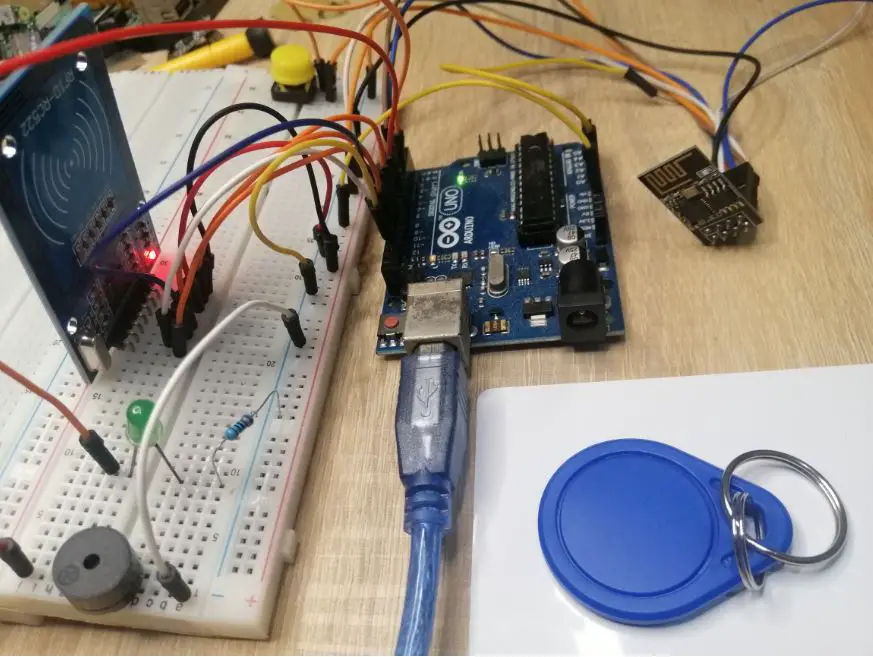
The following is the demo of my Arduino RFID Database Security System with ESP8266 ESP-01.
Wiring Diagram
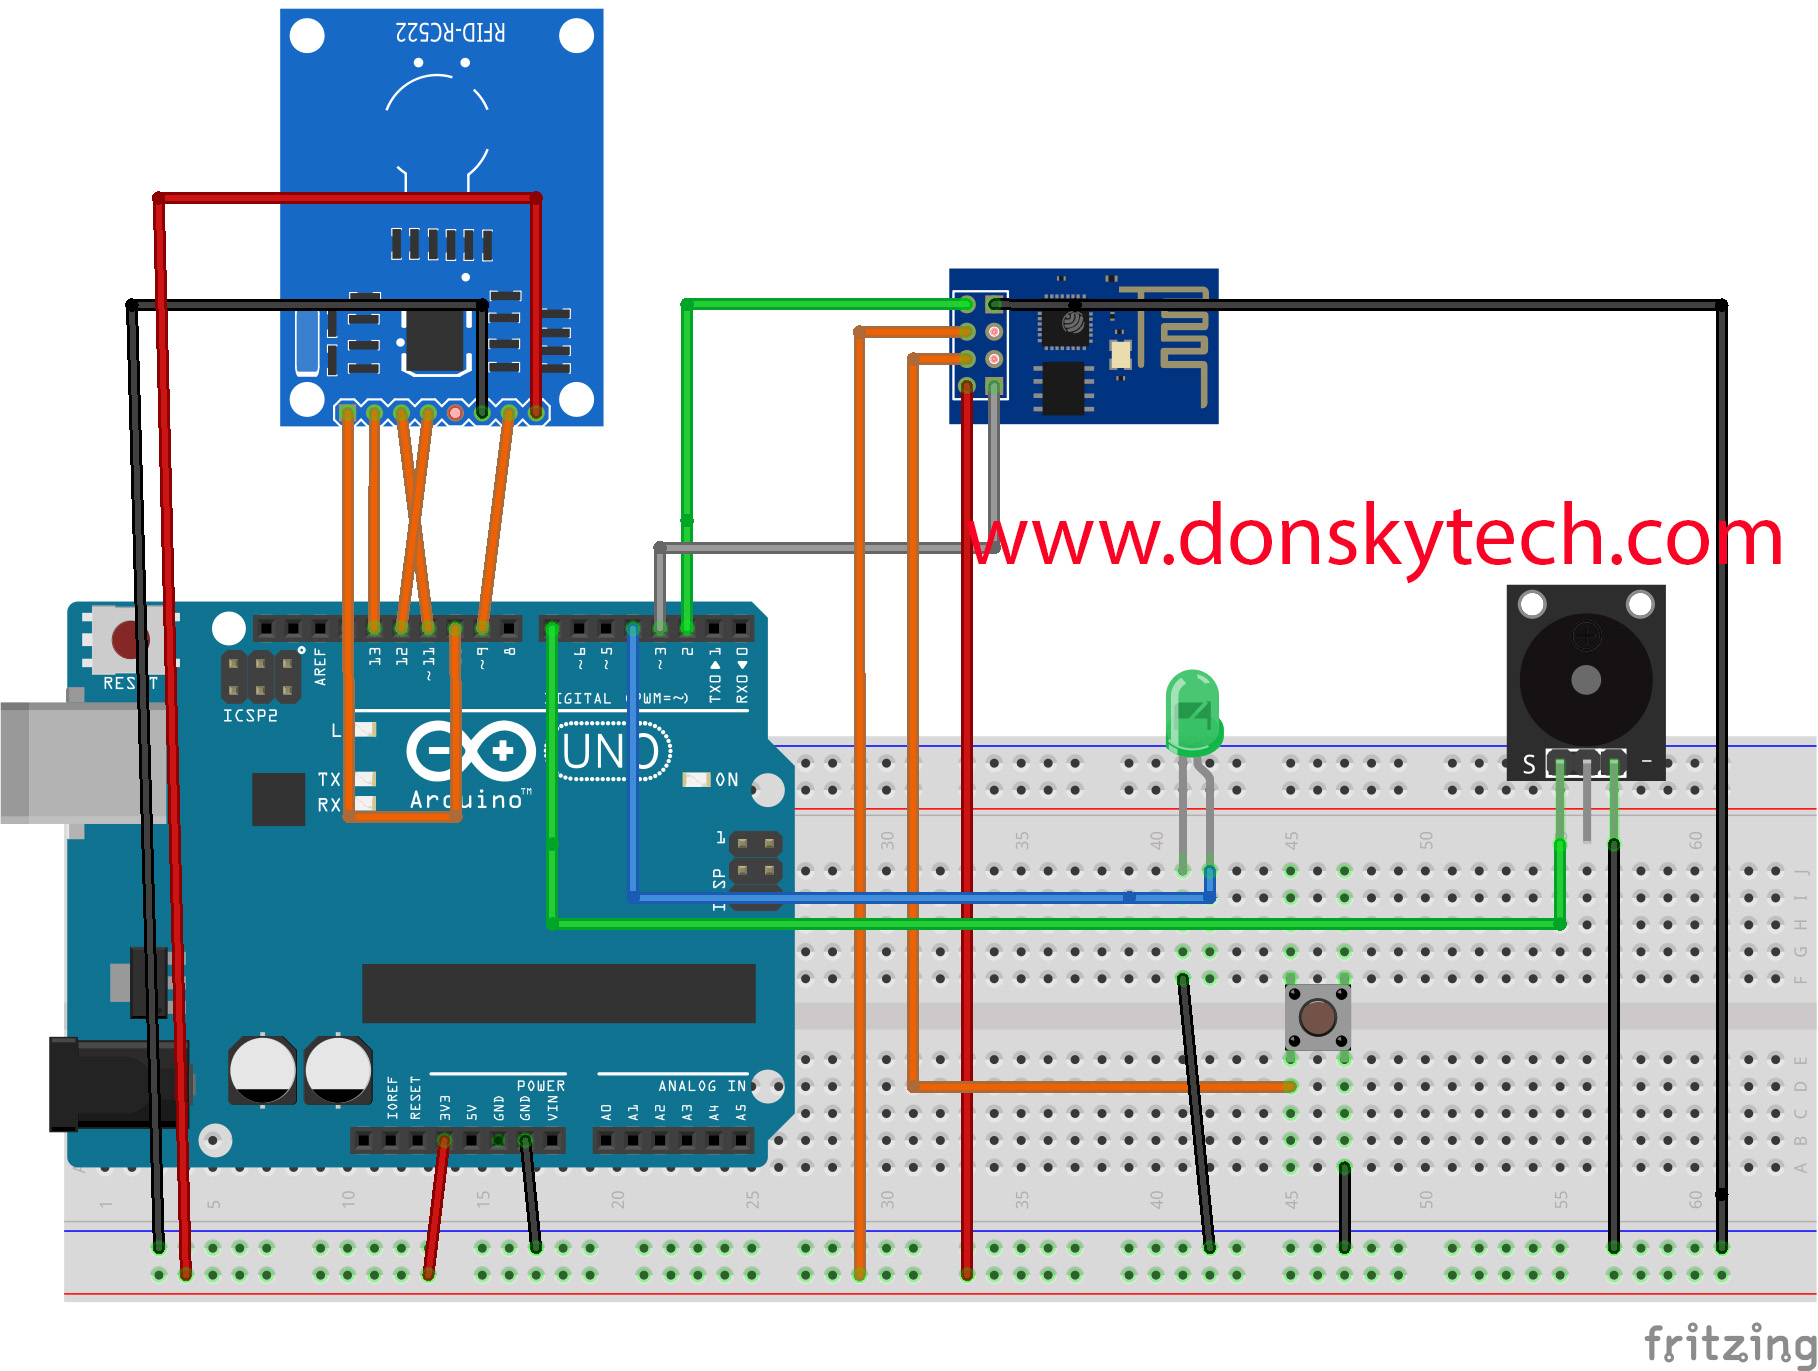
| ARDUINO | MFRC522 RFID |
| SDA | PIN 10 |
| SCK | PIN 13 |
| MOSI | PIN 11 |
| MISO | PIN 12 |
| IRQ | <NO CONNECTION> |
| GND | GND |
| RST | PIN 9 |
| 3.3 V | VCC |
Note: The VCC of the MFRFC522 should be powered by the 3.3 V
| ARDUINO | ESP8266 ESP-01 |
|---|---|
| PIN 2 | TX |
| PIN 3 | RX |
| ESP8266 ESP-01 | BREADBOARD |
| CH_PD | 3.3V |
| RST | To Switch To GND |
| VCC | 3.3V |
| GND | GND |
| GPIO 0 | <NO CONNECTION> |
| GPIO 2 | <NO CONNECTION> |
| ARDUINO | BUZZER |
| PIN 7 | SIGNAL (+) |
| GND (TO BREADBOARD GND) |
| ARDUINO | LED |
| PIN 4 | ANODE |
| CATHODE (TO BREADBOARD GND) |
Code
The whole project code is in my github account or you can click this link.
This project uses the “awesome” ArduinoJSON library V6 in handling the JSON response. So please follow the following installation procedure before continuing further.
ESP8266 ESP-01 Code
/*
 * Author: donksy
 * Website: //www.donskytech.com
 * Project: ARDUINO RFID DATABASE SYSTEM WITH ESP8266-ESP01
 * URL: https://www.donskytech.com/arduino-rfid-database-security-system-designing-the-project/
 */

#include <ESP8266WiFi.h>
#include <ESP8266HTTPClient.h>
#include <ArduinoJson.h>

// NOTE:  CHANGE THIS TO YOUR WIFI SSID AND PASSWORD
const char* ssid     = "<CHANGE ME!>";
const char* password = "<CHANGE ME!>";

//#define DEBUG   //If you comment this line, the DPRINT & DPRINTLN lines are defined as blank.
#ifdef DEBUG    //Macros are usually in all capital letters.
  #define DPRINT(...)    Serial.print(__VA_ARGS__)     //DPRINT is a macro, debug print
  #define DPRINTLN(...)  Serial.println(__VA_ARGS__)   //DPRINTLN is a macro, debug print with new line
#else
  #define DPRINT(...)     //now defines a blank line
  #define DPRINTLN(...)   //now defines a blank line
#endif

void setup() {
  Serial.begin(4800);
  delay(10);

  // We start by connecting to a WiFi network
  Serial.print("Connecting to ");
  Serial.println(ssid);
  WiFi.mode(WIFI_STA);
  WiFi.begin(ssid, password);

  while (WiFi.status() != WL_CONNECTED) {
    delay(500);
    Serial.print(".");
  }

  Serial.println("");
  Serial.println("WiFi connected");
  Serial.println("IP address: ");
  Serial.println(WiFi.localIP());
}

const byte numChars = 20;
char receivedChars[numChars];   // an array to store the received data

boolean newData = false;

void loop() {
    recvWithEndMarker();
    processRFIDCode();
}
void recvWithEndMarker() {
    static byte ndx = 0;
    char endMarker = '\n';
    char rc;

    while (Serial.available() > 0 && newData == false) {
        rc = Serial.read();

        if (rc != endMarker) {
            receivedChars[ndx] = rc;
            ndx++;
            if (ndx >= numChars) {
                ndx = numChars - 1;
            }
        }
        else {
            receivedChars[ndx] = '\0'; // terminate the string
            ndx = 0;
            newData = true;
        }
    }
}

void processRFIDCode() {
    if (newData == true) {
        DPRINT("This just in ... ");
        DPRINTLN(receivedChars);
        newData = false;
        isUserAuthorized(receivedChars);
    }
}


void isUserAuthorized(String rfIdCode){
    // wait for WiFi connection
  if ((WiFi.status() == WL_CONNECTED)) {

    WiFiClient client;

    HTTPClient http;

    // NOTE:  CHANGE THIS TO THE IP ADDRESS WHERE YOUR APPLICATION IS RUNNING
    String url = "http://192.168.100.10:8080/student/isauthorized?rf_id_code=";
    String encodedRFIDCode = urlencode(rfIdCode);
    url+=encodedRFIDCode;
    DPRINT("url :: ");
    DPRINTLN(url);

    http.setTimeout(20000);
    if (http.begin(client, url)) {  // HTTP

      // start connection and send HTTP header
      int httpCode = http.GET();
      DPRINT("httpCode :: ");
      DPRINTLN(httpCode);

      // httpCode will be negative on error
      if (httpCode > 0) {
        // HTTP header has been send and Server response header has been handled

        if (httpCode == HTTP_CODE_OK || httpCode == HTTP_CODE_MOVED_PERMANENTLY) {
          String payload = http.getString();
          DPRINTLN(payload);
          sendDataBackToArduino(payload);

        }
      } else {
        Serial.printf("[HTTP] GET... failed, error: %s\n", http.errorToString(httpCode).c_str());
      }

      http.end();
    } else {
      Serial.printf("[HTTP} Unable to connect\n");
    }
  }
}

String urlencode(String str)
{
    String encodedString="";
    char c;
    char code0;
    char code1;
    char code2;
    for (int i =0; i < str.length(); i++){
      c=str.charAt(i);
      if (c == ' '){
        encodedString+= '+';
      } else if (isalnum(c)){
        encodedString+=c;
      } else{
        code1=(c & 0xf)+'0';
        if ((c & 0xf) >9){
            code1=(c & 0xf) - 10 + 'A';
        }
        c=(c>>4)&0xf;
        code0=c+'0';
        if (c > 9){
            code0=c - 10 + 'A';
        }
        code2='\0';
        encodedString+='%';
        encodedString+=code0;
        encodedString+=code1;
        //encodedString+=code2;
      }
      yield();
    }
    return encodedString;

}

void sendDataBackToArduino(String payload){
  const size_t capacity = JSON_OBJECT_SIZE(1) + 30;
  DynamicJsonDocument doc(capacity);
    // Parse JSON object
  DeserializationError error = deserializeJson(doc, payload);
  if (error) {
    Serial.print(F("deserializeJson() failed: "));
    Serial.println(error.c_str());
    return;
  }
  serializeJson(doc, Serial);
}
The code above should be loaded into the ESP8266 ESP-01 firmware. You can use your arduino to program your ESP8266. I have written an article on how to program your ESP8266 ESP-01 with Arduino if you don’t have an idea about it.
Let us discuss the code line by line:
// NOTE:  CHANGE THIS TO YOUR WIFI SSID AND PASSWORD
const char* ssid     = "<CHANGE ME!>";
const char* password = "<CHANGE ME!>";
Change the ssid and password according to your wifi setup.
//#define DEBUG   //If you comment this line, the DPRINT & DPRINTLN lines are defined as blank.
#ifdef DEBUG    //Macros are usually in all capital letters.
  #define DPRINT(...)    Serial.print(__VA_ARGS__)     //DPRINT is a macro, debug print
  #define DPRINTLN(...)  Serial.println(__VA_ARGS__)   //DPRINTLN is a macro, debug print with new line
#else
  #define DPRINT(...)     //now defines a blank line
  #define DPRINTLN(...)   //now defines a blank line
#endif
This is a “macro” that will allow us to debug our code. So instead of deleting your debugging code like “Serial.println” then we will just need to comment out the “ifdef DEBUG“.
void setup() {
  Serial.begin(4800);
  delay(10);

  // We start by connecting to a WiFi network
  Serial.print("Connecting to ");
  Serial.println(ssid);
  WiFi.mode(WIFI_STA);
  WiFi.begin(ssid, password);

  while (WiFi.status() != WL_CONNECTED) {
    delay(500);
    Serial.print(".");
  }

  Serial.println("");
  Serial.println("WiFi connected");
  Serial.println("IP address: ");
  Serial.println(WiFi.localIP());
}
Code to connect to our wifi.
void loop() {
    recvWithEndMarker();
    processRFIDCode();
}
void recvWithEndMarker() {
    static byte ndx = 0;
    char endMarker = '\n';
    char rc;

    while (Serial.available() > 0 && newData == false) {
        rc = Serial.read();

        if (rc != endMarker) {
            receivedChars[ndx] = rc;
            ndx++;
            if (ndx >= numChars) {
                ndx = numChars - 1;
            }
        }
        else {
            receivedChars[ndx] = '\0'; // terminate the string
            ndx = 0;
            newData = true;
        }
    }
}

void processRFIDCode() {
    if (newData == true) {
        DPRINT("This just in ... ");
        DPRINTLN(receivedChars);
        newData = false;
        isUserAuthorized(receivedChars);
    }
}
The ESP8266 ESP-01 communicates with the Arduino thru SoftwareSerial so we parse the data coming in and extract the RFID code retrieve from the MRFC22 Reader.
void isUserAuthorized(String rfIdCode){
    // wait for WiFi connection
  if ((WiFi.status() == WL_CONNECTED)) {

    WiFiClient client;

    HTTPClient http;

    // NOTE:  CHANGE THIS TO THE IP ADDRESS WHERE YOUR APPLICATION IS RUNNING
    String url = "http://192.168.100.10:8080/student/isauthorized?rf_id_code=";
    String encodedRFIDCode = urlencode(rfIdCode);
    url+=encodedRFIDCode;
    DPRINT("url :: ");
    DPRINTLN(url);

    http.setTimeout(20000);
    if (http.begin(client, url)) {  // HTTP

      // start connection and send HTTP header
      int httpCode = http.GET();
      DPRINT("httpCode :: ");
      DPRINTLN(httpCode);

      // httpCode will be negative on error
      if (httpCode > 0) {
        // HTTP header has been send and Server response header has been handled

        if (httpCode == HTTP_CODE_OK || httpCode == HTTP_CODE_MOVED_PERMANENTLY) {
          String payload = http.getString();
          DPRINTLN(payload);
          sendDataBackToArduino(payload);

        }
      } else {
        Serial.printf("[HTTP] GET... failed, error: %s\n", http.errorToString(httpCode).c_str());
      }

      http.end();
    } else {
      Serial.printf("[HTTP} Unable to connect\n");
    }
  }
}
The code that will call our Application that we developed in the previous post. Make sure to change the IP Address on Line 10 to the IP address where you created the application.
String urlencode(String str)
{
    String encodedString="";
    char c;
    char code0;
    char code1;
    char code2;
    for (int i =0; i < str.length(); i++){
      c=str.charAt(i);
      if (c == ' '){
        encodedString+= '+';
      } else if (isalnum(c)){
        encodedString+=c;
      } else{
        code1=(c & 0xf)+'0';
        if ((c & 0xf) >9){
            code1=(c & 0xf) - 10 + 'A';
        }
        c=(c>>4)&0xf;
        code0=c+'0';
        if (c > 9){
            code0=c - 10 + 'A';
        }
        code2='\0';
        encodedString+='%';
        encodedString+=code0;
        encodedString+=code1;
        //encodedString+=code2;
      }
      yield();
    }
    return encodedString;

}
We need to encode our url parameters. When calling REST endpoint we make sure that special characters are replaced so that it will end up like this “http://localhost:8080/student/isauthorized?rf_id_code?A9+33+26+B5“.
void sendDataBackToArduino(String payload){
  const size_t capacity = JSON_OBJECT_SIZE(1) + 30;
  DynamicJsonDocument doc(capacity);
    // Parse JSON object
  DeserializationError error = deserializeJson(doc, payload);
  if (error) {
    Serial.print(F("deserializeJson() failed: "));
    Serial.println(error.c_str());
    return;
  }
  serializeJson(doc, Serial);
}
Return the JSON response back to the arduino. We used ArduinoJson in serializing our response thru the serial port.
Arduino Code
/*
 * Author: donksy
 * Website: //www.donskytech.com
 * Project: ARDUINO RFID DATABASE SYSTEM WITH ESP8266-ESP01
 * URL: https://www.donskytech.com/arduino-rfid-database-security-system-designing-the-project/
 */

#include <StreamUtils.h>
#include <SPI.h>
#include <MFRC522.h>
#include <ArduinoJson.h>
#include <SoftwareSerial.h>

SoftwareSerial mySerial(2, 3); // RX, TX

MFRC522 mfrc522(10, 9);   // Create Instance of MFRC522 mfrc522(SS_PIN, RST_PIN)

const int buzzerPin = 7; //buzzer attach to digital 7
const int ledPin = 4; //buzzer attach to digital 7

bool isRead = false;
bool isNewCard = false;
String tagContent = "";
String currentUID = "";

// Interval before we process the same RFID
int INTERVAL = 2000;
unsigned long previousMillis = 0;
unsigned long currentMillis = 0;

void setup()
{
  Serial.begin(115200);
  mySerial.begin(4800);
  mySerial.setTimeout(5000);
  // Setup the buzzer
  pinMode(buzzerPin, OUTPUT);
  // Setup the led
  pinMode(ledPin, OUTPUT);

  SPI.begin();
  mfrc522.PCD_Init();

  Serial.println("Detecting RFID Tags");
}


void loop()
{
  // Look for new cards
  if (mfrc522.PICC_IsNewCardPresent())
  {
    // Select one of the cards
    if (mfrc522.PICC_ReadCardSerial())
    {
      isRead = true;

      byte letter;
      for (byte i = 0; i < mfrc522.uid.size; i++)
      {
        tagContent.concat(String(mfrc522.uid.uidByte[i] < 0x10 ? " 0" : " "));
        tagContent.concat(String(mfrc522.uid.uidByte[i], HEX));
      }

      tagContent.toUpperCase();
    }
    if (isRead) {
      currentMillis = millis();
      // If current UID is not equal to current UID..meaning new card, then validate if it has access
      if (currentUID != tagContent) {
        currentUID =  tagContent;
        isNewCard = true;
      } else {
        // If it is the same RFID UID then we wait for interval to pass before we process the same RFID
        if (currentMillis - previousMillis >= INTERVAL) {
          isNewCard = true;
        } else {
          isNewCard = false;
        }
      }
      if (isNewCard) {
        if (tagContent != "") {
          // turn off LED if it is on for new card
          turnOffLED();

          previousMillis = currentMillis;
          //Send the RFID Uid code to the ESP-01 for validation
          Serial.print("Sending data to ESP-01 :: ");
          Serial.println(tagContent);
          //TODO Process read from serial here
          mySerial.println(tagContent);
          Serial.println("Waiting for response from ESP-01....");

          int iCtr = 0;
          while (!mySerial.available()) {
            iCtr++;
            if (iCtr >= 100)
              break;
            delay(50);
          }
          if (mySerial.available()) {
            bool isAuthorized = isUserAuthorized(tagContent);

            // If not authorized then sound the buzzer
            if (!isAuthorized) {
              playNotAuthorized();
            } else { //light up the Green LED
              turnOnLED();
            }
          }
          Serial.println("Finished processing response from ESP-01....");
        }

      }

    } else {
      Serial.println("No card details was read!");
    }
    tagContent = "";
    isNewCard = false;
  }

}

bool isUserAuthorized(String tagContent) {
  const size_t capacity = JSON_OBJECT_SIZE(1) + 30;
  DynamicJsonDocument doc(capacity);

  // Use during debugging
  //  ReadLoggingStream loggingStream(mySerial, Serial);
  //  DeserializationError error = deserializeJson(doc, loggingStream);

  // Use during actual running
  DeserializationError error = deserializeJson(doc, mySerial);
  if (error) {
    //    Serial.print(F("deserializeJson() failed: "));
    Serial.println(error.c_str());
    return error.c_str();
  }

  bool   is_authorized = doc["is_authorized"] == "true";
  Serial.print("is_authorized :: ");
  Serial.println(is_authorized);

  return is_authorized;
}

void playNotAuthorized() {
  tone(buzzerPin, 2000);
  delay(500);
  noTone(7);
}

void turnOffLED() {
  digitalWrite(ledPin, LOW);
}

void turnOnLED() {
  digitalWrite(ledPin, HIGH);
  delay(1000);
  digitalWrite(ledPin, LOW);
}
The following is the code for our Arduino. Let us discuss each section line by line.
#include <StreamUtils.h>
#include <SPI.h>
#include <MFRC522.h>
#include <ArduinoJson.h>
#include <SoftwareSerial.h>

SoftwareSerial mySerial(2, 3); // RX, TX

MFRC522 mfrc522(10, 9);   // Create Instance of MFRC522 mfrc522(SS_PIN, RST_PIN)

const int buzzerPin = 7; //buzzer attach to digital 7
const int ledPin = 4; //buzzer attach to digital 7

bool isRead = false;
bool isNewCard = false;
String tagContent = "";
String currentUID = "";

// Interval before we process the same RFID
int INTERVAL = 2000;
unsigned long previousMillis = 0;
unsigned long currentMillis = 0;
We define all our global variables to be used in our project here.
void setup()
{
  Serial.begin(115200);
  mySerial.begin(4800);
  mySerial.setTimeout(5000);
  // Setup the buzzer
  pinMode(buzzerPin, OUTPUT);
  // Setup the led
  pinMode(ledPin, OUTPUT);

  SPI.begin();
  mfrc522.PCD_Init();

  Serial.println("Detecting RFID Tags");
}
We setup our serial interface. The mySerial is the SoftwareSerial that we are using to communicate with the ESP8266 ESP-01. We setup the SPI interface for the MFRC522 RFID Reader.
void loop()
{
  // Look for new cards
  if (mfrc522.PICC_IsNewCardPresent())
  {
    // Select one of the cards
    if (mfrc522.PICC_ReadCardSerial())
    {
      isRead = true;

      byte letter;
      for (byte i = 0; i < mfrc522.uid.size; i++)
      {
        tagContent.concat(String(mfrc522.uid.uidByte[i] < 0x10 ? " 0" : " "));
        tagContent.concat(String(mfrc522.uid.uidByte[i], HEX));
      }

      tagContent.toUpperCase();
    }
    if (isRead) {
      currentMillis = millis();
      // If current UID is not equal to current UID..meaning new card, then validate if it has access
      if (currentUID != tagContent) {
        currentUID =  tagContent;
        isNewCard = true;
      } else {
        // If it is the same RFID UID then we wait for interval to pass before we process the same RFID
        if (currentMillis - previousMillis >= INTERVAL) {
          isNewCard = true;
        } else {
          isNewCard = false;
        }
      }
      if (isNewCard) {
        if (tagContent != "") {
          // turn off LED if it is on for new card
          turnOffLED();

          previousMillis = currentMillis;
          //Send the RFID Uid code to the ESP-01 for validation
          Serial.print("Sending data to ESP-01 :: ");
          Serial.println(tagContent);
          //TODO Process read from serial here
          mySerial.println(tagContent);
          Serial.println("Waiting for response from ESP-01....");

          int iCtr = 0;
          while (!mySerial.available()) {
            iCtr++;
            if (iCtr >= 100)
              break;
            delay(50);
          }
          if (mySerial.available()) {
            bool isAuthorized = isUserAuthorized(tagContent);

            // If not authorized then sound the buzzer
            if (!isAuthorized) {
              playNotAuthorized();
            } else { //light up the Green LED
              turnOnLED();
            }
          }
          Serial.println("Finished processing response from ESP-01....");
        }

      }

    } else {
      Serial.println("No card details was read!");
    }
    tagContent = "";
    isNewCard = false;
  }

}
The main line of our code.
- Line 50-66 – Check if a new RFID is placed near our MRFC522 Reader
- Line 68-79 – If the same RFID was scanned then we prevent reading it multiple times by checking for the INTERVAL. If we do not have this code then the reader will just read the same RFID tag continuously
if (isNewCard) {
        if (tagContent != "") {
          // turn off LED if it is on for new card
          turnOffLED();

          previousMillis = currentMillis;
          //Send the RFID Uid code to the ESP-01 for validation
          Serial.print("Sending data to ESP-01 :: ");
          Serial.println(tagContent);
          //TODO Process read from serial here
          mySerial.println(tagContent);
          Serial.println("Waiting for response from ESP-01....");

          int iCtr = 0;
          while (!mySerial.available()) {
            iCtr++;
            if (iCtr >= 100)
              break;
            delay(50);
          }
          if (mySerial.available()) {
            bool isAuthorized = isUserAuthorized(tagContent);

            // If not authorized then sound the buzzer
            if (!isAuthorized) {
              playNotAuthorized();
            } else { //light up the Green LED
              turnOnLED();
            }
          }
          Serial.println("Finished processing response from ESP-01....");
        }

      }

    } else {
      Serial.println("No card details was read!");
    }
    tagContent = "";
    isNewCard = false;
This is where we communicate with the ESP8266 ESP-01 to check if the RFID tag that we have detected is allowed or not.
- Lines 6-12 – We write to the Serial Port of the ESP8266 ESP-01 passing the RFID code that we have scanned
- Lines 14-20 – We wait for the ESP8266 ESP-01 to call the application and sleep at some defined interval until it writes back to our SoftwareSerial
- Lines 21-29 – If data is available then we extract the JSON response
bool isUserAuthorized(String tagContent) {
  const size_t capacity = JSON_OBJECT_SIZE(1) + 30;
  DynamicJsonDocument doc(capacity);

  // Use during debugging
  //  ReadLoggingStream loggingStream(mySerial, Serial);
  //  DeserializationError error = deserializeJson(doc, loggingStream);

  // Use during actual running
  DeserializationError error = deserializeJson(doc, mySerial);
  if (error) {
    //    Serial.print(F("deserializeJson() failed: "));
    Serial.println(error.c_str());
    return error.c_str();
  }

  bool   is_authorized = doc["is_authorized"] == "true";
  Serial.print("is_authorized :: ");
  Serial.println(is_authorized);

  return is_authorized;
}
This is the part where we extract or deserialize the returned JSON from the ESP8266 ESP-01 with the help of the ArduinoJSON library.
void playNotAuthorized() {
  tone(buzzerPin, 2000);
  delay(500);
  noTone(7);
}

void turnOffLED() {
  digitalWrite(ledPin, LOW);
}

void turnOnLED() {
  digitalWrite(ledPin, HIGH);
  delay(1000);
  digitalWrite(ledPin, LOW);
}
If the JSON Response says that “{‘is_authorized’: ‘true’}” then we turn on the LED else if “”{‘is_authorized’: ‘false’}” we sound our passive buzzer.
Hope you enjoyed this step by step guide that I have created on how to design your own RFID Database System. Until the next project!
That’s it!
Happy Exploring!
Leave a Reply