In this project we are going to control our WS2812B/Neopixels using our Mobile Phones and our Raspberry Pi. We will use Python in controlling these individually addressable LEDS and use Flask web micro framework to create a web application user interface that we can access using our Mobile phones.
We will split up our project into several sections so that it would be easy to read and understand.
- Part 1: Introduction and Design Walkthrough
- Part 2: Wiring Diagram and Control Using Luma.LED_Matrix
- Part 3: Creating the User Interface Using Flask
- Part 4: Putting it all together
Well start off this series with Part 1 in this post – Introduction and Design Walkthrough
Design:
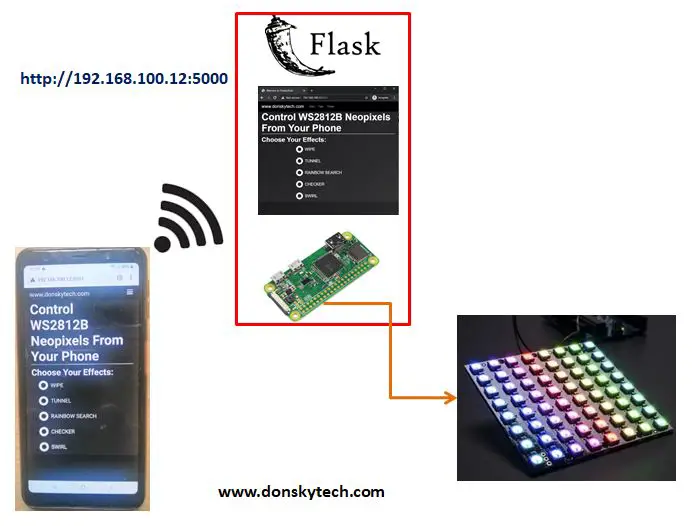
The following image above shows the design on how we are going to control our WS2812B/Neopixels RGB LEDs from our mobile phone. Basically we are going to deploy a Flask web application into our Raspberry Pi Zero W and access its user interface to control our 8*8 RGB LEDs.
Flask is a “micro” web framework that is easy to use and configure for your Internet of Things project if you need a web interface to present to your user. In this project we have created a web application to handle the generation of the user interface and process request coming from the browser. If you want to view how the flask web application used in this project is structured then go to my donskytech github account. We will discuss more about how we have created the Flask application in Part 3 of this series.
We are going to use the Luma.LED_Matrix library to control the brightness and color of these LEDs. From the description in their site “it provides a Pillow-compatible drawing canvas“. Pillow is the Python Image Library that add Image Processing capability to your project. I like this library since rather than programming each RGB LEDs individually just like other library, we are programming it like drawing something in a “canvas” like manner. Part 2 of this series will discuss more on how we can use this library in controlling our WS2812B/Neopixel LEDs.
Once our Flask Web application is up and running in our Raspberry Pi Zero W then we can use our browser in our laptop or mobile phones to access it and control the effects to be shown by our WS2812B/Neopixels LED’s.
We will be exposing a specific TCP Port in our Raspberry Pi Zero W that we can all connect using the following pattern http://<IP-Address-RPi>:TCP_PORT. In our case it will be:
http://192.168.100.12:5000
And that is the overall design of our project on how we are going to control our WS2812B Neopixels using your mobile phones and raspberry pi.
Parts Needed for this Project
In order to follow along with this project then prepare the following electronics components.
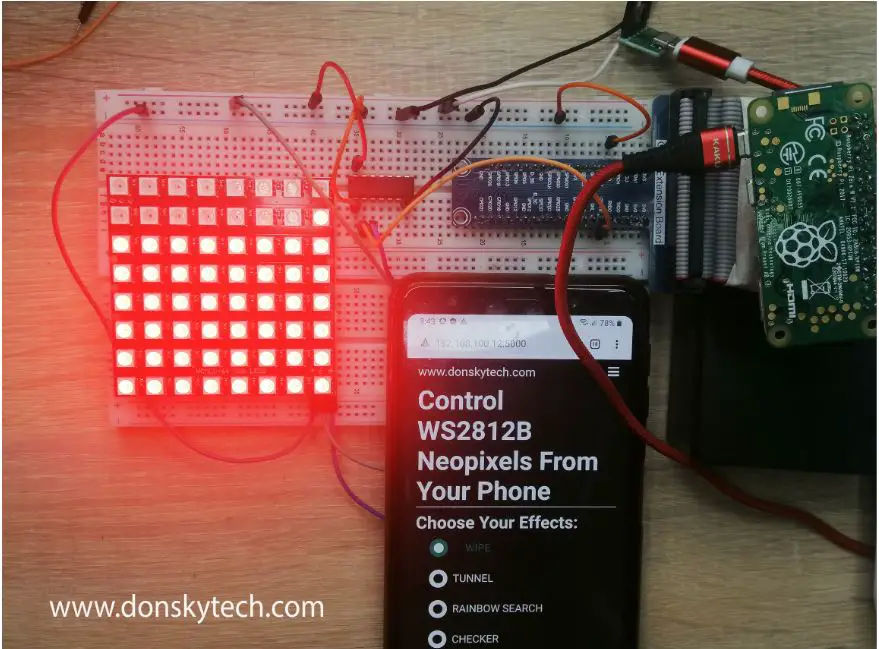
- WS2812B/Neopixel 8X8 Square or any other sizes
- Raspberry Pi Zero W or Raspberry Pi 4
- 74AHCT125 Level Converter Chip
- Micro USB interface to the power seat switch interface
- Breadboard/Connecting Wires
- Power Source USB 5V
Software Knowledge
As we are gonna be creating a web application then you need to have a basic working knowledge of the following:
- HTML
- Javascript
- CSS
You don’t need to become expert at these topics as there are lots of free web frameworks that you can use to be able to create awesome User Interface (UI). In this project we just stick with using plain html/css/javascripts. You just need to be comfortable on how to create the UI that you want.
You should be comfortable also with connecting to the Raspberry Pi using the bash shell scripts and know your way around like changing directory and running python scripts.
And last, knowledge on Python on how to program and use python libraries such as the Luma.Led_matrix, Flask etc. I will try to explain these topics as much as possible.
What is WS2812B/Neopixels?
WS2812B or Neopixels as what they call in Adafruit sites are individually addressable RGB LEDs that you can control using your microcontroller. They come in different shape and sizes and you can even cascade them to create glamorous lighting effects in your projects.
You can control the state, brightness and color of the individual RGB by using the data pin connected to the WS2812B chip controller for each Surface Mounted Device (SMD).
I got mine from a local store where I lived and can be traced back from Chinese suppliers abroad so check out the online stores near you as they come in cheap.
In this post we are going to use the Raspberry Pi W zero to power up these LEDS.
Raspberry Pi W Zero Setup
I used the Raspberry Pi W Zero in powering up this project. It will serve two specific purposes:
- Host the User Interface that we are gonna be creating by using the Flask Web Micro Framework.
- Control the WS2812B/Neopixel by showing different effects that is chosen by the user.
I have setup my Raspberry Pi Zero W in headless setup so I don’t need to connect a monitor or keyboard to interface to it. We will be using putty and ssh into the Raspberry Pi Zero W to configure our project.
Wrapping Up
That’s all there is to it regarding the design on how we can create this project. Please subscribe to my facebook page for the next part of this series.
Happy Exploring!
Leave a Reply