In the previous post, we discussed the wiring diagram of the WS2812B Neopixels with your Raspberry Pi. In addition, we have introduced the luma.led_matrix to control its effect. We will discuss how to install Flask on our Raspberry Pi in this post. Furthermore, we will show how you can use Flask in creating a web application to control your Internet of Things (IoT) project powered by the Raspberry Pi. We will leverage Flask functionality to control our WS2812B/Neopixels using your mobile phones. If this is the first time you have heard about Flask and how to create a web server using it then please read through the link below.
Must Read:
Raspberry Pi and Flask Quickstart Guide
This is Part 3 of our series about controlling your WS2812B Neopixels using Raspberry Pi. Firstly, we will introduce what is Flask and how we can install it. Secondly, we will create a sample web application using plain old HTML, CSS, and Javascript. Lastly, if you have followed the steps in the previous post already then you can skip the installation steps here and then go directly to the How to create a sample web application section.
- Part 1: Introduction and Design Walkthrough
- Part 2: Wiring Diagram and Control Using Luma.LED_Matrix
- Part 3: Creating the User Interface Using Flask
- Part 4: Putting it all together
Please refer to the following demo on how we are able to control our WS2812B Neopixels using our mobile phones.
What is Flask?
Flask is a “micro” web framework that you can use in your Internet of Things (IoT) project if ever you need to show a web user interface. However, being “micro” does not mean that it lacks the ability of other full-fledged frameworks. It just gives you the “bare minimum” features like showing HTML pages or returning Javascript Object Notation (JSON). We will leverage these two features in creating this project.
The sample web application that we are going to show in this post contains only a single file. You can access the same file in my GitHub repository here. This will return a sample HTML page
from flask import Flask, render_template, jsonify

app = Flask(__name__)


@app.route('/')
def index():
    return render_template('index.html')
When this web application is deployed into the Flask target server then we can access the application using the following URL. The 192.168.100.12 is the IP address assigned to our Raspberry Pi and port 4000 is the target TCP port. However, your IP address might be different than mine so check what was assigned by your network.
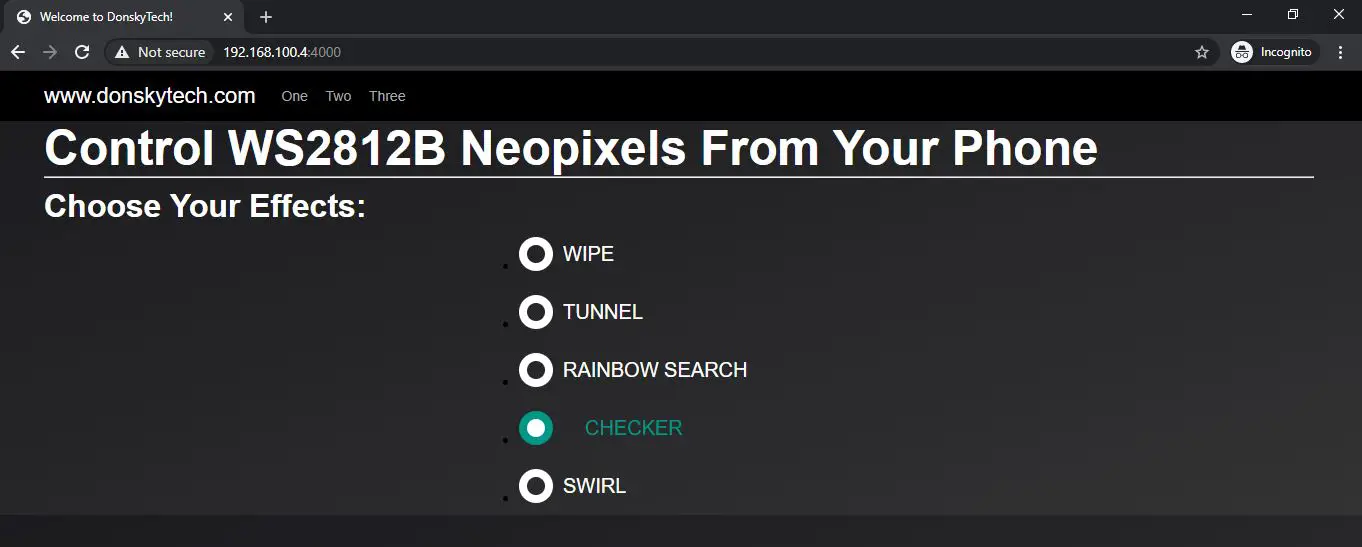
http://192.168.100.4:4000You can use either your laptop web browser or your mobile phone to access the web user interface that we have created here. In addition, the same application is used to control the effects of our WS2812B Neopixels. Here is what the sample flask web application looks like in this post.
How to Install Flask in Raspberry Pi?
If you have followed all the steps in my previous post then feel free to skip this section and go directly to the next. I have created this just in case you wanted to know what are the steps in installing Flask on a Raspberry Pi.
Note: I have used Raspberry Pi W Zero in “headless” mode in this setup so we will use putty in connecting to it.
Step 1: Connect to your Raspberry Pi Using Putty
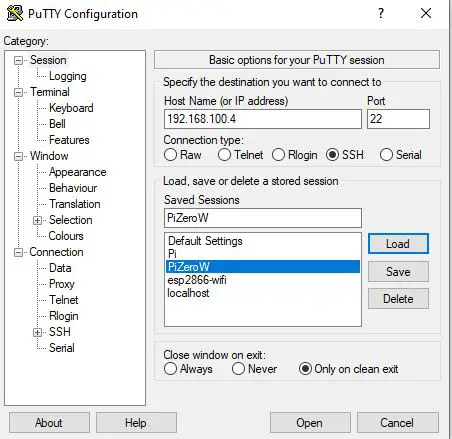
Connect to your Raspberry Pi using the IP address assigned to it by your network. Mine currently is 192.168.100.4 and yours could be different. If you have not downloaded putty before then you can get it here.
Step 2: Update your raspberry pi
It is always a good idea to upgrade your Raspberry Pi packages so you can do that by typing these commands.
pi@raspberrypi:~ sudo apt-get update
pi@raspberrypi:~ sudo apt-get upgrade
pi@raspberrypi:~ sudo reboot
Step 3: Install pip
pip is the Python package installer and we will install this so that it would be easier to install other packages.
pi@raspberrypi:~ sudo apt-get install python-pip

pi@raspberrypi:~ $ sudo pip3 --version
pip 20.2.4 from /usr/local/lib/python3.7/dist-packages/pip (python 3.7)
Step 4: Install Flask
The fastest way to install Flask is to use the “python pip” package and install it by following the commands below:
pi@raspberrypi:~ sudo pip3 install Flask

pi@raspberrypi:~ sudo pip3 freeze | grep Flask
Flask==1.1.2
Step 5: Install gunicorn
Flask comes with a development server that you can use out of the box but is not scalable and only allows one concurrent connection. In order to improve its performance then we will use gunicorn, a WSGI HTTP server.
pi@raspberrypi:~ sudo pip3 install gunicorn

pi@raspberrypi:~ sudo pip3 freeze | grep gunicorn
gunicorn==20.0.4
Step 6: Install GIT (Optional)
GIT is a version control system that allows us to store our source code. We will use this to access the sample project that we have in my GitHub account
pi@raspberrypi:~ sudo apt install git

pi@raspberrypi:~ $ git --version
git version 2.20.1
How to Create a Sample Flask Web Application in Raspberry Pi?
This post is not meant to discuss how Flask works so if you do not know how to create a web application using Flask then go to their quickstart guide.
I have created a sample Flask web application that we will use in controlling our WS2812B Neopixels using your mobile phones. Follow the steps below in order to recreate this Flask web application and how to run it on your Raspberry Pi.
Step 1: Clone my GitHub repository
pi@raspberrypi:~ $ mkdir -p git
pi@raspberrypi:~ $ cd git
pi@raspberrypi:~/git $ ls -l
total 0

pi@raspberrypi:~/git $ git clone https://github.com/donskytech/raspberrypi-projects.git
Cloning into 'raspberrypi-projects'...
remote: Enumerating objects: 43, done.
remote: Counting objects: 100% (43/43), done.
remote: Compressing objects: 100% (33/33), done.
remote: Total 43 (delta 9), reused 38 (delta 4), pack-reused 0
Unpacking objects: 100% (43/43), done.

pi@raspberrypi:~/git cd raspberrypi-projects
pi@raspberrypi:~/git/raspberrypi-projects $ cd ws2812b_neopixel_flask
First, we create a directory to place our project. Secondly, we use git to clone my GitHub repository. Lastly, we cd into the sample project directory.
Step 2: Run the Flask Web Application
In order to run the sample Flask Web Application, then execute the following command.
pi@raspberrypi:~/git/raspberrypi-projects/ws2812b_neopixel_flask $ gunicorn -w 4 -b 0.0.0.0:4000 app:app
[2021-01-03 08:31:21 +0000] [869] [INFO] Starting gunicorn 20.0.4
[2021-01-03 08:31:21 +0000] [869] [INFO] Listening at: http://0.0.0.0:4000 (869)
[2021-01-03 08:31:21 +0000] [869] [INFO] Using worker: sync
[2021-01-03 08:31:21 +0000] [872] [INFO] Booting worker with pid: 872
[2021-01-03 08:31:21 +0000] [873] [INFO] Booting worker with pid: 873
[2021-01-03 08:31:22 +0000] [874] [INFO] Booting worker with pid: 874
[2021-01-03 08:31:22 +0000] [875] [INFO] Booting worker with pid: 875
If you look closely the command to run our Flask Application is “gunicorn -w 4 -b 0.0.0.0:4000 app:app” . We have deployed our Flask Web Application into the gunicorn HTTP server to leverage its more powerful features. As I have mentioned before, Flask comes only with a development server.
If you do not see any errors then it means that our Flask Web Application is running fine!
Step 3: Open your browser and access the Flask Web Application
Open your web browser on your laptop or in your mobile phone and access the following URL “http://<raspberrypi-ip-address>:4000” (e.g http://192.168.100.4:4000)
Code Discussion:
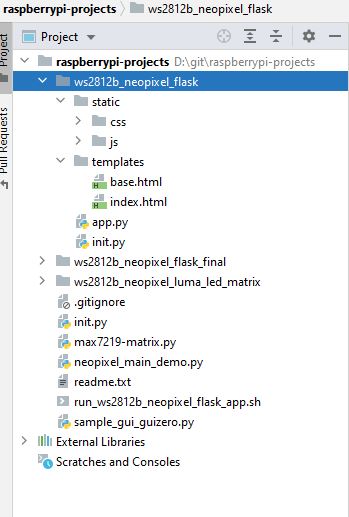
When you go to my GitHub repository you will see that I have laid out my Flask Web Application like this.
- static folder contains all the CSS and javascript files
- templates folder contains all my HTML files
- app.py contains my Flask Application
The app.py contains our entry point into the web application. When you type the following URL in your browser http://192.168.100.4:4000 then it will “route” you to the index.html page.
from flask import Flask, render_template, jsonify

app = Flask(__name__)


@app.route('/')
def index():
    return render_template('index.html')
The index.html page leverages the Flask Jinja templates and it contains the necessary HTML Templates to create that “sliding” toggle bar. Each effect is displayed as a radio button and is styled by CSS to make it “slide“.
{% extends 'base.html' %}
{% block title %}Welcome to DonskyTech!{% endblock %}
{% block content %}
<div class="container">
    <h1 class="header">Control WS2812B Neopixels From Your Phone</h1>
    <hr/>

    <h2 class="subheader">Choose Your Effects:</h2>
    <div class="content-container">

        <ul class="list">
            <li class="list__item">
                <input type="radio" class="radio-btn" name="choice" id="a-opt"/>
                <label for="a-opt" class="label">Wipe</label>
            </li>
            <li class="list__item">
                <input type="radio" class="radio-btn" name="choice" id="b-opt"/>
                <label for="b-opt" class="label">Tunnel</label>
            </li>
            <li class="list__item">
                <input type="radio" class="radio-btn" name="choice" id="c-opt"/>
                <label for="c-opt" class="label">Rainbow Search</label>
            </li>

            <li class="list__item">
                <input type="radio" class="radio-btn" name="choice" id="d-opt"/>
                <label for="d-opt" class="label">Checker</label>
            </li>

            <li class="list__item">
                <input type="radio" class="radio-btn" name="choice" id="e-opt"/>
                <label for="e-opt" class="label">Swirl</label>
            </li>
        </ul>
    </div>
</div>

{% endblock %}
Looking at the first line of the index.html page, you will notice this line “{% extends ‘base.html’ %}” which means that it uses the base.html as its “parent” page. We are using some sort of “templating” in order to use the same base.html section like the navigation bar etc. In this case, we only have one page which is the index.html so it’s hard to see the good use of this templating.
<!doctype html>
<html lang="en">
<head>
    <!-- Required meta tags -->
    <meta charset="utf-8">
    <meta content="width=device-width, initial-scale=1, shrink-to-fit=no" name="viewport">

    <link href="{{ url_for('static', filename='css/entireframework.min.css') }}" rel="stylesheet">
    <link href="{{ url_for('static', filename='css/style.css') }}" rel="stylesheet">
    <script src="{{ url_for('static', filename='js/custom.js') }}"></script>

    <title>{% block title %} {% endblock %}</title>

</head>
<body>
<nav class="nav" tabindex="-1" onclick="this.focus()">
    <div class="container">
        <a class="pagename current" href="#">www.donskytech.com</a>
        <a href="#">One</a>
        <a href="#">Two</a>
        <a href="#">Three</a>
    </div>
</nav>
<button class="btn-close btn btn-sm">×</button>


{% block content %} {% endblock %}


</body>
</html>
The base.html code above is doing all the importing of necessary Cascading Style Sheets (CSS) files in order to style our HTML Page. I have used the very minimalist CSS framework called mincss. Also, the style.css contains the styling for our web page, especially the sliding toggle bar. I have used the following codepen in this project in order to have that toggle bar. All credits belong to the creator of that code pen.
HTML markups only come with basic user interface blocks like “radio” or “checkbox” buttons. In order to enhance its appearance and to make it more mobile responsive, we need to use CSS. Sometimes Javascript is used also but for this post, we do not use it.
That is all there is on how you can create install and create a Flask Web Application and deploy it into the gunicorn HTTP server!
Wrap Up
In this post, we have discussed how you can use Flask in creating a web user interface for your IoT projects. We have created a sample Flask web application and deployed it to our Raspberry Pi. We will use the same application in controlling our Neopixels so watch out for the last part of this series!
That’s it!
Happy Exploring!
Support Me!
I love sharing what I know and hopefully, I was able to help you. Writing helpful content takes so much time and research. If you think you like my work and I have managed to help you then please consider supporting my channel. I would be very grateful and would boost my confidence that what I am doing is making a big change in the world. (No Pun Intended!) 😉
Become a Patron!
Leave a Reply