In the previous post, we discussed the design of how we can control our WS2812B Neopixels using our mobile phones and your Raspberry Pi.
This part of the tutorial will discuss how we can do the wiring and control of our WS2812B Neopixels using the Raspberry Pi. In addition, we will show how we can control its effects by using the luma.led_matrix library.
- Part 1: Introduction and Design Walkthrough
- Part 2: Wiring Diagram and Control Using Luma.LED_Matrix
- Part 3: Creating the User Interface Using Flask
- Part 4: Putting it all together
The following is the demo of how we are able to control our WS2812B Neopixels using our mobile phones.
We will first show the schematic diagram and then discuss how we can control it using the awesome library luma.led_matrix.
“it provides a Pillow-compatible drawing canvas”
Pillow is the Python Imaging Library and we will control our WS2812B Neopixels like drawing something in a “canvas” using the Raspberry Pi and Python instead of addressing each led individually.
Schematic/Wiring – WS2812B Neopixels to
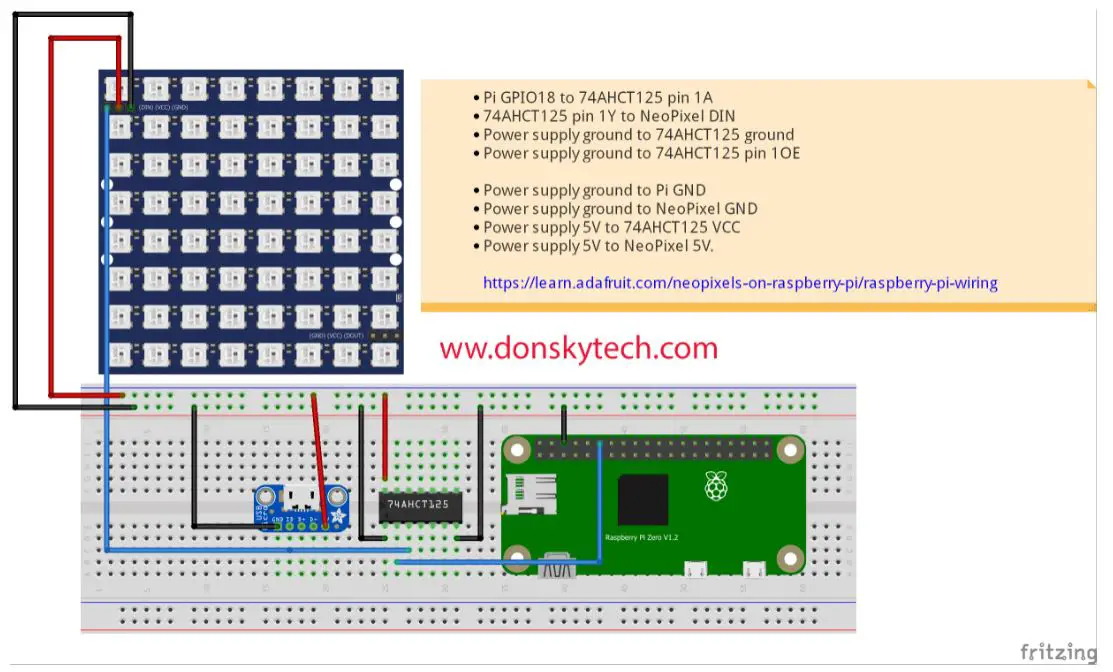
The image above shows the fritzing schematic diagram of how we are going to wire our WS2812B Neopixels to our Raspberry Pi. This was taken from the adafruit site using Level Shifting.
We need the 74AHCT125 Level converter since these WS2812B Neopixels require considerable 5V voltage to power and our Raspberry Pi GPIO Port can only supply 3.3V.
I have used an external 5V source using the micro-USB interface to power up the WS2812B neopixels as the Raspberry Pi cannot power these LEDs and may result in it being damaged.
| Raspberry Pi | 74AHCT125 | Neopixel | USB Micro |
| GPIO 18 | 1A | ||
| 1Y | DIN | ||
| GND | GND | GND | GND |
| GND | 10E | GND | GND |
| VCC | VCC | VCC |
NOTE: Make sure that the Neopixels, Raspberry Pi, and the external power grounds are all connected with each other.
Now that we have set up the hardware part let us discuss the software part on how we can control it using Python.
Software Setup
Power up your Raspberry Pi so that we can start the setup on how we can control our WS2812B Neopixels using Python Code.
The following are the steps that you need to follow:
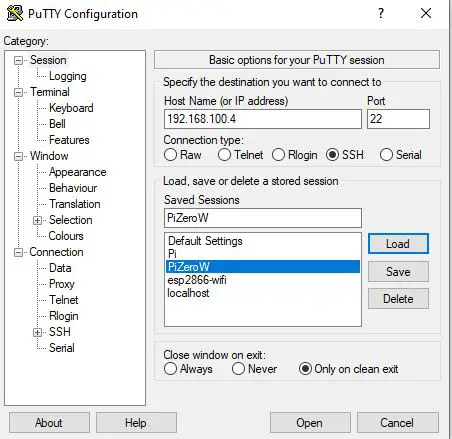
Step 1: Connect to your Raspberry Pi Zero W Using Putty
I have set up my Raspberry Pi W Zero in “headless” mode so that there is no need to connect any mouse or keyboard to it. We will use putty in order to connect to it.
If you haven’t downloaded putty then download it here. Configure it to the IP Address that was assigned by your home network so that we can SSH into our Raspberry Pi Zero W. Login as pi and input the password you assigned to it. Mine is the default password which is “raspberry”
Step 2: Update your Raspberry Pi
It’s better to update your Raspberry Pi so that the latest patches are applied to your operating system. You can skip this step if you have done this already.
pi@raspberrypi:~ sudo apt-get update
pi@raspberrypi:~ sudo apt-get upgrade
pi@raspberrypi:~ sudo reboot
Step 3: Install PIP
If you haven’t done so then install the PIP so that it would be easy to install Python packages in your raspberry pi.
pi@raspberrypi:~ sudo apt-get install python-pip

pi@raspberrypi:~ $ sudo pip3 --version
pip 20.2.4 from /usr/local/lib/python3.7/dist-packages/pip (python 3.7)
Step 4: Install GIT
GIT is a version control software that we can use to store our projects. Using git we are able to share our project with anyone. You can view my project link from my github account.
pi@raspberrypi:~ sudo apt install git

pi@raspberrypi:~ $ git --version
git version 2.20.1
Step 5: Install Flask
Step 4 and Step 5 are actually not needed for this post to power up our WS28128B Neopixels. However, we will use these packages in Part 3 of this series so we will install it right now also.
We will discuss Flask more in part 3 so don’t worry if you don’t understand this for now. Follow the steps below on how to install this package.
pi@raspberrypi:~ sudo pip3 install Flask

pi@raspberrypi:~ sudo pip3 freeze | grep Flask
Flask==1.1.2
Step 6: Install gunicorn
Gunicorn is a WSGI HTTP Server that we will be using to serve the user interface for our project. More to follow on this subject in the next part of this series.
pi@raspberrypi:~ sudo pip3 install gunicorn

pi@raspberrypi:~ sudo pip3 freeze | grep gunicorn
gunicorn==20.0.4
Step 7: Install luma.led_matrix
The luma.led_matrix is what we are going be using to control our WS2812B Neopixels. So follow the steps below to install it.
pi@raspberrypi:~ sudo pip3 install luma.led_matrix
pi@raspberrypi:~ sudo pip3 freeze | grep luma
luma.core==2.0.2
luma.led-matrix==1.5.0
Step 8: Clone my github project repo
Now we are going to clone my GitHub repo so that we can start checking out the code that I used to control the effects of my WS2812B Neopixels.
Follow the steps below on how to do it:
pi@raspberrypi:~ $ mkdir -p git
pi@raspberrypi:~ $ cd git
pi@raspberrypi:~/git $ ls -l
total 0

pi@raspberrypi:~/git $ git clone https://github.com/donskytech/raspberrypi-projects.git
Cloning into 'raspberrypi-projects'...
remote: Enumerating objects: 43, done.
remote: Counting objects: 100% (43/43), done.
remote: Compressing objects: 100% (33/33), done.
remote: Total 43 (delta 9), reused 38 (delta 4), pack-reused 0
Unpacking objects: 100% (43/43), done.

pi@raspberrypi:~/git cd raspberrypi-projects
First we create a directory in any location that you like. In my case, I just used my current home directory and created a “git” folder. I then clone my GitHub repository and cd into it.
Then execute the following command
pi@raspberrypi:~/git/raspberrypi-projects $ sudo python3 neopixel_main_demo.py wipe
You should be able to see your 8×8 WS2812B Neopixels light up like this.
You would see that the ws2812b/neopixels are lighting up one after the other similar to a ‘wiping’ effect. It starts from Red-Green-Bue-White then continues again.
You can also add different effects by replacing the “wipe” with either “tunnel/rainbow/checker/swirl”. Similar to this:
pi@raspberrypi:~/git/raspberrypi-projects $ sudo python3 neopixel_main_demo.py rainbowIf for some reason the LEDs are not lighting up then check if all the connections are good or according to the schematics.
Code Discussion
The code that powers up our WS2812B/Neopixels is the neopixel_demo.py in my GitHub account. This is my own fork of the neopixel_demo.py in the luma.led_matrix project.
#!/usr/bin/env python

# Edited by donsky for donskytech
# Code was taken from https://github.com/rm-hull/luma.led_matrix/blob/master/examples/neopixel_demo.py


# -*- coding: utf-8 -*-
# Copyright (c) 2017-18 Richard Hull and contributors
# See LICENSE.rst for details.

# Portions of this script were adapted from:
#  https://github.com/pimoroni/unicorn-hat/blob/master/examples/demo.py

import math
import time
import colorsys

from luma.led_matrix.device import neopixel
from luma.core.render import canvas


class WS2812_Neopixel:
    def __init__(self):
        # create matrix device
        self.device = neopixel(width=8, height=8)
        self.status = True;

    def get_status(self):
        return self.status

    def terminate(self):
        self.status = False

    def wipe(self):
        colors = ["red", "green", "blue", "white"]

        while True:
            for color in colors:
                for y in range(self.device.height):
                    for x in range(self.device.width):
                        with canvas(self.device) as draw:
                            z = y + 1
                            for temp in range(z):
                                if temp + 1 == z:
                                    draw.line((0, y, x, y), fill=color)
                                else:
                                    draw.line((0, temp, self.device.width, temp), fill=color)

                        time.sleep(0.05)

    # twisty swirly goodness
    def swirl(self, x, y, step):
        x -= (self.device.width / 2)
        y -= (self.device.height / 2)

        dist = math.sqrt(pow(x, 2) + pow(y, 2)) / 2.0
        angle = (step / 10.0) + (dist * 1.5)
        s = math.sin(angle)
        c = math.cos(angle)

        xs = x * c - y * s
        ys = x * s + y * c

        r = abs(xs + ys)
        r = r * 64.0
        r -= 20

        return (r, r + (s * 130), r + (c * 130))


    # roto-zooming checker board
    def checker(self, x, y, step):
        x -= (self.device.width / 2)
        y -= (self.device.height / 2)

        angle = (step / 10.0)
        s = math.sin(angle)
        c = math.cos(angle)

        xs = x * c - y * s
        ys = x * s + y * c

        xs -= math.sin(step / 200.0) * 40.0
        ys -= math.cos(step / 200.0) * 40.0

        scale = step % 20
        scale /= 20
        scale = (math.sin(step / 50.0) / 8.0) + 0.25

        xs *= scale
        ys *= scale

        xo = abs(xs) - int(abs(xs))
        yo = abs(ys) - int(abs(ys))
        l = 0 if (math.floor(xs) + math.floor(ys)) % 2 else 1 if xo > .1 and yo > .1 else .5

        r, g, b = colorsys.hsv_to_rgb((step % 255) / 255.0, 1, l)

        return (r * 255, g * 255, b * 255)


    # weeee waaaah
    def blues_and_twos(self, x, y, step):
        x -= (self.device.width / 2)
        y -= (self.device.height / 2)

        #    xs = (math.sin((x + step) / 10.0) / 2.0) + 1.0
        #    ys = (math.cos((y + step) / 10.0) / 2.0) + 1.0

        scale = math.sin(step / 6.0) / 1.5
        r = math.sin((x * scale) / 1.0) + math.cos((y * scale) / 1.0)
        b = math.sin(x * scale / 2.0) + math.cos(y * scale / 2.0)
        g = r - .8
        g = 0 if g < 0 else g

        b -= r
        b /= 1.4

        return (r * 255, (b + g) * 255, g * 255)


    # rainbow search spotlights
    def rainbow_search(self, x, y, step):
        xs = math.sin((step) / 100.0) * 20.0
        ys = math.cos((step) / 100.0) * 20.0

        scale = ((math.sin(step / 60.0) + 1.0) / 5.0) + 0.2
        r = math.sin((x + xs) * scale) + math.cos((y + xs) * scale)
        g = math.sin((x + xs) * scale) + math.cos((y + ys) * scale)
        b = math.sin((x + ys) * scale) + math.cos((y + ys) * scale)

        return (r * 255, g * 255, b * 255)


    # zoom tunnel
    def tunnel(self, x, y, step):
        speed = step / 100.0
        x -= (self.device.width / 2)
        y -= (self.device.height / 2)

        xo = math.sin(step / 27.0) * 2
        yo = math.cos(step / 18.0) * 2

        x += xo
        y += yo

        if y == 0:
            if x < 0:
                angle = -(math.pi / 2)
            else:
                angle = (math.pi / 2)
        else:
            angle = math.atan(x / y)

        if y > 0:
            angle += math.pi

        angle /= 2 * math.pi  # convert angle to 0...1 range

        shade = math.sqrt(math.pow(x, 2) + math.pow(y, 2)) / 2.1
        shade = 1 if shade > 1 else shade

        angle += speed
        depth = speed + (math.sqrt(math.pow(x, 2) + math.pow(y, 2)) / 10)

        col1 = colorsys.hsv_to_rgb((step % 255) / 255.0, 1, .8)
        col2 = colorsys.hsv_to_rgb((step % 255) / 255.0, 1, .3)

        col = col1 if int(abs(angle * 6.0)) % 2 == 0 else col2

        td = .3 if int(abs(depth * 3.0)) % 2 == 0 else 0

        col = (col[0] + td, col[1] + td, col[2] + td)

        col = (col[0] * shade, col[1] * shade, col[2] * shade)

        return (col[0] * 255, col[1] * 255, col[2] * 255)

    def gfx(self, effect):
        effects_dict = {"wipe": self.wipe, "tunnel": self.tunnel, "rainbow": self.rainbow_search, "checker": self.checker, "swirl": self.swirl}

        if effect not in effects_dict.keys():
            return

        chosen_effect = effects_dict.get(effect)

        step = 0
        while self.status:
            for i in range(500):
                with canvas(self.device) as draw:
                    if effect == "wipe":
                        self.wipe()
                    else:
                        for y in range(self.device.height):
                            for x in range(self.device.width):
                                r, g, b = chosen_effect(x, y, step)
                                r = int(max(0, min(255, r)))
                                g = int(max(0, min(255, g)))
                                b = int(max(0, min(255, b)))
                                draw.point((x, y), (r, g, b))

                        step += 1

                        time.sleep(0.01)
Let us discuss what each line of the code does.
As there are lot of code to look up let us just show how it works by removing most of the implementation and looking up the relevant bits.
class WS2812_Neopixel:
    def __init__(self):
        # create matrix device
        self.device = neopixel(width=8, height=8)
        self.status = True;

    def get_status(self):
        return self.status

    def terminate(self):
        self.status = False

    def wipe(self):
		# <Code Removed For Brevity>

    # twisty swirly goodness
    def swirl(self, x, y, step):
		# <Code Removed For Brevity>


    # roto-zooming checker board
    def checker(self, x, y, step):
		# <Code Removed For Brevity>

    # weeee waaaah
    def blues_and_twos(self, x, y, step):
		# <Code Removed For Brevity>

    # rainbow search spotlights
    def rainbow_search(self, x, y, step):
		# <Code Removed For Brevity>

    # zoom tunnel
    def tunnel(self, x, y, step):
		# <Code Removed For Brevity>

    def gfx(self, effect):
        effects_dict = {"wipe": self.wipe, "tunnel": self.tunnel, "rainbow": self.rainbow_search, "checker": self.checker, "swirl": self.swirl}

        if effect not in effects_dict.keys():
            return

        chosen_effect = effects_dict.get(effect)

        step = 0
        while self.status:
            for i in range(500):
                with canvas(self.device) as draw:
                    if effect == "wipe":
                        self.wipe()
                    else:
                        for y in range(self.device.height):
                            for x in range(self.device.width):
                                r, g, b = chosen_effect(x, y, step)
                                r = int(max(0, min(255, r)))
                                g = int(max(0, min(255, g)))
                                b = int(max(0, min(255, b)))
                                draw.point((x, y), (r, g, b))

                        step += 1

                        time.sleep(0.01)
First we define a class to represent our ws2812b neopixels:
class WS2812_Neopixel:
    def __init__(self):
        # create matrix device
        self.device = neopixel(width=8, height=8)
        self.status = True;
It contains several methods that represent each effect like “wipe”, “rainbow” etc.
def gfx(self, effect):
        effects_dict = {"wipe": self.wipe, "tunnel": self.tunnel, "rainbow": self.rainbow_search, "checker": self.checker, "swirl": self.swirl}

        if effect not in effects_dict.keys():
            return

        chosen_effect = effects_dict.get(effect)

        step = 0
        while self.status:
            for i in range(500):
                with canvas(self.device) as draw:
                    if effect == "wipe":
                        self.wipe()
                    else:
                        for y in range(self.device.height):
                            for x in range(self.device.width):
                                r, g, b = chosen_effect(x, y, step)
                                r = int(max(0, min(255, r)))
                                g = int(max(0, min(255, g)))
                                b = int(max(0, min(255, b)))
                                draw.point((x, y), (r, g, b))

                        step += 1

                        time.sleep(0.01)
The important line of code is the gfx() function which handles the effect that you passed in at the command line.
sudo python3 neopixel_main_demo.py wipeSo it matches which function is called to whatever command line argument you passed into the terminal.
Now here comes the luma.led_matrix pillow-like interface is being used.
with canvas(self.device) as draw:
                    if effect == "wipe":
                        self.wipe()
Looking at the code above, you would notice that we are creating a “canvas” object and then we will draw something into it. Let us see how the “wipe” function is implemented. I wrote this function myself and is not part of the original neopixel_demo.py from the luma.led_matrix examples.
    def wipe(self):
        colors = ["red", "green", "blue", "white"]

        while True:
            for color in colors:
                for y in range(self.device.height):
                    for x in range(self.device.width):
                        with canvas(self.device) as draw:
                            z = y + 1
                            for temp in range(z):
                                if temp + 1 == z:
                                    draw.line((0, y, x, y), fill=color)
                                else:
draw.line((0, temp, self.device.width, temp), fill=color)- Line 2: Define a list of colors that we like to show
- Line 5 – 7: Create an endless loop taking into account the width and height of our WS2812B/Neopixels
- Line 8 – 14: Logic of drawing a line. First, we start with one dot until we fill up the device width.
This is how “pillow” works. You basically draw something on a canvas like drawing “lines”, “rectangles” and other geometric objects.
To learn how this is done you can try to experiment with different pillow objects and see how it is being drawn into your WS2812B/Neopixels.
Other libraries address each LED individually. In a future post, we can explore those libraries also.
Wrap Up
This post discusses how we can do the wiring of our WS2812B Neopixels into our Raspberry Pi. We touch upon the luma.led_matrix library which shows how you can “draw” something in a “canvas” manner. The output of which is shown in our 8×8 LED’s.
The next post in this series will discuss how we can create a Graphical User Interface (GUI) that we can access using our Mobile Phones. That GUI is then used to control the effects on our WS2812B Neopixels.
Thats It!
Happy Exploring!
Support Me!
I love sharing what I know and hopefully, I was able to help you. Writing helpful content takes so much time and research. If you think you like my work and I have managed to help you then please consider supporting my channel. I would be very grateful and would boost my confidence that what I am doing is making a big change in the world. (No Pun Intended!) 😉
Become a Patron!
Leave a Reply