
Introduction
This post will show you how you to interface your ESP32 with your DHT22 sensor that uses the Arduino framework. If you need to monitor the temperature or humidity of your surroundings then I highly suggest that you use the DHT22 sensor for this. This sensor is cheap and easy to connect to any Microcontrollers and it boasts high accuracy and stable readings.
If you want to see a video demo presentation of this project then please see below it or watch it on my YouTube channel.
What is DHT22?

The DHT22 sensor is a low-cost temperature and humidity sensor and it may come as a standalone component or the module type. I am using a module type in this post with a pull-up resistor and a filtering capacitor included so that I won’t need to add any external components to it. It comes with 3 pins with a single data line and the power pins GND and VCC.
The single data line outputs both the temperature and humidity readings but should not be confused with the One-Wire protocol as you may need to use independent GPIO pins if you want to connect more than one with your Microcontroller.
Below are the specifications for this component:
| Operating Voltage | 3.3 – 5.5 V |
| Protocol/Output | Serial Data |
| Temperature Range | -40 to 80 °C |
| Humidity Range | 0 to 100% |
| Accuracy | ±0.5 °C and ±1% |
DHT22 vs DHT11?
The DHT22 (or AM2302) is an upgraded version of the DHT11 sensor and is considered to be more precise and stable. Also, the range of the temperature is higher but is much larger than the original DHT11 but is more expensive.
Parts/Components Required
To follow along with this post then you need the following parts and components:
- ESP32 – Amazon | AliExpress | Bangood
- DHT22 Sensor Module – Amazon | AliExpress
- Breadboard – Amazon | AliExpress | Bangood
- Connecting Wires – Amazon | AliExpress | Bangood
Disclosure: These are affiliate links and I will earn small commissions to support my site when you buy through these links.
Prerequisites
The code for this project is applicable for both the Arduino IDE 2 and for those using the PlatformIO IDE extension in Visual Studio Code.
I am a big fan of the PlatformIO IDE due to the numerous code assist features and if you are not familiar with it then please see this detailed post that I have written about it.
Related Content:
PlatformIO Tutorial for Arduino Development
Wiring/Schematic
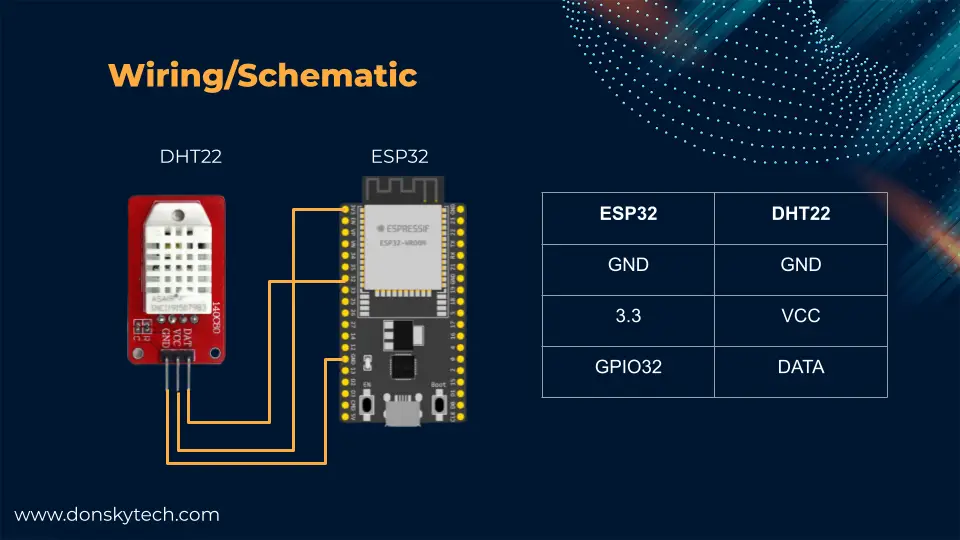
The above image is how we are going to wire our ESP32 Microcontroller with our DHT22 sensor module to retrieve temperature and humidity readings. You can choose any GPIO pins that support both input/output. If you are planning to connect more than two DHT22 sensors then you need another digital pin for that.
Arduino library for DHT22
In order for us to communicate with our DHT22 sensor then we would be using the library DHT-sensor-library from AdaFruit. We need to add the following library as a dependency for our project. Below are the steps on how you could add the library using the Arduino IDE 2 and PlatformIO extension in Visual Studio Code.
Arduino IDE 2
If you are using the Arduino IDE 2 then click the Libraries tab at the left and search for the “dht sensor library” and then click Install.
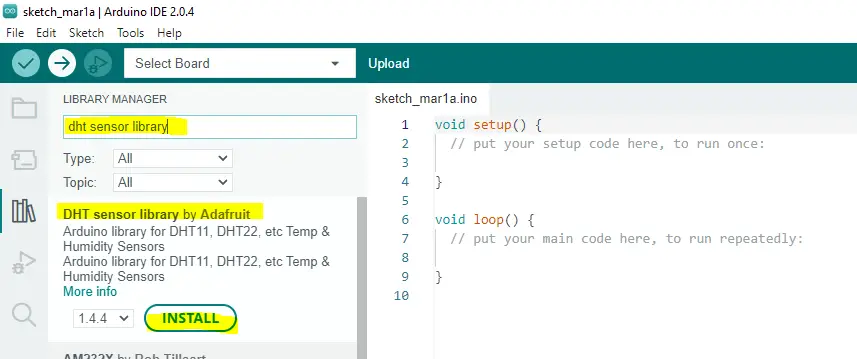
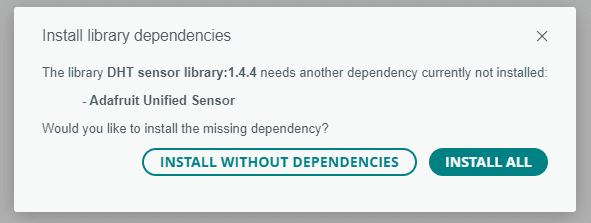
When a prompt window is displayed that asks you if you would like to install the dependent library then click “Install All“.
Install using PlatformIO IDE Extension
Go to the libraries tab and search for the “DHT Sensor Library” and then click the library below.
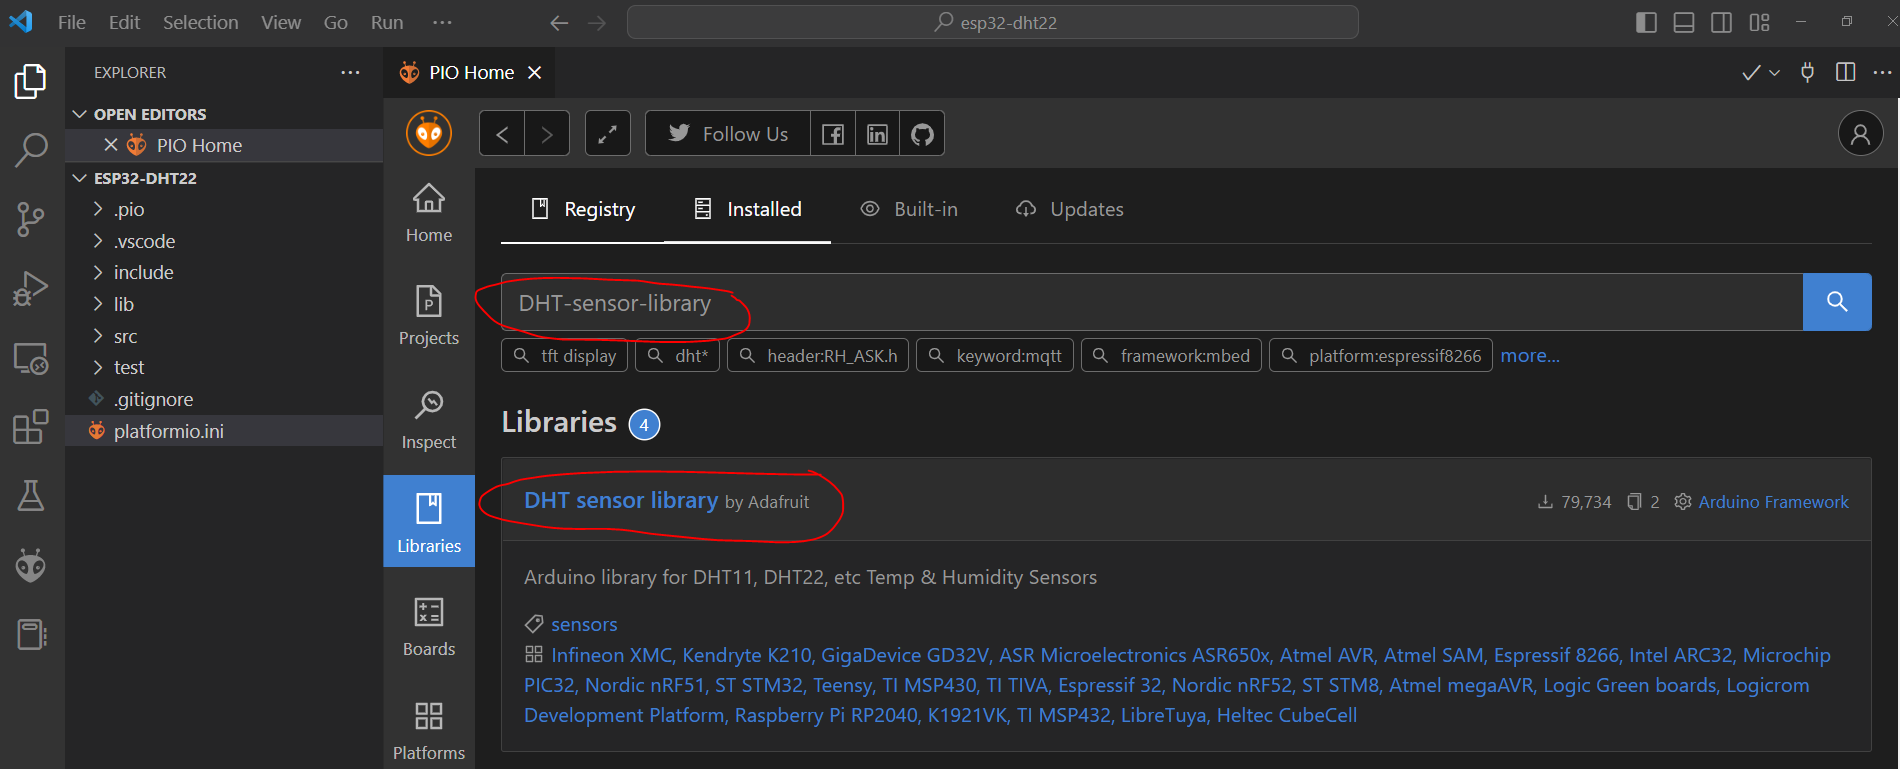
On the next screen, click the Add to project button and select the project to which you want to add to the library. This will download the library and all the dependent libraries into your project automatically.

Below is the final platform.ini setup that I have.
[env:esp32dev]
platform = espressif32
board = esp32dev
framework = arduino
monitor_speed = 115200
lib_deps =
	adafruit/Adafruit Unified Sensor@^1.1.7
	adafruit/DHT sensor library@^1.4.4
Code
The code for this project is available on my GitHub repository and is shown below. I have taken this from the example project of the said library and customized it according to my setup.
#include <Arduino.h>
#include "DHT.h"

#define DHTPIN 32     // Digital pin connected to the DHT sensor

// Uncomment whatever type you're using!
//#define DHTTYPE DHT11   // DHT 11
#define DHTTYPE DHT22   // DHT 22  (AM2302), AM2321
//#define DHTTYPE DHT21   // DHT 21 (AM2301)


// Initialize DHT sensor.
DHT dht(DHTPIN, DHTTYPE);

void setup() {
  Serial.begin(115200);
  Serial.println(F("DHTxx test!"));

  dht.begin();
}

void loop() {
  // Wait a few seconds between measurements.
  delay(2000);

  // Reading temperature or humidity takes about 250 milliseconds!
  // Sensor readings may also be up to 2 seconds 'old' (its a very slow sensor)
  float h = dht.readHumidity();
  // Read temperature as Celsius (the default)
  float t = dht.readTemperature();
  // Read temperature as Fahrenheit (isFahrenheit = true)
  float f = dht.readTemperature(true);

  // Check if any reads failed and exit early (to try again).
  if (isnan(h) || isnan(t) || isnan(f)) {
    Serial.println(F("Failed to read from DHT sensor!"));
    return;
  }

  // Compute heat index in Fahrenheit (the default)
  float hif = dht.computeHeatIndex(f, h);
  // Compute heat index in Celsius (isFahreheit = false)
  float hic = dht.computeHeatIndex(t, h, false);

  Serial.print(F("Humidity: "));
  Serial.print(h);
  Serial.print(F("%  Temperature: "));
  Serial.print(t);
  Serial.print(F("°C "));
  Serial.print(f);
  Serial.print(F("°F  Heat index: "));
  Serial.print(hic);
  Serial.print(F("°C "));
  Serial.print(hif);
  Serial.println(F("°F"));
}
Let us scan through what each line of the code does.
#include <Arduino.h>
#include "DHT.h"
Import the necessary libraries for us to communicate between our ESP32 and DHT22 sensor modules.
#define DHTPIN 32     // Digital pin connected to the DHT sensor

// Uncomment whatever type you're using!
//#define DHTTYPE DHT11   // DHT 11
#define DHTTYPE DHT22   // DHT 22  (AM2302), AM2321
//#define DHTTYPE DHT21   // DHT 21 (AM2301)

// Initialize DHT sensor.
DHT dht(DHTPIN, DHTTYPE);
Define the ESP32 GPIO Pin where you would like to communicate and make sure that it is an Input/Output pin else we will not be able to get the sensor readings from our DHT22. Also, this library is applicable to a DHT11 or a DHT21 type of sensor so you can define the type of sensor that you have here.
We define an object of type DHT and pass the parameter pin and DHT type.
void setup() {
  Serial.begin(115200);
  Serial.println(F("DHTxx test!"));

  dht.begin();
}
In the setup function, set the Serial Monitor baud rate and call the dht.begin() method of DHT class.
void loop() {
  // Wait a few seconds between measurements.
  delay(2000);

  // Reading temperature or humidity takes about 250 milliseconds!
  // Sensor readings may also be up to 2 seconds 'old' (its a very slow sensor)
  float h = dht.readHumidity();
  // Read temperature as Celsius (the default)
  float t = dht.readTemperature();
  // Read temperature as Fahrenheit (isFahrenheit = true)
  float f = dht.readTemperature(true);

  // Check if any reads failed and exit early (to try again).
  if (isnan(h) || isnan(t) || isnan(f)) {
    Serial.println(F("Failed to read from DHT sensor!"));
    return;
  }

  // Compute heat index in Fahrenheit (the default)
  float hif = dht.computeHeatIndex(f, h);
  // Compute heat index in Celsius (isFahreheit = false)
  float hic = dht.computeHeatIndex(t, h, false);

  Serial.print(F("Humidity: "));
  Serial.print(h);
  Serial.print(F("%  Temperature: "));
  Serial.print(t);
  Serial.print(F("°C "));
  Serial.print(f);
  Serial.print(F("°F  Heat index: "));
  Serial.print(hic);
  Serial.print(F("°C "));
  Serial.print(hif);
  Serial.println(F("°F"));
}
In the loop function, we have added a 2 seconds delay as we cannot ask for the readings of the DHT22 sensor that often as this sensor is slow.
We then call the dht.readHumidity();, dht.readTemperature();, and dht.readTemperature(true); to retrieve the temperature, humidity, and Fahrenheit sensor readings.
  // Check if any reads failed and exit early (to try again).
  if (isnan(h) || isnan(t) || isnan(f)) {
    Serial.println(F("Failed to read from DHT sensor!"));
    return;
  }
This DHT22 sensor is hard to read so we have added a check here such that if the returned sensor readings are not a number then it means that the readings have failed. We just exit the code and wait for the next iteration of the loop() function.
  // Compute heat index in Fahrenheit (the default)
  float hif = dht.computeHeatIndex(f, h);
  // Compute heat index in Celsius (isFahreheit = false)
  float hic = dht.computeHeatIndex(t, h, false);
The Adafruit DHT sensor library has the capability to compute the heat index by passing in the temperature and humidity sensor readings using the computeHeatIndex() function.
  Serial.print(F("Humidity: "));
  Serial.print(h);
  Serial.print(F("%  Temperature: "));
  Serial.print(t);
  Serial.print(F("°C "));
  Serial.print(f);
  Serial.print(F("°F  Heat index: "));
  Serial.print(hic);
  Serial.print(F("°C "));
  Serial.print(hif);
  Serial.println(F("°F"));
The following will print the values on our Serial Monitor.
Below is the sample output of the said program when you upload this sketch onto your ESP32 Microcontroller device.
Humidity: 60.60%  Temperature: 32.30°C 90.14°F  Heat index: 37.98°C 100.36°F
Humidity: 60.60%  Temperature: 32.40°C 90.32°F  Heat index: 38.22°C 100.80°F
Humidity: 60.50%  Temperature: 32.30°C 90.14°F  Heat index: 37.94°C 100.30°F
Humidity: 60.50%  Temperature: 32.30°C 90.14°F  Heat index: 37.94°C 100.30°F
Humidity: 60.50%  Temperature: 32.30°C 90.14°F  Heat index: 37.94°C 100.30°F
Humidity: 60.50%  Temperature: 32.30°C 90.14°F  Heat index: 37.94°C 100.30°F
Humidity: 60.50%  Temperature: 32.30°C 90.14°F  Heat index: 37.94°C 100.30°F
Issues
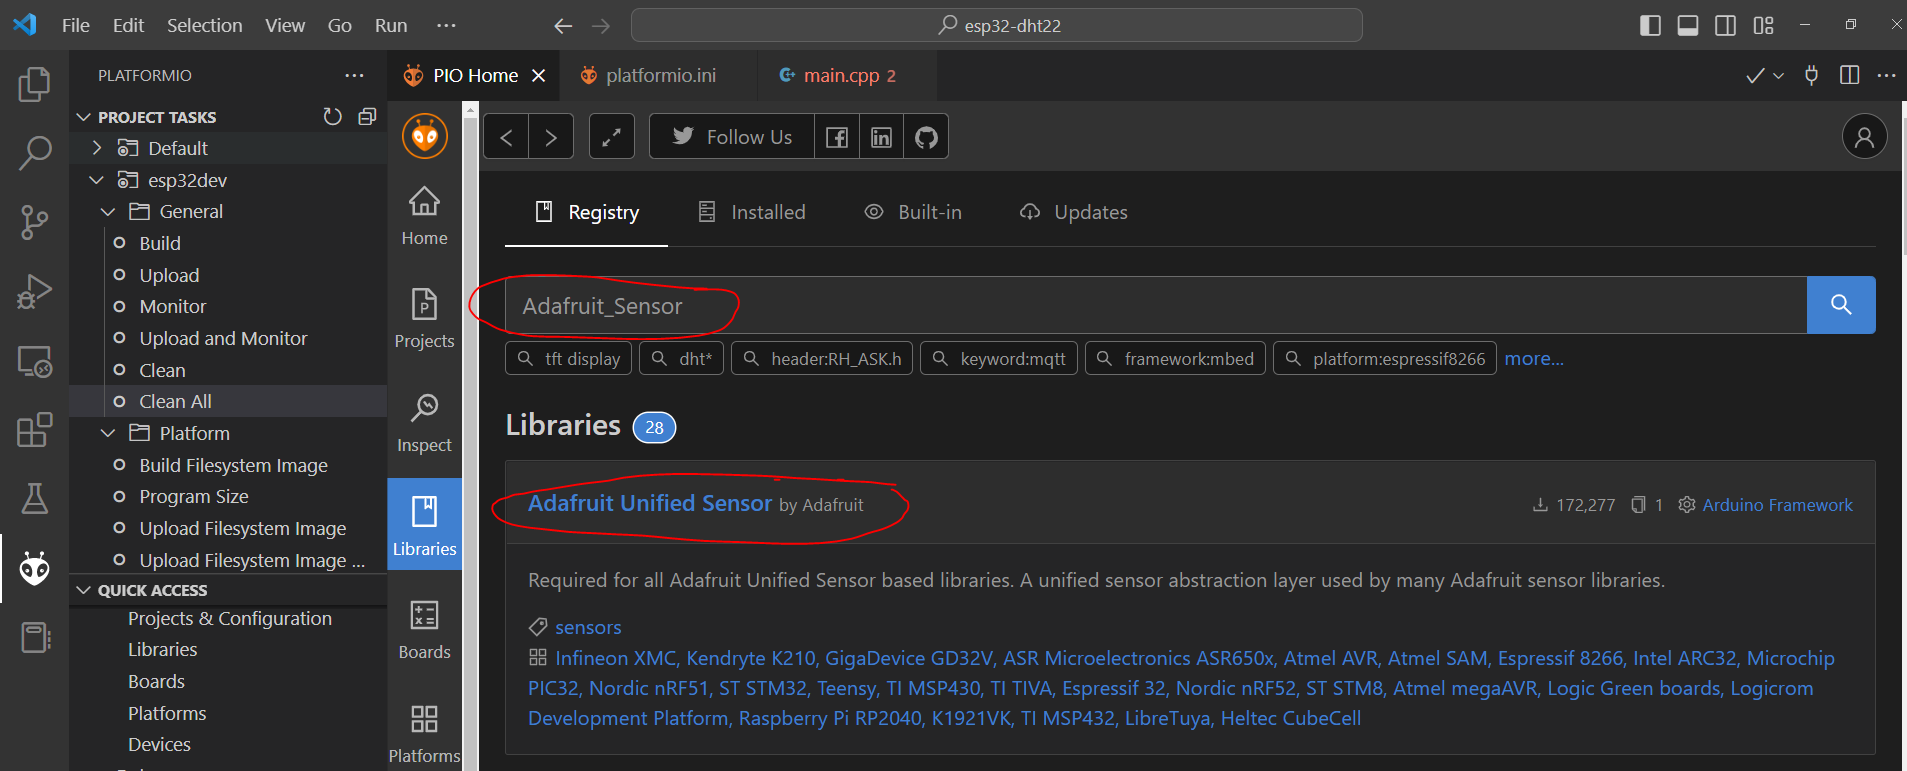
fatal error: Adafruit_Sensor.h: No such file or directory
At the time of writing this article, I had some issues installing the Adafruit DHT sensor library in PlatformIO IDE. It seems that the PlatformIO IDE extension cannot resolve the dependent library Adafruit Unified Sensor Driver causing an error “fatal error: Adafruit_Sensor.h: No such file or directory”.
To fix the issue, install the Adafruit Unified Sensor Driver Library first then the DHT Sensor library next.
Wrap Up
This is how easy it is to read the temperature and humidity readings from your DHT22 sensor module using your ESP32 device running the Arduino code.
I hope you learned something! Happy exploring!
Read Next:
Pico W -MicroPython MQTT – BMP/BME 280 Weather Station
Control DS18B20 using MicroPython with a Weather Station Project
Leave a Reply