- Introduction
- What is serial communication and UART?
- Why I wrote this post?
- What is “fatal error: SoftwareSerial.h: No such file or directory”?
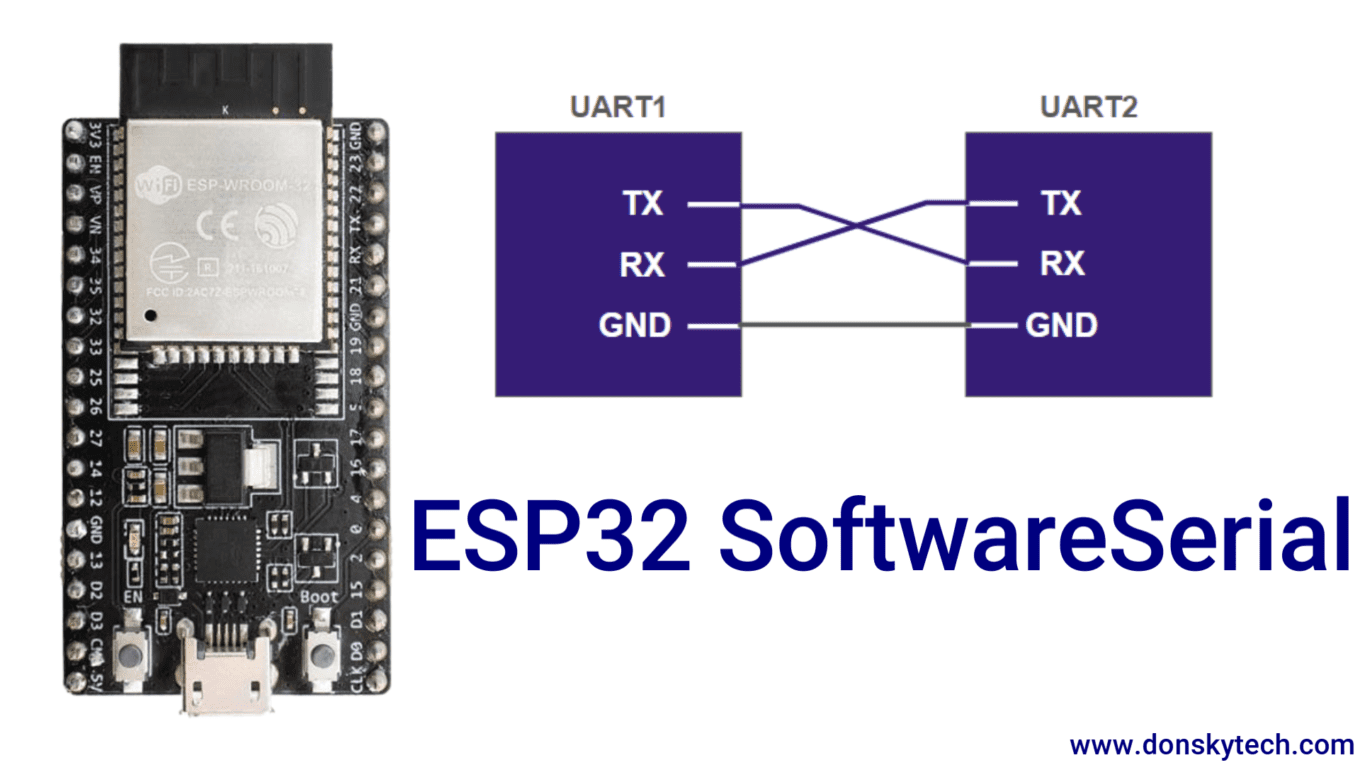
- What is SoftwareSerial in ESP32?
- What are the ESP32 UART Pins/Ports?
- Parts/Components Required
- Wiring/Schematics
- How to add the SoftwareSerial library to your ESP32 projects?
- Code
- Common Questions about Serial, SoftwareSerial, and UART
- Wrap Up
Introduction
If you have worked with the Arduino Uno R3 board, I am sure that you have used SoftwareSerial library in your projects. The board itself only contains a single hardware Universal asynchronous receiver-transmitter (UART) port in Digital Pins 0 (RX) and 1 (TX). If you have multiple sensors that use Serial communication then you need to convert some of the digital pins as UART using software using the SoftwareSerial library. In this post, I will show you how you can configure your ESP32 or ESP8266 microcontroller to use SoftwareSerial in your Arduino programs.
If you want to see a video demo presentation of this project, please look at the below video or watch it on my YouTube channel.
What is serial communication and UART?
Both serial communication and UART are used interchangeably to each other in terms of Arduino programming.
Serial communication is the process of sending data one bit at a time between a receiver and the sender.
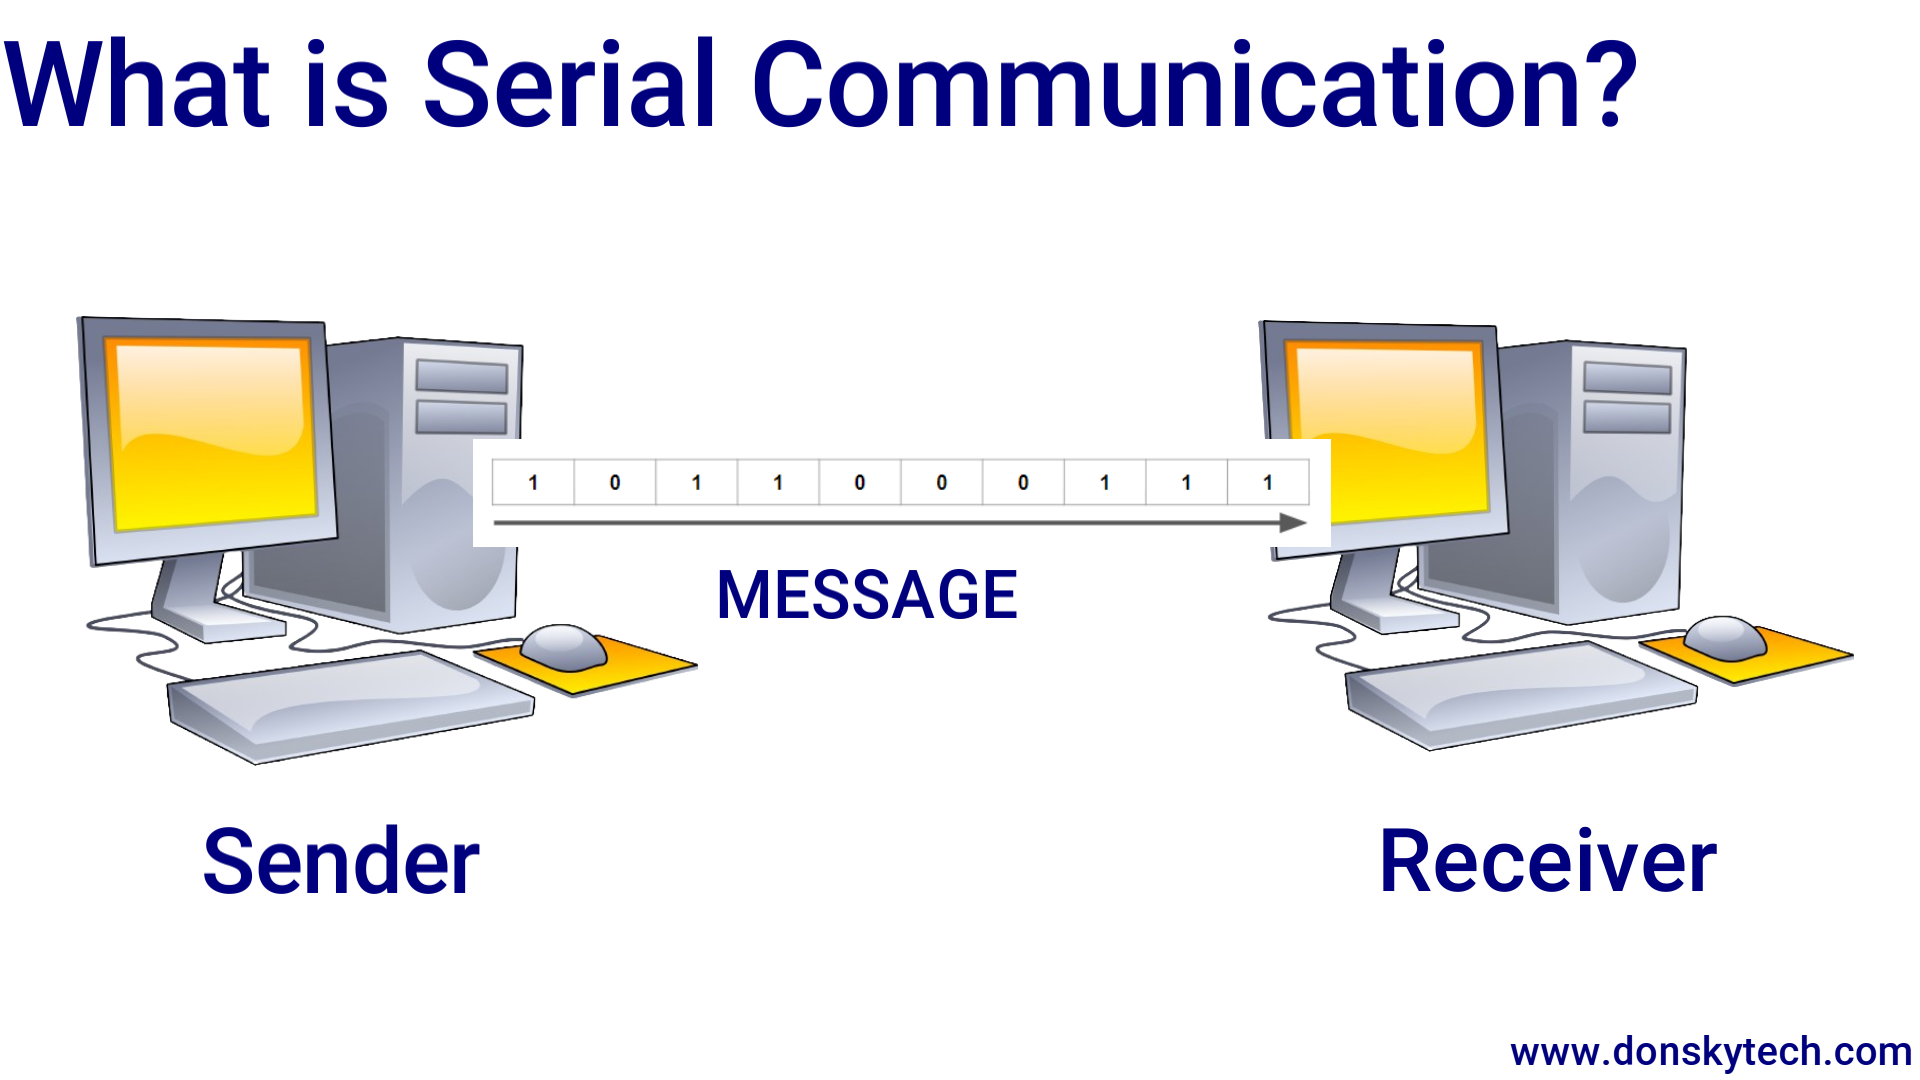
On the other hand, UART is a specific hardware communication protocol that defines how data is transmitted serially between devices. The speed at which the bits are transferred between the sender and the receiver is called the baud rate.

Why I wrote this post?
I was working on an IoT(Internet of Things) project that uses the Arduino Uno to send GPS data using a SIM900 module. Yes, I know that SIM900 is a very old GSM module and many countries already obsoleted their 2G network. However, this is still popular in my country and 2G is working fine :).
The code to communicate with the SIM900 is shown below.
#include <Arduino.h>
#include <SoftwareSerial.h>

// Software Serial object to interface with my SIM900
SoftwareSerial sim900(7, 8);

void updateSerial();

void setup()
{
  // Set Arduino IDE (Serial Monitor)
  Serial.begin(9600);

  // Begin serial communication with Arduino and SIM900
  sim900.begin(9600);

  Serial.println("Initialize SIM900");

  // SIM900 Handshake AT commands
  sim900.println("AT");
  updateSerial();
  // Signal Quality Test
  sim900.println("AT+CSQ");
  updateSerial();
  // Check SIM
  sim900.println("AT+CCID");
  updateSerial();
  // Check network registration
  sim900.println("AT+CREG?");
  updateSerial();
}

void loop()
{
  updateSerial();
}

void updateSerial()
{
  delay(500);
  while (Serial.available())
  {
    sim900.write(Serial.read()); // From Serial Port to Software Serial
  }
  while (sim900.available())
  {
    Serial.write(sim900.read()); // From Software Serial to Serial Port
  }
}
The important line is SoftwareSerial sim900(7, 8); where we have defined our SoftwareSerial object. In addition, the digital pins that we are going to use are defined here where GPIO7 and GPIO8 of the Arduino Uno act as the receiver(RX) and transmitter(TX) pins.
The project is working fine and good however I needed to transfer the project to a much faster Microcontroller like the ESP32. I uploaded the program using PlatformIO but you can also use Arduino IDE 2 here if you like.
Related Tutorial:
PlatformIO Tutorial for Arduino Development
Upon uploading, I encountered the dreaded error “fatal error: SoftwareSerial.h: No such file or directory“.
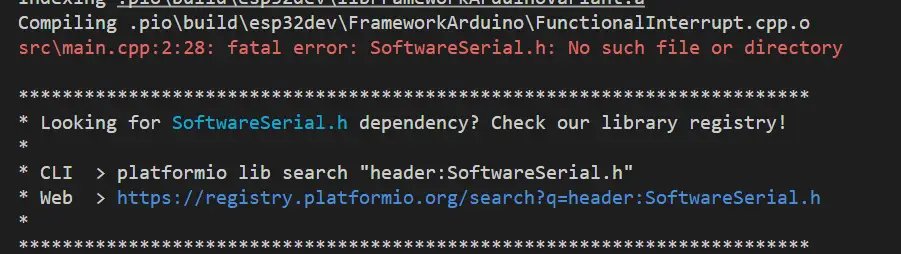
What is “fatal error: SoftwareSerial.h: No such file or directory“?
The exact cause of this error is that the ESP32 microcontroller has numerous hardware UART ports built in, it provides native support for serial communication and does not come with the SoftwareSerial library by default. Multiple hardware UART ports mean that SoftwareSerial or other software-based serial communication solutions are not necessary. Nevertheless, if you are interfacing with multiple components that use Serial connections like GPS modules, Bluetooth devices, or GSM modules then you need to add SoftwareSerial to your ESP32 projects.
By default, the Arduino Uno AVR platform contains the SoftwareSerial library; you can check it here. For this reason, you do not have to import an external library when you are working with the Arduino Uno. However, this is not the case for ESP32 as you may need to include an external library to make SoftwareSerial work in your Arduino projects.
What is SoftwareSerial in ESP32?
As mentioned above, to use SoftwareSerial in your ESP32/ESP8266 Arduino projects we need to include an external library called ESPSoftwareSerial. It has a similar interface to that of the original SoftwareSerial library from the Arduino-avr but with additional features.
Let us discuss a little bit about some of the Serial communication concepts in our ESP32 microcontroller.
What are the ESP32 UART Pins/Ports?
The common DevKit ESP32 38 pins model contains the following UART pins by default and the pins associated with it are shown below. Just remember that UART1 is connected to the SPI Flash of the microcontroller so you need to redefine the pins if you want to use it.
| UART Port | RX | TX | Available? |
|---|---|---|---|
| UART0 | GPIO3 | GPIO1 | YES |
| UART1 | GPIO9 | GPIO10 | Yes but pins should be changed |
| UART2 | GPIO16 | GPIO17 | Yes |
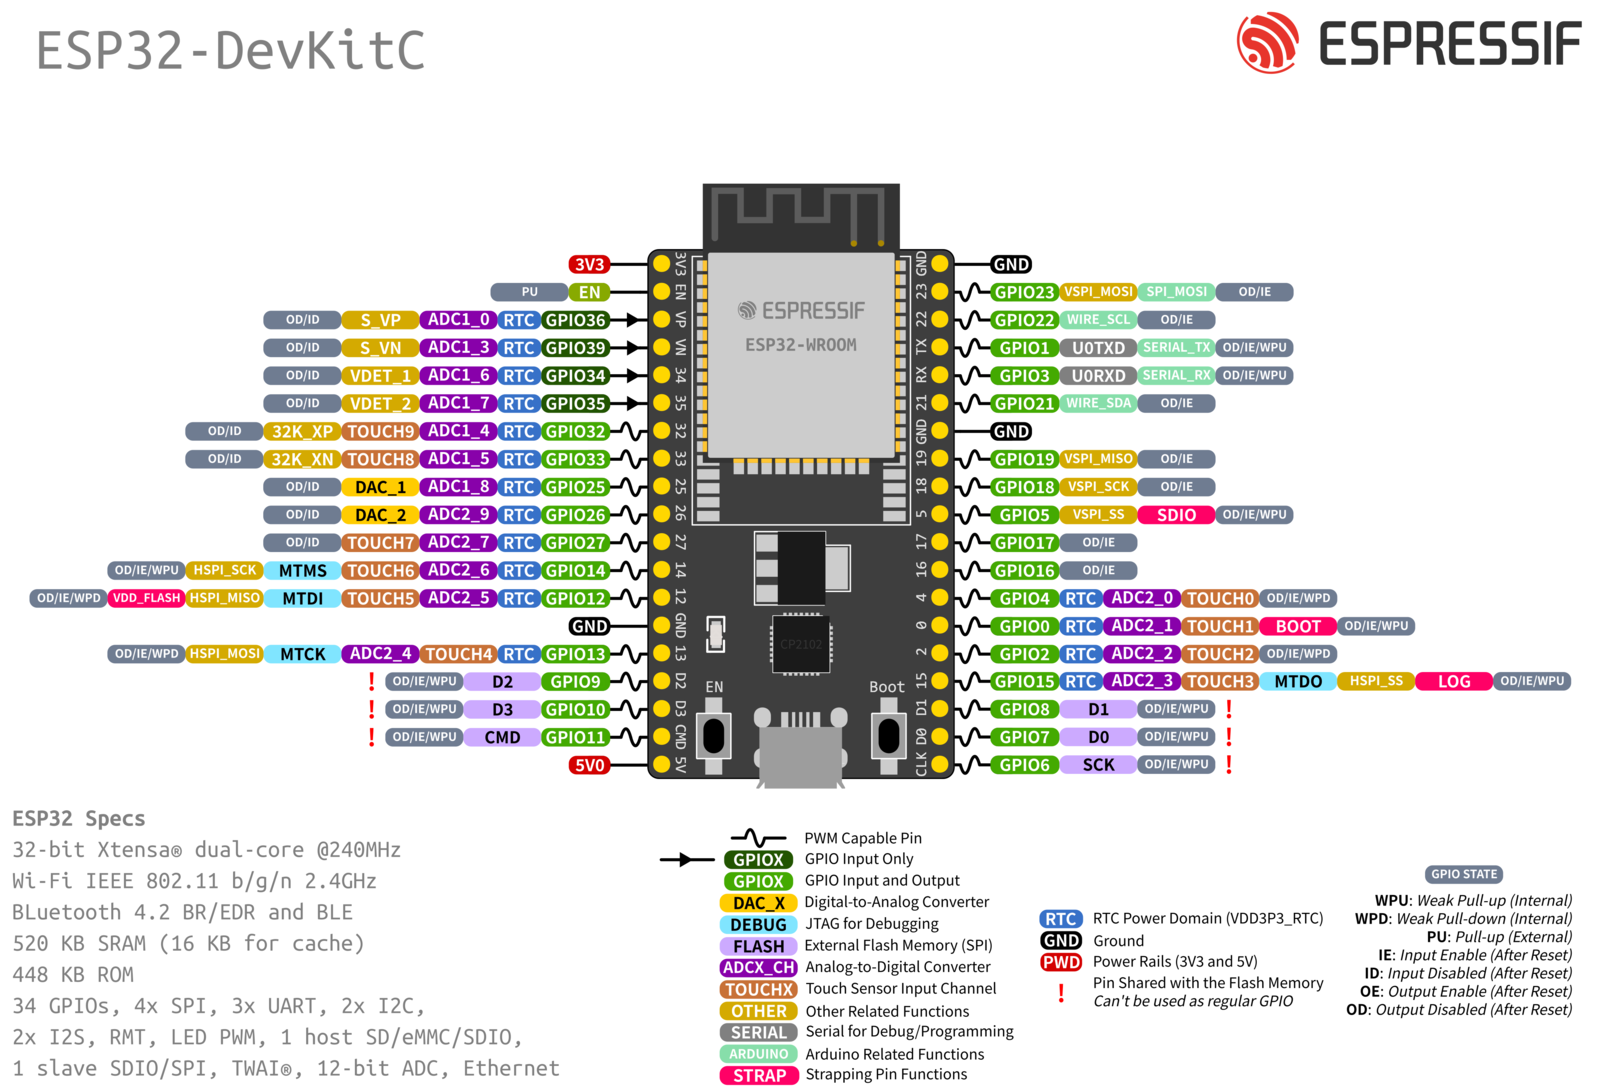
Note: Image taken from espressif.com
You can access these UART ports as defined in your project like the code below. You do not have to define these as they are defined by the ESP32 framework for you. The code that I am showing here is available on my GitHub repository.
#include <Arduino.h>

void setup()
{
  Serial.begin(9600);
  Serial1.begin(9600);
  Serial2.begin(115200);
}

void loop()
{
  while (Serial.available())
  {
    // Do your code
  }
  while (Serial1.available())
  {
    // Do your code
  }
  while (Serial2.available())
  {
    // Do your code
  }
}
But nothing will stop you from reconfiguring your project into creating a custom HardwareSerial object. In addition, you can define custom configurations like setting the baud rate, bit settings, parity, stop bits, and the RX/TX pins like the code below.
#include <Arduino.h>

HardwareSerial mySerial(0);
HardwareSerial mySerial1(1);
HardwareSerial mySerial2(2);

void setup()
{
  mySerial.begin(9600, SERIAL_8N1); // Default config
  mySerial1.begin(9600, SERIAL_8E1, 32, 33); // Set Serial Communication config and reassign pins to 32, 33
  mySerial2.begin(115200, SERIAL_8N2); // Set Serial Communication config
}

void loop()
{
  while (mySerial.available())
  {
    // Do your code
  }
  while (mySerial1.available())
  {
    // Do your code
  }
  while (mySerial2.available())
  {
    // Do your code
  }
}
Parts/Components Required
The following are the components required for this project
- ESP32 – Amazon | AliExpress
- or ESP8266 – Amazon | AliExpress
- GSM Sim900 – Amazon | AliExpress
- or GSM Sim800 – Amazon | AliExpress
- Breadboard – Amazon | AliExpress
- Connecting Wires – Amazon | AliExpress
If you are starting with Arduino programming then I highly suggest the following Arduino Starter Kit.
Disclosure: These are affiliate links and I will earn small commissions to support my site when you buy through these links.
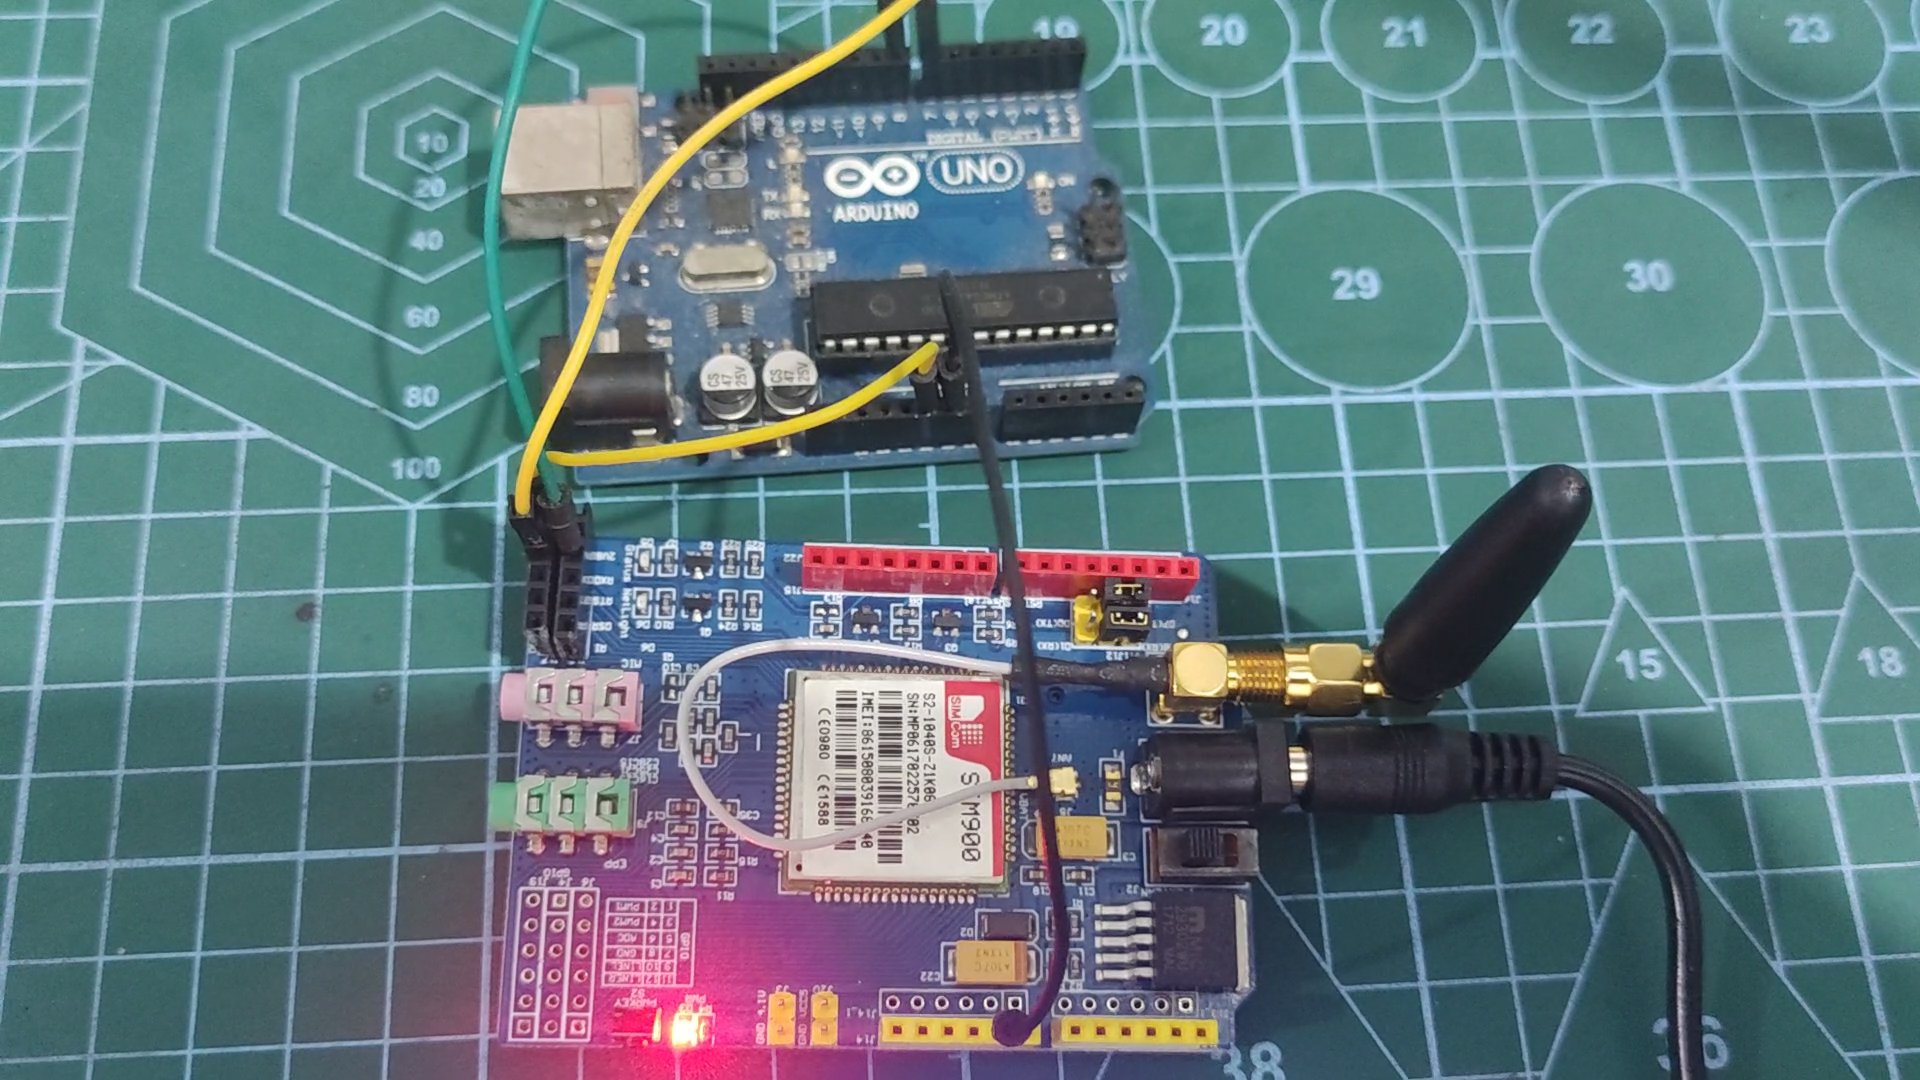
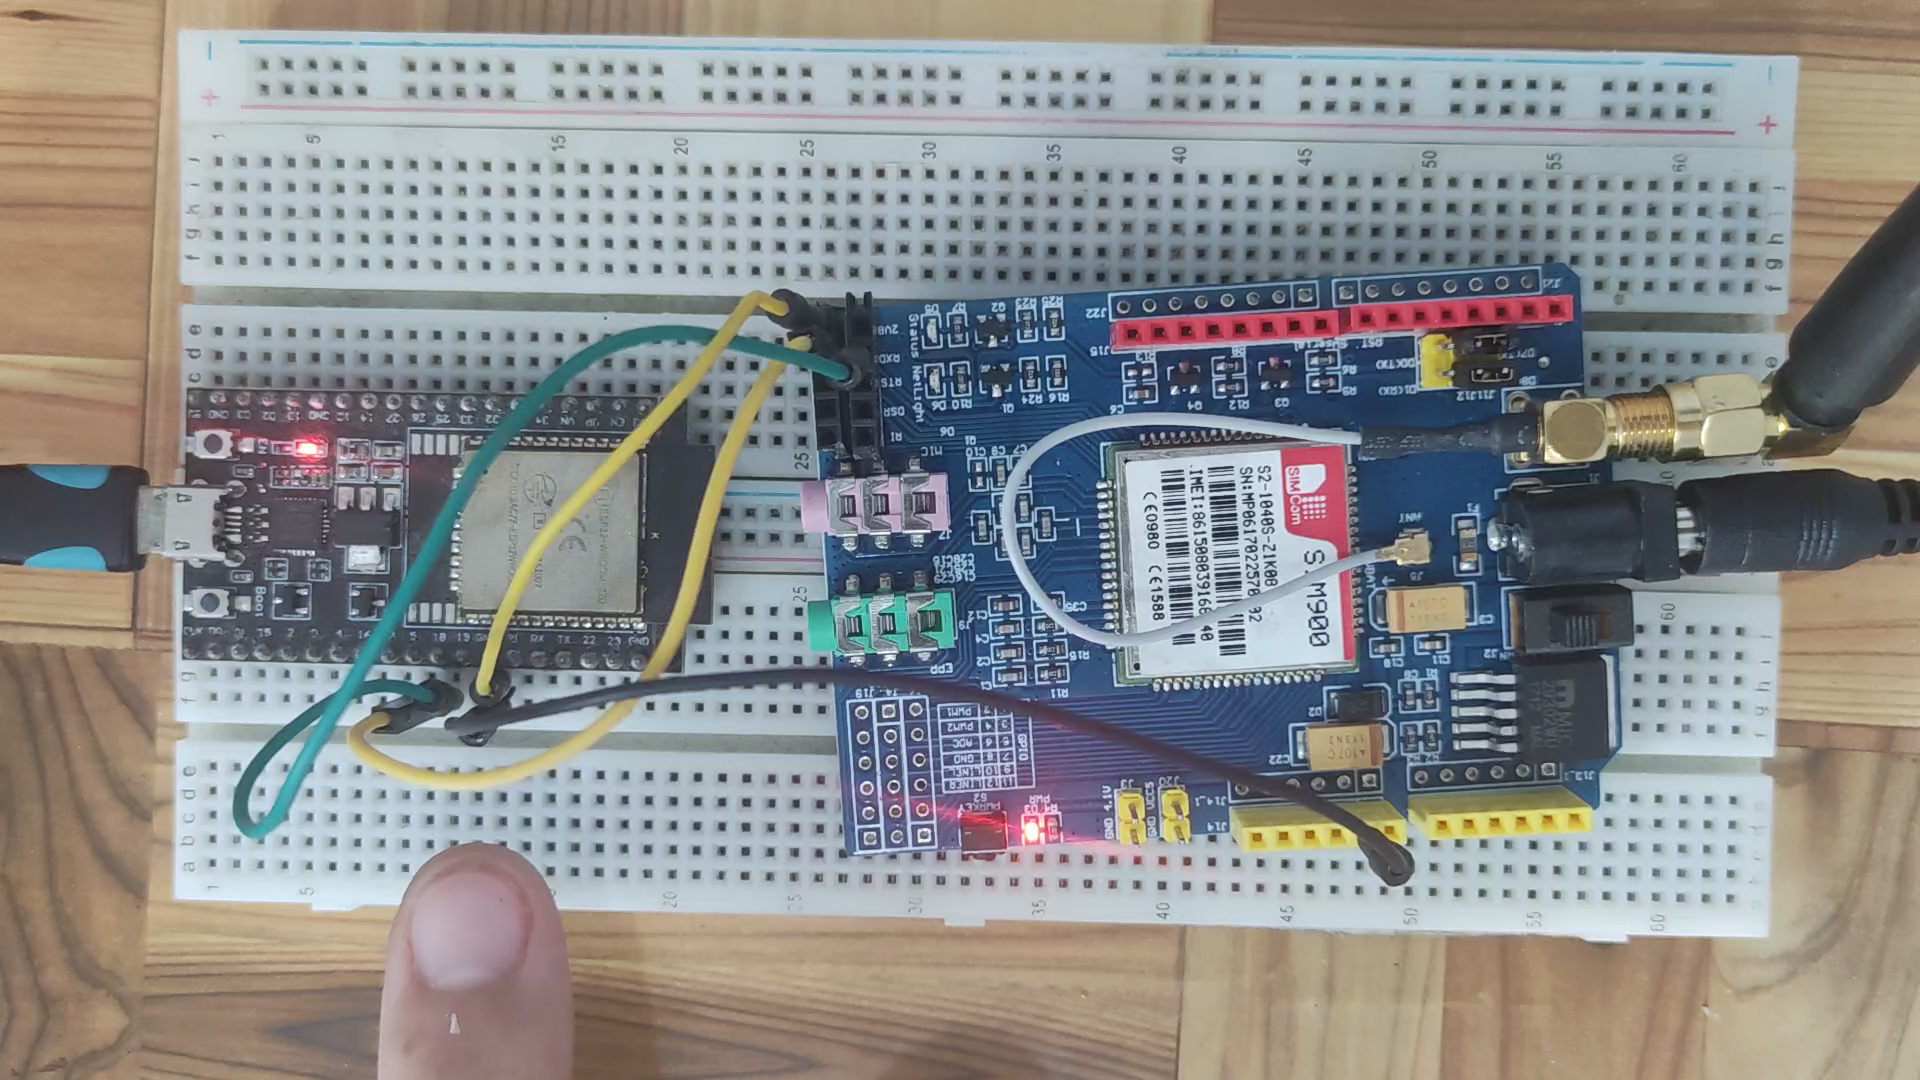
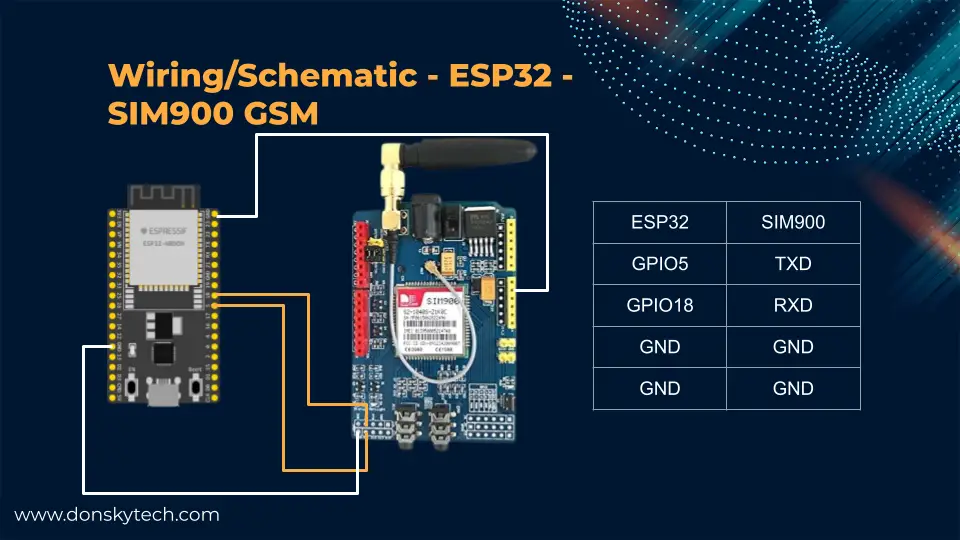
Wiring/Schematics
The below image shows the wiring and schematic between my ESP32 and GSM SIM900 module. You could also use a SIM800 module as a replacement.
How to add the SoftwareSerial library to your ESP32 projects?
To use the SoftwareSerial on our ESP32 projects, we first need to add the library.
If you are using PlatformIO IDE then you could follow the steps below.
Go to your PlatformIO home page and search for the library ESPSoftwareSerial. Add it to your project.
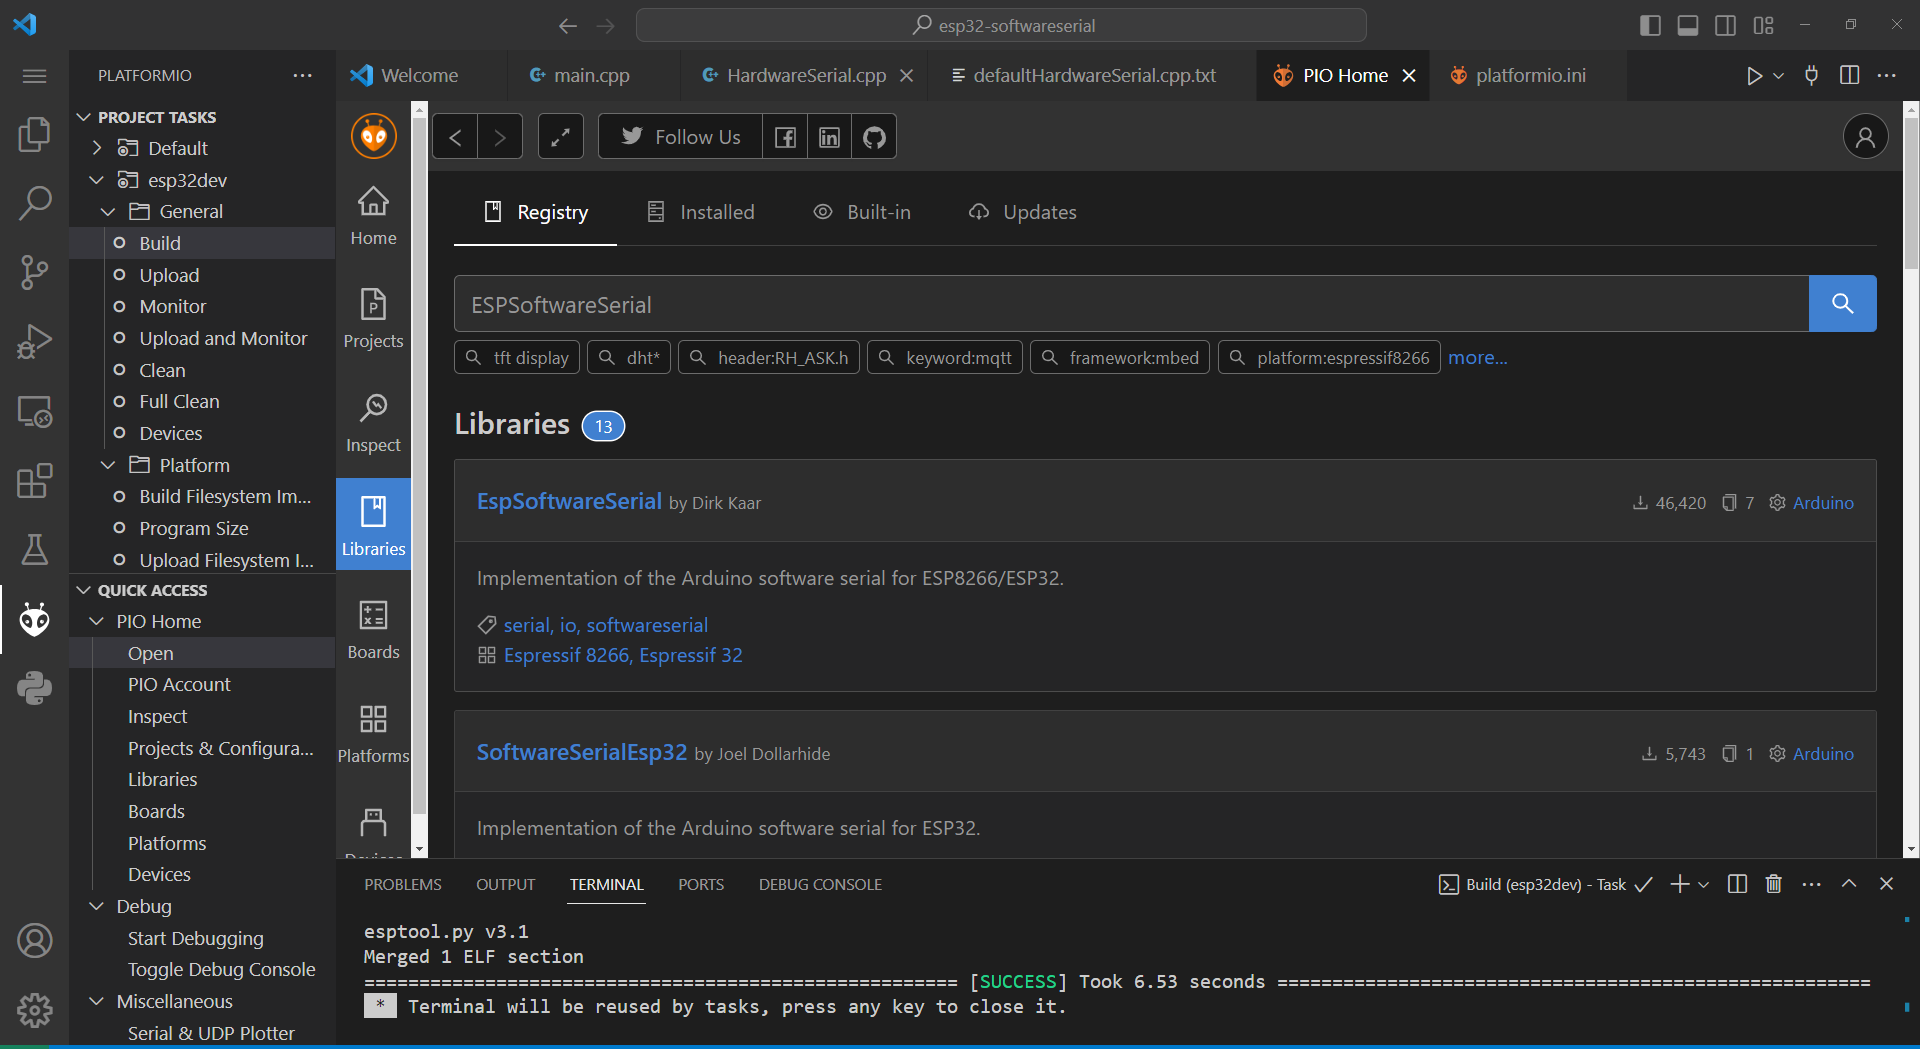
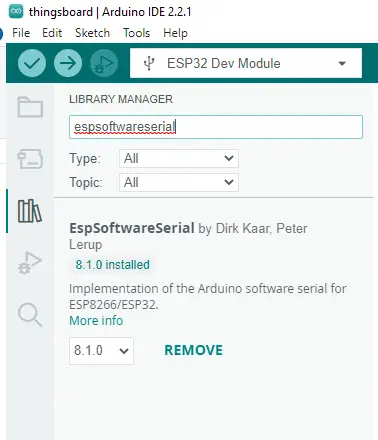
On the other hand, if you are using Arduino IDE then go to the libraries tab and search for ESPSoftwareSerial and install it.
Code
Below is the code that we will be using to show how you can use SoftwareSerial in your ESP32 projects. I am using SoftwareSerial to communicate with my GSM SIM900 module and send AT commands to check for its connection.
#include <Arduino.h>
#include <SoftwareSerial.h>

// Software Serial object to interface with my SIM900
SoftwareSerial sim900(5, 18);

void updateSerial();

void setup()
{
  // Set Arduino IDE (Serial Monitor)
  Serial.begin(9600);

  // Begin serial communication with Arduino and SIM900
  sim900.begin(9600);

  Serial.println("Initialize SIM900");

  // SIM900 Handshake AT commands
  sim900.println("AT");
  updateSerial();
  // Signal Quality Test
  sim900.println("AT+CSQ");
  updateSerial();
  // Check SIM
  sim900.println("AT+CCID");
  updateSerial();
  // Check network registration
  sim900.println("AT+CREG?");
  updateSerial();
}

void loop()
{
  updateSerial();
}

void updateSerial()
{
  delay(500);
  while (Serial.available())
  {
    sim900.write(Serial.read()); // From Serial Port to Software Serial
  }
  while (sim900.available())
  {
    Serial.write(sim900.read()); // From Software Serial to Serial Port
  }
}
Let us try going over the code.
#include <Arduino.h>
#include <SoftwareSerial.h>

// Software Serial object to interface with my SIM900
SoftwareSerial sim900(5, 18);
First, we import the SoftwareSerial library and create an object called sim900 passing in the GPIO5 and GPIO18 as RX and TX Pins.
void updateSerial();

void setup()
{
  // Set Arduino IDE (Serial Monitor)
  Serial.begin(9600);

  // Begin serial communication with Arduino and SIM900
  sim900.begin(9600);

  Serial.println("Initialize SIM900");

  // SIM900 Handshake AT commands
  sim900.println("AT");
  updateSerial();
  // Signal Quality Test
  sim900.println("AT+CSQ");
  updateSerial();
  // Check SIM
  sim900.println("AT+CCID");
  updateSerial();
  // Check network registration
  sim900.println("AT+CREG?");
  updateSerial();
}
We forward declared the function void updateSerial();
In the function setup(), we initialized the baud rate for our HardwareSerial and SoftwareSerial. After which, we execute a series of “AT” commands to send it to our GSM SIM900 module.
For each AT command, we check the GSM SIM900 response by outputting it to our HardwareSerial object.
void loop()
{
  updateSerial();
}

void updateSerial()
{
  delay(500);
  while (Serial.available())
  {
    sim900.write(Serial.read()); // From Serial Port to Software Serial
  }
  while (sim900.available())
  {
    Serial.write(sim900.read()); // From Software Serial to Serial Port
  }
}
In the function loop(), we continually check for messages coming in from our Serial interface and then write them back and forth between our SoftwareSerial and HardwareSerial.
That is how simple and easy it is to use SotwareSerial on your ESP32 projects.
Common Questions about Serial, SoftwareSerial, and UART
Can we mix SoftwareSerial with HardwareSerial?
To connect with many devices at once in an Arduino sketch, you can utilize both HardwareSerial and SoftwareSerial. If you need to communicate with several serial devices, each requiring its own communication channel, this can be helpful.
A sample Arduino sketch is shown below where we are mixing both HardwareSerial and SoftwareSerial in one program.
#include <Arduino.h>
#include <SoftwareSerial.h>

// Define SoftwareSerial
SoftwareSerial mySerial(5, 18);

void setup() {
  // Initialize hardware serial baud Rate
  Serial.begin(9600);
  // Initialize software serial
  mySerial.begin(9600);
}

void loop() {
  if (Serial.available()) {
    char c = Serial.read();
     // Send data received from hardware serial to software serial
    mySerial.write(c);
  }

  if (mySerial.available()) {
    char c = mySerial.read();
    // Send data received from software serial to hardware serial
    Serial.write(c);
  }
}
Which is faster SoftwareSerial or hardware UART?
Hardware UART is often quicker and more dependable than Arduino SoftwareSerial. The main distinction between SoftwareSerial and Hardware UART is that the former uses software-based timing and interrupts, while the latter is implemented in dedicated hardware.
Does SoftwareSerial use the hardware UART?
No, the hardware UART (Universal Asynchronous Receiver-Transmitter) ports on the microcontroller are not used by the Arduino SoftwareSerial library. Instead, you can generate more virtual UART ports on GPIO (General Purpose Input/Output) pins by using SoftwareSerial, a software-based version of a serial communication library.
What are the limitations of SoftwareSerial?
- Slower communication: When compared to hardware UART, software serial is typically slower, especially at higher baud rates.
- Timing problems: SoftwareSerial is more prone to timing faults in sophisticated or time-sensitive applications because it depends on exact software timing and interrupts.
Wrap Up
In this simple post, I have shown you how you can use SoftwareSerial in your ESP32 Arduino projects. Using SoftwareSerial will allow you to create virtual UART ports for your ESP32 microcontroller. This will allow you to re-assign some of your digital pins as RX and TX pins for serial communications.
I hope you learned something. Happy Exploring!
Read Next – Related to this topic:
Program ESP8266 ESP-01 With Arduino
Leave a Reply