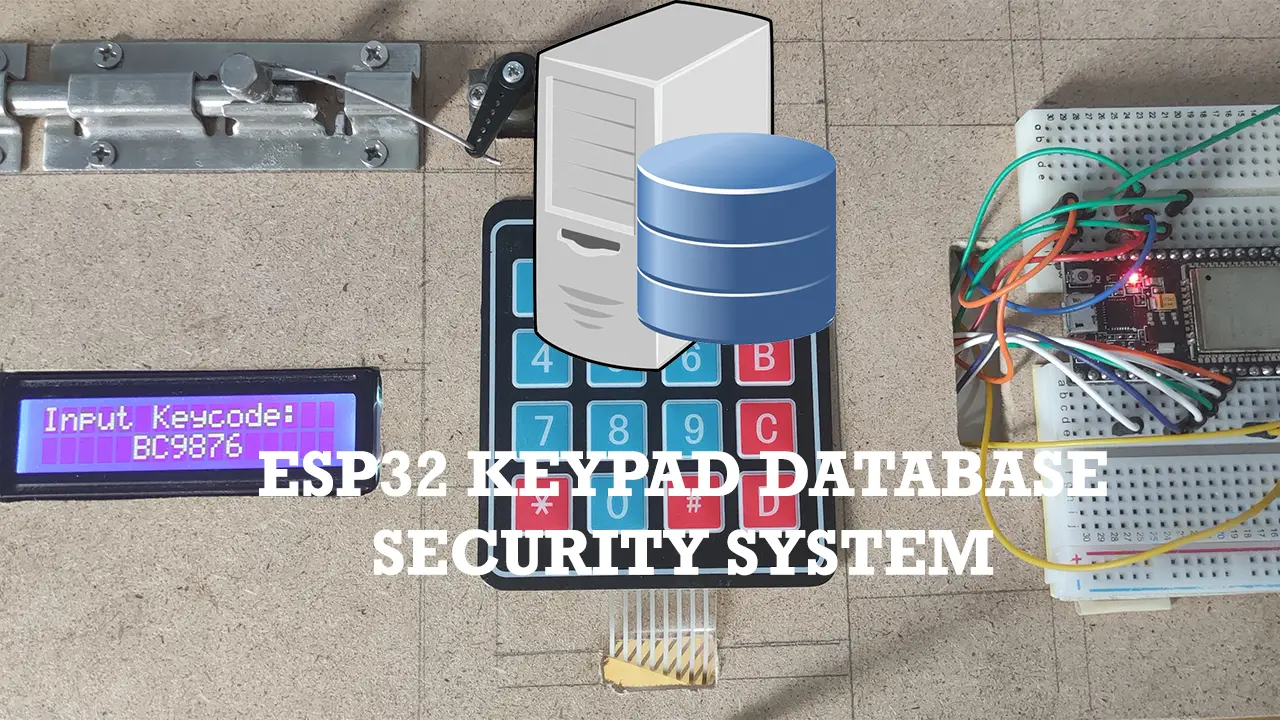
Introduction
This post will discuss the code of our ESP32 Keypad Database Security System and how we will control our doorlock using the keypad. This will also explain how it calls our REST API server so that we can access our database interface.
This is the part 3 of our series about our ESP32 Keypad Doorlock with Database Interface. If you need to refresh yourself about the project that we are doing then please read Part 1 and Part 2 first.
- Part 1 – ESP32 Keypad Database Security System – Design
- Part 2 – ESP32 Keypad Database Security System – Build REST API Using Node.js, Express and MongoDB
- Part 3 – ESP32 Keypad Database Security System – Code
If you need a recap of how this project works in action then please see the following video.
Prerequisites
Part 1 of this series discusses the wiring and schematic diagram of our project. You should be able to follow the setup that I did there.
Part 2 of this post in the series discusses about how to setup your own REST API Server for us to be able to access our MongoDB Atlas database. Node.js, Express and MongoDB were used in building the server with javascript as the programming language.
If you had a hard time understanding that post then you can skip that part and just setup your own MongoDB Atlas cluster by following this post.
I used Visual Studio Code with the PlatformIO extension installed in developing this project. If you are in Windows and have not yet installed Visual Studio Code then you can check my post about how to Install Visual Studio Code or VSCode in Windows. If you are not familiar with PlatformIO then please read this PlatformIO Tutorial for Arduino Development where I detailed how to get started with development using the PlatformIO IDE extension
Running the project
Once you have your MongoDB Atlas cluster setup then we can proceed setting up and running our projects. We have two projects that needs to configure in order for us to run our IOT project.
- REST API Server – Keycodes
- ESP32 MCU code
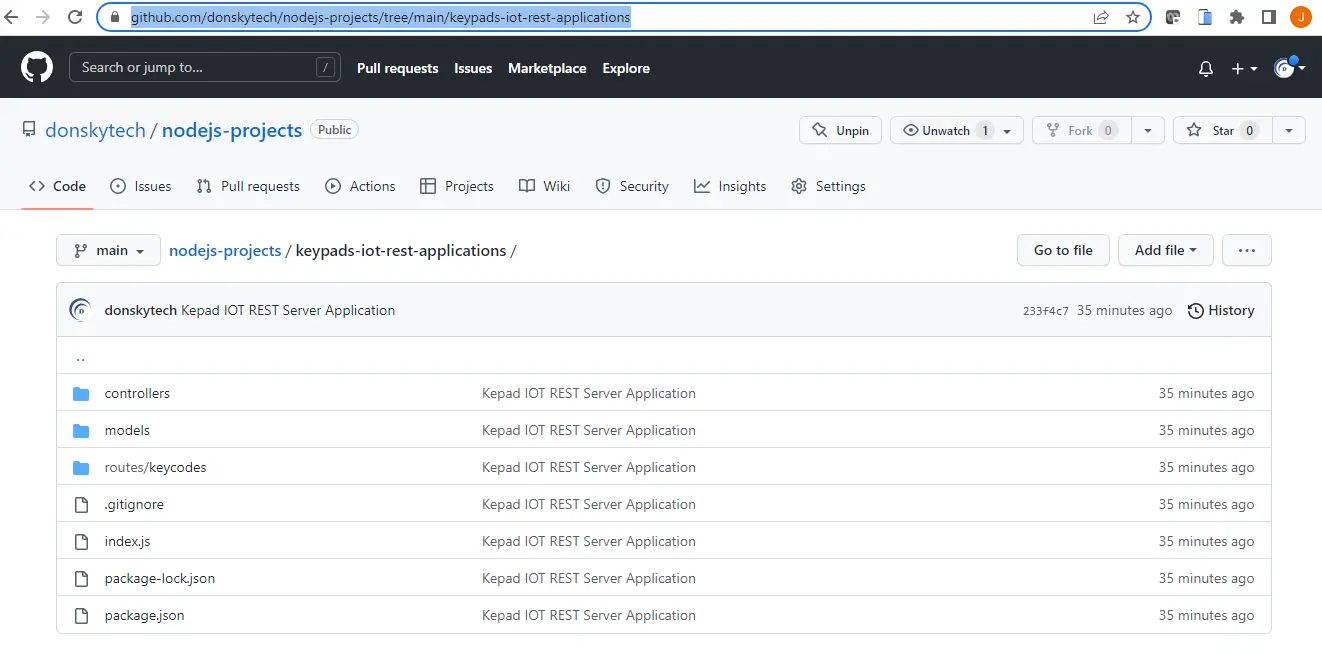
REST API Server – Keycodes
The whole code for our REST API Server is in this github account.
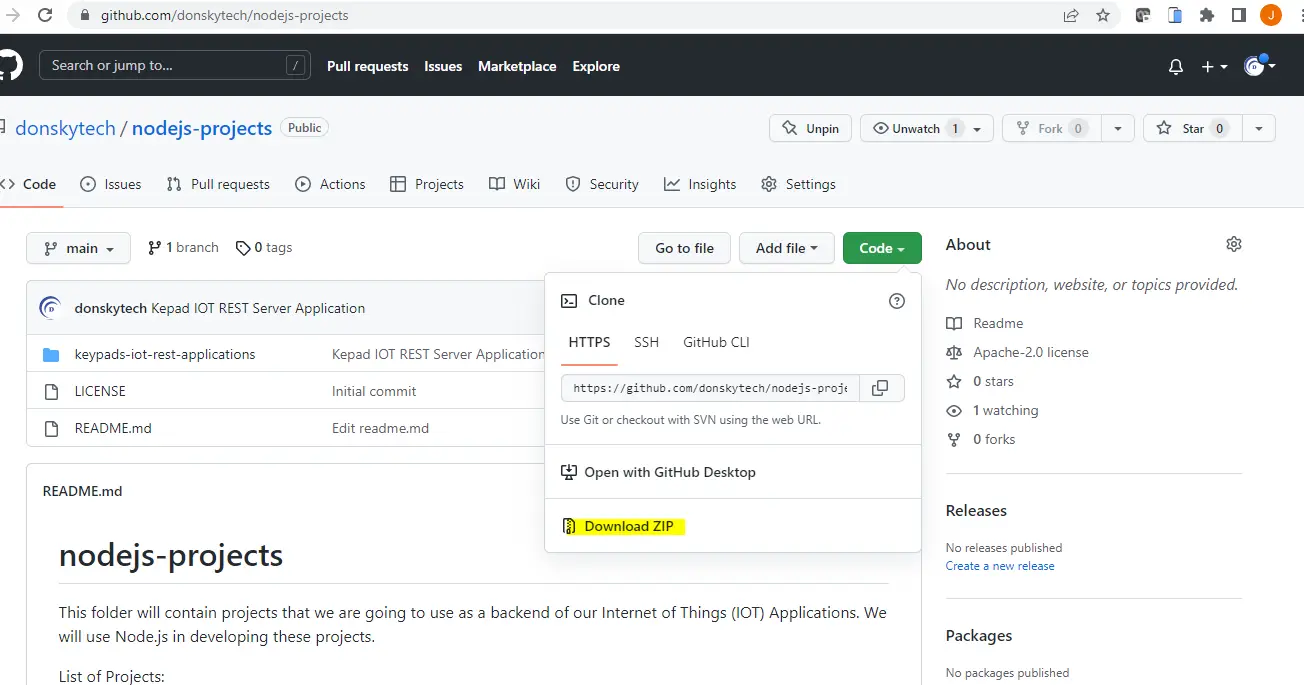
You can either clone this project by cloning this code if you are familiar with git.
DONSKY@DONSKY-LAP MINGW64 /c/git_temp
$ git clone https://github.com/donskytech/nodejs-projects.git
Cloning into 'nodejs-projects'...
remote: Enumerating objects: 27, done.
remote: Counting objects: 100% (27/27), done.
remote: Compressing objects: 100% (21/21), done.
remote: Total 27 (delta 3), reused 19 (delta 1), pack-reused 0
Unpacking objects: 100% (27/27), 21.36 KiB | 20.00 KiB/s, done.
Or you can manually download the project as a zip file.
And then open the application in Visual Studio Code. Once open, click new terminal.
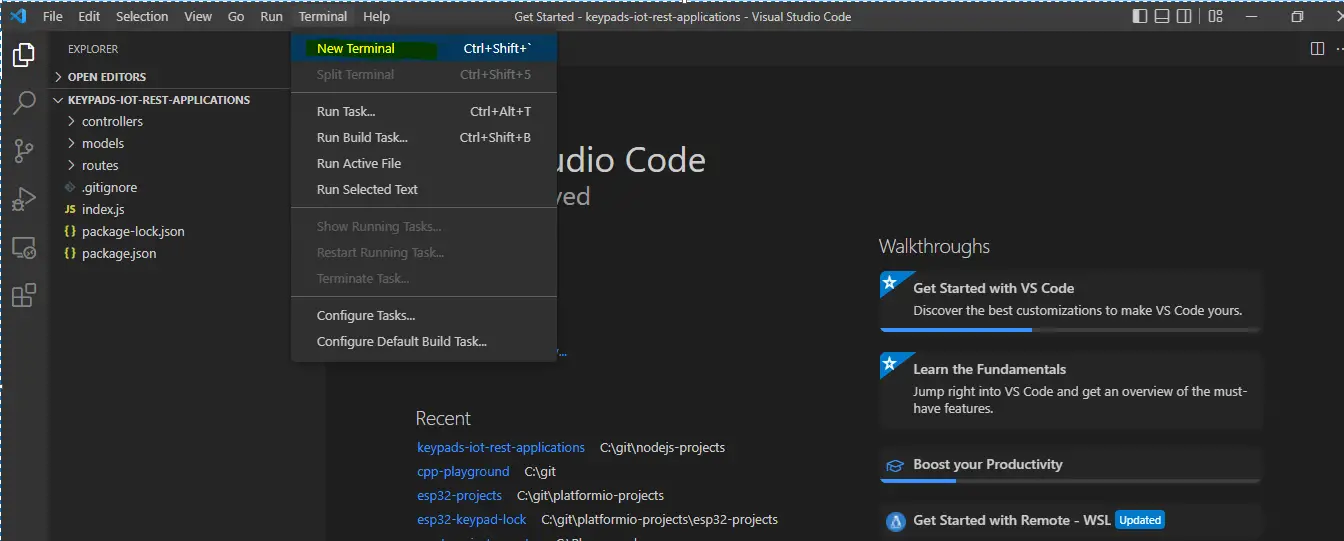
In the terminal, execute the following code. This might take some time as this will install all of our project dependencies.
npm install
Make sure that everything is successfully installed and no exception is encountered.
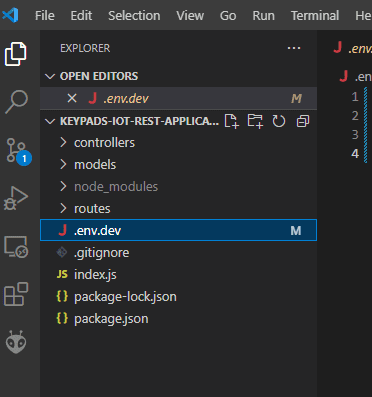
Next, in the Explorer, rename the file “.env.dev” to “.env”
In the .env file, input the following. Replaced the username, password and clustername of your MongoDB Atlas.
USER_NAME=<YOUR_USER>
PASSWORD=<YOUR PASSWORD>
CLUSTER_NAME_CONN=<CLUSTER_NAME>
DB_NAME=keypadsdb
This is equivalent to the following connection string that you have setup in your MongoDB Atlas.
mongodb+srv://user1:SamplePass123@iotdb.eyxlqlx.mongodb.net/keypadsdb
-- user_name = user1
-- password = SamplePass123
-- cluster_name = iotdb.eyxlqlx.mongodb.net
-- db_name = keypadsdb
Once you have set this up then execute the following code in your terminal.
npm startYou should be able to see the following message in your terminal.
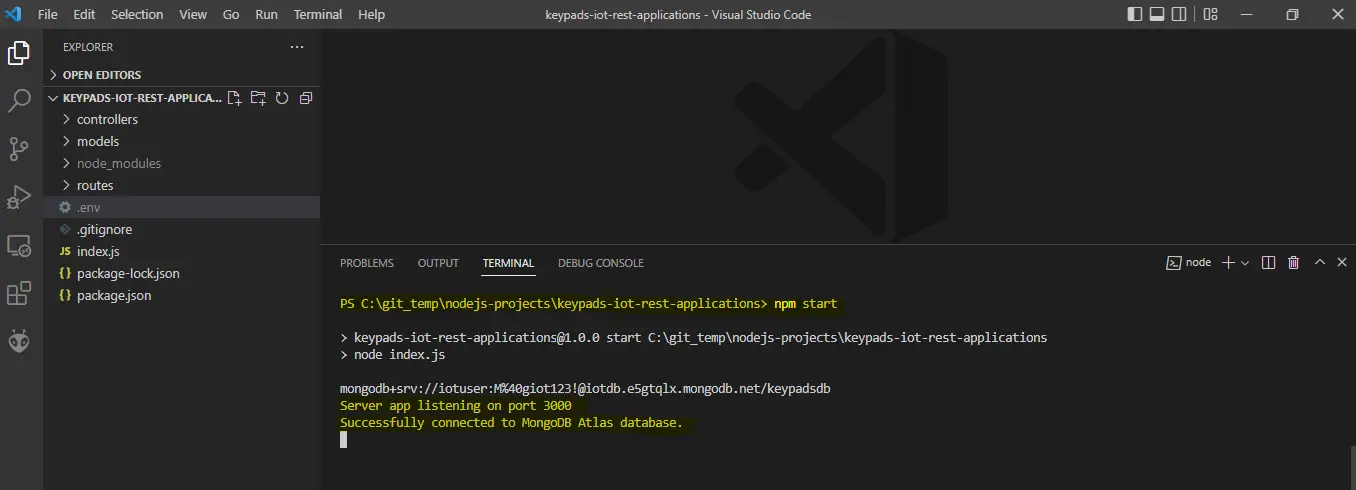
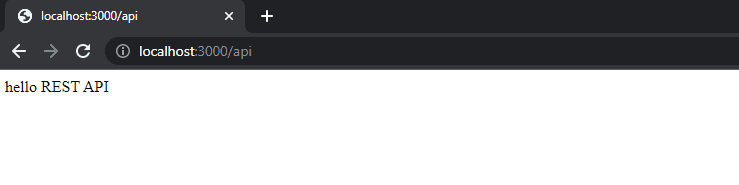
Open your browser and then type the following url “http://localhost:3000/api” or “http://<LAPTOP-IP-ADDRESS>:3000/api“. You should be able to see the following displayed in your browser.
Take note of the IP Address of your laptop by the way as we will be needing it in the ESP32 MCU code.
Congratulations! You now have successfully setup your REST API Server that is ready to execute CRUD operations for our keycodes.
ESP32 MCU code
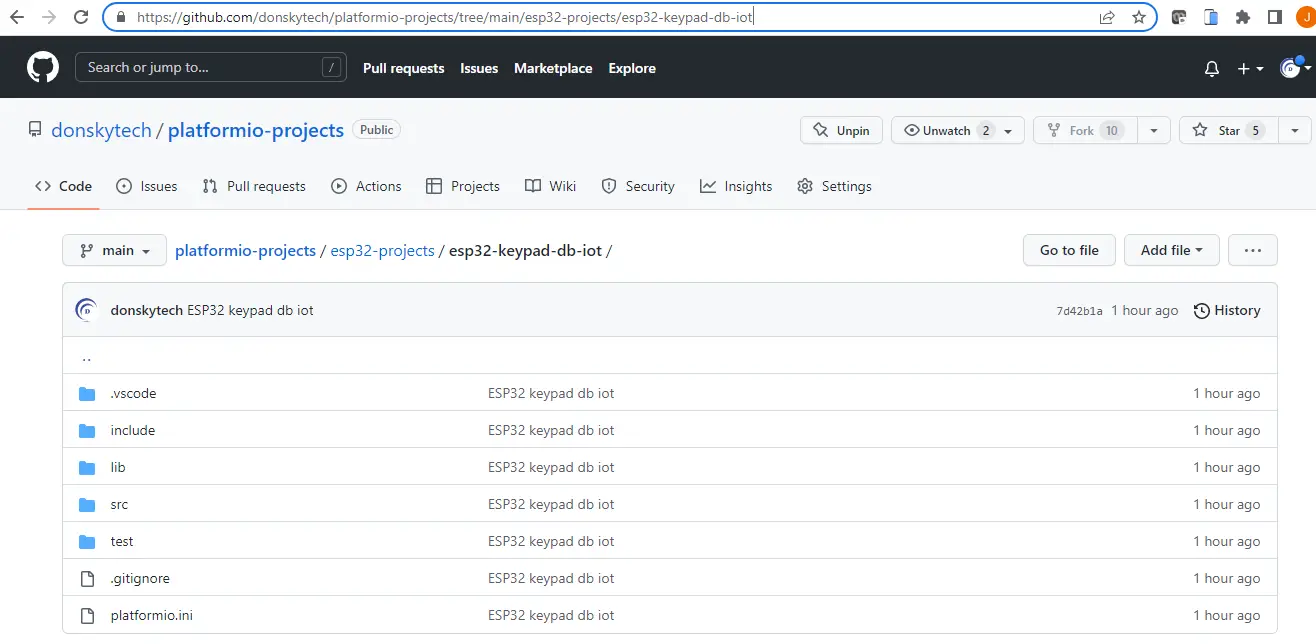
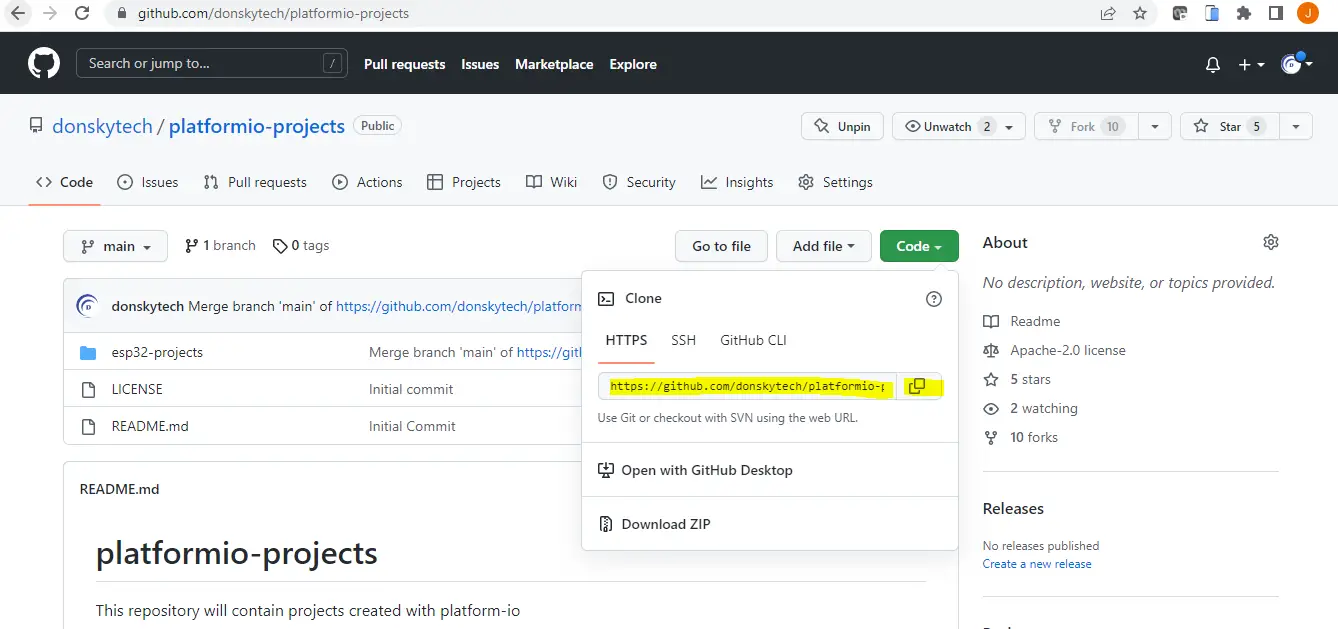
The code for our ESP32 Keypads IOT With Database interface is in my github account.
You can either clone this project or download as zip file as well. To clone, execute the following command.
$ cd /c/git_temp/

DONSKY@DONSKY-LAP MINGW64 /c/git_temp
$ git clone https://github.com/donskytech/platformio-projects.git
Cloning into 'platformio-projects'...
remote: Enumerating objects: 113, done.
remote: Counting objects: 100% (113/113), done.
remote: Compressing objects: 100% (75/75), done.
remote: Total 113 (delta 42), reused 84 (delta 17), pack-reused 0
Receiving objects: 100% (113/113), 32.01 KiB | 565.00 KiB/s, done.
Resolving deltas: 100% (42/42), done.

DONSKY@DONSKY-LAP MINGW64 /c/git_temp
$ ls -l
total 8
drwxr-xr-x 1 DONSKY 197121 0 Aug 13 17:14 nodejs-projects/
drwxr-xr-x 1 DONSKY 197121 0 Aug 13 17:52 platformio-projects/

DONSKY@DONSKY-LAP MINGW64 /c/git_temp
$ cd platformio-projects/esp32-projects/esp32-keypad-db-iot/
Or download it as zip.
Open the project in Visual Studio Code. Wait for the PlatformIO extensions to load all the dependencies needed by our project.
Open the platform.ini file. The following are our dependencies that we have used.
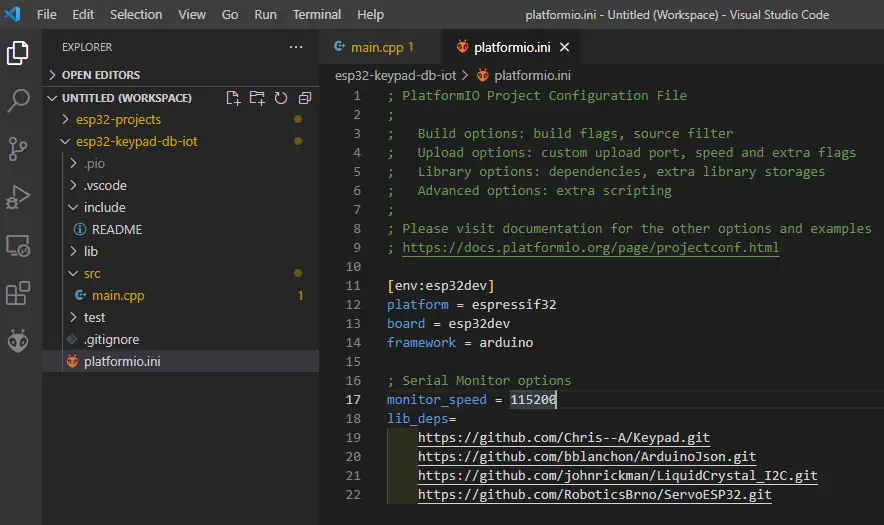
This library drives our Keypad component, our LCD display and our Servo Motor.
[env:esp32dev]
platform = espressif32
board = esp32dev
framework = arduino

; Serial Monitor options
monitor_speed = 115200
lib_deps=
    https://github.com/Chris--A/Keypad.git
    https://github.com/bblanchon/ArduinoJson.git
    https://github.com/johnrickman/LiquidCrystal_I2C.git
    https://github.com/RoboticsBrno/ServoESP32.git
Locate the main.cpp file. The code for the whole main.cpp file is below or at this link. This is the whole code that controls our Keypad, our LCD and our Servo Motor. This also connects to our REST API server to check if the inputted keycode is present or not.
/*
  PROJECT NAME: ESP32 Keypad Doorlock With Database Interface
  AUTHOR: Donsky
  FOR: www.donskytech.com
*/

#include <Arduino.h>
#include <Keypad.h>
#include <WiFi.h>
#include <HTTPClient.h>
#include <ArduinoJson.h>
#include <Wire.h>
#include <LiquidCrystal_I2C.h>
#include <Servo.h>

/**** NEED TO CHANGE THIS ACCORDING TO YOUR SETUP *****/
// The REST API endpoint - Change the IP Address
const char *base_rest_url = "http://<REST-SERVER-IP-ADDRESS>:3000/";

//SSID and Password
const char *ssid = "YOUR_WIFI_SSID";
const char *password = "YOUR_WIFI_PASSWORD";

/**** -- END -- *****/

// Keypad columns and rows
#define ROW_NUM 4    // four rows
#define COLUMN_NUM 4 // four columns

// Servo setup
Servo servoMotor;
static const int servoPin = 26;

// Length of Keycode
const int KEYCODE_SIZE = 6;

char keys[ROW_NUM][COLUMN_NUM] = {
    {'1', '2', '3', 'A'},
    {'4', '5', '6', 'B'},
    {'7', '8', '9', 'C'},
    {'*', '0', '#', 'D'}};

// GIOP19, GIOP18, GIOP5, GIOP17 for row pins
byte pin_rows[ROW_NUM] = {19, 18, 5, 17};
// GIOP13, GIOP14, GIOP015, GIOP16 for column pins
byte pin_column[COLUMN_NUM] = {13, 14, 15, 16};

Keypad keypad = Keypad(makeKeymap(keys), pin_rows, pin_column, ROW_NUM, COLUMN_NUM);

// Length of Keycode + '\0' char
char input_keypad_code[KEYCODE_SIZE + 1];

bool isComplete = false;
byte ctr = 0;

// set the LCD number of columns and rows
int lcdColumns = 16;
int lcdRows = 2;

// Check your I2C LCD Address
LiquidCrystal_I2C lcd(0x27, lcdColumns, lcdRows);

const int FIRST_LCD_ROW = 0;
const int SECOND_LCD_ROW = 1;

const int LCD_TIME_DELAY = 1000;

void closeLock()
{
  Serial.println("Closing lock...");
  servoMotor.write(0);
  delay(500);
}

void openLock()
{
  Serial.println("Opening lock...");
  servoMotor.write(45);
  // Close the lock after 5 seconds
  delay(5000);
  closeLock();
}

// Function to print to LCD
void printToLCD(const String &message, uint8_t column, uint8_t row, bool isClear)
{
  if (isClear)
  {
    lcd.clear();
  }
  // set cursor to  column,  row
  lcd.setCursor(column, row);
  if (message.length() == 0)
  {
    lcd.setCursor(0, 1);
    for (int n = 0; n < 16; n++)
    {
      lcd.print(" ");
    }
  }
  else
  {
    lcd.print(message);
  }
}

// Clear LCD display
void clearLCDLineDisplay(uint8_t row){
    lcd.setCursor(0, row);
    for (int n = 0; n < 16; n++)
    {
      lcd.print(" ");
    }
}

bool parseJson(String jsonDoc)
{
  StaticJsonDocument<512> doc;

  DeserializationError error = deserializeJson(doc, jsonDoc);

  if (error)
  {
    Serial.print("deserializeJson() failed: ");
    Serial.println(error.c_str());
    return false;
  }

  // JSON return from our API Rest Service
  // We are not using everything but only checking the success value if it is true or false
  bool success = doc["success"]; // true
  // const char *message = doc["message"]; // "Successfully retrieved keycode record"
  // JsonObject keyCode = doc["keyCode"];
  // const char *keyCode_id = keyCode["_id"];                  // "62e89195006f4422e95cc96f"
  // const char *keyCode_keyCode = keyCode["keyCode"];         // "BC9876"
  // bool keyCode_active = keyCode["active"];                  // true
  // const char *keyCode_description = keyCode["description"]; // "Anna key code"
  // const char *keyCode_createdAt = keyCode["createdAt"];     // "2022-08-02T02:53:09.096Z"
  // const char *keyCode_updatedAt = keyCode["updatedAt"];     // "2022-08-02T02:53:09.096Z"
  // int keyCode_v = keyCode["__v"];                           // 0
  // Serial.printf("success :: %d\n", success);
  // Serial.printf("message :: %s\n", message);
  // Serial.printf("keyCode :: ", keyCode);

  return success ? true : false;
}

bool checkKeyCode(String key_code)
{
  bool isPresent = false;
  char rest_api_url[200];
  // Calling our API server
  sprintf(rest_api_url, "%sapi/keycodes/%s", base_rest_url, key_code.c_str());
  Serial.printf("API URL=%s", rest_api_url);

  HTTPClient http;

  Serial.print("[HTTP] begin...\n");
  http.begin(rest_api_url);

  Serial.print("[HTTP] GET...\n");
  // start connection and send HTTP header
  int httpCode = http.GET();

  // httpCode will be negative on error
  if (httpCode > 0)
  {
    // HTTP header has been send and Server response header has been handled
    Serial.printf("[HTTP] GET... code: %d\n", httpCode);

    // file found at server
    if (httpCode == HTTP_CODE_OK)
    {
      String payload = http.getString();
      Serial.println(payload);
      isPresent = parseJson(payload);
      Serial.printf("isPresent :: %s\n", isPresent ? "Keycode is present!" : "Keycode not found!");
    }
  }
  else
  {
    Serial.printf("[HTTP] GET... failed, error: %s\n", http.errorToString(httpCode).c_str());
  }

  http.end();
  return isPresent;
}

void clearDataArray()
{
  int index = 0;
  while (input_keypad_code[index] != '\0')
  {
    input_keypad_code[index] = 0;
    index++;
  }
}

void keypadEvent(KeypadEvent key)
{
  switch (keypad.getState())
  {
  case PRESSED:
    if (key == '#')
    {
      Serial.println("Validating with the API...");
      if (isComplete)
      {
        Serial.println("Calling the API...");
        Serial.println(input_keypad_code);
        bool isValid = checkKeyCode(input_keypad_code);
        if (isValid)
        {
          printToLCD("Correct keycode!", 0, 1, false);
          delay(LCD_TIME_DELAY);
          openLock();
        }
        else
        {
          printToLCD("Invalid keycode!", 0, 1, false);
          delay(LCD_TIME_DELAY);
          closeLock();
        }
        delay(1000);
        printToLCD("", 0, 1, false);
        ctr = 0;
        isComplete = false;
        clearDataArray();
      }
    }
    else if (key == '*')
    {
      clearDataArray();
      Serial.print("After clearing...");
      Serial.println(input_keypad_code);
      printToLCD(input_keypad_code, 5, 1, false);
      ctr = 0;
      isComplete = false;
    }
    else
    {
      if(isComplete){
        printToLCD("Max Length Over!", 0, 1, false);
        delay(1000);
        clearLCDLineDisplay(SECOND_LCD_ROW);
        printToLCD(input_keypad_code, 5, 1, false);
        return;
      }
      input_keypad_code[ctr] = key;
      Serial.println(input_keypad_code);
      printToLCD(input_keypad_code, 5, 1, false);
      ctr++;
      if (ctr == KEYCODE_SIZE)
      {
        Serial.println("6 digit keypad entered!");
        isComplete = true;
      }
    }
    break;

  case RELEASED:
  case IDLE:
  case HOLD:
    break;
  }
}

void setup()
{
  Serial.begin(115200);
  keypad.addEventListener(keypadEvent); // Add an event listener for this keypad
  //Adjust the debounce accordingly
  keypad.setDebounceTime(50);

  // Close lock oif it is open
  closeLock();

  lcd.init();
  lcd.clear();
  lcd.backlight(); // Make sure backlight is on

  printToLCD("Initializing...", 1, 0, true);

  for (uint8_t t = 4; t > 0; t--)
  {
    Serial.printf("[SETUP] WAIT %d...\n", t);
    Serial.flush();
    delay(1000);
  }

  printToLCD("Connecting to WIFI...", 2, 0, true);
  printToLCD("WIFI...", 6, 1, false);
  WiFi.begin(ssid, password);

  while (WiFi.status() != WL_CONNECTED)
  {
    delay(500);
    Serial.print(".");
  }

  Serial.println("");
  Serial.println("WiFi connected");
  Serial.println("IP address: ");
  Serial.println(WiFi.localIP());

  printToLCD("Connected!", 2, 0, true);
  delay(2000);
  printToLCD("Input Keycode:", 0, 0, true);

  servoMotor.attach(servoPin);
}

void loop()
{
  // Just get the key char entered in our loop
  char key = keypad.getKey();
}
Lets go over each line by line. Before we proceed we need to change something.
#include <Arduino.h>
#include <Keypad.h>
#include <WiFi.h>
#include <HTTPClient.h>
#include <ArduinoJson.h>
#include <Wire.h>
#include <LiquidCrystal_I2C.h>
#include <Servo.h>

/**** NEED TO CHANGE THIS ACCORDING TO YOUR SETUP *****/
// The REST API endpoint - Change the IP Address
const char *base_rest_url = "http://<REST-SERVER-IP-ADDRESS>:3000/";

//SSID and Password
const char *ssid = "YOUR_WIFI_SSID";
const char *password = "YOUR_WIFI_PASSWORD";

/**** -- END -- *****/- Line 1-8 – are the required header library include
- Line 12 – change to point to the IP Address of your laptop or workstation.
- Line 15 -16 – change to point to your Wifi SSID and Password
// Keypad columns and rows
#define ROW_NUM 4    // four rows
#define COLUMN_NUM 4 // four columns

// Servo setup
Servo servoMotor;
static const int servoPin = 26;

// Length of Keycode
const int KEYCODE_SIZE = 6;

char keys[ROW_NUM][COLUMN_NUM] = {
    {'1', '2', '3', 'A'},
    {'4', '5', '6', 'B'},
    {'7', '8', '9', 'C'},
    {'*', '0', '#', 'D'}};

// GIOP19, GIOP18, GIOP5, GIOP17 for row pins
byte pin_rows[ROW_NUM] = {19, 18, 5, 17};
// GIOP13, GIOP14, GIOP015, GIOP16 for column pins
byte pin_column[COLUMN_NUM] = {13, 14, 15, 16};

Keypad keypad = Keypad(makeKeymap(keys), pin_rows, pin_column, ROW_NUM, COLUMN_NUM);- Line 2-3 – we define the keypad columns and rows that we are using
- Line 6-7 – we define our servo and servo pin
- Line 10 – we define the length of our keycodes
- Line 12-16 – we define our 4X4 keypad key chars
- Line 18-21 – we define our keypad GPIO pins for each rows and columns
- Line 23 – we define our keypad object
// Length of Keycode + '\0' char
char input_keypad_code[KEYCODE_SIZE + 1];

bool isComplete = false;
byte ctr = 0;

// set the LCD number of columns and rows
int lcdColumns = 16;
int lcdRows = 2;

// Check your I2C LCD Address
LiquidCrystal_I2C lcd(0x27, lcdColumns, lcdRows);

const int FIRST_LCD_ROW = 0;
const int SECOND_LCD_ROW = 1;

const int LCD_TIME_DELAY = 1000;- Line 2 – we define our character array that will hold our keycode char plus the null terminating char
- Line 4 and 5 – variables that will hold if they keycode entry is complete and the length of the keycode
- Line 8-9 – lcd rows and columns
- Line 12-17 – lcd variables and constants
void closeLock()
{
  Serial.println("Closing lock...");
  servoMotor.write(0);
  delay(500);
}

void openLock()
{
  Serial.println("Opening lock...");
  servoMotor.write(45);
  // Close the lock after 5 seconds
  delay(5000);
  closeLock();
}
The two functions above are used to close or open the lock by setting the value of the servo motor
// Function to print to LCD
void printToLCD(const String &message, uint8_t column, uint8_t row, bool isClear)
{
  if (isClear)
  {
    lcd.clear();
  }
  // set cursor to  column,  row
  lcd.setCursor(column, row);
  if (message.length() == 0)
  {
    lcd.setCursor(0, 1);
    for (int n = 0; n < 16; n++)
    {
      lcd.print(" ");
    }
  }
  else
  {
    lcd.print(message);
  }
}

// Clear LCD display
void clearLCDLineDisplay(uint8_t row){
    lcd.setCursor(0, row);
    for (int n = 0; n < 16; n++)
    {
      lcd.print(" ");
    }
}
The two functions printToLCD and clearLCDLineDisplay is use to print something into the LCD screen or clear its value.
bool parseJson(String jsonDoc)
{
  StaticJsonDocument<512> doc;

  DeserializationError error = deserializeJson(doc, jsonDoc);

  if (error)
  {
    Serial.print("deserializeJson() failed: ");
    Serial.println(error.c_str());
    return false;
  }

  // JSON return from our API Rest Service
  // We are not using everything but only checking the success value if it is true or false
  bool success = doc["success"]; // true
  // const char *message = doc["message"]; // "Successfully retrieved keycode record"
  // JsonObject keyCode = doc["keyCode"];
  // const char *keyCode_id = keyCode["_id"];                  // "62e89195006f4422e95cc96f"
  // const char *keyCode_keyCode = keyCode["keyCode"];         // "BC9876"
  // bool keyCode_active = keyCode["active"];                  // true
  // const char *keyCode_description = keyCode["description"]; // "Anna key code"
  // const char *keyCode_createdAt = keyCode["createdAt"];     // "2022-08-02T02:53:09.096Z"
  // const char *keyCode_updatedAt = keyCode["updatedAt"];     // "2022-08-02T02:53:09.096Z"
  // int keyCode_v = keyCode["__v"];                           // 0
  // Serial.printf("success :: %d\n", success);
  // Serial.printf("message :: %s\n", message);
  // Serial.printf("keyCode :: ", keyCode);

  return success ? true : false;
}
The function parseJson above is used to parse the JSON content that we are receiving from our REST API server. We are using the ArduinoJSON to do the parsing of the response.
- Line 3 – we define our static json document
- Line 5-12 – we deserialize the json string. We print to our Serial if error is encountered.
- Line 16 – we extract if the response is success or not meaning if the keycode is present or not.
- Line 17-28 – are the other response coming from our REST API server. We are not using this in our project for now
bool checkKeyCode(String key_code)
{
  bool isPresent = false;
  char rest_api_url[200];
  // Calling our API server
  sprintf(rest_api_url, "%sapi/keycodes/%s", base_rest_url, key_code.c_str());
  Serial.printf("API URL=%s", rest_api_url);

  HTTPClient http;

  Serial.print("[HTTP] begin...\n");
  http.begin(rest_api_url);

  Serial.print("[HTTP] GET...\n");
  // start connection and send HTTP header
  int httpCode = http.GET();

  // httpCode will be negative on error
  if (httpCode > 0)
  {
    // HTTP header has been send and Server response header has been handled
    Serial.printf("[HTTP] GET... code: %d\n", httpCode);

    // file found at server
    if (httpCode == HTTP_CODE_OK)
    {
      String payload = http.getString();
      Serial.println(payload);
      isPresent = parseJson(payload);
      Serial.printf("isPresent :: %s\n", isPresent ? "Keycode is present!" : "Keycode not found!");
    }
  }
  else
  {
    Serial.printf("[HTTP] GET... failed, error: %s\n", http.errorToString(httpCode).c_str());
  }

  http.end();
  return isPresent;
}
The function checkKeyCode is what we are using in calling our REST API Server. It handles the HTTP message protocol exchange as well.
- Line 3-7 – we create our REST API endpoint by creating a character array string that includes our passed keycode. Example “http://localhost:3000/api/keyCodes/BC9876“
- Line 9-16 – we initiate the HTTP connection and calling GET request method
- Line 22-30 – if http call is successful and the server returns a successful call then we call the parseJson method above
- Lines 33-36 – the serial monitor prints an error if it encounters one
- Lines 38-39 – we closed the http connection and return the value
void clearDataArray()
{
  int index = 0;
  while (input_keypad_code[index] != '\0')
  {
    input_keypad_code[index] = 0;
    index++;
  }
}
We created the clearDataArray function to clear the values of our input input_keypad_code char array. We used this function when we click the * char in our keypad.
void keypadEvent(KeypadEvent key)
{
  switch (keypad.getState())
  {
  case PRESSED:
    if (key == '#')
    {
      Serial.println("Validating with the API...");
      if (isComplete)
      {
        Serial.println("Calling the API...");
        Serial.println(input_keypad_code);
        bool isValid = checkKeyCode(input_keypad_code);
        if (isValid)
        {
          printToLCD("Correct keycode!", 0, 1, false);
          delay(LCD_TIME_DELAY);
          openLock();
        }
        else
        {
          printToLCD("Invalid keycode!", 0, 1, false);
          delay(LCD_TIME_DELAY);
          closeLock();
        }
        delay(1000);
        printToLCD("", 0, 1, false);
        ctr = 0;
        isComplete = false;
        clearDataArray();
      }
    }
    else if (key == '*')
    {
      clearDataArray();
      Serial.print("After clearing...");
      Serial.println(input_keypad_code);
      printToLCD(input_keypad_code, 5, 1, false);
      ctr = 0;
      isComplete = false;
    }
    else
    {
      if(isComplete){
        printToLCD("Max Length Over!", 0, 1, false);
        delay(1000);
        clearLCDLineDisplay(SECOND_LCD_ROW);
        printToLCD(input_keypad_code, 5, 1, false);
        return;
      }
      input_keypad_code[ctr] = key;
      Serial.println(input_keypad_code);
      printToLCD(input_keypad_code, 5, 1, false);
      ctr++;
      if (ctr == KEYCODE_SIZE)
      {
        Serial.println("6 digit keypad entered!");
        isComplete = true;
      }
    }
    break;

  case RELEASED:
  case IDLE:
  case HOLD:
    break;
  }
}
In part 1 of our series, I have mentioned the following business rules in our keypads keycode input.
- keycodes are restricted to a length of 6 character and any combinations of Letters and numbers are allowed
- the “*” (asterisk) character clears our input
- the “#” (pound) sign is used to validate our keycodes with that of our database
The function keypadEvent is our keypad callback handler when somebody clicks something in our keypad.
The “#” char input in the keypad means that we are validating our keycodes.
- Lines 3-5 – we are interested in checking if a keypress was executed
- Line 6 – we check if the key “#” is pressed. Meaning we are trying to validate our keycode and calling our REST API server.
- Line 9 – we check the variable isComplete if 6 characters are already inputted
- Line 13 – if 6 chars are already inputted then we call our REST API Server and passed in the inputted keycodes
- Line 14-25 – if the return is valid then we open the lock. If it is false then the lock remains shut
- Lines 26-30 – we re-initialize everything to blank again and clear all variables
The “*” input in the keypad means that we clear our inputted values including the LCD display.
- Lines 33-40 – we check if the key that was pressed is “*” then we clear our input chars including the LCD. We reinitialize our other variables as well.
If we received any other character from 0-9 and A, B, C, and D..
- Lines 44-60 – we handle the populating of our input chars in here and then printing it to the lcd variable. We also check the number of characters inputted in the keypad also here and set the isComplete var to true or false.
void setup()
{
  Serial.begin(115200);
  keypad.addEventListener(keypadEvent); // Add an event listener for this keypad
  //Adjust the debounce accordingly
  keypad.setDebounceTime(50);

  // Close lock oif it is open
  closeLock();

  lcd.init();
  lcd.clear();
  lcd.backlight(); // Make sure backlight is on

  printToLCD("Initializing...", 1, 0, true);

  for (uint8_t t = 4; t > 0; t--)
  {
    Serial.printf("[SETUP] WAIT %d...\n", t);
    Serial.flush();
    delay(1000);
  }

  printToLCD("Connecting to WIFI...", 2, 0, true);
  printToLCD("WIFI...", 6, 1, false);
  WiFi.begin(ssid, password);

  while (WiFi.status() != WL_CONNECTED)
  {
    delay(500);
    Serial.print(".");
  }

  Serial.println("");
  Serial.println("WiFi connected");
  Serial.println("IP address: ");
  Serial.println(WiFi.localIP());

  printToLCD("Connected!", 2, 0, true);
  delay(2000);
  printToLCD("Input Keycode:", 0, 0, true);

  servoMotor.attach(servoPin);
}
The setup function is where we initialize everything
- Line 3 – we set the baud rate
- Line 4-6 – we attach an event handler function to our keypad and set the debounce time to some value
- Line 9 – we closed the lock if it is open
- Line 11-15 – we initialize our LCD
- Line 17-22 – we wait for some time for our ESP32 to initialize
- Line 24-26 – we print that we are connecting to the Wifi in our LCD
- Line 28-41 – we wait for sometime until we can connect to our wifi and set the information to our LCD
- Line 43 – we attached our servo motor pin to our servo motor object
void loop()
{
  // Just get the key char entered in our loop
  char key = keypad.getKey();
}
The keypad captures the key in our loop function.
That is all about the code.
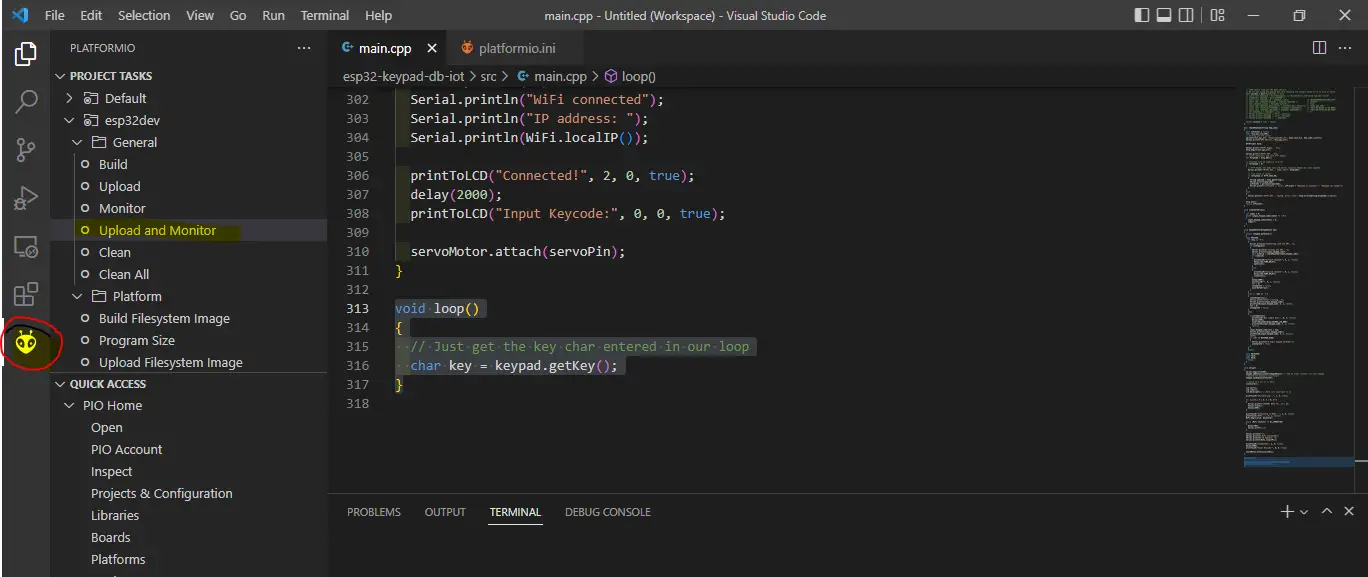
Uploading the code to our ESP32
If you have understood how the code works then we can upload this to our ESP32 MCU. Connect your ESP32 thru the USB input and in Visual Studio Code click the PlatformIO extension icon.
Click the Upload and Monitor in the task section and wait for sometime until it is successfully uploaded. Click the boot button in the ESP32
Wrap Up
We have discussed how to run our ESP32 Keypad Database security system in this post. First we setup the REST API server then we proceed to downloading the ESP32 code. We have explained what each line of the code does.
Happy Exploring!
Leave a Reply