
Introduction
In this article, we are going to create a real-time ESP8266 Web server object counter using an Infrared (IR) Sensor in a simple cardboard conveyor that I have created. The NodeMCU ESP8266 displays the number of loads that pass thru our conveyor that were detected by our IR Sensor.
This is quite a cool project to do and I had fun doing this. You can use the same technique used in this post for your Internet of Things (IoT) projects that use a sensor and you need to show it to your user using Wifi in real-time.
If you like to see this in action or watch video tutorials then please see the following on my youtube channel.
Design
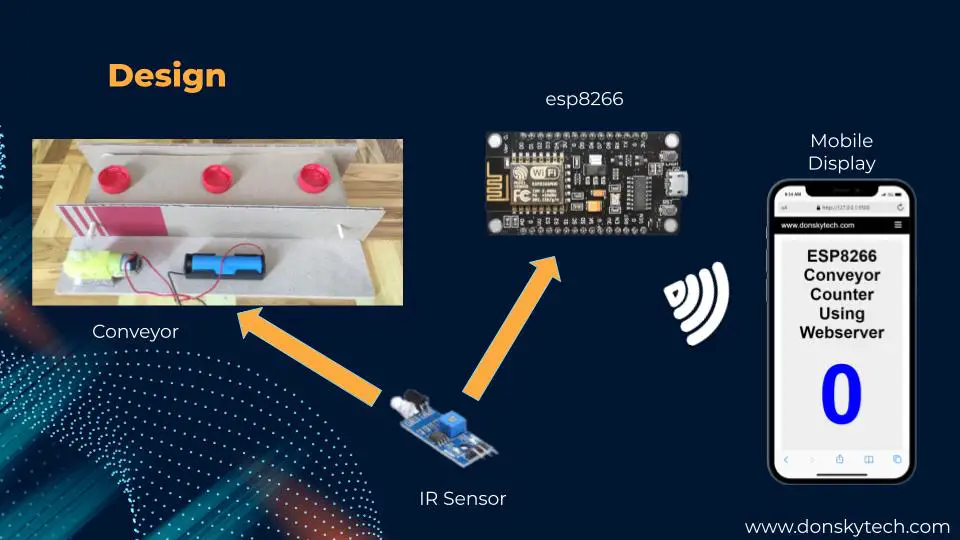
The image above is the overall design of our NodeMCU ESP8266 Web server object counter. I have attached an IR Sensor to the NodeMCU ESP8266 that acts as our Web server and is opening an HTML page that is mobile responsive. We access the HTML page exposed by the IP Address of our NodeMCU ESP8266 microcontroller.
When the IR sensor senses that a bottle cap that acts as our “load” is passing through then it relays the signal to our ESP8266 MCU. The ESP8266 then sends a WebSocket message to our HTML page to update or refresh its current count.
Prerequisite
I built my DIY conveyor using cardboard and if you want to do this, please see my post about DIY Cardboard Conveyor Belt. You can also refer to the following video on my youtube channel for visual step-by-step instructions.
You will need the following component to follow along with this post.
- ESP8266 (I used NodeMCU 12E)
- Gear Motor
- Battery
- Breadboard
- Wires
I used Visual Studio Code with the PlatformIO extension installed in developing this project. If you are in Windows and have not yet installed Visual Studio Code then you can check my post about how to Install Visual Studio Code or VSCode in Windows. If you are not familiar with PlatformIO then please read this PlatformIO Tutorial for Arduino Development where I detailed how to get started with development using the PlatformIO IDE extension
Schematic/Wiring
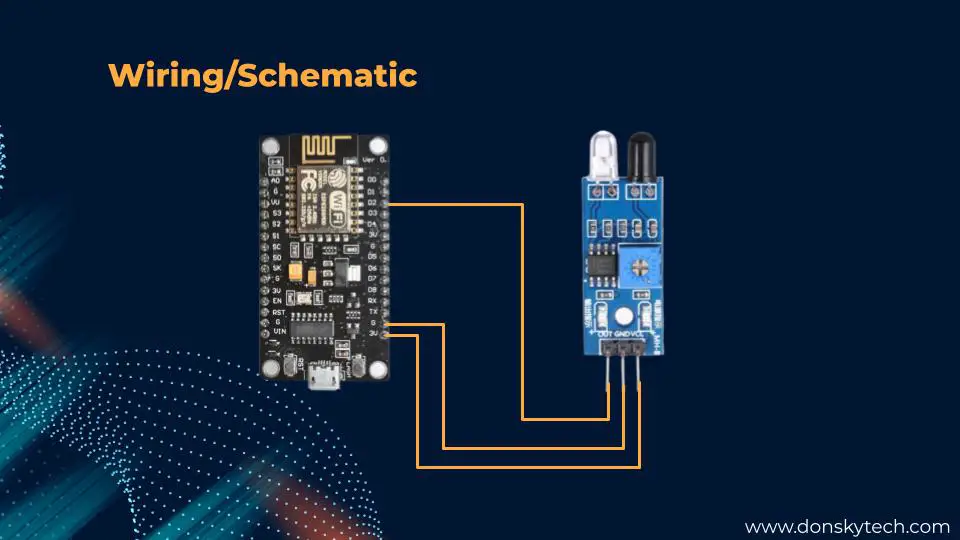
The image above is the schematic/wiring of our NodeMCU ESP8266 Web server object counter.
We only have two components to wire up in this ESP8266 Webserver conveyor counter project and it is the ESP8266 and the IR Sensor.
| ESP8266 | IR Sensor |
|---|---|
| GND | GND |
| 3V | VCC |
| D2 | OUT |
Code
The code for this project is in my GitHub repository and you can access it here. You can either download the project as a zip file or clone the project using Git.
Upon downloading, open the project in Visual Studio Code and wait for the PlatformIO extension to download all the dependencies.
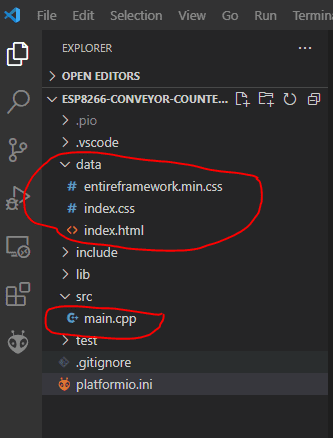
The important parts of the project are the following:
- data – contains our HTML Page that will render our Counter User Interface
- main.cpp – the main driver of our project
The data folder will be uploaded to the filesystem of our NodeMCU ESP8266 LittleFS. Let’s discuss what is inside each file
data
index.html
This file displays the current count of our counter. This is served by our NodeMCU ESP8266 Webserver.
<!DOCTYPE html>
<html>
  <head>
    <meta charset="UTF-8" />
    <meta name="viewport" content="width=device-width, initial-scale=1" />
    <title>Conveyor Counter Using Webserver</title>
    <link rel="stylesheet" href="index.css" />
    <link rel="stylesheet" href="entireframework.min.css" />
  </head>
  <body>
    <script>
      let socket = new WebSocket("ws://%LOCAL_IP_ADDRESS%/ws");

      socket.onopen = function (e) {
        console.log("[open] Connection established");
      };

      socket.onmessage = function (event) {
        console.log(`[message] Data received from server: ${event.data}`);
        document.getElementById("current-count").innerText = event.data;
      };

      socket.onclose = function (event) {
        if (event.wasClean) {
          console.log(
            `[close] Connection closed cleanly, code=${event.code} reason=${event.reason}`
          );
        } else {
          console.log("[close] Connection died");
        }
      };

      socket.onerror = function (error) {
        alert(`[error] ${error.message}`);
      };
    </script>
    <nav class="nav" tabindex="-1" onclick="this.focus()">
      <div class="container">
        <a class="pagename current" href="#">www.donskytech.com</a>
        <a href="#">One</a>
        <a href="#">Two</a>
        <a href="#">Three</a>
      </div>
    </nav>
    <button class="btn-close btn btn-sm">×</button>
    <div class="container">
      <div class="hero">
        <h1 class="title">ESP8266 Conveyor Counter Using Webserver</h1>
        <div class="counter">
          <h1 id="current-count">0</h1>
        </div>
      </div>
    </div>
  </body>
</html>
Let’s go over what each line of code is doing.
<!DOCTYPE html>This is the Standard Document Type Declaration for our HTML Page.
  <head>
    <meta charset="UTF-8" />
    <meta name="viewport" content="width=device-width, initial-scale=1" />
    <title>Conveyor Counter Using Webserver</title>
    <link rel="stylesheet" href="index.css" />
    <link rel="stylesheet" href="entireframework.min.css" />
  </head>
Shows the meta information for our HTML page so that it would display perfectly on mobile devices. It includes as well the title of our HTML page which would get displayed at the top of the browser.
We are including also our Cascading Style Sheet (CSS) to style our HTML page. We are including our local index.css and the very simple and minimal CSS framework called the Min which we downloaded as the entireframework.min.css.
    <script>
      let socket = new WebSocket("ws://%LOCAL_IP_ADDRESS%/ws");

      socket.onopen = function (e) {
        console.log("[open] Connection established");
      };

      socket.onmessage = function (event) {
        console.log(`[message] Data received from server: ${event.data}`);
        document.getElementById("current-count").innerText = event.data;
      };

      socket.onclose = function (event) {
        if (event.wasClean) {
          console.log(
            `[close] Connection closed cleanly, code=${event.code} reason=${event.reason}`
          );
        } else {
          console.log("[close] Connection died");
        }
      };

      socket.onerror = function (error) {
        alert(`[error] ${error.message}`);
      };
    </script>
This is our script that runs when our HTML page has completed loading.
We declare a socket and initialize it with the IP Address of our ESP8266. The %LOCAL_IP_ADDRESS% is a variable that gets resolved by our main.cpp file later. If you are not familiar with Websockets then please see this What is Websockets section in my ESP32 Robot Car Using Websockets post. I have explained fairly well how this protocol works on that post.
We then attach the callback functions to this socket which we are just logging as of the moment.
      socket.onmessage = function (event) {
        console.log(`[message] Data received from server: ${event.data}`);
        document.getElementById("current-count").innerText = event.data;
      };
This is the important part of our script as when we received a socket message from our ESP8266 Webserver then we update our current count using the code above.
    <nav class="nav" tabindex="-1" onclick="this.focus()">
      <div class="container">
        <a class="pagename current" href="#">www.donskytech.com</a>
        <a href="#">One</a>
        <a href="#">Two</a>
        <a href="#">Three</a>
      </div>
    </nav>
    <button class="btn-close btn btn-sm">×</button>
    <div class="container">
      <div class="hero">
        <h1 class="title">ESP8266 Conveyor Counter Using Webserver</h1>
        <div class="counter">
          <h1 id="current-count">0</h1>
        </div>
      </div>
    </div>
This is the standard page of our project and it gets styled by our CSS stylesheet. The HTML element current-count is what we update whenever we received a socket message to display the latest count from our conveyor.
index.css
/******** mincss **********/
.hero {
    background: #eee;
    padding: 20px;
    border-radius: 10px;
    margin-top: 1em;
}

.hero h1 {
    margin-top: 0;
    margin-bottom: 0.3em;
}

/****** Custom CSS  ********/
.title{
    text-align: center;
}

.counter{
    text-align: center;
}

#current-count{
    font-size: 15em;
    font-weight: bold;
    color: blue;
}
This is just custom styling we added to our index.html page.
entireframework.min.css
/* Copyright 2014 Owen Versteeg; MIT licensed */body,textarea,input,select{background:0;border-radius:0;font:16px sans-serif;margin:0}.smooth{transition:all .2s}.btn,.nav a{text-decoration:none}.container{margin:0 20px;width:auto}label>*{display:inline}form>*{display:block;margin-bottom:10px}.btn{background:#999;border-radius:6px;border:0;color:#fff;cursor:pointer;display:inline-block;margin:2px 0;padding:12px 30px 14px}.btn:hover{background:#888}.btn:active,.btn:focus{background:#777}.btn-a{background:#0ae}.btn-a:hover{background:#09d}.btn-a:active,.btn-a:focus{background:#08b}.btn-b{background:#3c5}.btn-b:hover{background:#2b4}.btn-b:active,.btn-b:focus{background:#2a4}.btn-c{background:#d33}.btn-c:hover{background:#c22}.btn-c:active,.btn-c:focus{background:#b22}.btn-sm{border-radius:4px;padding:10px 14px 11px}.row{margin:1% 0;overflow:auto}.col{float:left}.table,.c12{width:100%}.c11{width:91.66%}.c10{width:83.33%}.c9{width:75%}.c8{width:66.66%}.c7{width:58.33%}.c6{width:50%}.c5{width:41.66%}.c4{width:33.33%}.c3{width:25%}.c2{width:16.66%}.c1{width:8.33%}h1{font-size:3em}.btn,h2{font-size:2em}.ico{font:33px Arial Unicode MS,Lucida Sans Unicode}.addon,.btn-sm,.nav,textarea,input,select{outline:0;font-size:14px}textarea,input,select{padding:8px;border:1px solid #ccc}textarea:focus,input:focus,select:focus{border-color:#5ab}textarea,input[type=text]{-webkit-appearance:none;width:13em}.addon{padding:8px 12px;box-shadow:0 0 0 1px #ccc}.nav,.nav .current,.nav a:hover{background:#000;color:#fff}.nav{height:24px;padding:11px 0 15px}.nav a{color:#aaa;padding-right:1em;position:relative;top:-1px}.nav .pagename{font-size:22px;top:1px}.btn.btn-close{background:#000;float:right;font-size:25px;margin:-54px 7px;display:none}@media(min-width:1310px){.container{margin:auto;width:1270px}}@media(max-width:870px){.row .col{width:100%}}@media(max-width:500px){.btn.btn-close{display:block}.nav{overflow:hidden}.pagename{margin-top:-11px}.nav:active,.nav:focus{height:auto}.nav div:before{background:#000;border-bottom:10px double;border-top:3px solid;content:'';float:right;height:4px;position:relative;right:3px;top:14px;width:20px}.nav a{padding:.5em 0;display:block;width:50%}}.table th,.table td{padding:.5em;text-align:left}.table tbody>:nth-child(2n-1){background:#ddd}.msg{padding:1.5em;background:#def;border-left:5px solid #59d}This is the standard Min CSS file and we do not need to explain this further. The job of this file is to beautify or make our HTML page render better on desktop and mobile devices.
main.cpp
This is the driver code of our project and this controls everything. It communicates with the IR sensor and creates a Webserver where we can display an HTML page that gets updated in real-time whenever the IR sensor senses something.
Let’s go over each line of the code.
/*
  Title:  ESP8266 Conveyor Counter Using Webserver
  Author: donsky
  For:    www.donskytech.com
  Date:   September 10, 2022
*/

#include <Arduino.h>
#ifdef ESP32
#include <WiFi.h>
#include <AsyncTCP.h>
#elif defined(ESP8266)
#include <ESP8266WiFi.h>
#include <ESPAsyncTCP.h>
#endif
#include <ESPAsyncWebServer.h>
#include <LittleFS.h>

/*
  Replace the SSID and Password according to your wifi
*/
const char *ssid = "<YOUR_WIFI_SSID>";
const char *password = "<YOUR_PASSWORD>";

// Webserver and Websockets setup
AsyncWebServer server(80);
AsyncWebSocket ws("/ws");

// IR Sensor Pin
int IRSensor = D2;
int LED = LED_BUILTIN;

String localIPAddress = "";

void notFound(AsyncWebServerRequest *request)
{
  request->send(404, "text/plain", "Not found");
}

// Callback function for our websocket message
void onEvent(AsyncWebSocket *server, AsyncWebSocketClient *client, AwsEventType type, void *arg, uint8_t *data, size_t len)
{
  if (type == WS_EVT_CONNECT)
  {
    // client connected
    os_printf("ws[%s][%u] connect\n", server->url(), client->id());
    client->ping();
  }
  else if (type == WS_EVT_DISCONNECT)
  {
    // client disconnected
    os_printf("ws[%s][%u] disconnect: %u\n", server->url(), client->id());
  }
  else if (type == WS_EVT_ERROR)
  {
    // error was received from the other end
    os_printf("ws[%s][%u] error(%u): %s\n", server->url(), client->id(), *((uint16_t *)arg), (char *)data);
  }
  else if (type == WS_EVT_PONG)
  {
    // pong message was received (in response to a ping request maybe)
    os_printf("ws[%s][%u] pong[%u]: %s\n", server->url(), client->id(), len, (len) ? (char *)data : "");
  }
  else if (type == WS_EVT_DATA)
  {
    // do nothing as client is not sending message to server
    os_printf("ws[%s][%u] data received\n", server->url(), client->id());
  }
}

// Template Processor
String indexPageProcessor(const String &var)
{
  return localIPAddress;
}

void setup()
{

  Serial.begin(115200);

  // Initialize Filesystem LittleFS
  if (!LittleFS.begin())
  {
    Serial.println("Cannot load LittleFS Filesystem!");
    return;
  }

  // Connect to WIFI
  WiFi.mode(WIFI_STA);
  WiFi.begin(ssid, password);
  if (WiFi.waitForConnectResult() != WL_CONNECTED)
  {
    Serial.printf("WiFi Failed!\n");
    return;
  }
  localIPAddress = WiFi.localIP().toString();
  Serial.print("IP Address: ");
  Serial.println(localIPAddress);

  // attach AsyncWebSocket
  ws.onEvent(onEvent);
  server.addHandler(&ws);

  // Route for root index.html
  server.on("/", HTTP_GET, [](AsyncWebServerRequest *request)
            { request->send(LittleFS, "/index.html", String(), false, indexPageProcessor); });

  server.on("/index.css", HTTP_GET, [](AsyncWebServerRequest *request)
            { request->send(LittleFS, "/index.css", "text/css"); });

  server.on("/entireframework.min.css", HTTP_GET, [](AsyncWebServerRequest *request)
            { request->send(LittleFS, "/entireframework.min.css", "text/css"); });

  server.onNotFound(notFound);

  server.begin();

  pinMode(IRSensor, INPUT); // IR Sensor pin INPUT
  pinMode(LED, OUTPUT);     // LED Pin Output
}

static int counter = 0;
static bool isTriggered = false;
static long lastTriggered = 0;
const long WAIT_FOR_NEXT_TRIGGER = 1000;

void loop()
{

  int sensorStatus = digitalRead(IRSensor);
  if (sensorStatus == 1)
  {
    digitalWrite(LED, HIGH);
    isTriggered = false;
  }
  else
  {
    if (!isTriggered)
    {
      long timeElapsed = millis() - lastTriggered;
      Serial.printf("timeElapsed :: %u\n", timeElapsed);
      if (timeElapsed < WAIT_FOR_NEXT_TRIGGER)
      {
        // To avoid multiple consecutive signal coming from the IR sensor
        return;
      }

      isTriggered = true;
      counter++;
      digitalWrite(LED, LOW);
      Serial.printf("counter :: %u\n", counter);
      ws.printfAll("%u", counter);
      lastTriggered = millis();
    }
  }
  // cleanup websocket clients
  ws.cleanupClients();
}
#include <Arduino.h>
#ifdef ESP32
#include <WiFi.h>
#include <AsyncTCP.h>
#elif defined(ESP8266)
#include <ESP8266WiFi.h>
#include <ESPAsyncTCP.h>
#endif
#include <ESPAsyncWebServer.h>
#include <LittleFS.h>These are the standard header files we need to run our project.
/*
  Replace the SSID and Password according to your wifi
*/
const char *ssid = "<YOUR_WIFI_SSID>";
const char *password = "<YOUR_PASSWORD>";
Replaced this with your WIFI SSID and password
// Webserver and Websockets setup
AsyncWebServer server(80);
AsyncWebSocket ws("/ws");

// IR Sensor Pin
int IRSensor = D2;
int LED = LED_BUILTIN;

String localIPAddress = "";
We define our Webserver and Websocket server configurations here and the IR sensor pins. The “localIPAddress” will store the current IP address of our ESP8266 server and we will be needing it in the templating section later.
void notFound(AsyncWebServerRequest *request)
{
  request->send(404, "text/plain", "Not found");
}

// Callback function for our websocket message
void onEvent(AsyncWebSocket *server, AsyncWebSocketClient *client, AwsEventType type, void *arg, uint8_t *data, size_t len)
{
  if (type == WS_EVT_CONNECT)
  {
    // client connected
    os_printf("ws[%s][%u] connect\n", server->url(), client->id());
    client->ping();
  }
  else if (type == WS_EVT_DISCONNECT)
  {
    // client disconnected
    os_printf("ws[%s][%u] disconnect: %u\n", server->url(), client->id());
  }
  else if (type == WS_EVT_ERROR)
  {
    // error was received from the other end
    os_printf("ws[%s][%u] error(%u): %s\n", server->url(), client->id(), *((uint16_t *)arg), (char *)data);
  }
  else if (type == WS_EVT_PONG)
  {
    // pong message was received (in response to a ping request maybe)
    os_printf("ws[%s][%u] pong[%u]: %s\n", server->url(), client->id(), len, (len) ? (char *)data : "");
  }
  else if (type == WS_EVT_DATA)
  {
    // do nothing as client is not sending message to server
    os_printf("ws[%s][%u] data received\n", server->url(), client->id());
  }
}
The notFound and onEvent callback functions are defined here. These callback functions get called when you request a non-existent resource or URL in our server or when a socket message is received from our socket clients. They are just logging this for the meantime and do not affect anything in our project.
// Template Processor
String indexPageProcessor(const String &var)
{
  return localIPAddress;
}
This function indexPageProcessor is our template processor and will resolve our variable “%LOCAL_IP_ADDRESS%” in our index.html file. It returns the IP address of our NodeMCU ESP8266 Conveyor Webserver.
Now we go to our setup function.
void setup()
{

  Serial.begin(115200);

  // Initialize Filesystem LittleFS
  if (!LittleFS.begin())
  {
    Serial.println("Cannot load LittleFS Filesystem!");
    return;
  }
First, we initialize our serial monitor baud rate and our LittleFS filesystem.
  // Connect to WIFI
  WiFi.mode(WIFI_STA);
  WiFi.begin(ssid, password);
  if (WiFi.waitForConnectResult() != WL_CONNECTED)
  {
    Serial.printf("WiFi Failed!\n");
    return;
  }
  localIPAddress = WiFi.localIP().toString();
  Serial.print("IP Address: ");
  Serial.println(localIPAddress);
Then, we connect to our WIFI and save the IP address of our NodeMCU ESP8266 Conveyor Webserver to the “localIPAddress” variable.
  // attach AsyncWebSocket
  ws.onEvent(onEvent);
  server.addHandler(&ws);
We attached our Websocket plugin to our Webserver and add the handler.
  // Route for root index.html
  server.on("/", HTTP_GET, [](AsyncWebServerRequest *request)
            { request->send(LittleFS, "/index.html", String(), false, indexPageProcessor); });

  server.on("/index.css", HTTP_GET, [](AsyncWebServerRequest *request)
            { request->send(LittleFS, "/index.css", "text/css"); });

  server.on("/entireframework.min.css", HTTP_GET, [](AsyncWebServerRequest *request)
            { request->send(LittleFS, "/entireframework.min.css", "text/css"); });

  server.onNotFound(notFound);
  server.begin();
The server.on loads our files thru the LittleFS Filesystem and begin the Webserver process.
  pinMode(IRSensor, INPUT); // IR Sensor pin INPUT
  pinMode(LED, OUTPUT);     // LED Pin Output
Configuration for our IR sensor.
static int counter = 0;
static bool isTriggered = false;
static long lastTriggered = 0;
const long WAIT_FOR_NEXT_TRIGGER = 1000;
Variables we used to track the IR sensor read.
void loop()
{

  int sensorStatus = digitalRead(IRSensor);
  if (sensorStatus == 1)
  {
    digitalWrite(LED, HIGH);
    isTriggered = false;
  }
  else
  {
    if (!isTriggered)
    {
      long timeElapsed = millis() - lastTriggered;
      Serial.printf("timeElapsed :: %u\n", timeElapsed);
      if (timeElapsed < WAIT_FOR_NEXT_TRIGGER)
      {
        // To avoid multiple consecutive signal coming from the IR sensor
        return;
      }

      isTriggered = true;
      counter++;
      digitalWrite(LED, LOW);
      Serial.printf("counter :: %u\n", counter);
      ws.printfAll("%u", counter);
      lastTriggered = millis();
    }
  }
  // cleanup websocket clients
  ws.cleanupClients();
}
Our loop function contains the following logic.
- Reads our IR Sensor. If nothing is sensed or no load has passed then we set the variable “isTriggered” to false and turn off the built-in LED.
- If a sensor read was triggered then we check if the elapsed time is greater than 1000. You can adjust this as per your project. The IR sensor is reading LOW when something is blocking it so at this point we can send a socket message to all clients that it should update its count using the
ws.printfAll("%u", counter);We set the “isTriggered” variable to true at this point. - As multiple read is returned by the IR sensor so we neglect the succeeding reads by using the “isTriggered” variable.
- We clean up the WebSocket clients after using the
ws.cleanupClients();
I have added comments for each line so that it would be easier to read. If something is not clear to you then send me a message by commenting on this post.
That’s it for the code explanation.
platform.ini
; PlatformIO Project Configuration File
;
;   Build options: build flags, source filter
;   Upload options: custom upload port, speed and extra flags
;   Library options: dependencies, extra library storages
;   Advanced options: extra scripting
;
; Please visit documentation for the other options and examples
; https://docs.platformio.org/page/projectconf.html

[env:esp12e]
platform = espressif8266
board = esp12e
framework = arduino
board_build.filesystem = littlefs
platform_packages =
	platformio/framework-arduinoespressif8266 @ https://github.com/esp8266/Arduino.git
monitor_speed = 115200
lib_deps = me-no-dev/ESP Async WebServer@^1.2.3
Our PlatformIO configuration file contains the library we used in this project together with the board details plus the filesystem.
Running the Project
Once you understand the code then let’s start running the code. First, make sure that the IR sensor is capable of reading our bottle caps or “load“ in our conveyor. You can adjust the potentiometer there to adjust the length of the IR sensor reads.
Connect your NodeMCU ESP8266 Microcontroller to your laptop or workstation.
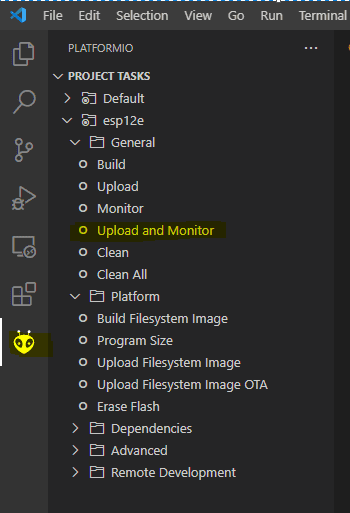
In your Visual Studio Code, open the PlatformIO tasks and Upload the Filesystem Image.
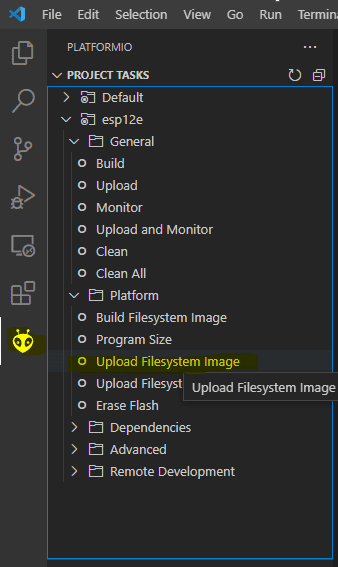
Once successful, then click the Upload and Monitor task.
In the serial monitor, wait for the IP Address assigned to our ESP8266 Webserver to be displayed then open your mobile phone or laptop then type in the IP Address. This should display the following user interface initially.
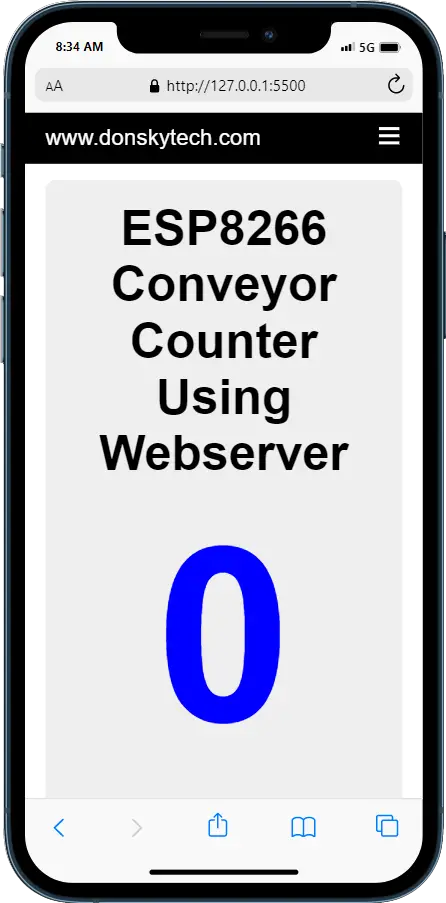
Put your “load” (mine are bottle caps) in our conveyor and see if the IR sensor is able to detect it. Your counter should automatically update its values.
Wrap Up
We have created our own custom NodeMCU ESP8266 web server object counter using an infrared sensor to count the object passing in our mini-conveyor. Anyone who has access to the same wifi can connect to the Webserver so they can view the real-time count of our conveyor. I have discussed the design and how the code works. If anything is not clear to you then comment on this post.
That’s it! Happy Exploring!
Leave a Reply