Introduction
So you now get your hands on that new Raspberry Pi Pico board and wanted to start developing your next Internet of Things (IoT) projects but you don’t know how to get started? First, you need to install or download or flash the latest MicroPython firmware on your Raspberry Pi Pico. This post will show you how this is done.
If you want to see this project in a video format then please see below. You can also watch this on my YouTube channel.
Prerequisites
You need to prepare the following in order to install MicroPython on your Raspberry Pi Pico or Pico W.
- Raspberry Pi Pico or Pico W ( I used Raspberry Pi Pico W in this post) – Amazon | AliExpress
- USB cable – Amazon | AliExpress
Disclosure: These are affiliate links and I will earn small commissions to support my site when you buy through these links.
A laptop or workstation where you could initiate the installation process. I used Windows PC in doing most of this.
Installing MicroPython Firmware Options
I am going to show you two options on how we can install MicroPython on your Raspberry Pi Pico. The first one is by flashing using the UF2 bootloader while the second one is using the Thonny IDE.
Option 1: Download MicroPython firmware using the UF2 bootloader
UF2 or USB Flashing Format is a widely used bootloader that allows us to program microcontrollers using storage or removable devices.
It might seem complicated but it really is just plain and simple if you will take a look at the following steps.
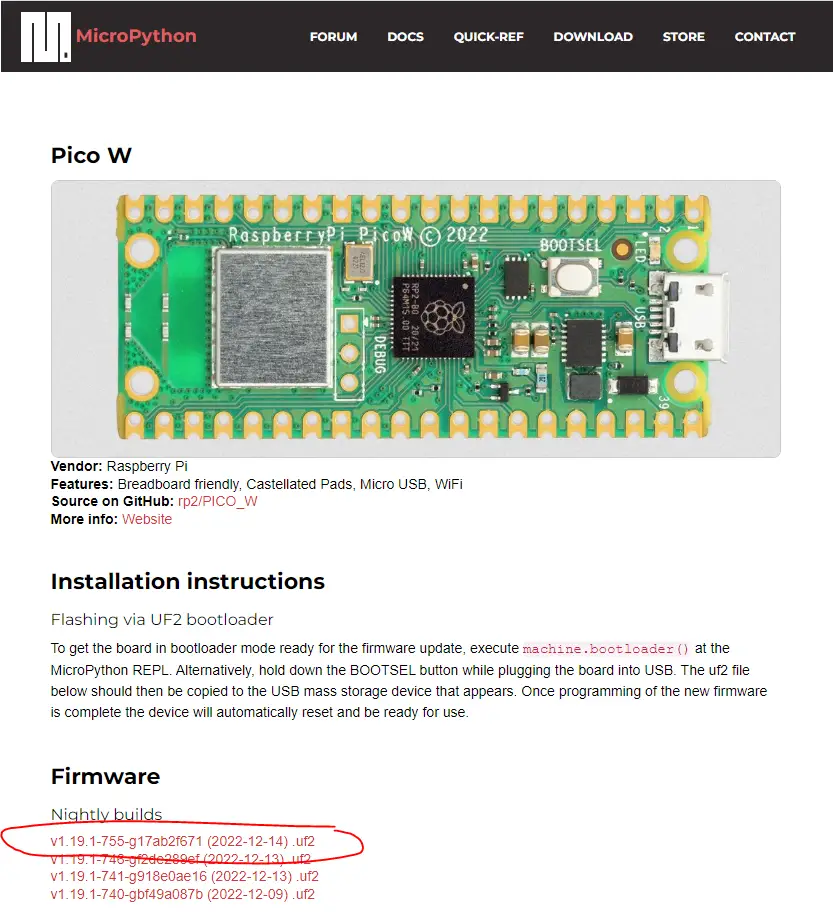
First, we need to download the firmware (.uf2 file) file from the MicroPython download website and locate what is applicable to your board. I am using Raspberry Pi Pico W so I am downloading the firmware that is appropriate for my device.
At this moment, the following is the latest MicroPython firmware available for Raspberry Pi Pico W.
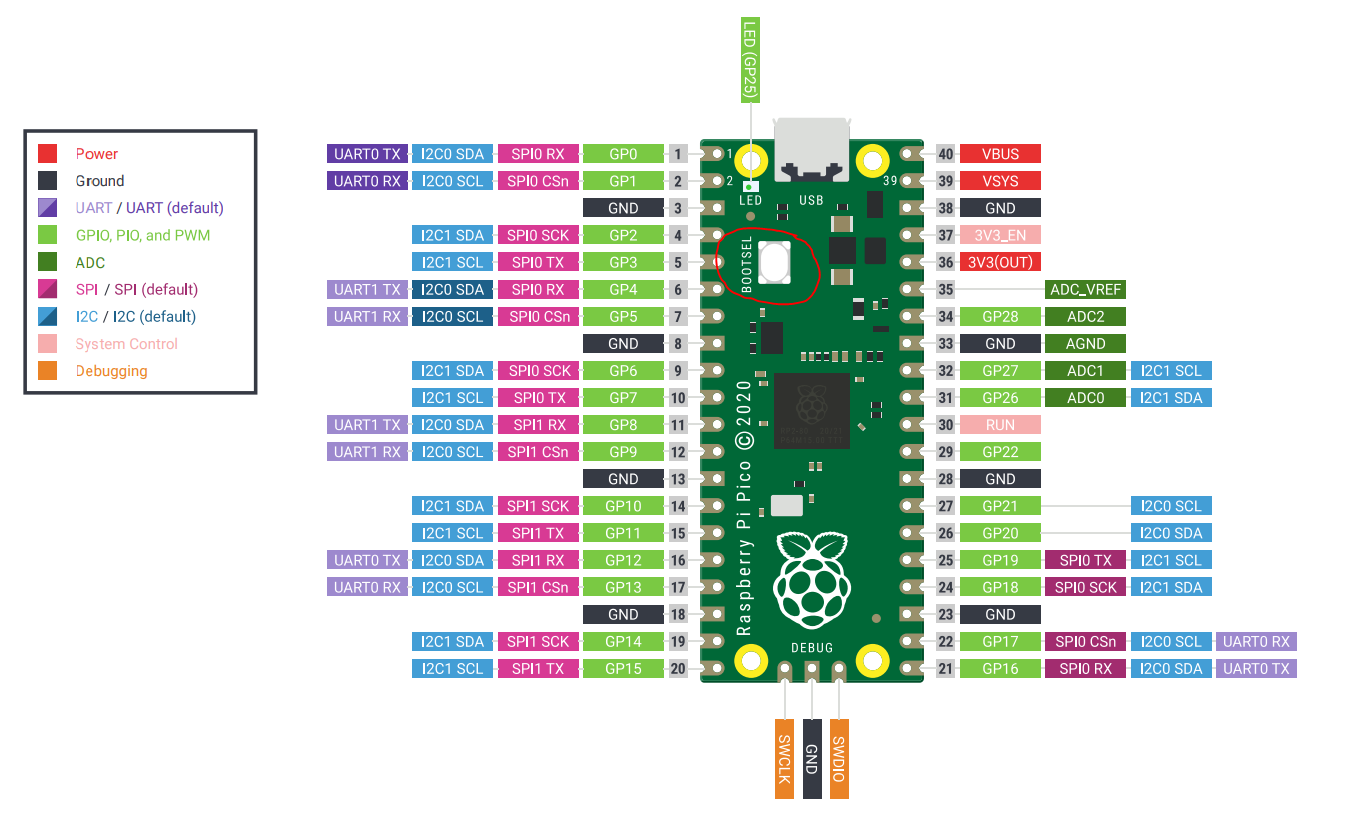
Next, put your Raspberry Pi Pico in bootloader mode by clicking the bootsel button then plug in the USB cable.
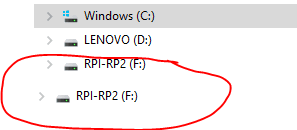
Wait until your device is recognized as an external mass storage or an external disk in Windows PC and it should be detected as RPI-RP2 Mass Storage. You can remove your hand from clicking the bootsel button when it is already detected.
Next, copy the .uf2 file firmware that we downloaded earlier into this RPI-RP2 storage. Upon copying the file then your window will automatically close. I highly suggest you wait for some time and then do a power on/power off cycle.
Option 2: Download MicroPython firmware using the Thonny IDE
Another popular option as recommended by the Raspberry Pi organization is using the Thonny IDE.
Related Content:
MicroPython Development Using Thonny IDE
How to guides in Thonny IDE using MicroPython
First, set your Raspberry Pi Pico in bootloader mode again by clicking the bootsel button and then attaching the USB.
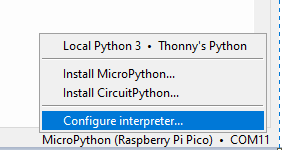
Next, open your Thonny IDE and then click the configure interpreter at the lower right-hand part of the screen.
Then set the following options on the screen. After which, click the Install or Update MicroPython link.
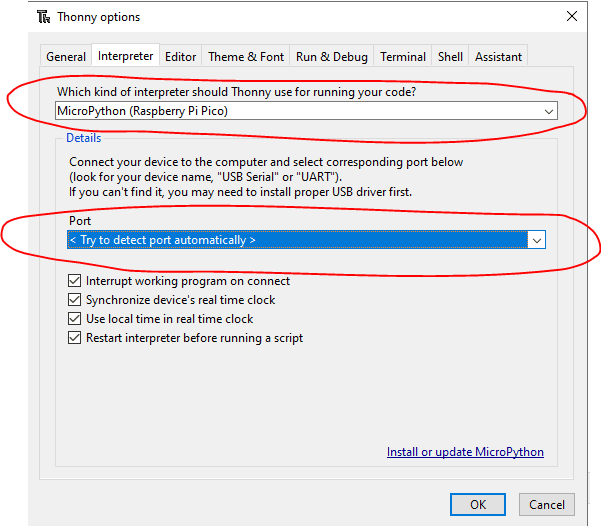
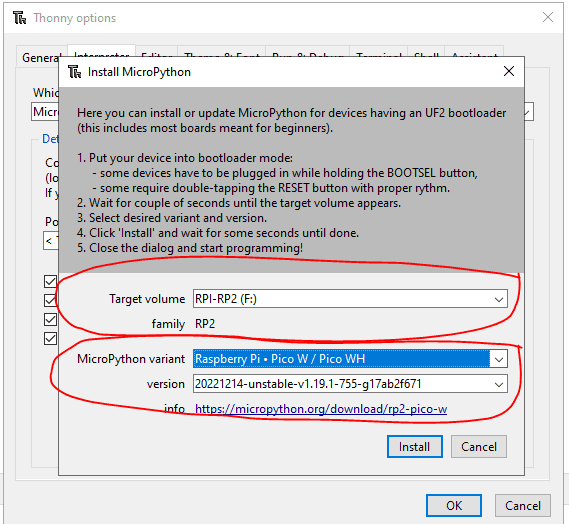
On the next screen, set your target volume, and in the MicroPython variant select Raspberry Pi Pico or Pico W. The version gets automatically populated and then click the Install button.
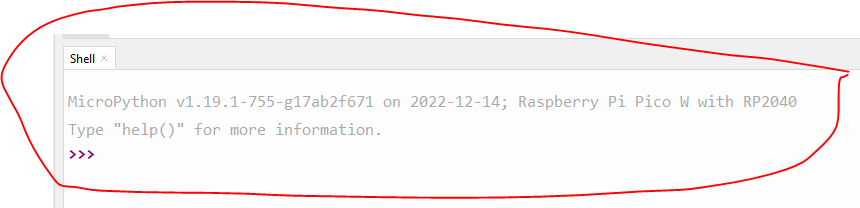
Wait for the installation to be Done and then click the close button and then OK. You should be able to see the following messages shown at your shell window.
How to test our MicroPython firmware installation in Raspberry Pi Pico?
Now that I have shown you the two steps on how to install the MicroPython firmware on Raspberry Pi Pico then it is time to test if our installation is ok.
To do that, let us create a small program that will blink the onboard LED of our Raspberry Pi Pico W.
Create a new file in Thonny IDE and name it blink.py and then paste the following code.
import time
from machine import Pin

led = Pin("LED",Pin.OUT)

while True:
  led.toggle()
  time.sleep_ms(500)
Note: If you are using Raspberry Pi Pico then replace the “LED” with 25 such as led = Pin(25,Pin.OUT)
Click the Run button in your Thonny IDE and then you should be able to see your Raspberry Pi Pico blinking the onboard LED.
Congratulations! You have successfully installed the MicroPython firmware on your Raspberry Pi Pico device.
Wrap Up
We have successfully installed the MicroPython firmware on our Raspberry Pi Pico device in this post. I have shown you two options that you can follow to do this.
You can now begin exploring this awesome device.
Happy Exploring!
Related Content:
Building a MicroPython Wifi Robot Car
Control DS18B20 using MicroPython with a Weather Station Project
Support Me!
I love sharing what I know and hopefully, I was able to help you. Writing helpful content takes so much time and research. If you think you like my work and I have managed to help you then please consider supporting my channel. I would be very grateful and would boost my confidence that what I am doing is making a big change in the world. (No Pun Intended!) 😉
Become a Patron!
Leave a Reply