Introduction
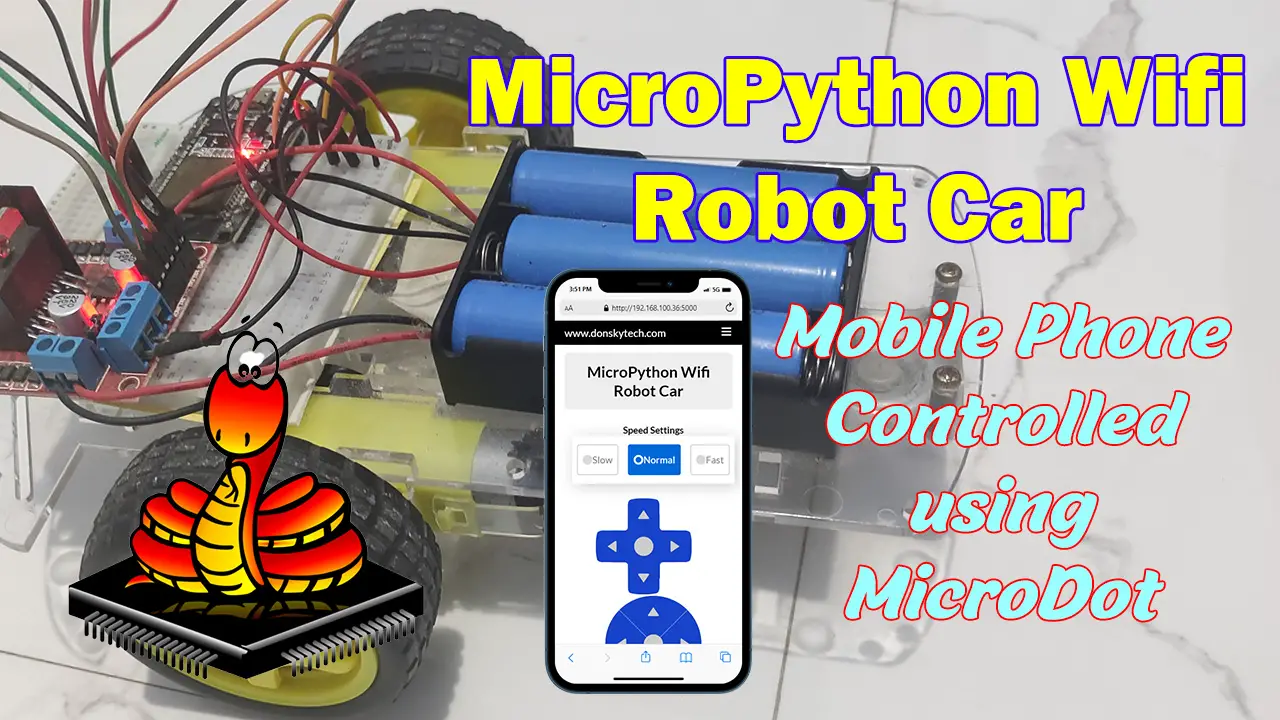
This post will show you how to create a MicroPython-powered Wifi robot car that you can control thru your mobile phone. I have searched the internet on how this can be done but I was not able to find one so I rolled on my custom solution for this. This might be a long post but I will try to explain to you the finer details of my project. Let’s start moving! 🙂
If you want to see this project in a video format then please see below. You can also watch this on my YouTube channel.
Design
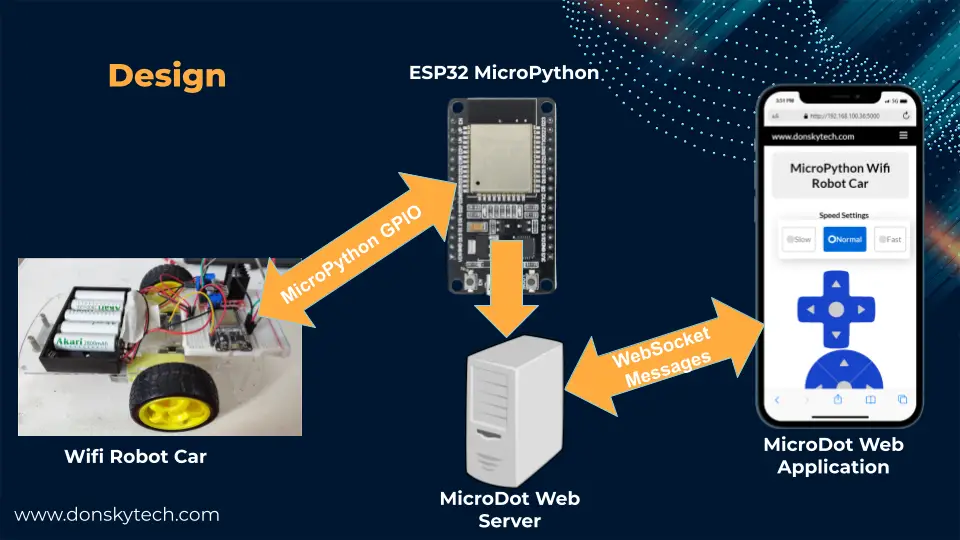
The image above is the overall design of our MicroPython Wifi Robot Car project.
The following are the 3 important components that power our project:
- Robot Car Chassis
- MicroPython device
- MicroDot web server
You can select any cheap robot car chassis available around you. The MicroPython device should be Wi-Fi-capable such as the ESP32. The MicroDot web server is deployed inside the file system of our ESP32.
The Web Server creates a web application that we need to access on our Mobile Phones browser. Note that we should access the web application only on our mobile phones as we have added javascript code that only supports touch gestures.
The communication between the MicroDot web application and the web server is thru WebSocket as this is a real-time project. If you are not familiar with what WebSocket is then please read my previous post about it.
Related Content:
Using WebSocket in the Internet of Things (IoT) projects
We will control the direction of our robot car by inspecting the WebSocket messages that we are receiving from our web application.
Prerequisites
The following are the components needed to follow along with this MicroPython robot car project.
- MicroPython Microcontroller board (I used generic ESP32 similar to DevKit) – Amazon | AliExpress | Bangood
- Robot Car Chassis with Gear TT Motor – Amazon | AliExpress | Bangood
- LM298N motor driver – Amazon | AliExpress | Bangood
- Battery Pack (I used 3 18650 batteries) – Amazon | AliExpress | Bangood
- Breadboard – Amazon | AliExpress | Bangood
- Jumper Wires – Amazon | AliExpress | Bangood
Disclosure: These are affiliate links and I will earn small commissions to support my site when you buy through these links.
You should have installed the latest MicroPython firmware on your device.
Related Content:
How to install MicroPython on ESP32 and download firmware
Also, you need to understand the basics of working with the MicroDot library as our web server. I have created the following posts and you must have done this before proceeding further. I highly recommend that you go through the posts below as I will not be explaining some of the finer details about the MicroDot library. It is also important that you have a firm grasp of the basics before we go deep dive into the code for this MicroPython robot car project.
Must Read:
Develop MicroPython Application using MicroDot
How to create a MicroPython Web Server the easy way!
I will be using Thonny in developing this project but you could use another IDE such as the PyMakr 2 extension in Visual Studio Code.
Related Content:
MicroPython Development Using Thonny IDE
MicroPython using VSCode PyMakr on ESP32/ESP8266
Schematic/Wiring
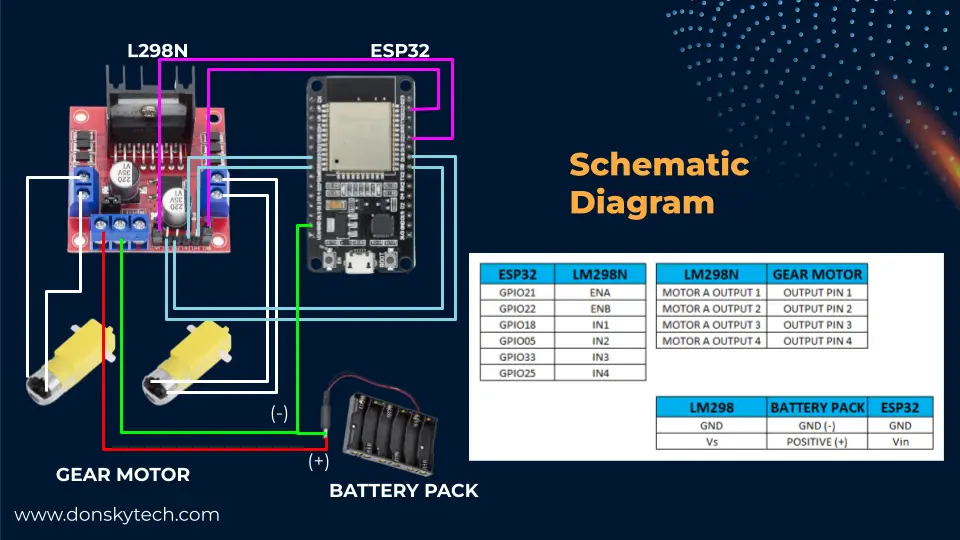
The image above is the wiring or schematic of our project. You can choose any other GPIO (General Purpose Input Output) pins of your liking. Make sure that the pins that you are gonna be using on the LM298N ENA and ENB pin are capable of generating PWM (Pulse Width Modulation) signal.
The ground between the LM298N, ESP32, and Battery Pack should be connected in common.
Note: Never connect the Vin pin of your ESP32 to the Vs of the LM 298N and positive of your battery pack while we are in development or the USB is connected to your ESP32. Connect this only when we are done loading the program to the ESP32 MicroPython device.
Code
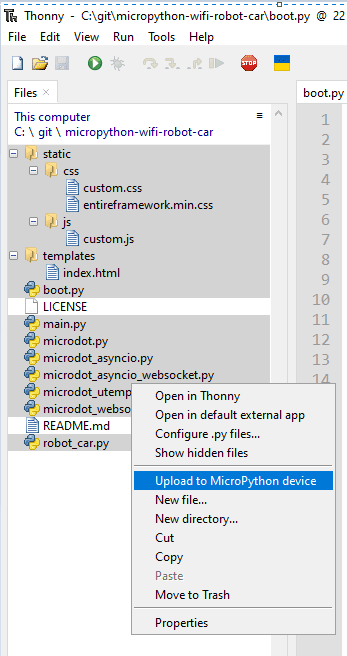
The complete code for this project is available in my GitHub repository. You can either clone it or download it as a zip file.
git clone https://github.com/donskytech/micropython-wifi-robot-car.gitThe image below is the project file layout of our program.
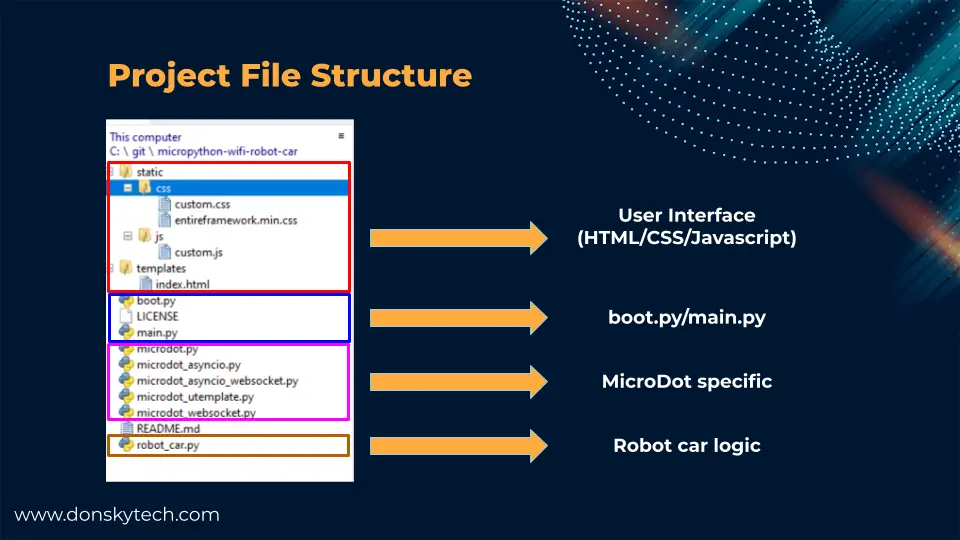
Let’s go through how each part of the program participates in our project.
- static/css and static/js – contains the Cascading Style Sheets (CSS) or styling file of our index.html page. The Javascript file (custom.js) handles the WebSocket message exchange between the MicroDot WebSocket server and our browser.
- templates/index.html – this contains the user interface of our project and has the HTML elements to create the D-Pad or O-Pad controller.
- boot.py – default script run by MicroPython when it is restarted. This file connects to our Wifi network.
- main.py – contains our MicroDot web server and WebSocket routes.
- microdot* – these are MicroDot-specific project files.
- robot-car.py – represents our Car object. The logic to control the motor driver LM298N is embedded in this file.
Let us go through and explain in detail the code for each file.
A little note about the LM298N driver
Before we continue let us define first how to control our LM2898N motor driver.
| IN1 | IN2 | SPIN DIRECTION |
|---|---|---|
| LOW (0) | LOW (0) | Motor Off |
| HIGH (1) | LOW (0) | Forward |
| LOW(0) | HIGH(1) | Reverse |
| HIGH(1) | HIGH(1) | Motor Off |
The Enable Pins can control the speed of the motor by adjusting the duty cycle of our period. In this project, I am passing the following values to represent the speed of the duty cycle. This is passed by the main.py file.
# Wifi Robot Car Configuration
MAX_POWER_LEVEL = 65535		# 100% Power
MEDIUM_POWER_LEVEL = 49151      # 75% Power
MIN_POWER_LEVEL = 32767		# 50% Power
Having known this setup then you could figure out how you can control your robot car.
robot_car.py
We have created a dedicated class to represent our MicroPython robot car and below is its code.
from machine import Pin, PWM

"""
Class to represent our robot car
""""
class RobotCar():
    def __init__(self, enable_pins, motor_pins, speed):
        self.right_motor_enable_pin = PWM(Pin(enable_pins[0]), freq=2000)
        self.left_motor_enable_pin = PWM(Pin(enable_pins[1]), freq=2000)

        self.right_motor_control_1 = Pin(motor_pins[0], Pin.OUT)
        self.right_motor_control_2 = Pin(motor_pins[1], Pin.OUT)

        self.left_motor_control_1 = Pin(motor_pins[2], Pin.OUT)
        self.left_motor_control_2 = Pin(motor_pins[3], Pin.OUT)

        self.speed = speed

    def stop(self):
        print('Car stopping')
        self.right_motor_control_1.value(0)
        self.right_motor_control_2.value(0)
        self.left_motor_control_1.value(0)
        self.left_motor_control_2.value(0)
        self.right_motor_enable_pin.duty_u16(0)
        self.left_motor_enable_pin.duty_u16(0)

    def forward(self):
        print('Move forward')
        self.right_motor_enable_pin.duty_u16(self.speed)
        self.left_motor_enable_pin.duty_u16(self.speed)

        self.right_motor_control_1.value(1)
        self.right_motor_control_2.value(0)
        self.left_motor_control_1.value(1)
        self.left_motor_control_2.value(0)


    def reverse(self):
        print('Move reverse')
        self.right_motor_enable_pin.duty_u16(self.speed)
        self.left_motor_enable_pin.duty_u16(self.speed)

        self.right_motor_control_1.value(0)
        self.right_motor_control_2.value(1)
        self.left_motor_control_1.value(0)
        self.left_motor_control_2.value(1)

    def turnLeft(self):
        print('Turning Left')
        self.right_motor_enable_pin.duty_u16(self.speed)
        self.left_motor_enable_pin.duty_u16(self.speed)

        self.right_motor_control_1.value(1)
        self.right_motor_control_2.value(0)
        self.left_motor_control_1.value(0)
        self.left_motor_control_2.value(0)

    def turnRight(self):
        print('Turning Right')
        self.right_motor_enable_pin.duty_u16(self.speed)
        self.left_motor_enable_pin.duty_u16(self.speed)

        self.right_motor_control_1.value(0)
        self.right_motor_control_2.value(0)
        self.left_motor_control_1.value(1)
        self.left_motor_control_2.value(0)

    def set_speed(self, new_speed):
        self.speed = new_speed

    def cleanUp(self):
        print('Cleaning up pins')
        self.right_motor_enable_pin.deinit()
        self.left_motor_enable_pin.deinit()
As you can see, the class has methods that mirror a real-life car object. It has methods named forward, reverse, turnLeft, turnRight or set_speed. Let us go over what each line of code does.
from machine import Pin, PWMImport the necessary packages especially the PWM. We will be using PWM to control the speed of our MicroPython robot car.
"""
Class to represent our robot car
""""
class RobotCar():
    def __init__(self, enable_pins, motor_pins, speed):
        self.right_motor_enable_pin = PWM(Pin(enable_pins[0]), freq=2000)
        self.left_motor_enable_pin = PWM(Pin(enable_pins[1]), freq=2000)

        self.right_motor_control_1 = Pin(motor_pins[0], Pin.OUT)
        self.right_motor_control_2 = Pin(motor_pins[1], Pin.OUT)

        self.left_motor_control_1 = Pin(motor_pins[2], Pin.OUT)
        self.left_motor_control_2 = Pin(motor_pins[3], Pin.OUT)

        self.speed = speed
We declare the RobotCar class here and defined the constructor of our class. It is expected that we are passing a list of enable_pins and motor_pins and the initial speed.
We define a PWM pin for both the enabled pins and set all the motor pins as output pins.
The initial speed of our robot car is also defined here.
    def stop(self):
        print('Car stopping')
        self.right_motor_control_1.value(0)
        self.right_motor_control_2.value(0)
        self.right_motor_enable_pin.duty_u16(0)
        self.left_motor_enable_pin.duty_u16(0)

    def forward(self):
        print('Move forward')
        self.right_motor_enable_pin.duty_u16(self.speed)
        self.left_motor_enable_pin.duty_u16(self.speed)

        self.right_motor_control_1.value(1)
        self.right_motor_control_2.value(0)
        self.left_motor_control_1.value(1)
        self.left_motor_control_2.value(0)


    def reverse(self):
        print('Move reverse')
        self.right_motor_enable_pin.duty_u16(self.speed)
        self.left_motor_enable_pin.duty_u16(self.speed)

        self.right_motor_control_1.value(0)
        self.right_motor_control_2.value(1)
        self.left_motor_control_1.value(0)
        self.left_motor_control_2.value(1)

    def turnLeft(self):
        print('Turning Left')
        self.right_motor_enable_pin.duty_u16(self.speed)
        self.left_motor_enable_pin.duty_u16(self.speed)

        self.right_motor_control_1.value(1)
        self.right_motor_control_2.value(0)
        self.left_motor_control_1.value(0)
        self.left_motor_control_2.value(0)

    def turnRight(self):
        print('Turning Right')
        self.right_motor_enable_pin.duty_u16(self.speed)
        self.left_motor_enable_pin.duty_u16(self.speed)

        self.right_motor_control_1.value(0)
        self.right_motor_control_2.value(0)
        self.left_motor_control_1.value(1)
        self.left_motor_control_2.value(0)
For example, for our car to move forward then we can configure our forward() method to set the value of both IN pins to a HIGH (1) and LOW (0). Also, we need to set the speed of our Enable Pins by setting the appropriate duty cycle thru the method self.right_motor_enable_pin.duty_u16(self.speed) and self.left_motor_enable_pin.duty_u16(self.speed)
I am not going to explain how each of the functions works but by looking at the table above then you would know why the values are set appropriately.
    def set_speed(self, new_speed):
        self.speed = new_speed

    def cleanUp(self):
        print('Cleaning up pins')
        self.right_motor_enable_pin.deinit()
        self.left_motor_enable_pin.deinit()
The set_speed() function will set the speed of our motor. The cleanUp() function is needed to de-initialize our PWM pins setup once we exit our program.
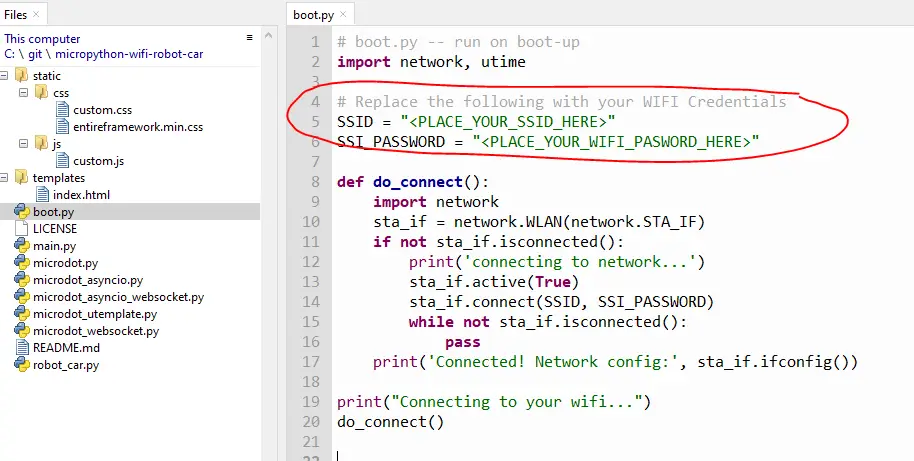
boot.py
The boot.py is the first script that is executed whenever we restart our Microcontroller device thus in this project we are using it to connect to our Wifi.
# boot.py -- run on boot-up
import network, utime

# Replace the following with your WIFI Credentials
SSID = "<PLACE_YOUR_SSID_HERE>"
SSI_PASSWORD = "<PLACE_YOUR_WIFI_PASWORD_HERE>"

def do_connect():
    import network
    sta_if = network.WLAN(network.STA_IF)
    if not sta_if.isconnected():
        print('connecting to network...')
        sta_if.active(True)
        sta_if.connect(SSID, SSI_PASSWORD)
        while not sta_if.isconnected():
            pass
    print('Connected! Network config:', sta_if.ifconfig())

print("Connecting to your wifi...")
do_connect()
Import the necessary Python packages.
# boot.py -- run on boot-up
import network, utime
Replace the following entry with your Wifi credentials
# Replace the following with your WIFI Credentials
SSID = "<PLACE_YOUR_SSID_HERE>"
SSI_PASSWORD = "<PLACE_YOUR_WIFI_PASWORD_HERE>"
This will connect to your Wifi until it is able to retrieve the desired IP Address.
def do_connect():
    import network
    sta_if = network.WLAN(network.STA_IF)
    if not sta_if.isconnected():
        print('connecting to network...')
        sta_if.active(True)
        sta_if.connect(SSID, SSI_PASSWORD)
        while not sta_if.isconnected():
            pass
    print('Connected! Network config:', sta_if.ifconfig())

print("Connecting to your wifi...")
do_connect()
main.py
The main.py contains the logic of our MicroDot web server. I am not going to explain how to create a MicroDot web server but just follow my earlier post on how this is done.
The main.py code is below and it contains all the necessary routes in order to respond to HTTP requests.
from microdot_asyncio import Microdot, Response, send_file
from microdot_asyncio_websocket import with_websocket
from microdot_utemplate import render_template
from robot_car import RobotCar

app = Microdot()
Response.default_content_type = "text/html"

# Wifi Robot Car Configuration
MAX_POWER_LEVEL = 65535		# 100%
MEDIUM_POWER_LEVEL = 49151  # 75%
MIN_POWER_LEVEL = 32767		# 50%

enable_pins = [21, 22]
motor_pins = [18, 5, 33, 25]

robot_car = RobotCar(enable_pins, motor_pins, MEDIUM_POWER_LEVEL)

car_commands = {
    "forward": robot_car.forward,
    "reverse": robot_car.reverse,
    "left": robot_car.turnLeft,
    "right": robot_car.turnRight,
    "stop": robot_car.stop
}

speed_commands = {
    "slow-speed": MIN_POWER_LEVEL,
    "normal-speed": MEDIUM_POWER_LEVEL,
    "fast-speed": MAX_POWER_LEVEL
}


# App Route
@app.route("/")
async def index(request):
    return render_template("index.html")


@app.route("/ws")
@with_websocket
async def executeCarCommands(request, ws):
    while True:
        websocket_message = await ws.receive()
        print(f"receive websocket message : {websocket_message}")

        if "speed" in websocket_message:
            new_speed = speed_commands.get(websocket_message)
            robot_car.set_speed(new_speed)
        else:
            command = car_commands.get(websocket_message)
            command()
        await ws.send("OK")


@app.route("/shutdown")
async def shutdown(request):
    request.app.shutdown()
    return "The server is shutting down..."


@app.route("/static/<path:path>")
def static(request, path):
    if ".." in path:
        # directory traversal is not allowed
        return "Not found", 404
    return send_file("static/" + path)


if __name__ == "__main__":
    try:
        app.run()
    except KeyboardInterrupt:
        robot_car.cleanUp()
Configure the imports
from microdot_asyncio import Microdot, Response, send_file
from microdot_asyncio_websocket import with_websocket
from microdot_utemplate import render_template
from robot_car import RobotCar
Import all the necessary MicroDot-specific packages including our RobotCar class. We are also adding MicroDot WebSocket support.
app = Microdot()
Response.default_content_type = "text/html"
Create an instance of MicroDot and set the content type to text/html.
Set up Robot Car configurations
# Wifi Robot Car Configuration
MAX_POWER_LEVEL = 65535		# 100%
MEDIUM_POWER_LEVEL = 49151  # 75%
MIN_POWER_LEVEL = 32767		# 50%

enable_pins = [21, 22]
motor_pins = [18, 5, 33, 25]
We define the configurations of our duty cycle here. The duty cycle can be set from zero to 65535 but in order for our MicroPython robot car to run then I arbitrarily set the minimum to at least 50%. You can change this minimum value depending on your preferences.
The GPIO pins for the Enable and Motor pins are defined here as well.
robot_car = RobotCar(enable_pins, motor_pins, MEDIUM_POWER_LEVEL)

car_commands = {
    "forward": robot_car.forward,
    "reverse": robot_car.reverse,
    "left": robot_car.turnLeft,
    "right": robot_car.turnRight,
    "stop": robot_car.stop
}

speed_commands = {
    "slow-speed": MIN_POWER_LEVEL,
    "normal-speed": MEDIUM_POWER_LEVEL,
    "fast-speed": MAX_POWER_LEVEL
}
We create an instance of our RobotCar and pass in the Enable and Motor Pins plus the default speed which is the medium level.
I have defined a Python dictionary car_commands here to handle WebSocket messages. I have assigned the function that will be called on our RobotCar object upon receiving specific car commands.
Below is the list of possible WebSocket Messages coming from our Web Application.
| WebSocket Command | Description |
|---|---|
| forward | Move the car forward |
| reverse | Move the car in reverse |
| left | Turn Left the car |
| right | Turn right the car |
| stop | Stop the car |
| slow-speed | Set the car speed to minimum |
| normal-speed | Set the car speed to normal |
| fast-speed | Set the car speed to maximum |
Making sense of the MicroDot routes
At this point of the program, we are defining the routes that will respond to HTTP requests.
# App Route
@app.route("/")
async def index(request):
    return render_template("index.html")
We define our index or root route here and it will serve the index.html page.
@app.route("/ws")
@with_websocket
async def executeCarCommands(request, ws):
    while True:
        websocket_message = await ws.receive()
        print(f"receive websocket message : {websocket_message}")

        if "speed" in websocket_message:
            new_speed = speed_commands.get(websocket_message)
            robot_car.set_speed(new_speed)
        else:
            command = car_commands.get(websocket_message)
            command()
        await ws.send("OK")
The WebSocket route is defined here and will respond to the path that starts with “/ws“. It will continually listen in a loop for any WebSocket message and if it receives one then it inspects if the message corresponds to speed change.
If the message is speed-related then we set the speed of our robot car by calling the robot_car.set_speed() else if the command is movement related then we call the corresponding robot car movement command.
We return “OK” message response for all WebSocket message exchanges.
@app.route("/shutdown")
async def shutdown(request):
    request.app.shutdown()
    return "The server is shutting down..."


@app.route("/static/<path:path>")
def static(request, path):
    if ".." in path:
        # directory traversal is not allowed
        return "Not found", 404
    return send_file("static/" + path)
The “/shutdown” route is used to shut down our Microdot application and can be triggered by typing the following in your browser.
http://<IP>:5000/shutdownOn the other hand, the “static” route is for serving static contents which in this case are our CSS (Cascading Style Sheets) and Javascript files.
if __name__ == "__main__":
    try:
        app.run()
    except KeyboardInterrupt:
        robot_car.cleanUp()
This is the entry point of our program and this will run our MicroDot web server. Also, take note of robot_car.cleanUp() the except block as this is important because PWM pins will continue to run even if we exit our MicroDot web server.
templates/index.html
The index.html will contain the D-Pad and the O-Pad controller which I have forked from one of the code pens. I would like to say shout out to the original creator of this excellent user interface which I have already used in different projects already like the ESP32/ESP8266.
Related Content:
ESP32 Robot Car Using Websockets
Create your own ESP32 Wifi Car using the library esp32-wifi-car
Please see below code pen if you would like to play around with it.
The complete index.html code is below.
<!DOCTYPE html>
<html>

<head>
    <meta charset="UTF-8">
    <meta name="viewport" content="width=device-width, initial-scale=1">
    <title>MicroPython Wifi Robot Car</title>
    <link href="static/css/entireframework.min.css" rel="stylesheet" type="text/css">
    <link href="static/css/custom.css" rel="stylesheet" type="text/css">

</head>

<body>
    <nav class="nav" tabindex="-1" onclick="this.focus()">
        <div class="container">
            <a class="pagename current" href="https://www.donskytech.com">www.donskytech.com</a>
        </div>
    </nav>
    <button class="btn-close btn btn-sm">×</button>
    <div class="container">
        <div class="hero">
            <h2>MicroPython Wifi Robot Car</h2>
        </div>

        <div class="parent">
            <div class="speed-settings">Speed Settings</div>
            <div class="wrapper">
                <input type="radio" name="speed-settings" id="option-1" value="slow-speed" >
                <input type="radio" name="speed-settings" id="option-2" value="normal-speed" checked>
                <input type="radio" name="speed-settings" id="option-3" value="fast-speed" >
                <label for="option-1" class="option option-1">
                    <div class="dot"></div>
                    <span>Slow</span>
                </label>
                <label for="option-2" class="option option-2">
                    <div class="dot"></div>
                    <span>Normal</span>
                </label>
                <label for="option-3" class="option option-3">
                    <div class="dot"></div>
                    <span>Fast</span>
                </label>
            </div>

            <div class="set blue">
                <nav class="d-pad">
                    <a class="up control" data-direction="forward"></a>
                    <a class="right control" data-direction="right"></a>
                    <a class="down control" data-direction="reverse"></a>
                    <a class="left control" data-direction="left"></a>
                </nav>
                <nav class="o-pad">
                    <a class="up control" data-direction="forward"></a>
                    <a class="right control" data-direction="right"></a>
                    <a class="down control" data-direction="reverse"></a>
                    <a class="left control" data-direction="left"></a>
                </nav>
            </div>

        </div>
    </div>
    <script src="static/js/custom.js"></script>
    </div>
    </div>
</body>

</html>
Overall, this file only contains the bare HTML elements and needs to be stylized by our CSS files especially the D-Pad and our O-Pad controllers.
<!DOCTYPE html>
<html>

<head>
    <meta charset="UTF-8">
    <meta name="viewport" content="width=device-width, initial-scale=1">
    <title>MicroPython Wifi Robot Car</title>
    <link href="static/css/entireframework.min.css" rel="stylesheet" type="text/css">
    <link href="static/css/custom.css" rel="stylesheet" type="text/css">

</head>
The head section contains the default meta elements, title and the CSS imports.
<body>
    <nav class="nav" tabindex="-1" onclick="this.focus()">
        <div class="container">
            <a class="pagename current" href="https://www.donskytech.com">www.donskytech.com</a>
        </div>
    </nav>
    <button class="btn-close btn btn-sm">×</button>
    <div class="container">
        <div class="hero">
            <h2>MicroPython Wifi Robot Car</h2>
        </div>
We define the navigation at the top of the page including our title.
       <div class="parent">
            <div class="speed-settings">Speed Settings</div>
            <div class="wrapper">
                <input type="radio" name="speed-settings" id="option-1" value="slow-speed" >
                <input type="radio" name="speed-settings" id="option-2" value="normal-speed" checked>
                <input type="radio" name="speed-settings" id="option-3" value="fast-speed" >
                <label for="option-1" class="option option-1">
                    <div class="dot"></div>
                    <span>Slow</span>
                </label>
                <label for="option-2" class="option option-2">
                    <div class="dot"></div>
                    <span>Normal</span>
                </label>
                <label for="option-3" class="option option-3">
                    <div class="dot"></div>
                    <span>Fast</span>
                </label>
            </div>
This is the section where we set the speed settings of our MicroPython Robot Car. Furthermore, take note of the value of the radio buttons. It has “slow-speed“, “normal-speed“, and “fast-speed” and they will be sent as WebSocket messages.
            <div class="set blue">
                <nav class="d-pad">
                    <a class="up control" data-direction="forward"></a>
                    <a class="right control" data-direction="right"></a>
                    <a class="down control" data-direction="reverse"></a>
                    <a class="left control" data-direction="left"></a>
                </nav>
                <nav class="o-pad">
                    <a class="up control" data-direction="forward"></a>
                    <a class="right control" data-direction="right"></a>
                    <a class="down control" data-direction="reverse"></a>
                    <a class="left control" data-direction="left"></a>
                </nav>
            </div>

        </div>
    </div>
    <script src="static/js/custom.js"></script>
    </div>
    </div>
</body>

</html>
Lastly, this section contains the HTML structure of our D-Pad and O-Pad controller. Also, take a close look at the “data-direction” attribute of each control elements. When these links are touch in our mobile phones then it would send the WebSocket messages to our web server.
The script custom.js is imported at the body section of our HTML page.
static/css/custom.css and static/css/entireframework.min.css
The two CSS files (custom.css and entireframework.min.css) provide the styling of our pages and their main function is to beautify the page. I am using the mincss as my CSS framework because of its size which is only a few kilobytes.
I won’t be explaining so much about the CSS classes of the mincss CSS framework but you can take a look at the example sections to figure out how it works.
The custom.css applies local styling to our user interface. Moreover, the speed settings and the D-Pad and O-Pad controller are being stylized by this file.
static/js/custom.js
The custom.js code is below and we will run through what each line of code does as this is the most important part of our user interface.
var targetUrl = `ws://${location.host}/ws`;
var websocket;
window.addEventListener("load", onLoad);

function onLoad() {
  initializeSocket();
  setDefaultSpeed();
}

function initializeSocket() {
  console.log("Opening WebSocket connection to ESP32 MicroPython Server...");
  websocket = new WebSocket(targetUrl);
  websocket.onopen = onOpen;
  websocket.onclose = onClose;
  websocket.onmessage = onMessage;
}
function onOpen(event) {
  console.log("Starting connection to WebSocket server..");
}
function onClose(event) {
  console.log("Closing connection to server..");
  setTimeout(initializeSocket, 2000);
}
function onMessage(event) {
  console.log("WebSocket message received:", event);
}

function sendMessage(message) {
  websocket.send(message);
}

/*
Speed Settings Handler
*/
var speedSettings = document.querySelectorAll(
  'input[type=radio][name="speed-settings"]'
);
speedSettings.forEach((radio) =>
  radio.addEventListener("change", () => {
    var speedSettings = radio.value;
    console.log("Speed Settings :: " + speedSettings);
    sendMessage(speedSettings);
  })
);

function setDefaultSpeed() {
  console.log("Setting default speed to normal..");
  let normalOption = document.getElementById("option-2");
  normalOption.checked = true;
}

/*
O-Pad/ D-Pad Controller and Javascript Code
*/
// Prevent scrolling on every click!
// super sweet vanilla JS delegated event handling!
document.body.addEventListener("click", function (e) {
  if (e.target && e.target.nodeName == "A") {
    e.preventDefault();
  }
});

function touchStartHandler(event) {
  var direction = event.target.dataset.direction;
  console.log("Touch Start :: " + direction);
  sendMessage(direction);
}

function touchEndHandler(event) {
  const stop_command = "stop";
  var direction = event.target.dataset.direction;
  console.log("Touch End :: " + direction);
  sendMessage(stop_command);
}

document.querySelectorAll(".control").forEach((item) => {
  item.addEventListener("touchstart", touchStartHandler);
});

document.querySelectorAll(".control").forEach((item) => {
  item.addEventListener("touchend", touchEndHandler);
});
var targetUrl = `ws://${location.host}/ws`;
var websocket;
window.addEventListener("load", onLoad);
function onLoad() {
initializeSocket();
setDefaultSpeed();
}First, we define our WebSocket URL connection and WebSocket variables at the top. They will be used to connect to our web server.
Next, we added an event listener to the “load” event of our web page by attaching the onLoad function. The onLoad function calls the initializeSocket() and setDefaultSpeed() whose primary job are to open the WebSocket connection and set the default speed of our controller.
function initializeSocket() {
  console.log("Opening WebSocket connection to ESP32 MicroPython Server...");
  websocket = new WebSocket(targetUrl);
  websocket.onopen = onOpen;
  websocket.onclose = onClose;
  websocket.onmessage = onMessage;
}
function onOpen(event) {
  console.log("Starting connection to WebSocket server..");
}
function onClose(event) {
  console.log("Closing connection to server..");
  setTimeout(initializeSocket, 2000);
}
function onMessage(event) {
  console.log("WebSocket message received:", event);
}

function sendMessage(message) {
  websocket.send(message);
}
The initializeSocket() function opens a WebSocket connection to our web server and then attached event handlers to it using the onopen, onclose, and onmessage
The sendMessage() function is where we send the actual WebSocket message.
/*
Speed Settings Handler
*/
var speedSettings = document.querySelectorAll(
  'input[type=radio][name="speed-settings"]'
);
speedSettings.forEach((radio) =>
  radio.addEventListener("change", () => {
    var speedSettings = radio.value;
    console.log("Speed Settings :: " + speedSettings);
    sendMessage(speedSettings);
  })
);

function setDefaultSpeed() {
  console.log("Setting default speed to normal..");
  let normalOption = document.getElementById("option-2");
  normalOption.checked = true;
}
We add event handlers to all radio buttons such that when it is clicked then it will call the sendMessage() function passing in the speed settings value.
The function setDefaultSpeed() will set the default speed setting which in this case is the normal value.
/*
O-Pad/ D-Pad Controller and Javascript Code
*/
// Prevent scrolling on every click!
// super sweet vanilla JS delegated event handling!
document.body.addEventListener("click", function (e) {
  if (e.target && e.target.nodeName == "A") {
    e.preventDefault();
  }
});

function touchStartHandler(event) {
  var direction = event.target.dataset.direction;
  console.log("Touch Start :: " + direction);
  sendMessage(direction);
}

function touchEndHandler(event) {
  const stop_command = "stop";
  var direction = event.target.dataset.direction;
  console.log("Touch End :: " + direction);
  sendMessage(stop_command);
}

document.querySelectorAll(".control").forEach((item) => {
  item.addEventListener("touchstart", touchStartHandler);
});

document.querySelectorAll(".control").forEach((item) => {
  item.addEventListener("touchend", touchEndHandler);
});
The following functions above are for our D-Pad and O-Pad controller and they might be hard to understand when you first see it so let us try to break it down one by one.
// Prevent scrolling on every click!
// super sweet vanilla JS delegated event handling!
document.body.addEventListener("click", function (e) {
  if (e.target && e.target.nodeName == "A") {
    e.preventDefault();
  }
});
When we click all the buttons in our controller then we should prevent our page from flickering or being submitted so we should call e.preventDefault() on the event object.
function touchStartHandler(event) {
  var direction = event.target.dataset.direction;
  console.log("Touch Start :: " + direction);
  sendMessage(direction);
}

function touchEndHandler(event) {
  const stop_command = "stop";
  var direction = event.target.dataset.direction;
  console.log("Touch End :: " + direction);
  sendMessage(stop_command);
}
The touchStartHandler() and touchEndHandler() functions will extract the data-direction attribute from our links and whatever the value then it should send a WebSocket message to our web server.
document.querySelectorAll(".control").forEach((item) => {
  item.addEventListener("touchstart", touchStartHandler);
});

document.querySelectorAll(".control").forEach((item) => {
  item.addEventListener("touchend", touchEndHandler);
});
We are attaching event handlers for the touchstart and touched events of our D-Pad and O-Pad controller.
As a side note, touch events is only applicable to our mobile phones that supports touch gestures so it will not work on your laptop browser.
MicroDot specific files
The MicroDot specific files are copied from the GitHub repository of the said project. We are making use of the Asynchronous, Templating, and WebSocket extensions of this project.
That is all for the code and how it works!
How to deploy the project to your MicroPython Device?
First, connect your MicroPython device in your Thonny IDE and make sure that it is detected by your laptop or workstation.
Next, open the boot.py file and change the credentials to match those of your Wifi network.
Next, install the uTemplate library in your MicroPython device. If you are unsure how this is done then you can follow my You can follow my How to install MicroPython libraries or packages in Thonny IDE?
Lastly, upload all the files to your MicroPython device
Soft reboot your MicroPython device and wait for the following messages to be displayed.
MPY: soft reboot
Connecting to your wifi...
Connected! Network config: ('192.168.100.36', '255.255.255.0', '192.168.100.1', '192.168.100.1')
Take note of the IP Address and then open the browser in your mobile phone and type in the following URL.
http://<IP-Address>:5000This should open up the web application in your browser. Try to click the D-Pad and O-Pad controller and verify if it is working.
Once you have confirmed that this works then you can now remove your ESP32 USB connection and connect the Vs pin of the LM298N pin to that of the Vin pin of your ESP32.
Have fun playing with your shiny MicroPython-powered Wifi Robot car! 🙂
Wrap Up
This is quite a long post and contains lots of code but I hope you learn something from my MicroDot Wifi robot car project. If something is not clear then please comment on this blog post and I would try to clear your doubts.
I hope you learned something. Happy Exploring!
Read Next:
ESP32 Robot Car Using Websockets
Create your own ESP32 Wifi Car using the library esp32-wifi-car
Leave a Reply