Introduction
This post will show you how to connect, publish, and subscribe to MQTT(MQ Telemetry Transport) broker using the Adafruit MQTT library. Using the ESP8266/ESP32 microcontroller board running the Arduino framework then we should be able to exchange MQTT messages with our broker.
What is MQTT and why you should care?

The advent of the Internet of Things (IoT) has brought together billions of devices connected to our internet network. This has been an exciting development for many years and one challenge is how to handle the message exchanges between the different devices connected to our network. Enter MQTT.
The image above is the typical MQTT setup in a nutshell wherein you have the MQTT broker in the middle and several clients attached or connected to it. The clients can either be a source of information (publisher) or the receiver of information (subscriber) or they can be both.
With the publish/subscribe model of MQTT then we can have multiple clients that can communicate with each other without hardcoding the connections between them. The MQTT broker in the middle serves as the middleman that will handle the message exchange between the sender (publisher) and the intended receivers (subscribers) thru the concept of “topic” or the subject of information like the current temperature or the state of the light.
Parts/Components Required
The following are the components required to be able to follow along with this post.
- ESP8266 – Amazon | AliExpress | Bangood
- or ESP32 – Amazon | AliExpress | Bangood
- Breadboard – Amazon | AliExpress | Bangood
Disclosure: These are affiliate links and I will earn small commissions to support my site when you buy through these links.
I have used a NodeMCU ESP8266 microcontroller board in developing this project but I think this is applicable to an ESP32 board also.
Prerequisites
You should have an MQTT broker that you can connect or you can set up your own using the Mosquitto application. I have used the PlatformIO IDE extension in Visual Studio Code in developing the code for this project but you can still use the Arduino IDE.
Related Content:
Install Mosquitto MQTT Windows
PlatformIO Tutorial for Arduino Development
I have used MQTTX in testing this project as it is quite easy to test our MQTT messages exchange using this application.
Read Next:
Pico W -MicroPython MQTT – BMP/BME 280 Weather Station
Control DS18B20 using MicroPython with a Weather Station Project
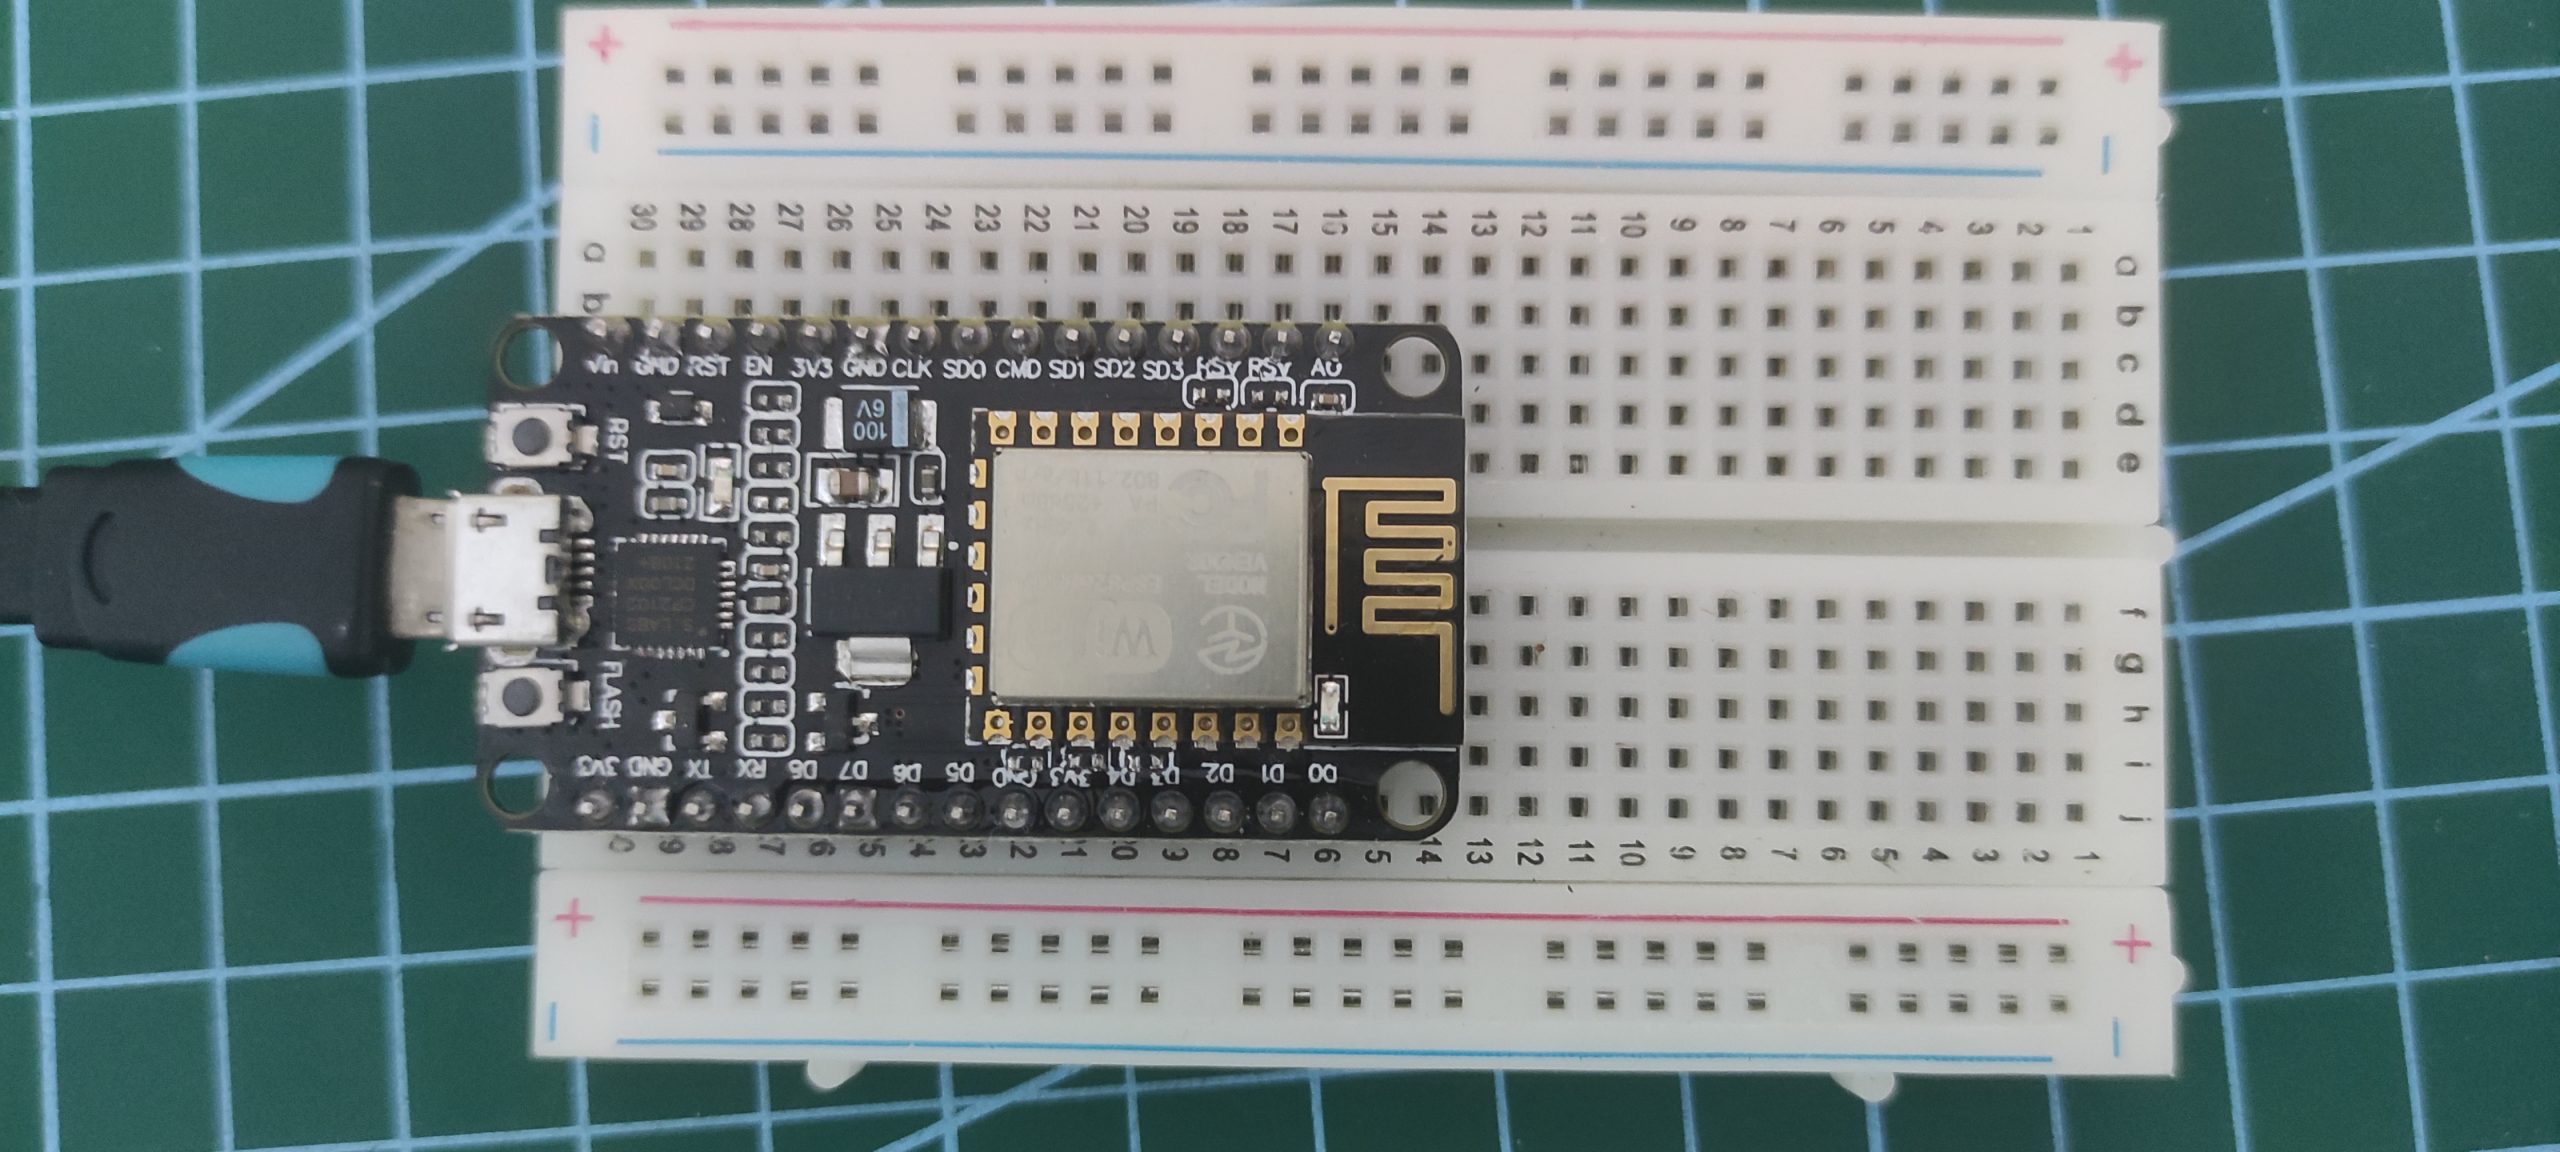
Wiring/Schematic
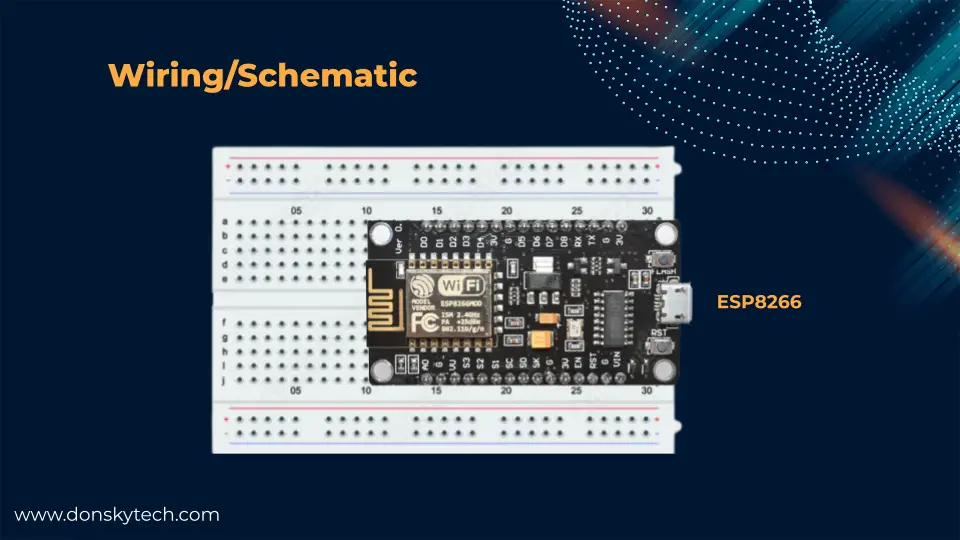
You only need your ESP8266/ESP32 placed on top of your breadboard. No other external components are needed so you can just power on your microcontroller board using the USB cable.
What are we going to do?
We are going to initiate a subscribe and publish MQTT topics to our Mosquitto broker.
- Our ESP32/ESP8266 will subscribe to an “led” topic and will wait for an “ON” or “OFF” message so that we could turn or off the built-in LED.
- Our ESP32/ESP8266 will regularly publish the “temperature” topic with a random value between 0-50. We should be able to see the published MQTT messages coming from our microcontroller board.
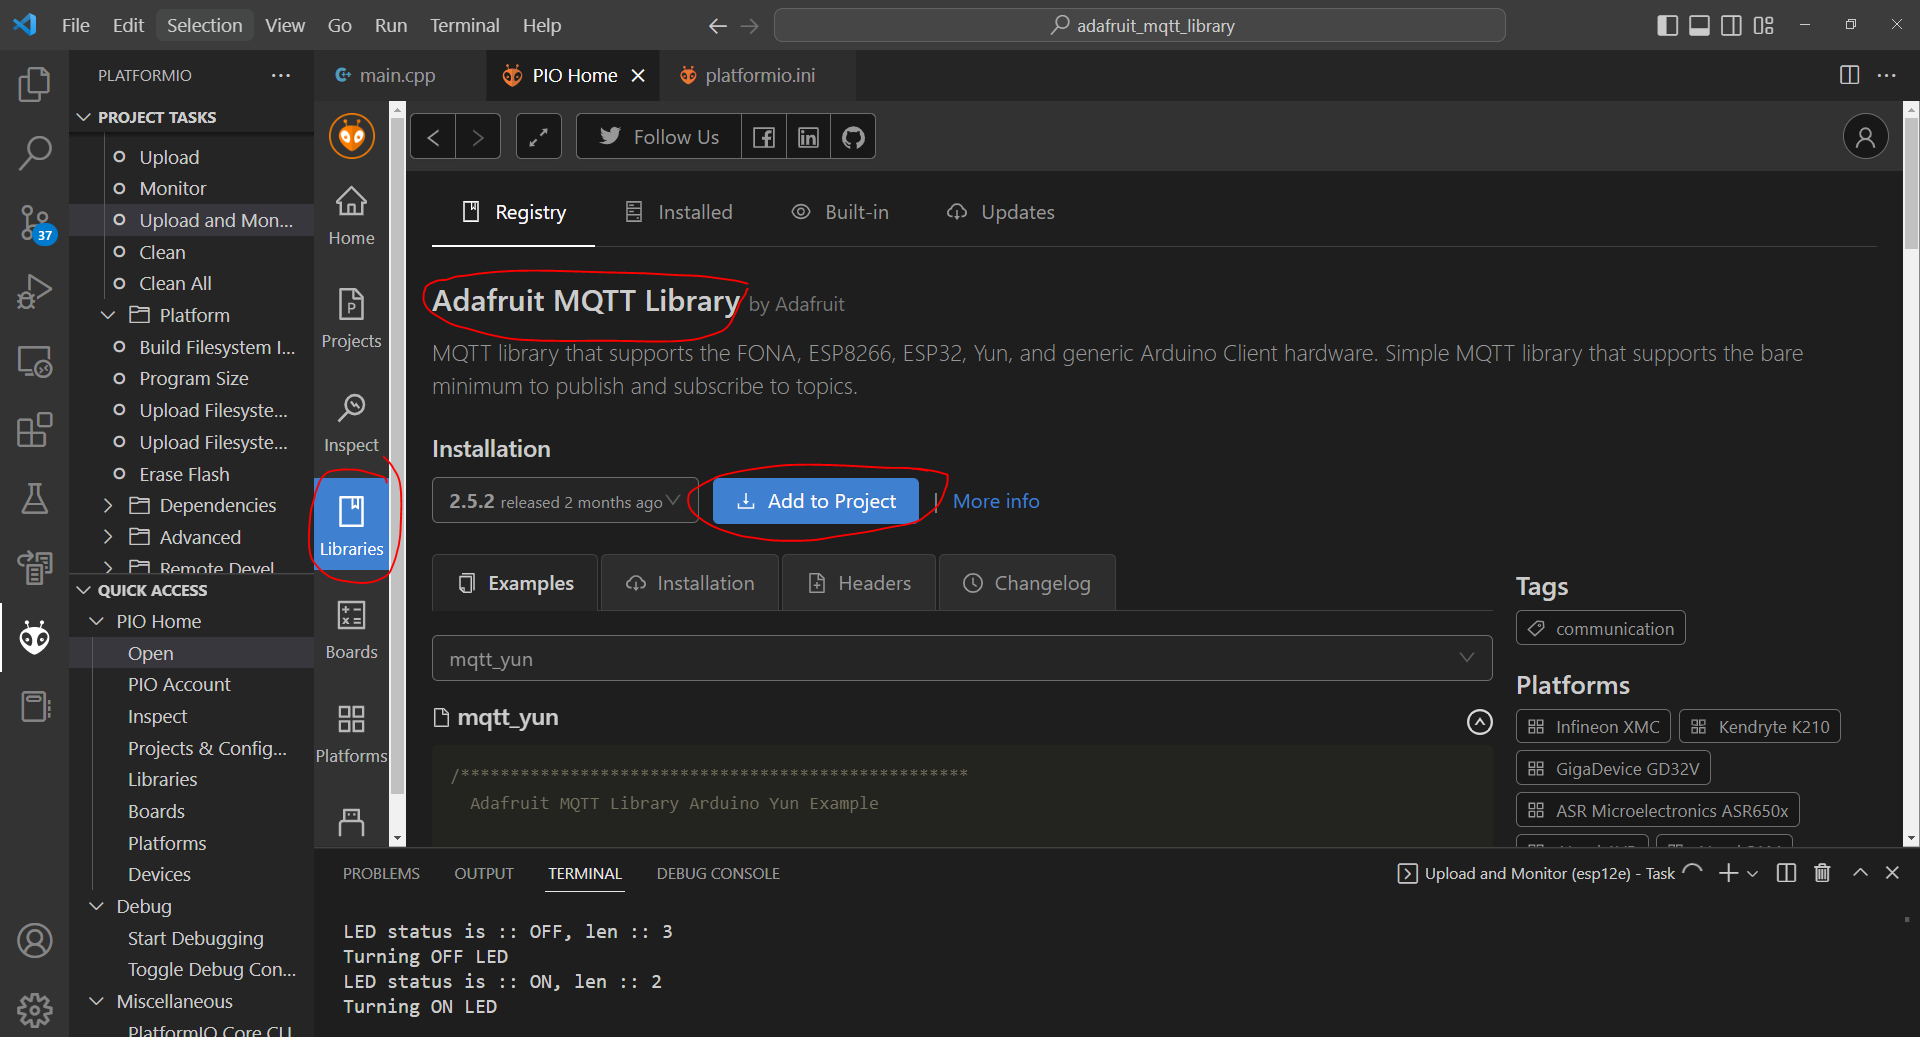
How to install the Adafruit MQTT Library?
If you are using the PlatformIO IDE extension in Visual Studio Code then just go to the Libraries tab and search for “Adafruit MQTT Library“. Locate the library and add this to your project.
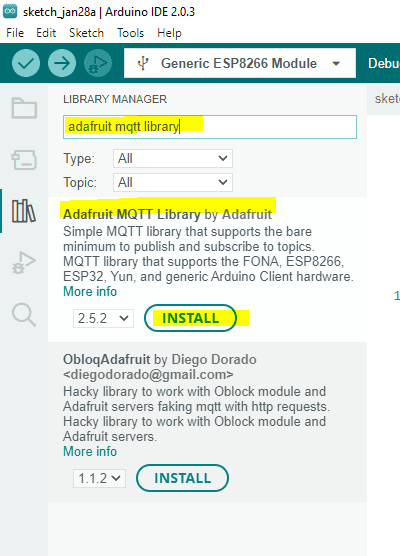
When using the Arduino IDE 2.0 IDE then just click the Library tab also and search for the “Adafruit MQTT library” then click Install.
Code
The code for this project is available in my GitHub repository and you can either clone it using Git or download it as a zip file.
git clone https://github.com/donskytech/platformio-projects.git
cd esp8266-projects/adafruit_mqtt_library/
Below is the complete code for this project. Let us walk thru what each line of the code does.
#include <Arduino.h>
#include <ESP8266WiFi.h>
#include "Adafruit_MQTT.h"
#include "Adafruit_MQTT_Client.h"

/*
  Replace the SSID and Password according to your wifi
*/
const char *ssid = "<YOUR_WIFI_SSID>";
const char *password = "<YOUR_WIFI_PASSWORD>";

// Your MQTT broker ID
const char *mqttBroker = "192.168.100.22";
const int mqttPort = 1883;
// const char *mqttUserName = "user";
// const char *mqttUserPassword = "password";

// MQTT topics
const char *publishTopic = "temperature";
const char *subscribeTopic = "led";

// Create an ESP8266 WiFiClient class to connect to the MQTT server.
WiFiClient client;
// or... use WiFiClientSecure for SSL
// WiFiClientSecure client;

// Setup the MQTT client class by passing in the WiFi client and MQTT server and login details.
Adafruit_MQTT_Client mqtt(&client, mqttBroker, mqttPort);
// Adafruit_MQTT_Client mqtt(&client, mqttBroker, mqttPort, mqttUserName, mqttUserPassword);

// Setup a subscriber
Adafruit_MQTT_Subscribe ledControl = Adafruit_MQTT_Subscribe(&mqtt, subscribeTopic, MQTT_QOS_1);

// Setup a publisher
Adafruit_MQTT_Publish temperatureControl = Adafruit_MQTT_Publish(&mqtt, publishTopic, MQTT_QOS_1);

unsigned long lastMsg = 0;
const int READ_CYCLE_TIME = 3000;

void ledCallback(char *message, uint16_t len)
{
  char messageBuffer[40];
  snprintf(messageBuffer, sizeof(messageBuffer), "LED status is :: %s, len :: %u", message, len);
  Serial.println(messageBuffer);
  if (strcmp(message, "ON") == 0)
  {
    Serial.println("Turning ON LED");
    digitalWrite(LED_BUILTIN, LOW);
  }
  else
  {
    Serial.println("Turning OFF LED");
    digitalWrite(LED_BUILTIN, HIGH);
  }
}

void setupWifi()
{
  delay(10);

  Serial.println(F("Adafruit MQTT demo"));

  // Connect to WiFi access point.
  Serial.println();
  Serial.println();
  Serial.print("Connecting to ");
  Serial.println(ssid);

  WiFi.begin(ssid, password);
  while (WiFi.status() != WL_CONNECTED)
  {
    delay(500);
    Serial.print(".");
  }
  Serial.println();

  Serial.println("WiFi connected");
  Serial.println("IP address: ");
  Serial.println(WiFi.localIP());
}

// Function to connect and reconnect as necessary to the MQTT server.
// Should be called in the loop function and it will take care if connecting.
void connectToMQTTServer()
{
  int8_t ret;

  // Stop if already connected.
  if (mqtt.connected())
  {
    return;
  }

  Serial.print("Connecting to MQTT... ");

  uint8_t retries = 3;
  while ((ret = mqtt.connect()) != 0)
  { // connect will return 0 for connected
    Serial.println(mqtt.connectErrorString(ret));
    Serial.println("Retrying MQTT connection in 10 seconds...");
    mqtt.disconnect();
    delay(10000); // wait 10 seconds
    retries--;
    if (retries == 0)
    {
      // basically die and wait for WDT to reset me
      while (1)
        ;
    }
  }
  Serial.println("MQTT Connected!");
}

void setup()
{
  // Set Serial Monitor Baud rate
  Serial.begin(115200);
  // Configure LED
  pinMode(LED_BUILTIN, OUTPUT);
  // Connect to Wifi
  setupWifi();
  // Randomize seed
  randomSeed(micros());
  // Set MQTT callback function
  ledControl.setCallback(&ledCallback);
  // Setup MQTT subscription for time feed.
  mqtt.subscribe(&ledControl);
}

void loop()
{
  // Connect to MQTT
  connectToMQTTServer();

  // this is our 'wait for incoming subscription packets and callback em' busy subloop
  // try to spend your time here:
  mqtt.processPackets(10000);

  // publish random temperature readings
  unsigned long now = millis();
  if (now - lastMsg > READ_CYCLE_TIME)
  {
    lastMsg = now;

    //  Publish MQTT messages
    int randomTemp = random(0, 50);
    if (!temperatureControl.publish(randomTemp))
    {
      Serial.println(F("Failed to send MQTT Message"));
    }
  }

  // ping the server to keep the mqtt connection alive
  // NOT required if you are publishing once every KEEPALIVE seconds
  // if (!mqtt.ping())
  // {
  //   mqtt.disconnect();
  // }
}
Header files and Global variables
#include <Arduino.h>
#include <ESP8266WiFi.h>
#include "Adafruit_MQTT.h"
#include "Adafruit_MQTT_Client.h"
Import the necessary header files needed to connect to our Wifi and the Adafruit MQTT library.
/*
  Replace the SSID and Password according to your wifi
*/
const char *ssid = "<YOUR_WIFI_SSID>";
const char *password = "<YOUR_WIFI_PASSWORD>";

// Your MQTT broker ID
const char *mqttBroker = "192.168.100.22";
const int mqttPort = 1883;
// const char *mqttUserName = "user";
// const char *mqttUserPassword = "password";

// MQTT topics
const char *publishTopic = "temperature";
const char *subscribeTopic = "led";
Replaced the ssid and password variable to match your Wifi network credentials. Change the mqttBroker and mqttPort variable to point to your MQTT broker IP Address or DNS name. If your connection to your MQTT broker requires a username and password then you can uncomment the mqttUserNameand mqttUserPassword variables.
The publishTopic variable refers to the name of the topic where we will periodically publish an MQTT message. On the other hand, the subscribeTopic refers to the topic where we will listen for an incoming MQTT message. It both refers to “temperature” and “led” topics.
Setup Adafruit MQTT Library Configurations
// Create an ESP8266 WiFiClient class to connect to the MQTT server.
WiFiClient client;
// or... use WiFiClientSecure for SSL
// WiFiClientSecure client;

// Setup the MQTT client class by passing in the WiFi client and MQTT server and login details.
Adafruit_MQTT_Client mqtt(&client, mqttBroker, mqttPort);
// Adafruit_MQTT_Client mqtt(&client, mqttBroker, mqttPort, mqttUserName, mqttUserPassword);
We declare an instance of WiFiClient client; that we are going to need to connect to our Wifi network. Next, we declare an instance of our Adafruit_MQTT_Client which we will be needed in setting up our connection to our MQTT broker. If your MQTT broker requires a username and password then uncomment the next line and pass it as a parameter.
// Setup a subscriber
Adafruit_MQTT_Subscribe ledControl = Adafruit_MQTT_Subscribe(&mqtt, subscribeTopic, MQTT_QOS_1);

// Setup a publisher
Adafruit_MQTT_Publish temperatureControl = Adafruit_MQTT_Publish(&mqtt, publishTopic, MQTT_QOS_1);I
If you are going to subscribe or publish to an MQTT topic then you need to declare an instance of both Adafruit_MQTT_Subscribe and Adafruit_MQTT_Publish by passing in the client, topic, and the Quality of Service (QoS).
unsigned long lastMsg = 0;
const int READ_CYCLE_TIME = 3000;

void ledCallback(char *message, uint16_t len)
{
  char messageBuffer[40];
  snprintf(messageBuffer, sizeof(messageBuffer), "LED status is :: %s, len :: %u", message, len);
  Serial.println(messageBuffer);
  if (strcmp(message, "ON") == 0)
  {
    Serial.println("Turning ON LED");
    digitalWrite(LED_BUILTIN, LOW);
  }
  else
  {
    Serial.println("Turning OFF LED");
    digitalWrite(LED_BUILTIN, HIGH);
  }
}
We then configure our READ_CYCLE_TIME variable to 3 seconds which is the number of seconds elapsed before we publish a new MQTT topic.
The ledCallback function is the callback function that will be called whenever a new MQTT message is received from the topic to which we subscribed. In our case here, if we receive an “ON” message then we turn on the built-in LED of our ESP8266 board otherwise it is off.
Connect to Wifi and MQTT broker
void setupWifi()
{
  delay(10);

  Serial.println(F("Adafruit MQTT demo"));

  // Connect to WiFi access point.
  Serial.println();
  Serial.println();
  Serial.print("Connecting to ");
  Serial.println(ssid);

  WiFi.begin(ssid, password);
  while (WiFi.status() != WL_CONNECTED)
  {
    delay(500);
    Serial.print(".");
  }
  Serial.println();

  Serial.println("WiFi connected");
  Serial.println("IP address: ");
  Serial.println(WiFi.localIP());
}

// Function to connect and reconnect as necessary to the MQTT server.
// Should be called in the loop function and it will take care if connecting.
void connectToMQTTServer()
{
  int8_t ret;

  // Stop if already connected.
  if (mqtt.connected())
  {
    return;
  }

  Serial.print("Connecting to MQTT... ");

  uint8_t retries = 3;
  while ((ret = mqtt.connect()) != 0)
  { // connect will return 0 for connected
    Serial.println(mqtt.connectErrorString(ret));
    Serial.println("Retrying MQTT connection in 10 seconds...");
    mqtt.disconnect();
    delay(10000); // wait 10 seconds
    retries--;
    if (retries == 0)
    {
      // basically die and wait for WDT to reset me
      while (1)
        ;
    }
  }
  Serial.println("MQTT Connected!");
}
The setupWifi() function is needed to connect to our Wifi network so that our microcontroller board can connect to the internet.
The connectToMQTTServer() function on the other hand is what we will be using to connect to our MQTT broker.
setup()
void setup()
{
  // Set Serial Monitor Baud rate
  Serial.begin(115200);
  // Configure LED
  pinMode(LED_BUILTIN, OUTPUT);
  // Connect to Wifi
  setupWifi();
  // Randomize seed
  randomSeed(micros());
  // Set MQTT callback function
  ledControl.setCallback(&ledCallback);
  // Setup MQTT subscription for time feed.
  mqtt.subscribe(&ledControl);
}
Our standard Arduino setup() function does the following:
- Set the baud rate of our Serial Monitor
- Configure our built-in LED for output.
- Connect to our Wifi
- Randomize the seed which we will be using later when publishing a random temperature number
- Assign the callback function of our MQTT subscription
- Subscribe to the specific topic.
loop()
void loop()
{
  // Connect to MQTT
  connectToMQTTServer();

  // this is our 'wait for incoming subscription packets and callback em' busy subloop
  // try to spend your time here:
  mqtt.processPackets(10000);

  // publish random temperature readings
  unsigned long now = millis();
  if (now - lastMsg > READ_CYCLE_TIME)
  {
    lastMsg = now;

    //  Publish MQTT messages
    int randomTemp = random(0, 50);
    if (!temperatureControl.publish(randomTemp))
    {
      Serial.println(F("Failed to send MQTT Message"));
    }
  }

  // ping the server to keep the mqtt connection alive
  // NOT required if you are publishing once every KEEPALIVE seconds
  // if (!mqtt.ping())
  // {
  //   mqtt.disconnect();
  // }
}
First, we connect to our MQTT broker if it is not connected. Next, wait for any incoming MQTT packet from our broker.
Lastly, we periodically publish a random temperature to our MQTT topic by generating a random value between 0 to 50.
If for some reason you would not be sending a publish command to your MQTT broker then you need to uncomment the last line and issue the mqtt.ping() function.
That is all actually for the code. You can now upload the sketch to your Microcontroller board and use MQTTX for testing.
Testing with MQTTX
You should have installed the MQTTX application if you want to test the Adafruit MQTT library.
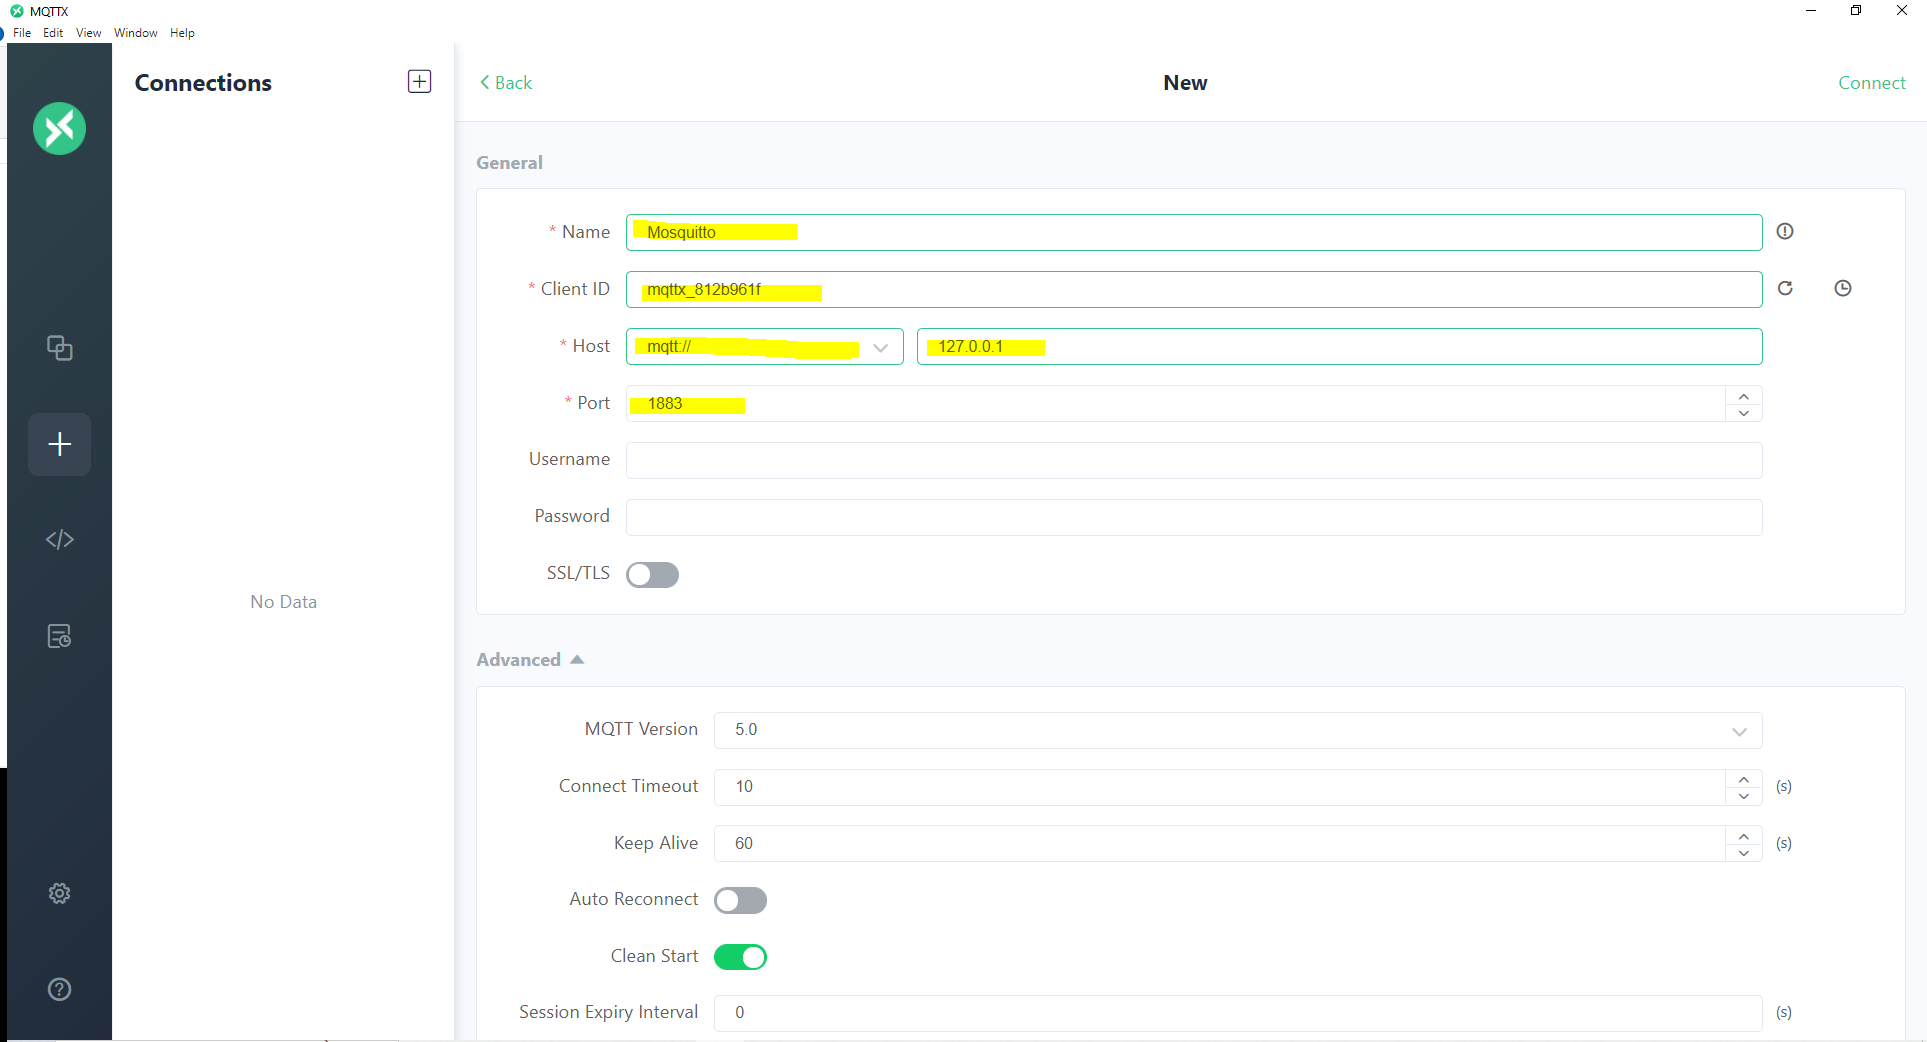
Connect with your MQTT broker by putting in your connection details.
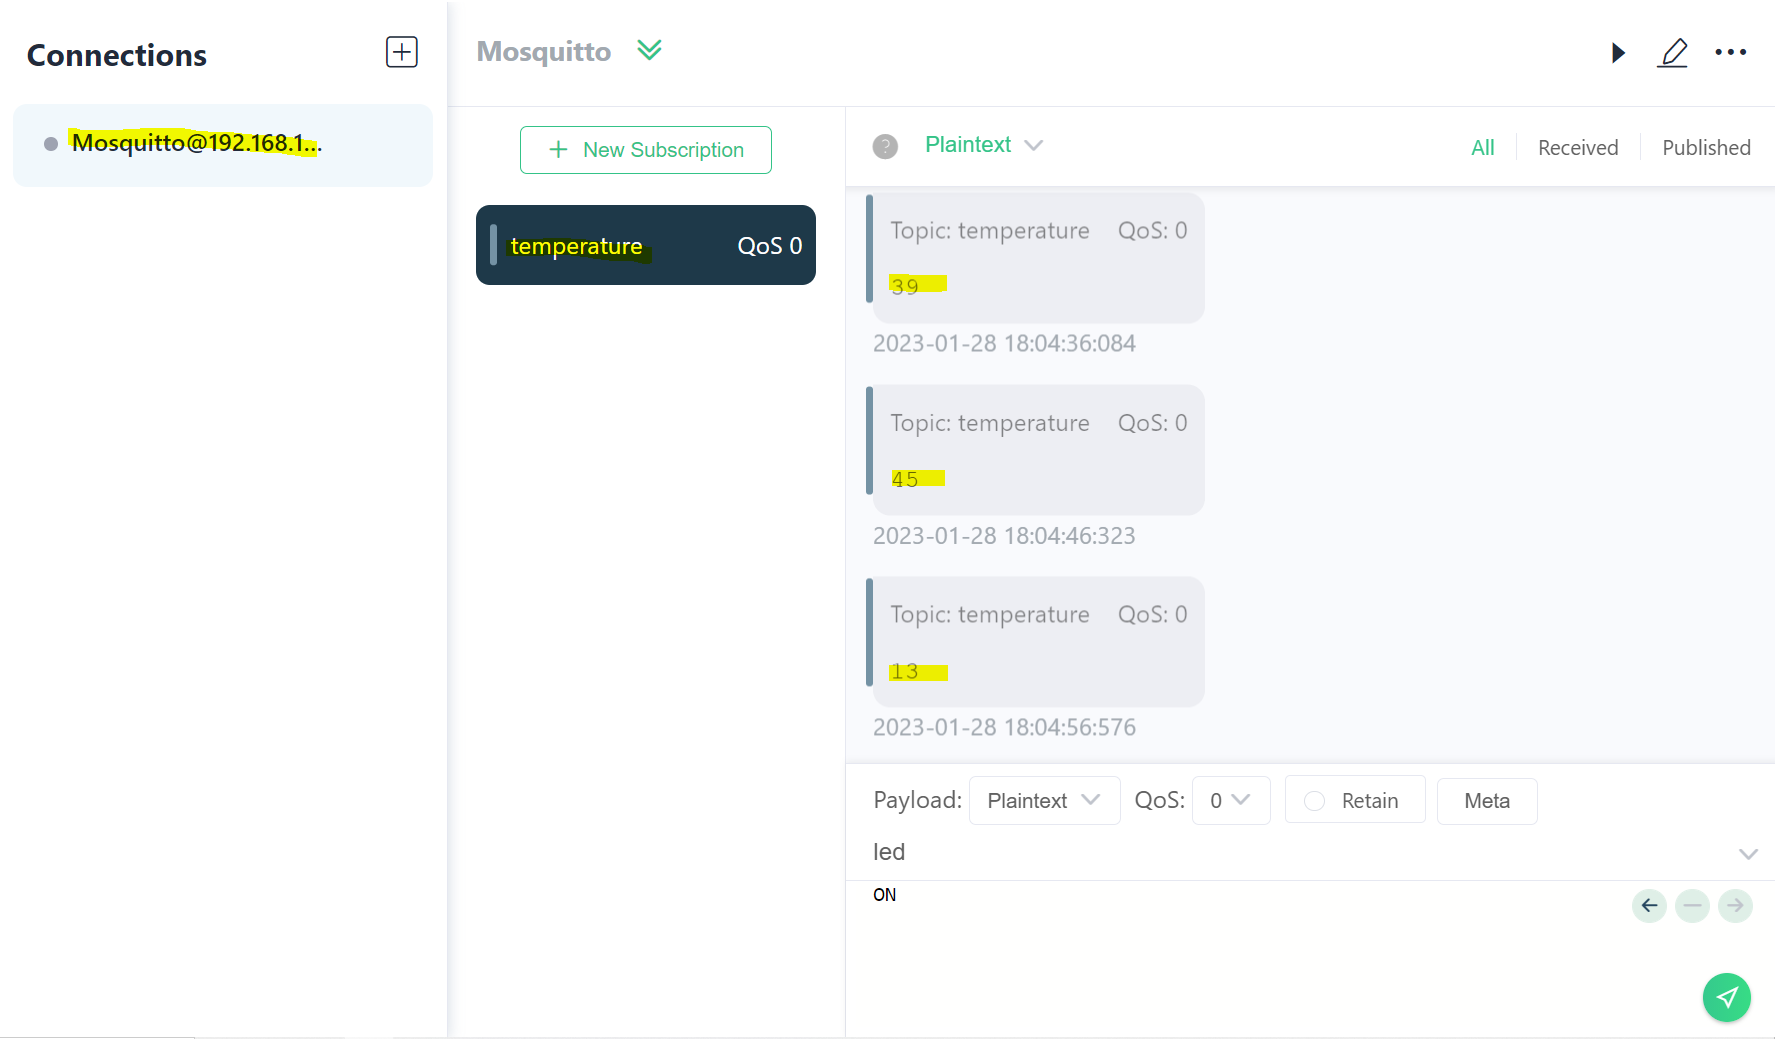
Create a new subscription and set the topic name to “temperature“ then you should be seeing the following messages displayed in your window every 3 seconds.
To test if our subscription is working for the “led” topic, then send the following from your MQTTX application.
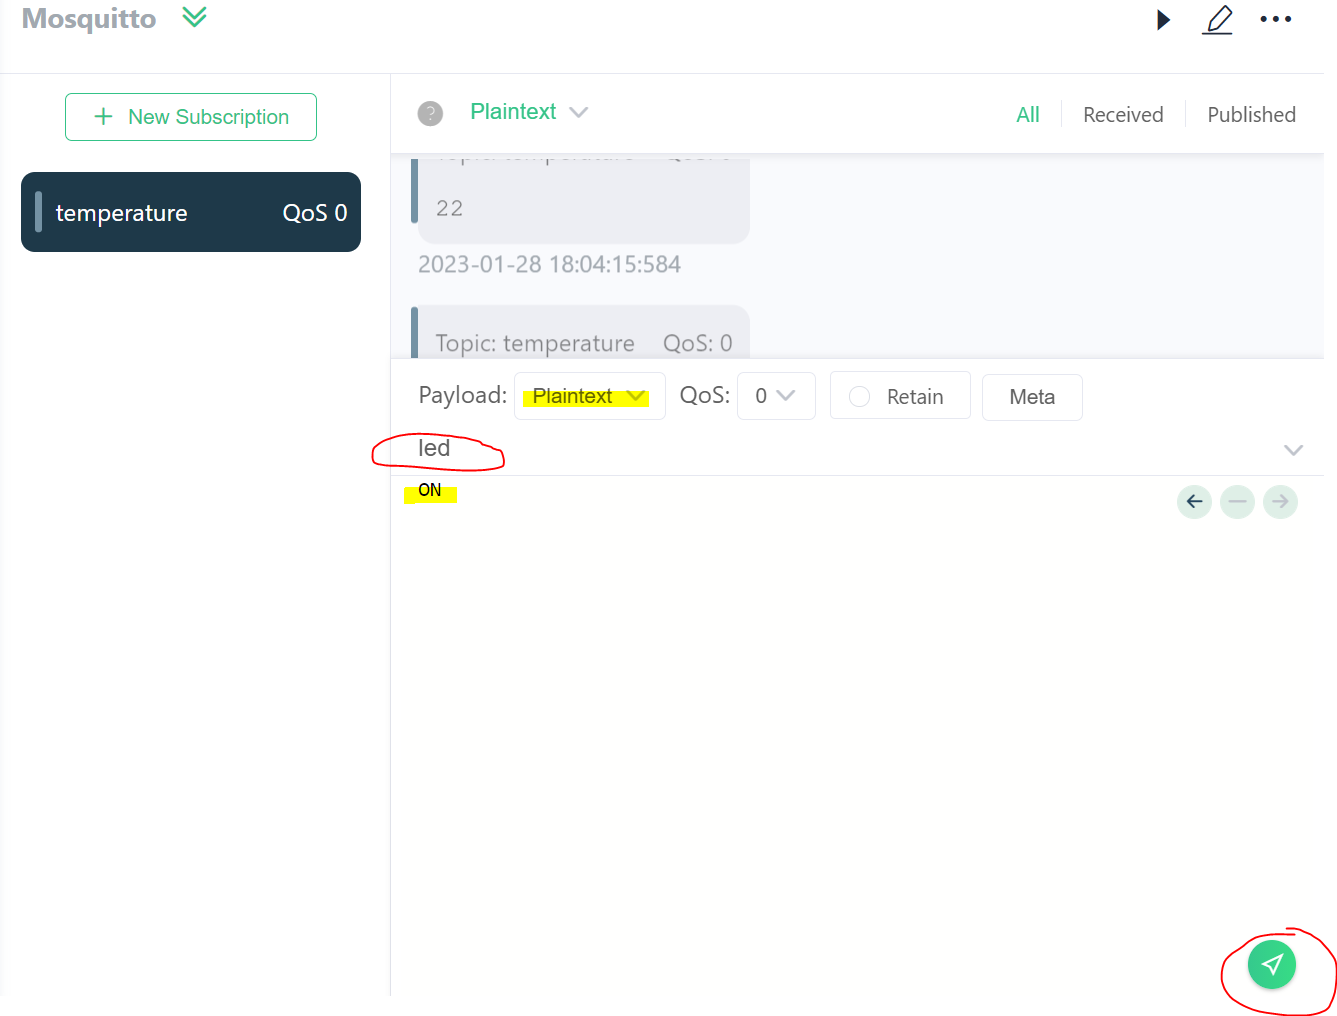
You should be seeing your ESP8266 built-in LED turning on.

Now send an “OFF” (or any other) message and you should be seeing the built-in LED turning off.
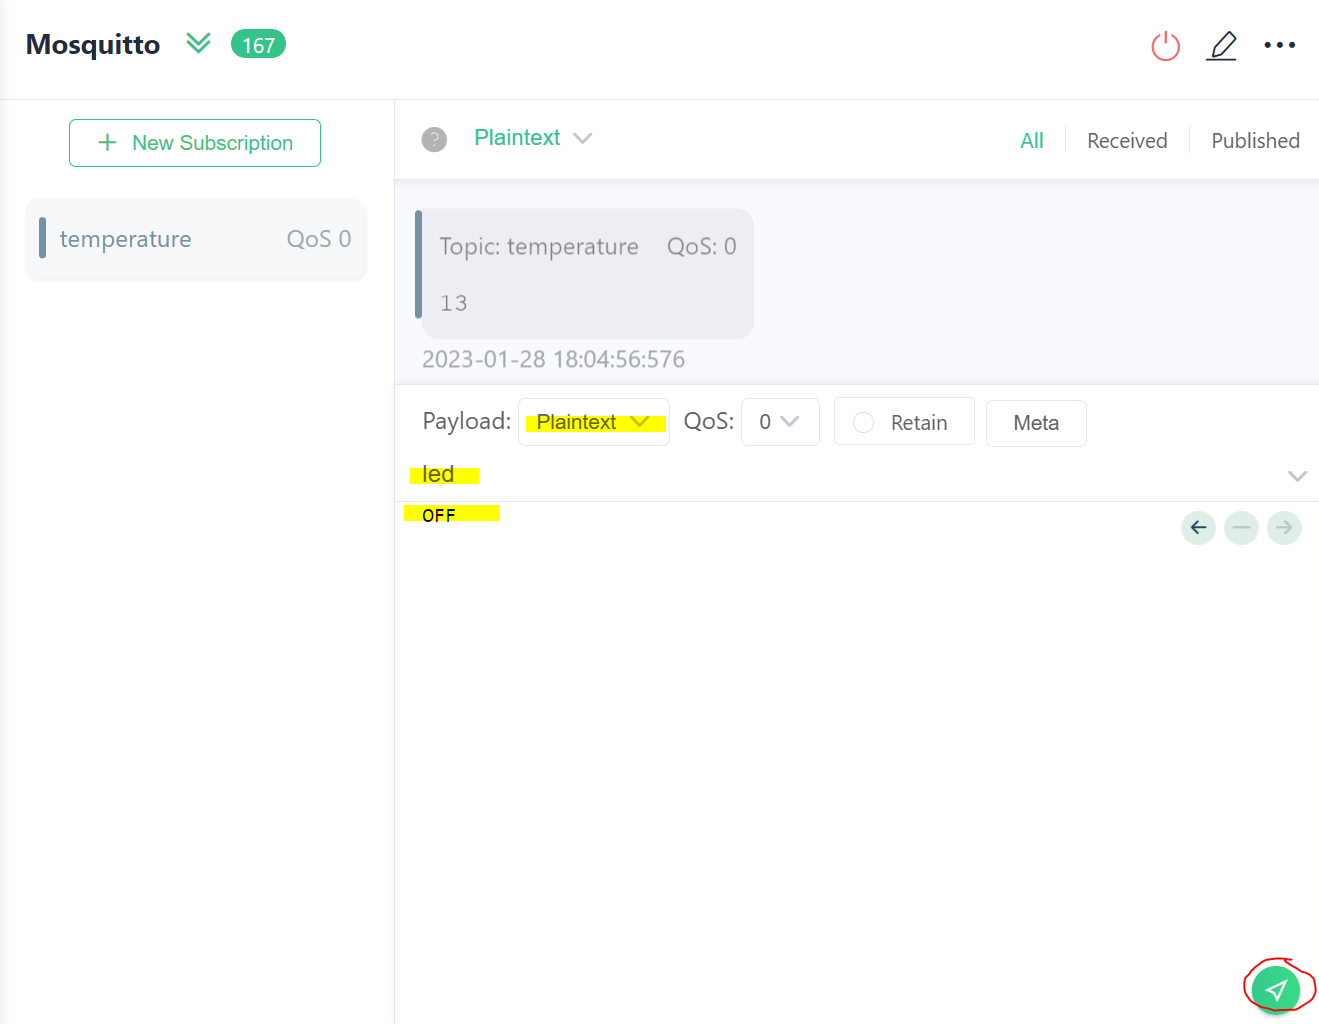
If you were able to see the following output then congratulations! You are now able to connect, publish, and subscribe to an MQTT broker using the Adafruit MQTT library. 🙂
Wrap up
We were able to exchange MQTT messages with our Mosquitto broker using the Adafruit MQTT library in this post.
I hope you learned something! Happy Exploring!
Read Next:
Using PubSubClient MQTT Library in Arduino
Leave a Reply