Introduction
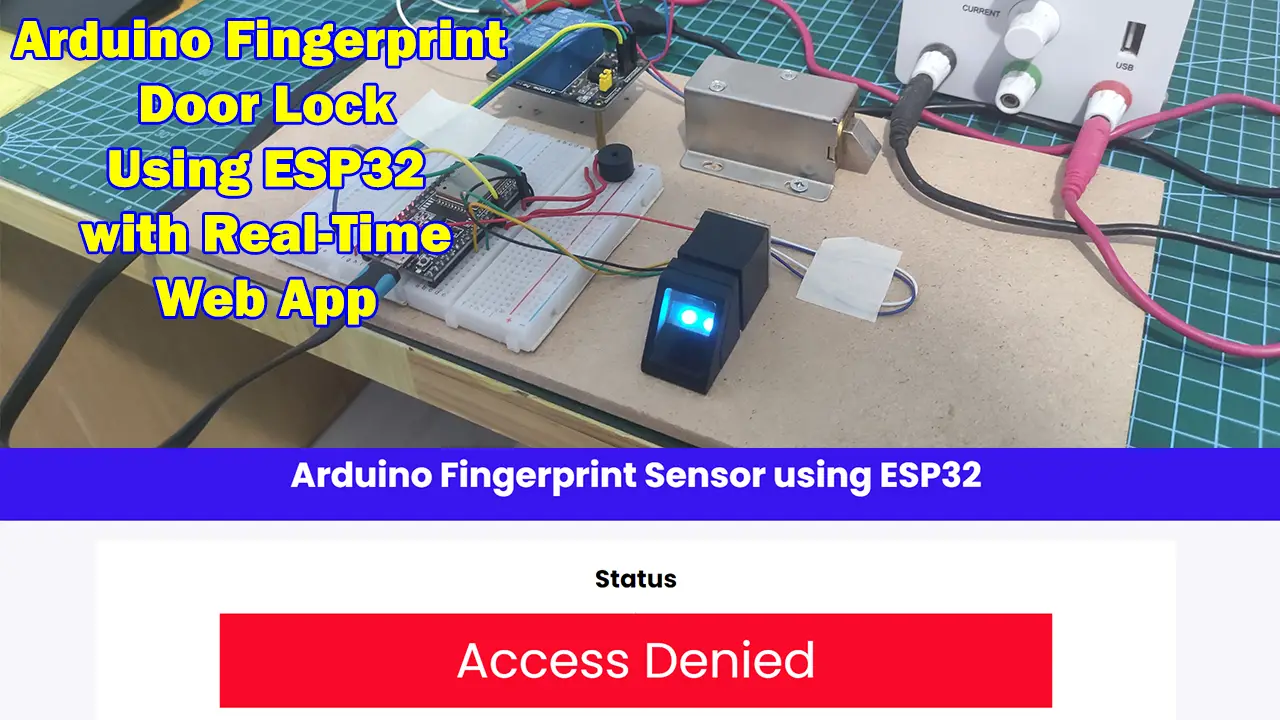
Do you need to add biometric fingerprint authentication to your Internet of Things (IoT) security system project? This post will teach you how to program your ESP32 microcontroller board using the Arduino framework in creating your own fingerprint door lock mechanism using the R307 sensor.
If you want to see a video demo presentation of this project then please see below or watch it on my YouTube channel.
What are we building?
Security has never been as important as today and if you want to add another layer of security check then checking the user access thru biometrics is a better choice as it is hard to replicate the fingerprints of each person. In this project, we will be creating our own door lock mechanism that uses fingerprint authentication.
At the same time, we are showing the result of the fingerprint validation in a real-time web application where you would see if you are granted access or denied.
Design
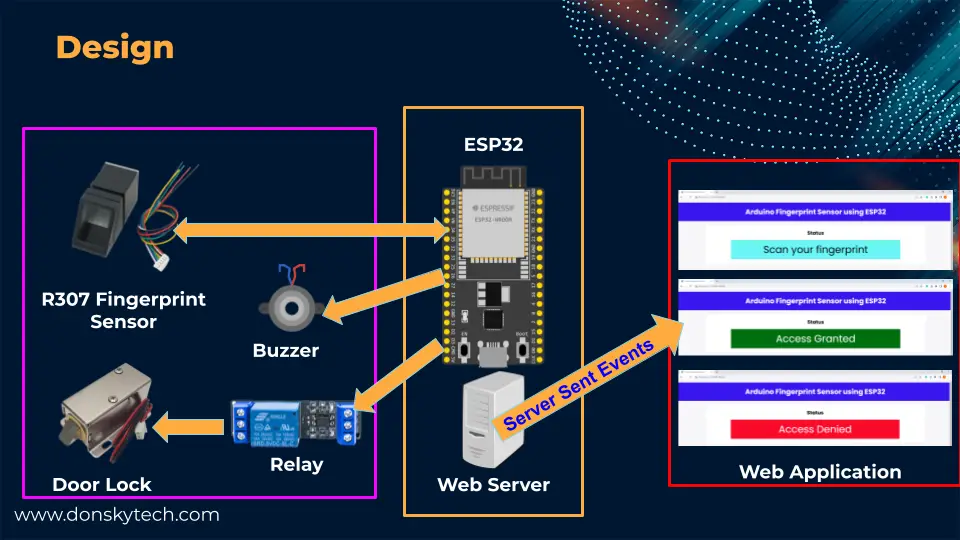
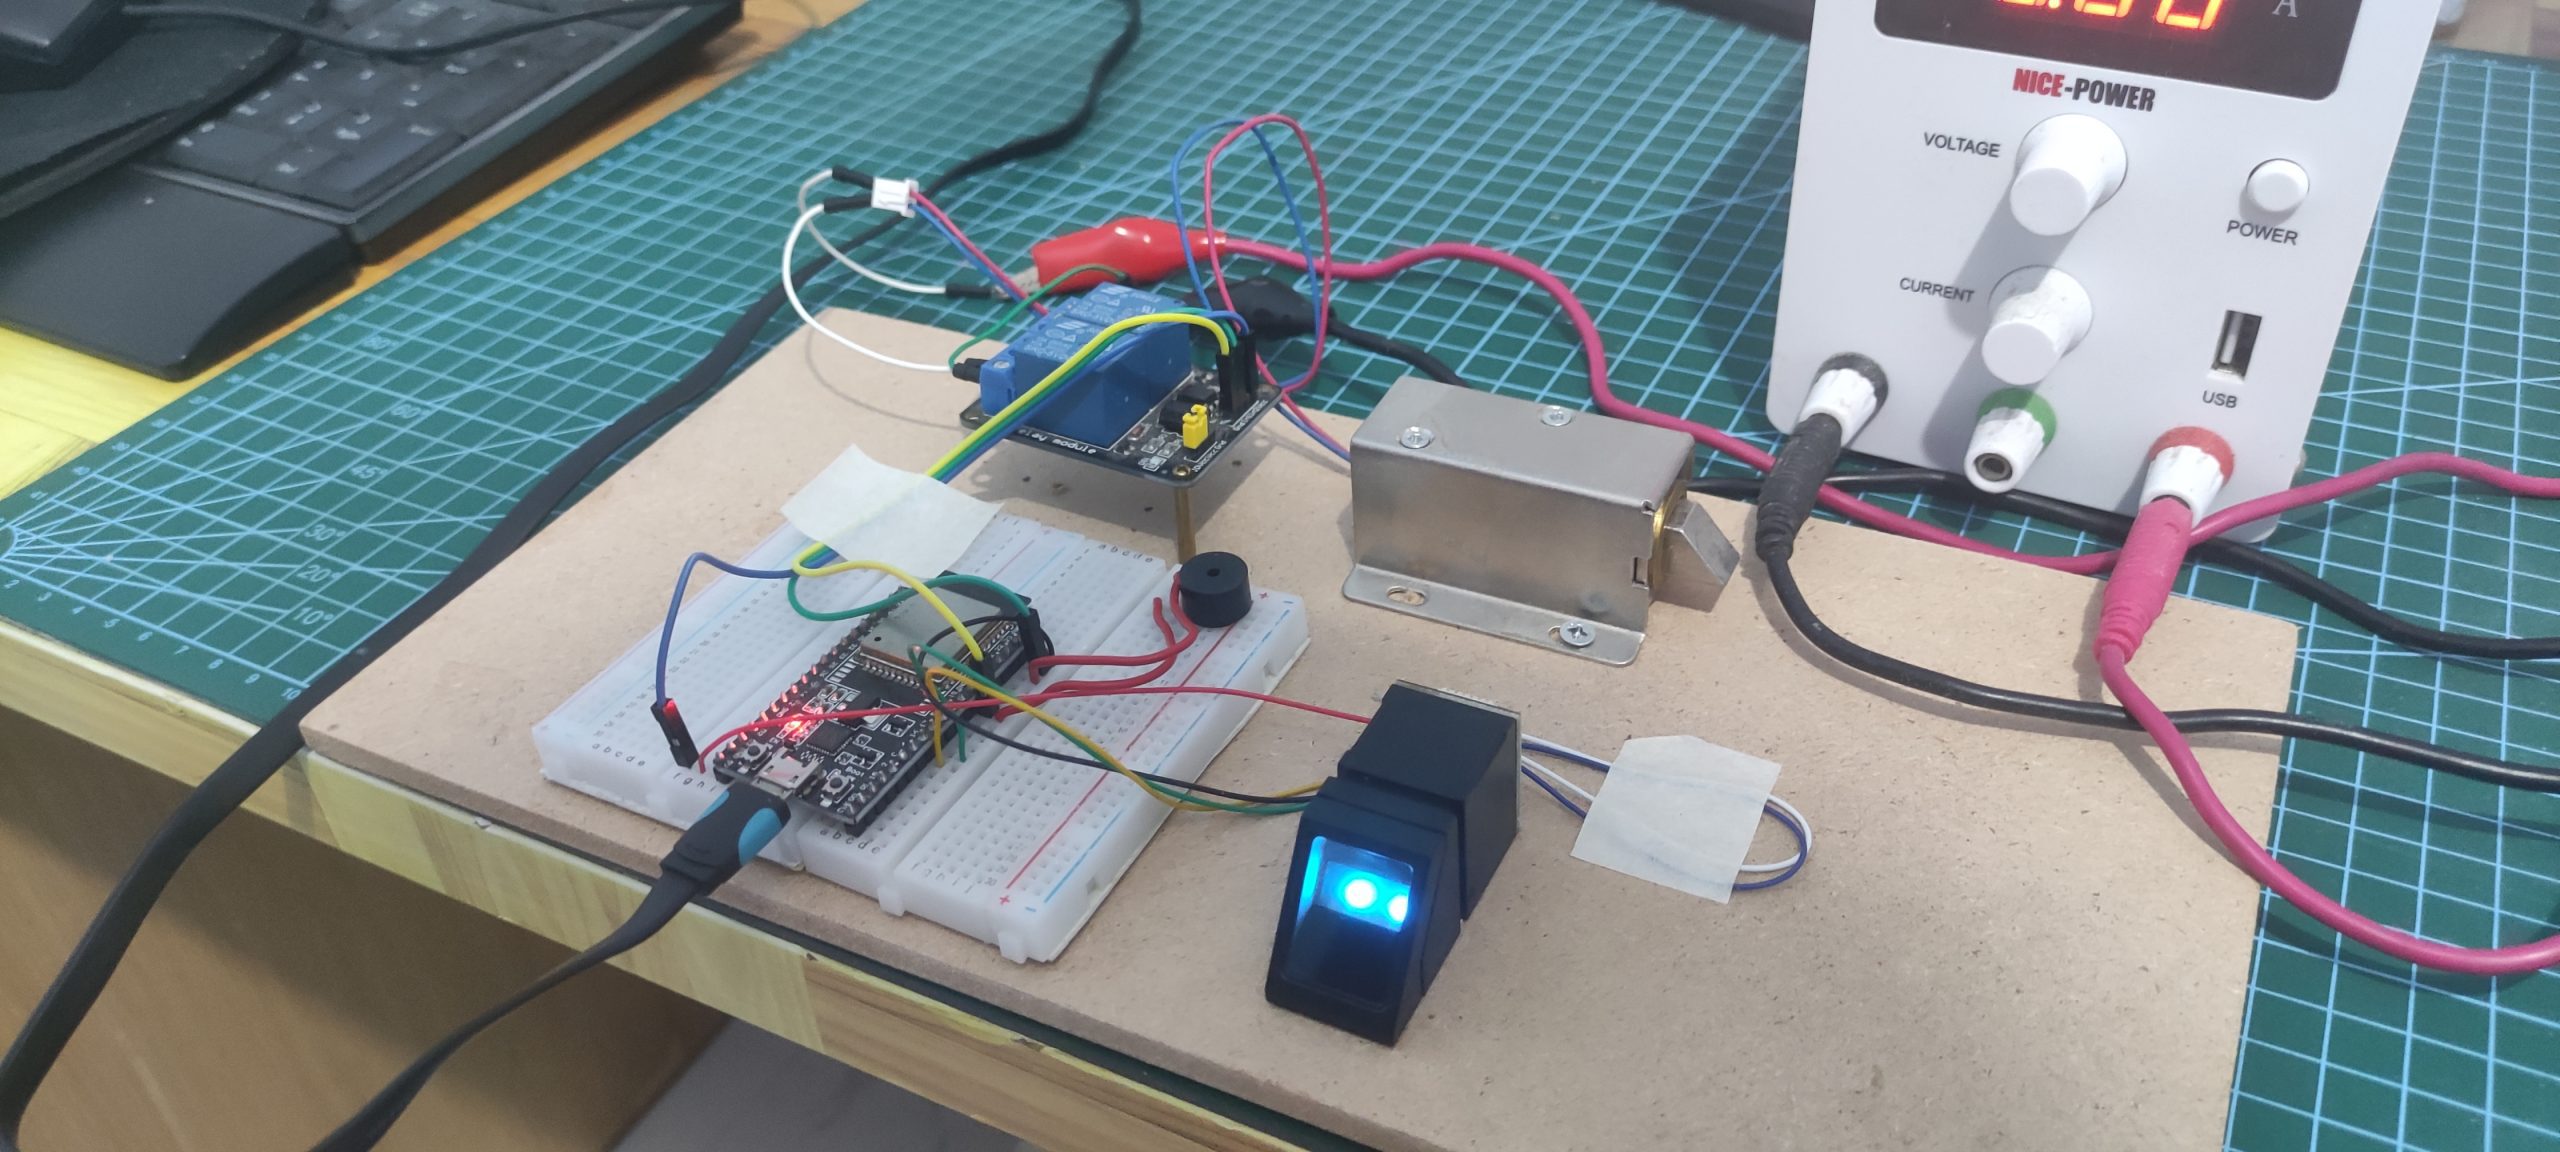
The image above shows the different components of our project and how they participate in our Arduino-powered ESP32 fingerprint door lock security system. Essentially, there are three major building blocks in this project and they are listed below:
- ESP32 and Web Server – this creates the web application where we would display the result of fingerprint validation.
- Hardware components – this contains the R307 fingerprint sensor, relay, buzzer, and the solenoid door lock we used as the hardware components of our security system.
- Web application – its purpose is to show to the user the result of the fingerprint validation. Aside from the physical opening of the door lock, we have added a mechanism to display the result of the validation using a browser interface
Hey Donsky, what are Server-Sent Events?
What are Server-Sent events?
If you have been an avid reader of my blog post, you might have seen me create countless applications that use WebSocket. WebSocket is a bi-directional web technology wherein the server (ESP32) and the client (browser) communicate simultaneously. Server-Sent Events are a server push technology and are unidirectional. Messages are sent from the server but the browser cannot reply back.
Since we only care about the result of the fingerprint validation using Server-Sent Events is applicable to our use case.
If you want to read more about what WebSocket is then please see the below post.
Related Content:
Using WebSocket in the Internet of Things (IoT) projects
Prerequisites
You should be familiar with how to use and enroll your fingerprints with the R307 fingerprint sensor and if not, please see the post below as I won’t be discussing how this sensor works so much.
Must Read:
Interfacing ESP32 with R307 Fingerprint Sensor
I have used the PlatformIO IDE extension in Visual Studio Code in developing this project but the code is available also to those who are familiar with Arduino IDE 2.0.
Related Content:
PlatformIO Tutorial for Arduino Development
Parts/Components Required
The followings are the components required to follow along with this Arduino-powered Fingerprint Door Lock project.
- ESP32 (I used NodeMCU ESP32S) – Amazon | AliExpress | Bangood
- R307 Fingerprint sensor – Amazon | AliExpress
- Solenoid Door Lock – Amazon | AliExpress |
- Relay – Amazon | AliExpress | Bangood
- Active Buzzer – Amazon | AliExpress | Bangood
- Bench Power Supply – Amazon | AliExpress | Bangood
- Breadboard – Amazon | AliExpress | Bangood
- Connecting Wires – Amazon | AliExpress | Bangood
Disclosure: These are affiliate links and I will earn small commissions to support my site when you buy through these links.
Wiring/Schematic
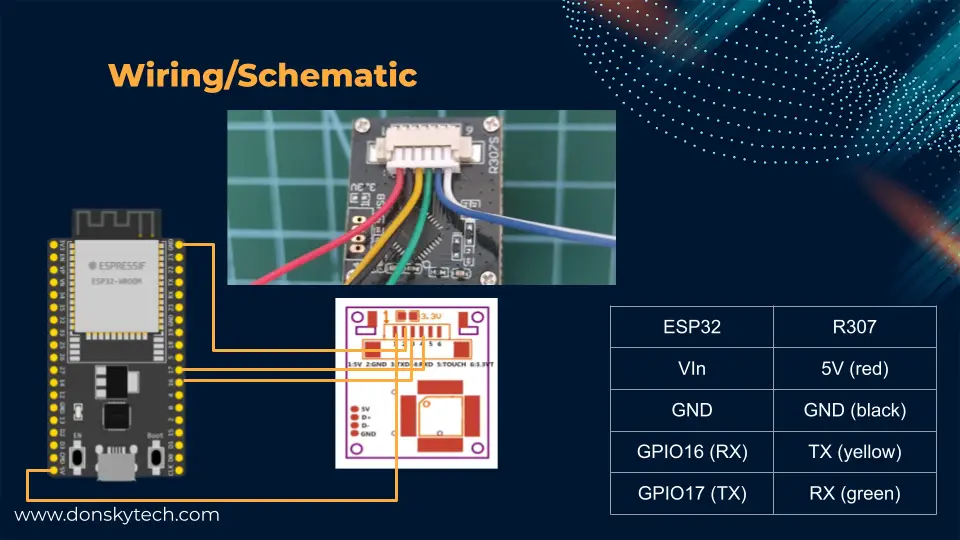
The above image is the wiring/schematic between the ESP32 Microcontroller and the R307 fingerprint sensor.
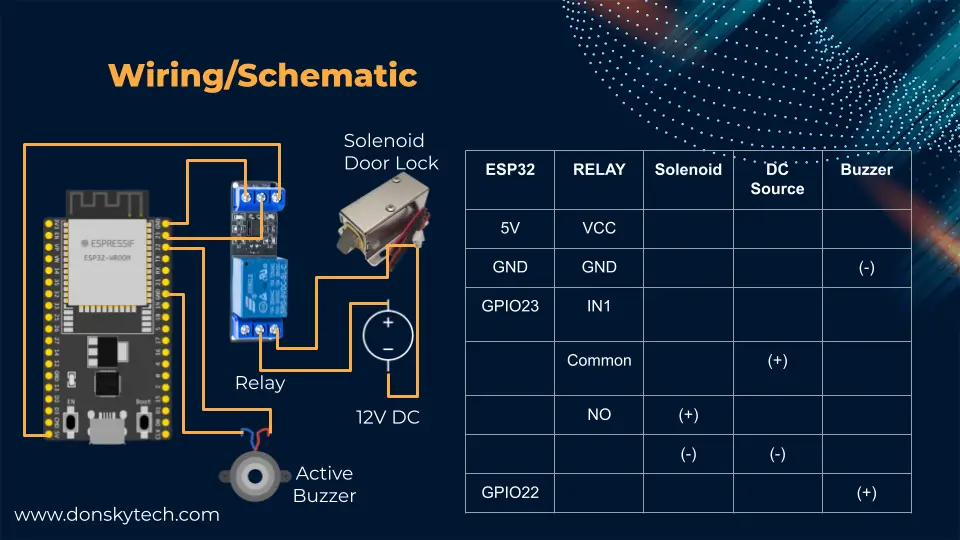
On the other hand, the image shows how the different components of our project are wired together.
Code
The code for this project is available in my GitHub repository and you can either download it as a zip file or clone it using Git using the below command.
git clone https://github.com/donskytech/platformio-projects.git
cd esp32-projects/esp32-r307-fingerprint-door-lock/
Open the following project onto your Visual Studio Code and the below image shows the essential files of our Arduino-powered fingerprint door lock security system using an ESP32 board.
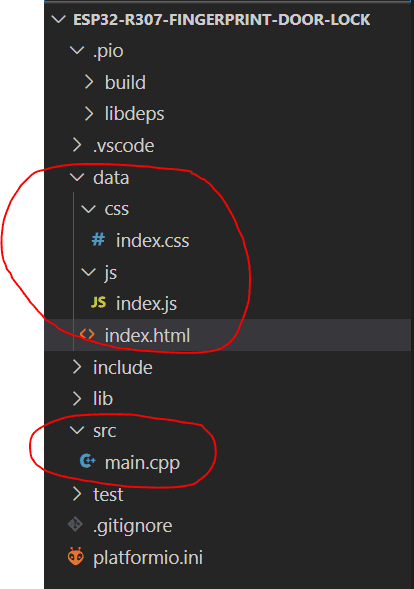
The data folder contains our HTML/CSS/Javascript files which would show if the fingerprint is valid or not. They are displayed by the web server that we have created inside our ESP32 and will be uploaded to the file system of our ESP32 microcontroller.
The main.cpp does the heavy lifting and contains the main logic of our project. It will do the following functionalities:
- Create the Web Server that will display the result of the fingerprint authentication
- Communicate with the R307 fingerprint sensor
- Control the door lock mechanism and the buzzer notification
Libraries used in this project
The followings are the libraries that were used in this project:
- ESPAsyncWebServer-esphome – for web server functionalities
- Adafruit Fingerprint Sensor Library – for communicating with the R307 fingerprint sensor
They are automatically downloaded when using the PlatformIO extension in Visual Studio Code as I have listed them as library dependencies on the platform.ini file.
[env:esp32dev]
platform = espressif32
board = esp32dev
framework = arduino
lib_deps =
	adafruit/Adafruit Fingerprint Sensor Library@^2.1.0
	ottowinter/ESPAsyncWebServer-esphome@^3.0.0
	FS
If you are using the Arduino IDE 2.0 then you can add them as dependencies at the Library tab.
main.cpp
#include <Arduino.h>
#include <Adafruit_Fingerprint.h>
#include <WiFi.h>
#include <AsyncTCP.h>
#include "SPIFFS.h"
#include <ESPAsyncWebServer.h>
// Change this to match your network SSID
const char *ssid = "<YOUR_WIFI_SSID>";
const char *password = "<YOUR_WIFI_PASSWORD>";
// AsyncWebserver runs on port 80 and the asyncwebsocket is initialize at this point also
AsyncWebServer server(80);
AsyncEventSource events("/events");
HardwareSerial serialPort(2); // use UART2
Adafruit_Fingerprint finger = Adafruit_Fingerprint(&serialPort);
// Forward declaration
uint8_t getFingerprintID();
void showNotAllowed();
// Function called when resource is not found on the server
void notFound(AsyncWebServerRequest *request)
{
request->send(404, "text/plain", "Not found");
}
// interval to read the fingerprint sensor
unsigned long previousMillis = 0;
const long readInterval = 1000;
// interval when to close the door lock
bool isOpen = false;
const long closeInterval = 5000;
unsigned long previousOpenMillis = 0;
// Relay Pin
const int RELAY_PIN = 23;
// Buzzer
const int buzzerPin = 22;
void setup()
{
Serial.begin(9600);
while (!Serial)
; // For Yun/Leo/Micro/Zero/...
delay(100);
// Connect to your wifi
WiFi.mode(WIFI_STA);
WiFi.begin(ssid, password);
if (WiFi.waitForConnectResult() != WL_CONNECTED)
{
Serial.printf("WiFi Failed!\n");
return;
}
Serial.print("IP Address: ");
Serial.println(WiFi.localIP());
// Initialize SPIFFS
if (!SPIFFS.begin(true))
{
Serial.println("An Error has occurred while mounting SPIFFS");
return;
}
// setup Server Sent Event
events.onConnect([](AsyncEventSourceClient *client)
{
if (client->lastId())
{
Serial.printf("Client reconnected! Last message ID that it gat is: %u\n", client->lastId());
} });
// attach AsyncEventSource
server.addHandler(&events);
server.on("/", HTTP_GET, [](AsyncWebServerRequest *request)
{
Serial.println("Requesting index page...");
request->send(SPIFFS, "/index.html", "text/html", false); });
server.serveStatic("/css", SPIFFS, "/css/");
server.serveStatic("/js", SPIFFS, "/js/");
// On Not Found
server.onNotFound(notFound);
// Start server
server.begin();
// set the data rate for the fingerprint sensor serial port
finger.begin(57600);
delay(5);
if (finger.verifyPassword())
{
Serial.println("Found fingerprint sensor!");
}
else
{
Serial.println("Did not find fingerprint sensor :(");
while (1)
{
delay(1);
}
}
Serial.println(F("Reading sensor parameters"));
finger.getParameters();
Serial.print(F("Status: 0x"));
Serial.println(finger.status_reg, HEX);
Serial.print(F("Sys ID: 0x"));
Serial.println(finger.system_id, HEX);
Serial.print(F("Capacity: "));
Serial.println(finger.capacity);
Serial.print(F("Security level: "));
Serial.println(finger.security_level);
Serial.print(F("Device address: "));
Serial.println(finger.device_addr, HEX);
Serial.print(F("Packet len: "));
Serial.println(finger.packet_len);
Serial.print(F("Baud rate: "));
Serial.println(finger.baud_rate);
finger.getTemplateCount();
if (finger.templateCount == 0)
{
Serial.print("Sensor doesn't contain any fingerprint data. Please run the 'enroll' example.");
}
else
{
Serial.println("Waiting for valid finger...");
Serial.print("Sensor contains ");
Serial.print(finger.templateCount);
Serial.println(" templates");
}
// initialize Relay digital pin as an output.
pinMode(RELAY_PIN, OUTPUT);
digitalWrite(RELAY_PIN, HIGH);
// configure buzzer and led pin
pinMode(buzzerPin, OUTPUT);
}
void loop()
{
unsigned long currentMillis = millis();
// Close the door lock after 5 seconds
if (isOpen && currentMillis - previousOpenMillis >= closeInterval)
{
isOpen = false;
Serial.println("Closing the door lock!");
digitalWrite(RELAY_PIN, HIGH);
}
// save the last time we read the fingerprint sensor
if (!isOpen && currentMillis - previousMillis >= readInterval)
{
previousMillis = currentMillis;
uint8_t result = getFingerprintID();
switch (result)
{
case FINGERPRINT_NOFINGER:
Serial.println("Scan your fingerprint");
events.send("Scan your fingerprint", "noFingerprint", millis());
break;
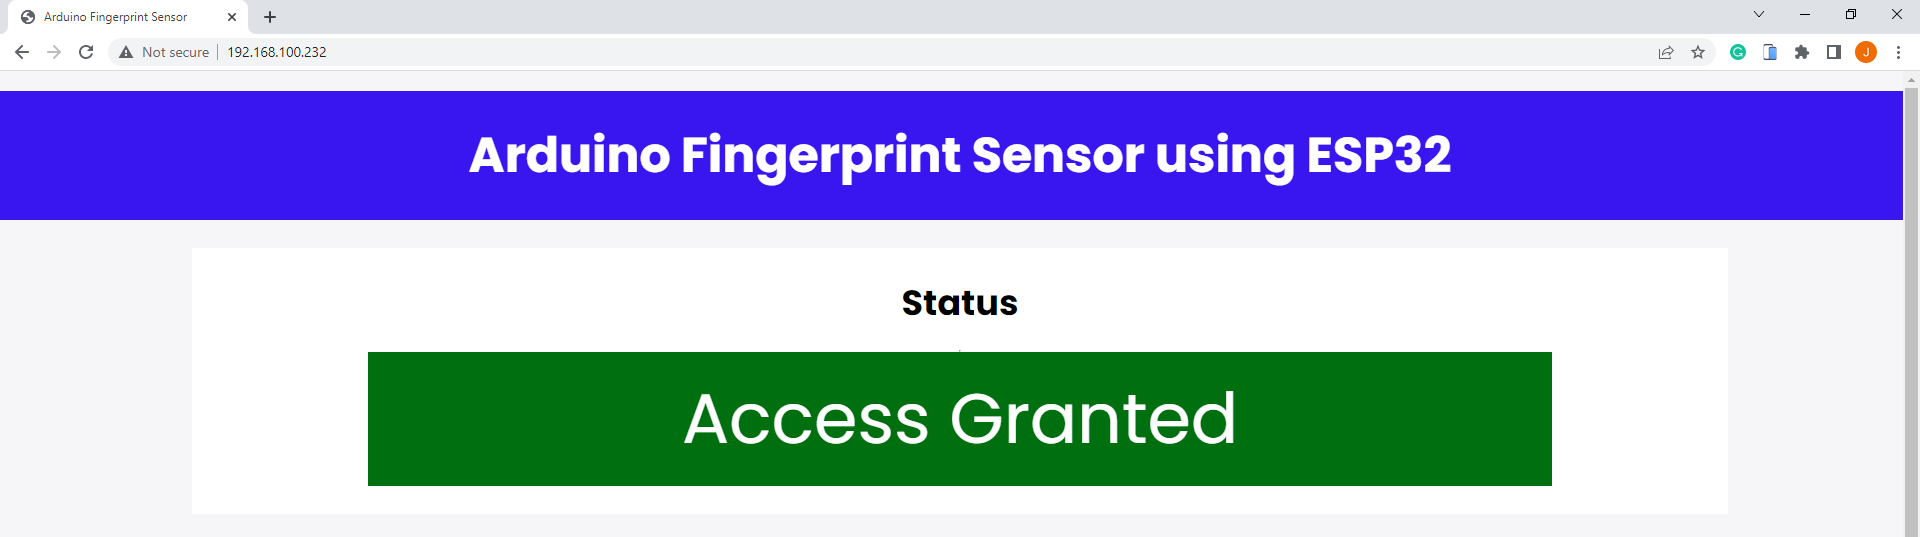
case FINGERPRINT_OK:
Serial.println("Access Granted..opening door lock!");
events.send("Access Granted", "accessGranted", millis());
previousOpenMillis = millis();
isOpen = true;
digitalWrite(RELAY_PIN, LOW);
break;
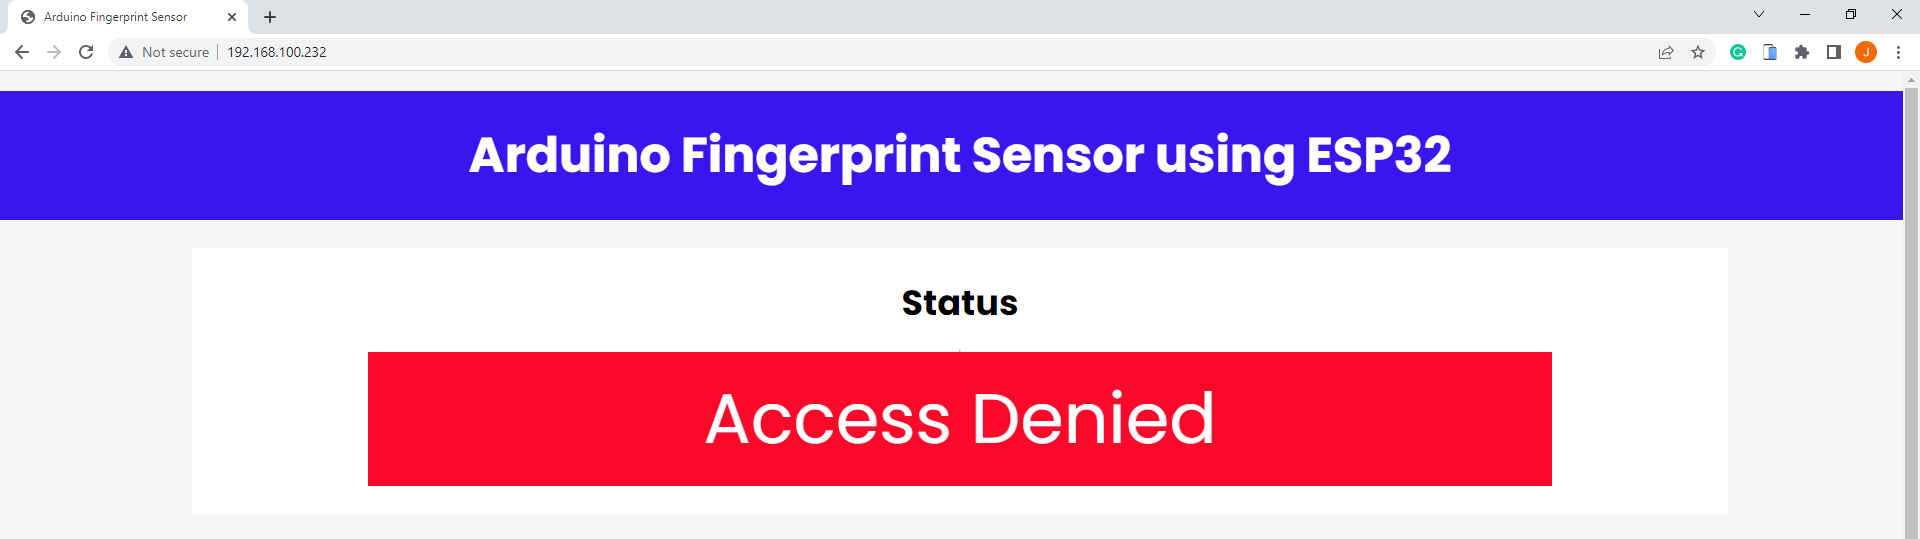
case FINGERPRINT_NOTFOUND:
Serial.println("Access Denied");
events.send("Access Denied", "accessDenied", millis());
showNotAllowed();
delay(2000);
break;
case FINGERPRINT_PACKETRECIEVEERR:
case FINGERPRINT_IMAGEFAIL:
case FINGERPRINT_IMAGEMESS:
case FINGERPRINT_FEATUREFAIL:
case FINGERPRINT_INVALIDIMAGE:
Serial.println("Error in Fingerprint Scan!");
events.send("Unknown Error", "unknownError", millis());
break;
default:
Serial.println("Unknown Error!");
break;
}
}
}
uint8_t getFingerprintID()
{
uint8_t p = finger.getImage();
switch (p)
{
case FINGERPRINT_OK:
Serial.println("Image taken");
break;
case FINGERPRINT_NOFINGER:
return p;
case FINGERPRINT_PACKETRECIEVEERR:
Serial.println("Communication error");
return p;
case FINGERPRINT_IMAGEFAIL:
Serial.println("Imaging error");
return p;
default:
Serial.println("Unknown error");
return p;
}
// OK success!
p = finger.image2Tz();
switch (p)
{
case FINGERPRINT_OK:
Serial.println("Image converted");
break;
case FINGERPRINT_IMAGEMESS:
Serial.println("Image too messy");
return p;
case FINGERPRINT_PACKETRECIEVEERR:
Serial.println("Communication error");
return p;
case FINGERPRINT_FEATUREFAIL:
Serial.println("Could not find fingerprint features");
return p;
case FINGERPRINT_INVALIDIMAGE:
Serial.println("Could not find fingerprint features");
return p;
default:
Serial.println("Unknown error");
return p;
}
// OK converted!
p = finger.fingerSearch();
if (p == FINGERPRINT_OK)
{
Serial.println("Found a print match!");
// found a match!
Serial.print("Found ID #");
Serial.print(finger.fingerID);
Serial.print(" with confidence of ");
Serial.println(finger.confidence);
return p;
}
else if (p == FINGERPRINT_PACKETRECIEVEERR)
{
Serial.println("Communication error");
return p;
}
else if (p == FINGERPRINT_NOTFOUND)
{
Serial.println("Did not find a match");
return p;
}
else
{
Serial.println("Unknown error");
return p;
}
}
void showNotAllowed()
{
digitalWrite(buzzerPin, HIGH);
delay(1000);
digitalWrite(buzzerPin, LOW);
}The above code is our main.cpp file and it contains quite a lot of code so let us try walking through what each line of code does.
Global Functions/Variable Declaration
#include <Arduino.h>
#include <Adafruit_Fingerprint.h>
#include <WiFi.h>
#include <AsyncTCP.h>
#include "SPIFFS.h"
#include <ESPAsyncWebServer.h>
Import the necessary header files to create a web server and for our Arduino-powered ESP32 microcontroller to communicate with the R307 fingerprint sensor.
// Change this to match your network SSID
const char *ssid = "<YOUR_WIFI_SSID>";
const char *password = "<YOUR_WIFI_PASSWORD>";
Change this to match your WiFi network configuration.
// AsyncWebserver runs on port 80 and the asyncwebsocket is initialize at this point also
AsyncWebServer server(80);
AsyncEventSource events("/events");
Set up our web server and our Server-sent events.
HardwareSerial serialPort(2); // use UART2
Adafruit_Fingerprint finger = Adafruit_Fingerprint(&serialPort);
Declare our serial port and the Adafruit_Fingerprint class that we will use to communicate with our R307 fingerprint sensor.
//  Forward declaration
uint8_t getFingerprintID();
void showNotAllowed();

// Function called when resource is not found on the server
void notFound(AsyncWebServerRequest *request)
{
  request->send(404, "text/plain", "Not found");
}
We forward declared some of our functions so that they will compile properly and define the notFound() which will handle requests that are not present on the web server.
// interval to read the fingerprint sensor
unsigned long previousMillis = 0;
const long readInterval = 1000;

// interval when to close the door lock
bool isOpen = false;
const long closeInterval = 5000;
unsigned long previousOpenMillis = 0;

// Relay Pin
const int RELAY_PIN = 23;

// Buzzer
const int buzzerPin = 22;
Define our read interval for our sensor and the time it takes to automatically close the lock. Next, we define the relay and the buzzer pins which we will use to control both components.
setup()
void setup()
{
  Serial.begin(9600);
  while (!Serial)
    ; // For Yun/Leo/Micro/Zero/...
  delay(100);

  // Connect to your wifi
  WiFi.mode(WIFI_STA);
  WiFi.begin(ssid, password);
  if (WiFi.waitForConnectResult() != WL_CONNECTED)
  {
    Serial.printf("WiFi Failed!\n");
    return;
  }

  Serial.print("IP Address: ");
  Serial.println(WiFi.localIP());
Initialize the serial monitor and connect to our WiFi network.
// Initialize SPIFFS
  if (!SPIFFS.begin(true))
  {
    Serial.println("An Error has occurred while mounting SPIFFS");
    return;
  }

  // setup Server Sent Event
  events.onConnect([](AsyncEventSourceClient *client)
                   {
    if (client->lastId())
    {
      Serial.printf("Client reconnected! Last message ID that it gat is: %u\n", client->lastId());
    } });

  // attach AsyncEventSource
  server.addHandler(&events);

  server.on("/", HTTP_GET, [](AsyncWebServerRequest *request)
            {
              Serial.println("Requesting index page...");
              request->send(SPIFFS, "/index.html", "text/html", false); });
  server.serveStatic("/css", SPIFFS, "/css/");
  server.serveStatic("/js", SPIFFS, "/js/");

  // On Not Found
  server.onNotFound(notFound);

  // Start server
  server.begin();
First, we initialize our SPIFFS file system. Next, we configure the Server-Sent events of our web server and create the routes to our resources. Lastly, we start our web server to begin servicing requests.
// set the data rate for the fingerprint sensor serial port
  finger.begin(57600);
  delay(5);
  if (finger.verifyPassword())
  {
    Serial.println("Found fingerprint sensor!");
  }
  else
  {
    Serial.println("Did not find fingerprint sensor :(");
    while (1)
    {
      delay(1);
    }
  }

  Serial.println(F("Reading sensor parameters"));
  finger.getParameters();
  Serial.print(F("Status: 0x"));
  Serial.println(finger.status_reg, HEX);
  Serial.print(F("Sys ID: 0x"));
  Serial.println(finger.system_id, HEX);
  Serial.print(F("Capacity: "));
  Serial.println(finger.capacity);
  Serial.print(F("Security level: "));
  Serial.println(finger.security_level);
  Serial.print(F("Device address: "));
  Serial.println(finger.device_addr, HEX);
  Serial.print(F("Packet len: "));
  Serial.println(finger.packet_len);
  Serial.print(F("Baud rate: "));
  Serial.println(finger.baud_rate);

  finger.getTemplateCount();

  if (finger.templateCount == 0)
  {
    Serial.print("Sensor doesn't contain any fingerprint data. Please run the 'enroll' example.");
  }
  else
  {
    Serial.println("Waiting for valid finger...");
    Serial.print("Sensor contains ");
    Serial.print(finger.templateCount);
    Serial.println(" templates");
  }
Begin communicating with our R307 fingerprint sensor and print the parameters and templates inside it.
  // initialize Relay digital pin as an output.
  pinMode(RELAY_PIN, OUTPUT);
  digitalWrite(RELAY_PIN, HIGH);

  // configure buzzer and led pin
  pinMode(buzzerPin, OUTPUT);
Initialize our relay and buzzer pins.
loop()
void loop()
{
  unsigned long currentMillis = millis();
  // Close the door lock after 5 seconds
  if (isOpen && currentMillis - previousOpenMillis >= closeInterval)
  {
    isOpen = false;
    Serial.println("Closing the door lock!");
    digitalWrite(RELAY_PIN, HIGH);
  }
Inside our loop() function, we check if the door was opened and automatically close it after the interval which is 5 seconds.
  // save the last time we read the fingerprint sensor
  if (!isOpen && currentMillis - previousMillis >= readInterval)
  {
    previousMillis = currentMillis;
    uint8_t result = getFingerprintID();
    switch (result)
    {
    case FINGERPRINT_NOFINGER:
      Serial.println("Scan your fingerprint");
      events.send("Scan your fingerprint", "noFingerprint", millis());
      break;
    case FINGERPRINT_OK:
      Serial.println("Access Granted..opening door lock!");
      events.send("Access Granted", "accessGranted", millis());
      previousOpenMillis = millis();
      isOpen = true;
      digitalWrite(RELAY_PIN, LOW);
      break;
    case FINGERPRINT_NOTFOUND:
      Serial.println("Access Denied");
      events.send("Access Denied", "accessDenied", millis());
      showNotAllowed();
      delay(2000);
      break;
    case FINGERPRINT_PACKETRECIEVEERR:
    case FINGERPRINT_IMAGEFAIL:
    case FINGERPRINT_IMAGEMESS:
    case FINGERPRINT_FEATUREFAIL:
    case FINGERPRINT_INVALIDIMAGE:
      Serial.println("Error in Fingerprint Scan!");
      events.send("Unknown Error", "unknownError", millis());
      break;
    default:
      Serial.println("Unknown Error!");
      break;
    }
  }
}
Check if it is time to read our R307 fingerprint sensor and If it is then read it. Check the corresponding read result and send a Server-Sent event for each case.
The way to send a Server-Sent event is by calling the events.send("Scan your fingerprint", "noFingerprint", millis()); line. The first parameter is the message, the next is the name of the event which in our example is “noFingerprint” and the last one will serve as the ID of our message.
For every result of the fingerprint validation such as a valid fingerprint, an invalid fingerprint, or encountering an error while communicating with the R307 sensor then a unique event is sent with a corresponding message.
The four names of Server-Sent events that I have created here are the following
- noFingerprint
- accessGranted
- accessDenied
- unknownError
You would see later in the Javascript code how each of these events is being handled separately in the browser.
uint8_t getFingerprintID()
{
  uint8_t p = finger.getImage();
  switch (p)
  {
  case FINGERPRINT_OK:
    Serial.println("Image taken");
    break;
  case FINGERPRINT_NOFINGER:
    return p;
  case FINGERPRINT_PACKETRECIEVEERR:
    Serial.println("Communication error");
    return p;
  case FINGERPRINT_IMAGEFAIL:
    Serial.println("Imaging error");
    return p;
  default:
    Serial.println("Unknown error");
    return p;
  }

  // OK success!

  p = finger.image2Tz();
  switch (p)
  {
  case FINGERPRINT_OK:
    Serial.println("Image converted");
    break;
  case FINGERPRINT_IMAGEMESS:
    Serial.println("Image too messy");
    return p;
  case FINGERPRINT_PACKETRECIEVEERR:
    Serial.println("Communication error");
    return p;
  case FINGERPRINT_FEATUREFAIL:
    Serial.println("Could not find fingerprint features");
    return p;
  case FINGERPRINT_INVALIDIMAGE:
    Serial.println("Could not find fingerprint features");
    return p;
  default:
    Serial.println("Unknown error");
    return p;
  }

  // OK converted!
  p = finger.fingerSearch();
  if (p == FINGERPRINT_OK)
  {
    Serial.println("Found a print match!");
    // found a match!
    Serial.print("Found ID #");
    Serial.print(finger.fingerID);
    Serial.print(" with confidence of ");
    Serial.println(finger.confidence);

    return p;
  }
  else if (p == FINGERPRINT_PACKETRECIEVEERR)
  {
    Serial.println("Communication error");
    return p;
  }
  else if (p == FINGERPRINT_NOTFOUND)
  {
    Serial.println("Did not find a match");
    return p;
  }
  else
  {
    Serial.println("Unknown error");
    return p;
  }
}

void showNotAllowed()
{
  digitalWrite(buzzerPin, HIGH);
  delay(1000);
  digitalWrite(buzzerPin, LOW);
}
The getFingerprintID() function will read our fingerprint sensor and the showNotAllowed() function will sound the buzzer.
data/index.html
<!DOCTYPE html>
<html lang="en">
  <head>
    <meta charset="UTF-8" />
    <meta name="viewport" content="width=device-width, initial-scale=1.0" />
    <meta http-equiv="X-UA-Compatible" content="ie=edge" />
    <title>Arduino Fingerprint Sensor</title>
    <link rel="stylesheet" href="./css/index.css" />
  </head>
  <body>
    <main>
      <div class="heading"><h1>Arduino Fingerprint Sensor using ESP32</h1></div>
      <div class="status">
        <h2>Status</h2>
        <hr />
        <div class="message message-info" id="statusDiv">Scan your Fingerprint</div>
      </div>
    </main>
    <script src="./js/index.js"></script>
  </body>
</html>
This is our web page that will display the result of the fingerprint validation. The important part of the HTML above is the code below.
<div class="message message-info" id="statusDiv">Scan your Fingerprint</div>We manipulate the text shown by this HTML div and add or remove classes so that we could change the background color depending on the Server-Sent events that we receive from our ESP32 Web Server.
data/css/index.css
@import url("https://fonts.googleapis.com/css2?family=Poppins:wght@300;400;500;600;700;800&display=swap");

:root {
  --color-background: #f6f6f9;
  --color-white: #fff;
}
* {
  margin: 0;
  padding: 0;
  outline: 0;
  appearance: none;
  text-decoration: none;
  list-style: none;
  box-sizing: border-box;
}

html {
  font-size: 14px;
}
body {
  width: 100vw;
  height: 100vh;
  font-family: poppins, san-serif;
  font-size: 0.88rem;
  background: #f6f6f9;
  user-select: none;
  overflow-x: hidden;
}
main {
  display: flex;
  flex-flow: column nowrap;
  justify-content: center;
  align-items: center;
  margin-top: 1.4rem;
}
.heading {
  /* background: var(--color-white); */
  background-color: rgb(57, 21, 239);
  color: white;
  width: 100%;
  text-align: center;
  padding: 2rem;
  /* border-radius: 2rem; */
  margin-bottom: 2rem;
}
.heading h1 {
  font-size: 3.5rem;
}

.status {
  display: flex;
  flex-flow: column nowrap;
  justify-content: center;
  align-items: center;
  background-color: white;
  width: 80%;
  padding: 2rem;
}

.status h2 {
  font-size: 2.5rem;
  margin-bottom: 1.5rem;
}

.message {
  font-size: 5rem;
  width: 80%;
  padding: 1rem;
  text-align: center;
}
.message-info {
  background-color: rgb(105, 245, 245);
}

.message-error {
  background-color: rgb(50, 1, 7);
  color: white;
}

.message-denied {
  background-color: rgb(250, 10, 42);
  color: white;
}

.message-granted {
  background-color: rgb(0, 111, 15);
  color: white;
}
These are our stylesheet classes which will add some styling to our web page. I won’t be discussing so much how it works as these are normal CSS stylesheet selectors.
The important styles are the below classes as they will tell you what color is the background of our fingerprint validation status.
.message {
  font-size: 5rem;
  width: 80%;
  padding: 1rem;
  text-align: center;
}
.message-info {
  background-color: rgb(105, 245, 245);
}

.message-error {
  background-color: rgb(50, 1, 7);
  color: white;
}

.message-denied {
  background-color: rgb(250, 10, 42);
  color: white;
}

.message-granted {
  background-color: rgb(0, 111, 15);
  color: white;
}
data/js/index.css
let statusDiv = document.querySelector("#statusDiv");
if (!!window.EventSource) {
  var source = new EventSource("/events");

  source.addEventListener(
    "open",
    function (e) {
      console.log("Events Connected");
    },
    false
  );

  source.addEventListener(
    "error",
    function (e) {
      if (e.target.readyState != EventSource.OPEN) {
        console.log("Events Disconnected");
      }
    },
    false
  );

  source.addEventListener(
    "message",
    function (e) {
      console.log("message", e.data);
    },
    false
  );

  source.addEventListener(
    "noFingerprint",
    function (e) {
      console.log(e.data);
      showMessage("message-info", e.data);
    },
    false
  );
  source.addEventListener(
    "accessGranted",
    function (e) {
      console.log(e.data);
      showMessage("message-granted", e.data);
    },
    false
  );
  source.addEventListener(
    "accessDenied",
    function (e) {
      console.log(e.data);
      showMessage("message-denied", e.data);
    },
    false
  );
  source.addEventListener(
    "unknownError",
    function (e) {
      console.log("Unknown Error", e.data);
      showMessage("message-error", e.data);
    },
    false
  );
}

function showMessage(newClass, message) {
  // clear the classes
  statusDiv.removeAttribute("class");
  // adding multiple class
  statusDiv.classList.add("message", newClass);
  //   Change message
  statusDiv.innerHTML = message;
}
The Javascript code above will handle the Server-Sent events that are coming from our ESP32 web server. As I have mentioned in the main.cpp file, each of the following events below
- noFingerprint
- accessGranted
- accessDenied
- unknownError
Whenever a Server-Sent event is pushed by our ESP32 Web Server then the Javascript function will handle the messages and will alter the content of our status HTML Div and change its color by altering the classes assigned to it.
That is all for the code and how it works.
How to run the project?
If you are using PlatformIO IDE then just execute the Upload File System Image first so that we could upload the HTML/CSS/Javascript code to the file system of your ESP32. Please see the below post if you are unsure what I mean.
Related Content:
How to upload FileSystem Image in PlatformIO IDE?
After which, you can now click the Upload and Monitor to upload our sketch to the ESP32 memory.
Wrap up
We have successfully created our own Arduino-powered fingerprint door lock security system using an ESP32 microcontroller in this post.
This project is quite enjoyable and challenging to do. Still, you can use the functionality here if you need to add biometric checking functionality in your next Internet of Things (IoT) project.
I hope you learned something! Happy Exploring!
Read Next:
Plot Real-time Chart display of Sensor Readings – ESP8266/ESP32
ESP32 Keypad Database Security System – Design
Leave a Reply