Introduction
Would you like to learn how to display a real-time chart of your sensor readings using the ESP8266/ESP32 Microcontroller? This post will explain to you how you could do it and how you could apply it to your own project.
If you would like to see this project in action or you want a video tutorial then please see the video below or watch it on my YouTube channel.
Project Overview
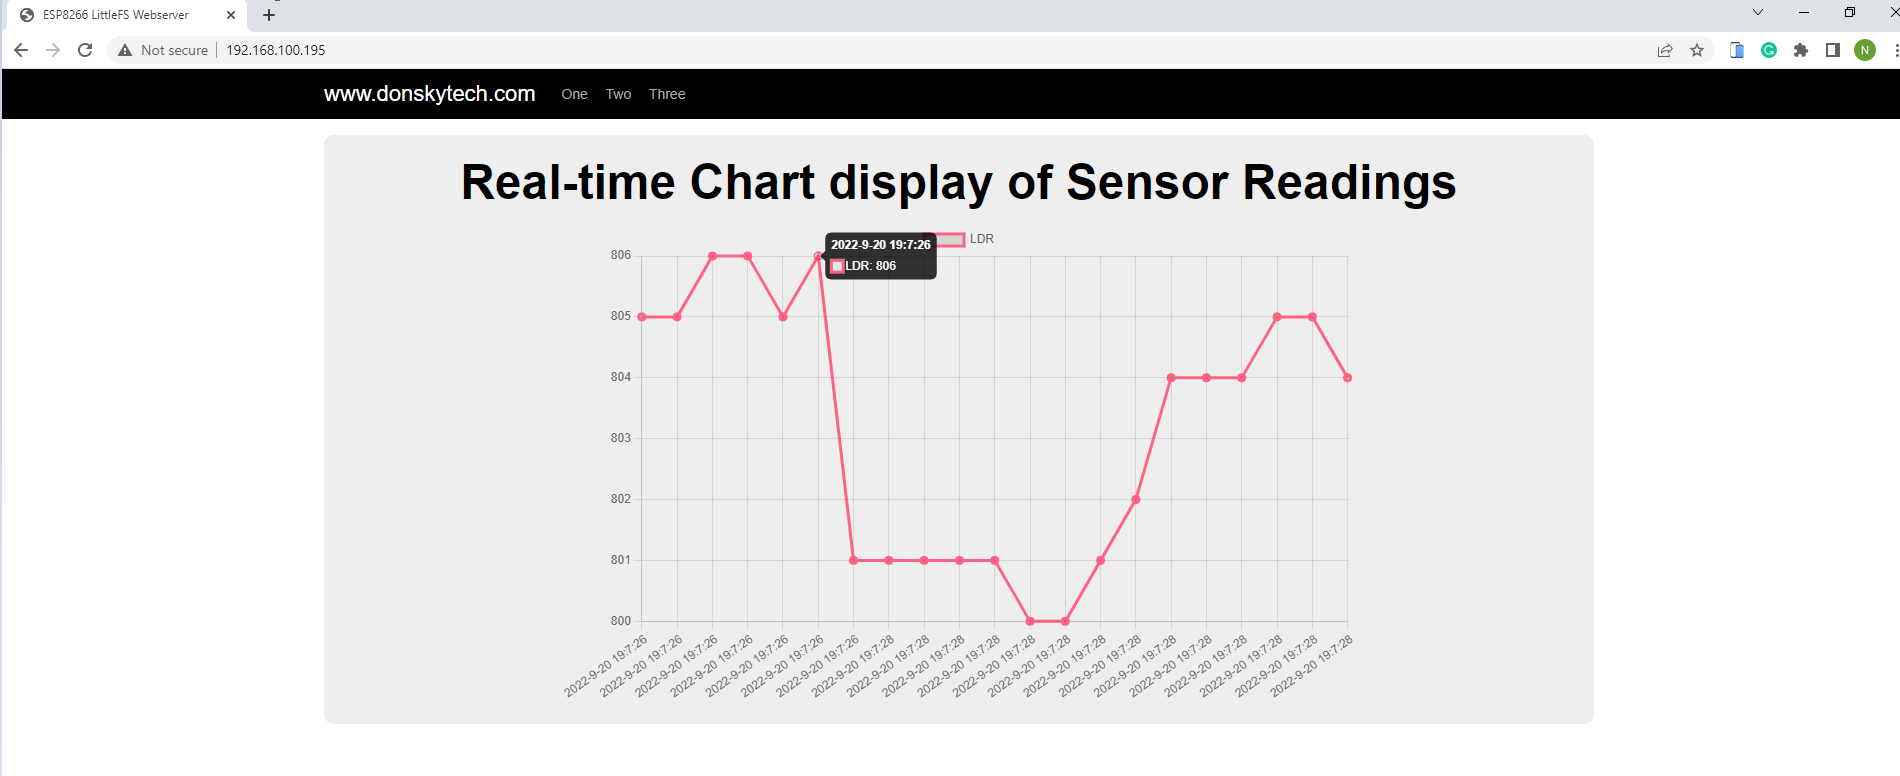
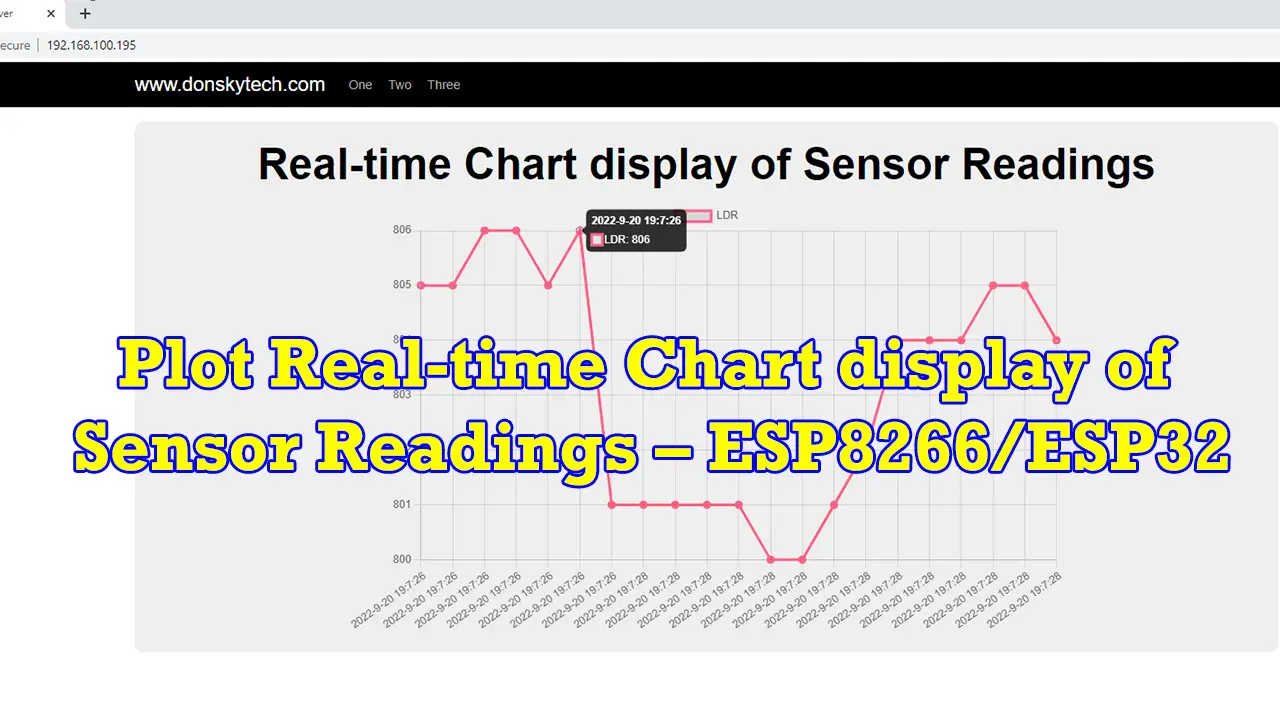
We are going to show an HTML page with a Line Chart of our sensor readings that are asynchronously updated in real time. I have chosen a sensor that changes instantaneously like the photoresistor or the Light Dependent Resistor (LDR). This will be a good scenario for how we could read and display the sensor readings at the same time in the millisecond range.
If we have used other sensors like Temperature, Pressure, or Humidity sensors then it does not change instantaneously then we can just update our HTML page after some seconds have passed.
The HTML page that displays the Line chart is served by our NodeMCU ESP8266/ESP32 Microcontrollers(MCU) Webserver and we have used WebSocket for the real-time message exchange.
Prerequisites
The followings are the components and materials needed to follow along with this post.
- ESP8266 (I used NodeMCU ESP8266) – Amazon | AliExpress | Bangood
- or ESP32 – Amazon | AliExpress | Bangood
- LDR or Photoresistor – Amazon | AliExpress
- Resistor (10K Ohms) – Amazon | AliExpress | Bangood
- Breadboard – Amazon | AliExpress | Bangood
- Connecting Wires – Amazon | AliExpress | Bangood
Disclosure: These are affiliate links and I will earn small commissions to support my site when you buy through these links.
I used Visual Studio Code with the PlatformIO extension installed in developing this project. If you are in Windows and have not yet installed Visual Studio Code then you can check my post about how to Install Visual Studio Code or VSCode in Windows. If you are not familiar with PlatformIO then please read this PlatformIO Tutorial for Arduino Development where I detailed how to get started with development using the PlatformIO IDE extension
Design
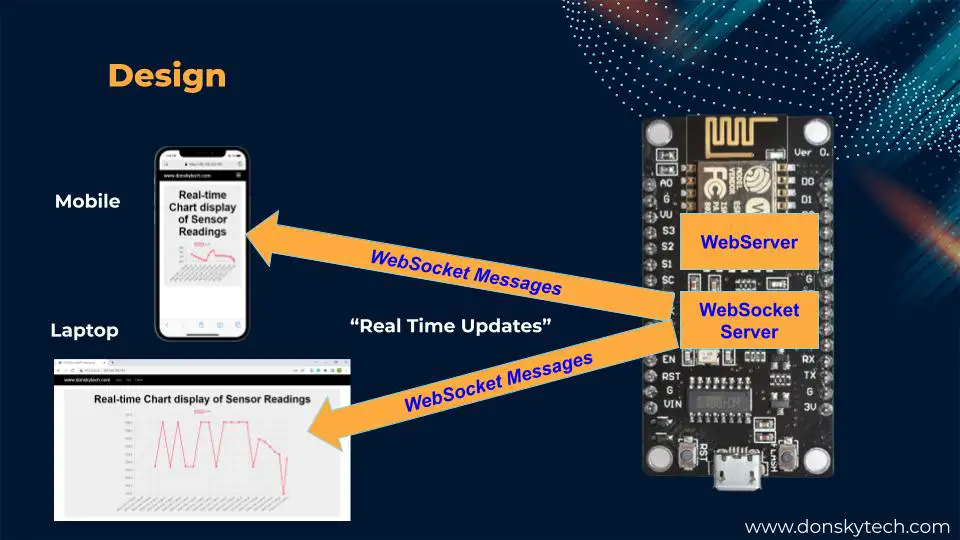
We are creating a Webserver inside our ESP8266/ESP32 MCU. At the same time, we have a WebSocket server created as well on the same port as our webserver.
When the HTML page loads, it opens a WebSocket connection to our WebSocket server. This WebSocket connection allows us to pass messages in real-time and in a bidirectional manner.
When the ESP8266/ESP32 MCU senses that the LDR sensor values change then it pushes a WebSocket message to all clients. When all clients receive these messages then it updates its user interface asynchronously.
WebSocket is a very versatile protocol and you could use it in different applications that require real-time updates. If you want to know more about WebSocket then please look at my Using WebSocket in the Internet of Things (IoT) projects. I have used this protocol in different projects:
Wiring/Schematic
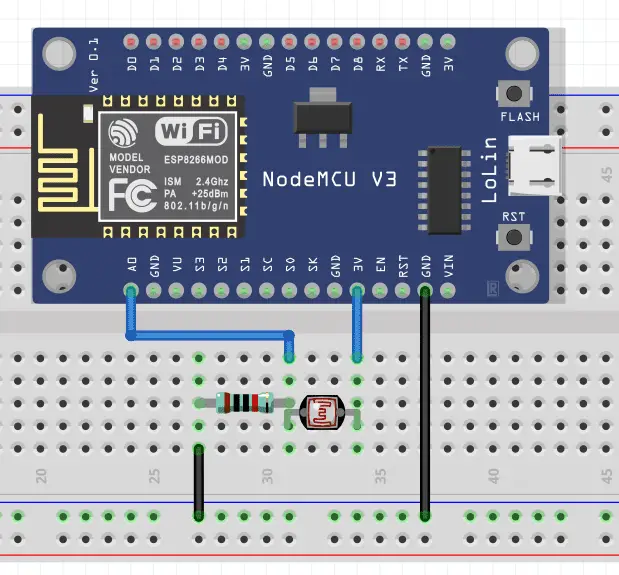
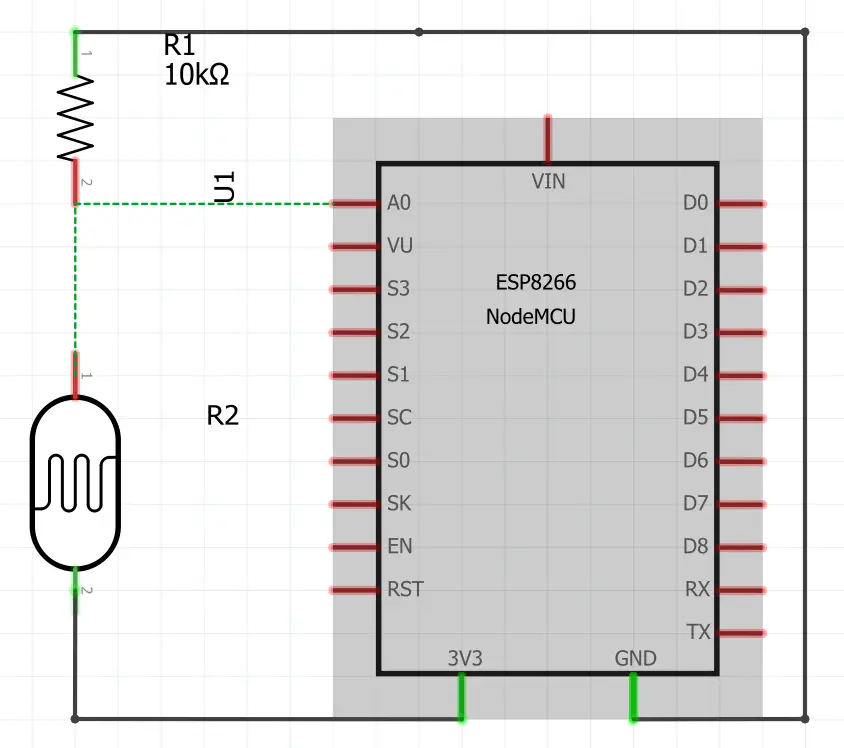
If you are not familiar with how to interface the ESP8266 with an LDR sensor then please see this Interfacing Photoresistor or LDR into NodeMCU ESP8266.
Code
The whole code for this project is available in my Github account which you can access from here. Let us discuss what files are important and how it works.
main.cpp
/*
  Title:  Plot Real-time Chart display of Sensor Readings – ESP8266/ESP32
  Description:  Displays sensor readings in real time
  Author: donsky
  For:    www.donskytech.com
  Date:   September 20, 2022
*/

#include <Arduino.h>
#ifdef ESP32
#include <WiFi.h>
#include <AsyncTCP.h>
#include "SPIFFS.h"
#elif defined(ESP8266)
#include <ESP8266WiFi.h>
#include <ESPAsyncTCP.h>
#include <LittleFS.h>
#endif
#include <ESPAsyncWebServer.h>


/*
  Replace the SSID and Password according to your wifi
*/
const char *ssid = "<REPLACE_WITH_YOUR_WIFI_SSID>";
const char *password = "<REPLACE_WITH_YOUR_WIFI_PASSWORD>";


// Webserver and Websockets setup
AsyncWebServer server(80);
AsyncWebSocket webSocket("/ws");

// LDR Pin
static int sensorVal = 0;
const int ANALOG_READ_PIN = A0; // or A0

// Function to handle request that is not serve by our web server
void notFound(AsyncWebServerRequest *request)
{
  request->send(404, "text/plain", "Not found");
}

// Callback function for our websocket message
void onEvent(AsyncWebSocket *server, AsyncWebSocketClient *client, AwsEventType type, void *arg, uint8_t *data, size_t len)
{
  if (type == WS_EVT_CONNECT)
  {
    // client connected
    Serial.println("Client connected....");
    os_printf("ws[%s][%u] connect\n", server->url(), client->id());
    client->ping();
  }
  else if (type == WS_EVT_DISCONNECT)
  {
    // client disconnected
    os_printf("ws[%s][%u] disconnect: %u\n", server->url(), client->id());
  }
  else if (type == WS_EVT_ERROR)
  {
    // error was received from the other end
    os_printf("ws[%s][%u] error(%u): %s\n", server->url(), client->id(), *((uint16_t *)arg), (char *)data);
  }
  else if (type == WS_EVT_PONG)
  {
    // pong message was received (in response to a ping request maybe)
    os_printf("ws[%s][%u] pong[%u]: %s\n", server->url(), client->id(), len, (len) ? (char *)data : "");
  }
  else if (type == WS_EVT_DATA)
  {
    // do nothing as client is not sending message to server
    os_printf("ws[%s][%u] data received\n", server->url(), client->id());
  }
}

// function to read LDR value
void readLDRValue()
{

  // Read
  int tempSensorVal = analogRead(ANALOG_READ_PIN);

  // Check if value read is different then send a websocket message to the client
  if (tempSensorVal != sensorVal)
  {
    Serial.println(tempSensorVal);
    sensorVal = tempSensorVal;

    // send message to clients when Connected
    webSocket.printfAll(std::to_string(sensorVal).c_str());

    // adding a little delay
    delay(10);
  }
}

void setup()
{

  Serial.begin(115200);
  Serial.println("Starting the Real-time Chart display of Sensor Readings ..");

  // Begin LittleFS for ESP8266 or SPIFFS for ESP32
  if (!LittleFS.begin())
  {
    Serial.println("An Error has occurred while mounting LittleFS");
    return;
  }

  // Connect to WIFI
  WiFi.mode(WIFI_STA);
  WiFi.begin(ssid, password);
  if (WiFi.waitForConnectResult() != WL_CONNECTED)
  {
    Serial.printf("WiFi Failed!\n");
    return;
  }

  Serial.print("IP Address: ");
  Serial.println(WiFi.localIP());

  // attach AsyncWebSocket
  webSocket.onEvent(onEvent);
  server.addHandler(&webSocket);

  // Route for root index.html
  server.on("/", HTTP_GET, [](AsyncWebServerRequest *request)
            { request->send(LittleFS, "/index.html", "text/html"); });

  // Route for root index.css
  server.on("/index.css", HTTP_GET, [](AsyncWebServerRequest *request)
            { request->send(LittleFS, "/index.css", "text/css"); });

  // Route for root entireframework.min.css
  server.on("/entireframework.min.css", HTTP_GET, [](AsyncWebServerRequest *request)
            { request->send(LittleFS, "/entireframework.min.css", "text/css"); });

  // Route for root index.js
  server.on("/index.js", HTTP_GET, [](AsyncWebServerRequest *request)
            { request->send(LittleFS, "/index.js", "text/javascript"); });

  server.onNotFound(notFound);

  // Start the server
  server.begin();
}

void loop()
{
  // Read the LDR values continously
  readLDRValue();
}
This file creates our Webserver and the WebSocket server. It also reads the values from our photoresistor or our LDR and sends them to all our WebSocket clients. Let us go over what each line of the code does.
#include <Arduino.h>
#ifdef ESP32
#include <WiFi.h>
#include <AsyncTCP.h>
#include "SPIFFS.h"
#elif defined(ESP8266)
#include <ESP8266WiFi.h>
#include <ESPAsyncTCP.h>
#include <LittleFS.h>
#endif
#include <ESPAsyncWebServer.h>
Imports the necessary header file for ESP32 and ESP8266.
/*
  Replace the SSID and Password according to your wifi
*/
const char *ssid = "<REPLACE_WITH_YOUR_WIFI_SSID>";
const char *password = "<REPLACE_WITH_YOUR_WIFI_PASSWORD>";
Change this to point to your WIFI SSID and credential.
// Webserver and Websockets setup
AsyncWebServer server(80);
AsyncWebSocket webSocket("/ws");
Declare our Webserver and Websocket server here.
// LDR Pin
static int sensorVal = 0;
const int ANALOG_READ_PIN = A0; // or A0
Set the pin to read our photoresistor or LDR.
// Function to handle request that is not serve by our web server
void notFound(AsyncWebServerRequest *request)
{
  request->send(404, "text/plain", "Not found");
}

// Callback function for our websocket message
void onEvent(AsyncWebSocket *server, AsyncWebSocketClient *client, AwsEventType type, void *arg, uint8_t *data, size_t len)
{
  if (type == WS_EVT_CONNECT)
  {
    // client connected
    Serial.println("Client connected....");
    os_printf("ws[%s][%u] connect\n", server->url(), client->id());
    client->ping();
  }
  else if (type == WS_EVT_DISCONNECT)
  {
    // client disconnected
    os_printf("ws[%s][%u] disconnect: %u\n", server->url(), client->id());
  }
  else if (type == WS_EVT_ERROR)
  {
    // error was received from the other end
    os_printf("ws[%s][%u] error(%u): %s\n", server->url(), client->id(), *((uint16_t *)arg), (char *)data);
  }
  else if (type == WS_EVT_PONG)
  {
    // pong message was received (in response to a ping request maybe)
    os_printf("ws[%s][%u] pong[%u]: %s\n", server->url(), client->id(), len, (len) ? (char *)data : "");
  }
  else if (type == WS_EVT_DATA)
  {
    // do nothing as client is not sending message to server
    os_printf("ws[%s][%u] data received\n", server->url(), client->id());
  }
}
The notFound function responds to requests that are not present in our Webserver. The onEvent is a callback for WebSocket message exchange. This is not doing anything right now but just prints the WebSocket events.
// function to read LDR value
void readLDRValue()
{

  // Read
  int tempSensorVal = analogRead(ANALOG_READ_PIN);

  // Check if value read is different then send a websocket message to the client
  if (tempSensorVal != sensorVal)
  {
    Serial.println(tempSensorVal);
    sensorVal = tempSensorVal;

    // send message to clients when Connected
    webSocket.printfAll(std::to_string(sensorVal).c_str());

    // adding a little delay
    delay(10);
  }
}
Reads our LDR or photoresistor. If the value read is different from the previous read then we send it to all WebSocket clients otherwise we skip it.
void setup()
{

  Serial.begin(115200);
  Serial.println("Starting the Real-time Chart display of Sensor Readings ..");

  // Begin LittleFS for ESP8266 or SPIFFS for ESP32
  if (!LittleFS.begin())
  {
    Serial.println("An Error has occurred while mounting LittleFS");
    return;
  }

  // Connect to WIFI
  WiFi.mode(WIFI_STA);
  WiFi.begin(ssid, password);
  if (WiFi.waitForConnectResult() != WL_CONNECTED)
  {
    Serial.printf("WiFi Failed!\n");
    return;
  }

  Serial.print("IP Address: ");
  Serial.println(WiFi.localIP());
In the setup() function of the Arduino, we initialize the baud rate of our serial monitor. We begin starting our LittleFS filesystem and connect to our Wifi.
If you are not familiar with what LittleFS is then please take a look ESP8266 LittleFS Tutorial Series.
  // attach AsyncWebSocket
  webSocket.onEvent(onEvent);
  server.addHandler(&webSocket);

  // Route for root index.html
  server.on("/", HTTP_GET, [](AsyncWebServerRequest *request)
            { request->send(LittleFS, "/index.html", "text/html"); });

  // Route for root index.css
  server.on("/index.css", HTTP_GET, [](AsyncWebServerRequest *request)
            { request->send(LittleFS, "/index.css", "text/css"); });

  // Route for root entireframework.min.css
  server.on("/entireframework.min.css", HTTP_GET, [](AsyncWebServerRequest *request)
            { request->send(LittleFS, "/entireframework.min.css", "text/css"); });

  // Route for root index.js
  server.on("/index.js", HTTP_GET, [](AsyncWebServerRequest *request)
            { request->send(LittleFS, "/index.js", "text/javascript"); });

  server.onNotFound(notFound);

  // Start the server
  server.begin();
Attach handler for our WebSocket server configure the resource that we serve from our Webserver using the server.on. After which, we start our server.
void loop()
{
  // Read the LDR values continously
  readLDRValue();
}
We read our photoresistor or LDR in the loop() function continuously.
index.html
<!DOCTYPE html>
<html>
  <head>
    <meta charset="UTF-8" />
    <meta name="viewport" content="width=device-width, initial-scale=1" />
    <title>Plot Real-time Chart display of Sensor Readings - ESP8266/ESP32</title>
    <link rel="stylesheet" href="index.css" />
    <link rel="stylesheet" href="entireframework.min.css" />
    <script
      src="https://cdnjs.cloudflare.com/ajax/libs/Chart.js/3.9.1/chart.min.js"
      integrity="sha512-ElRFoEQdI5Ht6kZvyzXhYG9NqjtkmlkfYk0wr6wHxU9JEHakS7UJZNeml5ALk+8IKlU6jDgMabC3vkumRokgJA=="
      crossorigin="anonymous"
      referrerpolicy="no-referrer"
    ></script>
    <script src="index.js"></script>
  </head>
  <body>
    <nav class="nav" tabindex="-1" onclick="this.focus()">
      <div class="container">
        <a class="pagename current" href="#">www.donskytech.com</a>
        <a href="#">One</a>
      </div>
    </nav>
    <button class="btn-close btn btn-sm">×</button>
    <div class="container">
      <div class="hero">
        <h1>Real-time Chart display of Sensor Readings</h1>
        <div class="chart-container">
          <canvas id="myChart" width="1000" height="600"></canvas>
        </div>
      </div>
    </div>
  </body>
</html>
HTML page that we serve thru our Webserver.
  <head>
    <meta charset="UTF-8" />
    <meta name="viewport" content="width=device-width, initial-scale=1" />
    <title>Plot Real-time Chart display of Sensor Readings - ESP8266/ESP32</title>
    <link rel="stylesheet" href="index.css" />
    <link rel="stylesheet" href="entireframework.min.css" />
    <script
      src="https://cdnjs.cloudflare.com/ajax/libs/Chart.js/3.9.1/chart.min.js"
      integrity="sha512-ElRFoEQdI5Ht6kZvyzXhYG9NqjtkmlkfYk0wr6wHxU9JEHakS7UJZNeml5ALk+8IKlU6jDgMabC3vkumRokgJA=="
      crossorigin="anonymous"
      referrerpolicy="no-referrer"
    ></script>
    <script src="index.js"></script>
  </head>
Import the necessary scripts and packages for our HTML page. We are using the following library in this project.
- Chart.js in displaying the sensor readings in a graphical line chart.
- mincss to make our web page render better on mobile
  <body>
    <nav class="nav" tabindex="-1" onclick="this.focus()">
      <div class="container">
        <a class="pagename current" href="#">www.donskytech.com</a>
        <a href="#">One</a>
      </div>
    </nav>
    <button class="btn-close btn btn-sm">×</button>
    <div class="container">
      <div class="hero">
        <h1>Real-time Chart display of Sensor Readings</h1>
        <div class="chart-container">
          <canvas id="myChart" width="1000" height="600"></canvas>
        </div>
      </div>
    </div>
  </body>
Displays the User Interface of our Webserver. The important part of this HTML fragment is <canvas id="myChart" width="1000" height="600"></canvas> which Chart.js is used to display the content.
index.js
// Declare variables
var targetUrl = `ws://${window.location.hostname}/ws`;
var websocket;
var ctx;
var myChart;
const MAX_DATA_COUNT = 20;

// Add function for body load
window.addEventListener("load", onLoad);

// Function to run during on load of the HTML Page
function onLoad() {
  initializeSocket();
  initializeChart();
}

// Initialize the chart
function initializeChart(){
  ctx = document.getElementById("myChart").getContext("2d");
  myChart = new Chart(ctx, {
    type: "line",
    data: {
      datasets: [{ label: "LDR" }],
    },
    options: {
      borderWidth: 3,
      borderColor: ["rgba(255, 99, 132, 1)"],
    },
  });
}

// Initialize the Websockets
function initializeSocket() {
  console.log(
    `Opening WebSocket connection to Microcontroller :: ${targetUrl}`
  );
  websocket = new WebSocket(targetUrl);
  websocket.onopen = onOpen;
  websocket.onclose = onClose;
  websocket.onmessage = onMessage;
}
// Websocket Callback Client function
function onOpen(event) {
  console.log("Starting connection to server..");
}
function onClose(event) {
  console.log("Closing connection to server..");
  setTimeout(initializeSocket, 2000);
}
function onMessage(event) {
  console.log("WebSocket message received:", event);
  // Show only MAX_DATA_COUNT data
  if (myChart.data.labels.length > MAX_DATA_COUNT) {
    removeFirstData();
  }
  addData(getCurrentDateTime(), event.data);
}

// Get the current date time.  This will serve as the x-axis of our sensor data
function getCurrentDateTime() {
  var today = new Date();
  var date =
    today.getFullYear() + "-" + (today.getMonth() + 1) + "-" + today.getDate();
  var time =
    today.getHours() + ":" + today.getMinutes() + ":" + today.getSeconds();
  var dateTime = date + " " + time;
  return dateTime;
}

// add sensor data to chart
function addData(label, data) {
  myChart.data.labels.push(label);
  myChart.data.datasets.forEach((dataset) => {
    dataset.data.push(data);
  });
  myChart.update();
}

// Remove the first data
function removeFirstData() {
  myChart.data.labels.splice(0, 1);
  myChart.data.datasets.forEach((dataset) => {
    dataset.data.shift();
  });
}
The javascript file that handles the WebSocket messages coming from our Webserver. It also creates and updates the chart with new data. Let us go over what each line of the code does.
// Declare variables
var targetUrl = `ws://${window.location.hostname}/ws`;
var websocket;
var ctx;
var myChart;
const MAX_DATA_COUNT = 20;
Declare the variables we used in this javascript file.
// Add function for body load
window.addEventListener("load", onLoad);

// Function to run during on load of the HTML Page
function onLoad() {
  initializeSocket();
  initializeChart();
}
Add the listener for the loading of our HTML page.
// Initialize the chart
function initializeChart(){
  ctx = document.getElementById("myChart").getContext("2d");
  myChart = new Chart(ctx, {
    type: "line",
    data: {
      datasets: [{ label: "LDR" }],
    },
    options: {
      borderWidth: 3,
      borderColor: ["rgba(255, 99, 132, 1)"],
    },
  });
}
Initializes our Chart.js Line chart and set the options.
// Initialize the Websockets
function initializeSocket() {
  console.log(
    `Opening WebSocket connection to Microcontroller :: ${targetUrl}`
  );
  websocket = new WebSocket(targetUrl);
  websocket.onopen = onOpen;
  websocket.onclose = onClose;
  websocket.onmessage = onMessage;
}
// Websocket Callback Client function
function onOpen(event) {
  console.log("Starting connection to server..");
}
function onClose(event) {
  console.log("Closing connection to server..");
  setTimeout(initializeSocket, 2000);
}
function onMessage(event) {
  console.log("WebSocket message received:", event);
  // Show only MAX_DATA_COUNT data
  if (myChart.data.labels.length > MAX_DATA_COUNT) {
    removeFirstData();
  }
  addData(getCurrentDateTime(), event.data);
}
We initialize our Websocket connections here and attach the needed callback functions. The onMessage function is called whenever our HTML page receives Websocket messages from our Webserver.
In this function, it checks first if the data exceed our maximum data count which is 20 then it removes the very first otherwise it adds data to our existing chart. This is the function that automatically updates our Line Chart from WebSocket messages coming from our ESP8266/ESP32 MCU.
// Get the current date time.  This will serve as the x-axis of our sensor data
function getCurrentDateTime() {
  var today = new Date();
  var date =
    today.getFullYear() + "-" + (today.getMonth() + 1) + "-" + today.getDate();
  var time =
    today.getHours() + ":" + today.getMinutes() + ":" + today.getSeconds();
  var dateTime = date + " " + time;
  return dateTime;
}
The function is used to retrieve the current date and time. We use this in the plotting of our line chart.
// add sensor data to chart
function addData(label, data) {
  myChart.data.labels.push(label);
  myChart.data.datasets.forEach((dataset) => {
    dataset.data.push(data);
  });
  myChart.update();
}

// Remove the first data
function removeFirstData() {
  myChart.data.labels.splice(0, 1);
  myChart.data.datasets.forEach((dataset) => {
    dataset.data.shift();
  });
}
addData and removeFirstData are used in adding data to our line chart. It uses the Chart.js API.
index.css
.hero {
  background: #eee;
  padding: 20px;
  border-radius: 10px;
  margin-top: 1em;
}

.hero h1 {
  margin-top: 0;
  margin-bottom: 0.3em;
  text-align: center;
}

.chart-container {
  max-width: 800px;
  margin: 0 auto;
}
The file that we use for styling purposes.
entireframework.min.css
This is the mincss CSS framework library that we are using for styling. You can check out the example page on how to use this awesome CSS framework.
Notes when using ESP32
When deploying this to ESP32 then replace all “LittleFS” with “SPIFFS” in the setup() function. We are using different Filesystems in both MCU. If you are not familiar with both concepts then please read this ESP8266 LittleFS Tutorial Series – Overview.
Deploy to ESP8266/ESP32
Once you understand the code then we can start deploying to your MCU.
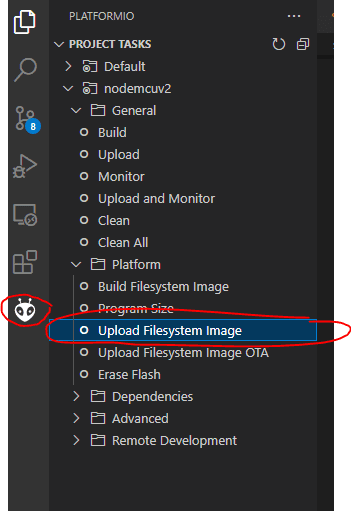
First, upload the File System Image
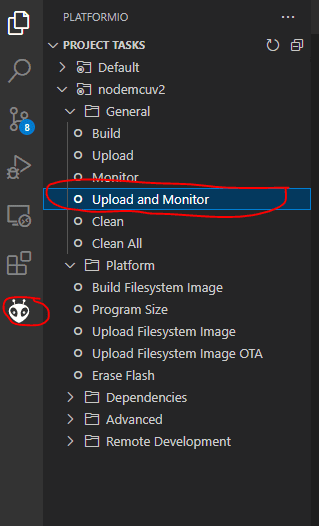
Then, click upload and monitor. Wait for the assigned IP address for your MCU to be displayed and then open your browser and type in that IP address.
Wrap
We have discussed how to plot your sensor readings in a chart and automatically update them in real time using your ESP8266/ESP32 microcontroller in this post.
I hope you learn something! Happy Exploring!
Related Content:
Create your own ESP32 Wifi Car using the library esp32-wifi-car
Creating an ESP32 RFID with a Web Server Application
Leave a Reply