- Introduction
- MongoDB IoT Tutorial Series Roadmap
- What is an API Server?
- Why do we need an API Server in Arduino, Raspberry Pi, and MicroPython?
- What is REST API Server?
- What are HTTP Status Codes?
- Wait, You lost me there?!
- Sensors Management System
- Prerequisites
- Prepare the database
- Code
- How to add error handling in Flask, MongoDB REST API Server?
- Deployment Options
- Future Improvements for Advanced Python Programmers
- Wrap Up
Introduction
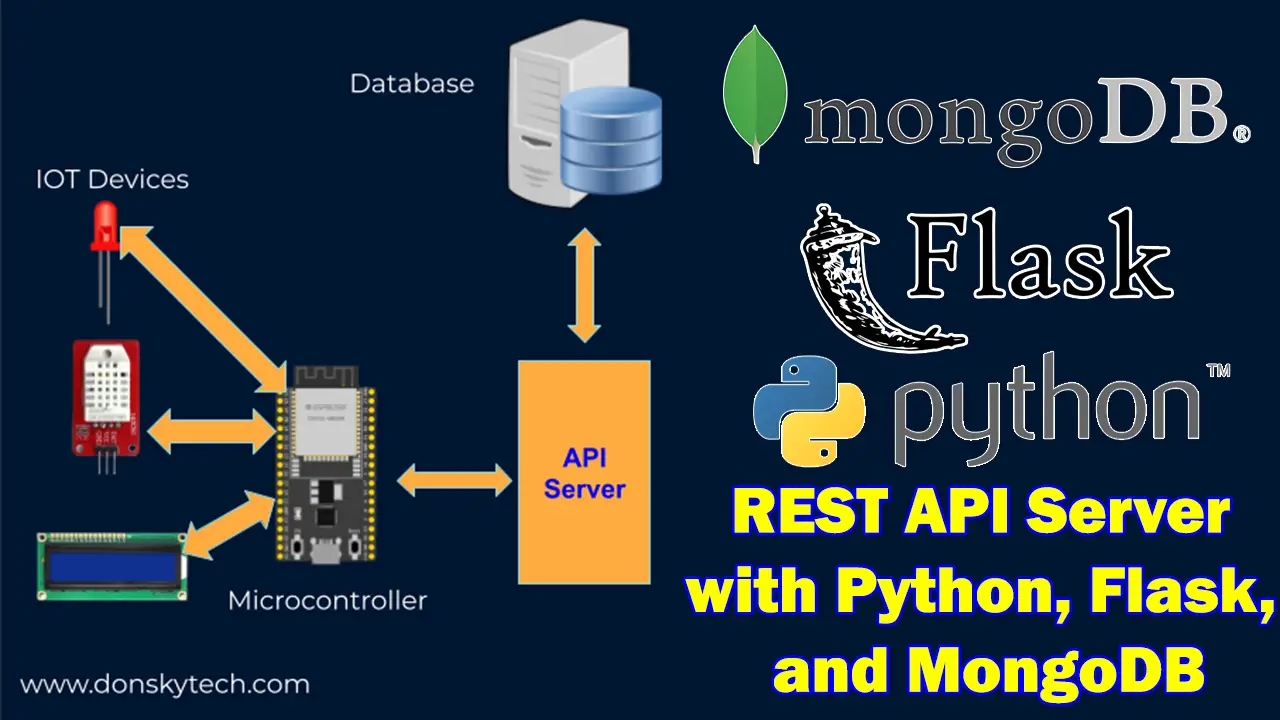
In this post, I am going to show you how you can create your REST or Representational State Transfer server using Python, Flask, and MongoDB. If you have your Internet of Things (IoT) projects and you would like to control it from your database or you want to create a logger of your sensor readings then knowing what is REST API server and how to create one is important.
If you want to see a video demo presentation of this post or a demo of this project then please see the below video or watch it on my YouTube channel.
MongoDB IoT Tutorial Series Roadmap
This series would teach you how to integrate a database particularly the MongoDB NoSQL database in your IoT projects. We will be using Arduino-based microcontrollers, Raspberry Pi Single Board Computers, and MicroPython devices.
The below list would tell you the different topics that we are going to discuss in this series.
- Part 1 – What is MongoDB database and why do we need it in our IoT projects?
- Part 2 – MongoDB Atlas: An Overview and How to get started
- Part 3 – Create a REST API Server with Python, Flask, and MongoDB
- Part 4 – Control your Arduino IoT projects with a MongoDB database
- Part 5 – Control your Raspberry Pi IoT projects with a MongoDB database
- Part 6 – Control your MicroPython IoT projects with a MongoDB database
- Part 7 – Arduino Data Logger using MongoDB Database
- Part 8 – Raspberry Pi Temperature Logger using MongoDB Database
- Part 9 – MicroPython Sensor Logger using MongoDB Database
This post is Part 3 of this series where I would show you how you can create your REST API server that will interact with our MongoDB database using Python and Flask.
Note that you should have a good idea of what MongoDB is and have prepared your own MongoDB Atlas cluster as I would not be discussing those items anymore in this post
What is an API Server?
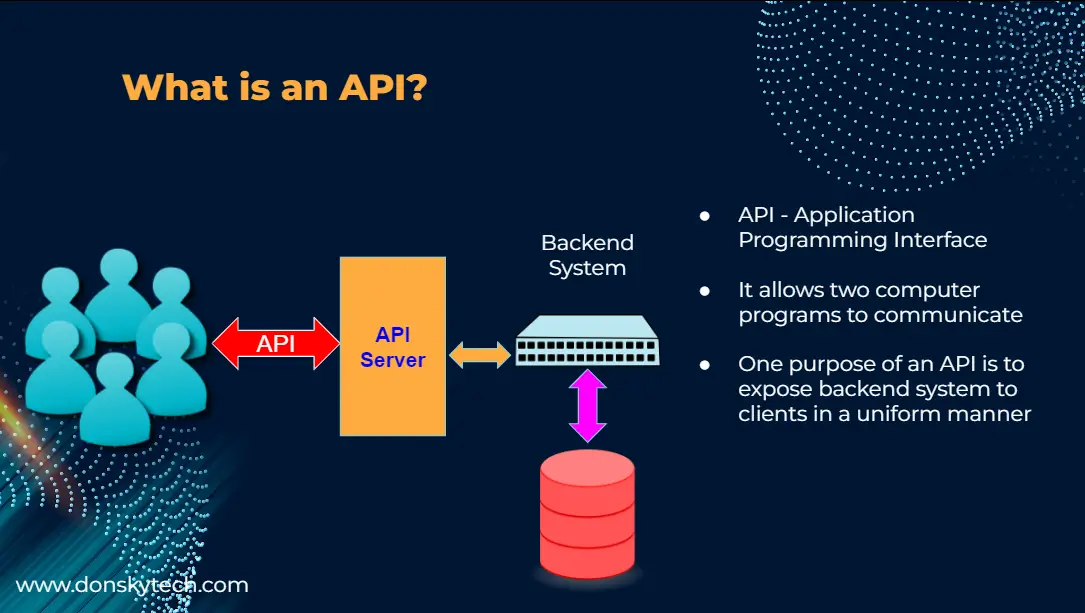
API is Application Programming Interface and it allows two computer programs to communicate with each other.
Let us say we have a backend system like a database with information that you wanted to share with other users. It is not a good practice to let other users access your data directly and do dangerous things directly on your data. Imagine a scenario in a Hospital System where people inside it can access all the Patient Information.
So what do we do to add a security layer? We can introduce the concept of an API server that exposes certain rules on how to access the data and add authorization on who can access it.
The users of our system would begin interacting with our API Server thru the set of rules that we exposed called an API
Why do we need an API Server in Arduino, Raspberry Pi, and MicroPython?
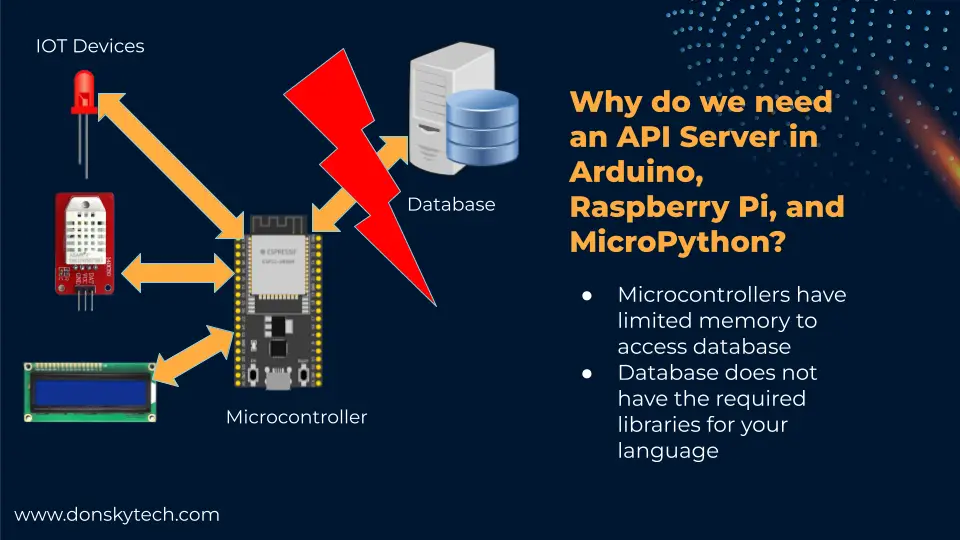
So why do we need to set up our API Server if we want to interface with a database on our Arduino, Raspberry Pi, and MicroPython code?
Aside from the security issues in the earlier slide, Microcontrollers tend to have a small memory footprint that if we connect to the database directly then we would run out of memory.
Also, no driver will allow you to connect to the database directly. For example, Arduino does not have any native driver to connect directly to the MongoDB Database. There is a C/C++ driver that you can adapt but that requires specific programming knowledge.
So what should we do?
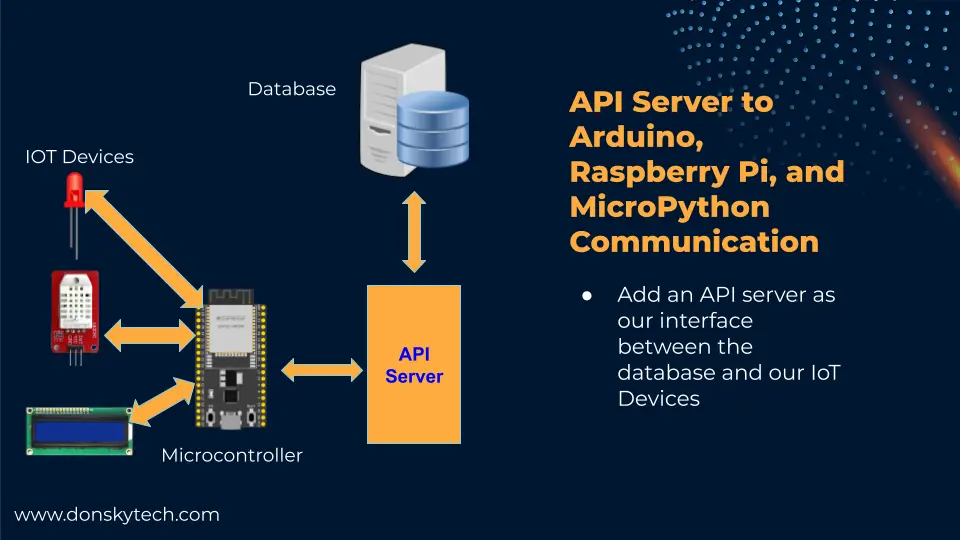
The quick solution is to create an API server that will communicate with MongoDB.
The API server will act as our interface to the database and if we would like to communicate with the database then we talk to the API server.
You can program this API server in the language of your choice as there are many drivers available in another language.
In this post, we will program our API server in Python programming language.
I hope you now appreciate and understand what an API server role is in the whole architecture. Let us now discuss what a REST API Server is.
What is REST API Server?
REST is an acronym for Representational State Transfer. It is a software architecture that governs how a client-server exchanges messages over a network. A REST Web Service then it discusses how we can access data through a public web URL
REST Client-Server Architecture
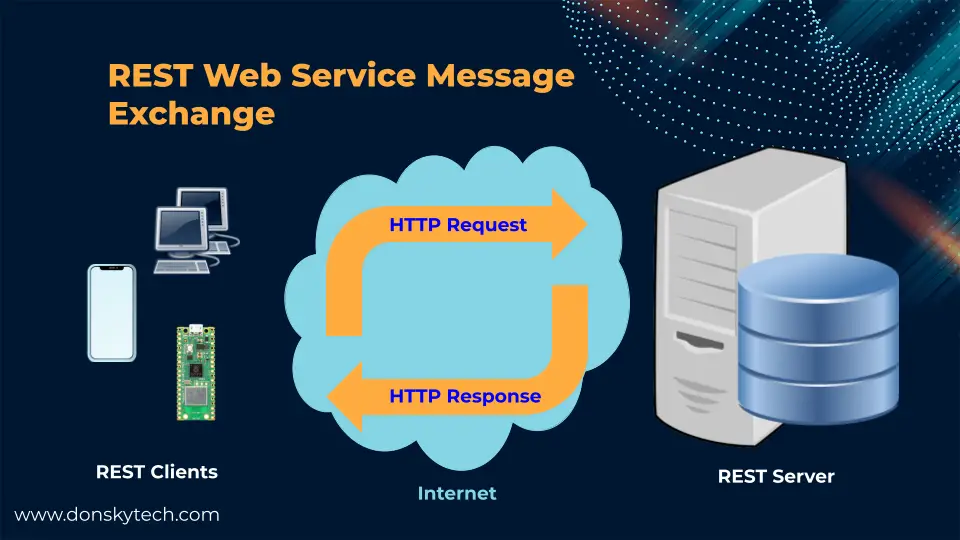
REST follows the client-server topology where there is a server and a client. Both of them are decoupled from each other and communicate thru the internet. The clients and the server could be programmed in different programming languages as they are independent of each other. They understand each other because they follow the REST API protocol.
The client usually sends an HTTP request and that request is processed by the server and it will respond with an appropriate response.
Sample REST API
The internet has so many popular REST API sources such as YouTube, Twitter, and GitHub REST API.
https://api.github.com/users/donskytechThe URL https://api.github.com/users/donskytech is a public-facing URL called a REST endpoint.
When you type in the following URL in your browser then you would see the following messages displayed on your browser.
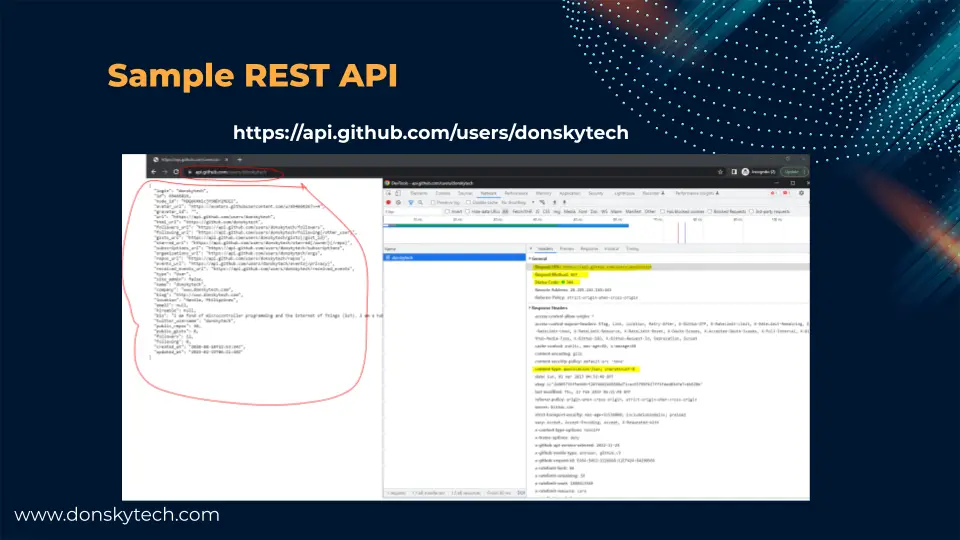
If you do this exercise then you are now interfacing with a REST Client-Server Architecture.
Your browser where you type the GitHub URL acts as the client and the GitHub server acts as the server.
If you open the developer tool then you would see the following information such as the HTTP Method, HTTP Endpoint, HTTP Status, and the Content-Type
What are HTTP Methods in REST?
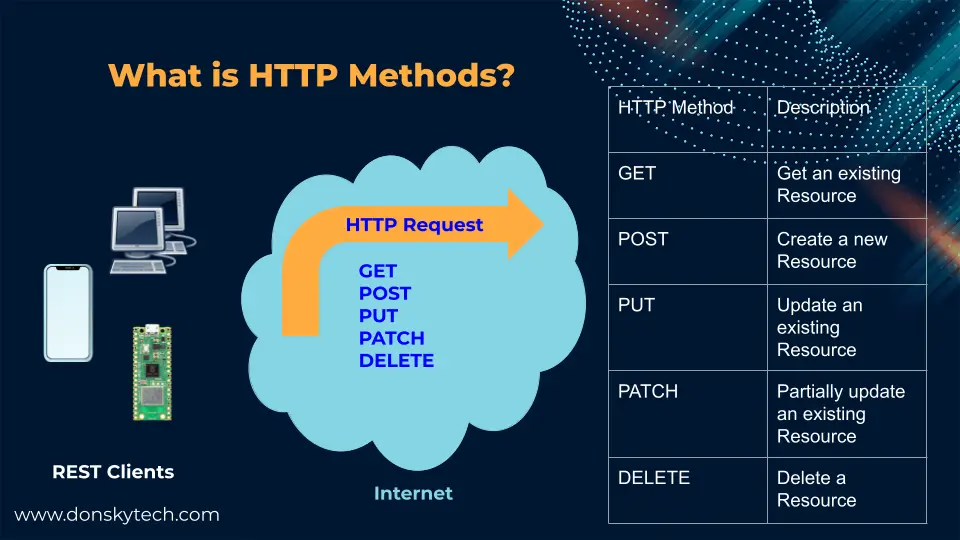
REST architecture uses the HTTP methods to manipulate the Server Resources. A resource refers to information that can be manipulated by the client.
If we are running a library system then a resource could be a Book or if we are in a car dealership business then it could be a Car.
An HTTP request is initiated by the client and assigned a specific HTTP Method. The table below maps the most common HTTP methods used to manipulate server resources.
| HTTP Methods | Description |
|---|---|
| GET | Get an existing Resource |
| POST | Create a new Resource |
| PUT | Update an existing Resource |
| PATCH | Partially update an existing Resource |
| DELETE | Delete a Resource |
It is important to understand that the server checks the HTTP methods for every request coming in and responds accordingly.
What are REST API Endpoints?
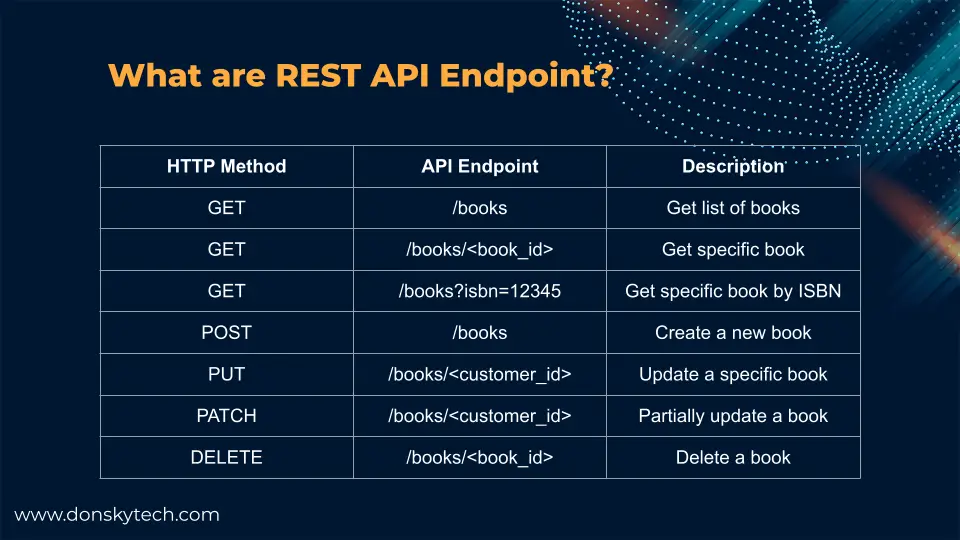
REST API Server usually exposes URLs that clients can look up to manipulate server resources.
If we go back to our library system and we are manipulating a book resource then the table above will show you the different
endpoints that you can send to the server.
To get a list of books then we need to pass an HTTP Get and the URL endpoint is /books.
If we are querying by ISBN number then we need to pass an HTTP GET request with the endpoint /books?isbn=12345. Anything after the question mark is a
query parameter.
On the other hand, if we want to create a new book record then we need to pass an HTTP POST to the endpoint /books
You will see this in action later on in the test application that we will develop.
What are HTTP Status Codes?
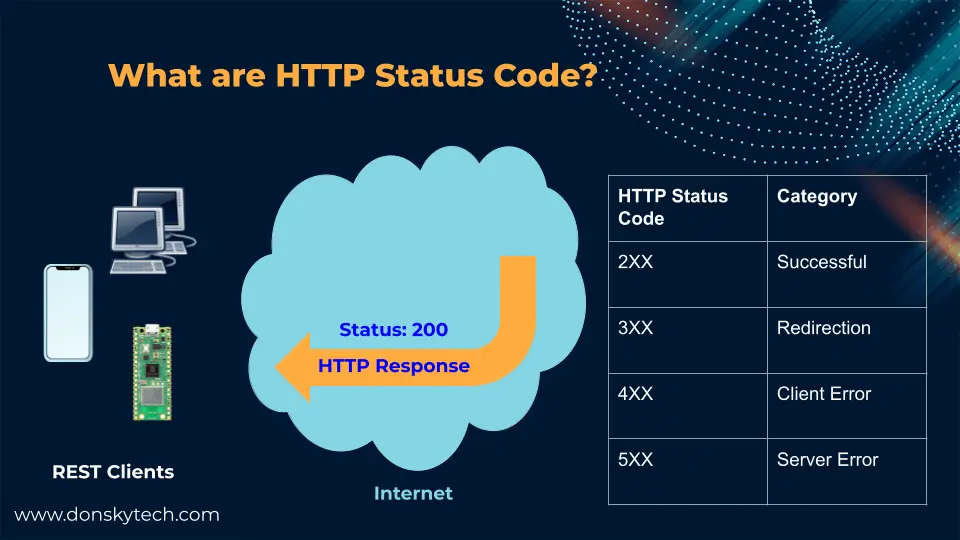
When an HTTP Request comes in from the client then an appropriate HTTP response is created by the REST API Server.
It tells the client about the result of the processing and this is largely based on the HTTP status codes.
For example, if we are creating a book and we receive a response of HTTP 200 then it means that the book was created successfully.
Wait, You lost me there?!

If you are new to these topics then I know you might be overwhelmed and you should be!
This is where an example project would help you understand what I am saying.
Sensors Management System
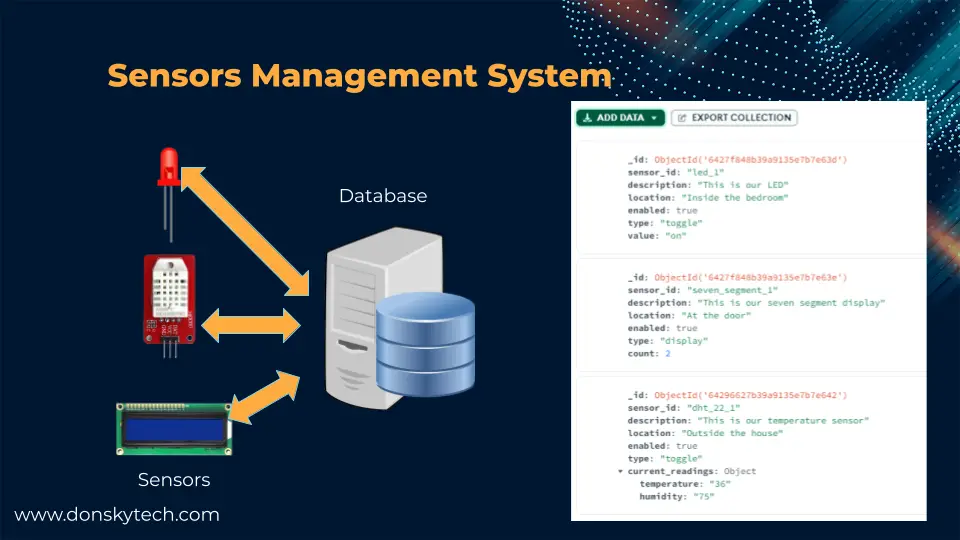
In this sample IoT project, we are going to keep track of the sensors that we attached to our system.
The data for each sensor is stored on our MongoDB database. In a future project, I will show you how easy it is to control your sensors from your database using your Arduino, Raspberry Pi, and MicroPython devices.
As you can see from the image, the right-hand side shows sample records of our sensor configurations.
We will develop our REST API server to manipulate the data on our database using Python programming language.
Design
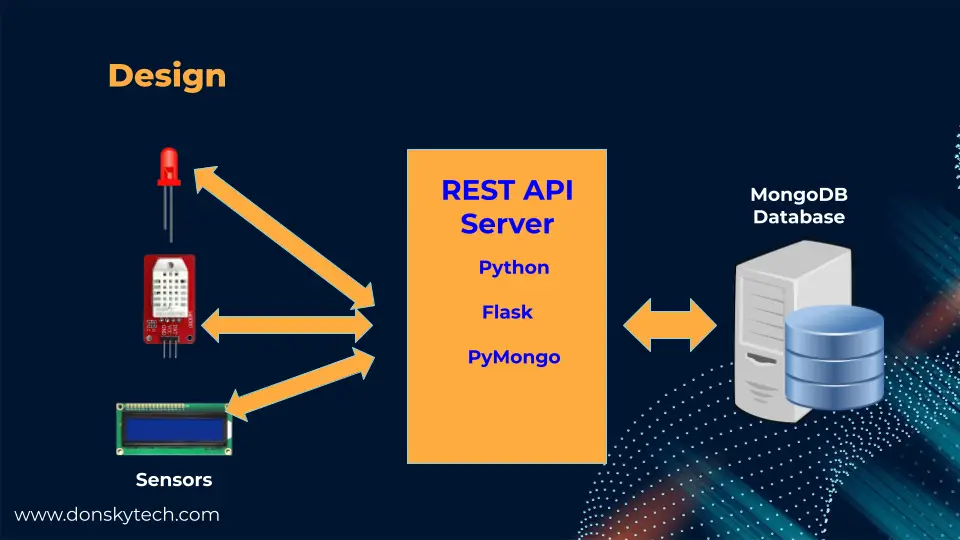
We will develop our REST API server to manipulate the data on our database using Python programming language.
The Python REST API server will provide a public URL for us to execute CRUD operations or Create-Read-Update-Delete on our MongoDB database.
We will be using Python, Flask micro web framework, and the PyMongo libraries in connecting with our MongoDB database.
REST API Endpoints
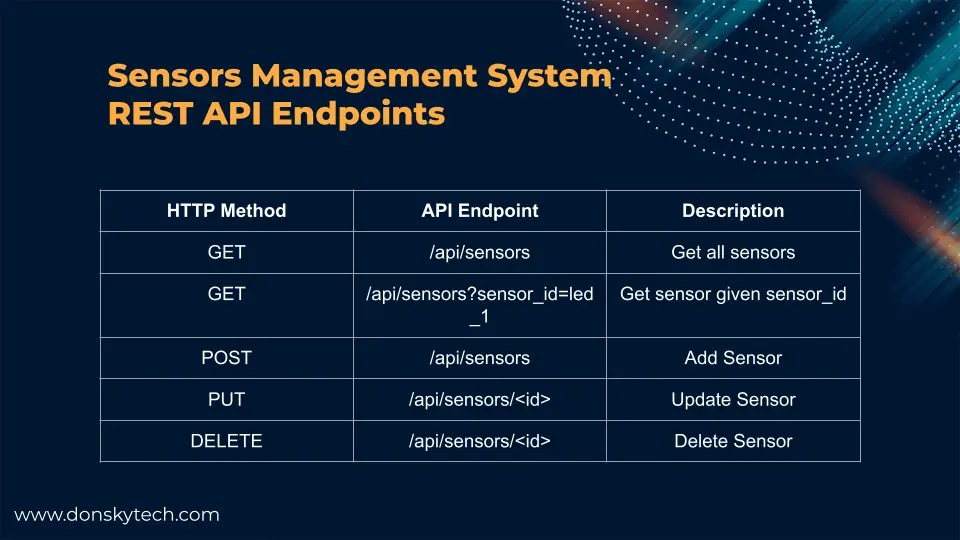
The following image shows the different REST API Endpoints that we are going to create in our Python code.
What is Python?

Python is an easy language to pick up, especially with hardware guys but is very powerful.
I have carefully chosen this language as any IoT developer can easily understand how programs written in Python work.
MicroPython is an extension of the Python language and is gaining traction in the Microcontroller community.
What is Flask?
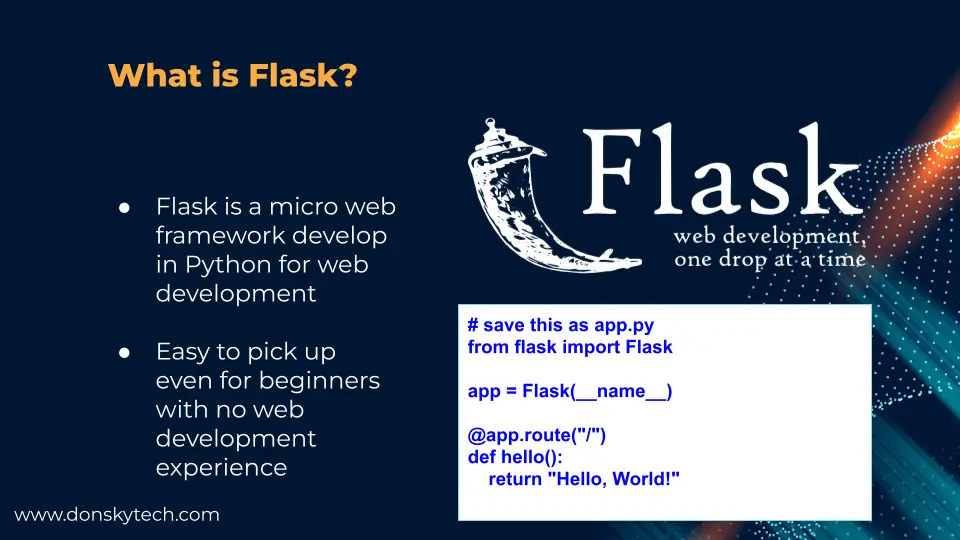
Flask is a micro web framework written in Python that is popular for web development among Python enthusiasts.
Beginners can easily pick up this library as it contains default configurations already that beginners could override. A sample program like this would print “hello world” on your browser.
What is PyMongo?
PyMongo is a library written by the MongoDB team as a thin wrapper for commands so that we could interact with the MongoDB database.
Prerequisites
You should have installed Python (3.7+) on your laptop or workstation. I am using Visual Studio Code in developing this project and running a Windows/PC on my laptop.
Related Content:
How to install Python on Windows
Install Visual Studio Code or VSCode on Windows
Lastly, you should install curl and Postman so that we could test our Flask and MongoDB REST API server. The curl program is a command line tool that is available in Linux and MacOS while Postman is a separate software that needs to be installed.
Since I am using a Windows/PC then I used the software called Git for Windows as it contains a git-bash tool where we can execute curl.
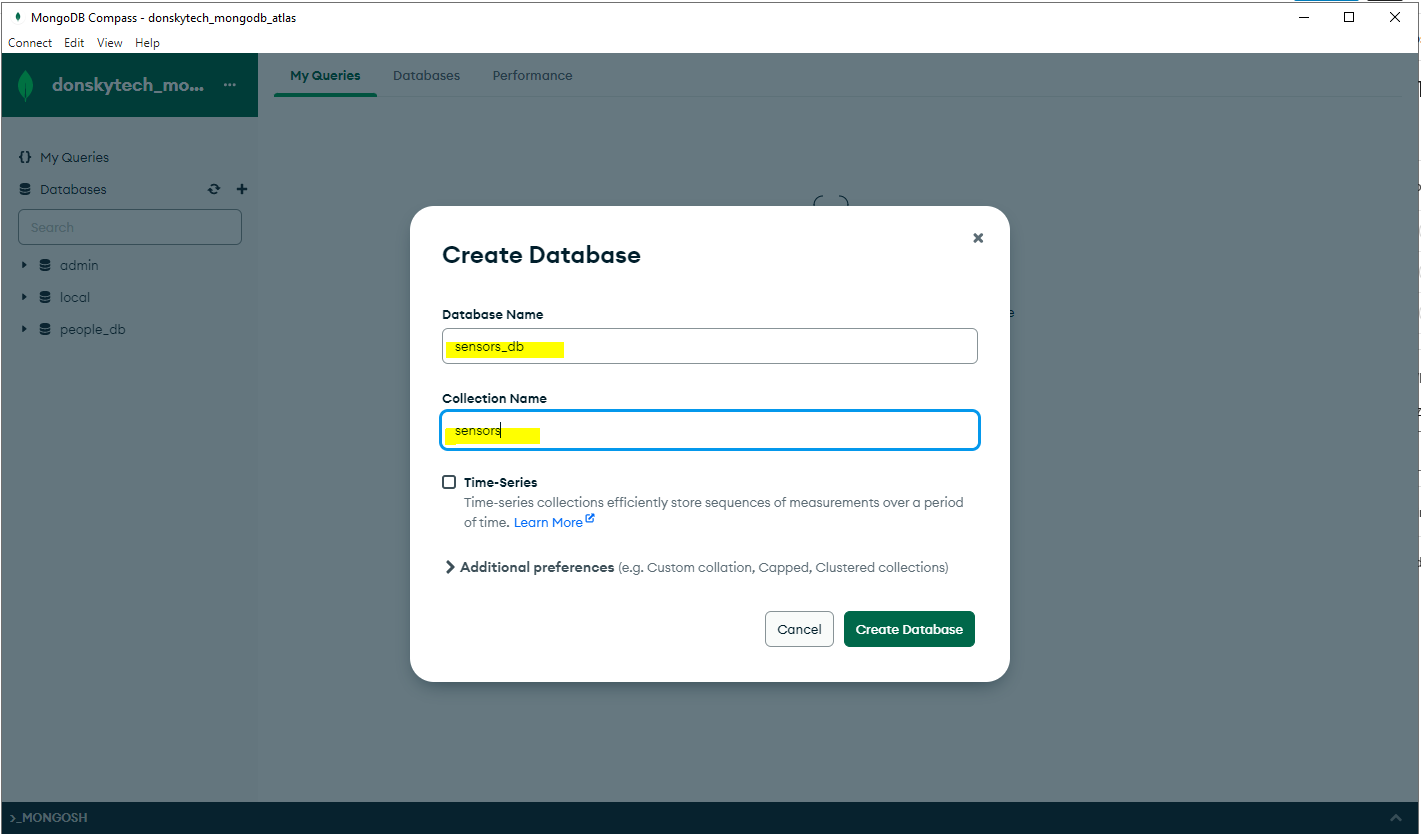
Prepare the database
We need to create our test database where we will store our sensors’ data information. In your MongoDB Compass or the Atlas UI, create the following database and collection.
- Database Name: sensors_db
- Collection: sensors
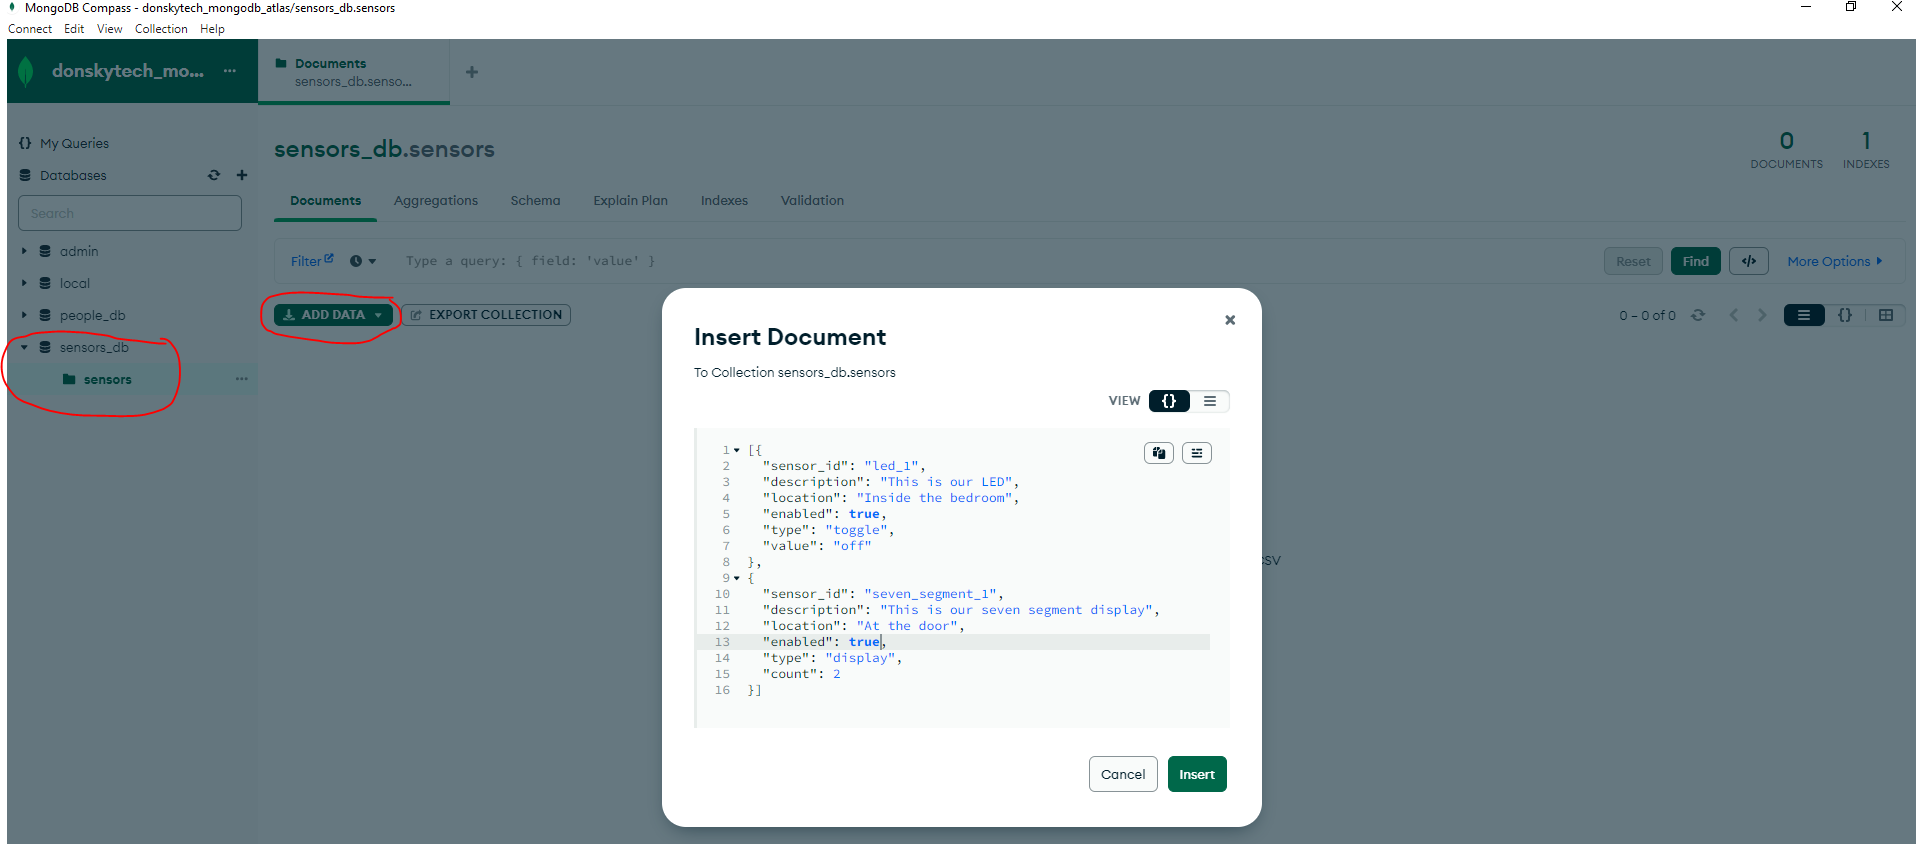
Add the following JSON objects which we will use as references in this project. These are sample records for sensors that we want to control from our database. Notice that the two documents have different structures as this is one of the features of MongoDB as a schema-less database.
[{
	"sensor_id": "led_1",
	"description": "This is our LED",
	"location": "Inside the bedroom",
	"enabled": true,
	"type": "toggle",
	"value": "off"
},
{
	"sensor_id": "seven_segment_1",
	"description": "This is our seven segment display",
	"location": "At the door",
	"enabled": true,
	"type": "display",
	"count": 2
}]
Open your MongoDB Compass and connect to your MongoDB Atlas database and then insert the two JSON documents above.
MongoDB CRUD Operations
The following are the usual commands used to interact with a MongoDB database and execute CRUD (Create-Read-Update-Delete) operations.
// show databases
show dbs

// switch to a new database
use sensors_db

// show the current database
db

//  Create
db.sensors.insertOne({
	"sensor_id": "led_2",
	"description": "This is our LED 2",
	"location": "Inside the bedroom",
	"enabled": true,
	"type": "toggle",
	"value": "off"
})

// Read
db.sensors.find({"sensor_id": "led_2"})

// Update
db.sensors.updateOne({
"_id": ObjectId("642984ed46b83665e0b47e23")}, {"$set" :
{"value": "on"}
})


// Delete
db.sensors.deleteOne( { "_id" : ObjectId("642984ed46b83665e0b47e23") } );
Code
The complete code for this project is available on my GitHub repository which you can either download as a zip file or clone using the below Git commands. You can view the Readme.md file for instructions on how to run this project.
git clone https://github.com/donskytech/python-flask-mongodb-projects.git
cd rest-api-server
If you want to recreate this project in a step-by-step manner then follow the steps below.
Prepare our project folder
Open Visual Studio Code and select a folder where you want to create your project.
Create a virtual environment
Create a Python virtual environment by executing the below code.
py -m venv .venv
# python -m venv .ven # for Linux/Mac
Activate the virtual environment
.\.venv\Scripts\activate
# or
source .venv\bin\activate
This should display the following messages on your terminal which tell you that you are now in a Python Virtual Environment
(.venv) C:\git\python-flask-mongodb-projects\rest-api-server>Install the Library dependencies
We need to install the following packages:
- Flask – use to create our REST API Server
- PyMongo – use to communicate with our MongoDB Database
- python-dotenv – to load environment variables
To install the packages/libraries above then execute the below command
pip install Flask PyMongo python-dotenv If you want to check how easy it is to create web applications using Flask then please see the below post that I have written about it. I have used Raspberry Pi in developing the sample project there but it is applicable also to other platforms such as Windows/Linux/MacOS
Related Content:
Raspberry Pi and Flask Quickstart Guide
Create our environment configuration files
Create a file called .flaskenv which will contain our Flask configuration files.
FLASK_APP=app
FLASK_DEBUG=1
This will set our entry file to the app.py and start the server in Debug mode so that it will automatically pick up our changes.
Next, we create a file called .env where we will place our connection MongoDB connection string with the following information.
MONGO_DB_CONN_STRING=mongodb+srv://<username>:<password>@<server_name>/sensors_dbBootstrap our Flask project
Create a file called app.py which will contain our REST API server
import os
from flask import Flask
from dotenv import load_dotenv

load_dotenv()

app = Flask(__name__)
mongo_db_url = os.environ.get("MONGO_DB_CONN_STRING")
print(mongo_db_url)
The code above will first import the necessary packages for our program. First, we read our environment variable files by calling the function load_dotenv() and then we create a Flask application.
Lastly, we retrieve our MongoDB URL connection string and assign it to the variable mongo_db_url
Run our project by executing the below command.
flask runThis should display the following messages
(.venv) C:\git\python-flask-mongodb-projects\rest-api-server>flask run
 * Serving Flask app 'app'
 * Debug mode: on
WARNING: This is a development server. Do not use it in a production deployment. Use a production WSGI server instead.
 * Running on http://127.0.0.1:5000
Press CTRL+C to quit
 * Restarting with stat
 * Debugger is active!
 * Debugger PIN: 137-320-697
Get all sensors/Get sensor given sensor_id
Now that we have bootstrapped our Flask API server then we can now begin creating our REST API Endpoints. We will start with getting all the sensors in our database.
First, we will need to import several packages into our app.py like the Response class from Flask, MongoClient from pymongo, and dumps from bson.json_util.
import os
from flask import Flask, Response, request, jsonify
from dotenv import load_dotenv
from pymongo import MongoClient
from bson.json_util import dumps
Next, we would create the object MongoClient that we would use to communicate with our MongoDB database by passing our MongoDB Atlas connection string. After this, we created a reference to our sensors_db database and assigned it to the variable db.
client = MongoClient(mongo_db_url)
db = client['sensors_db']
Finally, we will create a function that will serve a response when we call this endpoint.
@app.get("/api/sensors")
def get_sensors():
    sensor_id = request.args.get('sensor_id')
    filter = {} if sensor_id is None else {"sensor_id": sensor_id}
    sensors = list(db.sensors.find(filter))

    response = Response(
        response=dumps(sensors), status=200,  mimetype="application/json")
    return response
The function get_sensors() is decorated with the function @app.get which means that this will respond to any HTTP GET request with the path “/api/sensors“.
Next, we extract the sensor_id query parameter after which we will check if it is supplied or not. If yes then we create a Python dictionary {"sensor_id": sensor_id} that we will use to filter our sensor collection. Otherwise, we passed in a blank dictionary {} object so that no filter is applied.
We then call the PyMongo find() function on our sensors collection using the filter object and we assign it to a Python List.
Lastly, we created a Response object where we convert the resulting MongoDB BSON document into a JSON object and set the status to 200 and the MimeType to “application/json” before returning it to the caller.
The below code is what our app.py looks like after doing everything.
import os
from flask import Flask, Response, request, jsonify
from dotenv import load_dotenv
from pymongo import MongoClient
from bson.json_util import dumps

load_dotenv()

app = Flask(__name__)
mongo_db_url = os.environ.get("MONGO_DB_CONN_STRING")

client = MongoClient(mongo_db_url)
db = client['sensors_db']

@app.get("/api/sensors")
def get_sensors():
    sensor_id = request.args.get('sensor_id')
    filter = {} if sensor_id is None else {"sensor_id": sensor_id}
    sensors = list(db.sensors.find(filter))

    response = Response(
        response=dumps(sensors), status=200,  mimetype="application/json")
    return response
Testing using curl
Let us try getting all sensors in our collection by executing the below command. This will return all the documents that we have inserted inside our sensors collection.
$ curl http://localhost:5000/api/sensors

[{"_id": {"$oid": "6426689cb39a9135e7b7e63a"}, "sensor_id": "led_1", "description": "This is our LED", "location": "Inside the bedroom", "enabled": true, "type": "toggle", "value": "off"}, {"_id": {"$oid": "6426689cb39a9135e7b7e63b"}, "sensor_id": "seven_segment_1", "description": "This is our seven segment display", "location": "At the door", "enabled": true, "type": "display", "count": 2}]
If you want to specifically get only one document that matches the specific sensor_id then call it using the below command.
$ curl http://localhost:5000/api/sensors?sensor_id=led_1

[{"_id": {"$oid": "6426689cb39a9135e7b7e63a"}, "sensor_id": "led_1", "description": "This is our LED", "location": "Inside the bedroom", "enabled": true, "type": "toggle", "value": "off"}]
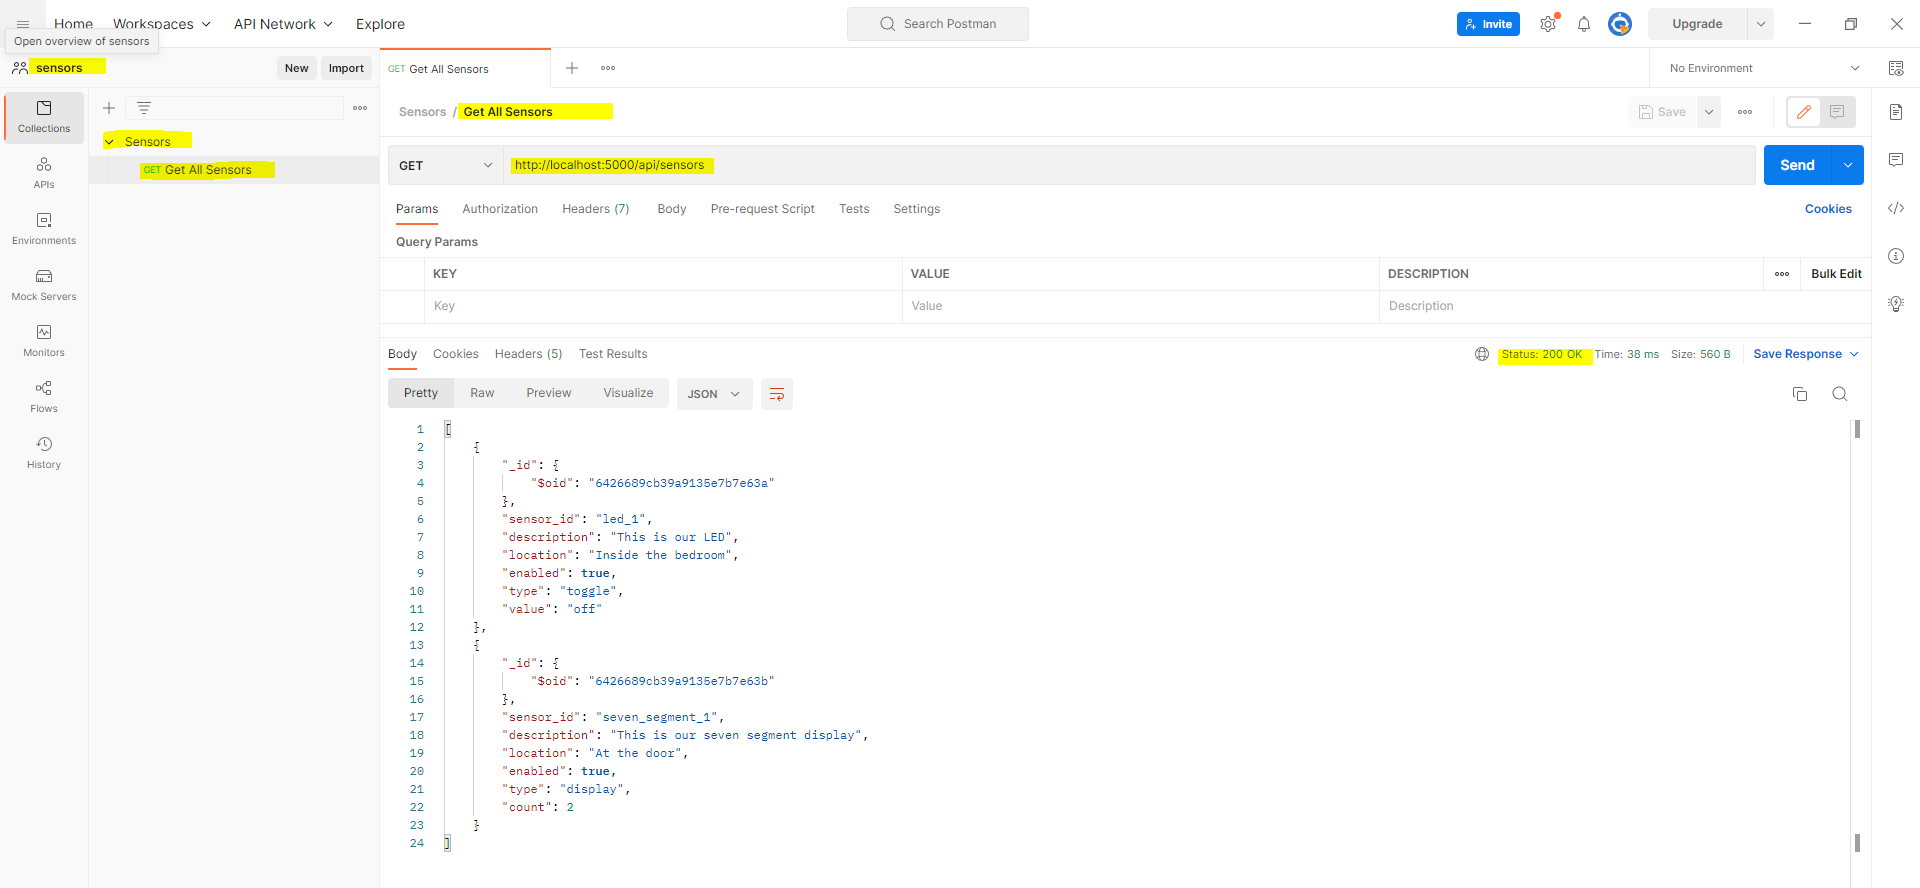
Testing using Postman
Create a new request object and supply the following parameters to get all the sensor documents on our sensors collection.
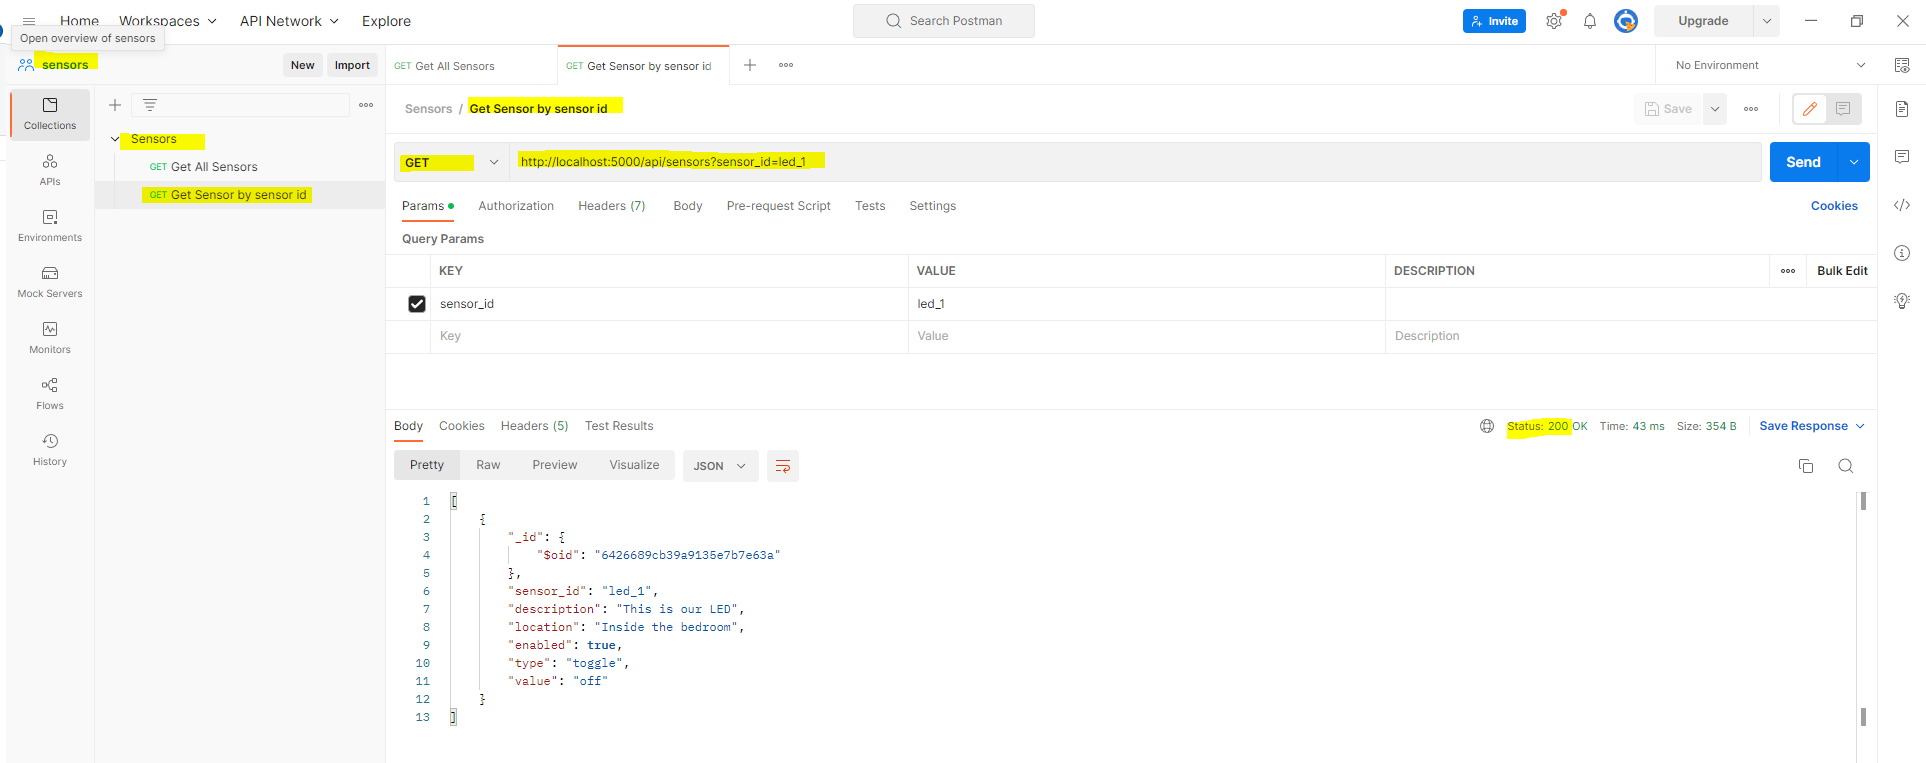
Supply the following parameters to get a specific sensor record.
Add sensor
Let us try adding a new sensor document to our sensors collection and we will try to add below JSON document.
{
	"sensor_id": "led_2",
	"description": "This is our 2nd LED",
	"location": "Inside the garage",
	"enabled": "true",
	"type": "toggle",
	"value": "off"
}
To add sensor information to our MongoDB database then we will need to add the following code to our app.py.
@app.post("/api/sensors")
def add_sensor():
    _json = request.json
     db.sensors.insert_one(_json)

    resp = jsonify({"message": "Sensor added successfully"})
    resp.status_code = 200
    return resp
We created a function called add_sensor() and added a decorator function @app.post("/api/sensors") which means that it will respond to the HTTP Post method.
We extract the JSON data using the code request.json and call the PyMongo insert_one() method to add a record to our sensors collection. After which, we return the message that sensor information was added successfully by calling the function jsonify().
Test using curl
If you want to test the API endpoint using curl then execute the below command.
$ curl -X POST http://localhost:5000/api/sensors -H 'Content-Type: application/json' -d '{"sensor_id": "led_2", "description": "This is our 2nd LED", "location": "Inside the garage", "enabled": "true", "type": "toggle","value": "off"}'

{
  "message": "Sensor added successfully"
}
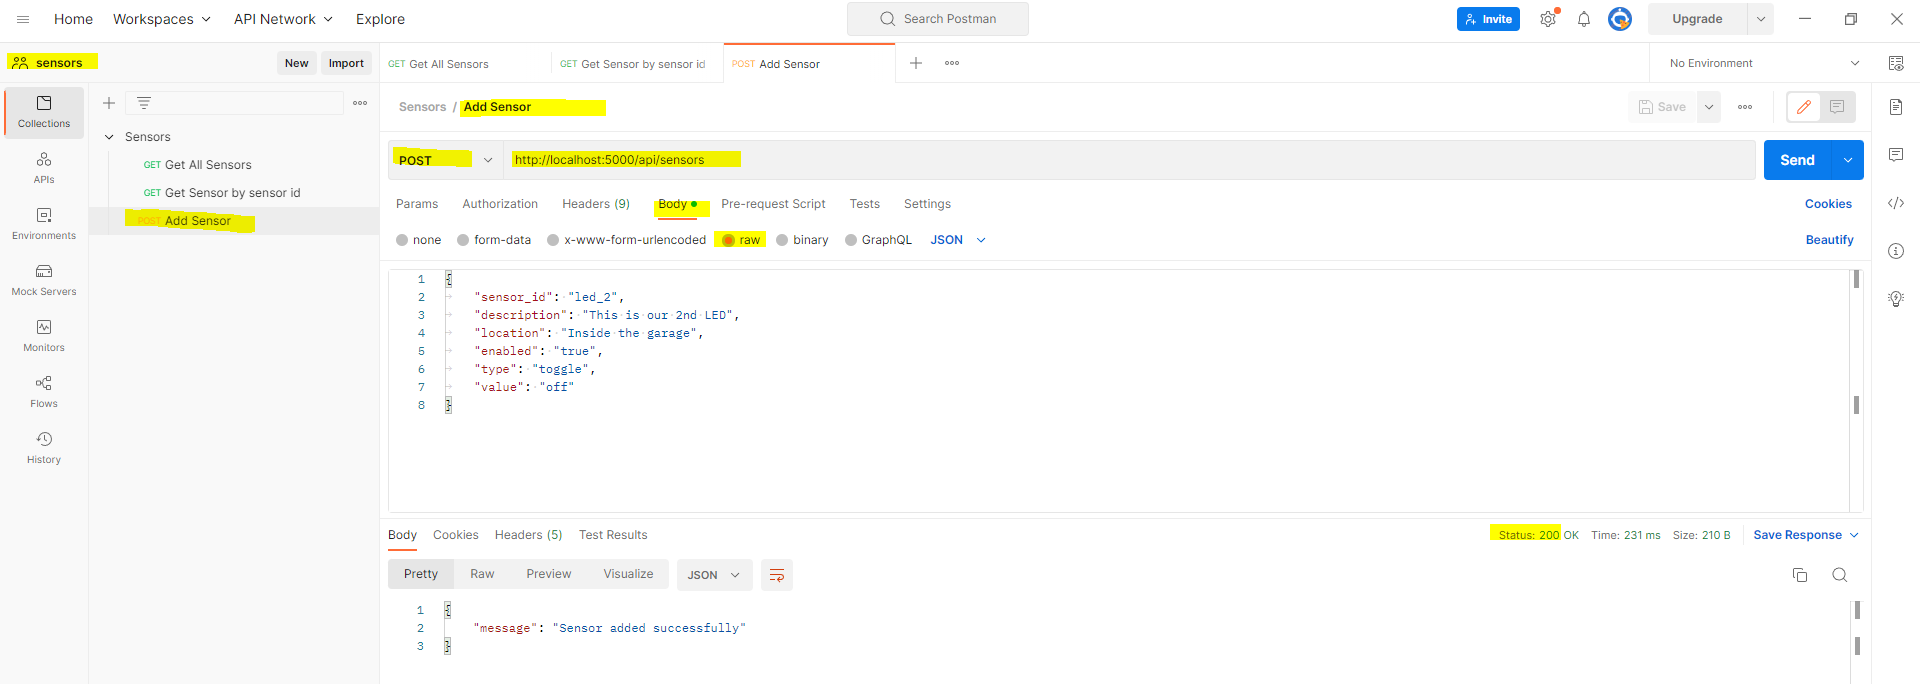
Test using Postman
To test using Postman then set the following parameters.
The code for our app.py at this point is shown below.
import os
from flask import Flask, Response, request, jsonify
from dotenv import load_dotenv
from pymongo import MongoClient
from bson.json_util import dumps

load_dotenv()

app = Flask(__name__)
mongo_db_url = os.environ.get("MONGO_DB_CONN_STRING")

client = MongoClient(mongo_db_url)
db = client['sensors_db']

@app.get("/api/sensors")
def get_sensors():
    sensor_id = request.args.get('sensor_id')
    filter = {} if sensor_id is None else {"sensor_id": sensor_id}
    sensors = list(db.sensors.find(filter))

    response = Response(
        response=dumps(sensors), status=200,  mimetype="application/json")
    return response

@app.post("/api/sensors")
def add_sensor():
    _json = request.json
    db.sensors.insert_one(_json)

    resp = jsonify({"message": "Sensor added successfully"})
    resp.status_code = 200
    return resp
Delete sensor
Next, we will begin working on deleting sensor records on our sensors collection.
We will begin by importing the following class as we need to pass in the ObjectId assigned by MongoDB when we want to delete a document.
from bson.objectid import ObjectIdAfter this, we add the following delete function delete_sensor() and added the decorator @app.delete("/api/sensors/<id>") where the path contains the ObjectId of our MongoDB document. This gets executed when we issue an HTTP Delete method.
This will call the PyMongo function delete_one() where we supply a class called ObjectId. If everything works as expected then we return a JSON response with the successful message.
@app.delete("/api/sensors/<id>")
def delete_sensor(id):
    db.sensors.delete_one({'_id': ObjectId(id)})

    resp = jsonify({"message": "Sensor deleted successfully"})
    resp.status_code = 200
    return resp
The app.py code at this point is shown below.
import os
from flask import Flask, Response, request, jsonify
from dotenv import load_dotenv
from pymongo import MongoClient
from bson.json_util import dumps
from bson.objectid import ObjectId

load_dotenv()

app = Flask(__name__)
mongo_db_url = os.environ.get("MONGO_DB_CONN_STRING")

client = MongoClient(mongo_db_url)
db = client['sensors_db']

@app.get("/api/sensors")
def get_sensors():
    sensor_id = request.args.get('sensor_id')
    filter = {} if sensor_id is None else {"sensor_id": sensor_id}
    sensors = list(db.sensors.find(filter))

    response = Response(
        response=dumps(sensors), status=200,  mimetype="application/json")
    return response

@app.post("/api/sensors")
def add_sensor():
    _json = request.json
    db.sensors.insert_one(_json)

    resp = jsonify({"message": "Sensor added successfully"})
    resp.status_code = 200
    return resp


@app.delete("/api/sensors/<id>")
def delete_sensor(id):
    db.sensors.delete_one({'_id': ObjectId(id)})

    resp = jsonify({"message": "Sensor deleted successfully"})
    resp.status_code = 200
    return resp
Test by curl
If you want to test the delete sensor API endpoint using curl then execute the below command. Take note that the supplied ObjectId should be present in our MongoDB sensors collection.
curl -X "DELETE" 'http://localhost:5000/api/sensors/6426d2a6fcd3368dd29f7f56'Test by Postman
Set the following highlighted parameters to execute an HTTP Delete.

Update sensor
Let us work now on the steps on how to update specific sensor documents. Below is the code on how to do this.
@app.put("/api/sensors/<id>")
def update_sensor(id):
    _json = request.json
    db.sensors.update_one({'_id': ObjectId(id)}, {"$set": _json})

    resp = jsonify({"message": "Sensor updated successfully"})
    resp.status_code = 200
    return resp
We created a function update_sensor() that uses the path “/api/sensors/<id>” wherein the <id> is mapped to the ObjectId of our sensor document. This view function gets called when an HTTP PUT is initiated from the client.
First, it extracts the JSON document that you want to update and it calls the PyMongo function update_one() which requires the ObjectId and uses the $set function to set the specific values in the document. If everything goes well then a JSON response is sent back that the update is successful.
Test by curl
Execute the below command to send an HTTP Put to our REST API server
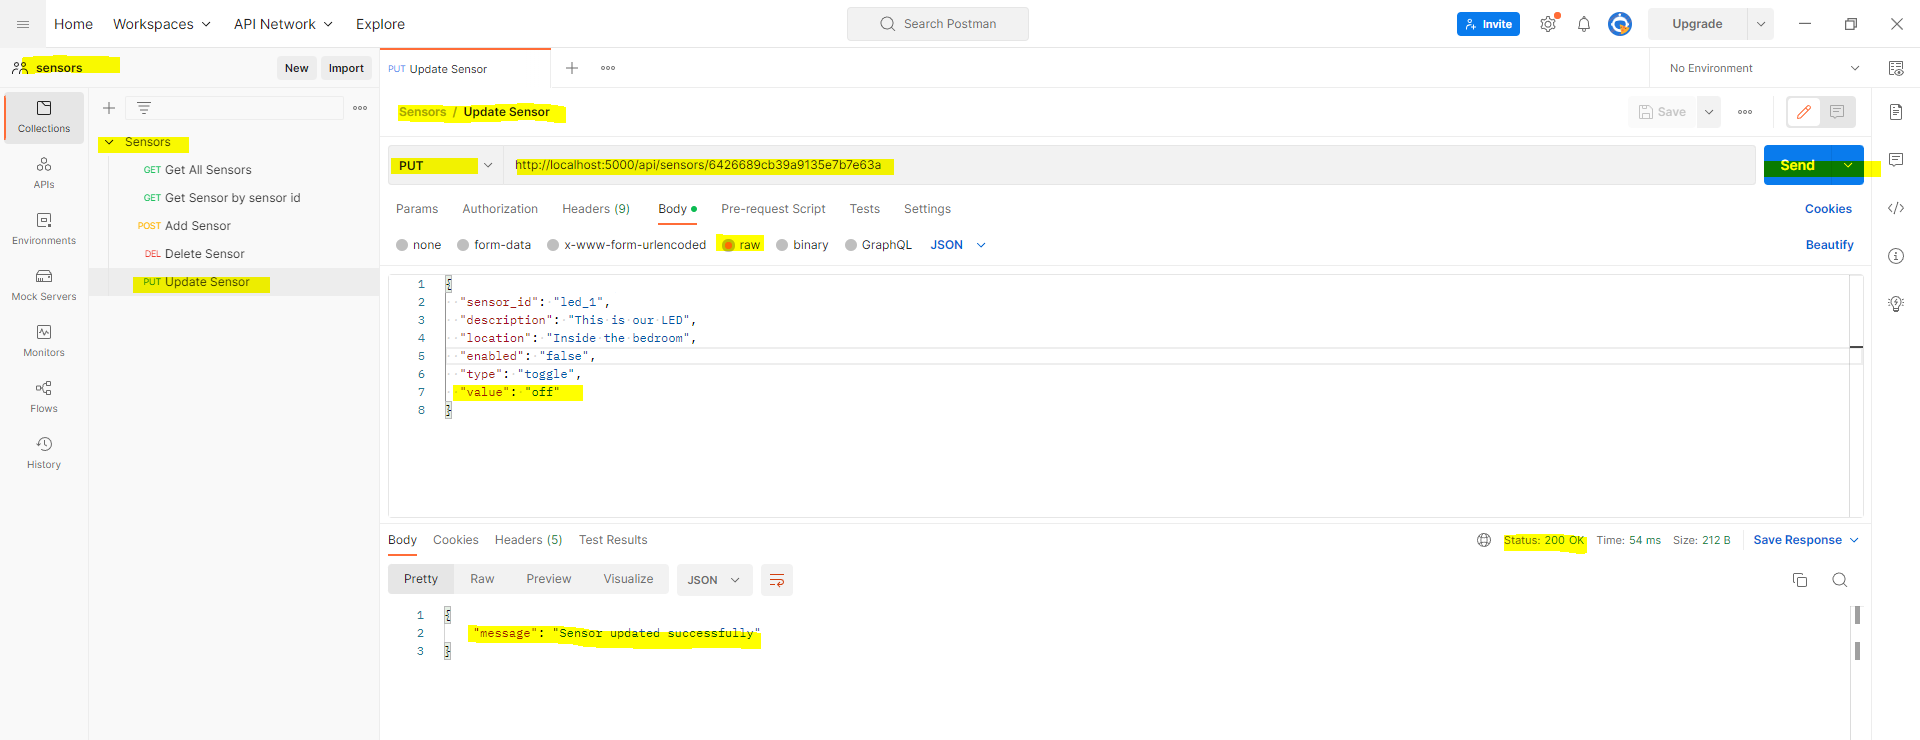
curl -X PUT 'http://localhost:5000/api/sensors/6426689cb39a9135e7b7e63a' -H 'Content-Type: application/json' -d '{"description": "This is our 1st LED", "value": "on"}'Test by Postman
Set the following parameters to test the update using Postman.
Below is the complete code at this point of our project.
import os
from flask import Flask, Response, request, jsonify
from dotenv import load_dotenv
from pymongo import MongoClient
from bson.json_util import dumps
from bson.objectid import ObjectId

load_dotenv()

app = Flask(__name__)
mongo_db_url = os.environ.get("MONGO_DB_CONN_STRING")

client = MongoClient(mongo_db_url)
db = client['sensors_db']

@app.get("/api/sensors")
def get_sensors():
    sensor_id = request.args.get('sensor_id')
    filter = {} if sensor_id is None else {"sensor_id": sensor_id}
    sensors = list(db.sensors.find(filter))

    response = Response(
        response=dumps(sensors), status=200,  mimetype="application/json")
    return response

@app.post("/api/sensors")
def add_sensor():
    _json = request.json
    db.sensors.insert_one(_json)

    resp = jsonify({"message": "Sensor added successfully"})
    resp.status_code = 200
    return resp


@app.delete("/api/sensors/<id>")
def delete_sensor(id):
    db.sensors.delete_one({'_id': ObjectId(id)})

    resp = jsonify({"message": "Sensor deleted successfully"})
    resp.status_code = 200
    return resp

@app.put("/api/sensors/<id>")
def update_sensor(id):
    _json = request.json
    db.sensors.update_one({'_id': ObjectId(id)}, {"$set": _json})

    resp = jsonify({"message": "Sensor updated successfully"})
    resp.status_code = 200
    return resp
How to add error handling in Flask, MongoDB REST API Server?
Our Python, Flask, and MongoDB API REST server are working as expected as we can perform CRUD operations on our database. However, we have not taken into account exceptional cases such as our MongoDB database server being inaccessible or the input data from our caller being invalid. This is where exception handling comes into the picture.
A dedicated page for handling application errors was created by the Flask team for this purpose and this awesome article will give you an excellent overview of how to handle exceptions in our REST API Server.
So maybe you might be asking what will happen if we do not add any error handling code in our current program. Say let us update one of our documents but not send any JSON input.
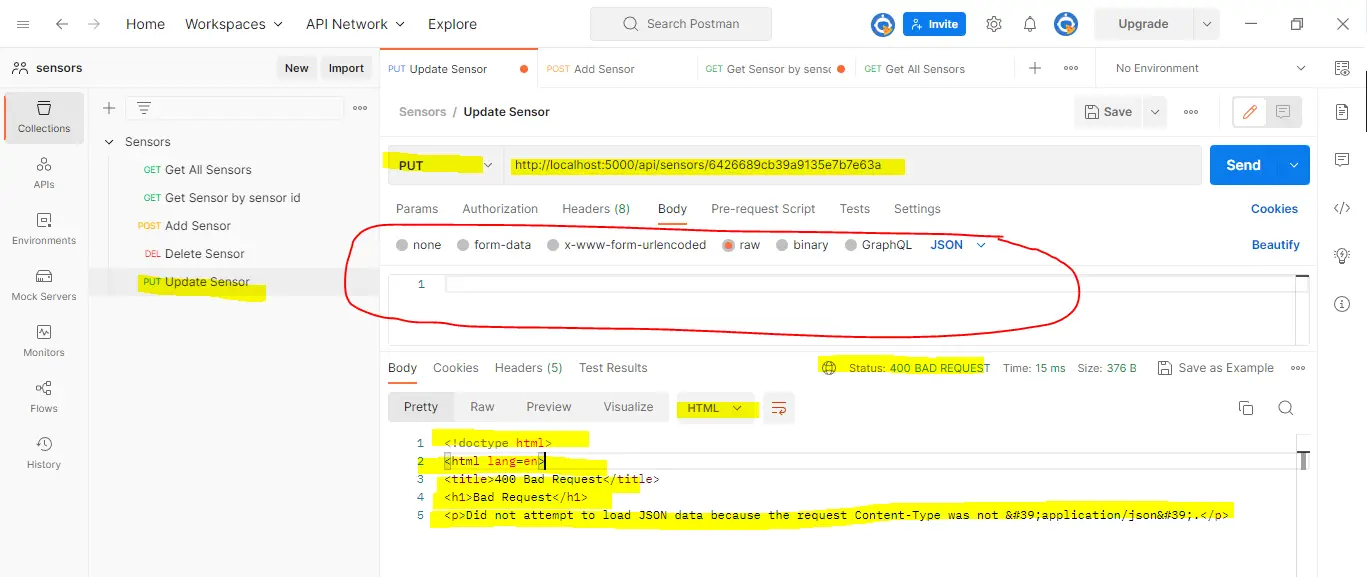
As you can see, we get an HTML output saying that it is a bad request or the status code is 400. Let us try using curl and see what the output is.
$ curl -X PUT 'http://localhost:5000/api/sensors/6426689cb39a9135e7b7e63a' -H 'Content-Type: application/json'

<!doctype html>
<html lang=en>
<title>400 Bad Request</title>
<h1>Bad Request</h1>
<p>Failed to decode JSON object: Expecting value: line 1 column 1 (char 0)</p>
We are receiving the exact error and it is an HTML page showing the error as this is the default Flask error handling mechanism. If you want to change the return result and make it a JSON message then we will need to handle it.
Add the following code at the bottom of our app.py. The below code will handle HTTP 400, 404, and 500 exceptions for us. Note, that this is not an optimal approach in error handling as we should be handling specific errors but that is the subject of another post.
@app.errorhandler(400)
def handle_400_error(error):
    return make_response(jsonify({"errorCode": error.code,
                                  "errorDescription": "Bad request!",
                                  "errorDetailedDescription": error.description,
                                  "errorName": error.name}), 400)

@app.errorhandler(404)
def handle_404_error(error):
        return make_response(jsonify({"errorCode": error.code,
                                  "errorDescription": "Resource not found!",
                                  "errorDetailedDescription": error.description,
                                  "errorName": error.name}), 404)

@app.errorhandler(500)
def handle_500_error(error):
        return make_response(jsonify({"errorCode": error.code,
                                  "errorDescription": "Internal Server Error",
                                  "errorDetailedDescription": error.description,
                                  "errorName": error.name}), 500)
After adding this then when we submit another request with missing JSON input then we should be able to see the following response.
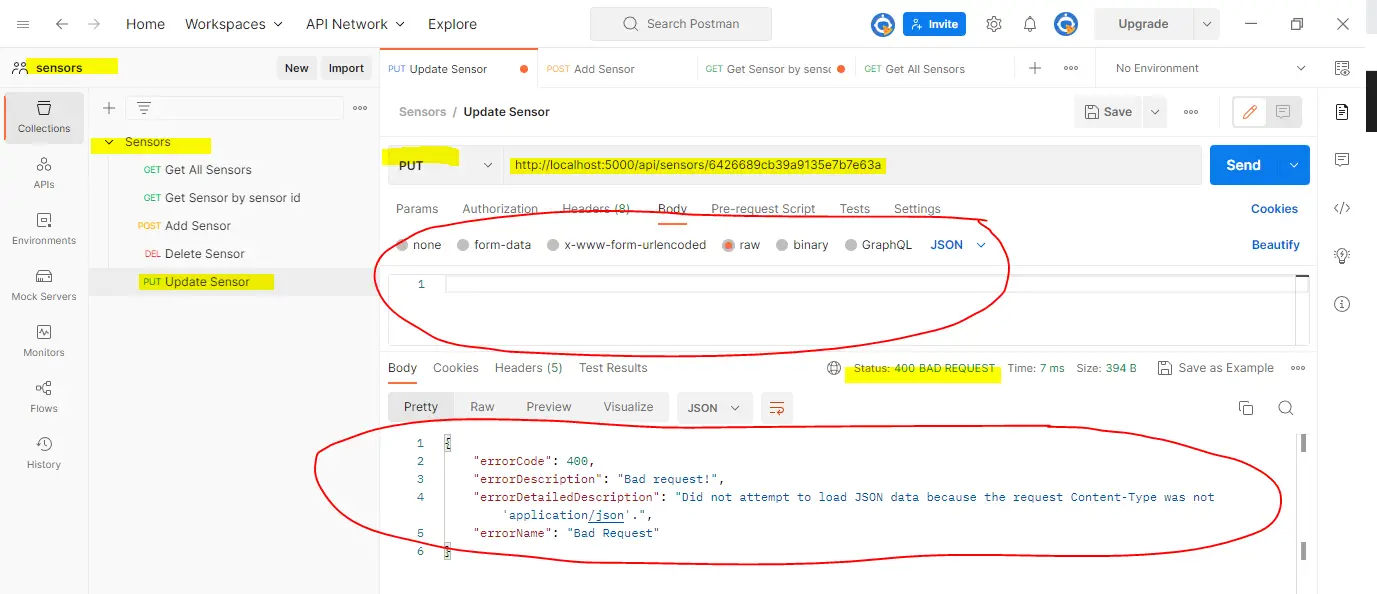
This is much better as we can see the exact cause of the exception in a JSON format.
The complete code for our app.py is below.
import os
from flask import Flask, Response, request, jsonify, make_response
from dotenv import load_dotenv
from pymongo import MongoClient
from bson.json_util import dumps
from bson.objectid import ObjectId

load_dotenv()

app = Flask(__name__)
mongo_db_url = os.environ.get("MONGO_DB_CONN_STRING")

client = MongoClient(mongo_db_url)
db = client['sensors_db']

@app.get("/api/sensors")
def get_sensors():
    sensor_id = request.args.get('sensor_id')
    filter = {} if sensor_id is None else {"sensor_id": sensor_id}
    sensors = list(db.sensors.find(filter))

    response = Response(
        response=dumps(sensors), status=200,  mimetype="application/json")
    return response

@app.post("/api/sensors")
def add_sensor():
    _json = request.json
    db.sensors.insert_one(_json)

    resp = jsonify({"message": "Sensor added successfully"})
    resp.status_code = 200
    return resp


@app.delete("/api/sensors/<id>")
def delete_sensor(id):
    db.sensors.delete_one({'_id': ObjectId(id)})

    resp = jsonify({"message": "Sensor deleted successfully"})
    resp.status_code = 200
    return resp

@app.put("/api/sensors/<id>")
def update_sensor(id):
    _json = request.json
    db.sensors.update_one({'_id': ObjectId(id)}, {"$set": _json})

    resp = jsonify({"message": "Sensor updated successfully"})
    resp.status_code = 200
    return resp

@app.errorhandler(400)
def handle_400_error(error):
    return make_response(jsonify({"errorCode": error.code,
                                  "errorDescription": "Bad request!",
                                  "errorDetailedDescription": error.description,
                                  "errorName": error.name}), 400)

@app.errorhandler(404)
def handle_404_error(error):
        return make_response(jsonify({"errorCode": error.code,
                                  "errorDescription": "Resource not found!",
                                  "errorDetailedDescription": error.description,
                                  "errorName": error.name}), 404)

@app.errorhandler(500)
def handle_500_error(error):
        return make_response(jsonify({"errorCode": error.code,
                                  "errorDescription": "Internal Server Error",
                                  "errorDetailedDescription": error.description,
                                  "errorName": error.name}), 500)
Deployment Options
If your IoT projects would only need to be accessed inside your home or school networks then you can deploy your REST API Server to any computer anywhere inside your network. You just need to handle the security of your applications by yourself so that only authorized personnel can access your API.
However, if you want to access this application anywhere then you can deploy it in any of the popular cloud hosting providers such as Amazon AWS, Microsoft Azure, or Google Cloud. The security on these cloud servers is very stringent so it is not an issue. You can deploy your Flask REST API server on their virtual machines and access it anywhere. I will tackle this option in future posts.
Future Improvements for Advanced Python Programmers
I took into account that most of my readers are hardware IoT guys who have less to little experience in web development. I program this in Python, Flask, and MongoDB REST API server with the above considerations.
The code may be basic but it will give them a headstart on how to develop their REST API server with a MongoDB database. As such, I have left the following topics intentionally.
- No ODM or Object Document Mapping was used in this project. Only PyMongo function call.
- No RESTful libraries were used only the Flask routing and view handling.
- No Authentication/Authorization
- No sophisticated exception handling only basic error handling
Wrap Up
In this post, we have explored how to set up your own Flask REST API server using Python and MongoDB. We have explored in detail what a REST API server is and how you can use it in your Internet of Things (IoT) projects. The MongoDB database is an excellent database that you can use as a database for your projects.
I hope you learned something! Happy Exploring!
Leave a Reply