Introduction
Do you want to control your Arduino-based Internet of Things (IoT) projects and electronic circuits with a database? For example, if you are outside your home and want to turn off your garage lights just by changing the values from your database This post will show you how we can configure our ESP32/ESP8266 microcontroller boards running the Arduino framework to communicate with a database specifically the MongoDB database.
If you want to see a video demo presentation of this post or a demo of this project then please see the below video or watch it on my YouTube channel.
What is this post all about?
I have often been reading the following questions on message boards and forums on any Arduino site.
- How to save sensor data from my Arduino-based board to a database?
- How can I control my sensors/components from my Arduino using my database?
- How to log my temperature readings on my Arduino-based microcontroller like the ESP32/ESP8266 to my database?
In this post, I am going to share to you my personal solution to these questions and show you why MongoDB is a good database for IoT development.
Using our MongoDB database we will do the following:
- Turn On/Off our LED by changing the values from our database
- Trigger the ON/OFF of our relay by changing the values from our database
- Save the latest DHT22 temperature/humidity readings on our database
Quite a lot of complex things to do but it actually is easy if you have understood the first 3 parts of my MongoDB IoT Tutorial Series.
MongoDB IoT Tutorial Series Roadmap
This series will teach you how to integrate a database particularly the MongoDB NoSQL database in your IoT projects. We will be using Arduino-based microcontrollers, Raspberry Pi Single Board Computers, and MicroPython devices.
The below list will tell you the different topics that we are going to discuss in this series.
- Part 1 – What is MongoDB database and why do we need it in our IoT projects?
- Part 2 – MongoDB Atlas: An Overview and How to get started
- Part 3 – Create a REST API Server with Python, Flask, and MongoDB
- Part 4 – Control your Arduino IoT projects with a MongoDB database
- Part 4.5 – Create your own Custom IoT Web Application
- Part 5 – Control your Raspberry Pi IoT projects with a MongoDB database
- Part 6 – Control your MicroPython IoT projects with a MongoDB database
- Part 7 – Arduino Data Logger using MongoDB Database
- Part 8 – Raspberry Pi Temperature Logger using MongoDB Database
- Part 9 – MicroPython Sensor Logger using MongoDB Database
This post is Part 4 of this series where I will show you how you can control your Arduino-based project using the popular MongoDB database. I am using ESP32 and ESP8266 microcontroller boards in this post but you can use any other boards that have WiFi capability.
Note that you should have a good idea of what MongoDB is and have prepared your own MongoDB Atlas cluster as I will not be discussing those items anymore in this post. Please refer to the first 3 parts of this series for details.
How to communicate with a database from our Arduino-powered Microcontroller board?
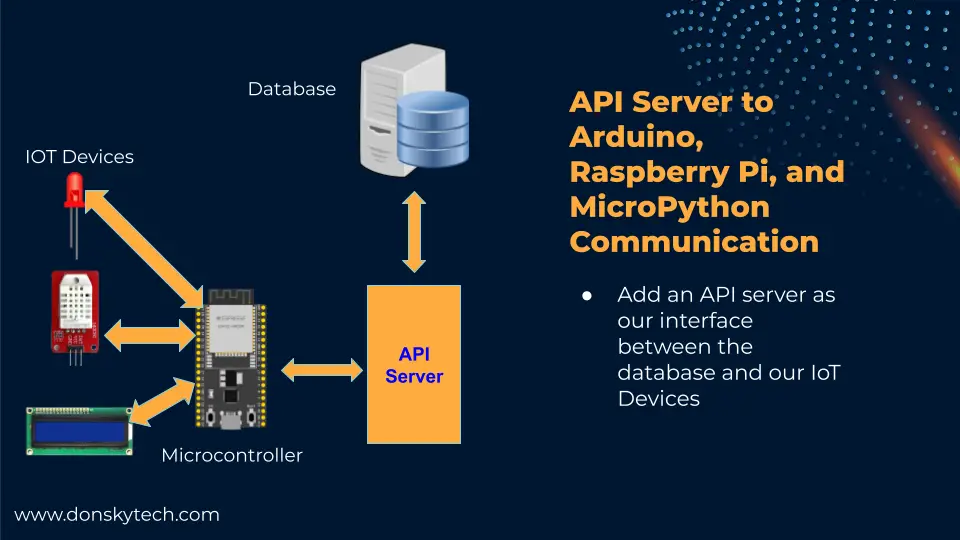
In the previous post of my MongoDB IoT Tutorial series, I specifically mentioned that it is a good practice to create an API server that would directly communicate with our database. Our Arduino Microcontrollers would then communicate with the API server if we want to interface with our MongoDB database.
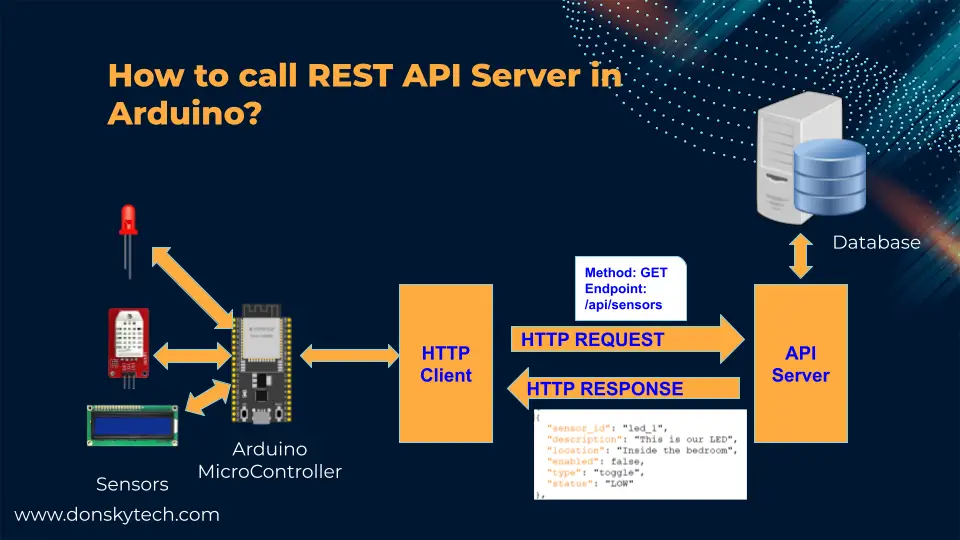
As we are using the REST (Representation State Transfer) architecture for our API server it means that we need to send an HTTP Request and handle the HTTP response from our Arduino Code.
To be able to do this easily from any Arduino-based microcontroller such as an ESP32/ESP8266 we can use the HTTP Client library.
- HTTPClient – For ESP32
- ESP8266HTTPClient – For ESP8266
Using HTTP Client, we would send an HTTP request with a specific method to a REST API Endpoint. It would return a JSON response which we then parse and check the values before sending the output to all components connected to our Arduino-based ESP32/ESP8266 Microcontroller.
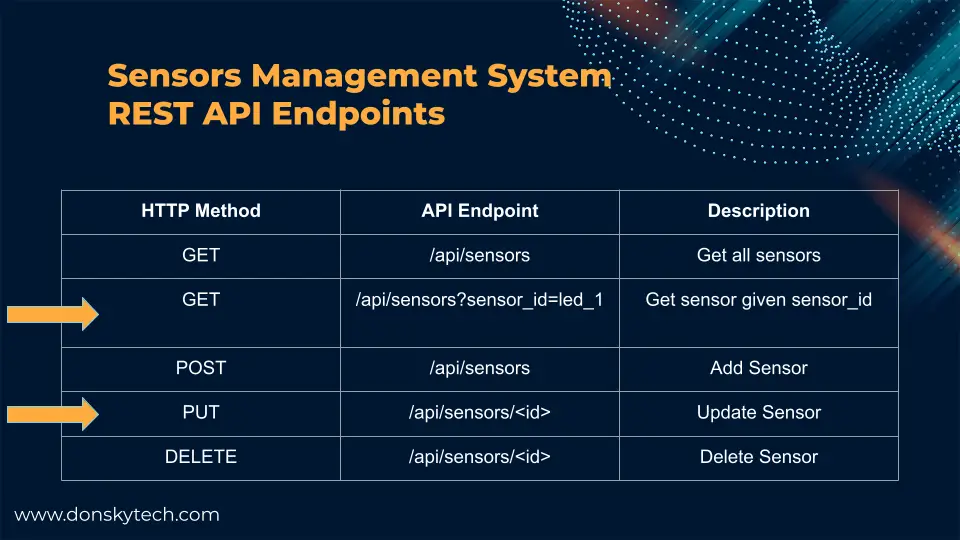
So what endpoint are we talking about here? In the previous post of this series, we created a REST API endpoint that will allow us to Create-Read-Update-Delete (CRUD) sensor records. But for this project, we are only interested in the two endpoints below that will allow us to get a sensor record by passing in the sensor_id and updating of sensor record.
Prerequisites
Knowledge about the DHT22 temperature sensors and how to interact with them is needed and if you are not familiar with how to interface with it using your ESP32/ESP8266 board then please see the below post.
Read Next:
Pico W -MicroPython MQTT – BMP/BME 280 Weather Station
Control DS18B20 using MicroPython with a Weather Station Project
I have used PlatformIO IDE in developing this project but you can use the Arduino IDE if you like.
Related Content:
PlatformIO Tutorial for Arduino Development
Parts/Components Required
The following are the components required in order to follow along with this post.
- ESP32 (I used NodeMCU) – Amazon | AliExpress | Bangood
- or ESP8266 – Amazon | AliExpress | Bangood
- DHT22 – Amazon | AliExpress
- or DHT11 – Amazon | AliExpress | Bangood
- Relay – 4 Channel (12V – used in this project) – Amazon | AliExpress
- or Relay- 4 Channel (5V) – Amazon | AliExpress | Bangood
- Bench Power Supply – Amazon | AliExpress | Bangood
- LED – Amazon | AliExpress | Bangood
- Resistors (220 Ohms) – Amazon | AliExpress | Bangood
- Breadboard – Amazon | AliExpress | Bangood
- Connecting Wires – Amazon | AliExpress | Bangood
Disclosure: These are affiliate links and I will earn small commissions to support my site when you buy through these links.
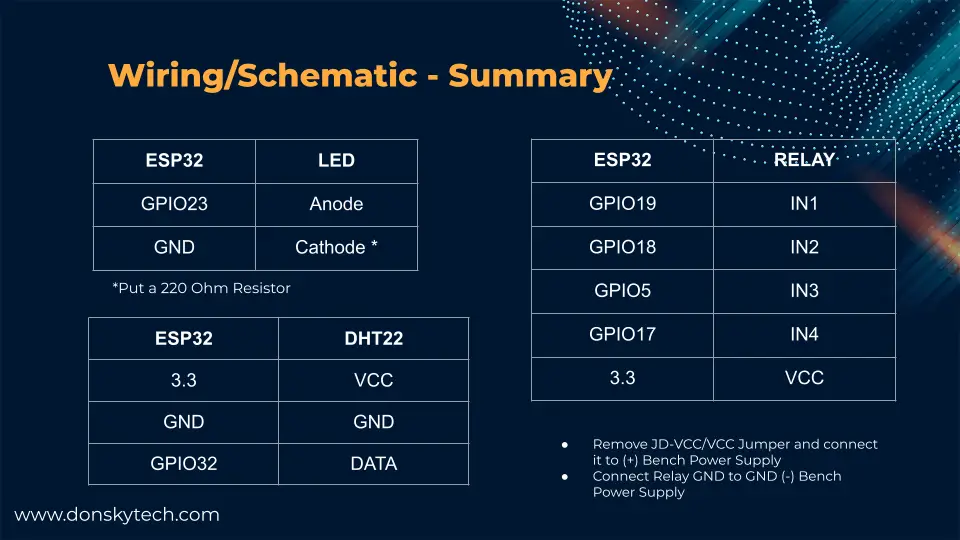
Wiring/Schematic
Below is the wiring and schematic diagram of our project.
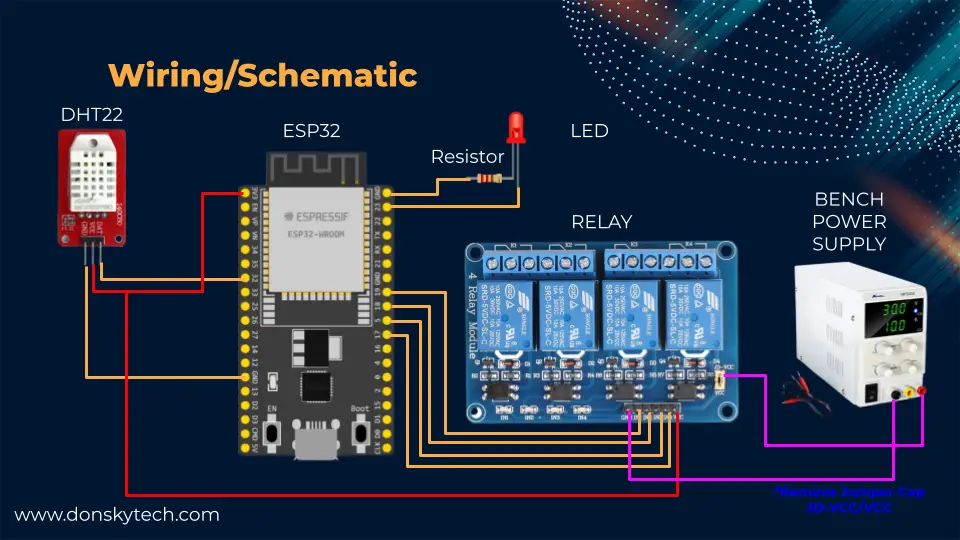
Take note that I am using a 12V Relay in this project so we need an external power supply to power the coil that will trigger our relay. It is also a good practice when using a relay to separate the load from the circuit that triggers it.
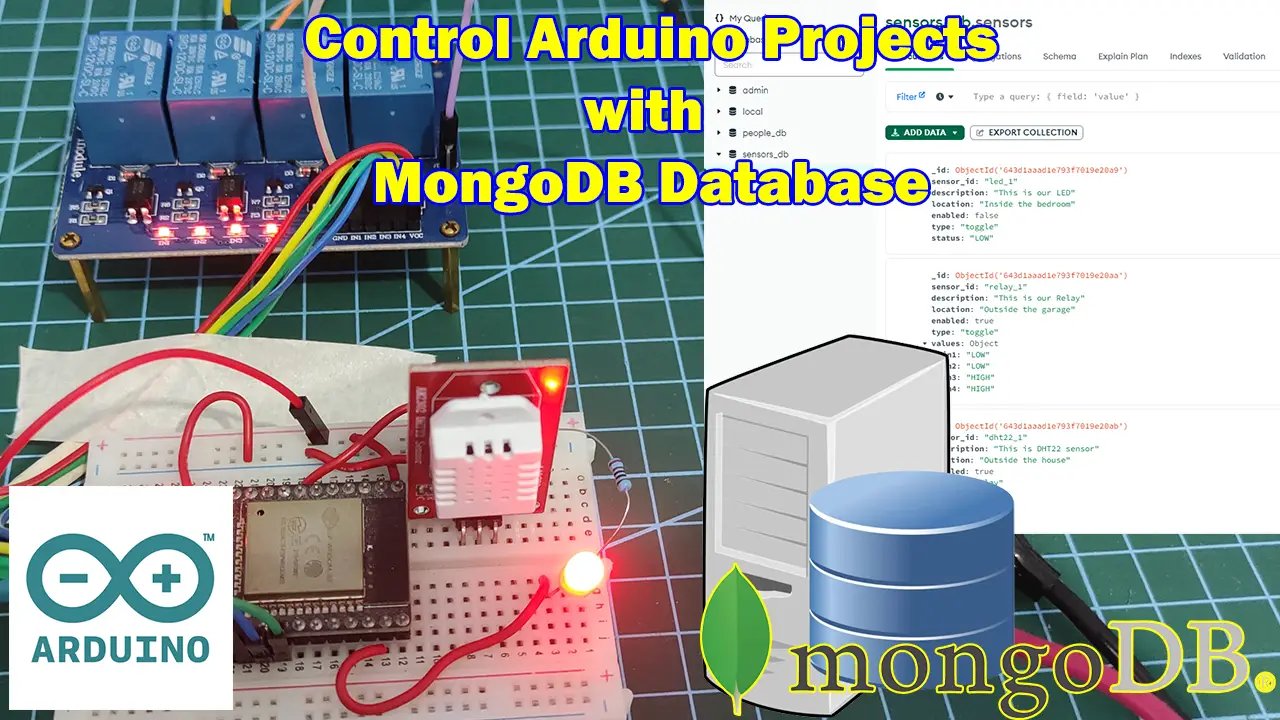
Setup our data
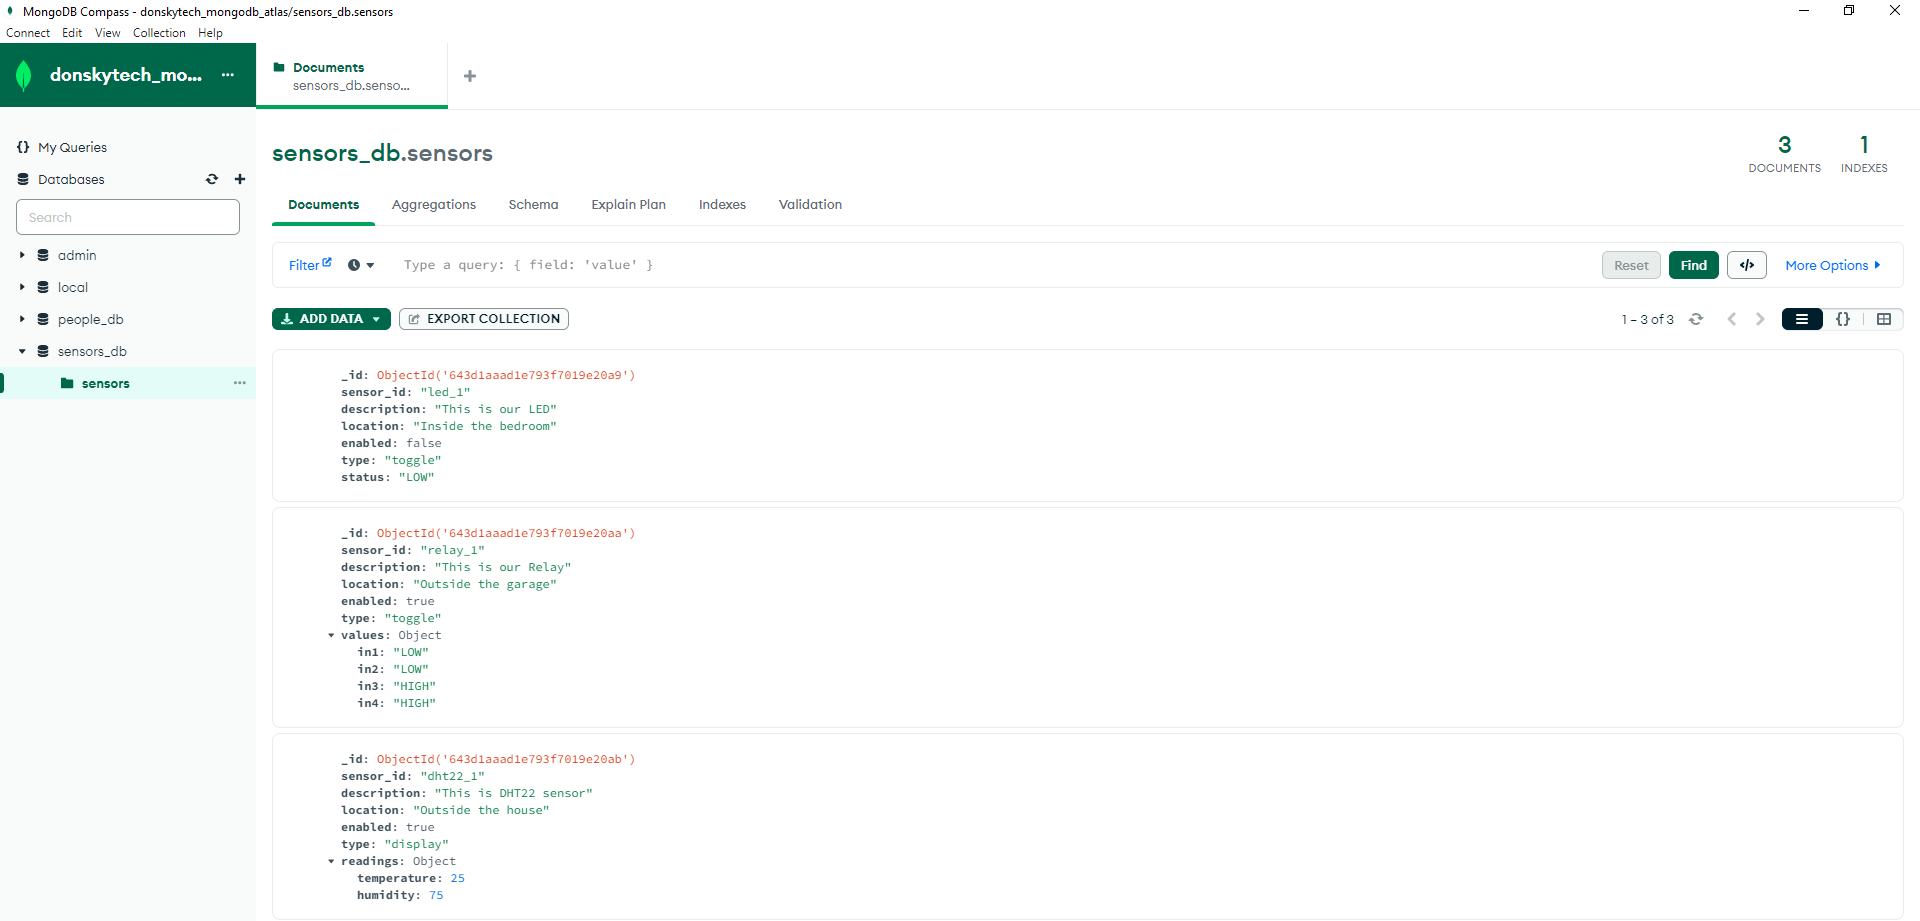
In Part 3 – Create a REST API Server with Python, Flask, and MongoDB of this MongoDB series, we created a MongoDB database called sensor_db and a collection named sensors on our MongoDB Atlas cluster. Make sure to delete all the documents under the collection (sensors) one by one.
Next, populate our sensors collection with the below JSON data as we will be using this in this project.
[
{
  "sensor_id": "led_1",
  "description": "This is our LED",
  "location": "Inside the bedroom",
  "enabled": false,
  "type": "toggle",
  "status": "LOW"
},
{
  "sensor_id": "relay_1",
  "description": "This is our Relay",
  "location": "Outside the garage",
  "enabled": true,
  "type": "toggle",
  "values": {
	"in1": "LOW",
	"in2": "LOW",
	"in3": "HIGH",
	"in4": "HIGH"
  }
},
{
  "sensor_id": "dht22_1",
  "description": "This is DHT22 sensor",
  "location": "Outside the house",
  "enabled": true,
  "type": "display",
  "readings": {
    "temperature": 25,
    "humidity": 75
  }
}
]
You can use MongoDB Compass to add the following documents to our collection (sensors) by clicking the Add Data and Insert Document buttons. At the end of this step, you should have the following data on your MongoDB database.
Code
The code to control your Arduino Project using the MongoDB database is available in my GitHub account. You can either download the project as a zip file or clone it using Git.
git clone https://github.com/donskytech/platformio-projects.git
cd esp32-projects/esp32-mongodb-database-control/
code . # Open in Visual Studio Code
Open the following project in Visual Studio code.
Libraries Used
The following list below is the libraries used in this project which you can find also in the platform.ini file of the said project.
- ArduinoJson – used to handle the JSON message exchange
- Adafruit DHT sensor library – interface with the DHT22 sensor.
- Adafruit Unified Sensor – common library for Adafruit sensors.
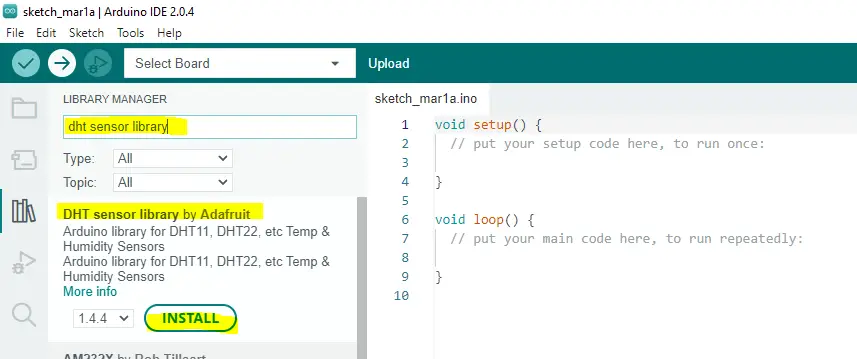
If you are using the Arduino IDE 2.0 IDE then you can add the following libraries in the Libraries tab just like the image below.
main.cpp
The core logic on how you can control your ESP32/ESP8266 Arduino-based project using the MongoDB database is shown below. Let us scan through what each line of the code does.
/*
  Title: Control your Arduino IoT projects with a MongoDB database
  Author: donsky (www.donskytech.com)
*/
#include <Arduino.h>
#include <HTTPClient.h>
#include <ArduinoJson.h>
#include "DHT.h"

// SSID and Password
const char *ssid = "<PLACE_YOUR_SSID_HERE>";
const char *password = "<PLACE_YOUR_PASSWORD_HERE>";

/**** NEED TO CHANGE THIS ACCORDING TO YOUR SETUP *****/
// The REST API endpoint - Change the IP Address
const char *base_rest_url = "http://192.168.100.22:5000/";

WiFiClient client;
HTTPClient http;

// Read interval
unsigned long previousMillis = 0;
const long readInterval = 5000;
// LED Pin
const int LED_PIN = 23;
// Relay Pins
const int RELAY_PIN_1 = 19;
const int RELAY_PIN_2 = 18;
const int RELAY_PIN_3 = 5;
const int RELAY_PIN_4 = 17;

char dhtObjectId[30];
#define DHTPIN 32 // Digital pin connected to the DHT sensor

// Uncomment whatever type you're using!
// #define DHTTYPE DHT11   // DHT 11
#define DHTTYPE DHT22 // DHT 22  (AM2302), AM2321

// Initialize DHT sensor.
DHT dht(DHTPIN, DHTTYPE);
// Struct to read DHT22 readings
struct DHT22Readings
{
  float temperature;
  float humidity;
};
// Struct to represent our LED  record
struct LED
{
  char sensor_id[10];
  char description[20];
  char location[20];
  bool enabled;
  char type[20];
  char status[10];
};
// Struct to represent our RELAY record
struct RELAY
{
  char sensor_id[10];
  char description[20];
  char location[20];
  bool enabled;
  char type[20];
  char in1[10];
  char in2[10];
  char in3[10];
  char in4[10];
};
// Size of the JSON document. Use the ArduinoJSON JSONAssistant
const int JSON_DOC_SIZE = 384;
// HTTP GET Call
StaticJsonDocument<JSON_DOC_SIZE> callHTTPGet(const char *sensor_id)
{
  char rest_api_url[200];
  // Calling our API server
  sprintf(rest_api_url, "%sapi/sensors?sensor_id=%s", base_rest_url, sensor_id);
  Serial.println(rest_api_url);

  http.useHTTP10(true);
  http.begin(client, rest_api_url);
  http.addHeader("Content-Type", "application/json");
  http.GET();

  StaticJsonDocument<JSON_DOC_SIZE> doc;
  // Parse response
  DeserializationError error = deserializeJson(doc, http.getStream());

  if (error)
  {
    Serial.print("deserializeJson() failed: ");
    Serial.println(error.c_str());
    return doc;
  }

  http.end();
  return doc;
}
// Extract LED records
LED extractLEDConfiguration(const char *sensor_id)
{
  StaticJsonDocument<JSON_DOC_SIZE> doc = callHTTPGet(sensor_id);
  if (doc.isNull() || doc.size() > 1)
    return {}; // or LED{}
  for (JsonObject item : doc.as<JsonArray>())
  {

    const char *sensorId = item["sensor_id"];      // "led_1"
    const char *description = item["description"]; // "This is our LED"
    const char *location = item["location"];       // "Inside the bedroom"
    bool enabled = item["enabled"];                // true
    const char *type = item["type"];               // "toggle"
    const char *status = item["status"];           // "HIGH"

    LED ledTemp = {};
    strcpy(ledTemp.sensor_id, sensorId);
    strcpy(ledTemp.description, description);
    strcpy(ledTemp.location, location);
    ledTemp.enabled = enabled;
    strcpy(ledTemp.type, type);
    strcpy(ledTemp.status, status);

    return ledTemp;
  }
  return {}; // or LED{}
}
// Extract Relay record
RELAY extractRelayConfiguration(const char *sensor_id)
{
  StaticJsonDocument<JSON_DOC_SIZE> doc = callHTTPGet(sensor_id);
  if (doc.isNull() || doc.size() > 1)
    return {}; // or RELAY{}
  for (JsonObject item : doc.as<JsonArray>())
  {
    const char *sensorId = item["sensor_id"];      // "relay_1"
    const char *description = item["description"]; // "This is our Relay"
    const char *location = item["location"];       // "Outside the garage"
    bool enabled = item["enabled"];                // true
    const char *type = item["type"];               // "toggle"

    JsonObject values = item["values"];
    const char *valuesIn1 = values["in1"]; // "LOW"
    const char *valuesIn2 = values["in2"]; // "LOW"
    const char *valuesIn3 = values["in3"]; // "HIGH"
    const char *valuesIn4 = values["in4"]; // "HIGH"

    RELAY relayTemp = {};
    strcpy(relayTemp.sensor_id, sensorId);
    strcpy(relayTemp.description, description);
    strcpy(relayTemp.location, location);
    relayTemp.enabled = enabled;
    strcpy(relayTemp.type, type);
    strcpy(relayTemp.in1, valuesIn1);
    strcpy(relayTemp.in2, valuesIn2);
    strcpy(relayTemp.in3, valuesIn3);
    strcpy(relayTemp.in4, valuesIn4);

    return relayTemp;
  }
  return {}; // or RELAY{}
}
// Send DHT22 readings using HTTP PUT
void sendDHT22Readings(const char *objectId, DHT22Readings dhtReadings)
{
  char rest_api_url[200];
  // Calling our API server
  sprintf(rest_api_url, "%sapi/sensors/%s", base_rest_url, objectId);
  Serial.println(rest_api_url);

  // Prepare our JSON data
  String jsondata = "";
  StaticJsonDocument<JSON_DOC_SIZE> doc;
  JsonObject readings = doc.createNestedObject("readings");
  readings["temperature"] = dhtReadings.temperature;
  readings["humidity"] = dhtReadings.humidity;

  serializeJson(doc, jsondata);
  Serial.println("JSON Data...");
  Serial.println(jsondata);

  http.begin(client, rest_api_url);
  http.addHeader("Content-Type", "application/json");

  // Send the PUT request
  int httpResponseCode = http.PUT(jsondata);
  if (httpResponseCode > 0)
  {
    String response = http.getString();
    Serial.println(httpResponseCode);
    Serial.println(response);
  }
  else
  {
    Serial.print("Error on sending POST: ");
    Serial.println(httpResponseCode);
    http.end();
  }
}

// Get DHT22 ObjectId
void getDHT22ObjectId(const char *sensor_id)
{
  StaticJsonDocument<JSON_DOC_SIZE> doc = callHTTPGet(sensor_id);
  if (doc.isNull() || doc.size() > 1)
    return;
  for (JsonObject item : doc.as<JsonArray>())
  {
    Serial.println(item);
    const char *objectId = item["_id"]["$oid"]; // "dht22_1"
    strcpy(dhtObjectId, objectId);

    return;
  }
  return;
}

// Read DHT22 sensor
DHT22Readings readDHT22()
{
  // Reading temperature or humidity takes about 250 milliseconds!
  // Sensor readings may also be up to 2 seconds 'old' (its a very slow sensor)
  float humidity = dht.readHumidity();
  // Read temperature as Celsius (the default)
  float temperatureInC = dht.readTemperature();
  // // Read temperature as Fahrenheit (isFahrenheit = true)
  // float temperatureInF = dht.readTemperature(true);

  return {temperatureInC, humidity};
}
// Convert HIGH and LOW to Arduino compatible values
int convertStatus(const char *value)
{
  if (strcmp(value, "HIGH") == 0)
  {
    Serial.println("Setting LED to HIGH");
    return HIGH;
  }
  else
  {
    Serial.println("Setting LED to LOW");
    return LOW;
  }
}
// Set our LED status
void setLEDStatus(int status)
{
  Serial.printf("Setting LED status to : %d", status);
  Serial.println("");
  digitalWrite(LED_PIN, status);
}
// Set our Relay status
void setRelayStatus(int pin, int status)
{
  Serial.printf("Setting Relay %d status to : %d", pin, status);
  Serial.println("");
  digitalWrite(pin, status);
}
// Turn off all relays during startup
void turnOffAllRelay()
{
  digitalWrite(RELAY_PIN_1, HIGH);
  digitalWrite(RELAY_PIN_2, HIGH);
  digitalWrite(RELAY_PIN_3, HIGH);
  digitalWrite(RELAY_PIN_4, HIGH);
}

void setup()
{
  Serial.begin(9600);
  for (uint8_t t = 2; t > 0; t--)
  {
    Serial.printf("[SETUP] WAIT %d...\n", t);
    Serial.flush();
    delay(1000);
  }

  WiFi.begin(ssid, password);

  while (WiFi.status() != WL_CONNECTED)
  {
    delay(500);
    Serial.print(".");
  }

  Serial.println("");
  Serial.println("WiFi connected");
  Serial.println("IP address: ");
  Serial.println(WiFi.localIP());
  //  Start DHT Sensor readings
  dht.begin();
  //  Get the ObjectId of the DHT22 sensor
  getDHT22ObjectId("dht22_1");
  // Setup LED
  pinMode(LED_PIN, OUTPUT);
  // Setup relay
  pinMode(RELAY_PIN_1, OUTPUT);
  pinMode(RELAY_PIN_2, OUTPUT);
  pinMode(RELAY_PIN_3, OUTPUT);
  pinMode(RELAY_PIN_4, OUTPUT);
  turnOffAllRelay();
}

void loop()
{

  unsigned long currentMillis = millis();

  if (currentMillis - previousMillis >= readInterval)
  {
    // save the last time
    previousMillis = currentMillis;

    Serial.println("---------------");
    // Read our configuration for our LED
    LED ledSetup = extractLEDConfiguration("led_1");
    Serial.println(ledSetup.sensor_id);
    Serial.println(ledSetup.description);
    Serial.println(ledSetup.location);
    Serial.println(ledSetup.enabled);
    Serial.println(ledSetup.type);
    Serial.println(ledSetup.status);
    setLEDStatus(convertStatus(ledSetup.status)); // Set LED value

    Serial.println("---------------");
    // Read our configuration for our RELAY
    RELAY relaySetup = extractRelayConfiguration("relay_1");
    Serial.println(relaySetup.sensor_id);
    Serial.println(relaySetup.description);
    Serial.println(relaySetup.location);
    Serial.println(relaySetup.enabled);
    Serial.println(relaySetup.type);
    Serial.println(relaySetup.in1);
    Serial.println(relaySetup.in2);
    Serial.println(relaySetup.in3);
    Serial.println(relaySetup.in4);
    // Set Relay Status
    setRelayStatus(RELAY_PIN_1, convertStatus(relaySetup.in1));
    setRelayStatus(RELAY_PIN_2, convertStatus(relaySetup.in2));
    setRelayStatus(RELAY_PIN_3, convertStatus(relaySetup.in3));
    setRelayStatus(RELAY_PIN_4, convertStatus(relaySetup.in4));

    Serial.println("---------------");
    // Send our DHT22 sensor readings
    // Locate the ObjectId of our DHT22 document in MongoDB
    Serial.println("Sending latest DHT22 readings");
    DHT22Readings readings = readDHT22();
    // Check if any reads failed and exit early (to try again).
    if (isnan(readings.humidity) || isnan(readings.temperature))
    {
      Serial.println(F("Failed to read from DHT sensor!"));
      return;
    }
    Serial.print("Temperature :: ");
    Serial.println(readings.temperature);
    Serial.print("Humidity :: ");
    Serial.println(readings.humidity);
    sendDHT22Readings(dhtObjectId, readings);
  }
}
Import header files
/*
  Title: Control your Arduino IoT projects with a MongoDB database
  Author: donsky (www.donskytech.com)
*/
#include <Arduino.h>
#include <HTTPClient.h>
#include <ArduinoJson.h>
#include "DHT.h"
Import the necessary header files needed to connect to our REST API server and our DHT sensor.
Set WiFi and REST server
// SSID and Password
const char *ssid = "<PLACE_YOUR_SSID_HERE>";
const char *password = "<PLACE_YOUR_PASSWORD_HERE>";

/**** NEED TO CHANGE THIS ACCORDING TO YOUR SETUP *****/
// The REST API endpoint - Change the IP Address
const char *base_rest_url = "http://192.168.100.22:5000/";
Change the following variables to match your WiFi network credentials. Also, set the IP Address of the REST service that we did in Part 3 of this series.
Define the HTTPClient
WiFiClient client;
HTTPClient http;
In order for us to call our REST API endpoint from our ESP32/ESP8266 board running Arduino then we will be using HTTPClient. Define the WiFiClient and HTTPClient at this point.
Set GPIO Pin configurations
// Read interval
unsigned long previousMillis = 0;
const long readInterval = 5000;
// LED Pin
const int LED_PIN = 23;
// Relay Pins
const int RELAY_PIN_1 = 19;
const int RELAY_PIN_2 = 18;
const int RELAY_PIN_3 = 5;
const int RELAY_PIN_4 = 17;

#define DHTPIN 32 // Digital pin connected to the DHT sensor

// Uncomment whatever type you're using!
// #define DHTTYPE DHT11   // DHT 11
#define DHTTYPE DHT22 // DHT 22  (AM2302), AM2321

// Initialize DHT sensor.
DHT dht(DHTPIN, DHTTYPE);
We define the read interval delay as 5000 ms or 5 seconds. This means that we will call our REST API endpoint and retrieve the MongoDB Database record every 5 seconds.
Next, we assign the GPIO pins where our components are connected such as the LED, Relay, and DHT22 sensor.
Define the data structure for our record
// Struct to read DHT22 readings
struct DHT22Readings
{
  float temperature;
  float humidity;
};
// Struct to represent our LED  record
struct LED
{
  char sensor_id[10];
  char description[20];
  char location[20];
  bool enabled;
  char type[20];
  char status[10];
};
// Struct to represent our RELAY record
struct RELAY
{
  char sensor_id[10];
  char description[20];
  char location[20];
  bool enabled;
  char type[20];
  char in1[10];
  char in2[10];
  char in3[10];
  char in4[10];
};
Once we retrieved the response from our REST API Server then we can map the records returned from it using a C/C++ struct. This will allow us to return multiple pieces of information from our function call.
HTTP GET (LED)
// Size of the JSON document. Use the ArduinoJSON JSONAssistant
const int JSON_DOC_SIZE = 384;
// HTTP GET Call
StaticJsonDocument<JSON_DOC_SIZE> callHTTPGet(const char *sensor_id)
{
  char rest_api_url[200];
  // Calling our API server
  sprintf(rest_api_url, "%sapi/sensors?sensor_id=%s", base_rest_url, sensor_id);
  Serial.println(rest_api_url);

  http.useHTTP10(true);
  http.begin(client, rest_api_url);
  http.addHeader("Content-Type", "application/json");
  http.GET();

  StaticJsonDocument<JSON_DOC_SIZE> doc;
  // Parse response
  DeserializationError error = deserializeJson(doc, http.getStream());

  if (error)
  {
    Serial.print("deserializeJson() failed: ");
    Serial.println(error.c_str());
    return doc;
  }

  http.end();
  return doc;
}

// Extract LED records
LED extractLEDConfiguration(const char *sensor_id)
{
  StaticJsonDocument<JSON_DOC_SIZE> doc = callHTTPGet(sensor_id);
  if (doc.isNull() || doc.size() > 1)
    return {}; // or LED{}
  for (JsonObject item : doc.as<JsonArray>())
  {

    const char *sensorId = item["sensor_id"];      // "led_1"
    const char *description = item["description"]; // "This is our LED"
    const char *location = item["location"];       // "Inside the bedroom"
    bool enabled = item["enabled"];                // true
    const char *type = item["type"];               // "toggle"
    const char *status = item["status"];           // "HIGH"

    LED ledTemp = {};
    strcpy(ledTemp.sensor_id, sensorId);
    strcpy(ledTemp.description, description);
    strcpy(ledTemp.location, location);
    ledTemp.enabled = enabled;
    strcpy(ledTemp.type, type);
    strcpy(ledTemp.status, status);

    return ledTemp;
  }
  return {}; // or LED{}
}
This is the code that will call an HTTP GET to our REST API server to retrieve sensor records. Let us go over what each line of the code does.
// Size of the JSON document. Use the ArduinoJSON JSONAssistant
const int JSON_DOC_SIZE = 384;
// HTTP GET Call
StaticJsonDocument<JSON_DOC_SIZE> callHTTPGet(const char *sensor_id)
{
  char rest_api_url[200];
  // Calling our API server
  sprintf(rest_api_url, "%sapi/sensors?sensor_id=%s", base_rest_url, sensor_id);
  Serial.println(rest_api_url);

  http.useHTTP10(true);
  http.begin(client, rest_api_url);
  http.addHeader("Content-Type", "application/json");
  http.GET();

  StaticJsonDocument<JSON_DOC_SIZE> doc;
  // Parse response
  DeserializationError error = deserializeJson(doc, http.getStream());

  if (error)
  {
    Serial.print("deserializeJson() failed: ");
    Serial.println(error.c_str());
    return doc;
  }

  http.end();
  return doc;
}
First, we need to compute the size of our JSON document by using the ArduinoJson JSON Assistant from here. Paste the largest JSON response that you have here and select the serialize option and your processor. You can assign this to the JSON_DOC_SIZE variable. You can put some buffer if you want just in case your JSON is bigger.
Next, we need to call our REST API endpoint and pass in our manually assigned sensor_id. The HTTP method is GET and we will use the HTTPClient function http.GET();
# URL ENDPOINT
http://192.168.100.22:5000/api/sensors?sensor_id=led_1
# HTTP METHOD
GET
After which, we will deserialize the response and assign it to our local variable StaticJsonDocument<JSON_DOC_SIZE> doc; and return it to the caller.
// Extract LED records
LED extractLEDConfiguration(const char *sensor_id)
{
  StaticJsonDocument<JSON_DOC_SIZE> doc = callHTTPGet(sensor_id);
  if (doc.isNull() || doc.size() > 1)
    return {}; // or LED{}
  for (JsonObject item : doc.as<JsonArray>())
  {

    const char *sensorId = item["sensor_id"];      // "led_1"
    const char *description = item["description"]; // "This is our LED"
    const char *location = item["location"];       // "Inside the bedroom"
    bool enabled = item["enabled"];                // true
    const char *type = item["type"];               // "toggle"
    const char *status = item["status"];           // "HIGH"

    LED ledTemp = {};
    strcpy(ledTemp.sensor_id, sensorId);
    strcpy(ledTemp.description, description);
    strcpy(ledTemp.location, location);
    ledTemp.enabled = enabled;
    strcpy(ledTemp.type, type);
    strcpy(ledTemp.status, status);

    return ledTemp;
  }
  return {}; // or LED{}
}
The function extractLEDConfiguration will call our earlier function callHTTPGet and whatever the result is checked. We are expecting only one record or document from our database.
Using the earlier LED struct that we defined, we create a local variable of that type and we populate it by copying the values to the array using the C++ function strcpy command. This temporary local variable is then returned to the caller.
HTTP GET (Relay)
// Extract Relay record
RELAY extractRelayConfiguration(const char *sensor_id)
{
  StaticJsonDocument<JSON_DOC_SIZE> doc = callHTTPGet(sensor_id);
  if (doc.isNull() || doc.size() > 1)
    return {}; // or RELAY{}
  for (JsonObject item : doc.as<JsonArray>())
  {
    const char *sensorId = item["sensor_id"];      // "relay_1"
    const char *description = item["description"]; // "This is our Relay"
    const char *location = item["location"];       // "Outside the garage"
    bool enabled = item["enabled"];                // true
    const char *type = item["type"];               // "toggle"

    JsonObject values = item["values"];
    const char *valuesIn1 = values["in1"]; // "LOW"
    const char *valuesIn2 = values["in2"]; // "LOW"
    const char *valuesIn3 = values["in3"]; // "HIGH"
    const char *valuesIn4 = values["in4"]; // "HIGH"

    RELAY relayTemp = {};
    strcpy(relayTemp.sensor_id, sensorId);
    strcpy(relayTemp.description, description);
    strcpy(relayTemp.location, location);
    relayTemp.enabled = enabled;
    strcpy(relayTemp.type, type);
    strcpy(relayTemp.in1, valuesIn1);
    strcpy(relayTemp.in2, valuesIn2);
    strcpy(relayTemp.in3, valuesIn3);
    strcpy(relayTemp.in4, valuesIn4);

    return relayTemp;
  }
  return {}; // or RELAY{}
}
The function extractRelayConfiguration() is almost similar to the function extractLEDConfiguration() and the only difference is the return type which is the struct RELAY.
In addition, we are calling the same REST API endpoint but we are passing in a different sensor_id like the one below.
# URL ENDPOINT
http://192.168.100.22:5000/api/sensors?sensor_id=relay_1
# HTTP METHOD
GET
HTTP PUT (DHT22 readings)
// Send DHT22 readings using HTTP PUT
void sendDHT22Readings(const char *objectId, DHT22Readings dhtReadings)
{
  char rest_api_url[200];
  // Calling our API server
  sprintf(rest_api_url, "%sapi/sensors/%s", base_rest_url, objectId);
  Serial.println(rest_api_url);

  // Prepare our JSON data
  String jsondata = "";
  StaticJsonDocument<JSON_DOC_SIZE> doc;
  JsonObject readings = doc.createNestedObject("readings");
  readings["temperature"] = dhtReadings.temperature;
  readings["humidity"] = dhtReadings.humidity;

  serializeJson(doc, jsondata);
  Serial.println("JSON Data...");
  Serial.println(jsondata);

  http.begin(client, rest_api_url);
  http.addHeader("Content-Type", "application/json");

  // Send the PUT request
  int httpResponseCode = http.PUT(jsondata);
  if (httpResponseCode > 0)
  {
    String response = http.getString();
    Serial.println(httpResponseCode);
    Serial.println(response);
  }
  else
  {
    Serial.print("Error on sending POST: ");
    Serial.println(httpResponseCode);
    http.end();
  }
}

// Get DHT22 ObjectId
void getDHT22ObjectId(const char *sensor_id)
{
  StaticJsonDocument<JSON_DOC_SIZE> doc = callHTTPGet(sensor_id);
  if (doc.isNull() || doc.size() > 1)
    return;
  for (JsonObject item : doc.as<JsonArray>())
  {
    Serial.println(item);
    const char *objectId = item["_id"]["$oid"]; // "dht22_1"
    strcpy(dhtObjectId, objectId);

    return;
  }
  return;
}

// Read DHT22 sensor
DHT22Readings readDHT22()
{
  // Reading temperature or humidity takes about 250 milliseconds!
  // Sensor readings may also be up to 2 seconds 'old' (its a very slow sensor)
  float humidity = dht.readHumidity();
  // Read temperature as Celsius (the default)
  float temperatureInC = dht.readTemperature();
  // // Read temperature as Fahrenheit (isFahrenheit = true)
  // float temperatureInF = dht.readTemperature(true);

  return {temperatureInC, humidity};
}
In order for us to update our DHT22 document/record with the latest sensor readings we need to call the REST API endpoint that will update records on our MongoDB database. To update a specific record/document we need the ObjectId of our record so that we can identify which document we want to update.
# URL ENDPOINT
http://192.168.100.22:5000/api/sensors/<ObjectId>
# HTTP Method
PUT
Next, we need to prepare the JSON object that we will pass in when we call the API using HTTPClient. We will use the ArduinoJSON library to encode a JSON object that will contain the readings of our DHT22. The expected JSON output will be in this pattern.
  "readings": {
    "temperature": 25,
    "humidity": 75
  }
We will use the function HTTPClient.PUT() to send an HTTP PUT request together with our serialized JSON.
utility functions
// Convert HIGH and LOW to Arduino compatible values
int convertStatus(const char *value)
{
  if (strcmp(value, "HIGH") == 0)
  {
    Serial.println("Setting LED to HIGH");
    return HIGH;
  }
  else
  {
    Serial.println("Setting LED to LOW");
    return LOW;
  }
}
// Set our LED status
void setLEDStatus(int status)
{
  Serial.printf("Setting LED status to : %d", status);
  Serial.println("");
  digitalWrite(LED_PIN, status);
}
// Set our Relay status
void setRelayStatus(int pin, int status)
{
  Serial.printf("Setting Relay %d status to : %d", pin, status);
  Serial.println("");
  digitalWrite(pin, status);
}
// Turn off all relays during startup
void turnOffAllRelay()
{
  digitalWrite(RELAY_PIN_1, HIGH);
  digitalWrite(RELAY_PIN_2, HIGH);
  digitalWrite(RELAY_PIN_3, HIGH);
  digitalWrite(RELAY_PIN_4, HIGH);
}
The following functions above are utility functions that are needed for us to control our components. I have added comments on what each function does for you to know what its intended use is.
setup()
void setup()
{
  Serial.begin(9600);
  for (uint8_t t = 2; t > 0; t--)
  {
    Serial.printf("[SETUP] WAIT %d...\n", t);
    Serial.flush();
    delay(1000);
  }

  WiFi.begin(ssid, password);

  while (WiFi.status() != WL_CONNECTED)
  {
    delay(500);
    Serial.print(".");
  }

  Serial.println("");
  Serial.println("WiFi connected");
  Serial.println("IP address: ");
  Serial.println(WiFi.localIP());
  //  Start DHT Sensor readings
  dht.begin();
  //  Get the ObjectId of the DHT22 sensor
  getDHT22ObjectId("dht22_1");
  // Setup LED
  pinMode(LED_PIN, OUTPUT);
  // Setup relay
  pinMode(RELAY_PIN_1, OUTPUT);
  pinMode(RELAY_PIN_2, OUTPUT);
  pinMode(RELAY_PIN_3, OUTPUT);
  pinMode(RELAY_PIN_4, OUTPUT);
  turnOffAllRelay();
}
This is our Arduino standard function setup() which does the following tasks during the startup
- Connect to our WiFi
- Begin communicating with our DHT22 sensor
- Set up the GPIO pins for the LED and Relay and turn off all relays initially.
- Get the DHT22 ObjectId from the database so that we can save the readings by calling the function
getDHT22ObjectId("dht22_1");
loop()
void loop()
{

  unsigned long currentMillis = millis();

  if (currentMillis - previousMillis >= readInterval)
  {
    // save the last time
    previousMillis = currentMillis;

    Serial.println("---------------");
    // Read our configuration for our LED
    LED ledSetup = extractLEDConfiguration("led_1");
    Serial.println(ledSetup.sensor_id);
    Serial.println(ledSetup.description);
    Serial.println(ledSetup.location);
    Serial.println(ledSetup.enabled);
    Serial.println(ledSetup.type);
    Serial.println(ledSetup.status);
    setLEDStatus(convertStatus(ledSetup.status)); // Set LED value

    Serial.println("---------------");
    // Read our configuration for our RELAY
    RELAY relaySetup = extractRelayConfiguration("relay_1");
    Serial.println(relaySetup.sensor_id);
    Serial.println(relaySetup.description);
    Serial.println(relaySetup.location);
    Serial.println(relaySetup.enabled);
    Serial.println(relaySetup.type);
    Serial.println(relaySetup.in1);
    Serial.println(relaySetup.in2);
    Serial.println(relaySetup.in3);
    Serial.println(relaySetup.in4);
    // Set Relay Status
    setRelayStatus(RELAY_PIN_1, convertStatus(relaySetup.in1));
    setRelayStatus(RELAY_PIN_2, convertStatus(relaySetup.in2));
    setRelayStatus(RELAY_PIN_3, convertStatus(relaySetup.in3));
    setRelayStatus(RELAY_PIN_4, convertStatus(relaySetup.in4));

    Serial.println("---------------");
    // Send our DHT22 sensor readings
    // Locate the ObjectId of our DHT22 document in MongoDB
    Serial.println("Sending latest DHT22 readings");
    DHT22Readings readings = readDHT22();
    // Check if any reads failed and exit early (to try again).
    if (isnan(readings.humidity) || isnan(readings.temperature))
    {
      Serial.println(F("Failed to read from DHT sensor!"));
      return;
    }
    Serial.print("Temperature :: ");
    Serial.println(readings.temperature);
    Serial.print("Humidity :: ");
    Serial.println(readings.humidity);
    sendDHT22Readings("64379da4d1e793f7019e20a0", readings);
  }
}
Our loop() function is our standard Arduino function and this is where we talk to our REST API server in 5-second intervals.
First, we retrieve the configurations for our LED by calling the function extractLEDConfiguration(). We specifically check for the status return and see if it is HIGH or LOW and then set the value of the LED accordingly.
Next, we retrieve the configurations for our Relay by calling the function extractRelayConfiguration("relay_1");. We then check the return value of the in1, in2, in3, and in4 member variables and set the value of the relay accordingly.
Lastly, in order for us to save the latest DHT22 reading we need the ObjectId of our DHT22 record/document. You can use your MongoDB compass or MongoDB Atlas to get this value. There is no need now to retrieve the ObjectId of our DHT22 sensor as the ObjectId is retrieved during startup.
  //  Start DHT Sensor readings
  dht.begin();
  //  Get the ObjectId of the DHT22 sensor
  getDHT22ObjectId("dht22_1");
Note: Update the main.cpp code and set the ObjectId to match that of your setup.

We retrieve the readings from our DHT22 sensor and then send them together with the ObjectId to the function sendDHT22Readings().
Future Improvements
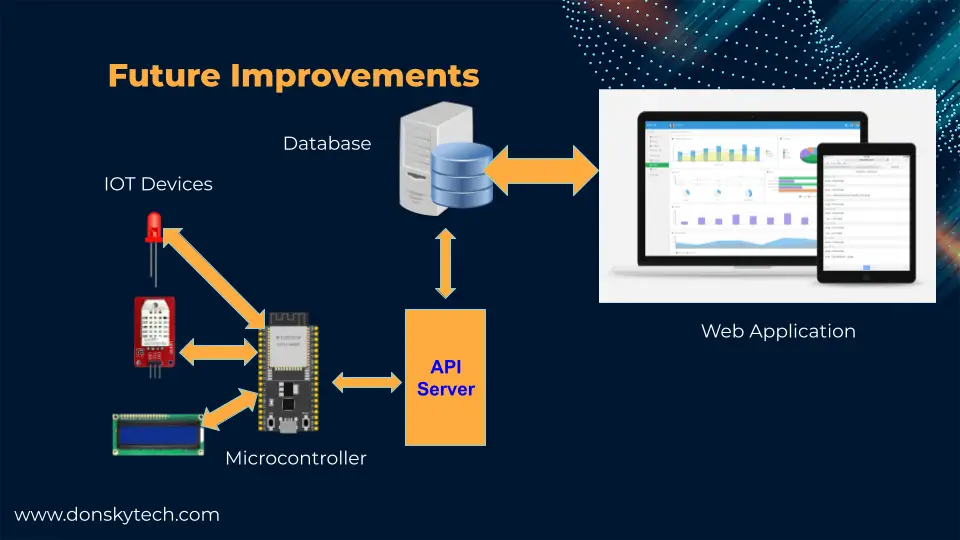
Now that the data is available on our database it would be easy to create a separate project that will display a user interface to your users like a web application that can control the turning on or off of your electronic components.
The web application will just read or change the values on our database and your Arduino program could read the latest values using our REST API server and update your projects remotely. How cool is that right?
The next post in this series will show you how I have created this custom IoT web application that will allow you to control your circuit and display your readings.
Wrap Up
We are successful in controlling our electronic circuit using the MongoDB database in this post. Our ESP32/ESP82266 running the Arduino framework was able to retrieve the information from our MongoDB database by leveraging the call to our REST API server. This would open up more opportunities for your Internet Of Things (IoT) projects.
I hope you learned something. Happy Exploring!
Leave a Reply