Introduction
This post will show you how you could create your own Arduino data logger application that will allow you to save your sensor readings on a MongoDB Time Series database.
If you want to see a demo of this project in video format then please see below it watch it on my YouTube channel.
Why use a database?
If you have a sensor that outputs a reading like a DHT22/DHT11 sensor then it would be a good idea to store it somewhere for historical purposes. Imagine if you would like to know the average, the peak, or the mean of the temperature and humidity readings in a day or even weeks or months.
When I tried to Google “Arduino data logger“, the first few results would tell me about saving it in an SD Card. SD Cards are an excellent option but you need to manually transfer the reading from your SD card to some application like Excel to do the processing.
This is where I thought having a database store our records would make it easier to add some later processing. After all, querying records and finding the min, max, or average is very much easier when data is in a database.
This is the topic of this post wherein I will try to share with you the steps on how to send your Arduino temperature readings to a database, particularly the MongoDB database.
MongoDB IoT Tutorial Series Roadmap
This series will teach you how to integrate a database particularly the MongoDB NoSQL database in your IoT projects. We will be using Arduino-based microcontrollers, Raspberry Pi Single Board Computers, and MicroPython devices.
The below list will tell you the different topics that we are going to discuss in this series.
- Part 1 – What is MongoDB database and why do we need it in our IoT projects?
- Part 2 – MongoDB Atlas: An Overview and How to get started
- Part 3 – Create a REST API Server with Python, Flask, and MongoDB
- Part 4 – Control your Arduino IoT projects with a MongoDB database
- Part 4.5 – Create your own Custom IoT Web Application
- Part 5 – Control your Raspberry Pi IoT projects with a MongoDB database
- Part 6 – Control your MicroPython IoT projects with a MongoDB database
- Part 7 – Arduino Data Logger using MongoDB Database
- Part 8 – Raspberry Pi Temperature Logger using MongoDB Database
- Part 9 – MicroPython Sensor Logger using MongoDB Database
This post is Part 7 of this series where I will try to show you my own way of saving your sensor readings in a MongoDB Time Series database.
Note that you should have a good idea of what MongoDB is and have prepared your own MongoDB Atlas cluster as I will not be discussing those items anymore in this post. Please refer to the first 3 parts of this series for details.
Design
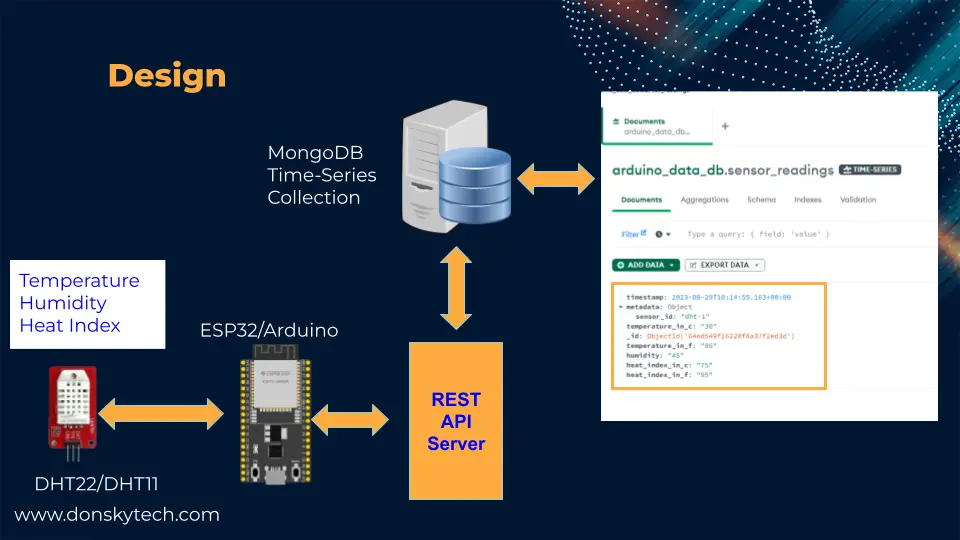
The image above shows how you could capture your sensor readings and save them to your MongoDB Time Series database.
The workflow can be summarized below:
- The ESP32 microcontroller reads the sensor readings from our DHT22/DHT11 sensor at regular intervals.
- The ESP32 microcontroller then communicates with our REST API server using an HTTP Post request.
- The REST API server would then communicate with our MongoDB Atlas database and save the sensor readings in a Time-Series collection.
Parts/Components
The following are the components required to follow along with this project.
- DHT22 – Amazon | AliExpress
- DHT11 – Amazon | AliExpress
- ESP32 – Amazon | AliExpress
- Raspberry Pi 4B – Amazon | AliExpress
- Breadboard – Amazon | AliExpress
- Connecting Wires – Amazon | AliExpress
Disclosure: These are affiliate links and I will earn small commissions to support my site when you buy through these links.
Prerequisites
You should have created your MongoDB Atlas Cluster and be familiar with what the use of a REST API server is. If you are unsure what MongoDB is and how it works then I highly suggest that you read the first 3 parts of my MongoDB Database for IoT Developers Series
Also, you should have Python and Git installed on your workstation.
I am using the PlatformIO IDE extension of Visual Studio Code in programming my ESP32 microcontroller but you can also use your Arduino IDE to program it.
Related Content:
PlatformIO Tutorial for Arduino Development
Install Visual Studio Code or VSCode in Windows
You should also be familiar with how to interface with a DHT22/DHT11 sensor with your Arduino code. If not, you can refer to my earlier post ESP32 – Read DHT22 Sensor using Arduino
Wiring/Schematic
You can refer to my post about how to read ESP32 – Read DHT22 Sensor using Arduino with how to wire the ESP32 with DHT22/DHT11 sensors.
In summary, here are the GPIO pins I have used for this project.
| ESP32 | DHT22/DHT11 |
| GPIO23 | DHT22 Data |
| GPIO22 | DHT11 Data |
Code
Python Flask REST API Server
This application can be deployed on your laptop running Windows, Linux, or Mac. You could also use your Raspberry Pi to deploy this project.
Setup
The code for my REST API server is available on my GitHub repository and you can either download it as a zip file or clone it using Git. If you are unfamiliar with how to use Git then please see the following post below.
Related Content:
How to download a GitHub file, folder, or project?
Note: This project is still currently in the development phase as I am still planning to add more features to it but you can download the initial code that I assigned to branch “v0” (Version Zero) so that you can follow along with this post.
- You can download the v0 branch zip file or clone the project using the below command
git clone -b v0 https://github.com/donskytech/arduino-data-logger.git
cd arduino-data-logger- Create a virtual environment and install the dependencies.
# Create Python Virtual Environment
python -m venv .venv- Activate the virtual environment
source .venv/bin/activateHowever, if you are on Windows/PC then do the following
.venv\Scripts\activate- Install the dependencies by executing the below command
pip install -r requirements.txt- Rename .env.sample to .env using the below command
mv .env.sample .env- Replace the content of the .env file to match your MongoDB Atlas cluster
MONGODB_USERNAME=<CHANGE_ME!!!>
MONGODB_PASSWORD=<CHANGE_ME!!!>
MONGODB_HOST=<CHANGE_ME!!!>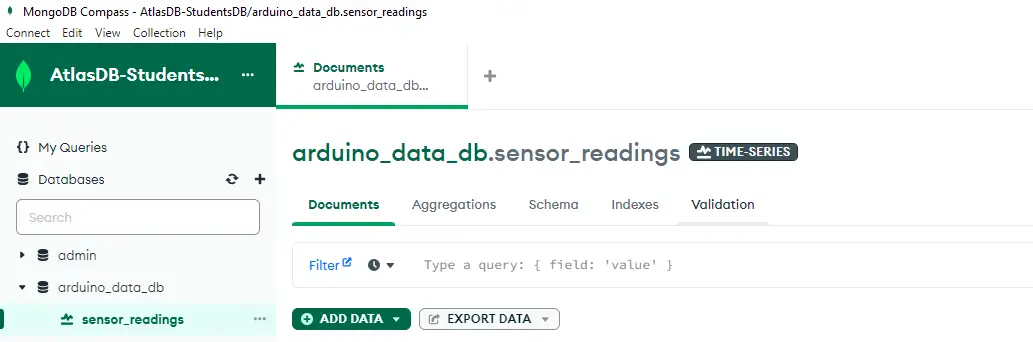
MONGODB_DB=arduino_data_db- Let us create the MongoDB database and collection that we will use to store our sensor readings by executing the below code.
$ flask commands init_db
Create database
If you open your MongoDB Compass then it should create the following MongoDB Time Series Collection on our database name arduino_data_db.
- You can now run the application by executing the below command
flask runYou should be seeing the following on your terminal
 * Serving Flask app 'app'
 * Debug mode: off
WARNING: This is a development server. Do not use it in a production deployment. Use a production WSGI server instead.
 * Running on all addresses (0.0.0.0)
 * Running on http://127.0.0.1:5000
 * Running on http://192.168.100.22:5000
Go into your browser and type the following in the search bar
http://192.168.100.22:5000The project as of the moment only has a simple message “Hello, World!” displayed.
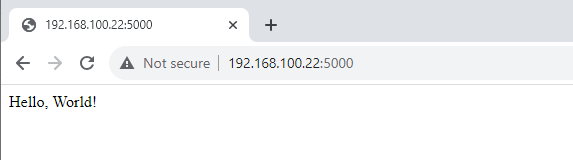
Your REST API server is now running and is ready to service HTTP requests. Take note of this URL as we will be needing it to our Arduino Data Logger program later.
About this project
The REST API server that we will be using here is created using the Flask framework using Flask Blueprint and Python as a programming language. This would allow us to easily create a backend for our system that will handle the savings of the sensor readings.
The main logic of saving the sensor readings is embedded inside the file app/api/views.py.
from . import api_bp
from flask import  jsonify, request
import datetime
from app.extensions import mongo
from flask import current_app

@api_bp.post('/sensors')
def add_sensor_reads():
    sensor_readings = request.get_json()

    sensor_id = sensor_readings['sensor_id']
    temperature_in_c = sensor_readings['temperature_in_c']
    temperature_in_f = sensor_readings['temperature_in_f']
    humidity = sensor_readings['humidity']
    heat_index_in_c = sensor_readings['heat_index_in_c']
    heat_index_in_f = sensor_readings['heat_index_in_f']

    current_app.logger.info(f"sensor_readings : {sensor_readings}")

    sensor_readings = {"timestamp": datetime.datetime.now(), "metadata": {"sensor_id": sensor_id},\
        "temperature_in_c": temperature_in_c, "temperature_in_f": temperature_in_f,  "humidity": humidity,\
        "heat_index_in_c": heat_index_in_c, "heat_index_in_f": heat_index_in_f}

    mongo.db.sensor_readings.insert_one(sensor_readings)

    return jsonify({"Status": "OK", "Message": "Successfully saved sensor records!"})
The code above is an example of a Flask blueprint that has a route called “/sensors“. We are waiting for an HTTP Post request that contains the JSON structure containing our sensor readings.
The following sensor readings coming from our ESP32 Microcontroller will be saved to our database:
- Temperature (Both in Fahrenheit and Celcius)
- Humidity
- Heat Index (Both in Fahrenheit and Celcius)
We then save the following information into our MongoDB database using the PyMongo library and store it in a MongoDB Time-Series Collection. After which, we returned a JSON response to the client with the message “Successfully saved sensor records!“.
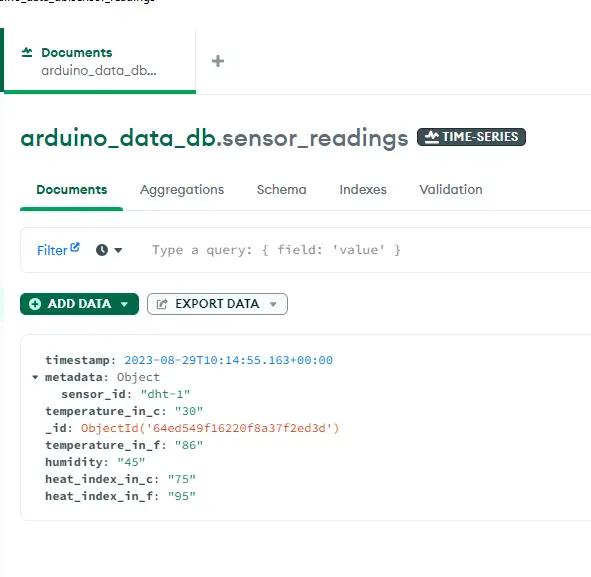
Below is a sample record saved on our Time-Series Collection.
If you want to explore more about Flask then you can take a look at the official Flask Quickstart Guide or a sample post that I have written called Raspberry Pi and Flask Quickstart Guide.
What is Time-Series Collection in MongoDB Database?
A Time-Series database allows you to save data with specific timestamps. This is advantageous to applications that regularly need to keep track of information every second, minute, or hour. In our case, we will need to record our sensor readings on a predefined interval. These databases are optimized to handle larger amounts of data than normal databases such as relational MySQL, PostgreSQL, or even Oracle Databases.
Popular Time Series databases include InfluxDB, Prometheus, and what we are using here which is the MongoDB Time-Series Collection. If you want to learn more about Time Series then I highly suggest the following article MongoDB Time Series Collections Explained
Now that we have finished the setup of our backend that will save our sensor readings we can now start working on our Arduino project that will be the source of our sensor readings.
Arduino Data Logger
We will be creating an Arduino-powered temperature logger in this post but you can apply the same principles to some other sensors.
Setup
This project is available on my GitHub repository and is part of my PlatformIO projects. I really liked working with PlatformIO IDE extension on Visual Studio Code but you can also use Arduino IDE if you are comfortable with it.
You can either clone the whole project by executing the below command.
git clone https://github.com/donskytech/platformio-projects.git
cd esp32-projects
/esp32-data-logger
Open the project in Visual Studio Code using the below command.
code .Or if you do not want to download the whole project and are interested only in this particular post then you can follow this How to download a GitHub folder?
Libraries used
The following are the libraries that I have used in this project.
The ArduinoJson is used to handle the exchange of JSON responses between our Arduino Data Logger and our Python backend application. On the other hand, the Adafruit library is what we use to communicate with our DHT22/DHT11 sensor. Lastly, the elpasedMillis is used for our timing of events.
Code
Below is the code that I have used to send sensor readings to our MongoDB database.
#include <WiFi.h>
#include <HTTPClient.h>
#include <ArduinoJson.h>
#include <elapsedMillis.h>
#include "Dht.h"

const char *ssid = "<CHANGE_TO_MATCH_YOUR_SSID>";
const char *password = "<CHANGE_TO_MATCH_YOUR_PASSWORD>";

// Change to match your REST Server IP Address example: http://192.168.100.22:5000/api/sensors
const char *serverName = "http://<REST_SERVER_IP>:5000/api/sensors";

#define DHT22_PIN 23 // Digital pin connected to the DHT sensor
#define DHT11_PIN 22 // Digital pin connected to the DHT sensor

// Initialize DHT sensor.
DHT dht22(DHT22_PIN, DHT22);
DHT dht11(DHT11_PIN, DHT11);

// Time interval before saving next readings
elapsedMillis timeElapsed;
unsigned long intervalSaveRequest = 10000;

// Forward declaration of saving sensor readings
void saveSensorRecord(const char *, DHT);

void setup()
{
  // Set Baud Rate
  Serial.begin(115200);

  // Begin WiFi connection
  WiFi.begin(ssid, password);
  Serial.println("Connecting");
  while (WiFi.status() != WL_CONNECTED)
  {
    delay(500);
    Serial.print(".");
  }
  Serial.println("");
  Serial.print("Connected to WiFi network with IP Address: ");
  Serial.println(WiFi.localIP());

  // Begin communicating with DHT sensors
  dht22.begin();
  dht11.begin();
}

void loop()
{
  if (timeElapsed >= intervalSaveRequest)
  {
    if (WiFi.status() == WL_CONNECTED)
    {
      Serial.println("Saving sensor records...");
      // Save sensor records, first parameter is the name or position of the sensor
      saveSensorRecord("dht-garage", dht22);
      saveSensorRecord("dht-front", dht11);
    }
    else
    {
      Serial.println("WiFi Disconnected");
    }
    timeElapsed = 0;
  }
}

void saveSensorRecord(const char *sensor_id, DHT dht)
{

  // Reading temperature or humidity takes about 250 milliseconds!
  // Sensor readings may also be up to 2 seconds 'old' (its a very slow sensor)
  float dhtHumidity = dht.readHumidity();
  // Read temperature as Celsius (the default)
  float dhtTempInC = dht.readTemperature();
  // Read temperature as Fahrenheit (isFahrenheit = true)
  float dhtTempInF = dht.readTemperature(true);

  // Check if any reads failed and exit early (to try again).
  if (isnan(dhtHumidity) || isnan(dhtTempInC) || isnan(dhtTempInF))
  {
    Serial.println(F("Failed to read from DHT sensor!"));
    return;
  }

  // Compute heat index in Fahrenheit (the default)
  float dhtHiF = dht.computeHeatIndex(dhtTempInF, dhtHumidity);
  // Compute heat index in Celsius (isFahreheit = false)
  float dhtHiC = dht.computeHeatIndex(dhtTempInC, dhtHumidity, false);

  WiFiClient client;
  HTTPClient http;
  //  Begin connection with your REST server
  http.begin(client, serverName);
  //  Set content type to JSON
  http.addHeader("Content-Type", "application/json");

  // Write JSON of sensor readings
  StaticJsonDocument<200> doc;
  doc["sensor_id"] = sensor_id;
  doc["temperature_in_c"] = dhtTempInC;
  doc["temperature_in_f"] = dhtTempInF;
  doc["humidity"] = dhtHumidity;
  doc["heat_index_in_c"] = dhtHiC;
  doc["heat_index_in_f"] = dhtHiF;
  String requestBody;
  serializeJson(doc, requestBody);

  // HTTP Post to REST server
  int httpResponseCode = http.POST(requestBody);

  if (httpResponseCode > 0)
  {

    String response = http.getString(); // Get the response to the request

    Serial.println(httpResponseCode); // Print return code
    Serial.println(response);         // Print request answer
  }
  else
  {

    Serial.print("Error on sending POST: ");
    Serial.println(httpResponseCode);
  }

  http.end();
}
Let us go through what each line of code does.
#include <WiFi.h>
#include <HTTPClient.h>
#include <ArduinoJson.h>
#include <elapsedMillis.h>
#include "Dht.h"
Import the necessary header files for our project.
const char *ssid = "<CHANGE_TO_MATCH_YOUR_SSID>";
const char *password = "<CHANGE_TO_MATCH_YOUR_PASSWORD>";

// Change to match your REST Server IP Address example: http://192.168.100.22:5000/api/sensors
const char *serverName = "http://<REST_SERVER_IP>:5000/api/sensors";
Change the following to match your WiFi network configuration. As mentioned above you need to set the IP address of where you installed the REST API Server.
#define DHT22_PIN 23 // Digital pin connected to the DHT sensor
#define DHT11_PIN 22 // Digital pin connected to the DHT sensor

// Initialize DHT sensor.
DHT dht22(DHT22_PIN, DHT22);
DHT dht11(DHT11_PIN, DHT11);

// Time interval before saving next readings
elapsedMillis timeElapsed;
unsigned long intervalSaveRequest = 10000;

// Forward declaration of saving sensor readings
void saveSensorRecord(const char *, DHT);
Here, we define our DHT22/DHT11 pins and the interval of saving our sensor records. We also have a forward declaration of the function saveSensorRecord() we will be using to save our sensor readings.
void setup()
{
  // Set Baud Rate
  Serial.begin(115200);

  // Begin WiFi connection
  WiFi.begin(ssid, password);
  Serial.println("Connecting");
  while (WiFi.status() != WL_CONNECTED)
  {
    delay(500);
    Serial.print(".");
  }
  Serial.println("");
  Serial.print("Connected to WiFi network with IP Address: ");
  Serial.println(WiFi.localIP());

  // Begin communicating with DHT sensors
  dht22.begin();
  dht11.begin();
}
In the function setup(), we define our baud rate and begin communicating with our WiFi network. Also, we start communicating with our DHT22/DHT11 sensors.
void loop()
{
  if (timeElapsed >= intervalSaveRequest)
  {
    if (WiFi.status() == WL_CONNECTED)
    {
      Serial.println("Saving sensor records...");
      // Save sensor records, first parameter is the name or position of the sensor
      saveSensorRecord("dht-garage", dht22);
      saveSensorRecord("dht-front", dht11);
    }
    else
    {
      Serial.println("WiFi Disconnected");
    }
    timeElapsed = 0;
  }
}
The function loop() is where we periodically read our sensor readings and call the function for us to save our sensor record. We specifically assign a sensor ID here for each DHT22/DHT11 sensor. In my case here, I am putting the location of our sensor (dht-garage, dht-front ).
void saveSensorRecord(const char *sensor_id, DHT dht)
{

  // Reading temperature or humidity takes about 250 milliseconds!
  // Sensor readings may also be up to 2 seconds 'old' (its a very slow sensor)
  float dhtHumidity = dht.readHumidity();
  // Read temperature as Celsius (the default)
  float dhtTempInC = dht.readTemperature();
  // Read temperature as Fahrenheit (isFahrenheit = true)
  float dhtTempInF = dht.readTemperature(true);

  // Check if any reads failed and exit early (to try again).
  if (isnan(dhtHumidity) || isnan(dhtTempInC) || isnan(dhtTempInF))
  {
    Serial.println(F("Failed to read from DHT sensor!"));
    return;
  }

  // Compute heat index in Fahrenheit (the default)
  float dhtHiF = dht.computeHeatIndex(dhtTempInF, dhtHumidity);
  // Compute heat index in Celsius (isFahreheit = false)
  float dhtHiC = dht.computeHeatIndex(dhtTempInC, dhtHumidity, false);

  WiFiClient client;
  HTTPClient http;
  //  Begin connection with your REST server
  http.begin(client, serverName);
  //  Set content type to JSON
  http.addHeader("Content-Type", "application/json");

  // Write JSON of sensor readings
  StaticJsonDocument<200> doc;
  doc["sensor_id"] = sensor_id;
  doc["temperature_in_c"] = dhtTempInC;
  doc["temperature_in_f"] = dhtTempInF;
  doc["humidity"] = dhtHumidity;
  doc["heat_index_in_c"] = dhtHiC;
  doc["heat_index_in_f"] = dhtHiF;
  String requestBody;
  serializeJson(doc, requestBody);

  // HTTP Post to REST server
  int httpResponseCode = http.POST(requestBody);

  if (httpResponseCode > 0)
  {

    String response = http.getString(); // Get the response to the request

    Serial.println(httpResponseCode); // Print return code
    Serial.println(response);         // Print request answer
  }
  else
  {

    Serial.print("Error on sending POST: ");
    Serial.println(httpResponseCode);
  }

  http.end();
}
This part of the code is where we extract the readings from our temperature sensors. We used the HTTPClient class to send an HTTP Post to our REST API endpoint. In addition, we used ArduinJson to format our request in a suitable JSON format.
We print the response to our serial monitor afterward.
This is really how easy you could create your own Arduino Data Logger application.
Future Improvements
We can add a web application where we can query the sensor readings for a particular date range. Additionally, we can add more business intelligence to our application where we could display our sensor readings in colorful graph format. Finding out the min, max, and average of sensor readings is easy with the different database query tools that MongoDB offers.
I would definitely add an external web application where everybody can view your data so subscribe to my YouTube account to get notified.
Wrap Up
In this post, we have created our Arduino data logger application where we have saved our sensor readings taken from our sensors into our MongoDB database for later processing. We have touched on the advantages of saving your temperature/humidity readings in a database compared to saving it to your SD Card.
Read Next:
Pico W -MicroPython MQTT – BMP/BME 280 Weather Station
Control DS18B20 using MicroPython with a Weather Station Project
Support Me!
I love sharing what I know and hopefully, I was able to help you. Writing helpful content takes so much time and research. If you think you like my work and I have managed to help you then please consider supporting my channel. I would be very grateful and would boost my confidence that what I am doing is making a big change in the world. (No Pun Intended!) 😉
Become a Patron!
Leave a Reply