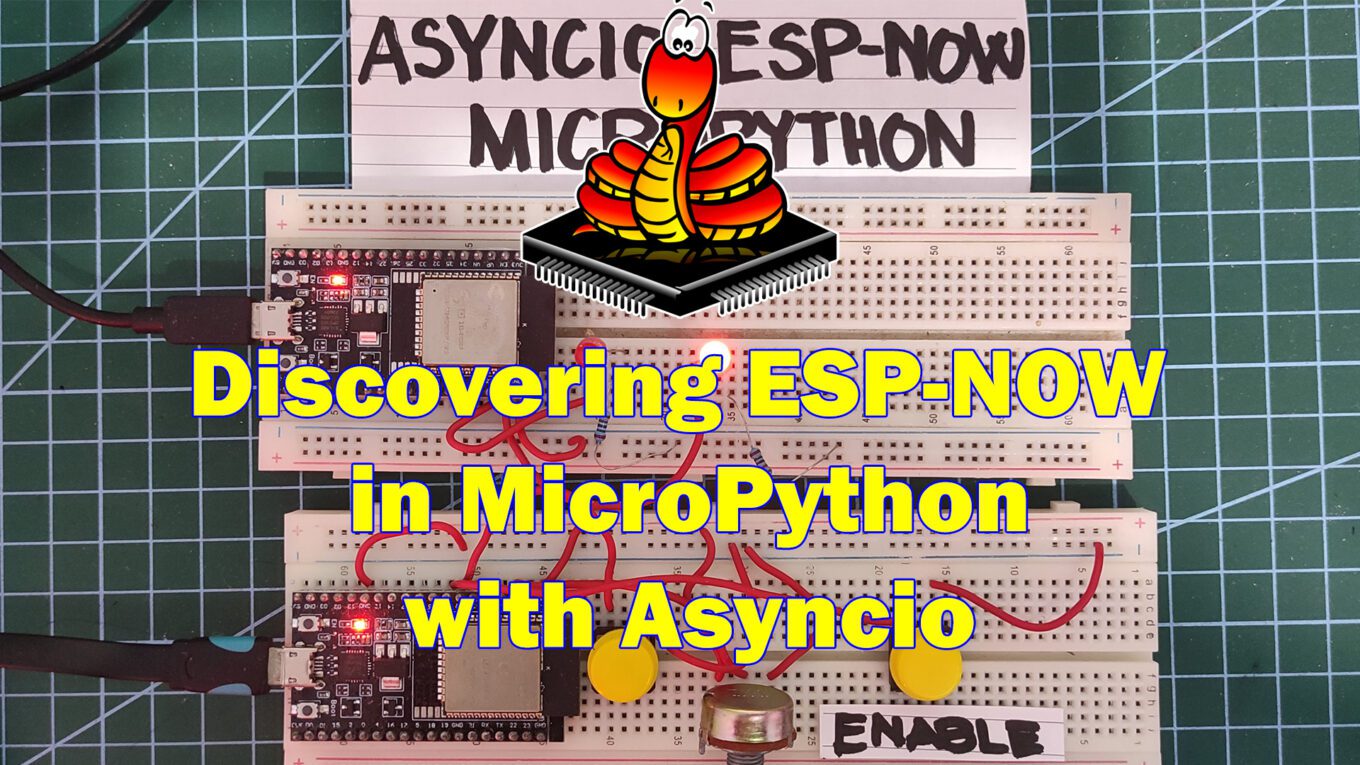
Introduction
Using ESP-NOW in MicroPython with Asyncio provides an efficient solution for your Internet of Things (IoT) projects. It will provide real-time and efficient message exchanges between your sensor networks and your control system. In this post, we’ll set out on an adventure to discover how ESP-NOW, working in tandem with MicroPython’s AsyncIO, may revolutionize the way we construct interconnected systems, from sensor networks to home automation initiatives, all while sparing valuable materials and energy.
If you want to see a video demo of the project here then I suggest you watch the video below or watch it on my YouTube channel. I highly suggest watching the whole video and making this written post as your reference later.
ESP-NOW in MicroPython
This series of posts is my own learner’s guide on how to get started with using ESP-NOW in MicroPython. I have documented my own personal learnings on how to use this awesome wireless protocol in my own IoT projects. There are not enough beginner tutorials currently on how to explore this topic on the internet so I have decided to write my own. I hope that I could help beginners about this subject but at the same time I would like feedback from veteran MicroPython programmers on how to improve these posts.
Below are the topics that I will cover in this series:
- Exploring ESP-NOW in MicroPython: A Learner’s Guide
- Discovering ESP-Now in MicroPython with Asyncio
- Sensor Data Sharing with ESP-NOW in MicroPython
- Integrating ESP-NOW with MicroPython and WiFi
We will explore how to utilize Asynchronous programming in this post and I will show you how to create responsive MicroPython IoT applications using Asyncio.
Basics of Micropython Asynchronous Programming
Before we go a deep dive into the program itself, it is worth taking a small detour to learn a little bit about asynchronous programming. Knowing this information will help us a lot on our ESP-NOW Micropython IoT projects with asyncio.
Explanation of asynchronous programming and its benefits
With the help of the programming paradigm known as “asynchronous programming,” you may carry out several actions at once without having to wait for one to finish before moving on to the next.
Synchronous Vs Asynchronous Programming Analogy
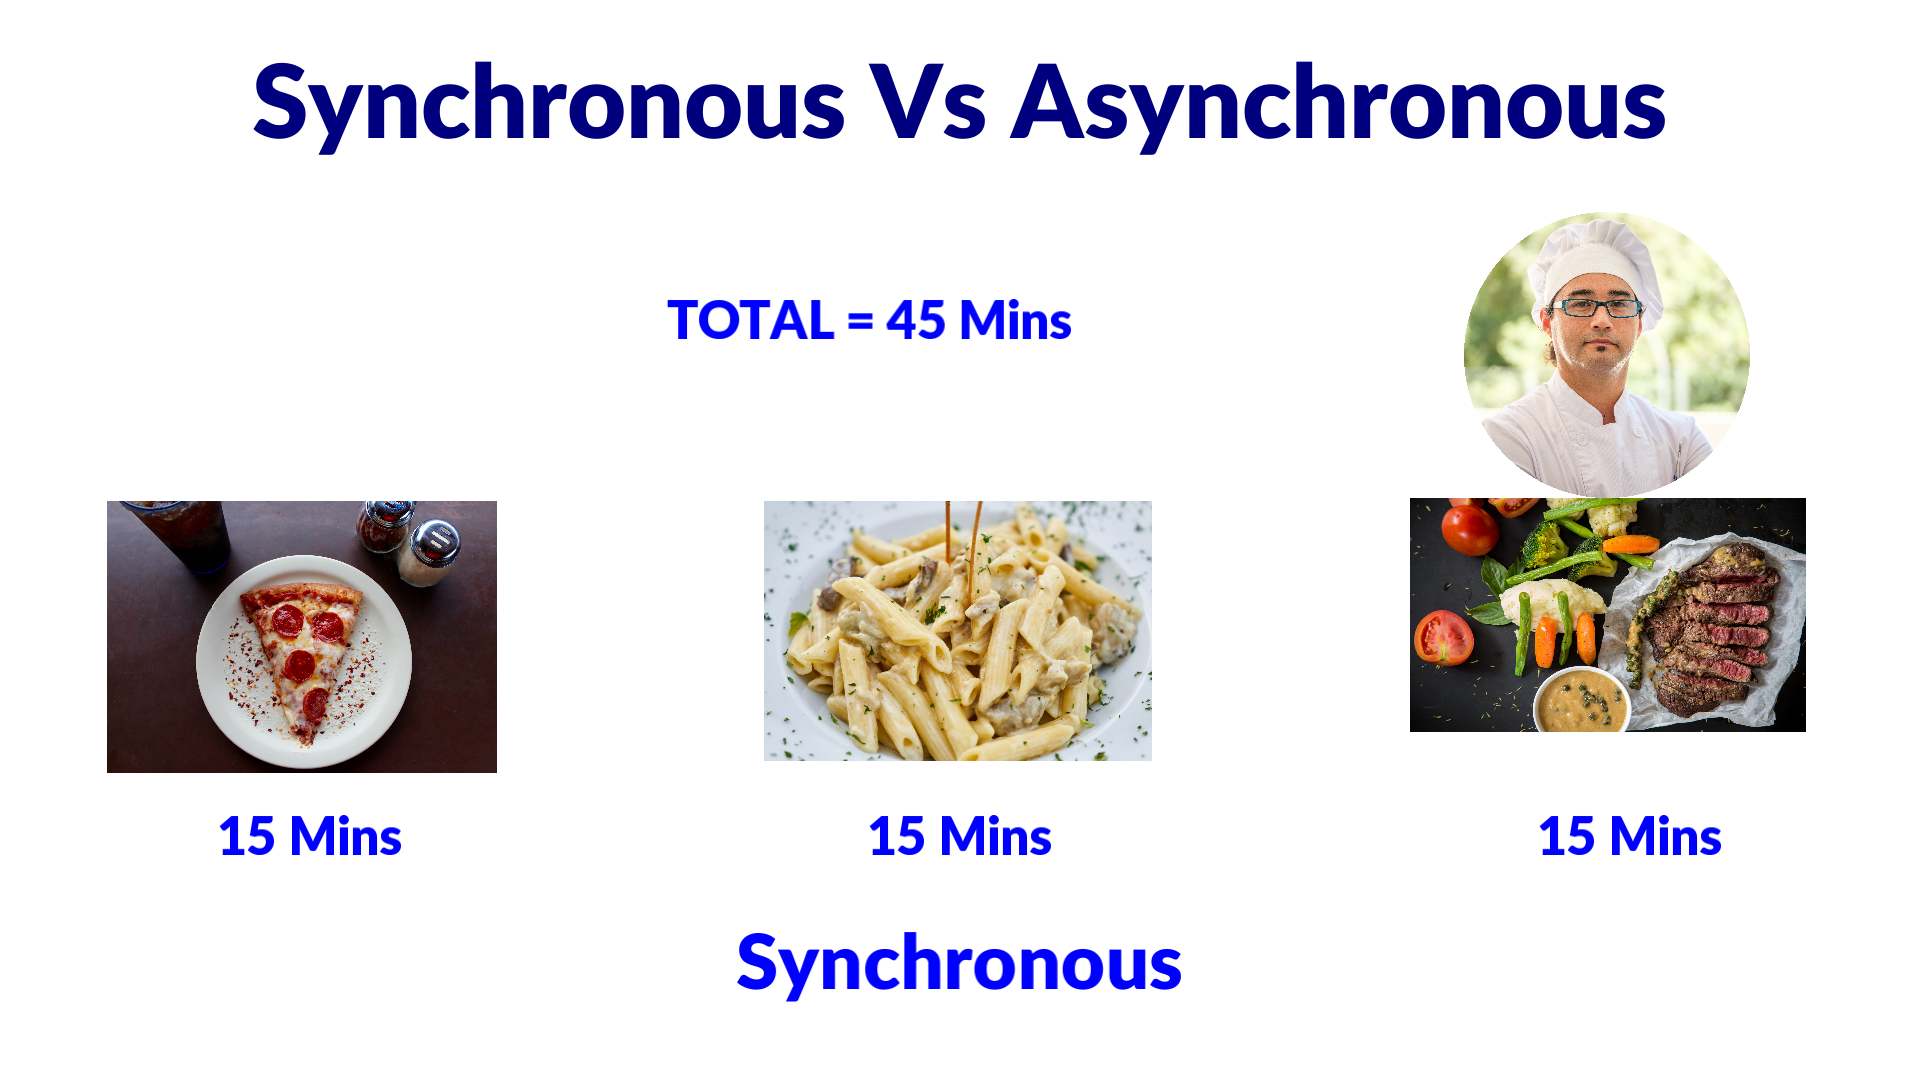
To help you understand what asynchronous programming is let us compare it to synchronous programming using an analogy. Let’s say we are a chef in a restaurant. An order for three dishes came in for different dishes (Pizza, Pasta, and Steak) so let us see how this will be processed in a synchronous manner.
The image below will show you how these dishes will be prepared in a synchronous manner. First, we will start with the Pizza and will continue working on it exclusively until it is cooked. After the pizza, it will be the pasta’s turn and we will finish this also before working on the last dish which is the steak. If each dish takes about 15 minutes to be cooked then the total would be 45 minutes. Yikes! If you are the customer then waiting for 45 minutes might not be good.
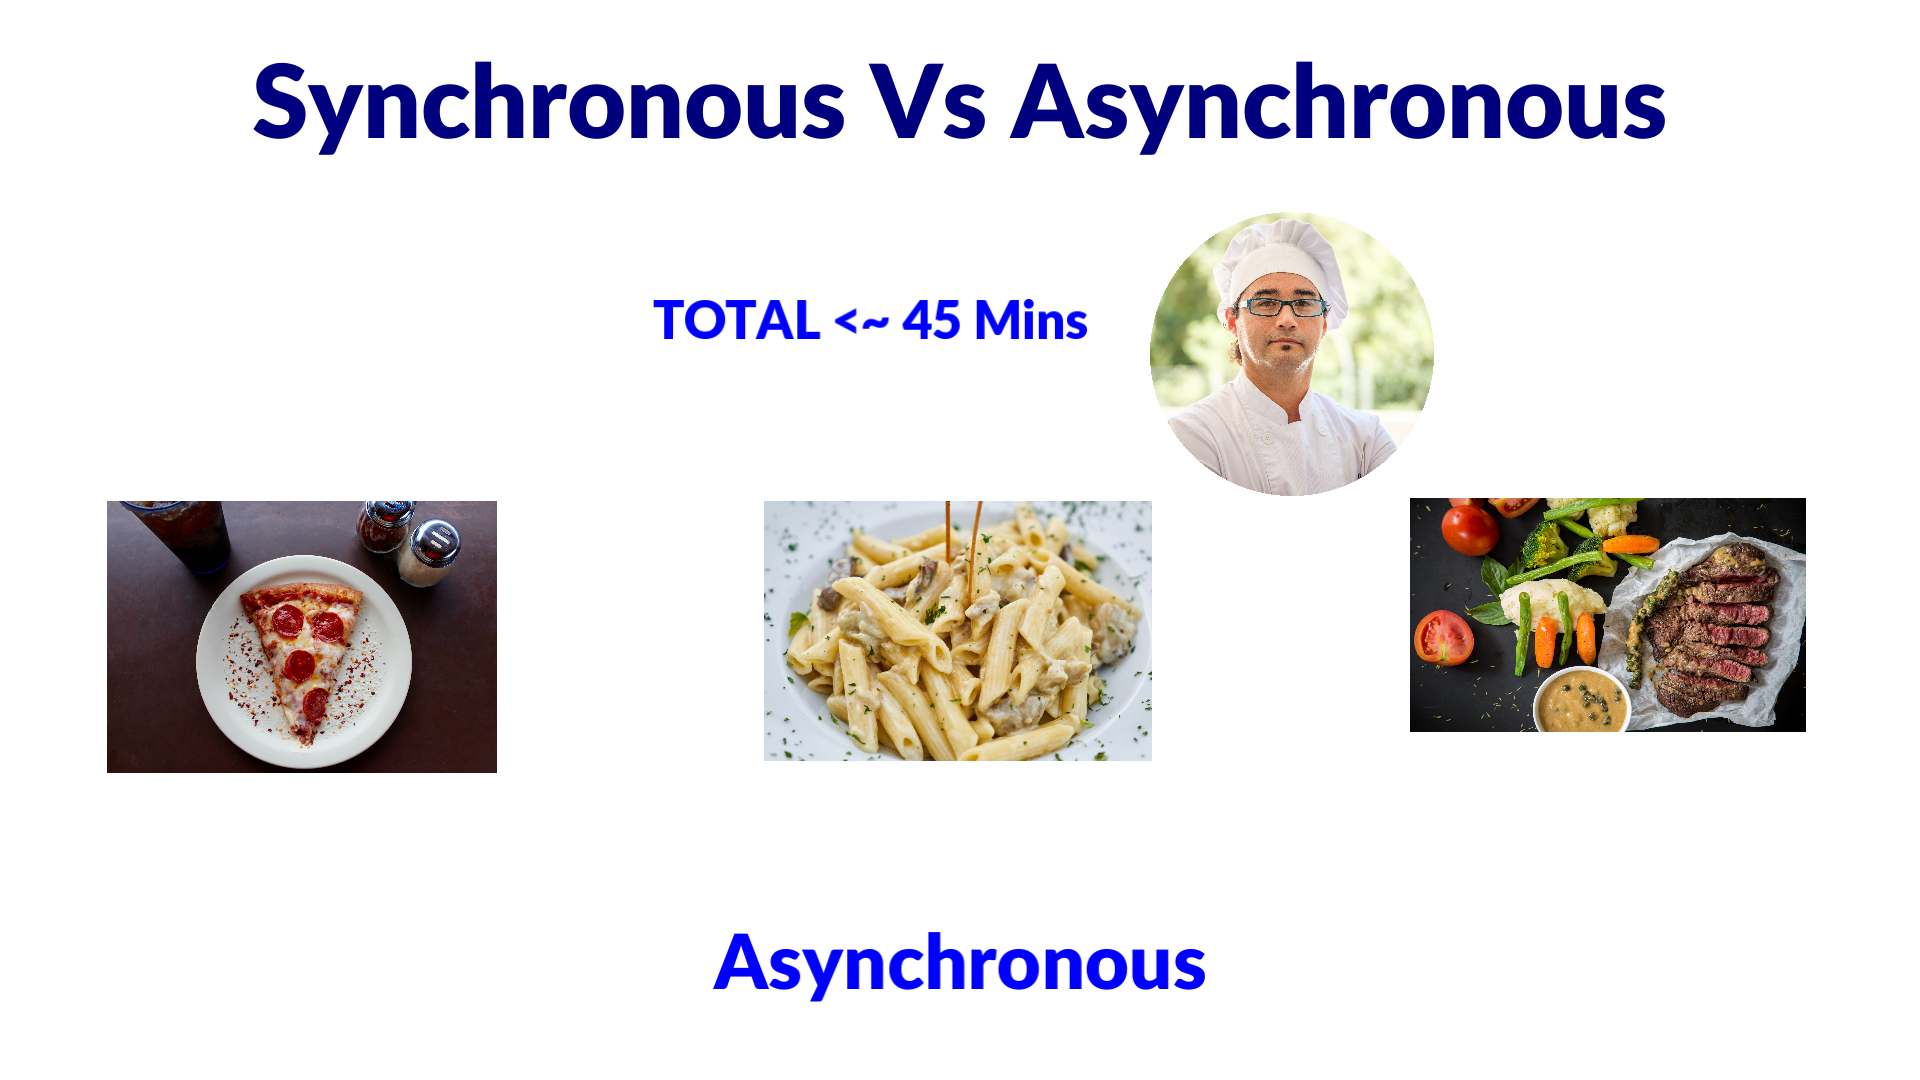
In an asynchronous paradigm, we will do something like this. First, we will start with the Pasta and wait for it to boil. While waiting for the pasta to boil we can start working on the Pizza until we almost finish putting the ingredients and put it to the oven. After this, we can switch to the steak and start putting it on the grill. At the same time, we can switch back to checking the condition of the pasta and the pizza. This is how the asynchronous paradigm works. If you total the amount of time working on the three dishes, it could be possible that it is much less than 45 minutes compared to the synchronous way of preparation.
Introduction to asyncio library in MicroPython
Developers may easily handle concurrent processes, control I/O operations, and produce responsive applications on resource-constrained devices using MicroPython’s asyncio feature, bringing Python’s adaptability to the world of embedded systems.
Key concepts: coroutines, event loops, and task
Coroutines, event loops, and tasks are the three main elements in the Python asyncio framework.
- Coroutines are Python functions that have the unique ability to be halted and resumed in execution. Before the def keyword, the async keyword is used to define them. Asynchronous programming uses coroutines, which let you create non-blocking code. A coroutine yields control back to the event loop when it comes across the await keyword, allowing other processes to run concurrently. Building asynchronous applications requires the use of coroutines, which are at the core of Python’s asynchronous programming language. Below is a sample of a coroutine with the async/await keywords.
async def cook_order(dish_name, duration):
    print(f"Start cooking food : {dish_name}")
    await asyncio.sleep(duration)
print(f"Finished cooking dish : {dish_name}")- Event Loops: A key element of asyncio is an event loop. The execution of asynchronous processes, such as coroutines, is managed and scheduled by it in its capacity as a coordinator. In our analogy earlier, think of the event loop as the Chef that manages the cooking of the dishes. The program’s event loop continuously checks which tasks are available to execute and makes sure they work together to avoid program blocking. It handles task switching and offers a structured method for dealing with asynchronous I/O operations, timers, and events.
- Tasks: Asyncio uses tasks as units of work. In our analogy, we can map this to the dishes that we need to cook. They stand in for the distinct coroutines that the event loop simultaneously controls and runs. Coroutines are used to construct tasks using
asyncio.create_task()andasyncio.ensure_future(), among other operations. They enable the simultaneous execution of numerous asynchronous processes inside of a single event loop. Individual asynchronous operations can be managed and their progress is easily tracked using tasks.
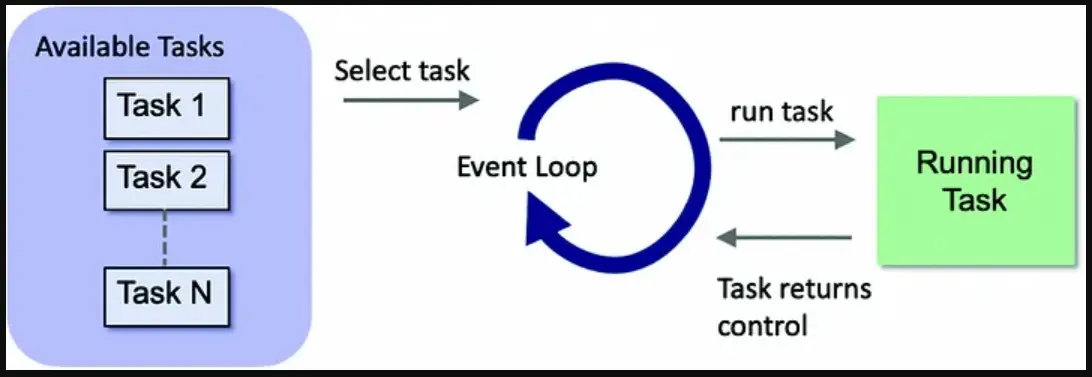
Asyncio diagram
I found the following diagram from a Medium post that describes the core Python asyncio concepts to be really good in describing its logic. The event loop runs in a single thread so the tasks should be able to support being paused and resumed. Switching between tasks is the job of the event loop so that we can run concurrent tasks in a single thread.
Synchronous/Asynchronous Python Code Demo
In order for us to appreciate the differences between synchronous and asynchronous programming then let us see that in code. We are going to program our analogy of asyncio where we will cook the dishes in two different paradigms.
Synchronous Programming
The code for this project is available on my GitHub repository and you can download the project folder by following this How to download a GitHub folder?
import random
import time

def cook_order(dish_name, duration):
    print(f"Start cooking food : {dish_name}")
    time.sleep(duration)
    print(f"Finished cooking dish : {dish_name}")

def serve_food():
    start_time = time.ticks_ms()
    print("Waiting for order...")

    orders = [
        {"name": "Pasta", "time": 2},
        {"name": "Pizza", "time": 4},
        {"name": "Steak", "time": 3},
    ]

    for order in orders:
        cook_order(order['name'], order['time'])

    print("Finished cooking order. Serving food...")

    end_time = time.ticks_ms()
    print(f"Elapsed Time {(end_time - start_time) / 1000} second(s)")

serve_food()
Connect your ESP32/ESP8266 device and run the following file on your Thonny IDE. You should see the following results printed on your shell terminal.
Waiting for order...
Start cooking food : Pasta
Finished cooking dish : Pasta
Start cooking food : Pizza
Finished cooking dish : Pizza
Start cooking food : Steak
Finished cooking dish : Steak
Finished cooking order. Serving food...
Elapsed Time 9.004 second(s)
As you can see from the output, it has taken the program 9 seconds to cook the three dishes. Let us try to figure out why.
import random
import time

def cook_order(dish_name, duration):
    print(f"Start cooking food : {dish_name}")
    time.sleep(duration)
    print(f"Finished cooking dish : {dish_name}")
First, we import some MicroPython modules needed by our program. Next, we define a function cook_order() that expects the name of the dish and the length of time for it to be cooked. We will simulate this cooking process by using the function time.sleep().
def serve_food():
    start_time = time.ticks_ms()
    print("Waiting for order...")

    orders = [
        {"name": "Pasta", "time": 2},
        {"name": "Pizza", "time": 4},
        {"name": "Steak", "time": 3},
    ]
A timer is started by using the function time.ticks_ms() and defining a list of orders together with the length of time for it to be cooked.
for order in orders:
        cook_order(order['name'], order['time'])

    print("Finished cooking order. Serving food...")

    end_time = time.ticks_ms()
    print(f"Elapsed Time {(end_time - start_time) / 1000} second(s)")

serve_food()
We iterated our list of orders and cooked each dish until it was finished before moving to the next dish. This is the exact reason why it takes our program 9 seconds to finish the cooking process.
Lastly, we print the elapsed time that the program has run and we call our function serve_food() at the end. Let us see how we can improve this in the next section.
Asynchronous Programming
The below code is our asynchronous version of our food cooking.
import random
import uasyncio as asyncio
import time

async def cook_order(dish_name, duration):
    print(f"Start cooking food : {dish_name}")
    await asyncio.sleep(duration)
    print(f"Finished cooking dish : {dish_name}")

async def serve_food():
    start_time = time.ticks_ms()
    print("Waiting for order...")

    orders = [
        {"name": "Pasta", "time": 2},
        {"name": "Pizza", "time": 4},
        {"name": "Steak", "time": 3},
    ]
    order_tasks = [cook_order(order['name'], order['time']) for order in orders]

    await asyncio.gather(*order_tasks)

    print("Finished cooking order. Serving food...")

    end_time = time.ticks_ms()
    print(f"Elapsed Time {(end_time - start_time) / 1000} second(s)")

asyncio.run(serve_food())
If you try running this code then you will see the following output. The main difference is that it only took 4 seconds to finish cooking the three dishes. The reason is that the Pasta, Pizza, and Steak dishes were started one after the other.
Waiting for order...
Start cooking food : Pasta
Start cooking food : Pizza
Start cooking food : Steak
Finished cooking dish : Pasta
Finished cooking dish : Steak
Finished cooking dish : Pizza
Finished cooking order. Serving food...
Elapsed Time 4.014 second(s)
Let us try running over the code.
import random
import uasyncio as asyncio
import time
As usual, we import the necessary modules including the Micropython uasyncio.
async def cook_order(dish_name, duration):
    print(f"Start cooking food : {dish_name}")
    await asyncio.sleep(duration)
    print(f"Finished cooking dish : {dish_name}")
This is our coroutine function and the only difference is the presence of the async/await keyword.
async def serve_food():
    start_time = time.ticks_ms()
    print("Waiting for order...")

    orders = [
        {"name": "Pasta", "time": 2},
        {"name": "Pizza", "time": 4},
        {"name": "Steak", "time": 3},
Next, we define our coroutine serve_food() which starts our timer and declares the same order list.
    order_tasks = [cook_order(order['name'], order['time']) for order in orders]

    await asyncio.gather(*order_tasks)

    print("Finished cooking order. Serving food...")

    end_time = time.ticks_ms()
    print(f"Elapsed Time {(end_time - start_time) / 1000} second(s)")

asyncio.run(serve_food())
We declare a list of tasks and use the line await asyncio.gather(*order_tasks) to load it on our event loop. The last part will just print the elapsed time that this program has run. We run our event loop using this line asyncio.run(serve_food())
Learn more about Python/Micropython asyncio programming
It would be hard to explain an ESP-NOW Micropython application that uses asyncio in one post so I suggest that you read more about this topic on the internet. You can read the official documentation here.
Now that you have an overview of asynchronous programming it is time for us to explore how to apply it in a Micropython IoT project.
How to install Asynchronous ESP-NOW(aioespnow) in Micropython
As I have mentioned in my How to install ESP-NOW in MicroPython? the current stable Micropython binary does not yet support ESP-NOW out of the box. However, things might change in the future so for now you could follow the steps outlined here to install the aioespnow in your ESP32/ESP8266 devices.
In order for you to use in your ESP-NOW Micropython projects the asyncio concepts then you need to use the ESP-NOW module that has support for asyncio which is the module called aioespnow.
After you have installed the nightly build of the firmware and you try to import this module you will be shown the following error.
>>> import aioespnow
Traceback (most recent call last):
File "<stdin>", line 1, in <module>
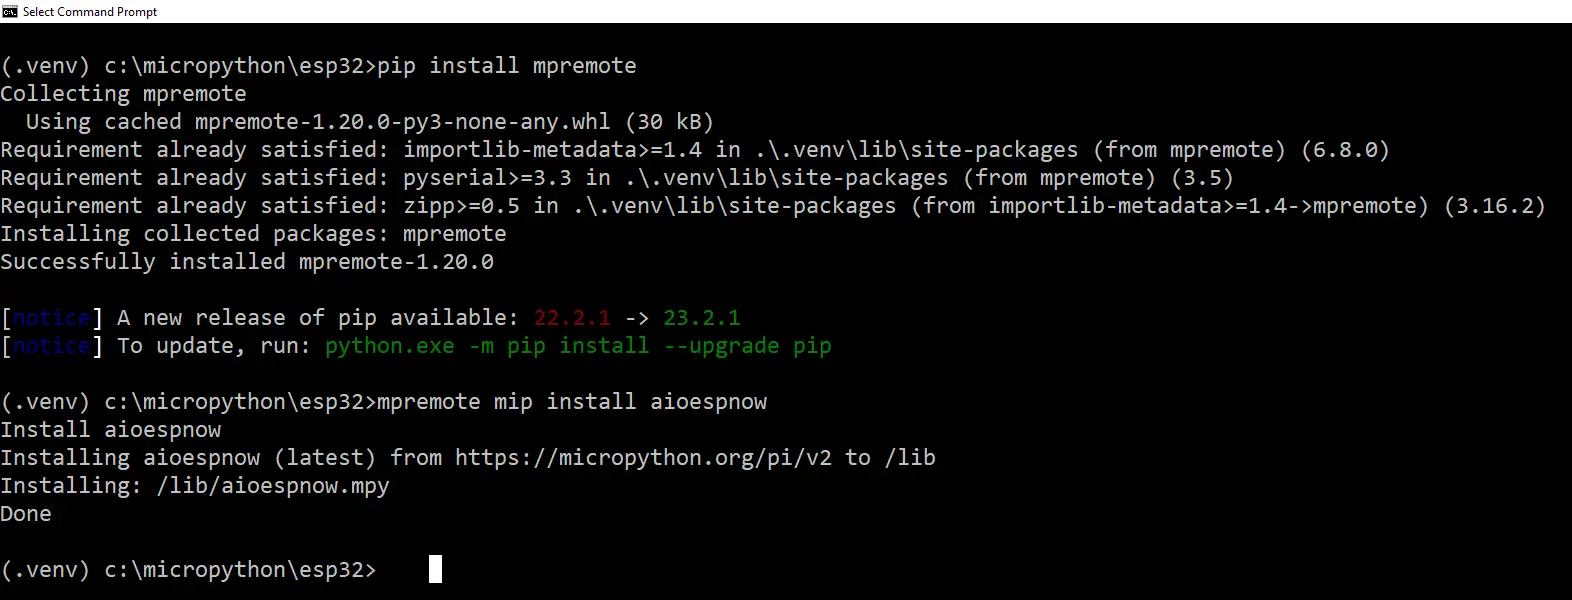
ImportError: no module named 'aioespnow'According to this GitHub discussion, we can use the command below to install the aioespnow.
mpremote mip install aioespnowmpremote is a command line utility that we can use to manage the filesystem or the device itself.
How to install MicroPython libraries using mpremote?
First, you need to install mpremote by opening a terminal.
pip install mpremoteNext, we can install the aioespnow by using the mip command.
mpremote mip install aioespnowYou should be seeing the following image shown below.
Parts/Components Required
The following are the components used in this project.
- ESP32 – Amazon | AliExpress
- or ESP8266 – Amazon | AliExpress
- Button Switch – Amazon | AliExpress
- Resistors – Amazon | AliExpress
- LED Kit – Amazon | AliExpress
- Potentiometer – Amazon | AliExpress
- Breadboard – Amazon | AliExpress
- Connecting Wires – Amazon | AliExpress
- Arduino/Raspberry Pi Kit – Amazon | AliExpress
Note: We need a minimum of two ESP32 or ESP8266 to test out ESP-NOW.
Disclosure: These are affiliate links and I will earn small commissions to support my site when you buy through these links.
PCBWay is a manufacturer specializing in PCB prototyping, low-volume production, and PCB Assembly service all under one roof. So if you want to make a PCB for your electronic project then PCBWay is a great choice for you.
donskytech
Prerequisites
You should have installed the latest Micropython firmware with ESP-NOW support on your ESP32/ESP8266 devices. Please review the following How to install ESP-NOW in MicroPython?
I am using Thonny IDE in developing this post but you can also use VSCode if you are more familiar with it.
Read More:
MicroPython Development Using Thonny IDE
MicroPython using VSCode PyMakr on ESP32/ESP8266
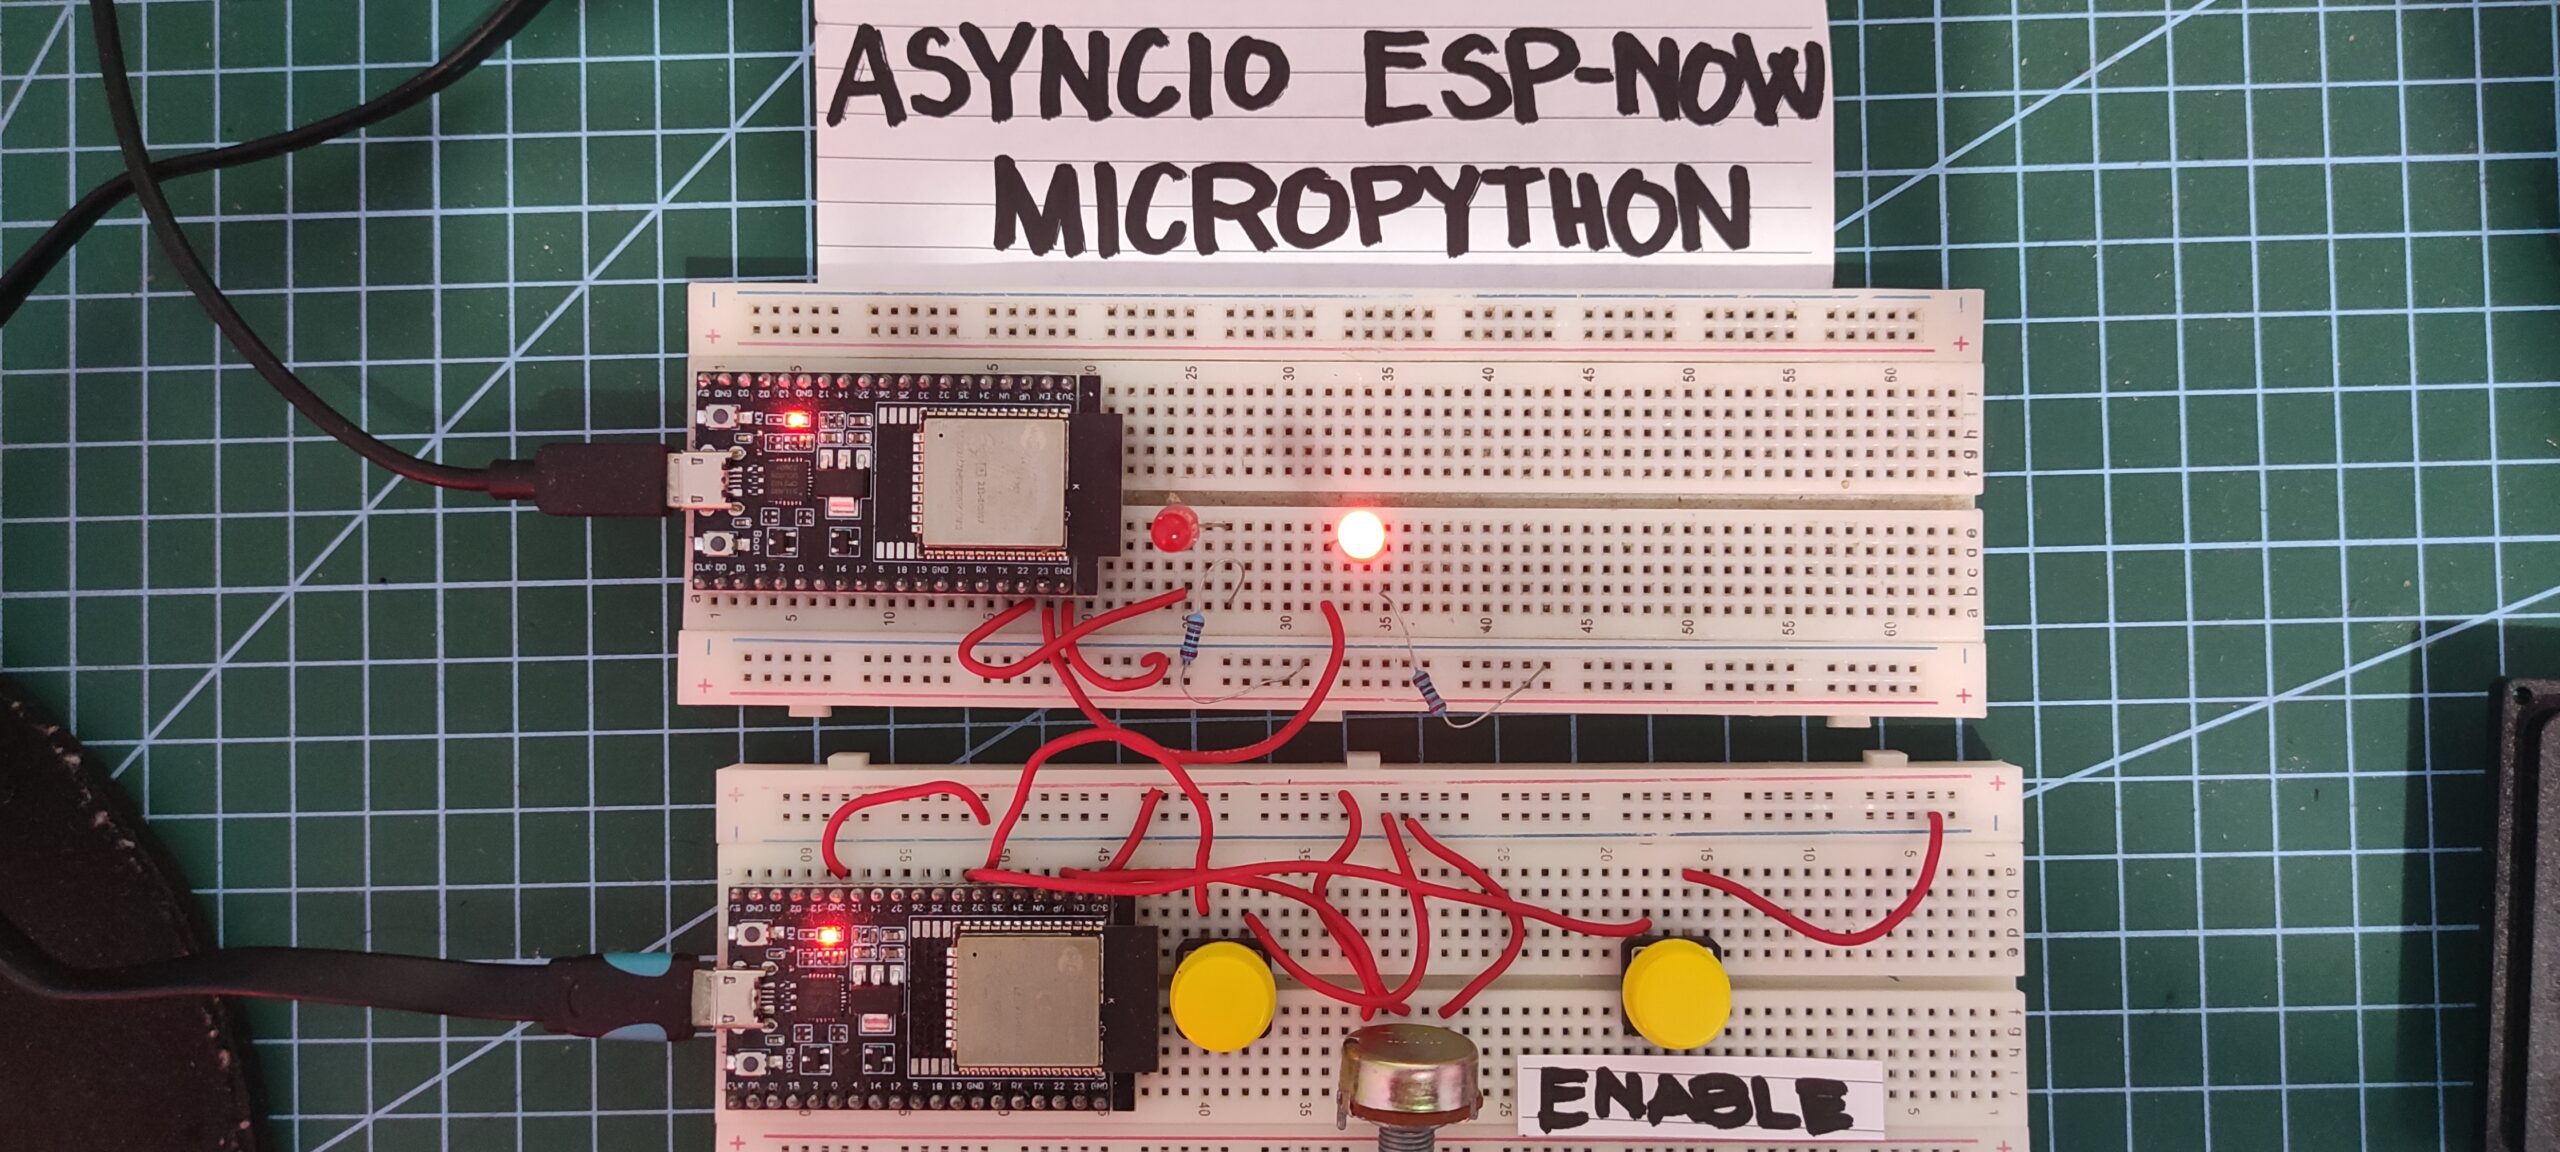
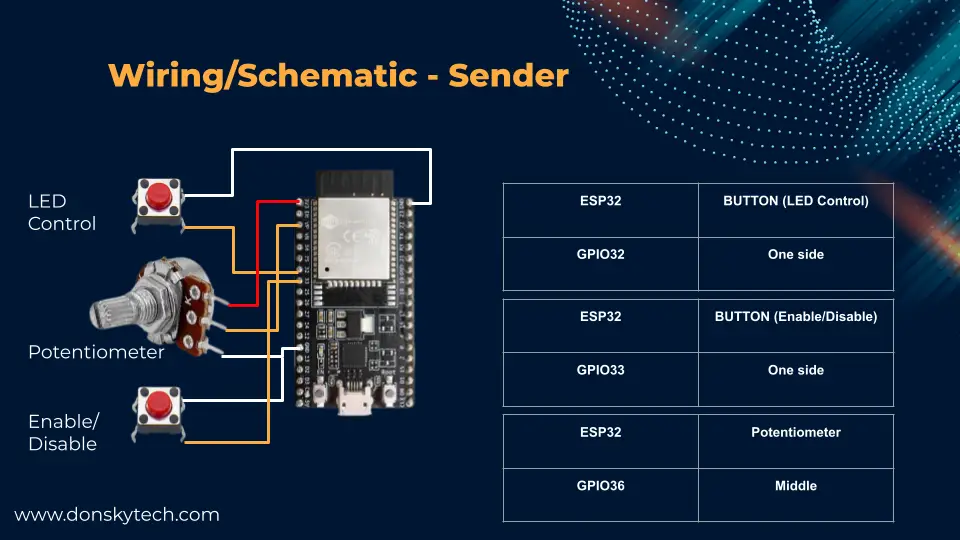
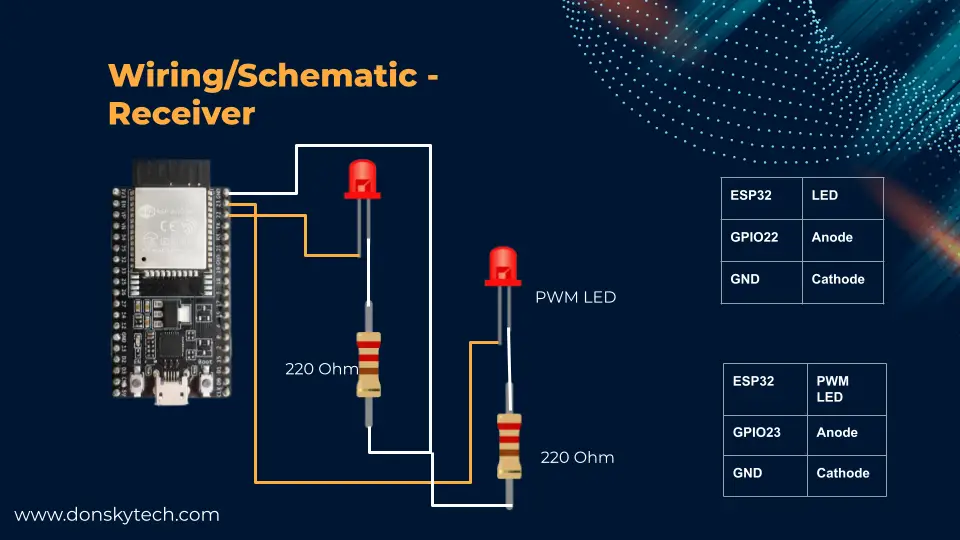
Wiring/Schematics
The below images will show you the wiring and schematic for the components used in this post.
The sender which contains the buttons and the potentiometer is the source of our ESP-NOW messages.
The receiver on the other contains the below wiring and schematic.
Code
The code of our ESP-NOW Micropython with asyncio support can be found on my GitHub repository also. This project contains the code for our sender and receiver. Note that there are two files for the sender (esp_now_async_control_sender.py and esp_now_async_control_sender_with_cancel.py). They are similar and the only difference is the presence of the enable and disable button.
About the micropython-async library
Before we check out the code that I have created for this sample project, I would like to mention that there is a library called micropython-async. It contains classes and utilities that we can use in our Micropython asynchronous programming. An example is how to handle the debouncing mechanism of buttons. I intentionally removed the use of that library to shorten the explanation in this post but that is quite useful if you are going to create serious MicroPython IoT-based projects.
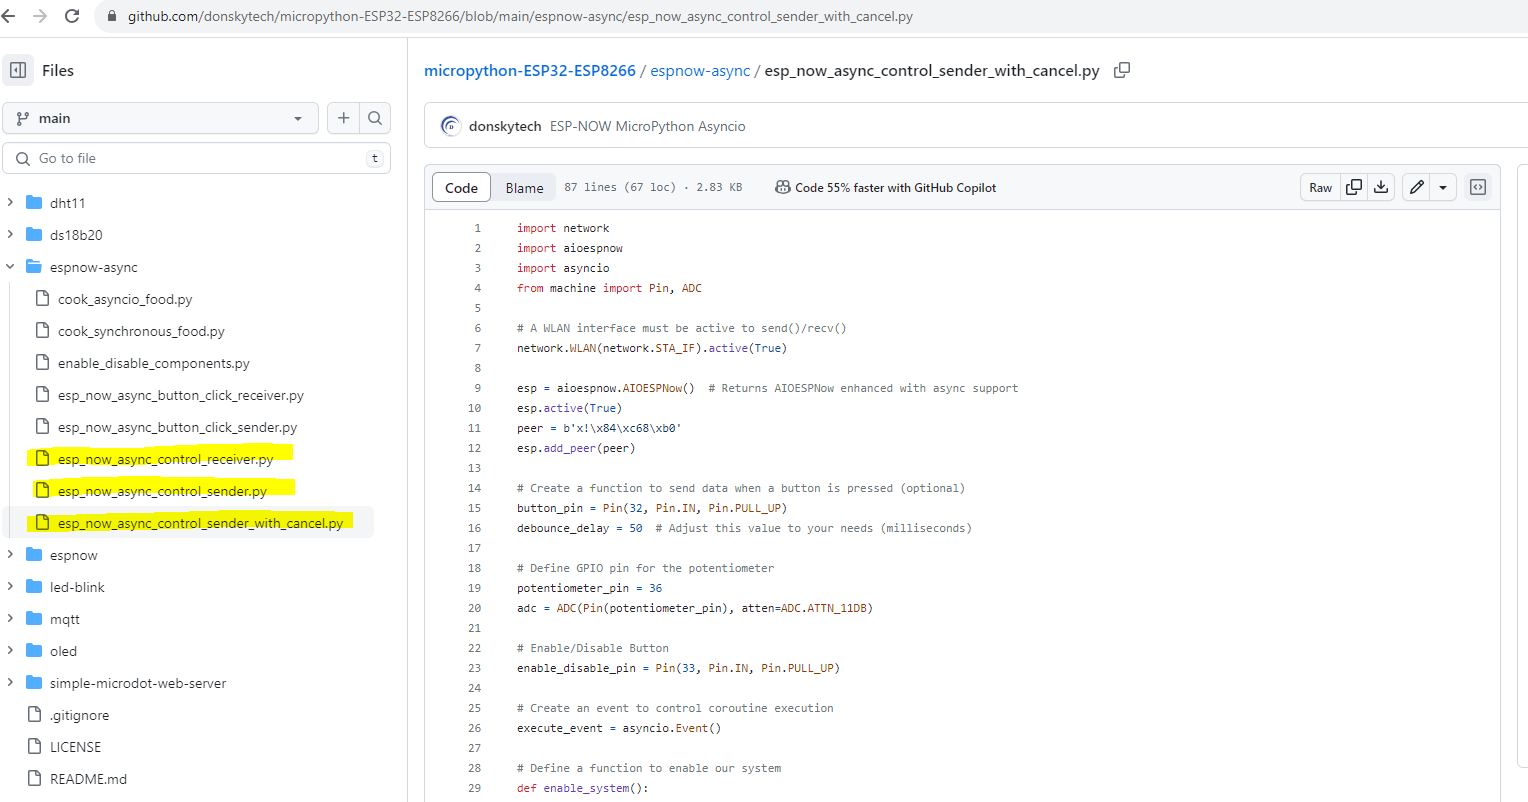
esp_now_async_control_sender_with_cancel.py
The below code is our sender which controls the components on our receiver ESP32.
import network
import aioespnow
import asyncio
from machine import Pin, ADC

# A WLAN interface must be active to send()/recv()
network.WLAN(network.STA_IF).active(True)

esp = aioespnow.AIOESPNow()  # Returns AIOESPNow enhanced with async support
esp.active(True)
peer = b'x!\x84\xc68\xb0'
esp.add_peer(peer)

# Create a function to send data when a button is pressed (optional)
button_pin = Pin(32, Pin.IN, Pin.PULL_UP)
debounce_delay = 50  # Adjust this value to your needs (milliseconds)

# Define GPIO pin for the potentiometer
potentiometer_pin = 36
adc = ADC(Pin(potentiometer_pin), atten=ADC.ATTN_11DB)

# Enable/Disable Button
enable_disable_pin = Pin(33, Pin.IN, Pin.PULL_UP)

# Create an event to control coroutine execution
execute_event = asyncio.Event()

# Define a function to enable our system
def enable_system():
    execute_event.set()

# Define a function to disable our system
def disable_system():
    execute_event.clear()


async def send_button_state(espnow):
    last_state = button_pin.value()
    while True:
        if execute_event.is_set():  # Check if execution is enabled
            state = button_pin.value()
            if state != last_state:
                await asyncio.sleep_ms(debounce_delay)
                state = button_pin.value()
                if state != last_state:
                    if state == 0:
                        message = "ledOn"
                        print(f"Sending command : {message}")
                        await espnow.asend(peer, message)
                    else:
                        message = "ledOff"
                        print(f"Sending command : {message}")
                        await espnow.asend(peer, message)
                    last_state = state
        await asyncio.sleep_ms(10)  # Adjust the polling interval as needed


# Async function for reading and sending potentiometer data
async def send_potentiometer_data(espnow):
    while True:
        if execute_event.is_set():  # Check if execution is enabled
            potentiometer_value = adc.read()
            message = f"potentiometer:{potentiometer_value}"
            espnow.send(peer, message)
        await asyncio.sleep_ms(200)


# Define an async task that listens for button clicks
async def enable_disable_listener():
    while True:
        if not enable_disable_pin.value():  # Button is pressed
            print("Button clicked, toggling coroutine execution.")
            if execute_event.is_set():
                disable_system()
            else:
                enable_system()
            await asyncio.sleep_ms(500)  # Debounce
        await asyncio.sleep_ms(100)  # Check button state every 100ms


async def main(espnow):
    await asyncio.gather(enable_disable_listener(), send_button_state(espnow), send_potentiometer_data(espnow))


asyncio.run(main(esp))
Let us run through what each line of the code does.
import network
import aioespnow
import asyncio
from machine import Pin, ADC
Import the necessary modules including the asyncio needed by our project.
# A WLAN interface must be active to send()/recv()
network.WLAN(network.STA_IF).active(True)

esp = aioespnow.AIOESPNow()  # Returns AIOESPNow enhanced with async support
esp.active(True)
peer = b'x!\x84\xc68\xb0'
esp.add_peer(peer)
Activate our WLAN interface and declare the asynchronous ESP-NOW class including the MAC address of our peer.
# Create a function to send data when a button is pressed (optional)
button_pin = Pin(32, Pin.IN, Pin.PULL_UP)
debounce_delay = 50  # Adjust this value to your needs (milliseconds)

# Define GPIO pin for the potentiometer
potentiometer_pin = 36
adc = ADC(Pin(potentiometer_pin), atten=ADC.ATTN_11DB)

# Enable/Disable Button
enable_disable_pin = Pin(33, Pin.IN, Pin.PULL_UP)
Declare also the GPIO connections of our buttons and potentiometers.
# Create an event to control coroutine execution
execute_event = asyncio.Event()

# Define a function to enable our system
def enable_system():
    execute_event.set()

# Define a function to disable our system
def disable_system():
    execute_event.clear()
We will use the following functions and Event object to enable and disable our system.
async def send_button_state(espnow):
    last_state = button_pin.value()
    while True:
        if execute_event.is_set():  # Check if execution is enabled
            state = button_pin.value()
            if state != last_state:
                await asyncio.sleep_ms(debounce_delay)
                state = button_pin.value()
                if state != last_state:
                    if state == 0:
                        message = "ledOn"
                        print(f"Sending command : {message}")
                        await espnow.asend(peer, message)
                    else:
                        message = "ledOff"
                        print(f"Sending command : {message}")
                        await espnow.asend(peer, message)
                    last_state = state
        await asyncio.sleep_ms(10)  # Adjust the polling interval as needed


# Async function for reading and sending potentiometer data
async def send_potentiometer_data(espnow):
    while True:
        if execute_event.is_set():  # Check if execution is enabled
            potentiometer_value = adc.read()
            message = f"potentiometer:{potentiometer_value}"
            espnow.send(peer, message)
        await asyncio.sleep_ms(200)


# Define an async task that listens for button clicks
async def enable_disable_listener():
    while True:
        if not enable_disable_pin.value():  # Button is pressed
            print("Button clicked, toggling coroutine execution.")
            if execute_event.is_set():
                disable_system()
            else:
                enable_system()
            await asyncio.sleep_ms(500)  # Debounce
        await asyncio.sleep_ms(100)  # Check button state every 100ms
The following are the functions that we use to control our receiver. Each coroutine sends ESP-NOW messages to our receiver by checking its present value. To enable/disable the system we can set or unset the asyncio Event object.
async def main(espnow):
    await asyncio.gather(enable_disable_listener(), send_button_state(espnow), send_potentiometer_data(espnow))


asyncio.run(main(esp))
This is the part that runs the whole system in an asyncio event loop mechanism.
esp_now_async_control_receiver.py
The below code is for our receiver.
import network
import aioespnow
import machine
import asyncio

# A WLAN interface must be active to send()/recv()
sta = network.WLAN(network.STA_IF)  # Or network.AP_IF
sta.active(True)
sta.disconnect()      # For ESP8266

# Initialize ESP-NOW
esp = aioespnow.AIOESPNow()  # Returns AIOESPNow enhanced with async support
esp.active(True)

led_pin = machine.Pin(22, machine.Pin.OUT)
pwm_pin = machine.Pin(23, machine.Pin.OUT)
pwm = machine.PWM(machine.Pin(pwm_pin), freq=1000, duty=0)

def map_value(value, in_min, in_max, out_min, out_max):
    return (value - in_min) * (out_max - out_min) / (in_max - in_min) + out_min

async def wait_for_message():
    while True:
        _, msg = esp.recv()
        if msg:             # msg == None if timeout in recv()
            if msg == b'ledOn':
                print("Turning on LED")
                led_pin.on()
            elif msg == b'ledOff':
                print("Turning off LED")
                led_pin.off()
            elif msg.startswith(b'potentiometer'):
                string_data = msg.decode('utf-8')
                potentiometer_value = string_data.split(":")[1]
                print(f"Pot Value: {potentiometer_value}")
                # Map the potentiometer value to PWM duty cycle (0 to 1023)
                duty_cycle = int(map_value(int(potentiometer_value), 0, 4095, 0, 1023))
                pwm.duty(duty_cycle)
            else:
                print(f"Unknown message {msg}")


asyncio.run(wait_for_message())
Again, let me try to walk you through the code.
import network
import aioespnow
import machine
import asyncio
Import the necessary libraries for our project.
# A WLAN interface must be active to send()/recv()
sta = network.WLAN(network.STA_IF)  # Or network.AP_IF
sta.active(True)
sta.disconnect()      # For ESP8266

# Initialize ESP-NOW
esp = aioespnow.AIOESPNow()  # Returns AIOESPNow enhanced with async support
esp.active(True)
Activate our WLAN and initialize our asynchronous ESP-NOW object.
led_pin = machine.Pin(22, machine.Pin.OUT)
pwm_pin = machine.Pin(23, machine.Pin.OUT)
pwm = machine.PWM(machine.Pin(pwm_pin), freq=1000, duty=0)

def map_value(value, in_min, in_max, out_min, out_max):
    return (value - in_min) * (out_max - out_min) / (in_max - in_min) + out_min
Declare the pins that we are going to use to control our LEDs and a mapping function that will convert the potentiometer values to their appropriate duty cycle values.
async def wait_for_message():
    while True:
        _, msg = esp.recv()
        if msg:             # msg == None if timeout in recv()
            if msg == b'ledOn':
                print("Turning on LED")
                led_pin.on()
            elif msg == b'ledOff':
                print("Turning off LED")
                led_pin.off()
            elif msg.startswith(b'potentiometer'):
                string_data = msg.decode('utf-8')
                potentiometer_value = string_data.split(":")[1]
                print(f"Pot Value: {potentiometer_value}")
                # Map the potentiometer value to PWM duty cycle (0 to 1023)
                duty_cycle = int(map_value(int(potentiometer_value), 0, 4095, 0, 1023))
                pwm.duty(duty_cycle)
            else:
                print(f"Unknown message {msg}")


asyncio.run(wait_for_message())
This function waits for messages coming from our ESP-NOW sender and parses them. The parsed messages are then used to control our LEDs.
This is really how simple it is to use ESP-NOW in your MicroPython IoT projects using asyncio programming.
Wrap Up
We have covered quite a lot of topics in this post. Beginning from the advantages of using asyncio in our Micropython application up to using it in interfacing with our sensors and components.
This was quite a long post but if you made it here then I hope you have learned something in my ESP-NOW Micropython with asyncio adventure. 🙂
Happy Exploring!
Support Me!
I love sharing what I know and hopefully, I was able to help you. Writing helpful content takes so much time and research. If you think you like my work and I have managed to help you then please consider supporting my channel. I would be very grateful and would boost my confidence that what I am doing is making a big change in the world. (No Pun Intended!) 😉
Become a Patron!
Leave a Reply