Introduction
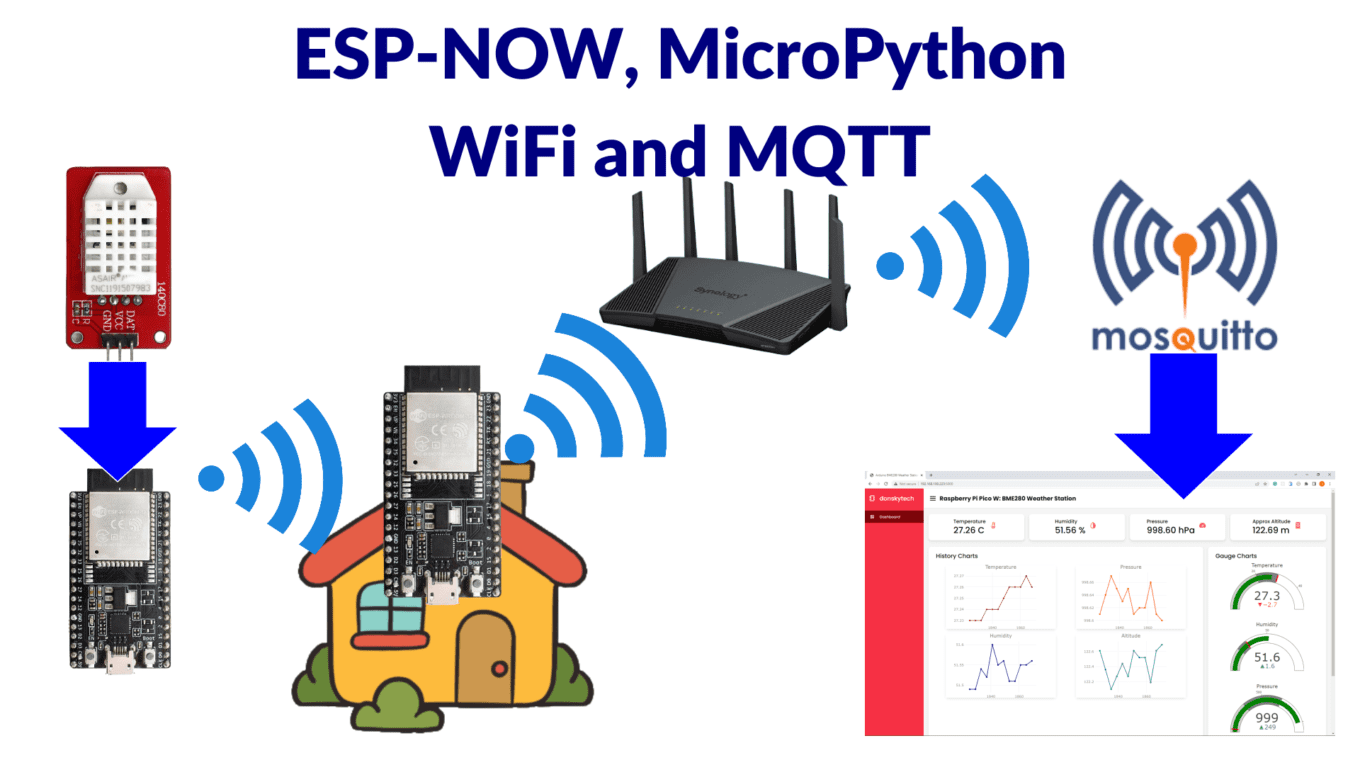
In this post, I will share with you my exploration of using ESP-NOW, MicroPython, WiFi, and MQTT. I will share with you how easy it is to integrate these technologies that you could apply to your Internet of Things (IoT) projects. This integration gives IoT developers the power to wirelessly transfer data between devices, bridging the divide between local communication and wider Wi-Fi connectivity
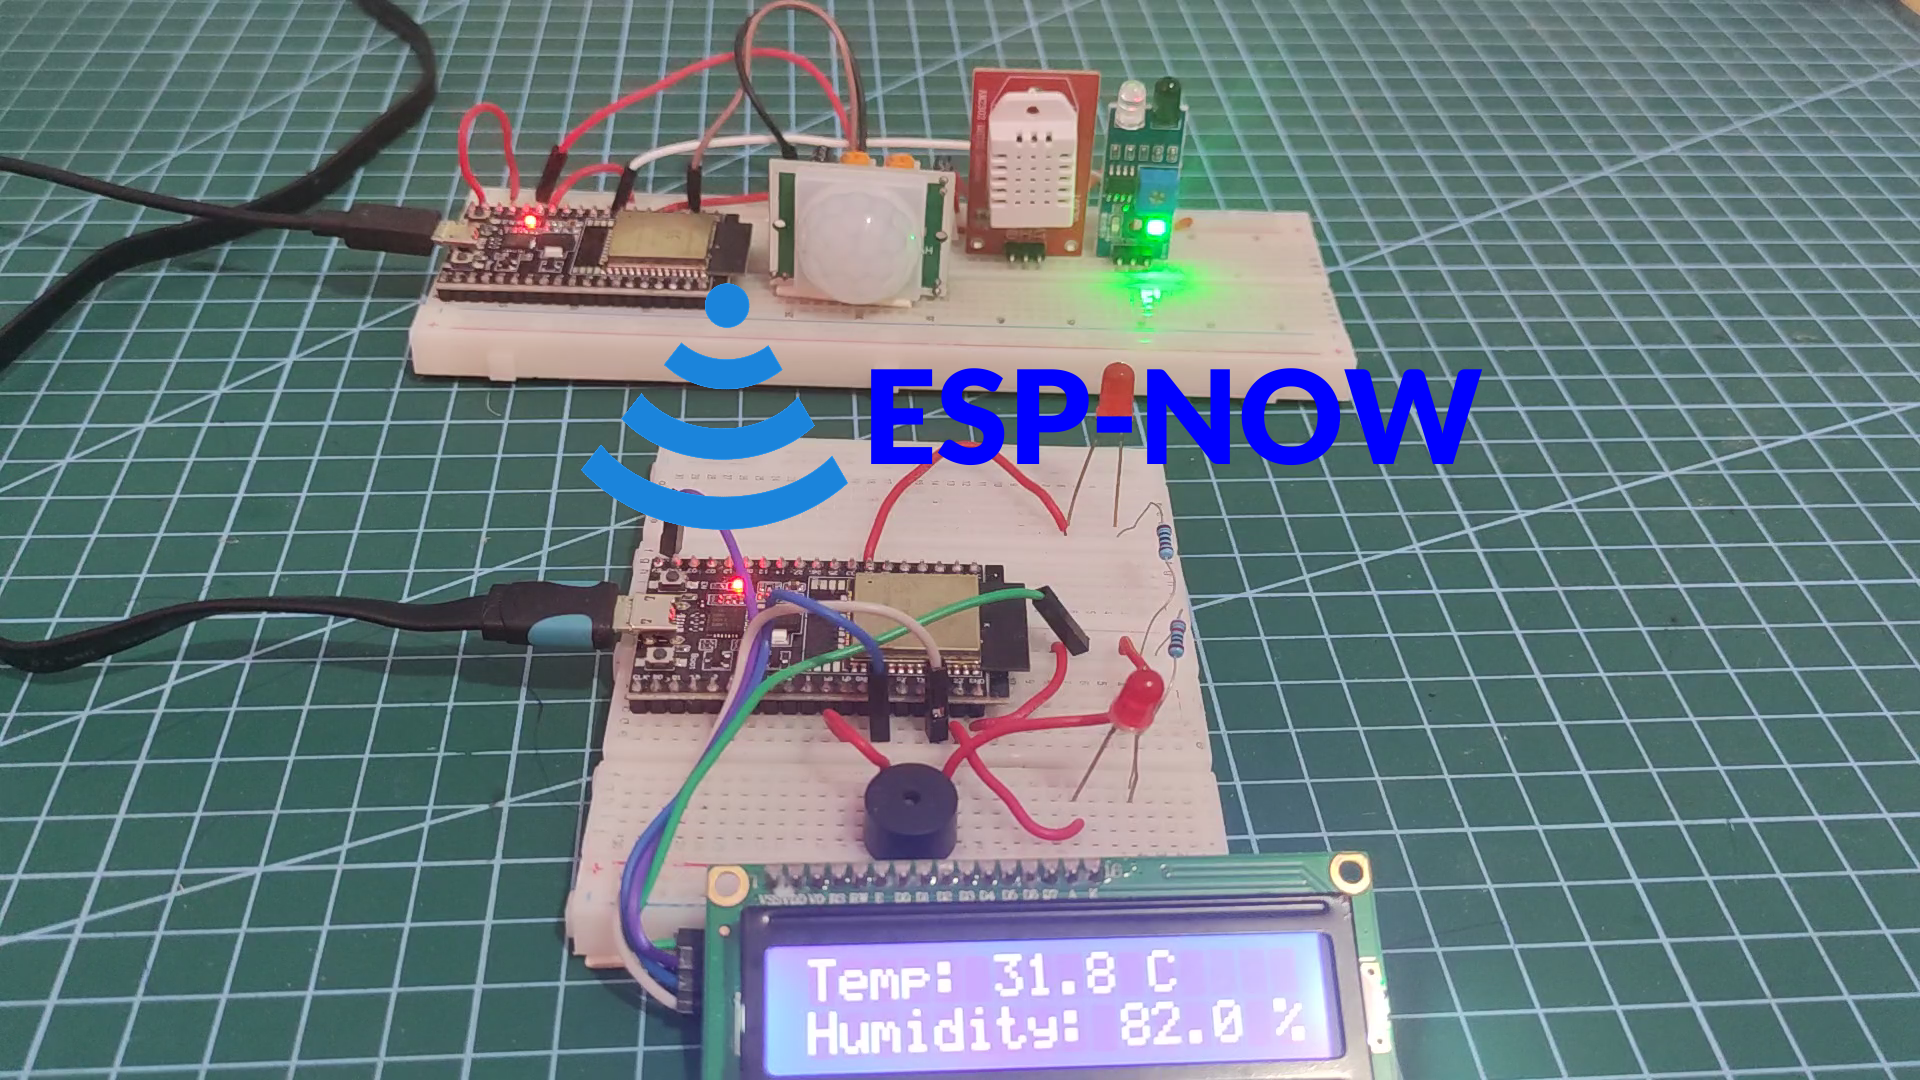
If you want to see a demo of this project then please see the below video or watch it on my YouTube channel. I highly suggest that you watch the video first before reading this accompanying blog.
Why ESP-NOW with MicroPython and WiFi is exciting?
The exciting combination of ESP-NOW, MicroPython, and WiFi could lead to awesome IoT and embedded projects. The thrill is in being able to build real-time, low-latency communication networks that allow for blazing-fast data transfer between gadgets. This opens the door to a wide range of applications, from smart sensor networks and home automation to remote monitoring and industrial IoT, where quick response times and dependable connectivity are crucial.
For example, a sensor outside our house connected to one of our ESP32 devices can transfer the sensor readings to another ESP32 that is simultaneously connected to our home WiFi network. This device could then transmit its data to an external MQTT server which in turn could notify subscribers about the sensor readings. We then could view our sensor readings in a web application dashboard where we could see the sensor readings in colorful graphs or charts.

In this post, I will try to answer the following questions:
- How to retrieve sensor readings from multiple sensors and send the data concurrently through ESP-NOW messages?
- How to configure ESP32/ESP8266 devices to communicate with ESP-NOW and connect to a WiFi network at the same time?
- How to integrate MQTT into a system that uses ESP-NOW as a medium for wireless data transfer?
ESP-NOW in MicroPython
This series of posts is my own learner’s guide on how to get started with using ESP-NOW in MicroPython. I have documented my own personal learnings on how to use this awesome wireless protocol in my own IoT projects. There are not enough beginner tutorials currently on how to explore this topic on the internet so I have decided to write my own. I hope that I could help beginners about this subject but at the same time I would like feedback from veteran MicroPython programmers on how to improve these posts.
Below are the topics that I will cover in this series:
- Exploring ESP-NOW in MicroPython: A Learner’s Guide
- Discovering ESP-Now in MicroPython with Asyncio
- Sending sensor data through ESP-NOW in MicroPython
In this post, I will try to show you the steps on how to integrate your ESP-NOW application written in MicroPython with your WiFi network. I will show you how you can use your new WiFi connection to send out MQTT messages.
Reference Resources
I have used the following resources on how we enable our ESP-NOW wireless communication with your WiFi.
- The official MicroPython and ESP-NOW documentation
- Enable esp-now and WiFi at the same time – GitHub MicroPython Discussion
The GitHub discussion was extremely helpful as a sample project was uploaded there which I have used as a reference for this post.
Prerequisites
You should have read the first three parts of this series as I won’t be discussing so much about how to set up ESP-NOW in MicroPython in this post. Also, the topic of how to use asyncio was discussed there so I won’t be explaining what a coroutine, event loop, and task are.
Download the latest firmware of MicroPython for your ESP32/ESP8266 devices which has support for ESP-NOW. I have used the Thonny IDE in developing this project so you should be familiar with how to use it.
Related Content:
MicroPython Development Using Thonny IDE
MicroPython using VSCode PyMakr on ESP32/ESP8266
Also, you need to have an MQTT server that you can use to send our sensor data readings. I am using my local Mosquitto MQTT server but you could use other cloud MQTT services if you want.
Related Content:
Install Mosquitto MQTT Windows
Parts/Components Required
The following are the components used in this project.
- ESP32 – Amazon | AliExpress
- or ESP8266 – Amazon | AliExpress
- DHT22 – Amazon | AliExpress
- DHT11 – Amazon | AliExpress
- PIR Motion Sensor – Amazon | AliExpress
- Infrared Sensor – Amazon | AliExpress
- LCD 1602 – Amazon | AliExpress
- Resistors – Amazon | AliExpress
- LED Kit – Amazon | AliExpress
- Potentiometer – Amazon | AliExpress
- Breadboard – Amazon | AliExpress
- Connecting Wires – Amazon | AliExpress
- Arduino/Raspberry Pi Kit – Amazon | AliExpress
Note: We need a minimum of two ESP32 or ESP8266 to test out ESP-NOW.
Disclosure: These are affiliate links and I will earn small commissions to support my site when you buy through these links.
PCBWay is a manufacturer specializing in PCB prototyping, low-volume production, and PCB Assembly service all under one roof. So if you want to make a PCB for your electronic project then PCBWay is a great choice for you.
donskytech
Schematic/Wiring
The following are the wiring and the schematic for the components that are used in this project.
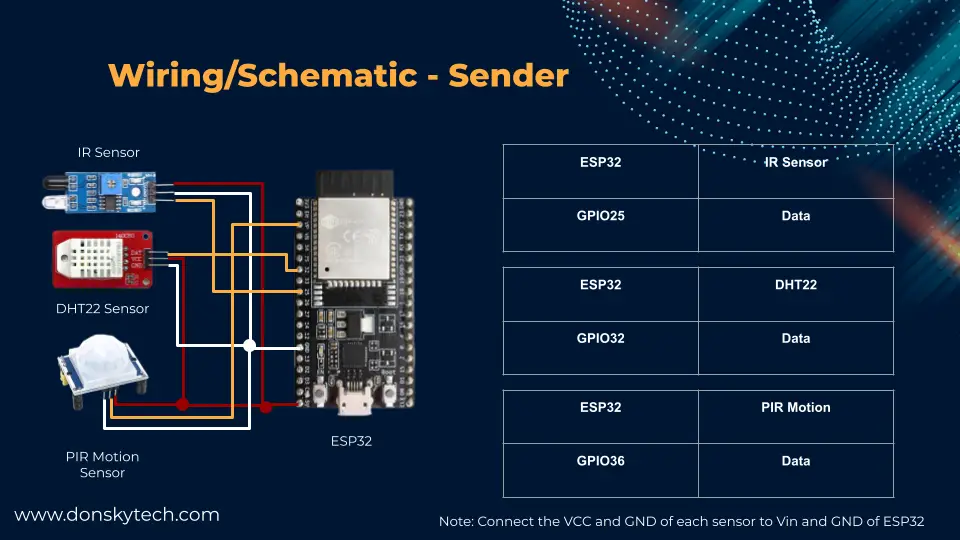
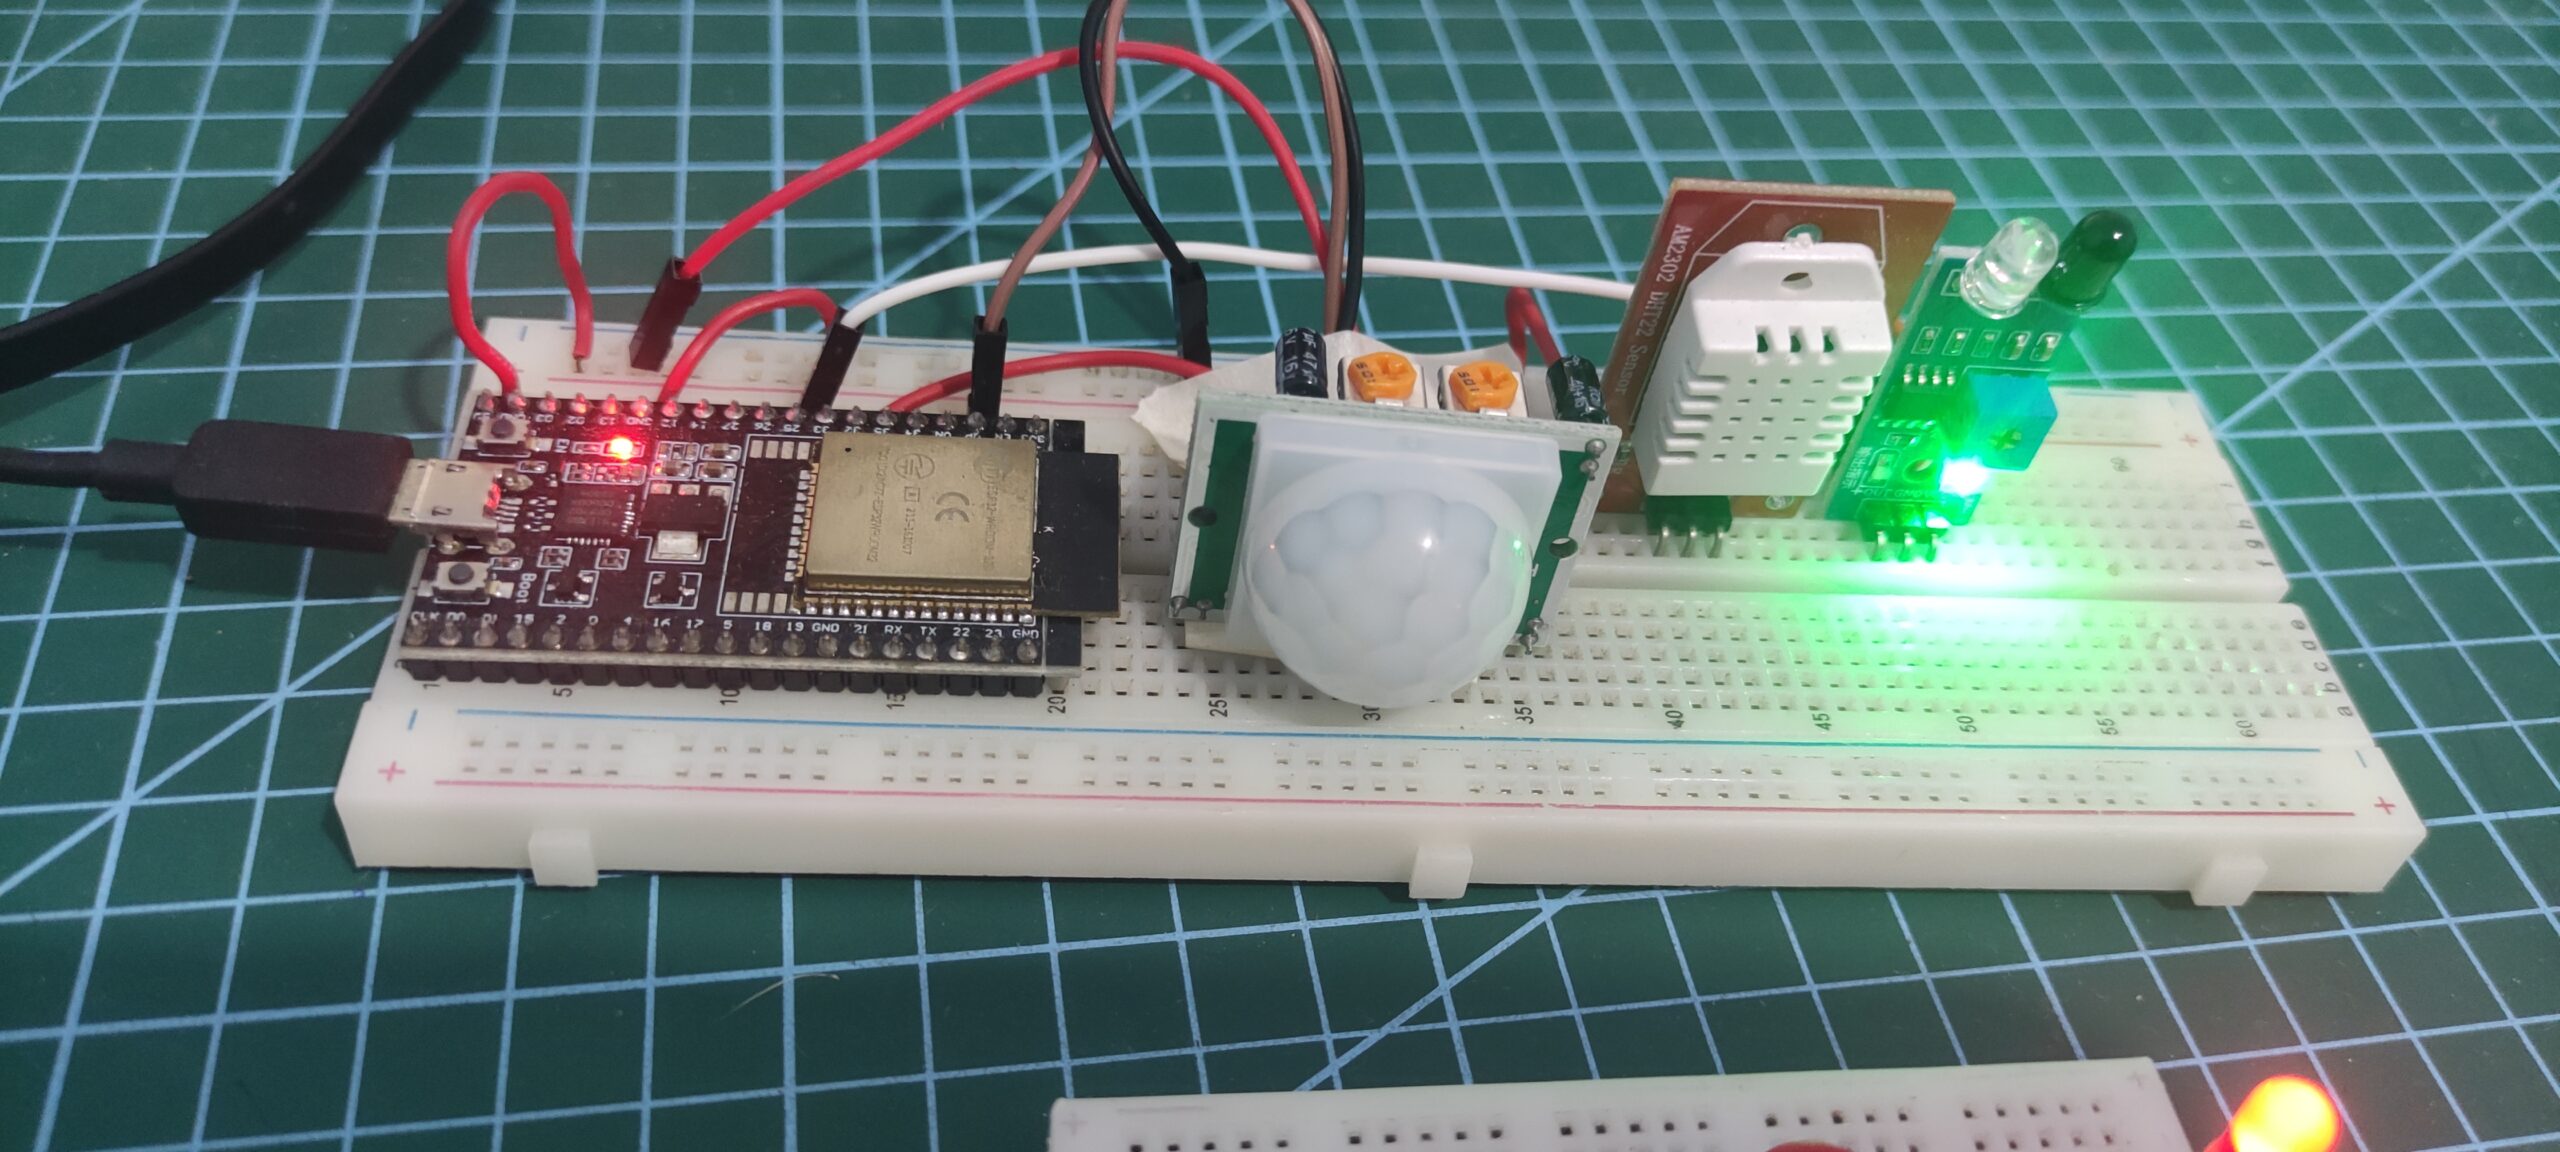
Below is the connection for the ESP32 where our PIR motion, Infrared, and DHT22 sensors are connected.
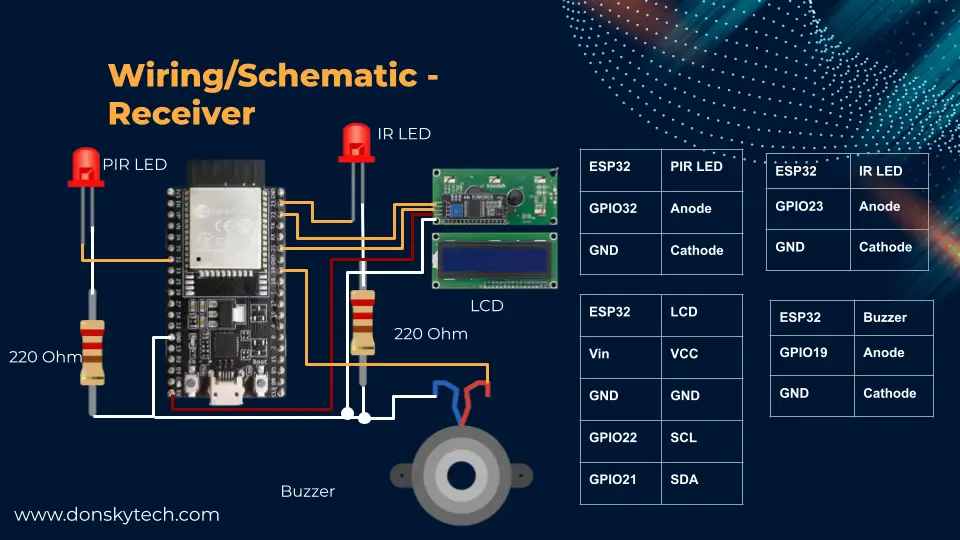
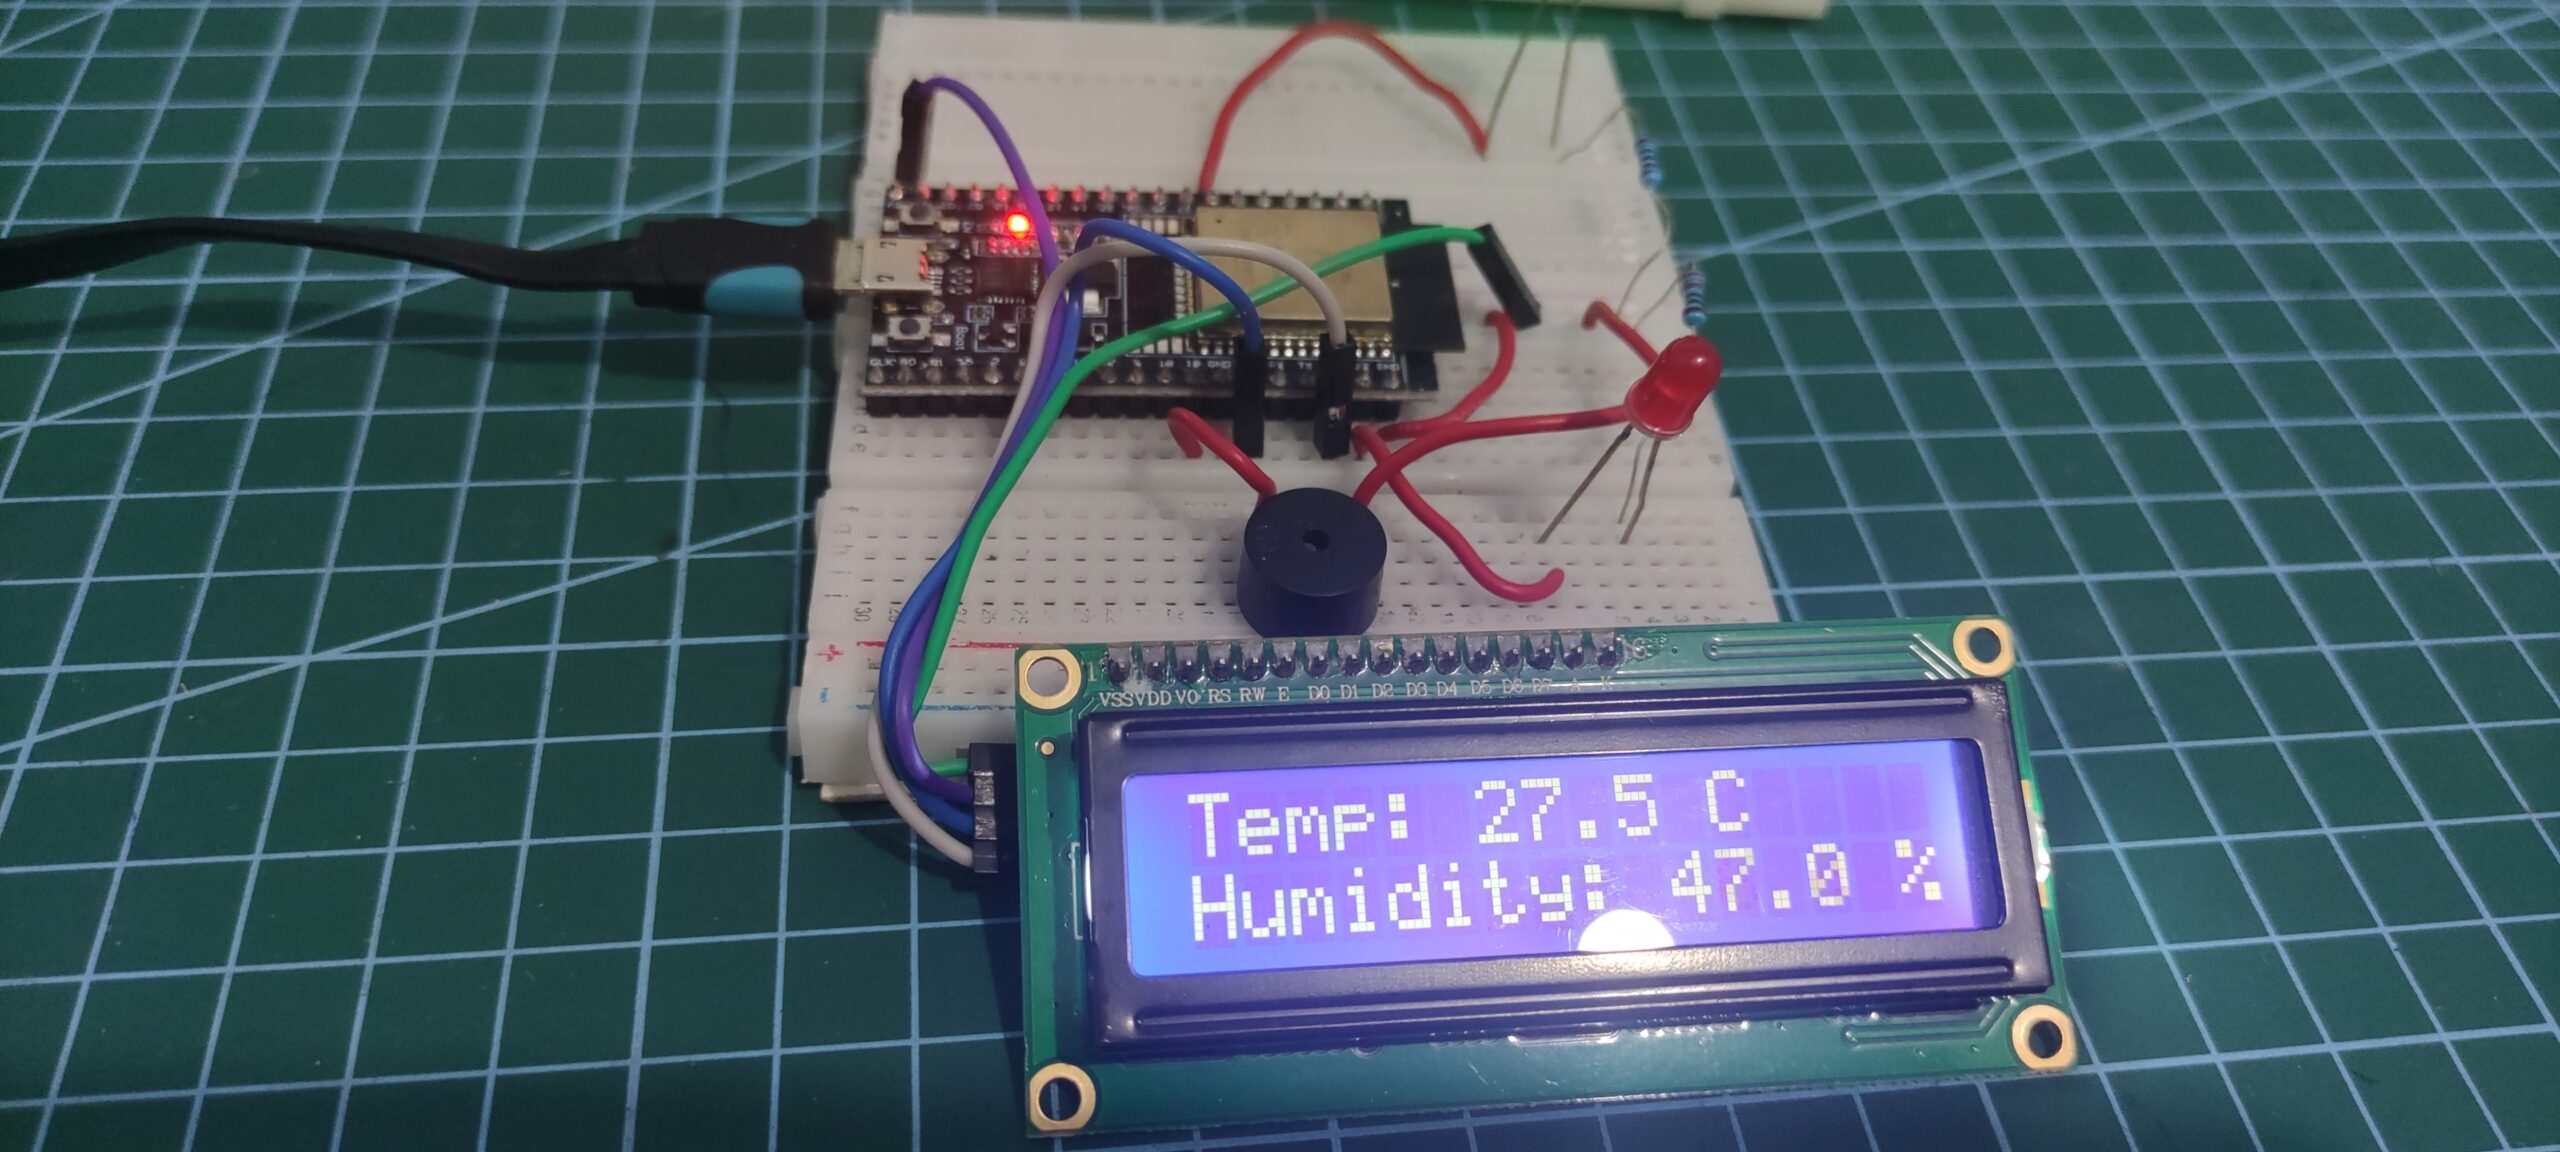
The receiver on the other hand has the following wiring.
Code
The code for this project is available on my GitHub repository. You can download the project folder by following this How to download a GitHub folder?
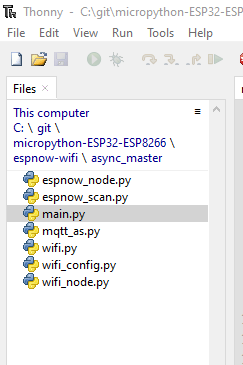
This project contains only directories, namely:
The async_master directory is our ESP-NOW MicroPython program that receives messages from clients and is connected to our WiFi. It is the one that sends the MQTT messages into our Mosquitto server and controls the other components also.
Let us go through what each file does.
Libraries used in this project
These projects use the following files from the micropython-espnow-utils particularly the:
The utility files above are used to bulletproof our ESP-NOW connection. I have just copied the latest file into my project directory. You will see that later in the code section.
I have also used the mqtt_as library since we are using asyncio in these programs so we need a non-blocking MQTT library. I have just copied the following files into my master folder.
async_master
The below files make up our async_master project.
As I have mentioned above, the following files below are just taken from the GitHub directories of the file.
- espnow_scan.py
- mqtt_as.py
- wifi.py
The rest of the files that we need for this project. Let us try to go over what each file does.
espnow_node.py
import aioespnow

class EspNowNode:

    def __init__(self, peers_mac: list[str]) -> None:
        self.node = aioespnow.AIOESPNow()  # Returns AIOESPNow enhanced with async support
        self.node.active(True)
        self.peers_mac = peers_mac

        for peer_mac in self.peers_mac:
            try:
                self.node.add_peer(peer_mac)      # Must add_peer() before send()
            except OSError:
                print("Peer already exists")
The above files create a class named EspNowNode that we are using to initialize an instance of an asynchronous ESPNOW object. These also add the MAC address of the peers or the clients that will be the source of our sensor readings.
wifi_node.py
import time
import wifi as wifi

class WiFiNode:

    def __init__(self, ssid: str=None, password: str=None)->None:
        self.sta, self.ap = wifi.reset(sta=True, ap=False)
        wifi.connect(ssid, password)

        # Wait until connected...
        while not self.sta.isconnected():
            time.sleep(0.1)

        wifi.status()

        # Disable power saving mode.
        self.sta.config(pm=0)
This file creates a class named WiFiNode which we will be using to connect to our wifi. As you can see from the first line after the constructor it is calling the function wifi.reset() which ensures the wifi is always in a fully known state (even after soft_reset).
It also disables the power-saving mode.
wifi_config.py
SSID="<REPLACE>"
PASSWORD="<REPLACE>"
Remember to replace the following variables to match your network setup.
main.py
The main.py is the heart and soul of our async_master project.
from espnow_node import EspNowNode
from wifi_node import WiFiNode
import uasyncio as asyncio
from mqtt_as import MQTTClient, config
import wifi_config
import network
import aioespnow
from machine import I2C, Pin
import ujson
from lcd_i2c import LCD

MAC_0 = 'C8:F0:9E:0D:B6:04'
b_MAC = [bytes([int(i, 16) for i in mac.split(':')]) for mac in [MAC_0]]

config['ssid'] = wifi_config.SSID  # Optional on ESP8266
config['wifi_pw'] = wifi_config.PASSWORD
config['server'] = '192.168.100.22'  # Change to suit your setup
config["queue_len"] = 1  # Use event interface with default queue size

MQTTClient.DEBUG = True  # Optional: print diagnostic messages
client = MQTTClient(config)
espnow = EspNowNode(peers_mac=b_MAC)
wifi = WiFiNode(wifi_config.SSID, wifi_config.PASSWORD)

pir_pin = Pin(32, Pin.OUT)
infrared_pin = Pin(23, Pin.OUT)
buzzer_pin = Pin(19, Pin.OUT)

I2C_ADDR = 0x27     # DEC 39, HEX 0x27
NUM_ROWS = 2
NUM_COLS = 16

i2c = I2C(0, scl=Pin(22), sda=Pin(21), freq=10000)
lcd = LCD(addr=I2C_ADDR, cols=NUM_COLS, rows=NUM_ROWS, i2c=i2c)

lcd.begin()


async def trigger_pir_alert(msg):
    pir_pin.on()
    await client.publish("alert", ujson.dumps(msg), qos = 1)
    await asyncio.sleep(1)
    pir_pin.off()

async def trigger_infrared_alert(msg):
    infrared_pin.on()
    buzzer_pin.value(1)
    await client.publish("alert", ujson.dumps(msg), qos = 1)
    await asyncio.sleep(1)
    infrared_pin.off()
    buzzer_pin.value(0)

async def display_temp_humidity(msg):
    temperature = msg['temperature']
    lcd.set_cursor(col=0, row=0)
    lcd.print(f"Temp: {temperature} C")
    humidity = msg['humidity']
    lcd.set_cursor(col=0, row=1)
    lcd.print(f"Humidity: {humidity} %")
    await client.publish("alert", ujson.dumps(msg), qos = 1)
    await asyncio.sleep(1)

async def display_humidity(msg):
    humidity = msg['humidity']
    lcd.set_cursor(col=0, row=1)
    lcd.print(f"Humidity: {humidity} %")
    await client.publish("alert", ujson.dumps(msg), qos = 1)
    await asyncio.sleep(1)


async def messages(client):  # Respond to incoming messages
    async for topic, msg, retained in client.queue:
        print((topic, msg, retained))

async def up(client):  # Respond to connectivity being (re)established
    while True:
        await client.up.wait()  # Wait on an Event
        client.up.clear()
#         await client.subscribe('foo_topic', 1)  # renew subscriptions

async def wait_for_message():
    async for mac, msg in espnow.node:
        if msg:
            try:
                msg = ujson.loads(msg)
            except ValueError as e:
                print(f"Parsing Error: {e}")
            else:
                print(msg)
                if "pir_alert_detected" in msg:
                    await trigger_pir_alert(msg)
                elif "infrared_alert_detected" in msg:
                    await trigger_infrared_alert(msg)
                elif "temperature"  in msg:
                    await display_temp_humidity(msg)

async def recv_cb():
    while True:  # Read out all messages waiting in the buffer
        msg = espnow.node.airecv()  # Don't wait if no messages left
        if msg is None:
            return

        for val in msg:
            print(val)


async def main():
    print("MQTT Connect in progress...")
    await client.connect()
    print("Sleep for some time...")
    await asyncio.sleep(3)
    print("Creating task....")

    await asyncio.gather( wait_for_message(), messages(client), up(client))

asyncio.run(main())
Let us try to scan what each line of the code does.
from espnow_node import EspNowNode
from wifi_node import WiFiNode
import uasyncio as asyncio
from mqtt_as import MQTTClient, config
import wifi_config
import network
import aioespnow
from machine import I2C, Pin
import ujson
from lcd_i2c import LCD
Import the necessary packages to connect to our components, mqtt server, and ESP-NOW message exchange.
MAC_0 = 'C8:F0:9E:0D:B6:04'
b_MAC = [bytes([int(i, 16) for i in mac.split(':')]) for mac in [MAC_0]]
Set the MAC address of our peers or clients here.
config['ssid'] = wifi_config.SSID  # Optional on ESP8266
config['wifi_pw'] = wifi_config.PASSWORD
config['server'] = '192.168.100.22'  # Change to suit your setup
config["queue_len"] = 1  # Use event interface with default queue size

MQTTClient.DEBUG = True  # Optional: print diagnostic messages
client = MQTTClient(config)
These are the configurations and settings that we will need to connect to our Mosquitto MQTT server. We have also created our MQTT client which we will be using to send out MQTT messages.
espnow = EspNowNode(peers_mac=b_MAC)
wifi = WiFiNode(wifi_config.SSID, wifi_config.PASSWORD)
Here, we instantiate an instance of the classes EspNowNode and WiFiNode. These will allow us to instantiate our ESP-NOW object for us to send messages. Additionally, it would connect our master project to our WiFi network.
pir_pin = Pin(32, Pin.OUT)
infrared_pin = Pin(23, Pin.OUT)
buzzer_pin = Pin(19, Pin.OUT)

I2C_ADDR = 0x27     # DEC 39, HEX 0x27
NUM_ROWS = 2
NUM_COLS = 16

i2c = I2C(0, scl=Pin(22), sda=Pin(21), freq=10000)
lcd = LCD(addr=I2C_ADDR, cols=NUM_COLS, rows=NUM_ROWS, i2c=i2c)

lcd.begin()
The following are the GPIO pins that we will be needing to control the LEDs, buzzer, and I2C LCD. You can review the previous posts from these series if you are not familiar with the setup.
async def trigger_pir_alert(msg):
    pir_pin.on()
    await client.publish("alert", ujson.dumps(msg), qos = 1)
    await asyncio.sleep(1)
    pir_pin.off()

async def trigger_infrared_alert(msg):
    infrared_pin.on()
    buzzer_pin.value(1)
    await client.publish("alert", ujson.dumps(msg), qos = 1)
    await asyncio.sleep(1)
    infrared_pin.off()
    buzzer_pin.value(0)

async def display_temp_humidity(msg):
    temperature = msg['temperature']
    lcd.set_cursor(col=0, row=0)
    lcd.print(f"Temp: {temperature} C")
    humidity = msg['humidity']
    lcd.set_cursor(col=0, row=1)
    lcd.print(f"Humidity: {humidity} %")
    await client.publish("alert", ujson.dumps(msg), qos = 1)
    await asyncio.sleep(1)

async def display_humidity(msg):
    humidity = msg['humidity']
    lcd.set_cursor(col=0, row=1)
    lcd.print(f"Humidity: {humidity} %")
    await client.publish("alert", ujson.dumps(msg), qos = 1)
    await asyncio.sleep(1)
The following are the coroutines that will allow us to control the different components attached to our master ESP32. Aside from controlling the components, it sends out MQTT messages for the topic “alert”.
async def messages(client):  # Respond to incoming messages
    async for topic, msg, retained in client.queue:
        print((topic, msg, retained))

async def up(client):  # Respond to connectivity being (re)established
    while True:
        await client.up.wait()  # Wait on an Event
        client.up.clear()
#         await client.subscribe('foo_topic', 1)  # renew subscriptions
These two functions can be used if you need to subscribe to some topic upon successful MQTT connection.
async def wait_for_message():
    async for mac, msg in espnow.node:
        if msg:
            try:
                msg = ujson.loads(msg)
            except ValueError as e:
                print(f"Parsing Error: {e}")
            else:
                print(msg)
                if "pir_alert_detected" in msg:
                    await trigger_pir_alert(msg)
                elif "infrared_alert_detected" in msg:
                    await trigger_infrared_alert(msg)
                elif "temperature"  in msg:
                    await display_temp_humidity(msg)

async def recv_cb():
    while True:  # Read out all messages waiting in the buffer
        msg = espnow.node.airecv()  # Don't wait if no messages left
        if msg is None:
            return

        for val in msg:
            print(val)
You can use any of the two functions if you want to listen to any ESP-NOW messages. First, it parses the messages into a JSON format and checks the details of the message. After that, we call our respective coroutines above to update our components and send the appropriate MQTT messages.
async def main():
    print("MQTT Connect in progress...")
    await client.connect()
    print("Sleep for some time...")
    await asyncio.sleep(3)
    print("Creating task....")

    await asyncio.gather( wait_for_message(), messages(client), up(client))

asyncio.run(main())
Finally, the function main() will first connect to our Mosquitto MQTT server and start our MicroPython event loop.
This is how the async_master project handles ESP-NOW messages in our MicroPython project that is connected to a WiFi network.
async_client
The async_client project is the source of our sensor readings whose values are sent through ESP-NOW messages.
Both wifi.py and espnow_scan.py are taken from the library that we used above so we will just be scanning the files that are local for this project.
espnow_node.py
import aioespnow
import espnow_scan

class EspNowNode:

    def __init__(self, peer_mac: bytes):
        self.node = aioespnow.AIOESPNow()  # Returns AIOESPNow enhanced with async support
        self.node.active(True)
        self.peer_mac = peer_mac

        # Scan network for existing master devices.
        espnow_scan.scan(peer=self.peer_mac)
The code is almost similar to the one above and we are just initializing an instance of our asynchronous ESP-NOW object.
We also have a call to the function espnow_scan.scan(peer=self.peer_mac) which will communicate with our master MAC address.
wifi_node.py
import wifi as wifi

class WiFiNode:

    def __init__(self) -> None:
        self.sta, self.ap = wifi.reset(sta=True, ap=False)

        # Disable power saving mode.
        self.sta.config(pm=0)

        wifi.status()
This class WiFiNode will activate our WLAN interface and the only difference from the master is that we are not connecting to any WiFi network here.
main.py
from espnow_node import EspNowNode
from wifi_node import WiFiNode
import network
import uasyncio as asyncio
from machine import Pin, ADC
import time
import dht
import ujson

MAC = '78:21:84:C6:38:B0'
b_MAC = bytes([int(i, 16) for i in MAC.split(':')])

wifi = WiFiNode()
espnow = EspNowNode(peer_mac=b_MAC)

# Define the GPIO pin to which the PIR sensor is connected (change this as needed)
pir_pin = Pin(36, Pin.IN)

# Define GPIO pin for the DHT sensor
dht_pin = Pin(32)
dht_sensor = dht.DHT22(dht_pin)

ir_pin = Pin(25, Pin.IN)

async def send_pir_motion_readings():
    while True:
        motion_detected = pir_pin.value()

        if motion_detected:
            print("Motion detected!")
            message = {"pir_alert_detected": True}
            await espnow.node.asend(ujson.dumps(message))
        else:
#             print("No motion detected.")
            pass
        await asyncio.sleep_ms(1000)

# Async function for sending DHT temperature data
async def send_dht_temperature_data():
    while True:
        dht_sensor.measure()
        temperature = dht_sensor.temperature()
        humidity = dht_sensor.humidity()
        print(f"temperature : {temperature}, humidity: {humidity}")
        message = {"temperature":temperature, "humidity": humidity}
        await espnow.node.asend(ujson.dumps(message))
        await asyncio.sleep(30)

async def send_ir_data():
    while True:
        # Read data from the IR sensor
        ir_data = ir_pin.value()

        if ir_data == 0:
            print(f"Infrared Alert!")
            message = {"infrared_alert_detected": True}
            await espnow.node.asend(ujson.dumps(message))

        await asyncio.sleep_ms(2000)

async def main():
    await asyncio.gather(send_pir_motion_readings(), send_dht_temperature_data(), send_ir_data())
#     await asyncio.gather(send_pir_motion_readings(), send_ir_data())

asyncio.run(main())
This is the main entry point of our client project and is largely similar to the earlier post in this series.
from espnow_node import EspNowNode
from wifi_node import WiFiNode
import network
import uasyncio as asyncio
from machine import Pin, ADC
import time
import dht
import ujson
As usual, we need to import the necessary packages for our projects.
MAC = '78:21:84:C6:38:B0'
b_MAC = bytes([int(i, 16) for i in MAC.split(':')])

wifi = WiFiNode()
espnow = EspNowNode(peer_mac=b_MAC)
We defined our master MAC address and created an instance of the classes WiFiNode and EspNodeNode.
# Define the GPIO pin to which the PIR sensor is connected (change this as needed)
pir_pin = Pin(36, Pin.IN)

# Define GPIO pin for the DHT sensor
dht_pin = Pin(32)
dht_sensor = dht.DHT22(dht_pin)

ir_pin = Pin(25, Pin.IN)
These are the GPIO pins that we will be using to retrieve our sensor readings from our PIR motion sensor, DHT22, and Infrared distance sensor.
async def send_pir_motion_readings():
    while True:
        motion_detected = pir_pin.value()

        if motion_detected:
            print("Motion detected!")
            message = {"pir_alert_detected": True}
            await espnow.node.asend(ujson.dumps(message))
        else:
#             print("No motion detected.")
            pass
        await asyncio.sleep_ms(1000)

# Async function for sending DHT temperature data
async def send_dht_temperature_data():
    while True:
        dht_sensor.measure()
        temperature = dht_sensor.temperature()
        humidity = dht_sensor.humidity()
        print(f"temperature : {temperature}, humidity: {humidity}")
        message = {"temperature":temperature, "humidity": humidity}
        await espnow.node.asend(ujson.dumps(message))
        await asyncio.sleep(30)

async def send_ir_data():
    while True:
        # Read data from the IR sensor
        ir_data = ir_pin.value()

        if ir_data == 0:
            print(f"Infrared Alert!")
            message = {"infrared_alert_detected": True}
            await espnow.node.asend(ujson.dumps(message))

        await asyncio.sleep_ms(2000)
The following coroutines are used to extract readings from our sensor. For the PIR and Infrared sensor, it checks if it is activated, and if it is then an ESP-NOW message is sent.
We periodically cycle the DHT22 sensor readings every 30 seconds and send the temperature and humidity readings on an ESP-NOW message.
async def main():
    await asyncio.gather(send_pir_motion_readings(), send_dht_temperature_data(), send_ir_data())


asyncio.run(main())
Finally, we load our coroutines on the Python event loop and start it.
How to deploy the project to our MicroPython device?
To test out this project we need to upload it to our ESP32/ESP8266 device. You can follow the following How to upload files to your MicroPython Device using Thonny IDE?
How to run and test the project?
Run the Mosquitto MQTT server
For running and testing the project we first need to run our Mosquitto MQTT server.
Open a new terminal and execute the below code.
mosquitto -c mosquitto.conf -vIn a separate terminal, execute the following command.
mosquitto_sb -h <IP-ADDRESS> -t alertReplace the IP Address to match the IP of your Mosquitto MQTT server. We are going to subscribe to the topic “alert” so that we can see the messages being published by our ESP32 master device.
Running the async_master and async_client
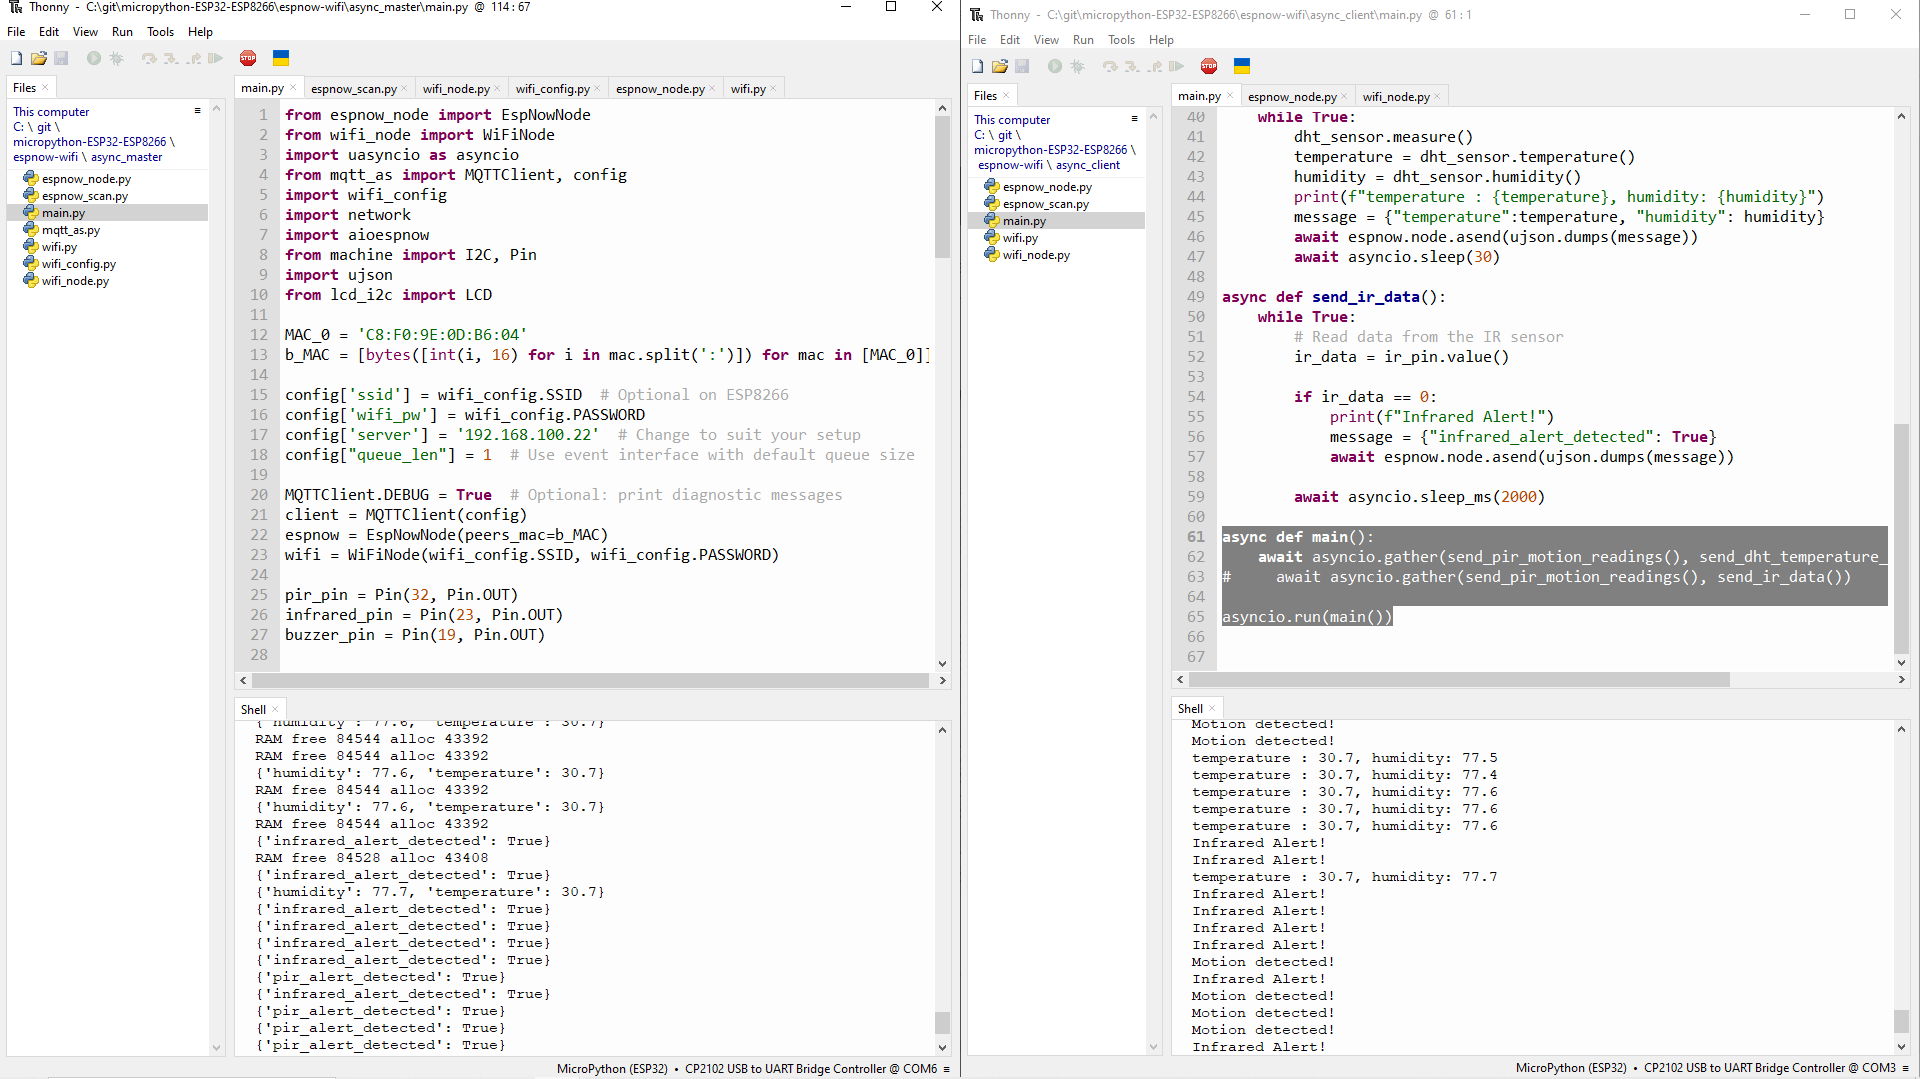
In order for you to run and test the project, you need to run Thonny in multiple instances. You can refer to my earlier post about How do you run Thonny IDE with multiple windows or instances.
After you have uploaded the async_master and async_client project files to your ESP32/ESP8266 file system just press Ctrl+D on your Thonny IDE as this will issue a soft reset to your device.
You should be seeing the ESP-NOW messages coming in from your client. At the same time, the terminal should display the MQTT messages as well. If you have seen this then congratulations!
Wrap up
In conclusion, IoT developers and enthusiasts have access to a remarkably powerful alliance thanks to the combination of ESP-NOW, MicroPython, and WiFi. The capacity to create quick, dependable, and responsive communication networks for a variety of applications is provided by this dynamic trio. Whether you’re designing sensor networks, monitoring remote assets, or building smart homes, the combination of these technologies gives you the freedom to innovate quickly and effectively. ESP-NOW with MicroPython and WiFi realize your IoT goals by seamlessly integrating devices, streamlining challenging tasks, and expanding the boundaries of wireless communication. Take advantage of this potent mix and set out on your journey to a connected and intelligent future.
I hope you have learned something. Happy Exploring!
Support Me!
I love sharing what I know and hopefully, I was able to help you. Writing helpful content takes so much time and research. If you think you like my work and I have managed to help you then please consider supporting my channel. I would be very grateful and would boost my confidence that what I am doing is making a big change in the world. (No Pun Intended!) 😉
Become a Patron!
Leave a Reply