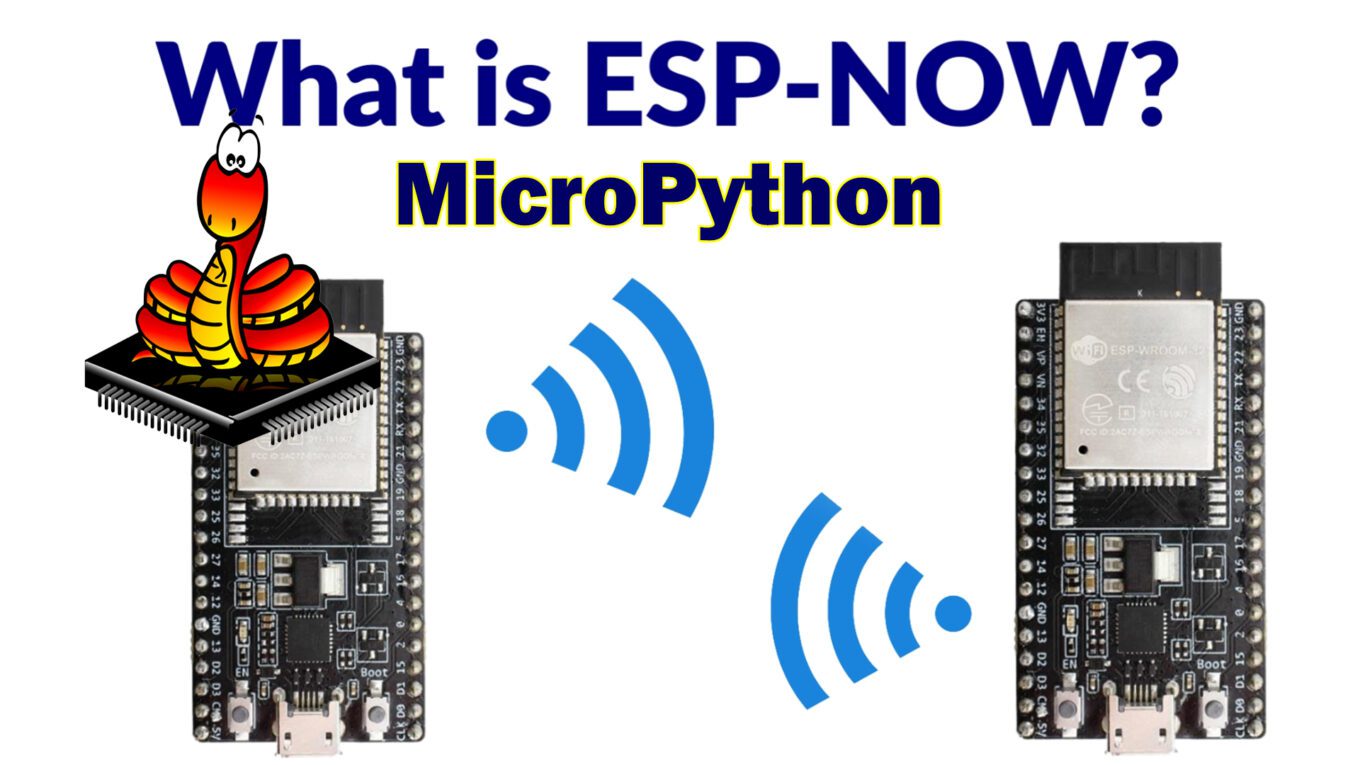
- Introduction
- ESP-NOW in MicroPython
- What is ESP-NOW?
- ESP-NOW Versus WiFi Network
- Features of ESP-NOW
- ESP-NOW Practical Application
- ESP-NOW and MicroPython
- Prerequisites
- Parts/Components Required
- How to install ESP-NOW in MicroPython?
- How to find ESP32/ESP8266 Mac Address in MicroPython?
- LED Blink: Your first MicroPython ESP-NOW project
- Future Improvement
- Wrap up
Introduction
ESP-NOW is a unique and robust peer-to-peer protocol developed by Espressif Systems for their ESP32/ESP8266 devices. It allows us to send messages between two microcontroller devices without the need for an external WiFi access point. In this post, we will try to explore what is ESP-NOW and how to get started using it in a MicroPython setup. ESP-NOW is an exciting protocol that we can use in our Internet of Things (IoT) projects.
If you want to see a demo of this project then please see the below video or watch it on my YouTube channel.
ESP-NOW in MicroPython
This series of posts is my own learner’s guide on how to get started with using ESP-NOW in MicroPython. I have documented my own personal learnings on how to use this awesome wireless protocol in my own IoT projects. There are not enough beginner tutorials currently on how to explore this topic on the internet so I have decided to write my own. I hope that I could help beginners about this subject but at the same time I would like feedback from veteran MicroPython programmers on how to improve these posts.
Below are the topics that I will cover in this series:
- Exploring ESP-NOW in MicroPython: A Learner’s Guide
- Discovering ESP-Now in MicroPython with Asyncio
- Sensor Data Sharing with ESP-NOW in MicroPython
- Integrating ESP-NOW with MicroPython and WiFi
In this post, I will show you how to get started with ESP-Now in MicroPython.
What is ESP-NOW?
ESP-NOW is a communication protocol and framework developed by Espressif Systems. Espressif Systems is the manufacturer of the widely popular ESP32 and ESP8266 family of microcontroller devices. In short, ESP-NOW allows us to configure our ESP32/ESP8266 to talk to each other and exchange messages or data without connecting to a WiFi network.
It enables low-power and efficient wireless communication between ESP8266/ESP32 devices without the complexity of a traditional Wi-Fi network infrastructure or TCP/IP stack.
This opens up a whole range of possible IoT applications as we won’t need WiFi to interconnect our sensors. Imagine if you are building a weather-oriented application that spans multiple areas and for each area you have to read several sensors. Even if there is no WiFi, we can still retrieve the sensor readings using ESP-NOW.
ESP-NOW Versus WiFi Network
To better understand what ESP-NOW is I think comparing it with traditional WiFi networks would be a great idea as they offer the same wireless connectivity feature in an IoT project.
WiFi Network Setup
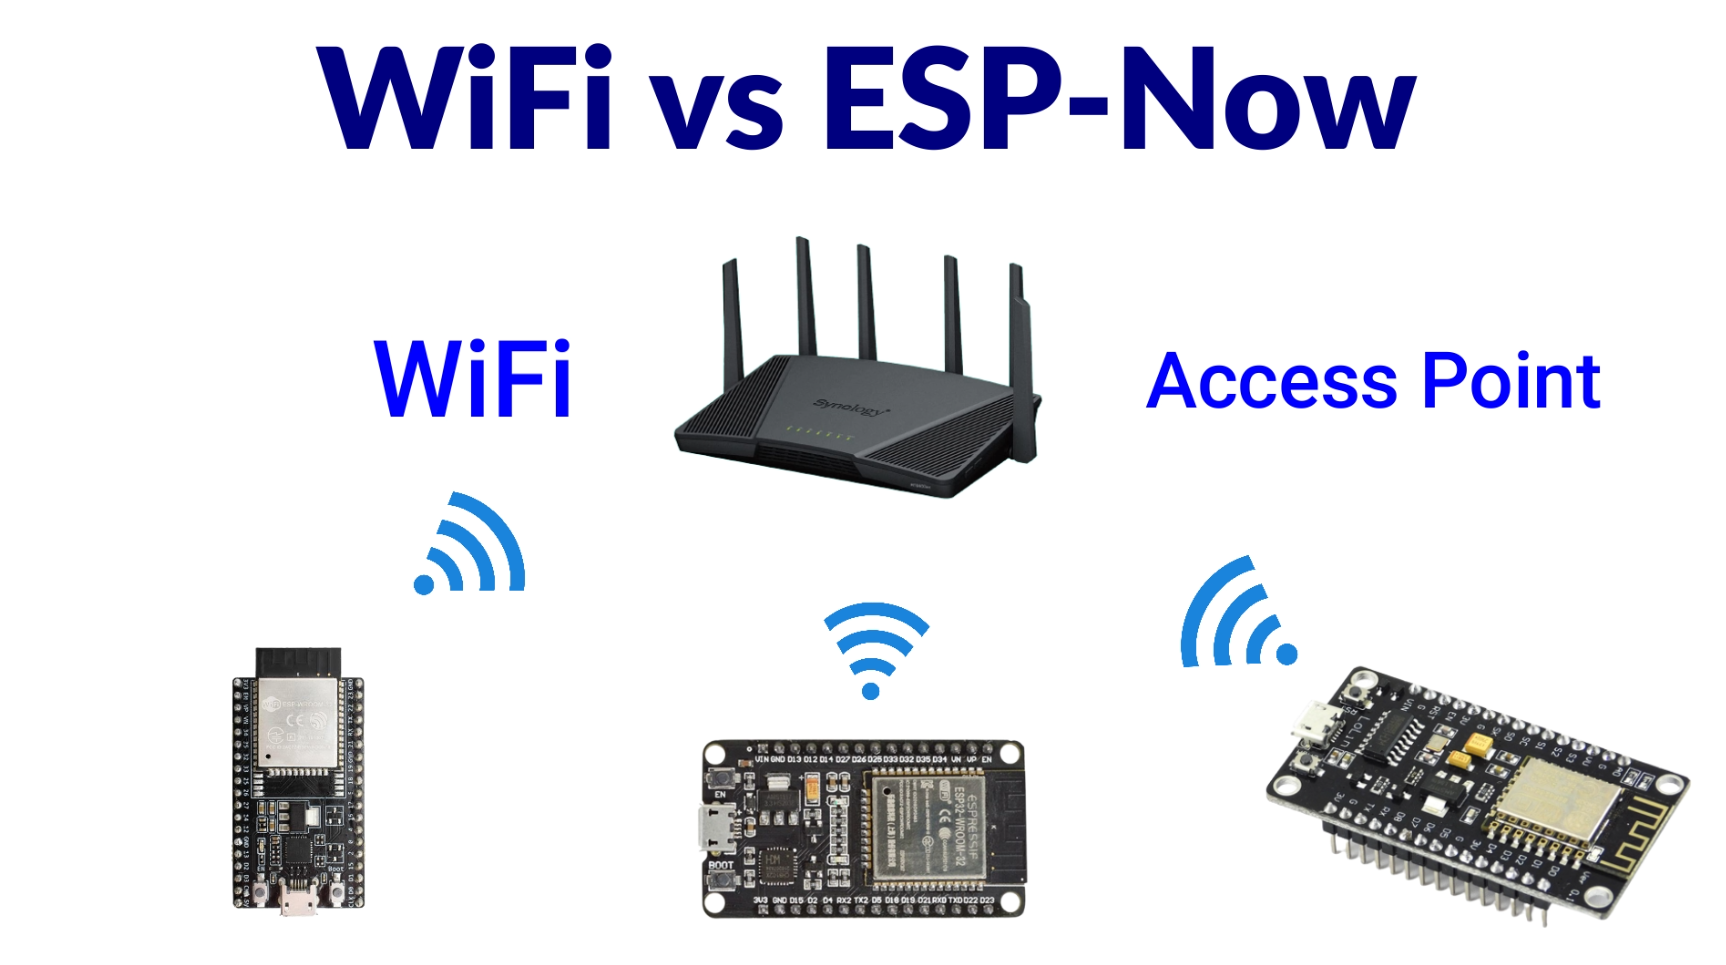
In a traditional WiFi-enabled network, our IoT devices are connected through a WiFi router or access point. The message exchange between devices goes through the WiFi router or access point. WiFi is suited for broader wireless networking needs, including connecting devices to the internet, local area networks, and cloud services.
ESP-NOW Network Setup
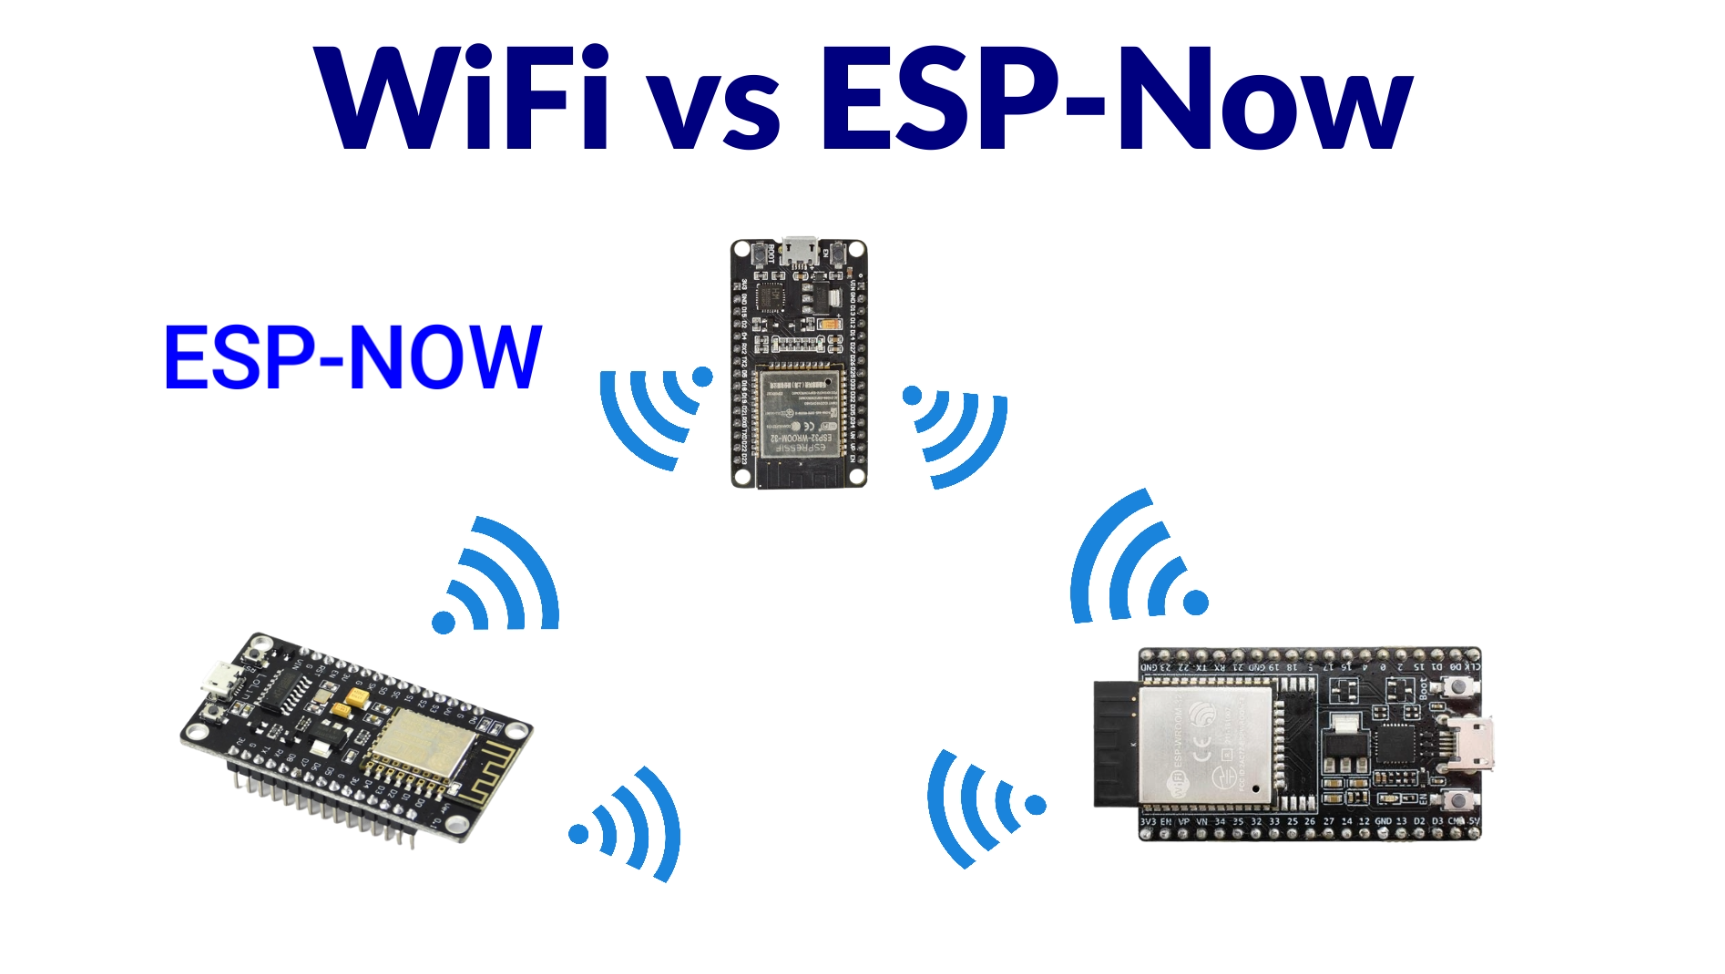
While in an ESP-NOW network, the WiFi router or access point is removed and our devices connect to each other directly. This setup is often called peer-to-peer networking. In this particular setup, messages are exchanged directly between each device and since there is no need for a router or access point would result in low latency. Latency is the amount of time between a message sent and received between a sender and a receiver.
Can ESP-NOW work with WiFi?
Yes, we can configure our ESP32/ESP8266 devices to connect with our WiFi network at the same time.
Features of ESP-NOW
The following are the basic features of an ESP-NOW-powered network.
Peer-to-Peer Communication: ESP-NOW allows ESP8266 and ESP32 devices to communicate directly with each other in a peer-to-peer fashion without the need for a central router or access point. Each device can send and receive data to/from other devices within its range.
Low Latency: ESP-NOW is designed for low-latency communication, making it suitable for real-time applications such as remote control, sensor networks, and home automation.
Low Power Consumption: It offers low-power operation, allowing devices to enter sleep modes when not actively transmitting or receiving data. This is essential for battery-operated and energy-efficient applications.
ESP-NOW Practical Application
The ESP-NOW is a very versatile wireless protocol that you can use in your IoT projects. I will list some of the common projects where you could apply it.
Home Automation System
In this particular scenario, we can create a remote control system that would turn on or turn off the devices in our house. We could even connect lights that are outside our house and send the command through ESP-NOW.
Sensor Station
We could have a mesh of sensors connected through different ESP32/ESP8266 devices with each sending back the readings in real-time. All sensor readings are gathered and sent through the ESP-NOW wireless protocol to our central server. In addition, we can configure our central server to have the ability to display the sensor readings in colorful charts or graphs in real time.
Security System
ESP-NOW can be used on your home security system as well. As an illustration, we can have multiple sensors connected through our different ESP32/ESP8266 devices spread throughout different places. If a burglar comes in then our sensor could alert our security system since we have multiple sensors that could detect them. In addition, since no physical wires are present it would be impossible for an unauthorized person to notice that they are being detected.
ESP-NOW and MicroPython
I have discussed what ESP-NOW is in the earlier part of this post hence it is time to discuss why it is quite exciting to use it together with MicroPython. MicroPython is an easy language to pick up, especially for beginners in the field of embedded programming. In addition, most of the hardware complexities are abstracted so that you can focus on making your IoT projects work.
However, as of this time (Sept 2023), one issue that I encountered while I was trying to start exploring ESP-NOW implementation in MicroPython is the lack of concrete documentation for beginners to walk through and explore.
In fact, when you try searching for ESP-NOW in MicroPython you would notice that there is not much information about this even on YouTube.
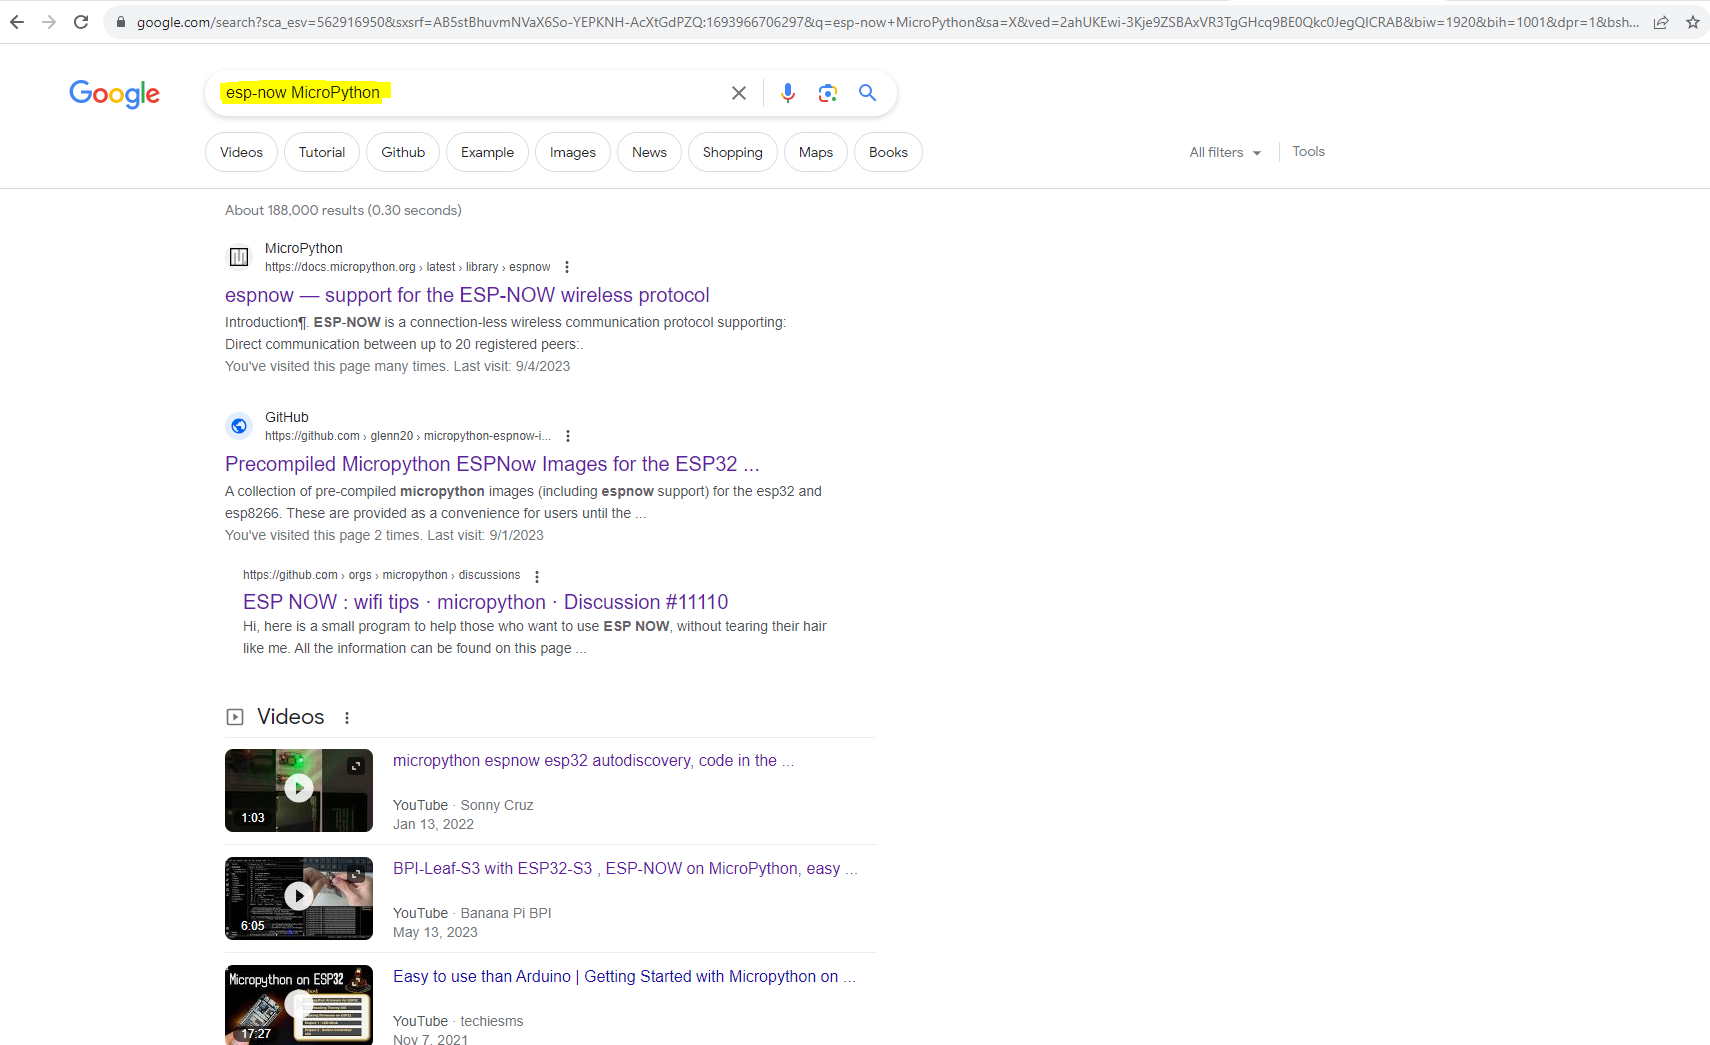
The official ESP-Now for MicroPython documentation might be good, especially for a seasoned veteran of MicroPython programming. However, for a newbie like me, I tend to look for simple basic practical examples to let me appreciate the power of ESP-NOW. In this series of posts of mine, I would try to share my learnings on this subject so that is why this is titled “A learner guide” not a beginner guide as I am not an expert on this subject. 🙂
Prerequisites
Before we proceed you should be familiar you should be familiar on how to install MicroPython firmware for your ESP32/ESP8266 devices. Also, you should be familiar with how to use Thonny IDE as this is what I have used in these projects.
If you are not familiar with these then take a look at my two posts MicroPython Development Using Thonny IDE and How to install MicroPython on ESP32 and download firmware
Parts/Components Required
The following are the components used in this project.
- ESP32 – Amazon | AliExpress
- or ESP8266 – Amazon | AliExpress
- Button Switch – Amazon | AliExpress
- Resistors – Amazon | AliExpress
- Breadboard – Amazon | AliExpress
- Connecting Wires – Amazon | AliExpress
- Arduino/Raspberry Pi Kit – Amazon | AliExpress
Note: We need a minimum of two ESP32 or ESP8266 to test out ESP-NOW.
Disclosure: These are affiliate links and I will earn small commissions to support my site when you buy through these links.
PCBWay is a manufacturer specializing in PCB prototyping, low-volume production, and PCB Assembly service all under one roof. So if you want to make a PCB for your electronic project then PCBWay is a great choice for you.
donskytech
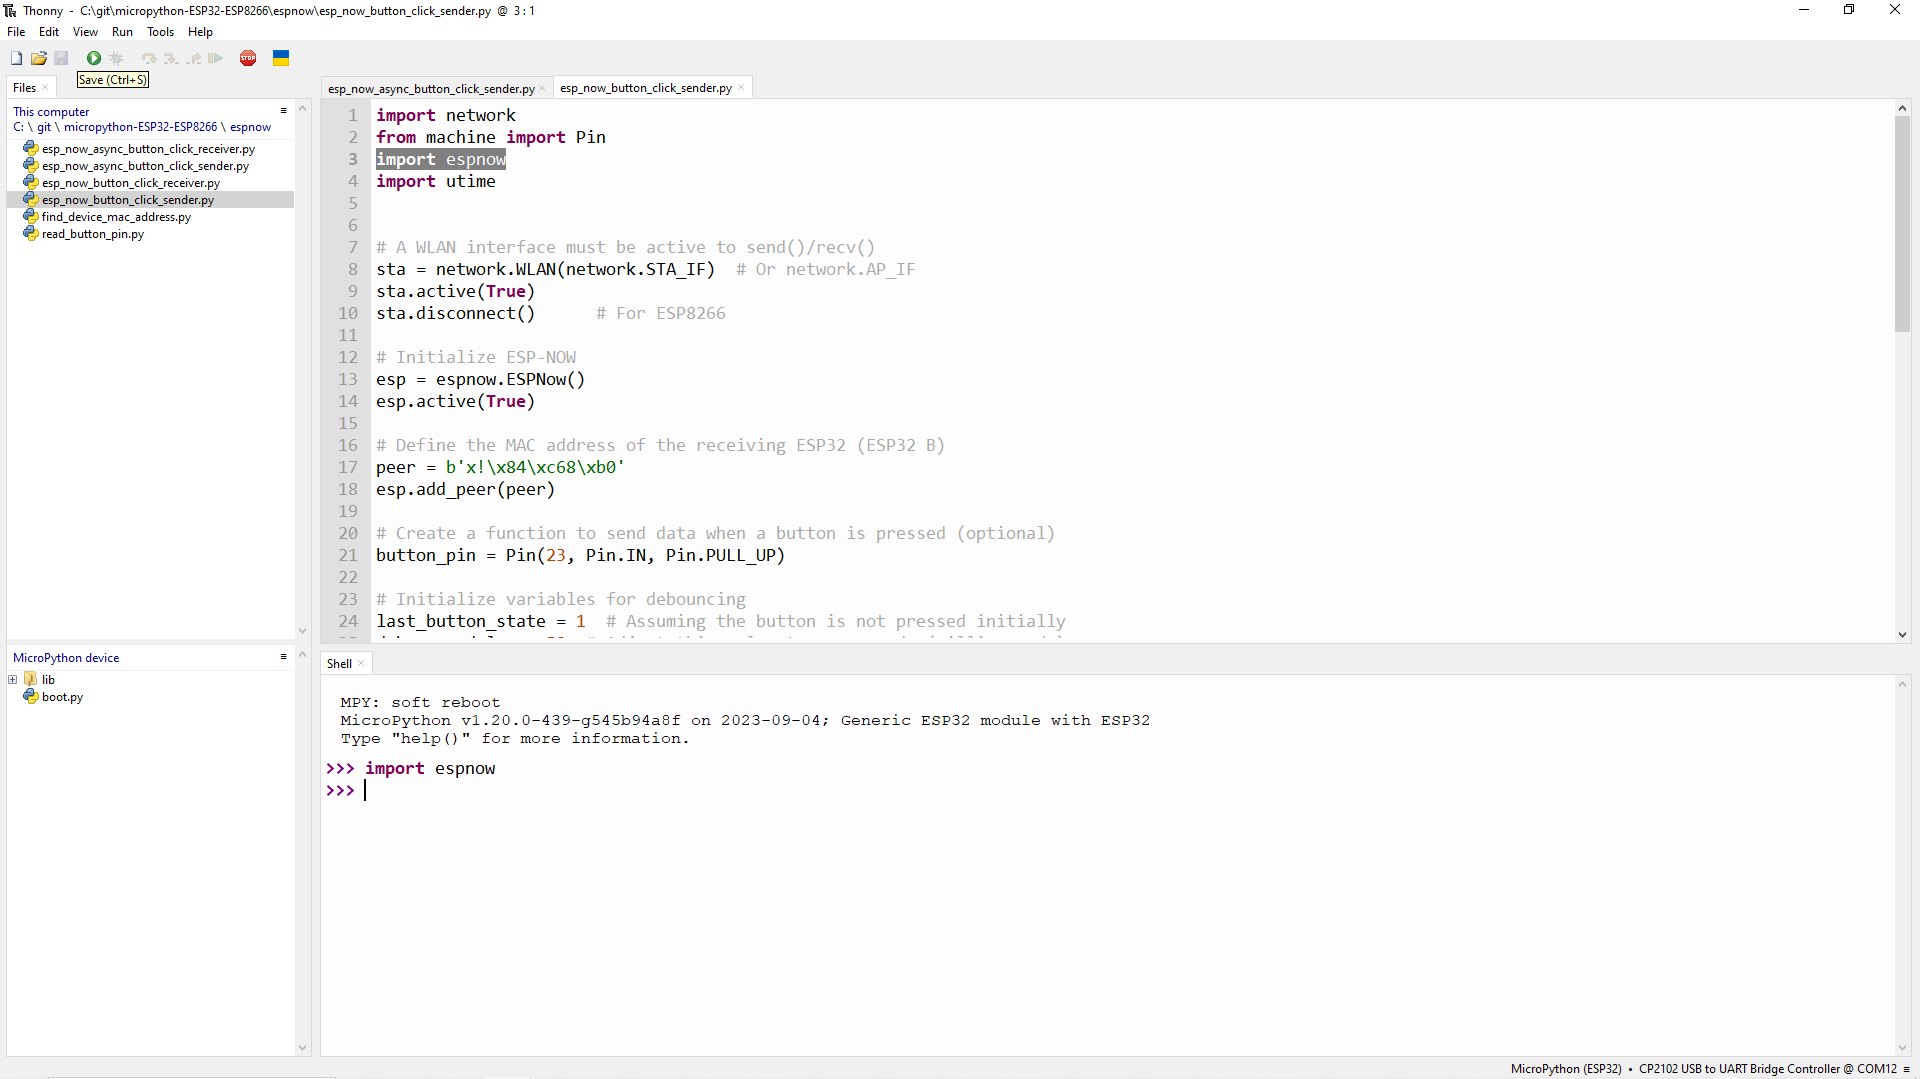
How to install ESP-NOW in MicroPython?
UPDATE – The MicroPython release v1.21.0 (2023-10-05) now includes the ESP-NOW features so there is no need to install the Nightly Build. Please see the release notes.
As of this time (September 2023), the official build for MicroPython that supports ESP-NOW is not yet included in the main build but the nightly builds already have this. So go to the MicroPython download page and download the firmware for your device.

In the future, there will be a main build that already contains ESP-NOW so we can download it but in the meantime, you can download the nightly build.
The below steps will show you how you can download your MicroPython firmware to your device. I am using a Windows/PC laptop but you can just adapt this to your Linux or Mac.
- Connect your ESP32/ESP8266 device using your USB.
- Open a command prompt or terminal or Linux/Mac. Erase the current program by executing the below code.
esptool.py --chip esp32 --port COM12 erase_flash- Install the firmware using the below command.
esptool.py --chip esp32 --port COM12 --baud 460800 write_flash -z 0x1000 ESP32_GENERIC-20230904-unstable-v1.20.0-439-g545b94a8f.binReplace the name of the binary to match the one that you download.
- Open Thonny IDE and in the shell terminal verify if ESP-NOW is present by typing the below command.
import espnowIf no error is encountered then we are now ready to start exploring ESP-NOW in Micropython.
How to find ESP32/ESP8266 Mac Address in MicroPython?
Before we can continue working with ESP-NOW, we need to figure out the MAC(Media Access Control ) address of our ESP32/ESP8266 device. This address is unique per each device and we would need them later in our program. The MAC address is used by ESP-NOW to know where to send or receive messages.
The below code will show you how you can figure out the MAC address of your device. This is available also on my GitHub repository.
import network

# Initialize the network interface
wlan = network.WLAN(network.STA_IF)
# Activate the WLAN Interface
wlan.active(True)

# Check if the interface is active (connected)
if wlan.active():
    # Get the MAC address
    mac_address = wlan.config("mac")
    print(mac_address)
    print("Device MAC Address:", ":".join(["{:02X}".format(byte) for byte in mac_address]))
else:
    print("Wi-Fi is not active.")
If you execute this command then you should see the following displayed on your Thonny
b'\xc8\xf0\x9e\r\xb6\x04'
Device MAC Address: C8:F0:9E:0D:B6:04
The top value is the byte representation of the Mac Address while the below value is the formatted MAC address value.
Take note of the MAC address for both of your ESP32/ESP8266 devices.
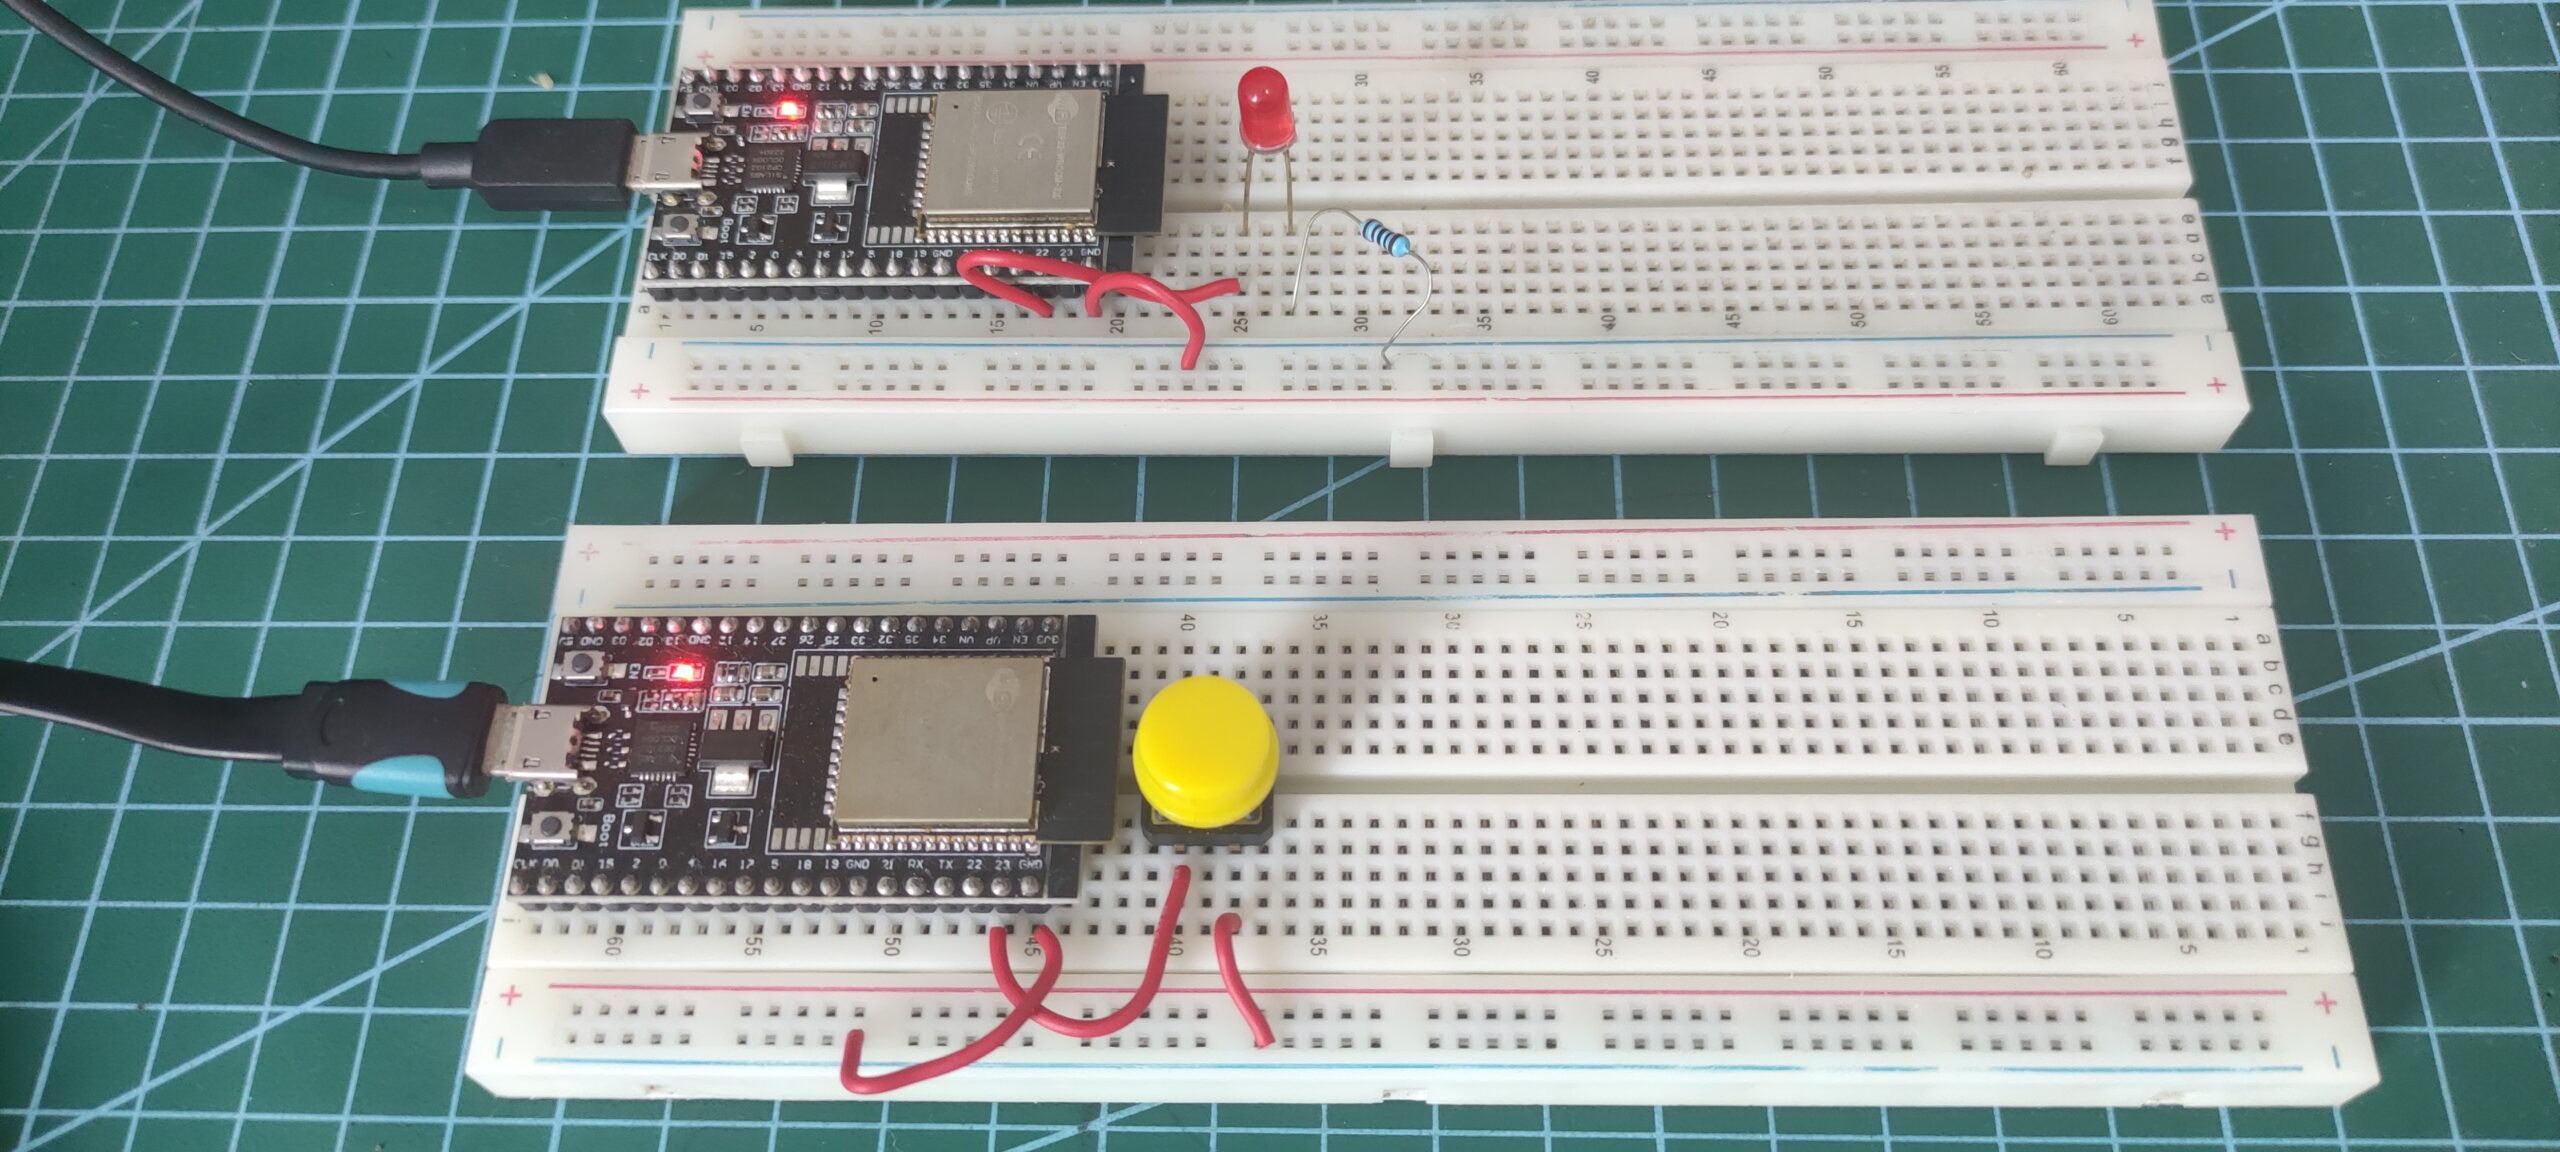
LED Blink: Your first MicroPython ESP-NOW project
Blinking an LED is perhaps the first project that I created when I started learning Arduino, Raspberry Pi, or MicroPython programming. This is a really simple project but is really effective to get started on any embedded platform.
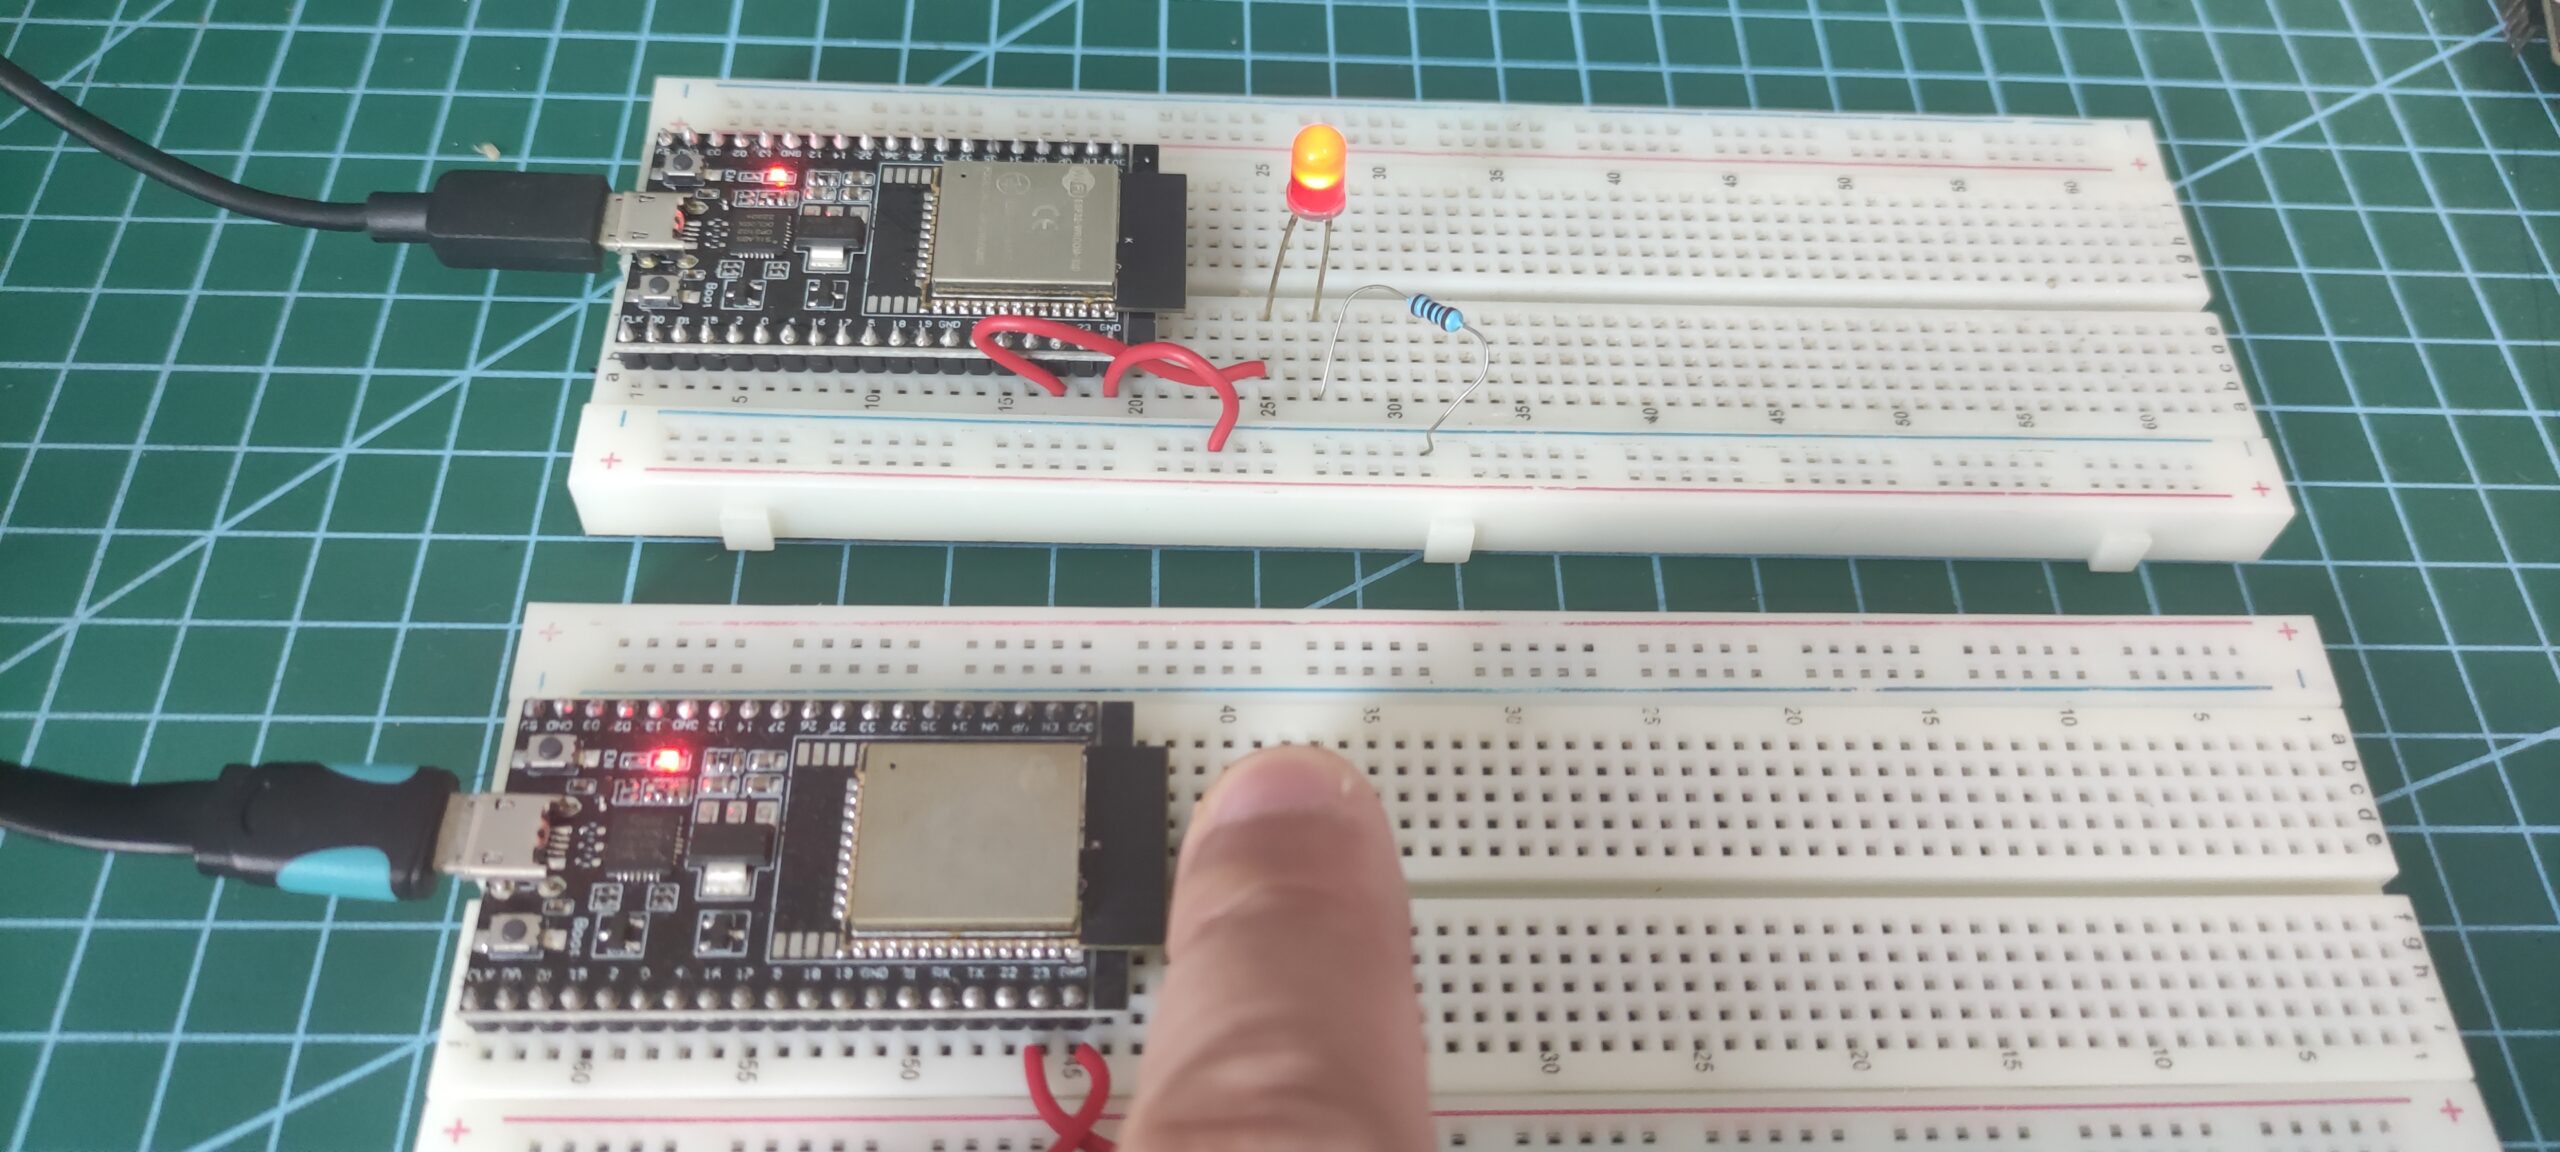
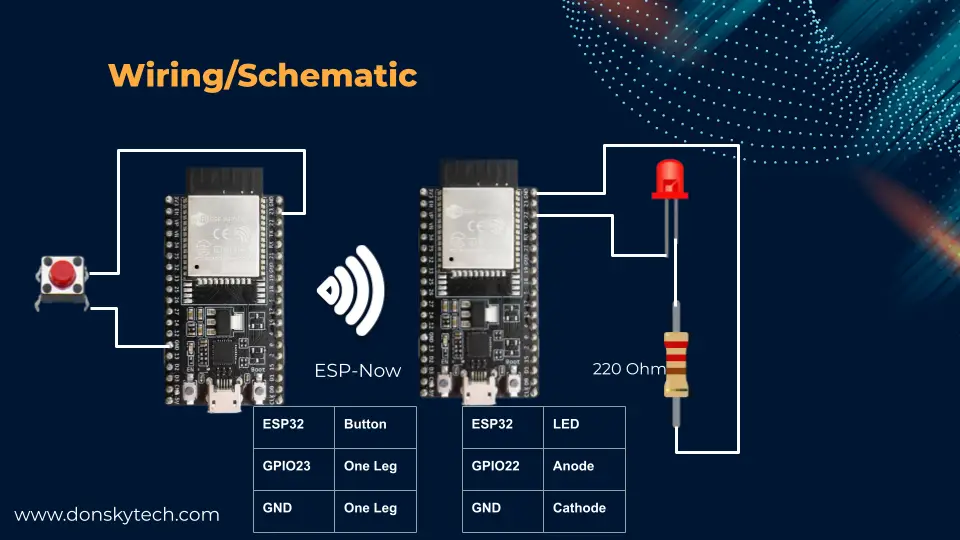
I have two ESP32s in my setup. The First ESP32 has a button switch connected to it while the second one has an LED connected to it. If I click the button on my first ESP32 then the LED connected to the second ESP32 should light on or light off when I remove my finger.
Take note that there is no physical or wireless connection between the two and they are not connected to the WiFi.
Is there a master-slave concept in ESP-NOW?
Technically speaking, I don’t see the term being used in the official ESP-Now documentation of Espressif but I always see the term “peer”. So in this project, we will call the first ESP32 with the button connected ESP32-A and the one with the LED ESP32-B.
ESP32-A will be the source or the sender of our control signal and ESP32-B as the one being controlled or receiver. Think of this in a Home Automation System setup, ESP32-A is our remote control and ESP32-B is the one connected to our light.
Code
The complete code for this project can be found in my GitHub repository of MicroPython projects. If you only want to download the project folder for this post then you can follow this How to download a GitHub folder?
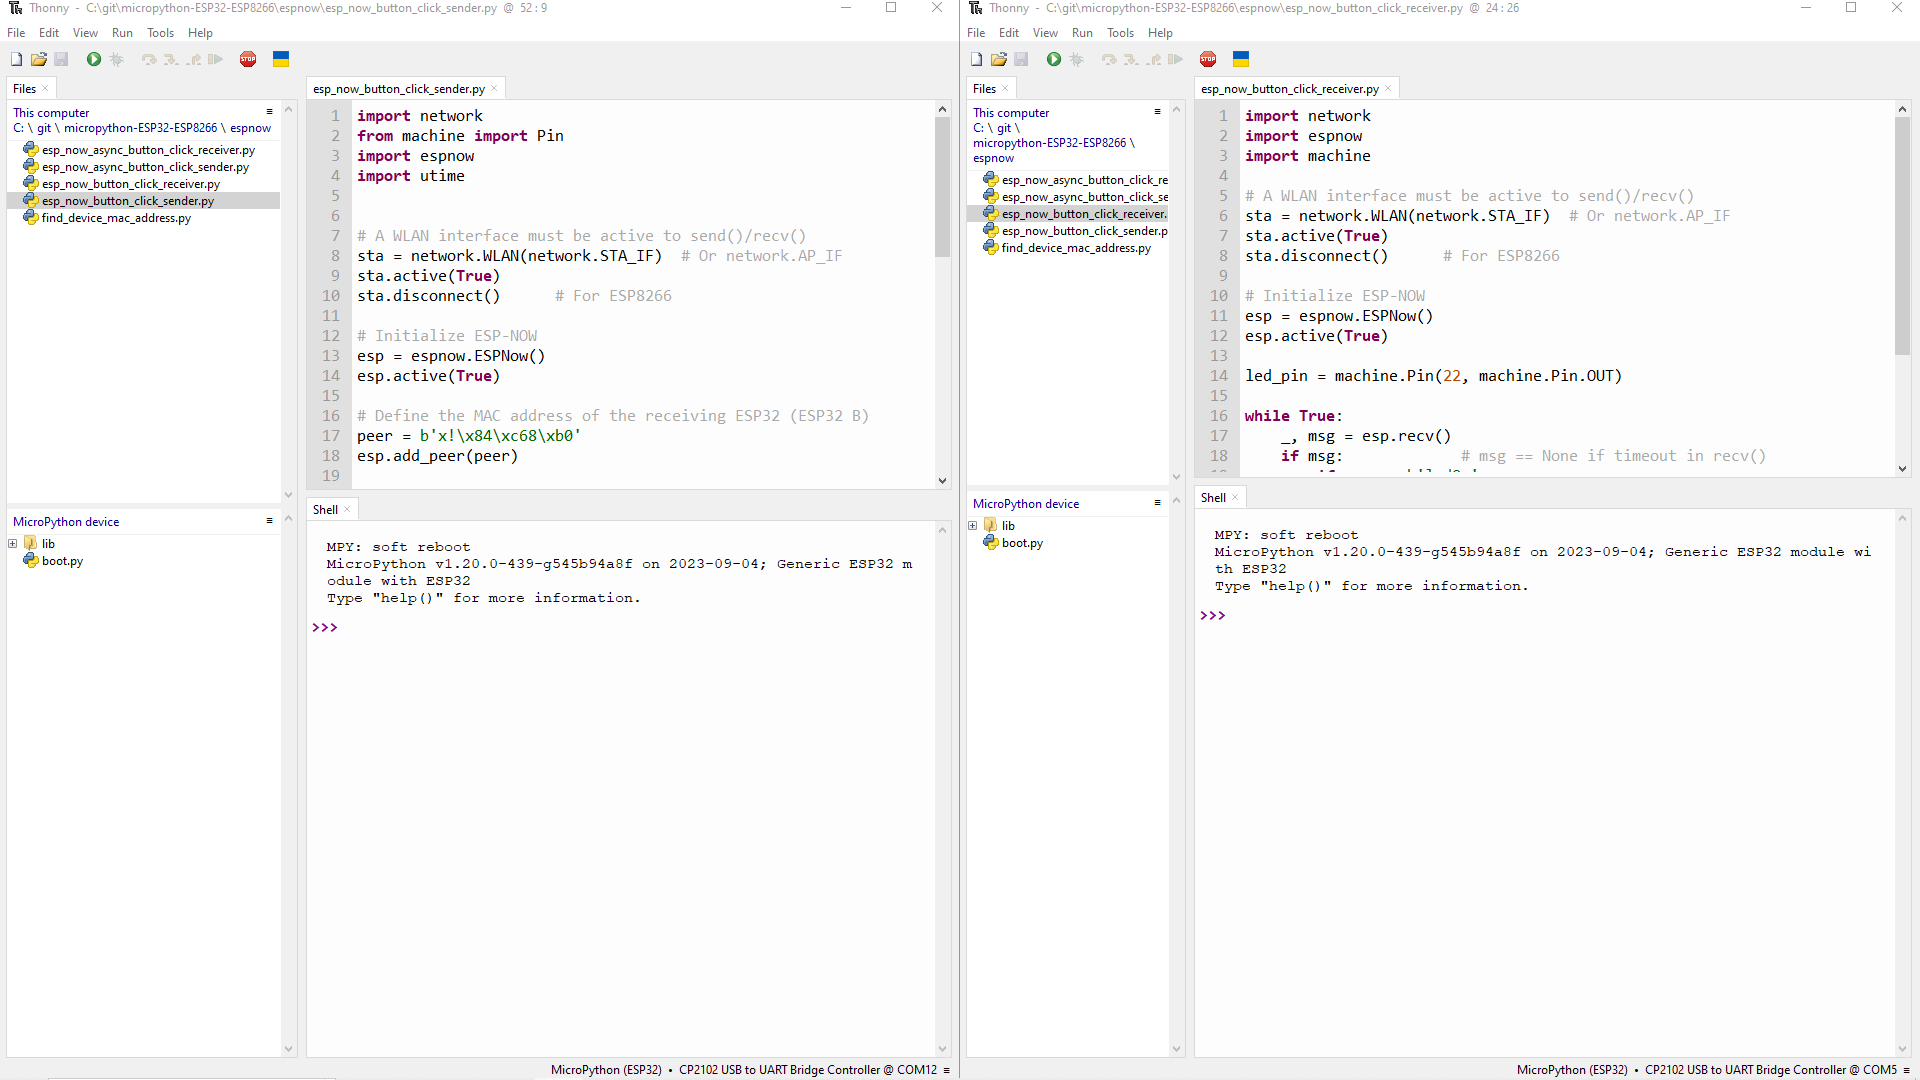
ESP32-A (esp_now_button_click_sender.py)
import network
from machine import Pin
import espnow
import utime


# A WLAN interface must be active to send()/recv()
sta = network.WLAN(network.STA_IF)  # Or network.AP_IF
sta.active(True)
sta.disconnect()      # For ESP8266

# Initialize ESP-NOW
esp = espnow.ESPNow()
esp.active(True)

# Define the MAC address of the receiving ESP32 (ESP32 B)
peer = b'x!\x84\xc68\xb0'
esp.add_peer(peer)

# Create a function to send data when a button is pressed (optional)
button_pin = Pin(23, Pin.IN, Pin.PULL_UP)

# Initialize variables for debouncing
last_button_state = 1  # Assuming the button is not pressed initially
debounce_delay = 50  # Adjust this value to your needs (milliseconds)

while True:
    # Read the current state of the button
    current_button_state = button_pin.value()

    # Check if the button state has changed
    if current_button_state != last_button_state:
        # Wait for a short time to debounce the button
        utime.sleep_ms(debounce_delay)

        # Read the button state again to make sure it's stable
        current_button_state = button_pin.value()

        # If the button state is still different, it's a valid press
        if current_button_state != last_button_state:
            if current_button_state == 0:
                message = "ledOn"
                print(f"Sending command : {message}")
                esp.send(peer, message)
            else:
                message = "ledOff"
                print(f"Sending command : {message}")
                esp.send(peer, message)

        # Update the last button state
        last_button_state = current_button_state
This is the code that will be loaded to our ESP32-A device. Let’s try to check how the program works line by line.
import network
from machine import Pin
import espnow
import utime
Import the necessary module, especially the espnow which contains the core classes that we will be using to make our ESP-NOW work.
# A WLAN interface must be active to send()/recv()
sta = network.WLAN(network.STA_IF)  # Or network.AP_IF
sta.active(True)
sta.disconnect()      # For ESP8266

# Initialize ESP-NOW
esp = espnow.ESPNow()
esp.active(True)
Initialize the WLAN interface as we will need it to make ESP-NOW work. We then create an instance of the class ESPNow() which we will be using throughout the code.
# Define the MAC address of the receiving ESP32 (ESP32 B)
peer = b'x!\x84\xc68\xb0'
esp.add_peer(peer)
We need to add the MAC Address of ESP32-B as we will treat this device as a “peer” where we can send our ESP-NOW messages.
# Create a function to send data when a button is pressed (optional)
button_pin = Pin(23, Pin.IN, Pin.PULL_UP)

# Initialize variables for debouncing
last_button_state = 1  # Assuming the button is not pressed initially
debounce_delay = 50  # Adjust this value to your needs (milliseconds)
Next, we define our button pin GPIO connection and add some code needed to debounce the button.
while True:
    # Read the current state of the button
    current_button_state = button_pin.value()

    # Check if the button state has changed
    if current_button_state != last_button_state:
        # Wait for a short time to debounce the button
        utime.sleep_ms(debounce_delay)

        # Read the button state again to make sure it's stable
        current_button_state = button_pin.value()

        # If the button state is still different, it's a valid press
        if current_button_state != last_button_state:
            if current_button_state == 0:
                message = "ledOn"
                print(f"Sending command : {message}")
                esp.send(peer, message)
            else:
                message = "ledOff"
                print(f"Sending command : {message}")
                esp.send(peer, message)

        # Update the last button state
        last_button_state = current_button_state
This is our loop that periodically checks if the button is pressed or not. As buttons or mechanical switches are very noisy devices we added some debouncing algorithm to verify that the button was indeed pushed or not. This is done by adding the code utime.sleep_ms(debounce_delay) which will allow the button value to normalize.
You can adjust this value depending on your use case or scenario.
if current_button_state != last_button_state:
if current_button_state == 0:
message = "ledOn"
print(f"Sending command : {message}")
esp.send(peer, message)
else:
message = "ledOff"
print(f"Sending command : {message}")
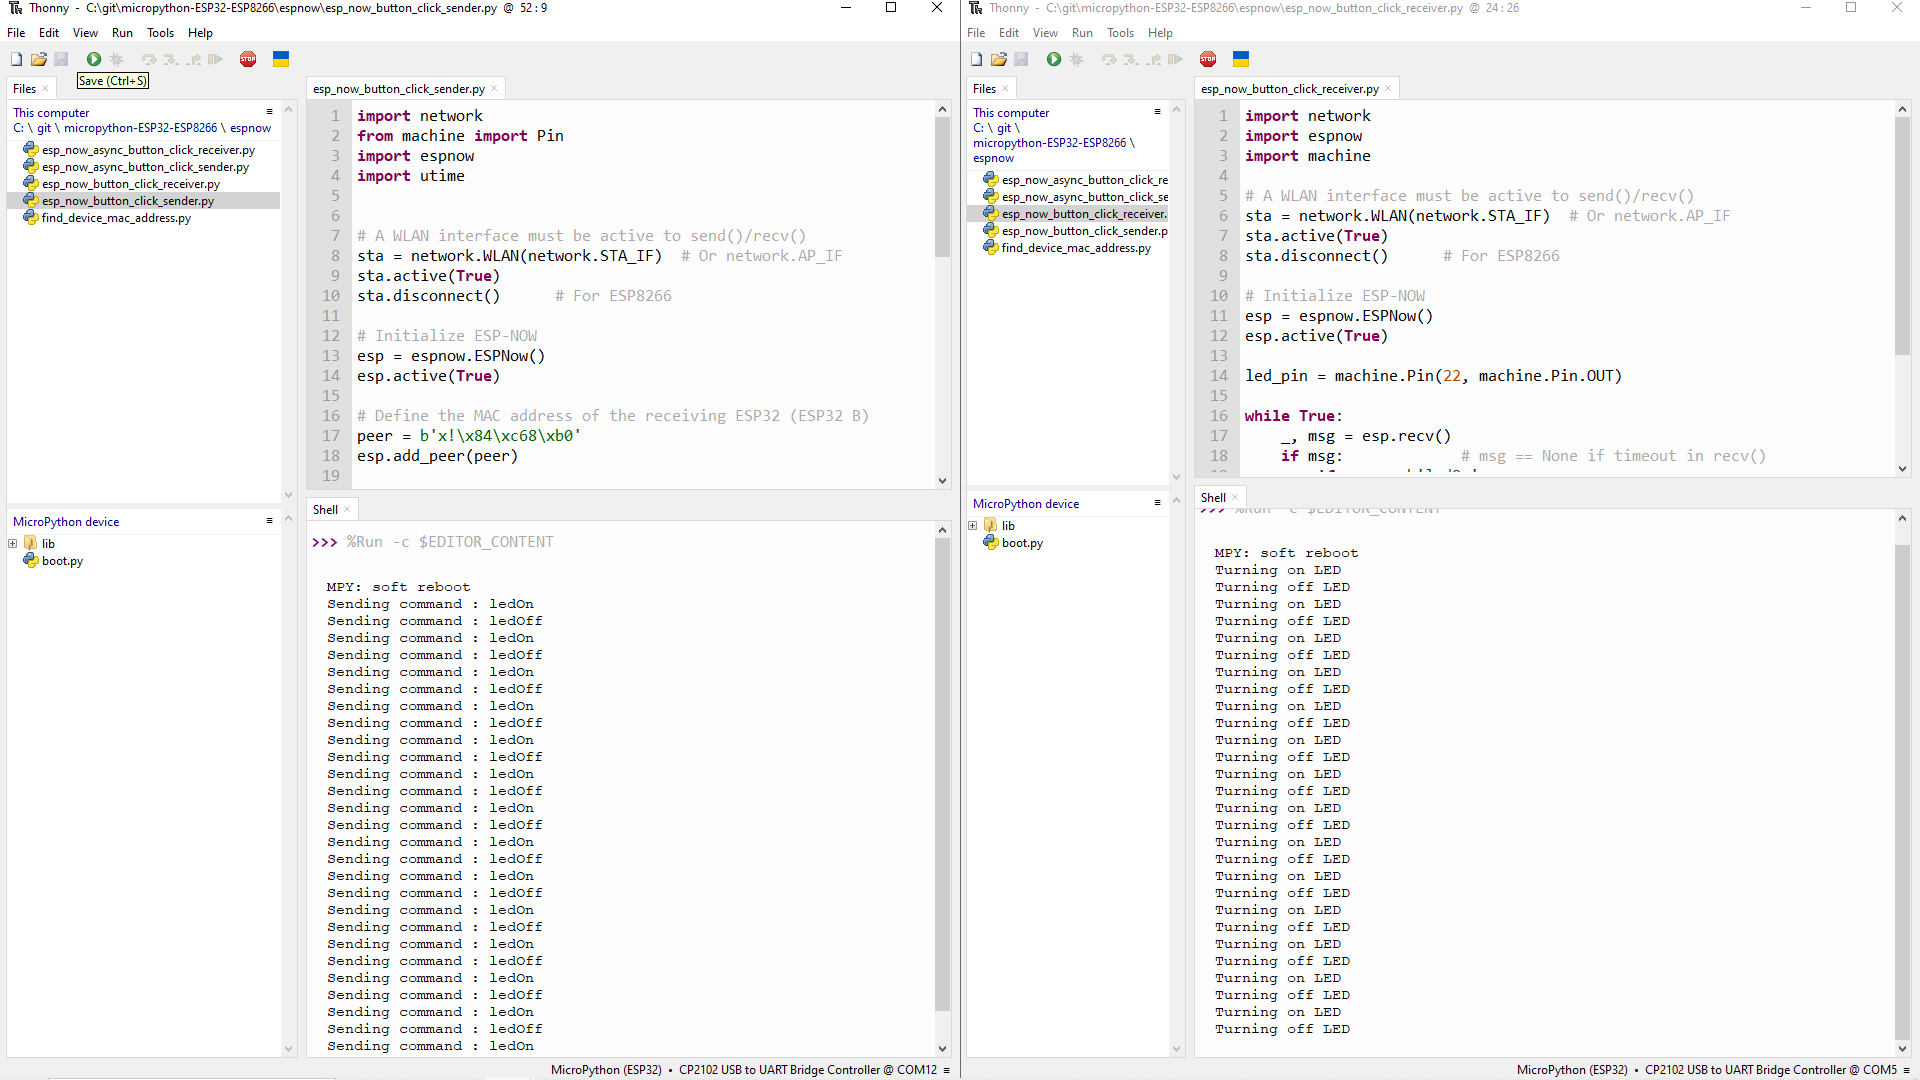
esp.send(peer, message)How ESP-NOW messages are sent is done by the code above where an ESP-NOW message is sent by using this esp.send(peer, message). We will only be sending “ledOn” and “ledOff” messages to the other ESP32
That is really how easy it is to send an ESP-NOW message from our MicroPython code.
ESP32-B (esp_now_button_click_receiver.py)
Below is the code that will listen or wait for ESP-NOW messages from our sender.
import network
import espnow
import machine

# A WLAN interface must be active to send()/recv()
sta = network.WLAN(network.STA_IF)  # Or network.AP_IF
sta.active(True)
sta.disconnect()      # For ESP8266

# Initialize ESP-NOW
esp = espnow.ESPNow()
esp.active(True)

led_pin = machine.Pin(22, machine.Pin.OUT)

while True:
    _, msg = esp.recv()
    if msg:             # msg == None if timeout in recv()
        if msg == b'ledOn':
            print("Turning on LED")
            led_pin.on()
        elif msg == b'ledOff':
            print("Turning off LED")
            led_pin.off()
        else:
            print("Unknown message!")
Let us go through each line one by one.
import network
import espnow
import machine
Similar to the sender code, we import the module for the ESP-NOW and others.
# A WLAN interface must be active to send()/recv()
sta = network.WLAN(network.STA_IF)  # Or network.AP_IF
sta.active(True)
sta.disconnect()      # For ESP8266

# Initialize ESP-NOW
esp = espnow.ESPNow()
esp.active(True)
We initialize our WLAN interface as we need it to send ESP-NOW messages. Also, we have defined our class esp = espnow.ESPNow() which we will use to receive ESP-NOW messages.
led_pin = machine.Pin(22, machine.Pin.OUT)

while True:
    _, msg = esp.recv()
    if msg:             # msg == None if timeout in recv()
        if msg == b'ledOn':
            print("Turning on LED")
            led_pin.on()
        elif msg == b'ledOff':
            print("Turning off LED")
            led_pin.off()
        else:
            print("Unknown message!")
We defined the GPIO where our LED is connected. Next, we have defined our endless loop where we could receive ESP-NOW messages through this _, msg = esp.recv().
If a message is received then we parse it and turn on or turn off the connected LED. This is how we could receive and handle ESP-NOW messages from any other ESP32/ESP8266 devices.
Running the program
Now that I have finished explaining the workings of our sender and receiver applications then it is time to explain how we could test our ESP-NOW Blink LED application.
First, you have to configure your Thonny IDE to run multiple instances and you can follow this earlier post that I have create about How do you run Thonny IDE with multiple windows or instances?
Next, configure it to run side by side or in splitscreen mode in Windows/PC. Open the esp_now_button_click_sender.py at the left panel and the esp_now_button_click_receiver.py to the right. Run first the esp_now_button_click_receiver.py as this should be listening already so that it could receive messages from our sender. After which, run the esp_now_button_click_sender.py in the left panel.
Finally, you should be able to see your LED connected to ESP32B blinking and the below messages on your Thonny terminal.
Future Improvement
At this point in our program, do you think you can add another set of buttons and LEDs for each ESP32? This will be the subject of our next post so stay tuned.
Wrap up
In this post, I have introduced to you what ESP-NOW is and how we can get started using it on our MicroPython IoT projects. I firmly believe that this wireless protocol is very useful, especially for applications that require real-time response.
I hope you have learned something! Happy Exploring!
Read Next:
Discovering ESP-Now in MicroPython with Asyncio
Support Me!
I love sharing what I know and hopefully, I was able to help you. Writing helpful content takes so much time and research. If you think you like my work and I have managed to help you then please consider supporting my channel. I would be very grateful and would boost my confidence that what I am doing is making a big change in the world. (No Pun Intended!) 😉
Become a Patron!
Leave a Reply