Introduction
Most of the top searches on the web when searching for “MicroPython Web Server” returns using low-level MicroPython socket code so I have decided to share with you my own MicroPython Web Server tutorial using the MicroDot framework. I am not saying that using socket programming is bad in any sense but I just feel that using this MicroDot framework would make your Internet of Things (IoT) project much simpler rather than dealing with the low-level details of handling connections and processing responses.
For a video demo presentation and explanation please see the video below or watch it on my YouTube channel! Please subscribe to my channel if you have not done so, please! 🙂
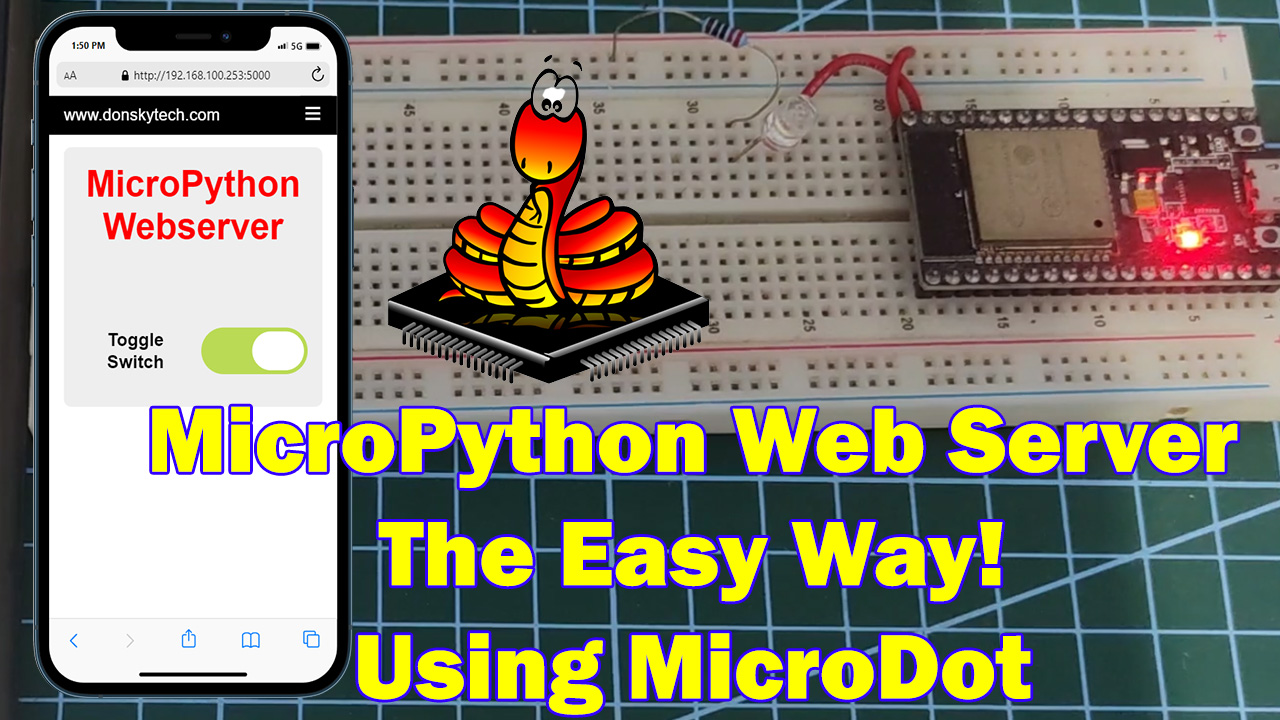
What are we building?
We are going to create a very basic MicroPython Web Server using an ESP32 MicroController Unit (MCU) board that will allow us to control the output of an LED (Light Emitting Diode).

By clicking the toggle switch we will be able to turn ON or OFF our LED. Sounds simple right?
Prerequisites
The following are the required materials and software needed to follow this post.
- MicroPython-compliant MCU Board (I have used ESP32) – Amazon | AliExpress | Bangood
- LED (Light Emitting Diode) – Amazon | AliExpress | Bangood
- Resistors – Amazon | AliExpress | Bangood
- Breadboard – Amazon | AliExpress | Bangood
- Jumper Wire- Amazon | AliExpress | Bangood
Disclosure: These are affiliate links and I will earn small commissions to support my site when you buy through these links.
Download the latest MicroPython firmware to your microcontroller board. I have used Thonny as my IDE in developing this project.
Related Content:
How to install MicroPython on ESP32 and download firmware
MicroPython Development Using Thonny IDE
What is MicroDot?
“The impossibly small web framework for Python and MicroPython”
Miguel Grinberg – creator of MicroDot
Rather than dealing with socket programming code in our MicroPython program then using MicroDot would help us abstract all the low-level details.
I wrote a simple but detailed post on how to get started with MicroDot. I highly recommend that you go over that post before proceeding further as I would not be explaining some of the finer details of this project.
Must Read:
Develop MicroPython Application using MicroDot
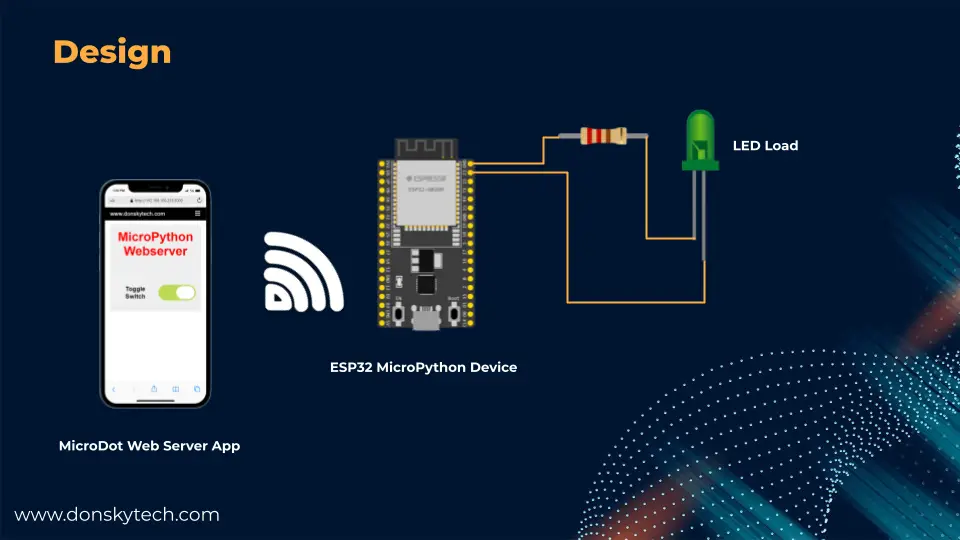
Design
The image below is the design of our MicroPyon application wherein we have the MicroDot web server application deployed in our ESP32 Microcontroller device. We then access the application that we have deployed through our mobile phone or laptop.
The MicroDot web application displays a toggle switch that sends a remote message to our ESP32 MicroPython device that toggles the value of our LED load.
Wiring/Schematic
Below is the schematic of our simple MicroPython Web Server project wherein the LED is connected to one GPIO (General Purpose Input Output) pin of our ESP32 device.
Please connect a 220 Ohm resistor to the anode of the LED to limit the current flowing through it.

Code
Downloading the project
The complete code for this project is available for you to check out in my GitHub repository. You can either download or clone this project using Git using the below command.
git clone https://github.com/donskytech/micropython-web-server-microdot.git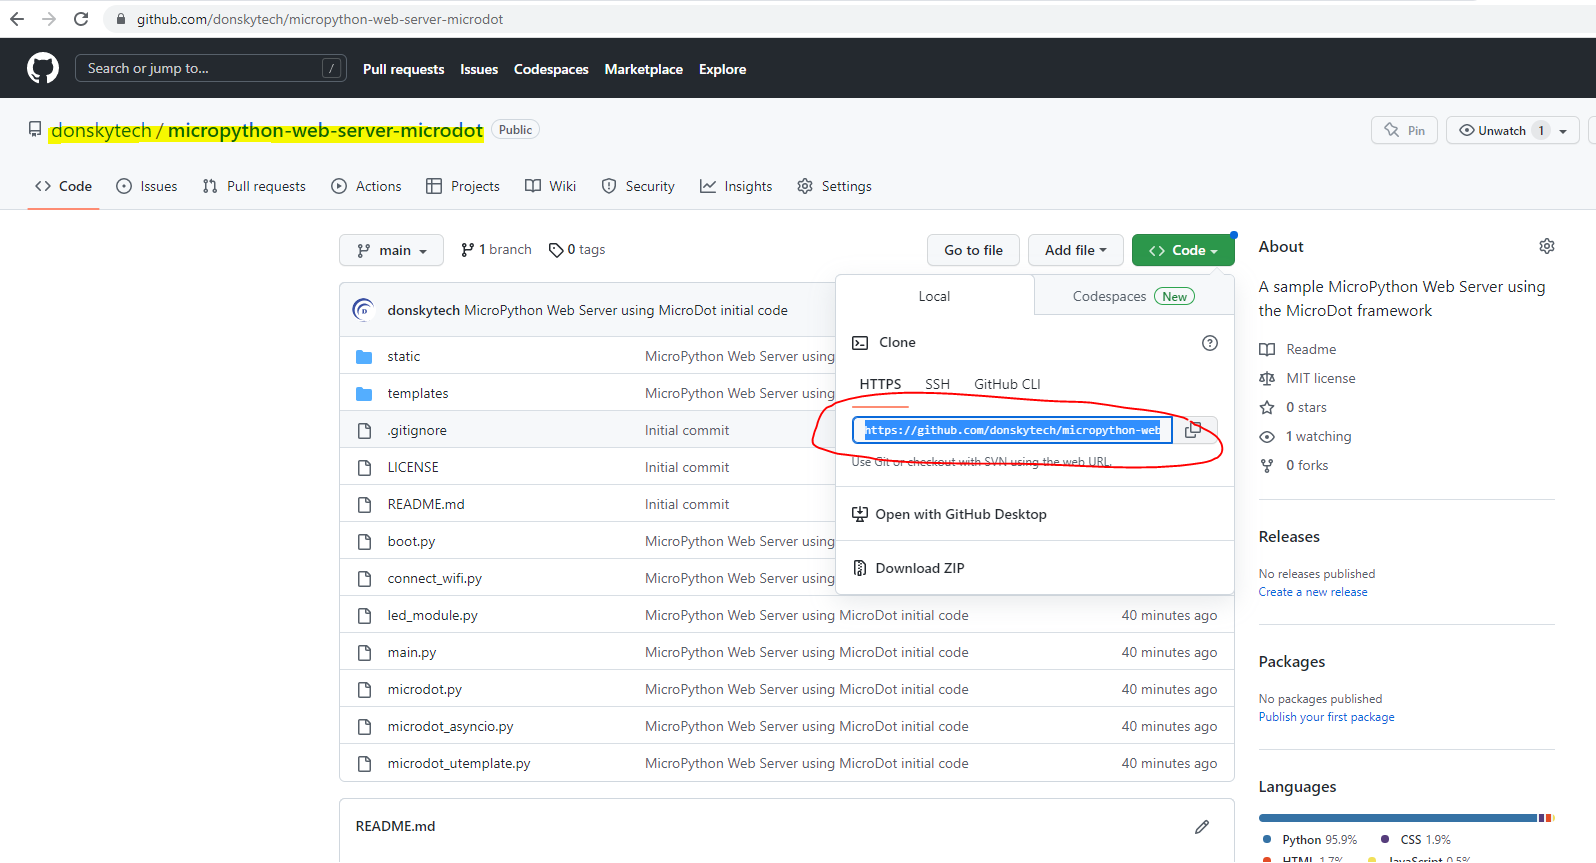
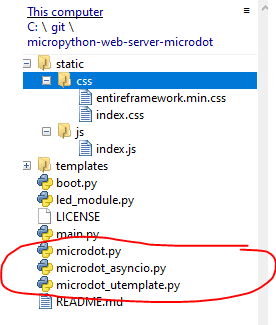
How to install MicroDot?
The recommended approach from the MicroDot documentation for MicroPython development is to copy the necessary updated MicroDot files and extensions from this project source folder. In my project folder, you will see files that start with microdot which means that I have copied the latest copy from the project source file.
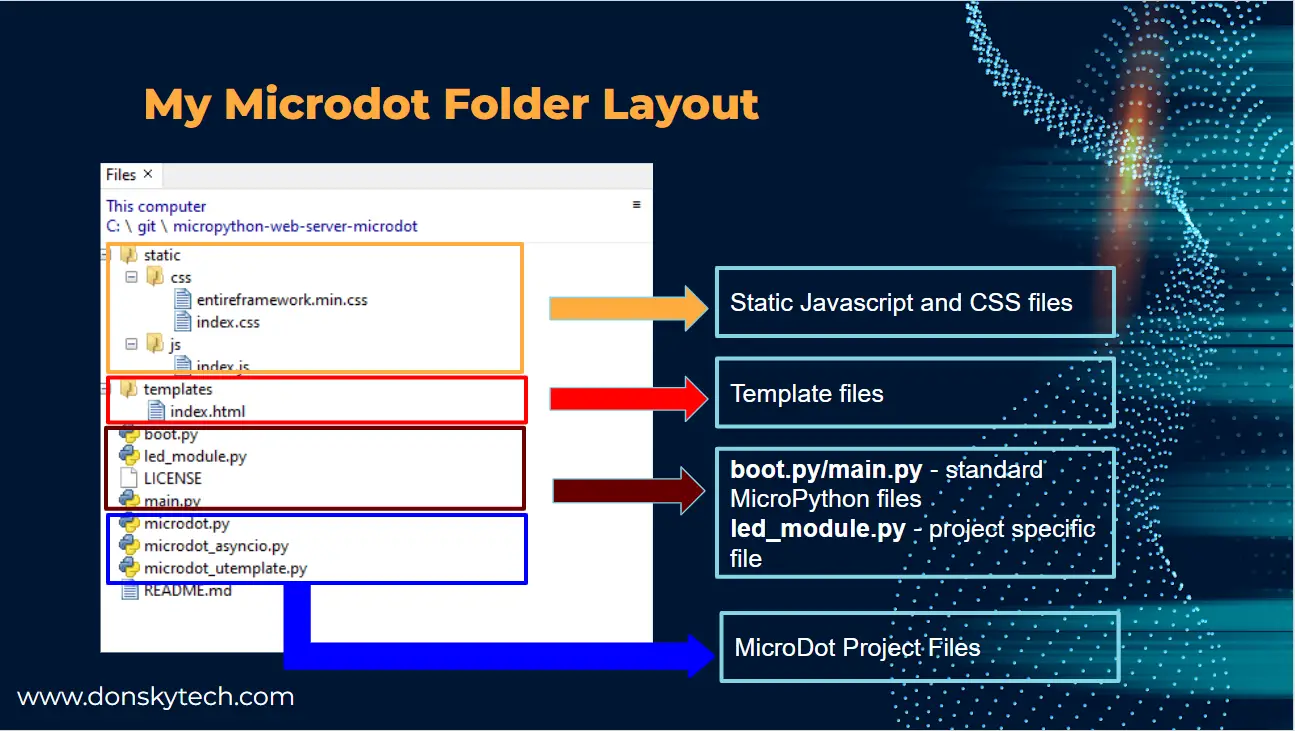
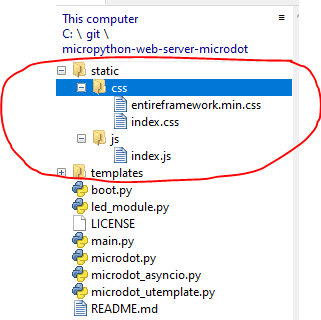
MicroDot Folder Layout
The image below is the overall folder layout of our project and it contains the following files and folder hierarchy.
- static – This folder will contain the static CSS and javascript files that will be needed by the webpage that we created.
- templates – This folder is used to process templates that need to be resolved by our program. An example of a template is when you need to show a web page that needs to get its information from the database.
- microdot – files that start with microdot are MicroDot-specific source files and extension
- boot.py and main.py – these are MicroPython-specific files that are read by our MicroController board when it starts up
- custom project files – You can create your project-specific files here. In the case of our project, the led_module.py is a sample file that I created that our project needs.
Let us run through what each file in our MicroPython project does and see how it participates in our Web Server application.
boot.py
The following is the code for the boot.py whose main function is to connect to our Wifi network when the ESP32 restarts.
# boot.py -- run on boot-up
import network, utime

# Replace the following with your WIFI Credentials
SSID = "<PLACE_YOUR_SSID_HERE>"
SSI_PASSWORD = "<PLACE_YOUR_WIFI_PASWORD_HERE>"

def do_connect():
    import network
    sta_if = network.WLAN(network.STA_IF)
    if not sta_if.isconnected():
        print('connecting to network...')
        sta_if.active(True)
        sta_if.connect(SSID, SSI_PASSWORD)
        while not sta_if.isconnected():
            pass
    print('Connected! Network config:', sta_if.ifconfig())

print("Connecting to your wifi...")
do_connect()
First, we need to replace the following line in your wifi settings
# Replace the following with your WIFI Credentials
SSID = "<PLACE_YOUR_SSID_HERE>"
SSI_PASSWORD = "<PLACE_YOUR_WIFI_PASWORD_HERE>"
The function do_connect initiates a connection to our Wi-Fi. If this function is able to connect to our wifi then we should see the following messages.
Connected! Network config: ('192.168.100.253', '255.255.255.0', '192.168.100.1', '192.168.100.1')
Starting sync server on 0.0.0.0:5000...
led_module.py
This file represents our LED module that serves as a load of our program.
from machine import Pin

class LEDModule:
    """This will represent our LED"""

    def __init__(self, pinNumber):
        self.pinNumber = pinNumber
        self.led_pin = Pin(self.pinNumber, Pin.OUT)

    def get_value(self):
        return self.led_pin.value()

    def toggle(self):
        self.led_pin.value(not self.get_value())
Let us go over what each line of code does.
class LEDModule:
    """This will represent our LED"""

    def __init__(self, pinNumber):
        self.pinNumber = pinNumber
        self.led_pin = Pin(self.pinNumber, Pin.OUT)
This is the name of our class which is LEDModule. We have defined a constructor or an initializer to set the Pin where the LED is connected.
    def get_value(self):
        return self.led_pin.value()

    def toggle(self):
        self.led_pin.value(not self.get_value())
We have two methods that get and toggle the value of the LED. This get_value will return the current state of the LED and toggle will invert the value.
main.py
This is the main application file of our MicroPython project and this is where we define most of the web server setup. Below is the code of our project.
from microdot_asyncio import Microdot, Response, send_file
from microdot_utemplate import render_template
from led_module import LEDModule

app = Microdot()
Response.default_content_type = 'text/html'

# Our LED Module
led_module = LEDModule(23)


@app.route('/')
async def index(request):
    return render_template('index.html', led_value=led_module.get_value())


@app.route('/toggle')
async def toggle_led(request):
    print("Receive Toggle Request!")
    led_module.toggle()
    return "OK"


@app.route('/shutdown')
async def shutdown(request):
    request.app.shutdown()
    return 'The server is shutting down...'


@app.route('/static/<path:path>')
def static(request, path):
    if '..' in path:
        # directory traversal is not allowed
        return 'Not found', 404
    return send_file('static/' + path)

app.run()
Let us go over what each line of code does.
from microdot_asyncio import Microdot, Response, send_file
from microdot_utemplate import render_template
from led_module import LEDModule
We import the necessary microdot project, especially the asyncio extension which would make our project perform better when deployed to our ESP32 MicroPython device. We also imported several templates related render_template method and our LEDModule.
If you are still confused about what a template is then please see the section Using Template in my earlier post about how to use MicroDot.
app = Microdot()
Response.default_content_type = 'text/html'

# Our LED Module
led_module = LEDModule(23)
We define our MicroDot application and set the content type to “text/html” which means that the default content type returned by our routes is “text/html”. We also initialized our LEDModule and assigned it to GPIO 23 of our ESP32.
@app.route('/')
async def index(request):
    return render_template('index.html', led_value=led_module.get_value())


@app.route('/toggle')
async def toggle_led(request):
    print("Receive Toggle Request!")
    led_module.toggle()
    return "OK"


@app.route('/shutdown')
async def shutdown(request):
    request.app.shutdown()
    return 'The server is shutting down...'


@app.route('/static/<path:path>')
def static(request, path):
    if '..' in path:
        # directory traversal is not allowed
        return 'Not found', 404
    return send_file('static/' + path)
These are the routes that we defined in our project and they respond to specific requests whether through URL path or fetching requests from our javascript code.
@app.route('/')
async def index(request):
    return render_template('index.html', led_value=led_module.get_value())
This would render our index.html page that is in our templates folder. When I say render then it means that the values that should be altered at runtime are resolved or computed. You will see this when we discuss the index.html page.
The led_value parameter passed to our render_template method reads the current value of our LEDModule. This would determine whether the toggle switch should be turned on or off.
@app.route('/shutdown')
async def shutdown(request):
    request.app.shutdown()
    return 'The server is shutting down...'
This is out convenience route such that when you want to shut down our MicroDot web server thru our application. You can access this route by typing the following in your browser.
http://<IP>:5000/shutdown@app.route('/static/<path:path>')
def static(request, path):
if '..' in path:
# directory traversal is not allowed
return 'Not found', 404
return send_file('static/' + path)This route will load all the HTML/CSS/Javascript files that are placed in our static folder.
app.run()This will run our program.
templates/index.html
This is the user interface of our MicroPython application and our MicroDot web server is serving this HTML page with template values or variables that need to be resolved.
{% args led_value %}
<!DOCTYPE html>
<html>
  <head>
    <meta charset="UTF-8" />
    <meta name="viewport" content="width=device-width, initial-scale=1" />
    <title>MicroPython Webserver</title>
    <link rel="stylesheet" href="static/css/entireframework.min.css" />
    <link rel="stylesheet" href="static/css/index.css" />
    <script src="static/js/index.js"></script>
  </head>
  <body>
    <nav class="nav" tabindex="-1" onclick="this.focus()">
      <div class="container">
        <a class="pagename current" href="#">www.donskytech.com</a>
        <a href="#">One</a>
        <a href="#">Two</a>
        <a href="#">Three</a>
      </div>
    </nav>
    <button class="btn-close btn btn-sm">×</button>
    <div class="container">
      <div class="hero">
        <h1 class="title">MicroPython Webserver</h1>
        <div class="toggle-div">
            <p class="label">Toggle Switch</p>
            <input type="checkbox" id="switch" onclick="toggleButtonSwitch()" {% if led_value == 1 %} checked {% endif %}/><label for="switch">Toggle</label>
        </div>
      </div>
    </div>
  </body>
</html>
Let us go over the important part of this file.
{% args led_value %}We defined the arguments needed by this file. In this case, it is expecting the led_value to be passed in. We passed this one in the render_template in the index route.
<html>
  <head>
    <meta charset="UTF-8" />
    <meta name="viewport" content="width=device-width, initial-scale=1" />
    <title>MicroPython Webserver</title>
    <link rel="stylesheet" href="static/css/entireframework.min.css" />
    <link rel="stylesheet" href="static/css/index.css" />
    <script src="static/js/index.js"></script>
  </head>
  <body>
    <nav class="nav" tabindex="-1" onclick="this.focus()">
      <div class="container">
        <a class="pagename current" href="#">www.donskytech.com</a>
        <a href="#">One</a>
        <a href="#">Two</a>
        <a href="#">Three</a>
      </div>
    </nav>
    <button class="btn-close btn btn-sm">×</button>
    <div class="container">
      <div class="hero">
        <h1 class="title">MicroPython Webserver</h1>
These are standard HTML markups. The HEAD section imports all the CSS and JavaScript files that we need. The BODY section displays the user interface of our web server application, particularly the menu bar at the top and the title of our application which is MicroPython Web Server.
        <div class="toggle-div">
            <p class="label">Toggle Switch</p>
            <input type="checkbox" id="switch" onclick="toggleButtonSwitch()" {% if led_value == 1 %} checked {% endif %}/><label for="switch">Toggle</label>
        </div>
      </div>
    </div>
  </body>
</html>
This is the code for our toggle sliding switch which is is checkbox styled with CSS. The interesting part of this page is the following line.
{% if led_value == 1 %} checked {% endif %}It uses a template expression that checks if the argument that we passed in led_value is equal to 1. If it is then it prints the “checked” string. This would toggle our sliding switch to ON in this case. If it is not then it would be OFF.
static/css
The static/css folder contains the CSS to style our web page. I am using the very simple mincss CSS framework in styling my page. The index.css is for styling our toggle switch.
I won’t be discussing so much about how CSS works in this case as they are just for styling.
/static/js/index.js
The index.js responds to events when we toggle our switch button.
function toggleButtonSwitch(e) {
  var switchButton = document.getElementById("switch");

  var toggleValue = "";
  if (switchButton.checked) {
    console.log("On!");
    toggleValue = "ON";
  } else {
    console.log("Off!");
    toggleValue = "OFF"
  }
  fetch( `/toggle`)
  .then( response => {
    console.log(response);
  } )
}
If we click the toggle button then we call the “/toggle” route of our main.py using the fetch API. This will cause the value of our LEDModule to be updated.
microdot files and extensions
The MicroDot files and extensions are the source project of the MicroDot framework. It starts with Microdot and all we have to do is copy the latest of these files from the MicroDot source code.
That is all for the code and how they participate in our MicroPython web server project. If something is not clear to you then just add a comment to this post or on my YouTube channel.
Deploying the MicroPython Web Server application
Install first the uTemplate package by following the steps here.
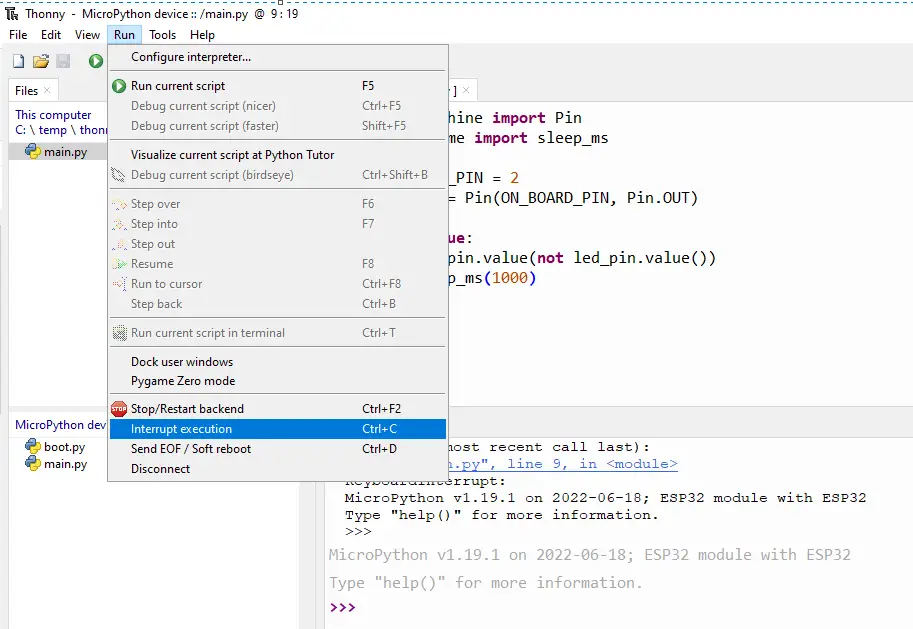
To deploy the whole MicroPython project then make sure that your MicroPython device is interrupted in Thonny so that it is not executing any script.
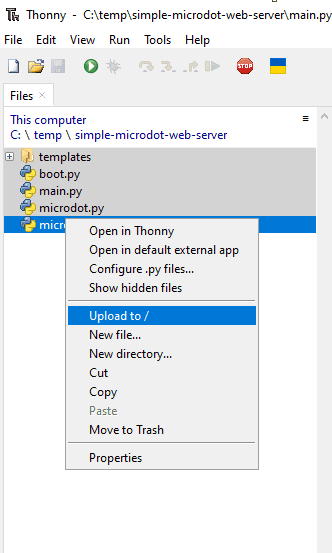
Then select all files and right-click then upload to your MicroPython device. Please see a sample image on how to upload below.
Soft reboot your MicroPython device.

Wait for the following messages to be displayed.
Connected! Network config: ('192.168.100.253', '255.255.255.0', '192.168.100.1', '192.168.100.1')
Starting sync server on 0.0.0.0:5000...
Copy the IP Address go to your browser and paste the following URL.
http://<IP>:5000Wrap up
This is quite a long post as I have tried to explain to you all the finer details on how to start creating your own MicroPython web server using the MicroDot framework.
If something is confusing then send me a message here and I will try to rectify it.
I hope you have learned something! Happy Exploring!
Read Next:
Raspberry Pi Pico W: BME280 Weather Station Dashboard
Using Arduino with BME280 plus a weather station project
Support Me!
I love sharing what I know and hopefully, I was able to help you. Writing helpful content takes so much time and research. If you think you like my work and I have managed to help you then please consider supporting my channel. I would be very grateful and would boost my confidence that what I am doing is making a big change in the world. (No Pun Intended!) 😉
Become a Patron!
Leave a Reply