Introduction
In the previous post, we discussed how we can publish and subscribe to an MQTT(MQ Telemetry Transport) broker through WebSocket by using the library mqtt.js and purely coded everything in the browser by using Javascript. This post will recreate the same project but using the Node.js runtime environment.
If you want to see this project in a video format then please see below. You can also watch this on my YouTube channel.
Prerequisites
You should have installed the latest Node.js version in your workstation. I am using Windows PC in developing this project but the steps outlined here apply to a Mac/Linux environment. I am using Visual Studio Code in developing the example projects here.
Related Content:
Install Node.js on Windows
Also, you should have an MQTT broker that you can connect to and must have configured MQTT over WebSocket. I am using a local Mosquitto broker with WebSocket configured in this post. Please see the content below on how and why we need to do this in this post.
Related Content:
Install Mosquitto MQTT Windows
How to enable WebSockets in Mosquitto MQTT broker?
How to install mqtt.js in a node.js environment?
First, verify that you have installed the latest Node.js version by executing the below command.
$ node -v
v18.13.0
Next, create a directory that will serve as the root folder of our project.
mkdir mqtt-node
cd mqtt-node
Next, we initialize our root folder with Node.js configuration
npm init -yLastly, install the dependency mqtt using NPM
npm install mqtt --saveNow that we have installed the mqtt.js library in our Node.js project it is time to create two projects that will show how to use it.
What are we building?
When you Google for “node MQTT” the links that are shown on the first page of the search results will show you how to use mqtt.js in a command line interface (CLI) project. I was looking for a way to apply Node.js in one of my Internet of Things (IoT) projects and I was thinking of showing it in a dashboard web application served through your browser.
So in this post of mine, I am going to create two Node.js MQTT-based example projects/application that uses the mqtt.js:
- Node.js MQTT CLI (Command Line Interface) project
- Node-Express-MQTT web application that displays MQTT message
This is my own implementation and it might be different from yours but I am just sharing what I know so you can use it or evaluate it if this is feasible in your own project. The complete code for the two projects can be found in my GitHub repository.
Node.js MQTT CLI project
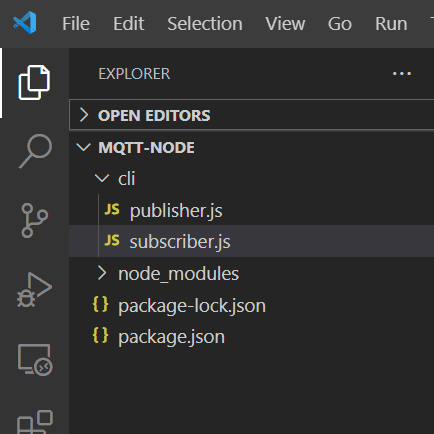
Open our root folder in Visual Studio Code and create a directory called “cli” inside it then create two files called the publisher.js and subscriber.js under it.
How to connect to the MQTT broker using mqtt.js?
The MQTT.js#Client class wraps a client connection to an MQTT broker over an arbitrary transport method (TCP, TLS, WebSocket, etc.). This Client class handles lots of things and includes:
- Regular server pings
- QoS flow
- Automatic reconnections
- Start publishing before being connected
This is created by calling the method mqtt.connect()
Open your subscriber.js and publisher.js and place the following code. Make sure that you change the mqttHost variable below to point to your MQTT broker.
const mqtt = require("mqtt");

var mqttClient;

// Change this to point to your MQTT broker or DNS name
const mqttHost = "192.168.100.22";
const protocol = "mqtt";
const port = "1883";

function connectToBroker() {
  const clientId = "client" + Math.random().toString(36).substring(7);

  // Change this to point to your MQTT broker
  const hostURL = `${protocol}://${mqttHost}:${port}`;

  const options = {
    keepalive: 60,
    clientId: clientId,
    protocolId: "MQTT",
    protocolVersion: 4,
    clean: true,
    reconnectPeriod: 1000,
    connectTimeout: 30 * 1000,
  };

  mqttClient = mqtt.connect(hostURL, options);

  mqttClient.on("error", (err) => {
    console.log("Error: ", err);
    mqttClient.end();
  });

  mqttClient.on("reconnect", () => {
    console.log("Reconnecting...");
  });

  mqttClient.on("connect", () => {
    console.log("Client connected:" + clientId);
  });

  // Received Message
  mqttClient.on("message", (topic, message, packet) => {
    console.log(
      "Received Message: " + message.toString() + "\nOn topic: " + topic
    );
  });
}

connectToBroker();
Take note of how the host URL is constructed by the below code as it also supports ‘mqtt‘, ‘mqtts‘, ‘tcp‘, ‘tls‘, ‘ws‘, ‘wss‘, ‘wxs‘, ‘alis‘. I am using an unsecured MQTT connection to my broker so I am using the following URL pattern mqtt://192.168.100.22:1833/. The IP address here refers to the IP Address of my Mosquitto MQTT broker.
// Change this to point to your MQTT broker or DNS name
const mqttHost = "192.168.100.22";
const protocol = "mqtt";
const port = "1883";
To test the code, open a new terminal in your VSCode and cd into the cli directory. You should see the following message shown in your terminal
cd cli
node subscriber.js
Client connected:clientje0fnr
How to subscribe to topics in mqtt.js?
If you want to receive MQTT messages from your broker then you could call the mqtt.Client#subscribe method from your Client class and subscribe to the topic that you want to listen to
function subscribeToTopic(topic) {
  console.log(`Subscribing to Topic: ${topic}`);

  mqttClient.subscribe(topic, { qos: 0 });
}

connectToBroker();
subscribeToTopic("temperature");
Go back to your terminal and run the subscriber.js file again. You should be seeing the following message displayed at your terminal.
function subscribeToTopic(topic) {
  console.log(`Subscribing to Topic: ${topic}`);

  mqttClient.subscribe(topic, { qos: 0 });
}

connectToBroker();
subscribeToTopic("temperature");
How to publish topics in mqtt.js?
In order to publish MQTT Messages to our broker we just need to call the mqtt.Client#publish method on our Client object. A sample of how I used this method can be seen in the code below.
function publishMessage(topic, message) {
  console.log(`Sending Topic: ${topic}, Message: ${message}`);
  mqttClient.publish(topic, message, {
    qos: 0,
    retain: false,
  });
}

connectToBroker();

publishMessage("temperature", 32)
Open a new terminal but don’t close the running subscriber.js and execute the below code.
cd cli
node publisher.js
You should see the following message displayed on the terminal.
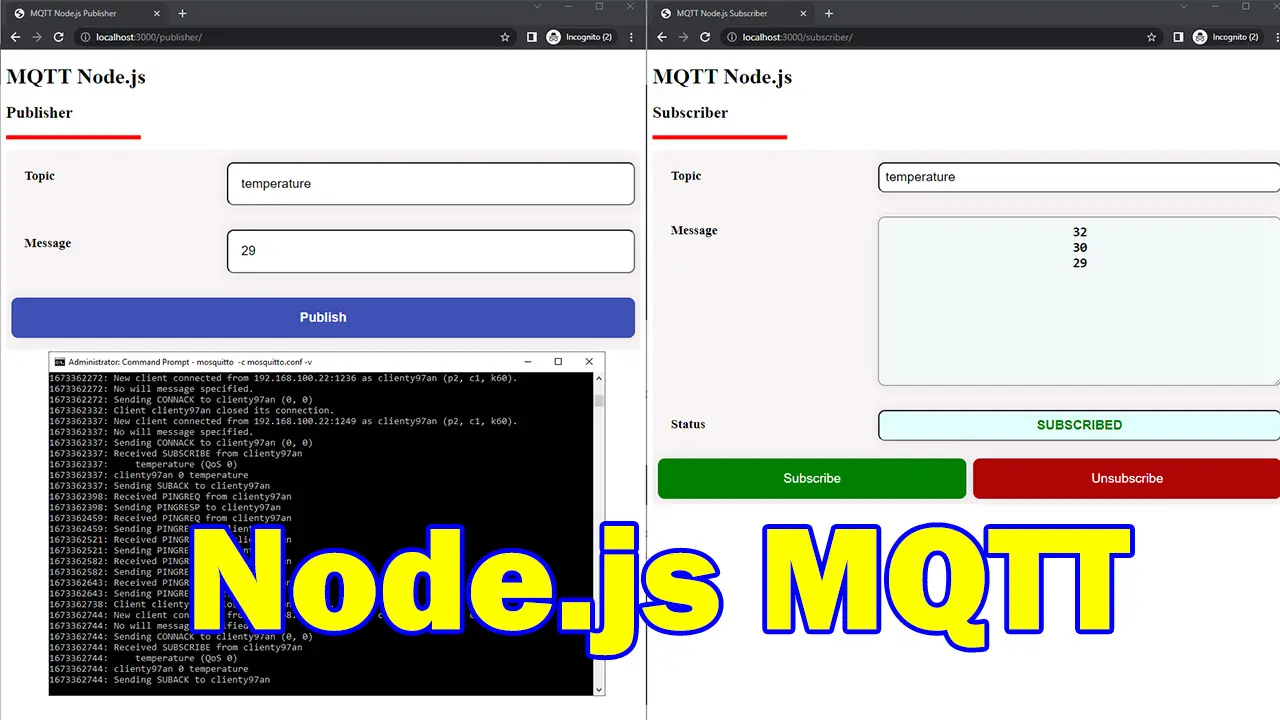
C:\git\mqtt-node\cli>node publisher.js
Sending Topic: temperature, Message: 32
Client connected:client4vjw
If you switch back to the subscriber.js terminal then you should see the following messages.
C:\git\mqtt-node\cli>node subscriber.js
Subscribing to Topic: temperature
Client connected:clienti8zs44
Received Message: 32
On topic: temperature
That is all for the code on how you can use the mqtt.js javascript library in a CLI MQTT project that uses the Node.js runtime.
Node-Express-MQTT web application
The next project that we will be doing is to re-create the previous project that we have done in the previous post but we will be using Node.js and the Express web framework. If you haven’t thoroughly read the previous post then I highly suggest that you read it as I won’t be explaining so much about how this project works in this post. I will be focussing on the Node.js environment configurations in this post.
Setup express project
The first thing to do is to install the express web framework by executing the below command.
npm install expressWe then create the entry point of our project by creating the following file named app.js and putting the below code. This will bootstrap a barebones express web application.
const express = require("express");
const app = express();
const port = 3000;
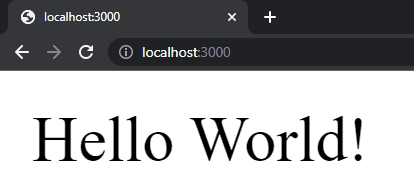
app.get("/", (req, res) => {
res.send("Hello World!");
});
app.listen(port, () => {
console.log(`Example app listening on port ${port}`);
});Open a new terminal inside VSCode and enter the below command to start our express web server
C:\git\mqtt-node>node app.js
Example app listening on port 3000
Open your browser and type http://localhost:3000 then you should be seeing the following displayed in your browser
Install nodemon
To speed up our development we will install the nodemon package utility so that we don’t need to manually restart our server for any changes. Execute the below command to install this package.
npm install --save-dev nodemonNext, we configure our startup script by editing the package.json and adding two scripts below (e.g. “prod“, “dev“)
{
  "name": "node-mqtt",
  "version": "1.0.0",
  "description": "",
  "main": "index.js",
  "scripts": {
    "prod": "node app.js",
    "dev": "nodemon app.js"
  },
  "keywords": [],
  "author": "",
  "license": "ISC",
  "dependencies": {
    "express": "^4.18.2"
  },
  "devDependencies": {
    "nodemon": "^2.0.20"
  }
}
Cancel the previous command that we did to run our express server if it is still running and then execute the below command.
npm run devThis should open up the same message above.
Design
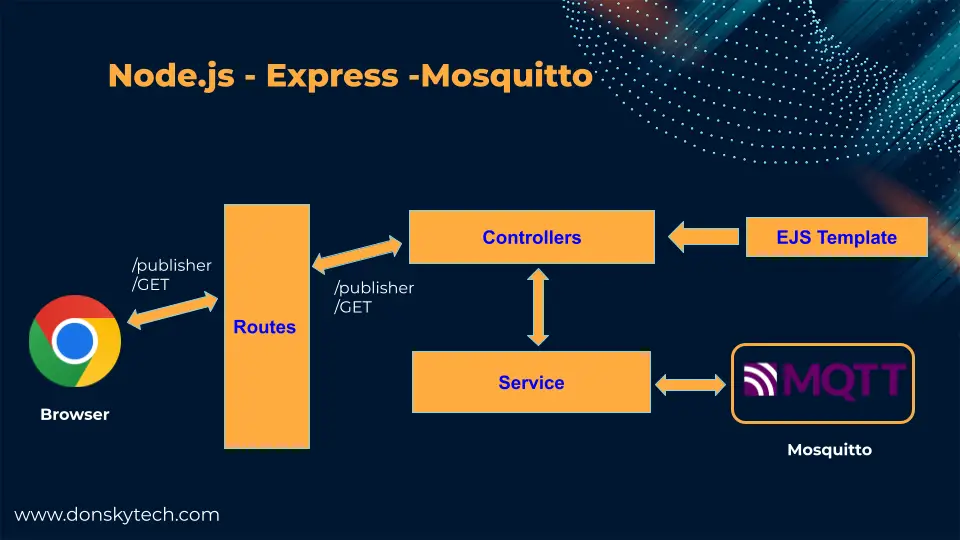
The image above is how I structured my project and how the request from the browser would get handled by the different Node.js components.
Create routes
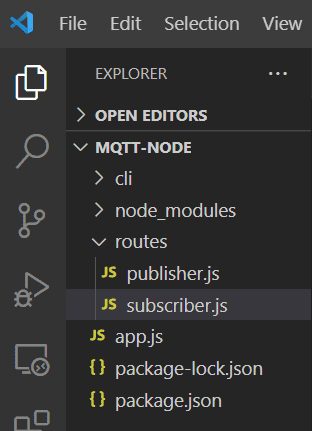
Create a directory name “routes” and create two files publisher.js and subscriber.js
const express = require("express");
const router = express.Router();

// Publisher Home Route.
router.get("/", function (req, res) {
  res.send("Publisher Page");
});

module.exports = router;
const express = require("express");
const router = express.Router();

// Subscriber Home Route.
router.get("/", function (req, res) {
  res.send("Subscriber Page");
});

module.exports = router;
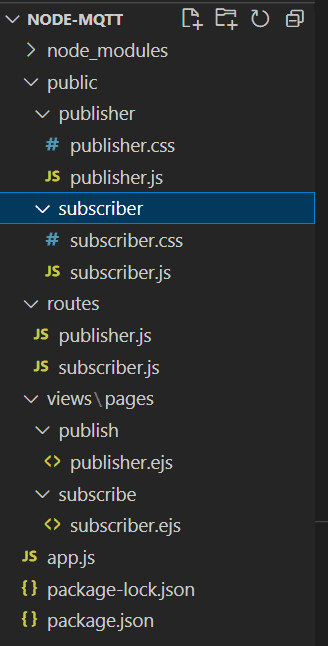
At this point, your project should now look like this.
Next, edit your app.js and include the following routes
const express = require("express");
const app = express();
const port = 3000;

//routes
const subscriberRouter = require("./routes/subscriber");
const publisherRouter = require("./routes/publisher");

app.get("/", (req, res) => {
  res.send("Hello World!");
});

app.use("/subscriber", subscriberRouter);
app.use("/publisher", publisherRouter);

app.listen(port, () => {
  console.log(`Example app listening on port ${port}`);
});
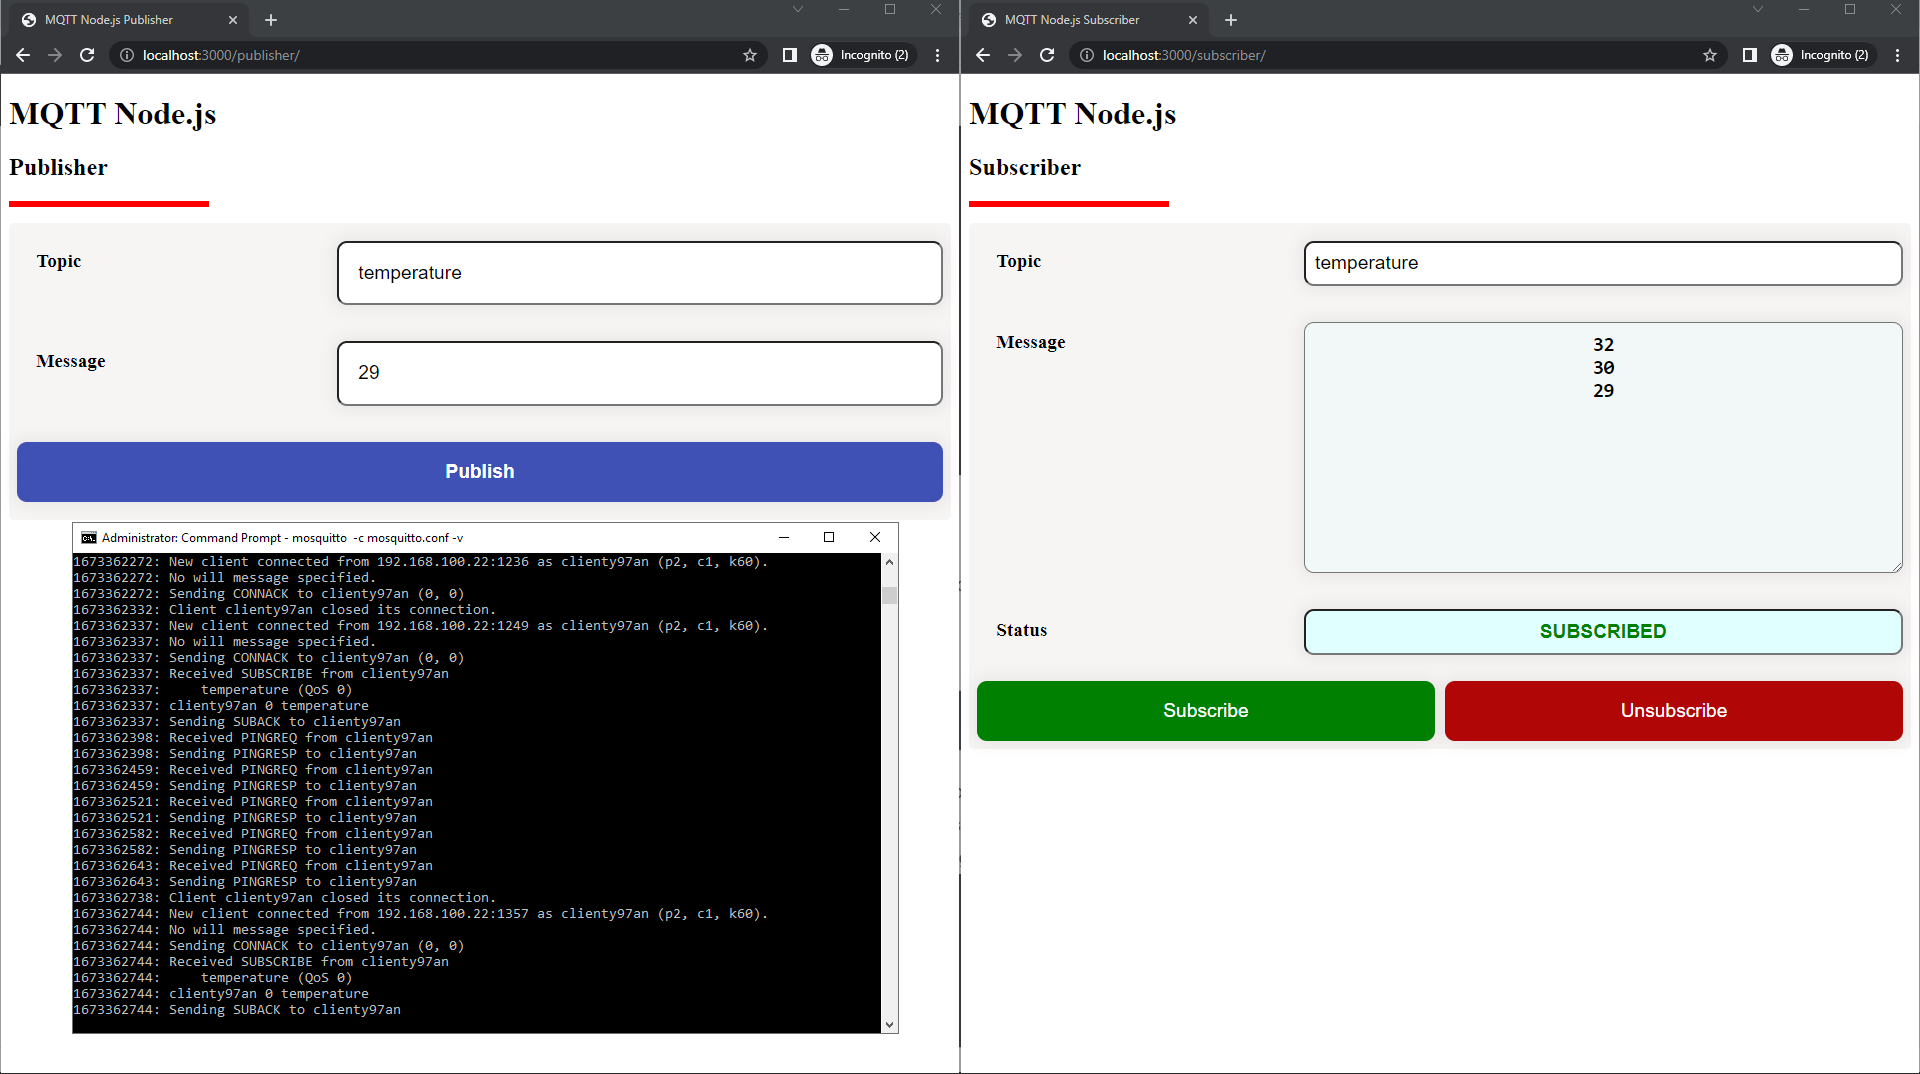
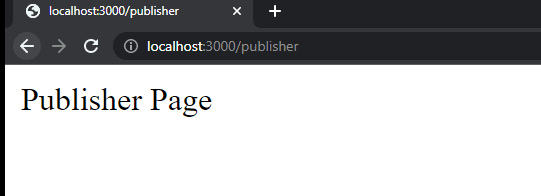
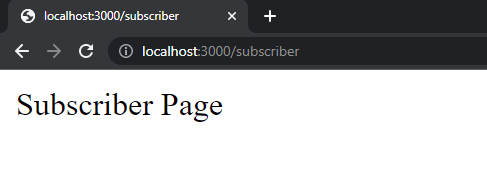
Next, type in the following URLs in your browser http://localhost:3000/publisher and http://localhost:3000/subscriber. This should open up the following pages in your browser
Install EJS
We will use the ejs as our templating library to generate our HTML web user interfaces. To install ejs execute the below command
npm install ejsNext, we edit our app.js and explicitly set our view engine to ejs, and also add the middleware to parse the JSON body of the request.
const express = require("express");
const app = express();
const port = 3000;

// template view engine
app.set('view engine', 'ejs');

// Set the json request body
app.use(express.json());
app.use(express.urlencoded({ extended: true }));

//routes
const subscriberRouter = require("./routes/subscriber");
const publisherRouter = require("./routes/publisher");

app.get("/", (req, res) => {
  res.send("Hello World!");
});

app.use("/subscriber", subscriberRouter);
app.use("/publisher", publisherRouter);

app.listen(port, () => {
  console.log(`Example app listening on port ${port}`);
});
Create the views folder where we will create our views and inside it create the pages folder.
mkdir views\pagesCreate file publisher.ejs and place the following code inside it.
<!DOCTYPE html>
<html lang="en">
  <head>
    <meta charset="UTF-8" />
    <meta name="viewport" content="width=device-width, initial-scale=1.0" />
    <meta http-equiv="X-UA-Compatible" content="ie=edge" />
    <title>MQTT Node.js Publisher</title>
    <link rel="stylesheet" href="/assets/publisher/publisher.css" />
  </head>
  <body>
    <h1>MQTT Node.js</h1>
    <h2>Publisher</h2>
    <div class="line"></div>
    <form method="post" action="/publish" id="publishForm">
      <ul class="wrapper">
        <li class="form-row">
          <label for="topic">Topic</label>
          <input type="text" id="topic" />
        </li>
        <li class="form-row">
          <label for="message">Message</label>
          <input type="text" id="message" />
        </li>
        <li class="form-row">
          <button type="submit" class="publish">Publish</button>
        </li>
      </ul>
    </form>
    <script src="/assets/publisher/publisher.js"></script>
  </body>
</html>
Also, create the subscriber.ejs and place the following code.
<!DOCTYPE html>
<html lang="en">
  <head>
    <meta charset="UTF-8" />
    <meta name="viewport" content="width=device-width, initial-scale=1.0" />
    <meta http-equiv="X-UA-Compatible" content="ie=edge" />
    <title>MQTT Node.js Subscriber</title>
    <link rel="stylesheet" href="/assets/subscriber/subscriber.css" />
    <script src="https://unpkg.com/mqtt/dist/mqtt.min.js"></script>
  </head>
  <body>
    <h1>MQTT Node.js</h1>
    <h2>Subscriber</h2>
    <div class="line"></div>
    <ul class="wrapper">
      <li class="form-row">
        <label for="topic">Topic</label>
        <input type="text" id="topic" />
      </li>
      <li class="form-row">
        <label for="message">Message</label>
        <textarea id="message" name="message" rows="10" readonly></textarea>
      </li>
      <li class="form-row">
        <label for="status">Status</label>
        <input type="text" id="status" readonly />
      </li>
      <li class="form-row">
        <div class="btn-container">
          <button type="button" id="subscribe">Subscribe</button>
          <button type="button" id="unsubscribe">Unsubscribe</button>
        </div>
      </li>
    </ul>
    <script src="/assets/subscriber/subscriber.js"></script>
  </body>
</html>
At this point, your project files should now look like this.

Setup static files
To serve static content such as HTML/CSS/Javascript from our Express server we need to create the following folder.
mkdir publicInside the public directory, create two folders and name them publisher and subscriber then we create the files publisher.css, publisher.js, subscriber.css, and subscriber.js inside both folders. At this point, your project should now contain the following files.
Next, populate the contents of the following files from my GitHub repository.
Note: Make sure to change the host variable in the subscriber.js to point to your own MQTT broker that has WebSocket configured.
  // Change this to point to your MQTT broker
  const host = "ws://192.168.100.22:9001/mqtt";
Edit your app.js and add the static serving code.
const express = require("express");
const app = express();
const port = 3000;

// Serve Static Files
app.use(express.static("public"));
app.use("/assets", express.static("public"));

// template view engine
app.set('view engine', 'ejs');

// Set the json request body
app.use(express.json());
app.use(express.urlencoded({ extended: true }));

//routes
const subscriberRouter = require("./routes/subscriber");
const publisherRouter = require("./routes/publisher");

app.get("/", (req, res) => {
  res.send("Hello World!");
});

app.use("/subscriber", subscriberRouter);
app.use("/publisher", publisherRouter);

app.listen(port, () => {
  console.log(`Example app listening on port ${port}`);
});
Next, we need to edit our router/publisher.js and router/subscriber.js such that instead of sending hardcoded text we will render our template.
const express = require("express");
const router = express.Router();

// Publisher Home Route.
router.get("/", function (req, res) {
  res.render("pages/publisher");
});

module.exports = router;
const express = require("express");
const router = express.Router();

// Subscriber Home Route.
router.get("/", function (req, res) {
  res.render("pages/subscriber");
});

module.exports = router;
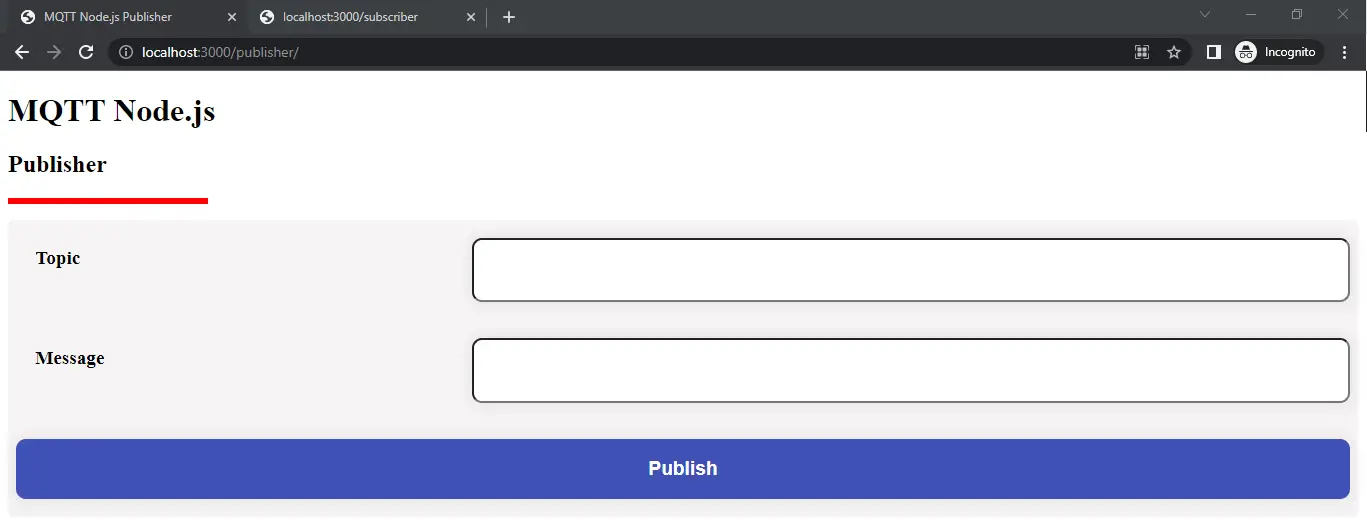
If you open http://localhost:3000/publisher/ then it should display the following in your browser.
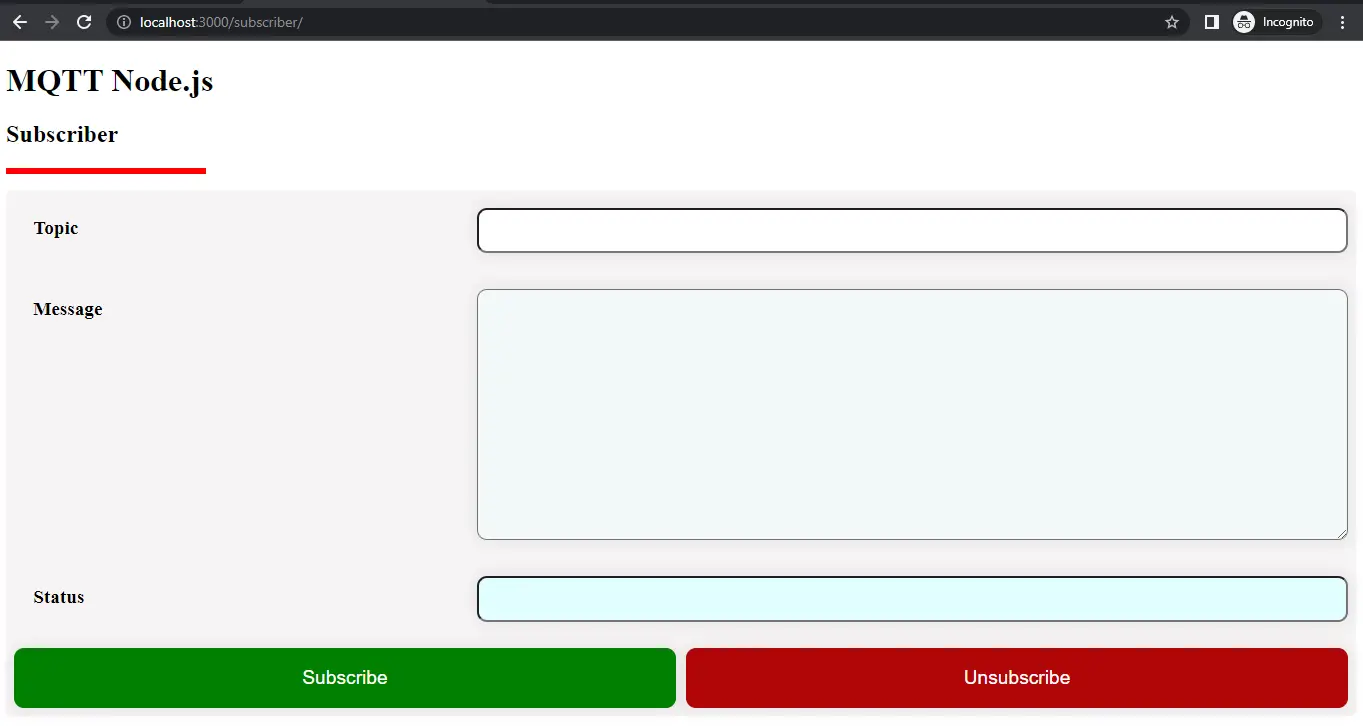
Next, if you open http://localhost:3000/subscriber/ then it should display the following in your browser.
Create our MQTT Service layer
Let us add a separate service layer that will talk to our MQTT so create a directory named “service”.
mkdir serviceInside our service directory, Let us create a class that will handle our MQTT connection. We have encapsulated all the MQTT logic inside the class.
const mqtt = require("mqtt");

class MQTTService {
  constructor(host, messageCallback) {
    this.mqttClient = null;
    this.host = host;
    this.messageCallback = messageCallback;
  }

  connect() {
    this.mqttClient = mqtt.connect(this.host);

    // MQTT Callback for 'error' event
    this.mqttClient.on("error", (err) => {
      console.log(err);
      this.mqttClient.end();
    });

    // MQTT Callback for 'connect' event
    this.mqttClient.on("connect", () => {
      console.log(`MQTT client connected`);
    });

    // Call the message callback function when message arrived
    this.mqttClient.on("message", function (topic, message) {
      console.log(message.toString());
      if (this.messageCallback) this.messageCallback(topic, message);
    });

    this.mqttClient.on("close", () => {
      console.log(`MQTT client disconnected`);
    });
  }

  // Publish MQTT Message
  publish(topic, message, options) {
    this.mqttClient.publish(topic, message);
  }

  // Subscribe to MQTT Message
  subscribe(topic, options) {
    this.mqttClient.subscribe(topic, options);
  }
}

module.exports = MQTTService;
Create our controller layer
We will separate the business logic of rendering our pages by creating a controller layer.
mkdir controllersInside it, we have created publisher.js and subscriber.js controllers.
const mqttService = require("../service/mqttService");

// Change this to point to your MQTT broker
const MQTT_HOST_NAME = "mqtt://127.0.0.1:1883";

var mqttClient = new mqttService(MQTT_HOST_NAME);
mqttClient.connect();

exports.getPublisherPage = async function (req, res) {
  try {
    res.render("pages/publisher");
  } catch (error) {
    return res.status(400).json({ status: 400, message: error.message });
  }
};

exports.publishMQTTMessage = async function (req, res) {
  try {
    const topic = req.body.topic;
    const message = req.body.message;

    console.log(`Request Topic :: ${topic}`);
    console.log(`Request Message :: ${message}`);

    mqttClient.publish(topic, message, {});
    res
      .status(200)
      .json({ status: "200", message: "Sucessfully published MQTT Message" });
  } catch (error) {
    return res.status(400).json({ status: 400, message: error.message });
  }
};
exports.getSubscriberPage = async function (req, res) {
  try {
    res.render("pages/subscriber");
  } catch (error) {
    console.log(error);
    res
      .status(400)
      .json({ status: 400, message: "Error getting subscriber page" });
  }
};
We now can edit our routes to use our controller layer.
const express = require("express");
const router = express.Router();

var publisherController = require("../controllers/publisher");

// Publisher Home Route.
router.get("/", publisherController.getPublisherPage);

router.post("/", publisherController.publishMQTTMessage);

module.exports = router;
const express = require("express");
const router = express.Router();

var subscriberController = require("../controllers/subscriber");

// Subscriber Home Route.
router.get("/", subscriberController.getSubscriberPage);

module.exports = router;
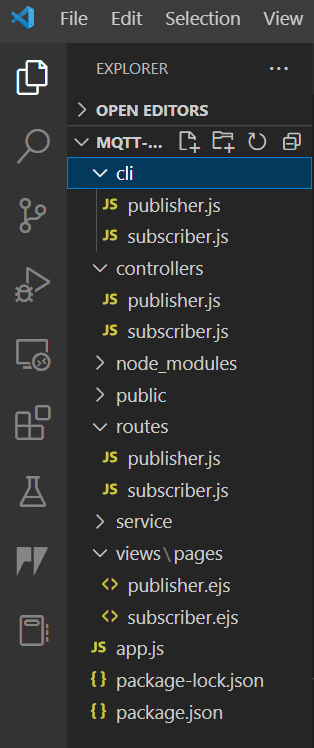
At this point, your project should now look like the below image.
That is all for the code. For a demo of the said project please see the following video below on how this project works.
Wrap Up
We have successfully created some example projects that utilize MQTT in a Node.js environment in this post.
I hope you learned something. Happy Exploring!
Support Me!
I love sharing what I know and hopefully, I was able to help you. Writing helpful content takes so much time and research. If you think you like my work and I have managed to help you then please consider supporting my channel. I would be very grateful and would boost my confidence that what I am doing is making a big change in the world. (No Pun Intended!) 😉
Become a Patron!
Leave a Reply