Introduction
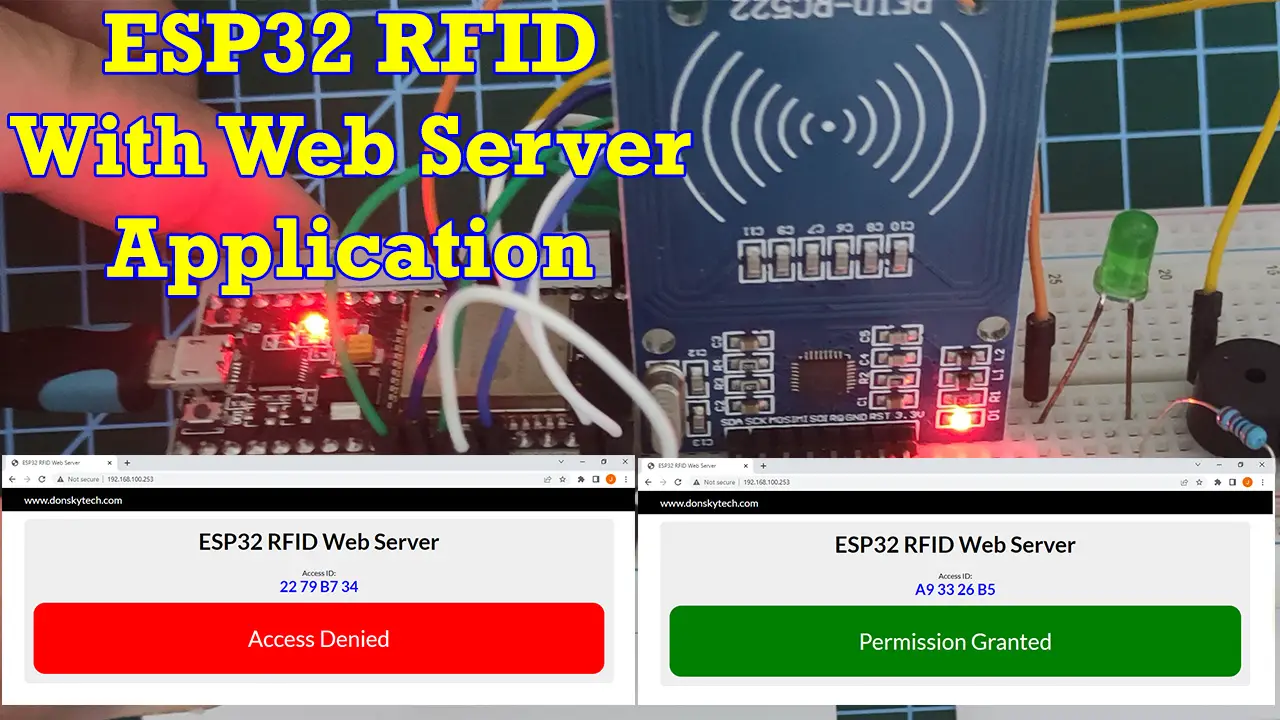
Would you like to create an ESP32 RFID (Radio Frequency ID) Cards/Tags reading project with a Web Server application that displays if it is valid or not? This project is about reading RFID cards and tags using the ESP32 microcontroller which has a web application that displays the result of the validation in real time.
This makes it ideal for Security System that checks if a person has access or not to enter a premise. Messages are displayed in real-time upon placing the RFID tags/cards close to the card reader. If you want to see this project in a demo then please see the video below or watch it on my YouTube channel.
Design
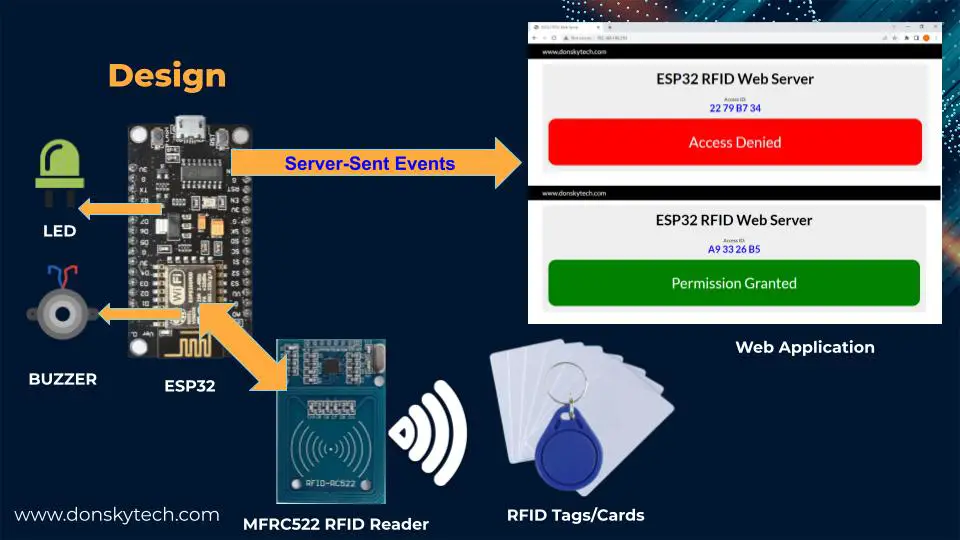
The image above is the design of our project. We have the ESP32 microcontroller talking to an MFRC522 RFID reader to read the RFID tags/cards. It also controls an LED (Light Emitting Diode) and an Active buzzer.
At the same time, it is hosting a Web Application that will display in real-time if the RFID tag/card is valid or not. We have hard-coded the list of valid RFID in our program for now but we will extend this later into putting those values in a database.
Messages are sent to the Web Application using Server-Sent Events and the Web Application updates itself asynchronously.
Prerequisites
The following components are required to follow along with this post.
- ESP32 (I used NodeMCU ESP32S) – Amazon | AliExpress | Bangood
- MFRC522 RFID Card Reader – Amazon | AliExpress | Bangood
- LED – Amazon | AliExpress | Bangood
- Active Buzzer – Amazon | AliExpress | Bangood
- Breadboard – Amazon | AliExpress | Bangood
- Connecting Wires – Amazon | AliExpress | Bangood
Disclosure: These are affiliate links and I will earn small commissions to support my site when you buy through these links.
I used Visual Studio Code with the PlatformIO extension installed in developing this project. If you are in Windows and have not yet installed Visual Studio Code then you can check my post about how to Install Visual Studio Code or VSCode in Windows. If you are not familiar with PlatformIO then please read this PlatformIO Tutorial for Arduino Development where I detailed how to get started with development using the PlatformIO IDE extension.
We are using the Arduino framework in programming our ESP32 microcontroller unit.
Schematic/Wiring
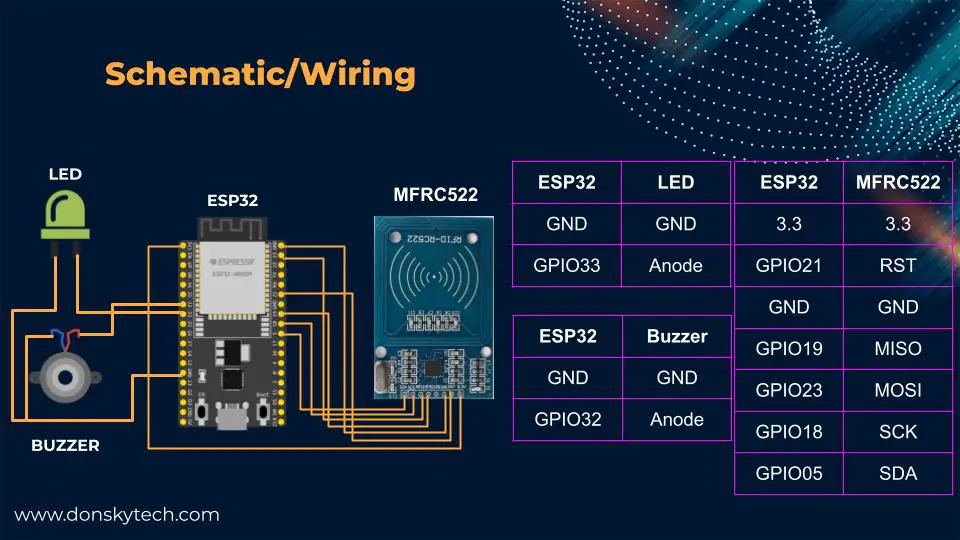
The image above is the complete wiring/schematic of our project. If the RFID Tag/Card is valid then we just light up the LED and display Permission Granted in our Web Application. However, if the RFID Tag/Card is invalid then we sound the buzzer and display Access Denied in our Web Application.
If you are not familiar with how to interface with an MFRC522 RFID card Reader then please see my post about Interfacing RFID MFRC522 to ESP32.
Also, place a 220 Ohms resistor between the LED and the ground to limit the current flowing thru it.
Code
The code for this project is available on my GitHub page and you can access it from here.
platform.ini
[env:esp32dev]
platform = espressif32
board = esp32dev
framework = arduino
monitor_speed = 115200
lib_deps =
	https://github.com/OSSLibraries/Arduino_MFRC522v2.git
	Wire
	Wifi
	FS
	SPIFFS
	me-no-dev/ESP Async WebServer@^1.2.3
	bblanchon/ArduinoJson@^6.19.4
This project has dependencies on the following library.
- ESP Async WebServer – our Webserver
- ArduinoJson – used for JSON messages transfer
- Arduino_MFRC522v2 – used for our RFID Card reader
main.cpp
This is the entry point of our project. This will interface with the RFID reader, display the web application and control the output LED and Buzzer for our project.
#include <Arduino.h>
#ifdef ESP32
#include <WiFi.h>
#include <AsyncTCP.h>
#include "SPIFFS.h"
#elif defined(ESP8266)
#include <ESP8266WiFi.h>
#include <ESPAsyncTCP.h>
#include "LittleFS.h"
#endif
#include <ESPAsyncWebServer.h>
#include <MFRC522v2.h>
#include <MFRC522DriverSPI.h>
//#include <MFRC522DriverI2C.h>
#include <MFRC522DriverPinSimple.h>
#include <MFRC522Debug.h>
#include <ArduinoJson.h>

// Change this to your network SSID
const char *ssid = "<CHANGE TO YOUR SSID>";
const char *password = "<CHANGE TO YOUR SSID PASSWORD>";

// AsyncWebserver runs on port 80 and the asyncwebsocket is initialize at this point also
AsyncWebServer server(80);
AsyncEventSource events("/events");

MFRC522DriverPinSimple ss_pin(5); // Configurable, see typical pin layout above.
MFRC522DriverSPI driver{ss_pin}; // Create SPI driver.
// MFRC522DriverI2C driver{}; // Create I2C driver.
MFRC522 mfrc522{driver}; // Create MFRC522 instance.

// Buzzer and LED Pins
const int buzzerPin = 32;
const int ledPin = 33;

// The current tag being processed
String tagContent = "";
String currentUID = "";

// Interval before we process the same RFID
int INTERVAL = 3000;
unsigned long previousMillis = 0;
unsigned long currentMillis = 0;

// List of valid RFID codes
String validRFID[2] = {"04 DC 69 2B", "A9 33 26 B5"};

// Forward declaration of function
void notFound(AsyncWebServerRequest *request);
void sendMessage();
void initOutputControl();
void showAllowed();
void showNotAllowed();

void setup()
{
  Serial.begin(115200); // Initialize serial communications with the PC for debugging.
  while (!Serial)
    ; // Do nothing if no serial port is opened (added for Arduinos based on ATMEGA32U4).

  // configure buzzer and led pin
  pinMode(buzzerPin, OUTPUT);
  pinMode(ledPin, OUTPUT);

  // Connect to your wifi
  WiFi.mode(WIFI_STA);
  WiFi.begin(ssid, password);
  if (WiFi.waitForConnectResult() != WL_CONNECTED)
  {
    Serial.printf("WiFi Failed!\n");
    return;
  }

  Serial.print("IP Address: ");
  Serial.println(WiFi.localIP());

  // Initialize SPIFFS
  if (!SPIFFS.begin(true))
  {
    Serial.println("An Error has occurred while mounting SPIFFS");
    return;
  }

  // setup ......
  events.onConnect([](AsyncEventSourceClient *client)
                   {
    if (client->lastId())
    {
      Serial.printf("Client reconnected! Last message ID that it gat is: %u\n", client->lastId());
    } });

  // attach AsyncEventSource
  server.addHandler(&events);

  server.on("/", HTTP_GET, [](AsyncWebServerRequest *request)
            {
              Serial.println("Requesting index page...");
              request->send(SPIFFS, "/index.html", "text/html", false); });
  server.serveStatic("/css", SPIFFS, "/css/");
  server.serveStatic("/js", SPIFFS, "/js/");

  // On Not Found
  server.onNotFound(notFound);

  // Start server
  server.begin();

  mfrc522.PCD_Init();                                     // Init MFRC522 board.
  MFRC522Debug::PCD_DumpVersionToSerial(mfrc522, Serial); // Show details of PCD - MFRC522 Card Reader details.
  Serial.println(F("Scan PICC to see UID, SAK, type, and data blocks..."));
}

void loop()
{
  // Reset the loop if no new card present on the sensor/reader. This saves the entire process when idle.
  if (!mfrc522.PICC_IsNewCardPresent())
  {
    return;
  }

  // Select one of the cards.
  if (!mfrc522.PICC_ReadCardSerial())
  {
    return;
  }

  initOutputControl();

  for (byte i = 0; i < mfrc522.uid.size; i++)
  {
    tagContent.concat(String(mfrc522.uid.uidByte[i] < 0x10 ? " 0" : " "));
    tagContent.concat(String(mfrc522.uid.uidByte[i], HEX));
  }

  tagContent.trim();
  tagContent.toUpperCase();

  currentMillis = millis();
  // If current UID is not equal to current UID..meaning new card, then validate if it has access
  if (currentUID != tagContent)
  {
    currentUID = tagContent;
  }
  else
  {
    // If it is the same RFID UID then we wait for interval to pass before we process the same RFID
    if (currentMillis - previousMillis <= INTERVAL)
    {
      tagContent = "";
      return;
    }
  }

  if (tagContent != "")
  {
    sendMessage();
    previousMillis = currentMillis;
    tagContent = "";
  }
}

void initOutputControl()
{
  digitalWrite(ledPin, LOW);
  digitalWrite(buzzerPin, LOW);
  delay(1000);
}
void showAllowed()
{
  digitalWrite(ledPin, HIGH);
  delay(1000);
  digitalWrite(ledPin, LOW);
}

void showNotAllowed()
{
  digitalWrite(buzzerPin, HIGH);
  delay(1000);
  digitalWrite(buzzerPin, LOW);
}

// Function called when resource is not found on the server
void notFound(AsyncWebServerRequest *request)
{
  request->send(404, "text/plain", "Not found");
}

void sendMessage()
{
  // Declare a buffer to hold the result
  char output[128];
  StaticJsonDocument<64> doc;

  bool isValid = false;
  for (size_t i = 0; i < 2; i++)
  {
    if (validRFID[i].equals(tagContent))
    {
      isValid = true;
      break;
    }
  }

  doc["status"] = isValid;
  doc["rfid_tag_id"] = tagContent;

  serializeJson(doc, output);
  events.send(output);

  if (isValid)
    showAllowed();
  else
    showNotAllowed();
}
Let us go over what each line of the code does by looking at the following subsections.
Declaration
#include <Arduino.h>
#ifdef ESP32
#include <WiFi.h>
#include <AsyncTCP.h>
#include "SPIFFS.h"
#elif defined(ESP8266)
#include <ESP8266WiFi.h>
#include <ESPAsyncTCP.h>
#include "LittleFS.h"
#endif
#include <ESPAsyncWebServer.h>
#include <MFRC522v2.h>
#include <MFRC522DriverSPI.h>
//#include <MFRC522DriverI2C.h>
#include <MFRC522DriverPinSimple.h>
#include <MFRC522Debug.h>
#include <ArduinoJson.h>
Import the necessary header files.
// Change this to your network SSID
const char *ssid = "<CHANGE TO YOUR SSID>";
const char *password = "<CHANGE TO YOUR SSID PASSWORD>";
Change this to your Wifi SSID and Password.
// AsyncWebserver runs on port 80 and the asyncwebsocket is initialize at this point also
AsyncWebServer server(80);
AsyncEventSource events("/events");
Declare our Webserver and our Server-Sent Event plugin.
MFRC522DriverPinSimple ss_pin(5); // Configurable, see typical pin layout above.
MFRC522DriverSPI driver{ss_pin}; // Create SPI driver.
// MFRC522DriverI2C driver{}; // Create I2C driver.
MFRC522 mfrc522{driver}; // Create MFRC522 instance.
Initialize our card reader configurations.
// Buzzer and LED Pins
const int buzzerPin = 32;
const int ledPin = 33;
The buzzer and LED pin configurations.
// The current tag being processed
String tagContent = "";
String currentUID = "";

// Interval before we process the same RFID
int INTERVAL = 3000;
unsigned long previousMillis = 0;
unsigned long currentMillis = 0;

// List of valid RFID codes
String validRFID[2] = {"04 DC 69 2B", "A9 33 26 B5"};
Variables to set the current RFID tag being processed and the interval of processing of RFID tags. Also, the hard-coded list of our valid RFID tags.
// Forward declaration of function
void notFound(AsyncWebServerRequest *request);
void sendMessage();
void initOutputControl();
void showAllowed();
void showNotAllowed();
Forward declaration of our functions.
setup() function
void setup()
{
  Serial.begin(115200); // Initialize serial communications with the PC for debugging.
  while (!Serial)
    ; // Do nothing if no serial port is opened (added for Arduinos based on ATMEGA32U4).

  // configure buzzer and led pin
  pinMode(buzzerPin, OUTPUT);
  pinMode(ledPin, OUTPUT);
Set the Serial Monitor baud rate and mode of our LED and Buzzer pins.
  // Connect to your wifi
  WiFi.mode(WIFI_STA);
  WiFi.begin(ssid, password);
  if (WiFi.waitForConnectResult() != WL_CONNECTED)
  {
    Serial.printf("WiFi Failed!\n");
    return;
  }

  Serial.print("IP Address: ");
  Serial.println(WiFi.localIP());

  // Initialize SPIFFS
  if (!SPIFFS.begin(true))
  {
    Serial.println("An Error has occurred while mounting SPIFFS");
    return;
  }
Connect to our Wifi and initialize the SPIFFS Filesystem.
  // setup ......
  events.onConnect([](AsyncEventSourceClient *client)
                   {
    if (client->lastId())
    {
      Serial.printf("Client reconnected! Last message ID that it gat is: %u\n", client->lastId());
    } });

  // attach AsyncEventSource
  server.addHandler(&events);

  server.on("/", HTTP_GET, [](AsyncWebServerRequest *request)
            {
              Serial.println("Requesting index page...");
              request->send(SPIFFS, "/index.html", "text/html", false); });
  server.serveStatic("/css", SPIFFS, "/css/");
  server.serveStatic("/js", SPIFFS, "/js/");

  // On Not Found
  server.onNotFound(notFound);

  // Start server
  server.begin();
Set the Server-Sent Event plugin on connecting function and add a handler to our server for Server-Sent Event transactions. Serve our index.html page and the static Cascading Style Sheet (CSS) and Javascript files. Start the server afterward.
  mfrc522.PCD_Init();                                     // Init MFRC522 board.
  MFRC522Debug::PCD_DumpVersionToSerial(mfrc522, Serial); // Show details of PCD - MFRC522 Card Reader details.
  Serial.println(F("Scan PICC to see UID, SAK, type, and data blocks..."));
Initialize our MFRC522 card reader and display its details of it.
loop() function
void loop()
{
  // Reset the loop if no new card present on the sensor/reader. This saves the entire process when idle.
  if (!mfrc522.PICC_IsNewCardPresent())
  {
    return;
  }

  // Select one of the cards.
  if (!mfrc522.PICC_ReadCardSerial())
  {
    return;
  }
In the loop function, we check if a new RFID tag or card is captured and if not then we just exit.
  initOutputControl();

  for (byte i = 0; i < mfrc522.uid.size; i++)
  {
    tagContent.concat(String(mfrc522.uid.uidByte[i] < 0x10 ? " 0" : " "));
    tagContent.concat(String(mfrc522.uid.uidByte[i], HEX));
  }

  tagContent.trim();
  tagContent.toUpperCase();
If a new RFID tag or card is captured then we turn off the LED and Buzzer. Read the RFID and set it to the variable tagContent
  currentMillis = millis();
  // If current UID is not equal to current UID..meaning new card, then validate if it has access
  if (currentUID != tagContent)
  {
    currentUID = tagContent;
  }
  else
  {
    // If it is the same RFID UID then we wait for interval to pass before we process the same RFID
    if (currentMillis - previousMillis <= INTERVAL)
    {
      tagContent = "";
      return;
    }
  }
Take note of the RFID tag and verify if this is new or not. If it is new then we process the next part of the code else we check if the interval has passed. We need the interval to limit multiple reads of the MFRC522 RFID card reader.
  if (tagContent != "")
  {
    sendMessage();
    previousMillis = currentMillis;
    tagContent = "";
  }
If the tagContent is not empty then we send a message to our Web Application.
void initOutputControl()
{
  digitalWrite(ledPin, LOW);
  digitalWrite(buzzerPin, LOW);
  delay(1000);
}
void showAllowed()
{
  digitalWrite(ledPin, HIGH);
  delay(1000);
  digitalWrite(ledPin, LOW);
}

void showNotAllowed()
{
  digitalWrite(buzzerPin, HIGH);
  delay(1000);
  digitalWrite(buzzerPin, LOW);
}
Functions that would control our LED and buzzer pins.
// Function called when resource is not found on the server
void notFound(AsyncWebServerRequest *request)
{
  request->send(404, "text/plain", "Not found");
}
Message to be displayed when a resource is requested from our WebServer that is not available.
void sendMessage()
{
  // Declare a buffer to hold the result
  char output[128];
  StaticJsonDocument<64> doc;

  bool isValid = false;
  for (size_t i = 0; i < 2; i++)
  {
    if (validRFID[i].equals(tagContent))
    {
      isValid = true;
      break;
    }
  }

  doc["status"] = isValid;
  doc["rfid_tag_id"] = tagContent;

  serializeJson(doc, output);
  events.send(output);

  if (isValid)
    showAllowed();
  else
    showNotAllowed();
}
This is a function that would send a JSON message to our Web Application thru Server Sent Events message. Also, it first checks if the RFID is valid with our hard-coded list of RFID tags/cards. We then send back a JSON message thru Server-Sent Events to our Web Application by using the library ArduinoJSON.
index.html
This file contains the user interface of our Web Application.
<!DOCTYPE html>
<html>

<head>
    <meta charset="UTF-8">
    <meta name="viewport" content="width=device-width, initial-scale=1">
    <title>ESP32 RFID Web Server</title>
    <link href="css/entireframework.min.css" rel="stylesheet" type="text/css">
    <link href="css/custom.css" rel="stylesheet" type="text/css">

</head>

<body>
    <nav class="nav" tabindex="-1" onclick="this.focus()">
        <div class="container">
            <a class="pagename current" href="https://www.donskytech.com">www.donskytech.com</a>
        </div>
    </nav>
    <button class="btn-close btn btn-sm">×</button>
    <div class="container">
        <div class="hero">
            <h1>ESP32 RFID Web Server</h1>
            <div class="access">
                <p>Access ID:</p>
                <h2 id="access-id"></h2>
            </div>
            <div id="access-denied"><p>Access Denied</p></div>
            <div id="access-approve"><p>Permission Granted</p></div>
        </div>

    </div>
    <script src="js/custom.js"></script>
    </div>
    </div>
</body>

</html>
Let us go after each line of the code.
<head>
    <meta charset="UTF-8">
    <meta name="viewport" content="width=device-width, initial-scale=1">
    <title>ESP32 RFID Web Server</title>
    <link href="css/entireframework.min.css" rel="stylesheet" type="text/css">
    <link href="css/custom.css" rel="stylesheet" type="text/css">

</head>
Set the title of our Web Application and include the necessary CSS files like the mincss CSS framework and our custom CSS.
<body>
    <nav class="nav" tabindex="-1" onclick="this.focus()">
        <div class="container">
            <a class="pagename current" href="https://www.donskytech.com">www.donskytech.com</a>
        </div>
    </nav>
    <button class="btn-close btn btn-sm">×</button>
    <div class="container">
        <div class="hero">
            <h1>ESP32 RFID Web Server</h1>
            <div class="access">
                <p>Access ID:</p>
                <h2 id="access-id"></h2>
            </div>
            <div id="access-denied"><p>Access Denied</p></div>
            <div id="access-approve"><p>Permission Granted</p></div>
        </div>

    </div>
    <script src="js/custom.js"></script>
    </div>
    </div>
</body>
We declare our navigation component for our Web Application and display the current RFID tag being processed. Also, the message “Access Denied” and “Permission Granted is displayed here. We manipulate the display of these two elements thru Javascript code and we import our custom.js file at the end.
custom.js
This is the file that handles the Server-Sent Event messages from our WebServer and updates our Web Application asynchronously.
window.addEventListener("load", onLoad);

function onLoad() {
  if (!!window.EventSource) {
    var source = new EventSource("/events");

    source.addEventListener(
      "open",
      function (e) {
        console.log("Events Connected");
      },
      false
    );

    source.addEventListener(
      "error",
      function (e) {
        if (e.target.readyState != EventSource.OPEN) {
          console.log("Events Disconnected");
        }
      },
      false
    );

    source.addEventListener(
      "message",
      function (e) {
        // console.log("message", e.data);
        const message = JSON.parse(e.data);
        console.log(message);
        let accessId = document.getElementById("access-id");
        accessId.innerHTML = message.rfid_tag_id;
        accessId.style.display = 'block';

        let accessDenied = document.getElementById("access-denied")
        let accessApproved = document.getElementById("access-approve")

        let status = message.status;
        if(status){
          accessDenied.style.display = 'none';
          accessApproved.style.display = 'block';
        }else{
          accessDenied.style.display = 'block';
          accessApproved.style.display = 'none';
        }
      },
      false
    );

    source.addEventListener(
      "myevent",
      function (e) {
        console.log("myevent", e.data);
      },
      false
    );
  }
}
Let us go over what each line of the code does.
window.addEventListener("load", onLoad);First, we call the onLoad function when the HTML page is loaded.
function onLoad() {
if (!!window.EventSource) {
var source = new EventSource("/events");
source.addEventListener(
"open",
function (e) {
console.log("Events Connected");
},
false
);
source.addEventListener(
"error",
function (e) {
if (e.target.readyState != EventSource.OPEN) {
console.log("Events Disconnected");
}
},
false
);
source.addEventListener(
"message",
function (e) {
// console.log("message", e.data);
const message = JSON.parse(e.data);
console.log(message);
let accessId = document.getElementById("access-id");
accessId.innerHTML = message.rfid_tag_id;
accessId.style.display = 'block';
let accessDenied = document.getElementById("access-denied")
let accessApproved = document.getElementById("access-approve")
let status = message.status;
if(status){
accessDenied.style.display = 'none';
accessApproved.style.display = 'block';
}else{
accessDenied.style.display = 'block';
accessApproved.style.display = 'none';
}
},
false
);
source.addEventListener(
"myevent",
function (e) {
console.log("myevent", e.data);
},
false
);
}
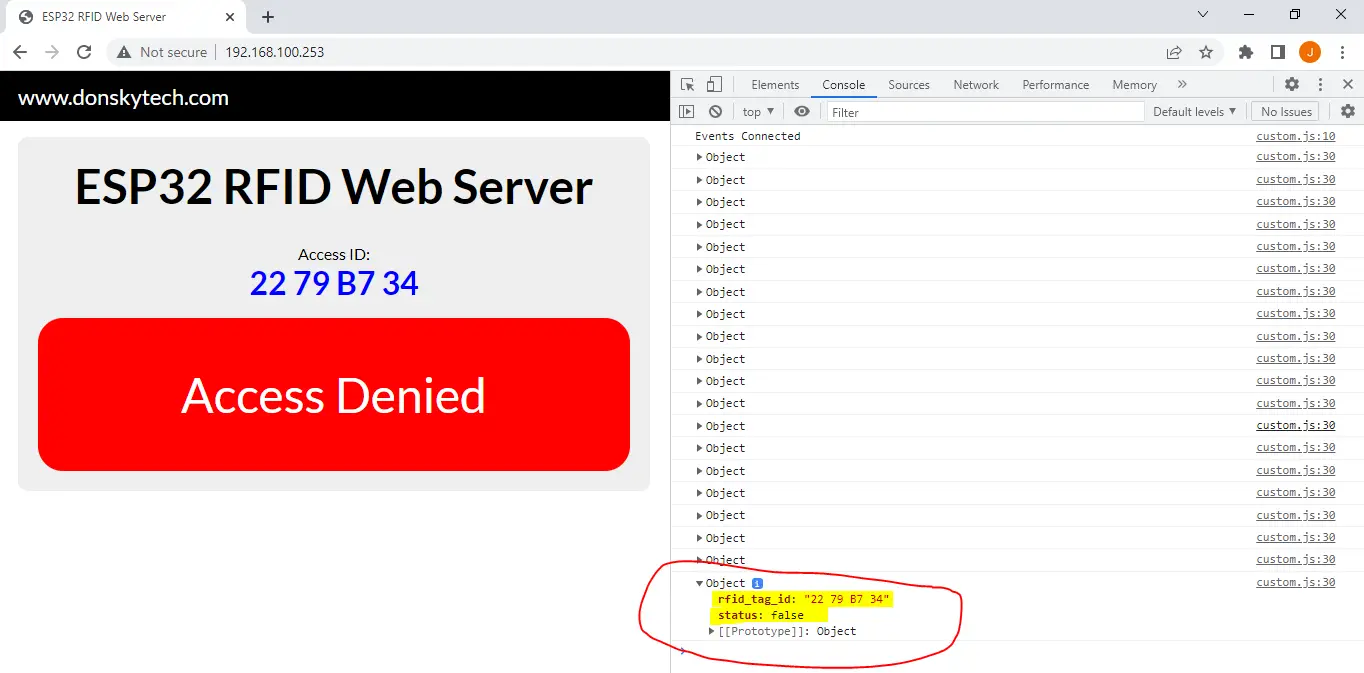
}Next, we declare our event source for our Server-Sent events. We declare event listeners for our EventSource object and we are particularly interested in the message event. This is the callback function that gets called when a new message is sent from our WebServer.
In the message callback event function, we parse the returned JSON message from our ESP32. We show the current RFID and then hide and show the div for the messages Access Denied and Permission Granted based on the message.status JSON variable.
custom.css
@import url("https://fonts.googleapis.com/css?family=Lato:400,500,600,700&display=swap");
* {
  margin: 0;
  padding: 0;
  /* box-sizing: border-box; */
  font-family: "Lato", sans-serif;
}

.hero {
    background: #eee;
    padding: 20px;
    border-radius: 10px;
    margin-top: 1em;
    text-align: center;
}

.hero h1 {
    margin-top: 0;
    margin-bottom: 0.3em;
}

.c4 {
    padding: 10px;
    box-sizing: border-box;
}

.c4 h3 {
    margin-top: 0;
}

.c4 a {
    margin-top: 10px;
    display: inline-block;
}

/** RFID CSS ***/
.access{
  padding: 1em;
}
#access-id{
  color:blue;
  display: none;
}

#access-denied, #access-approve{
  border-radius: 25px;
  padding: 1em;
  font-size: 3em;
  color: #FFF;
  display: none;
}

#access-denied{
  background-color: red;
}

#access-approve{
  background-color: green;
}
This is our custom Cascading Style Sheet (CSS) to style our web page.
entireframework.min.css
This is a very small CSS framework that I used regularly to style my HTML page as it is really simple and we can safely upload it to our ESP32 Microcontroller. This is based on the min CSS framework and you can take a look at the examples from here.
Upload the program to your Microcontroller
Once you have understood how this code works then we can now start uploading this to our microcontroller.
You can begin by uploading the filesystem image first and then uploading the sketch of our program next to your microcontroller. If you are not familiar with how to do this then please take a look at How to upload FileSystem Image in PlatformIO IDE?
Wrap up
We have discussed how to set up your own ESP32 RFID Web Server in this post and how easy it is to create your own web application that will display the result.
I hope you learned something! Happy Exploring!
Read Next:
Raspberry Pi RFID Door Lock System with Database
Arduino MQTT Example Project – BMP/BME 280 Weather Station
Leave a Reply