Introduction
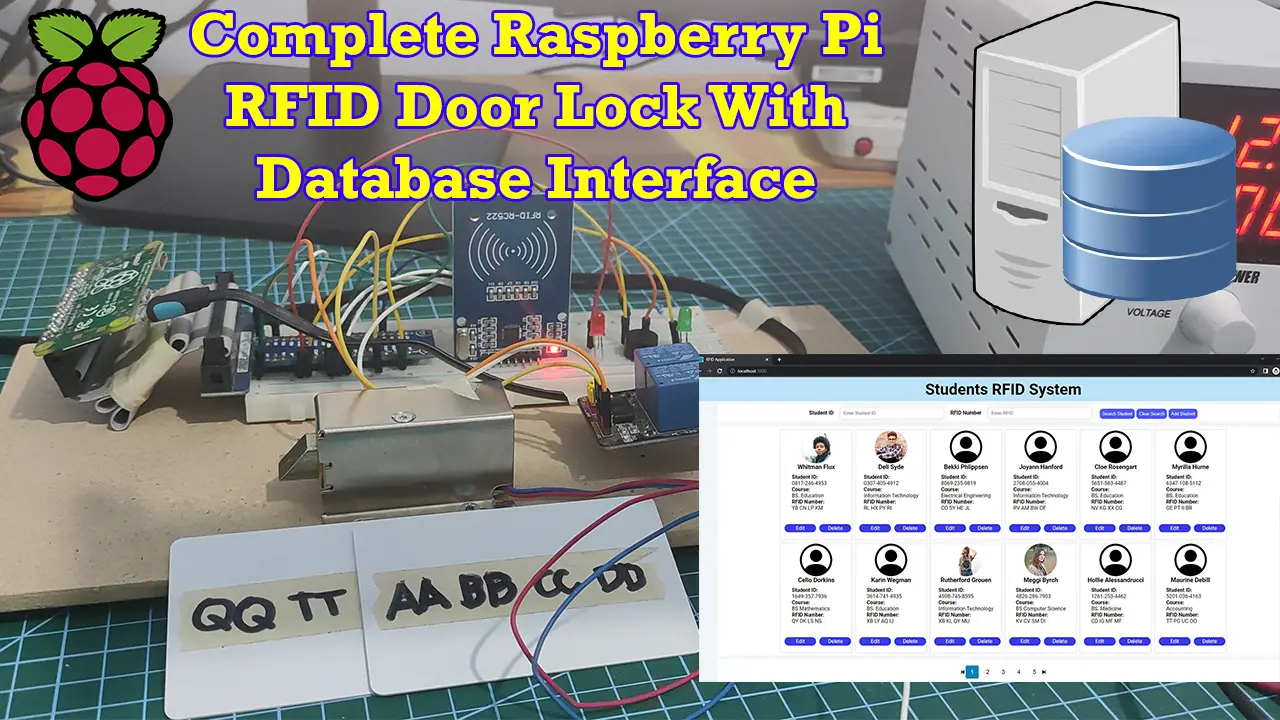
This post is about my Raspberry Pi-powered Radio Frequency Identification (RFID) door lock system with a database interface. RFID badges and tags are scanned and processed and are validated if a record of them is present in our database.
For a video demo presentation of this project then please take a look below or watch it on my YouTube channel.
Design – Raspberry Pi RFID Door Lock
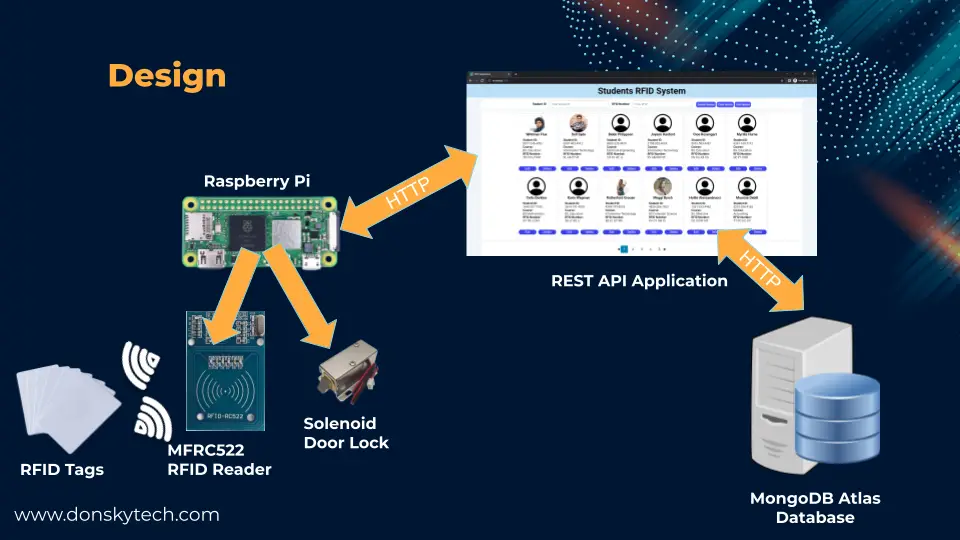
The image above is the overall design of our project. There are two significant components that participate in this project. The first is the Raspberry Pi and the components connected thru it like the MFRC522 RFID Reader, solenoid locks, LEDs, and the buzzer. The second one is the REST (Representation State Transfer) API (Application Programming Interface) Application whose job is to communicate with our MongoDB Atlas database that holds information about our Student information and RFID details.
As you can see, the Raspberry Pi talks to the REST API Application thru HTTP and passed in the RFID badge number. The REST API Application, in turn, communicates with our MongoDB Atlas database to retrieve Student information. The result is then passed back to the Raspberry Pi to process. If the RFID badge that was passed in is present in the database then the door lock is unlocked else it remains shot and the buzzer plus red LED is activated.
The REST API Application is deployed in a separate host or computer and is basically written in Javascript using the MERN (MongoDB-Express-React-Node) technology stack. For more details about this then please see the link below.
Related Content:
MERN Stack Tutorial – RFID Management System
Parts/Components Required
In order to follow along with this project then you need the following components:
- Raspberry Pi (I used Raspberry Pi Zero W) – Amazon | AliExpress
- MFRC522 RFID Card Reader – Amazon | AliExpress | Bangood
- Solenoid door lock – Amazon | AliExpress
- Light Emitting Diode (LED) – Amazon | AliExpress | Bangood
- Relay – Amazon | AliExpress | Bangood
- Buzzer (I used an Active Buzzer) – Amazon | AliExpress | Bangood
- Resistors (220 Ohms) – Amazon | AliExpress | Bangood
- Breadboard – Amazon | AliExpress | Bangood
- External 12V power supply – Amazon | AliExpress | Bangood
- Connecting wires – Amazon | AliExpress | Bangood
Disclosure: These are affiliate links and I will earn small commissions to support my site when you buy through these links.
Prerequisites
Install the latest Raspberry Pi OS on your device. You should be familiar with how to use the MFRC522 RFID reader and drive the solenoid lock. If not, then please see the related content below.
Related Content:
Setup Raspberry Pi Headless No Monitor
How to Setup Raspberry Pi with MFRC522 RFID Card Reader
Interface Raspberry Pi with Solenoid door lock
I used Windows PC for the development of this project. We are going to use a mixture of several programming languages like Python and Javascript in programming this project.
Wiring/Schematic
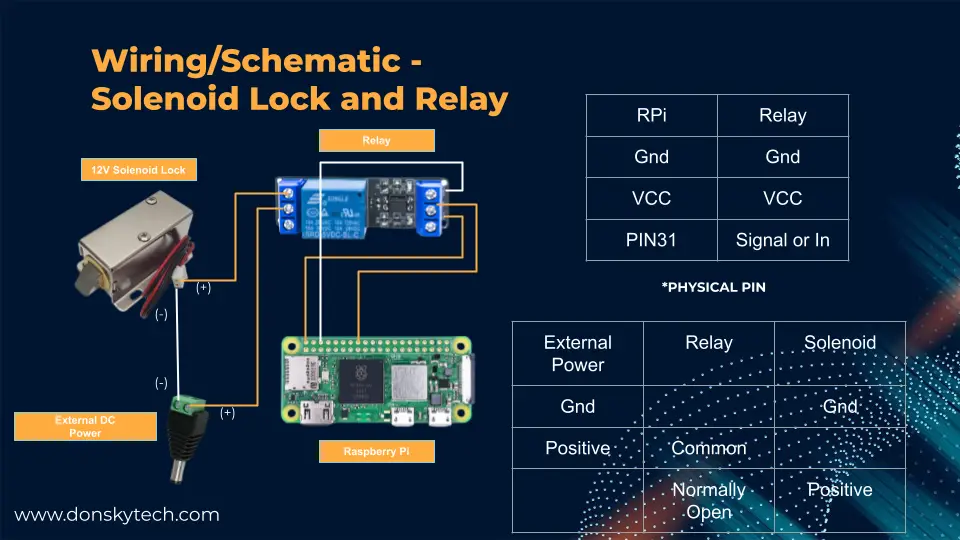
The following images below discuss how we are going to wire our system. Take note of adding a 220 Ohms current limiting resistor between the cathode section of your LED to the ground of the Raspberry Pi. Also, the pin assignments below are using physical board numbering and not the BCM.
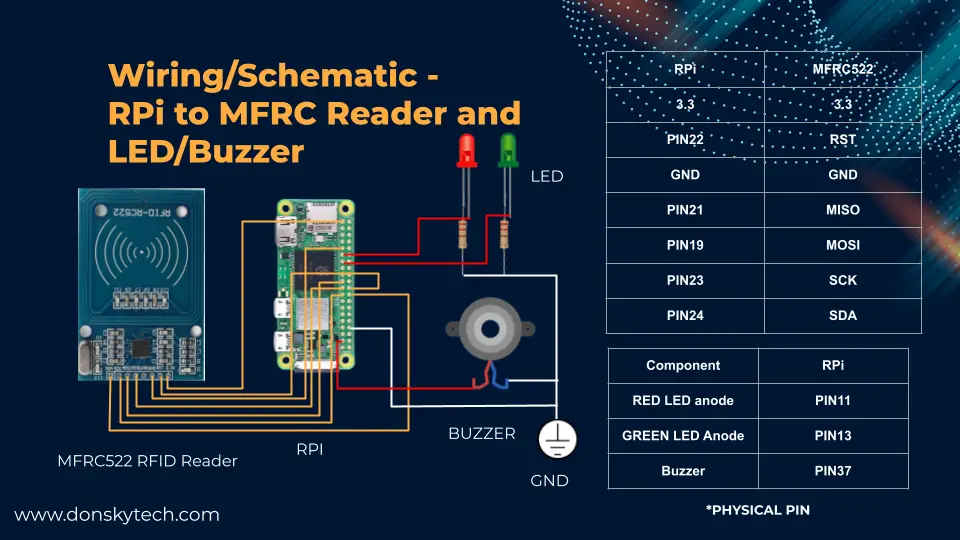
Make sure that the external power supply has sufficient current to support your solenoid door lock as it draws a considerable amount of it.
How to run the Raspberry Pi RFID Door Lock System?
Now that we have discussed the design and wiring of our project then let us proceed on how to run the whole Raspberry Pi RFID door lock system.
Before running the application, you should prepare RFID tags by writing RFID Badge Number content information into several tags. Follow the steps from here on how to do this.
Running the REST API Application
You need to install Node.js and create your own MongoDB Atlas database cluster first as a prerequisite. I am using a Raspberry Pi Zero W here that is not able to support the latest version of Node.js so I have to install the REST API application on my personal Windows PC. If you have the later version of Raspberry Pi then you could have the REST API Application and the RFID Application on the same device.
Related Content:
Install Node.js on Windows
MongoDB Atlas: An Overview and how to get started
Next, follow the steps outlined here on how to run the REST API application.
When you have successfully run the project then take note of the IP Address of where you deploy the REST API Application. We will be needing it in the next step.
Running the RFID Application code in Raspberry Pi
The code for this project is available in my GitHub account.
To run this project on your Raspberry Pi then follow the following steps.
- Open an SSH connection to your Raspberry Pi using Putty. Log in with your credentials. Once logged in, select a folder where you can download the code.
- Clone the application by running the below command
git clone https://github.com/donskytech/rpi-rfid-door-lock-databasethen go into that directory
cd https://github.com/donskytech/rpi-rfid-door-lock-databaseNext, we are going to create a Python Virtual Environment where we could install all our package dependencies. This is so that we would not be polluting our main Python package installations.
- Execute the below code to create the virtual environment
python -m venv .venvThis will load the module venv which will assist us in creating the virtual environment. This command might take some time so please be patient and let it finish.
- Once the above command is successful then let us activate the virtual environment by executing the below commands.
source .venv/bin/activateThis will activate our virtual environments and you would see that it is successfully activated when you see the following message in your shell command.
(.venv) pi@raspberrypi-zero-w:~/Projects/rpi-rfid-door-lock-database $- Install the dependencies needed by our project by executing the below command.
pip install -r requirements.txtYou should be able to see the following messages displayed.
(.venv) pi@raspberrypi-zero-w:~/Projects/rpi-rfid-door-lock-database $ pip install -r requirements.txt
Looking in indexes: https://pypi.org/simple, https://www.piwheels.org/simple
Collecting certifi==2022.9.24
  Using cached https://www.piwheels.org/simple/certifi/certifi-2022.9.24-py3-none-any.whl (161 kB)
Collecting charset-normalizer==2.1.1
  Using cached https://www.piwheels.org/simple/charset-normalizer/charset_normalizer-2.1.1-py3-none-any.whl (39 kB)
Collecting idna==3.4
  Using cached https://www.piwheels.org/simple/idna/idna-3.4-py3-none-any.whl (61 kB)
Collecting mfrc522==0.0.7
  Using cached https://www.piwheels.org/simple/mfrc522/mfrc522-0.0.7-py3-none-any.whl (18 kB)
Collecting requests==2.28.1
  Using cached https://www.piwheels.org/simple/requests/requests-2.28.1-py3-none-any.whl (62 kB)
Collecting RPi.GPIO==0.7.1
  Using cached https://www.piwheels.org/simple/rpi-gpio/RPi.GPIO-0.7.1-cp39-cp39-linux_armv6l.whl (66 kB)
Collecting spidev==3.6
  Using cached https://www.piwheels.org/simple/spidev/spidev-3.6-cp39-cp39-linux_armv6l.whl (38 kB)
Collecting urllib3==1.26.12
  Using cached https://www.piwheels.org/simple/urllib3/urllib3-1.26.12-py2.py3-none-any.whl (140 kB)
Installing collected packages: urllib3, spidev, RPi.GPIO, idna, charset-normalizer, certifi, requests, mfrc522
Successfully installed RPi.GPIO-0.7.1 certifi-2022.9.24 charset-normalizer-2.1.1 idna-3.4 mfrc522-0.0.7 requests-2.28.1 spidev-3.6 urllib3-1.26.12
- Open the rfid_door_lock.py file and edit this line of code using nano editor. Change the IP Address to where you installed the REST API Application.
nano rfid_door_lock.py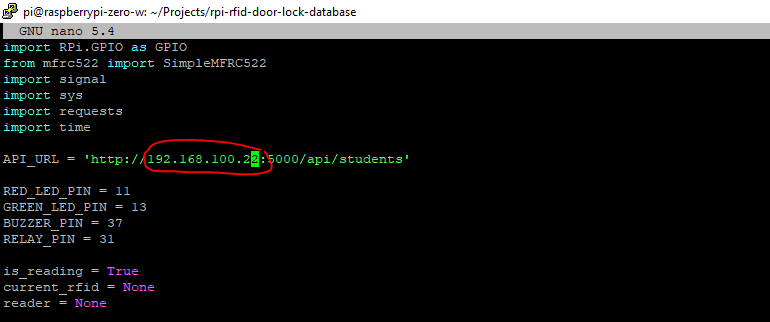
- Run the application by executing the below command. If you see the message “Please scan your RFID(s)…” then using any RFID tags that we have written information about RFID badge number
python rfid_door_lock.pyYou now have a running Raspberry Pi RFID system with a database interface.
Code Explanation – Raspberry Pi RFID Application
The following is the code for our RFID Application that is deployed in our Raspberry Pi and is the one that communicates with our MFRC522 RFID reader and our REST API Application. This is also available in the project files here.
import RPi.GPIO as GPIO
from mfrc522 import SimpleMFRC522
import signal
import sys
import requests
import time

# IMPORTANT - CHANGE THIS!!!!!
# Define the IP Address endpoint of your REST API Endpoints
API_URL = 'http://192.168.100.22:5000/api/students'

# Define PIN assignments
RED_LED_PIN = 11
GREEN_LED_PIN = 13
BUZZER_PIN = 37
RELAY_PIN = 31

# Define variables for use in the program
is_reading = True
current_rfid = None
# Define our RFID Reader
reader = None

''' Cleanup function when the program is terminated '''
def end_read(signal, frame):
    global is_reading
    print('Cleaning up GPIO before exiting...')
    GPIO.cleanup()
    is_reading = False
    sys.exit()


''' Hook function when the program is terminated '''
signal.signal(signal.SIGINT, end_read)

''' Function to call the REST API function and validate the RFID Badge '''
def get_rfid_info(rfid_badge_number):
    query_params = {
        "rfId": rfid_badge_number.strip()
    }
    response = requests.get(API_URL, params=query_params)

    return response.json()


''' Initialize our pins and rfid reader '''
def setup():
    global reader
    GPIO.setmode(GPIO.BOARD)
    GPIO.setwarnings(False)
    GPIO.setup(RED_LED_PIN, GPIO.OUT)
    GPIO.setup(GREEN_LED_PIN, GPIO.OUT)
    GPIO.setup(BUZZER_PIN, GPIO.OUT)
    GPIO.setup(RELAY_PIN, GPIO.OUT, initial=GPIO.HIGH)

    reader = SimpleMFRC522()


''' Clear the LED and Buzzer '''
def clear_outputs():
    GPIO.output(RED_LED_PIN, GPIO.LOW)
    GPIO.output(GREEN_LED_PIN, GPIO.LOW)
    GPIO.output(BUZZER_PIN, GPIO.LOW)


'''If RFID is invalid then the Red LED and Buzzer is turned on'''
def show_invalid_rfid():
    clear_outputs()
    GPIO.output(RED_LED_PIN, GPIO.HIGH)
    GPIO.output(BUZZER_PIN, GPIO.HIGH)
    time.sleep(1.0)
    clear_outputs()


'''If RFID is valid then the Green LED and Solenoid Lock is turned on'''
def show_valid_rfid():
    clear_outputs()
    GPIO.output(GREEN_LED_PIN, GPIO.HIGH)
    open_lock()
    clear_outputs()


'''Unlock the door lock and close after 3 seconds'''
def open_lock():
    print("Opening door lock...")
    GPIO.output(RELAY_PIN, GPIO.LOW)
    time.sleep(3)
    GPIO.output(RELAY_PIN, GPIO.HIGH)


'''Our main entry function that calls the setup() method and periodically scans for RFID'''
def main():
    global reader, current_rfid
    setup()

    print("Please scan your RFID(s)...")
    while is_reading:
        _, rfid_badge_number = reader.read()
        strip_rfid_badge_number = rfid_badge_number.replace('\x00', '')

        if len(strip_rfid_badge_number.strip()) :
            if strip_rfid_badge_number == current_rfid:
                time.sleep(1)
                current_rfid=None
            else:
                current_rfid=strip_rfid_badge_number
                response=get_rfid_info(strip_rfid_badge_number)
                print(f"Response :: {response}")
                if response:
                    show_valid_rfid()
                    print("Access Granted")
                else:
                    show_invalid_rfid()
                    print("Access Denied")
        else:
            print("Invalid RFID Tag!")
            show_invalid_rfid()


# Main entry Point
if __name__ == '__main__':
    main()
Let us go over each line of code and see what it does. I have added several comments on each line so that it could guide you in understanding what it does.
Import the required packages
import RPi.GPIO as GPIO
from mfrc522 import SimpleMFRC522
import signal
import sys
import requests
import time
Import the necessary packages for our project including the library to drive our MFRC522 card reader. We will be using the following packages in driving this program.
| Package Name | Description |
| RPi.GPIO | For driving our GPIO Pins |
| mfrc522 | For controlling our MFRC522 RFID Reader |
| requests | Used for calling our REST API endpoints in validating our RFID Badge Number |
Update the REST API Endpoint IP Address
# IMPORTANT - CHANGE THIS!!!!!
# Define the IP Address endpoint of your REST API Endpoints
API_URL = 'http://192.168.100.22:5000/api/students'
You need to change this to point to the IP Address where you installed the REST API Application. This is the REST API endpoint that we are calling to check if this RFID Badge number is present or not in our database. This is discussed in more detail here.
GPIO Pin definition
# Define PIN assignments
RED_LED_PIN = 11
GREEN_LED_PIN = 13
BUZZER_PIN = 37
RELAY_PIN = 31

# Define variables for use in the program
is_reading = True
current_rfid = None
# Define our RFID Reader
reader = None
We define our variables here for our GPIO Pins and other variables to hold information while the program is running.
Take note that we are using Physical board numbering here and not the BCM.
Clean up function
''' Cleanup function when the program is terminated '''
def end_read(signal, frame):
    global is_reading
    print('Cleaning up GPIO before exiting...')
    GPIO.cleanup()
    is_reading = False
    sys.exit()


''' Hook function when the program is terminated '''
signal.signal(signal.SIGINT, end_read)
We add cleanup functions here that will be executed when our program is terminated or closed.
How does the Raspberry Pi communicate with the REST API Application?
''' Function to call the REST API function and validate the RFID Badge '''
def get_rfid_info(rfid_badge_number):
    query_params = {
        "rfId": rfid_badge_number.strip()
    }
    response = requests.get(API_URL, params=query_params)

    return response.json()
This is the code that calls our REST API endpoint while passing in the scanned RFID Badge Number. The result of this function call is returned for processing later.
We are using the requests python package in calling the REST API endpoint.
GPIO pins configurations and assignment
''' Initialize our pins and rfid reader '''
def setup():
    global reader
    GPIO.setmode(GPIO.BOARD)
    GPIO.setwarnings(False)
    GPIO.setup(RED_LED_PIN, GPIO.OUT)
    GPIO.setup(GREEN_LED_PIN, GPIO.OUT)
    GPIO.setup(BUZZER_PIN, GPIO.OUT)
    GPIO.setup(RELAY_PIN, GPIO.OUT, initial=GPIO.HIGH)

    reader = SimpleMFRC522()
We initialized our GPIO pins here and create an instance of our MFRC522 Card Reader class.
''' Clear the LED and Buzzer '''
def clear_outputs():
    GPIO.output(RED_LED_PIN, GPIO.LOW)
    GPIO.output(GREEN_LED_PIN, GPIO.LOW)
    GPIO.output(BUZZER_PIN, GPIO.LOW)


'''If RFID is invalid then the Red LED and Buzzer is turned on'''
def show_invalid_rfid():
    clear_outputs()
    GPIO.output(RED_LED_PIN, GPIO.HIGH)
    GPIO.output(BUZZER_PIN, GPIO.HIGH)
    time.sleep(1.0)
    clear_outputs()


'''If RFID is valid then the Green LED and Solenoid Lock is turned on'''
def show_valid_rfid():
    clear_outputs()
    GPIO.output(GREEN_LED_PIN, GPIO.HIGH)
    open_lock()
    clear_outputs()


'''Unlock the door lock and close after 3 seconds'''
def open_lock():
    print("Opening door lock...")
    GPIO.output(RELAY_PIN, GPIO.LOW)
    time.sleep(3)
    GPIO.output(RELAY_PIN, GPIO.HIGH)
These are functions that set the GPIO output of our LED(s), buzzer, and relay components. The comment for each function explains what each one is doing.
These functions are called upon processing the result of the REST API call.
main() function
'''Our main entry function that calls the setup() method and periodically scans for RFID'''
def main():
    global reader, current_rfid
    setup()

    print("Please scan your RFID(s)...")
    while is_reading:
        _, rfid_badge_number = reader.read()
        strip_rfid_badge_number = rfid_badge_number.replace('\x00', '')

        if len(strip_rfid_badge_number.strip()) :
            if strip_rfid_badge_number == current_rfid:
                time.sleep(1)
                current_rfid=None
            else:
                current_rfid=strip_rfid_badge_number
                response=get_rfid_info(strip_rfid_badge_number)
                print(f"Response :: {response}")
                if response:
                    show_valid_rfid()
                    print("Access Granted")
                else:
                    show_invalid_rfid()
                    print("Access Denied")
        else:
            print("Invalid RFID Tag!")
            show_invalid_rfid()


# Main entry Point
if __name__ == '__main__':
    main()
The main() is the entry point of our program. It first initializes our program by calling the setup()
When an RFID badge is detected then it validates if it is a valid RFID tag or not. If it is then it retrieves the information written in that tag. Afterwhich, it calls our REST API endpoint passing in the retrieved information from the RFID badge number.
The result is then processed and our status LED(s), buzzer, and relay are activated based on it.
To prevent the same RFID Badge number from being processed multiple times then we call a sleep(1) function before processing it again.
That is all for the code! 🙂
Wrap up
We have discussed how to process and validate our RFID tags and check for their presence in our database using your Raspberry Pi in this project.
If you have any questions or suggestions then please feel free to comment on this post.
I hope you learned something! Happy Exploring!
Related Content:
Arduino RFID Database Security System: Program Arduino and ESP8266
Leave a Reply