- Introduction
- MQTT in a nutshell
- Prerequisites
- How to use MQTT in MicroPython?
- How to install the MQTT library in ESP32/ESP8266 MicroPython?
- How to connect to the MQTT broker from your MicroPython device?
- How to subscribe to MQTT topics using your MicroPython device?
- How to publish MQTT topics using your MicroPython device?
- How to test MQTT publish/subscribe using your MicroPython device?
- Wrap Up
Introduction
This post will show you how to connect, published, and subscribe to MQTT(MQ Telemetry Transport) topics with your broker using MicroPython and an ESP32/ESP8266 board.
If you like to see a video demo presentation of this post then please see below or watch it on my YouTube channel.
MQTT in a nutshell

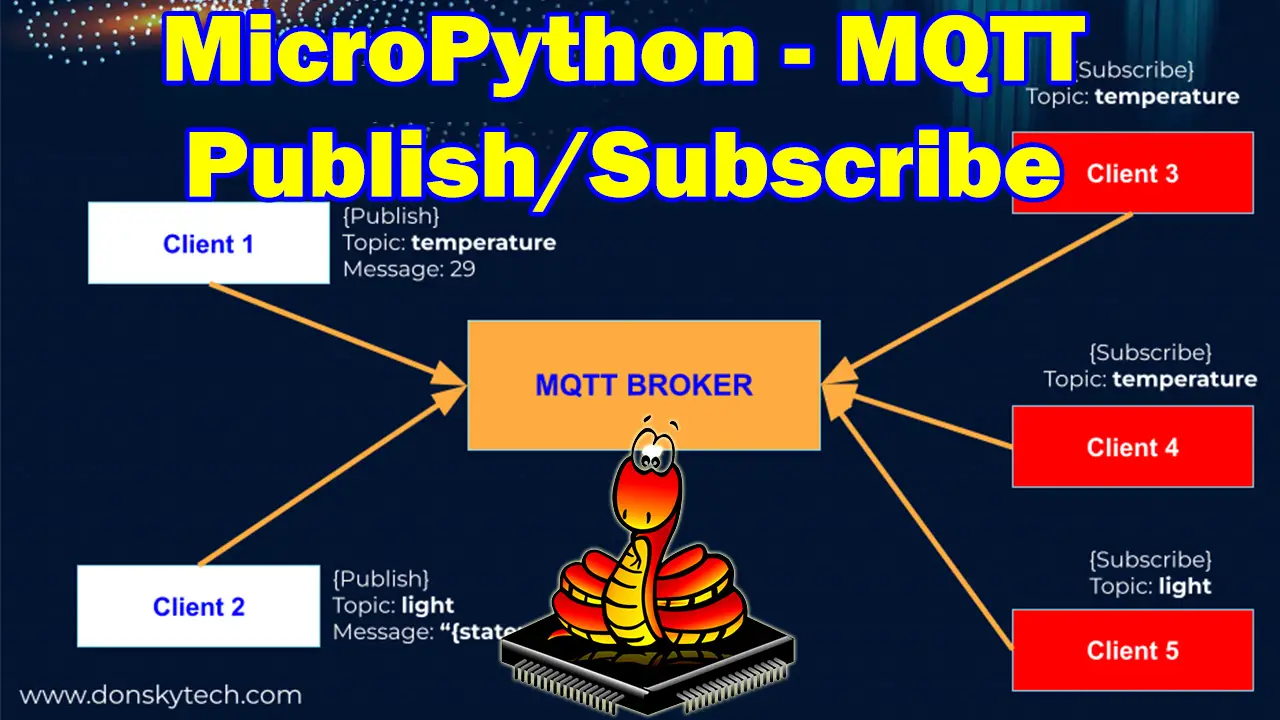
The image above is the typical MQTT setup in a nutshell wherein you have the MQTT broker in the middle and several clients attached or connected to it. The clients can either be a source of information (publisher) or the receiver of information (subscriber) or they can be both.
The MQTT protocol is an excellent communication tool that powers many of the Internet of Things (IoT) projects around the globe. The MQTT architecture above makes it ideal to communicate with the millions of devices that are getting connected to our network.
With the publish/subscribe model of MQTT then we can have multiple clients that can communicate with each other without hardcoding the connections between them. The MQTT broker in the middle serves as the middleman that will handle the message exchange between the sender (publisher) and the intended receivers (subscribers) thru the concept of “topic” or the subject of information like the current temperature or the state of the light.
There are lots of public and privately hosted MQTT brokers in the Cloud nowadays but you can set up your own MQTT broker locally on your laptop or workstation just to learn the MQTT concepts. I am using the Mosquitto broker in this post and you can follow the below posts if you want to set up your own.
Related Content:
Install Mosquitto MQTT Windows
How to enable WebSockets in Mosquitto MQTT broker?
Prerequisites
You will need the following components in order to follow along with this post.
- ESP32 – Amazon | AliExpress | Bangood
- or ESP8266 – Amazon | AliExpress | Bangood
- Breadboard – Amazon | AliExpress | Bangood
- USB Cable – Amazon | AliExpress
Disclosure: These are affiliate links and I will earn small commissions to support my site when you buy through these links.
Also, you should have installed your device’s latest MicroPython firmware and be familiar with working with Thonny IDE.
Related Content:
How to install MicroPython on ESP32 and download firmware
MicroPython Development Using Thonny IDE
How to use MQTT in MicroPython?
All the code for this post is available in my GitHub repository. You can either download it as a zip file or clone it with Git using the below command.
git clone https://github.com/donskytech/micropython-ESP32-ESP8266.git
cd mqtt
If you have not done so, connect the USB cable between your laptop or your ESP32/ESP8266 device. Open the said folder in your Thonny IDE.
How to install the MQTT library in ESP32/ESP8266 MicroPython?
By default, the firmware released by MicroPython for your ESP32/ESP8266 board contains a module that will allow you to communicate with any MQTT broker.
To verify this, type in the REPL command terminal of your MicroPython device to verify.
help("modules")You should see the following libraries displayed on your MicroPython device.
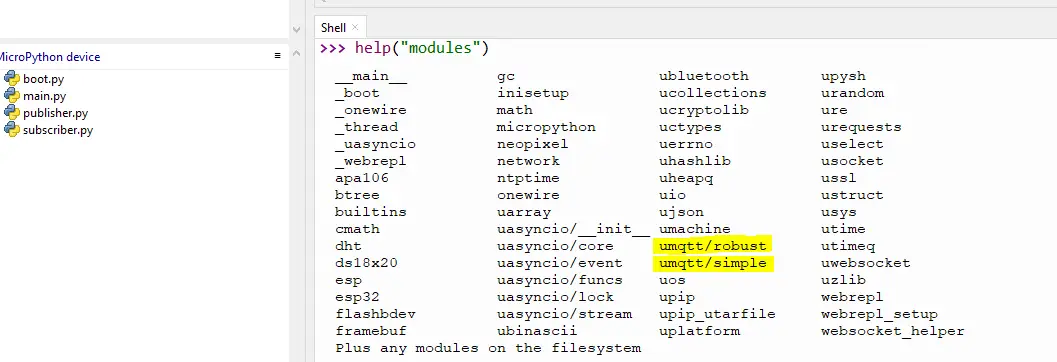
We will be using the umqtt.simple module in connecting, publishing, and subscribing with our Mosquitto MQTT broker.
How to connect to the MQTT broker from your MicroPython device?
First, we need to connect our ESP32/ESP8266 MicroPython device to our Wifi network by editing its boot.py script.
# boot.py -- run on boot-up
import network, utime, machine

# Replace the following with your WIFI Credentials
SSID = "<PLACE_YOUR_SSID_HERE>"
SSID_PASSWORD = "<PLACE_YOUR_WIFI_PASWORD_HERE>"


def do_connect():
    sta_if = network.WLAN(network.STA_IF)
    if not sta_if.isconnected():
        print('connecting to network...')
        sta_if.active(True)
        sta_if.connect(SSID, SSID_PASSWORD)
        while not sta_if.isconnected():
            print("Attempting to connect....")
            utime.sleep(1)
    print('Connected! Network config:', sta_if.ifconfig())

print("Connecting to your wifi...")
do_connect()
Make sure to replace the SSID and SSID_PASSWORD with your network credentials. If this script was able to connect to your Wifi network then you should see the IP address assigned to it like the below sample
Connected! Network config: ('192.168.100.253', '255.255.255.0', '192.168.100.1', '192.168.100.1')Next, we can create an instance of your MQTTClient class by passing in several required parameters.
import ubinascii
from umqtt.simple import MQTTClient

# Default MQTT MQTT_BROKER to connect to
MQTT_BROKER = "192.168.100.22"
CLIENT_ID = ubinascii.hexlify(machine.unique_id())

mqttClient = MQTTClient(CLIENT_ID, MQTT_BROKER, keepalive=60)
mqttClient.connect()
The CLIENT_ID needs to be unique so as not to collide with other users especially if you are using a public cloud-hosted MQTT broker. You then can call the connect() method of your MQTTClient class to start the connection with your broker.
How to subscribe to MQTT topics using your MicroPython device?
Below is the code on how to subscribe to MQTT topics and be alerted of any incoming messages from your MQTT broker.
import time
import ubinascii
from umqtt.simple import MQTTClient
import machine

# Default MQTT MQTT_BROKER to connect to
MQTT_BROKER = "192.168.100.22"
CLIENT_ID = ubinascii.hexlify(machine.unique_id())
TOPIC = b"temperature"

# Ping the MQTT broker since we are not publishing any message
last_ping = time.time()
ping_interval = 60

# Received messages from subscriptions will be delivered to this callback
def sub_cb(topic, msg):
    print((topic, msg))


def reset():
    print("Resetting...")
    time.sleep(5)
    machine.reset()

def main():
    mqttClient = MQTTClient(CLIENT_ID, MQTT_BROKER, keepalive=60)
    mqttClient.set_callback(sub_cb)
    mqttClient.connect()
    mqttClient.subscribe(TOPIC)
    print(f"Connected to MQTT  Broker :: {MQTT_BROKER}, and waiting for callback function to be called!")
    while True:
        if False:
            # Blocking wait for message
            mqttClient.wait_msg()
        else:
            # Non-blocking wait for message
            mqttClient.check_msg()
            # Then need to sleep to avoid 100% CPU usage (in a real
            # app other useful actions would be performed instead)
            global last_ping
            if (time.time() - last_ping) >= ping_interval:
                mqttClient.ping()
                last_ping = time.time()
                now = time.localtime()
                print(f"Pinging MQTT Broker, last ping :: {now[0]}/{now[1]}/{now[2]} {now[3]}:{now[4]}:{now[5]}")
            time.sleep(1)

    print("Disconnecting...")
    mqttClient.disconnect()


if __name__ == "__main__":
    try:
        main()
    except OSError as e:
        print("Error: " + str(e))
        reset()
Let us go over what each line of the code does for you to understand further.
import time
import ubinascii
from umqtt.simple import MQTTClient
import machine
Import the necessary modules and packages to communicate with our MQTT broker.
# Default MQTT MQTT_BROKER to connect to
MQTT_BROKER = "192.168.100.22"
CLIENT_ID = ubinascii.hexlify(machine.unique_id())
TOPIC = b"temperature"
Define the MQTT broker IP address which at the moment is my laptop where I am running the Mosquitto application. I generated a unique client id for my MQTTClient class. I then define a topic that I want to subscribe to which in this case is the “temperature”. Notice that the topic is not a string but in bytes format.
# Ping the MQTT broker since we are not publishing any message
last_ping = time.time()
ping_interval = 60
We are going to ping our MQTT broker every 60 seconds so that it will not disconnect our connection.
# Received messages from subscriptions will be delivered to this callback
def sub_cb(topic, msg):
    print((topic, msg))
This is the callback function that gets called whenever an MQTT message arrives from our Mosquitto broker. Both the topic and the msg parameter are in byte format so if you need to do any further processing then you need to decode it.
def reset():
    print("Resetting...")
    time.sleep(5)
    machine.reset()
In case of an unknown exception, we will try to reset our ESP8266/ESP32 board.
def main():
    mqttClient = MQTTClient(CLIENT_ID, MQTT_BROKER, keepalive=60)
    mqttClient.set_callback(sub_cb)
    mqttClient.connect()
    mqttClient.subscribe(TOPIC)
    print(f"Connected to MQTT  Broker :: {MQTT_BROKER}, and waiting for callback function to be called!")
    while True:
        if False:
            # Blocking wait for message
            mqttClient.wait_msg()
        else:
            # Non-blocking wait for message
            mqttClient.check_msg()
            # Then need to sleep to avoid 100% CPU usage (in a real
            # app other useful actions would be performed instead)
            global last_ping
            if (time.time() - last_ping) >= ping_interval:
                mqttClient.ping()
                last_ping = time.time()
                now = time.localtime()
                print(f"Pinging MQTT Broker, last ping :: {now[0]}/{now[1]}/{now[2]} {now[3]}:{now[4]}:{now[5]}")
            time.sleep(1)

    print("Disconnecting...")
    mqttClient.disconnect()
Here, we define an MQTTClient class and set the callback to our sub_cb function. Next, we connect to our broker and subscribe to the topic that we are interested in. We will use the “temperature” topic as the topic that we are interested in.
The umqttsimple has two functions we can use to monitor for MQTT messages coming from our broker. One is the blocking mqttClient.wait_msg() and the other is the non-blocking mqttClient.check_msg().
If you have other things to do in your program while waiting for messages coming from your broker then use the non-blocking function.
We also need to issue a ping to our MQTT broker since we are not publishing any messages to keep our connection with our broker alive otherwise we will be disconnected.
if __name__ == "__main__":
    try:
        main()
    except OSError as e:
        print("Error: " + str(e))
        reset()
This is the entry point of our application where we wrap our main() function in a try-catch block and try to reset our device for any OS Error.
How to publish MQTT topics using your MicroPython device?
The code below is how you can publish to your MQTT broker. Let us run through what each line of code does.
import time
import ubinascii
import machine
from umqtt.simple import MQTTClient
import random

# Default MQTT server to connect to
SERVER = "192.168.100.22"
CLIENT_ID = ubinascii.hexlify(machine.unique_id())
TOPIC = b"temperature"

def reset():
    print("Resetting...")
    time.sleep(5)
    machine.reset()

def main():
    mqttClient = MQTTClient(CLIENT_ID, SERVER, keepalive=60)
    mqttClient.connect()
    print(f"Connected to MQTT  Broker :: {SERVER}")

    while True:
        random_temp = random.randint(20, 50)
        print(f"Publishing temperature :: {random_temp}")
        mqttClient.publish(TOPIC, str(random_temp).encode())
        time.sleep(3)
    mqttClient.disconnect()


if __name__ == "__main__":
    try:
        main()
    except OSError as e:
        print("Error: " + str(e))
        reset()
import time
import ubinascii
import machine
from umqtt.simple import MQTTClient
import randomImport the necessary packages and modules in order to connect to our MQTT broker.
# Default MQTT server to connect to
SERVER = "192.168.100.22"
CLIENT_ID = ubinascii.hexlify(machine.unique_id())
TOPIC = b"temperature"
Define our MQTT broker, client id, and the topic that we will be publishing.
def reset():
    print("Resetting...")
    time.sleep(5)
    machine.reset()
In case of an unknown exception, we will try to reset our ESP8266/ESP32 board.
def main():
    mqttClient = MQTTClient(CLIENT_ID, SERVER, keepalive=60)
    mqttClient.connect()
    print(f"Connected to MQTT  Broker :: {SERVER}")

    while True:
        random_temp = random.randint(20, 50)
        print(f"Publishing temperature :: {random_temp}")
        mqttClient.publish(TOPIC, str(random_temp).encode())
        time.sleep(3)
    mqttClient.disconnect()
We create our MQTTClient class and pass in the required parameters then we call the connect() function. We published the topic “temperature” and passed in a random value of a sample temperature reading then we sleep for 3 seconds before publishing a new MQTT message again.
if __name__ == "__main__":
    try:
        main()
    except OSError as e:
        print("Error: " + str(e))
        reset()
This is our entry point of the program where we call the main() function. We wrapped it in a try-catch block just in case an unknown exception occurs.
How to test MQTT publish/subscribe using your MicroPython device?
I am going to show you two ways how to test our code. First, by using the default Mosquitto command line tool mosquitto_sub and mosquitto_pub. The other one is by using an app called MQTTX.
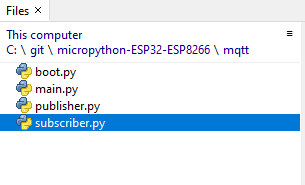
But let us look at my project setup first on how we can run our project. The image below shows that I have 4 files in my project.
- boot.py – used to connect to our Wifi network
- main.py – runs the main logic of our program
- publisher.py – code to publish to our MQTT broker
- subscriber.py – code to subscribe to our MQTT broker
When you want to test the subscriber then you can copy the content of the subscriber.py into the main.py and upload it into the MicroPython device filesystem.
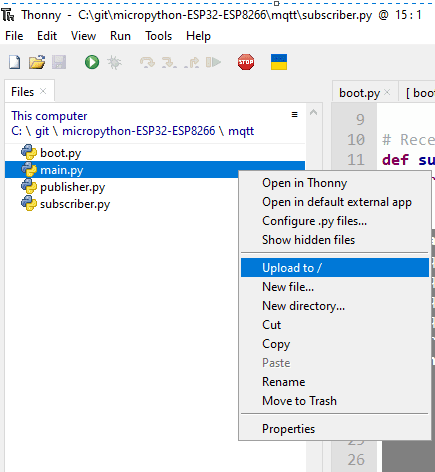
Next, click the menu Run and then send EOF/ Soft Reboot.

This will reboot your ESP32/ESP8266 MicroPython device. The same steps apply to your publisher.py
You should see the following sample message displayed at the shell or terminal of the Thonny IDE.
MPY: soft reboot
Connecting to your wifi...
Connected! Network config: ('192.168.100.253', '255.255.255.0', '192.168.100.1', '192.168.100.1')
Connected to MQTT  Broker :: 192.168.100.22, and waiting for callback function to be called!
If you don’t like the steps then you can upload all files into the MicroPython device filesystem and run the file individually using the below command.
exec(open("subscriber.py").read())Below is a sample run on how you can run Python script or file from the REPL prompt of your MicroPython device.

Choose whatever you like as I have just shown you the different steps on how to do the testing. 🙂
mosquitto_pub and mosquitto_sub
Test 1: Subscribe to a topic
Let us start by testing the subscriber.py file. Run the subscriber.py by choosing any of the two options above. I have edited my main.py so that I could subscribe to the “temperature” topic. The messages and the image displayed at the terminal are the following.
MPY: soft reboot
Connecting to your wifi...
Connected! Network config: ('192.168.100.253', '255.255.255.0', '192.168.100.1', '192.168.100.1')
Connected to MQTT  Broker :: 192.168.100.22, and waiting for callback function to be called!
Open another terminal then type in the following code. This will publish a message on the topic “temperature” towards our Mosquitto MQTT broker.
mosquitto_pub -h localhost -t temperature -m 31 -q 0
If everything goes well then you should see the following messages or the image displayed at your shell terminal.
MPY: soft reboot
Connecting to your wifi...
Connected! Network config: ('192.168.100.253', '255.255.255.0', '192.168.100.1', '192.168.100.1')
Connected to MQTT  Broker :: 192.168.100.22, and waiting for callback function to be called!
(b'temperature', b'31')
If you have seen the message then congratulations! You have now successfully tested the MQTT subscribe to topics scenario! Next, we test out how to publish.
Test 2: Publish a message to a Topic
First, open a terminal and execute the following commands. The command mosquitto_sub will subscribe to a particular topic and will wait for any messages coming from the Mosquitto MQTT broker on the same topic.
mosquitto_sub -h localhost -t temperature -q 0
Next, in our Thonny IDE, we will publish a topic by using the exec method.
exec(open("publisher.py").read())
Then you should see the following images displayed at your terminal
>>> exec(open("publisher.py").read())
Connected to 192.168.100.22
>>> 
If you see this message displayed then it means that you are successful in publishing to your Mosquitto MQTT broker.
Testing using MQTTX
Another tool that we can use to perform MQTT testing is using the MQTTX application. If you are not familiar with how to use this tool then please see my earlier post on how to use it.
Related Content:
How to test MQTT using MQTTX?
Test 1: Subscribe to a topic
Run the subscriber.py file by copying the subscriber.py code again into the main.py and uploading it into the file system of your ESP32/ESP8266 MicroPython device.
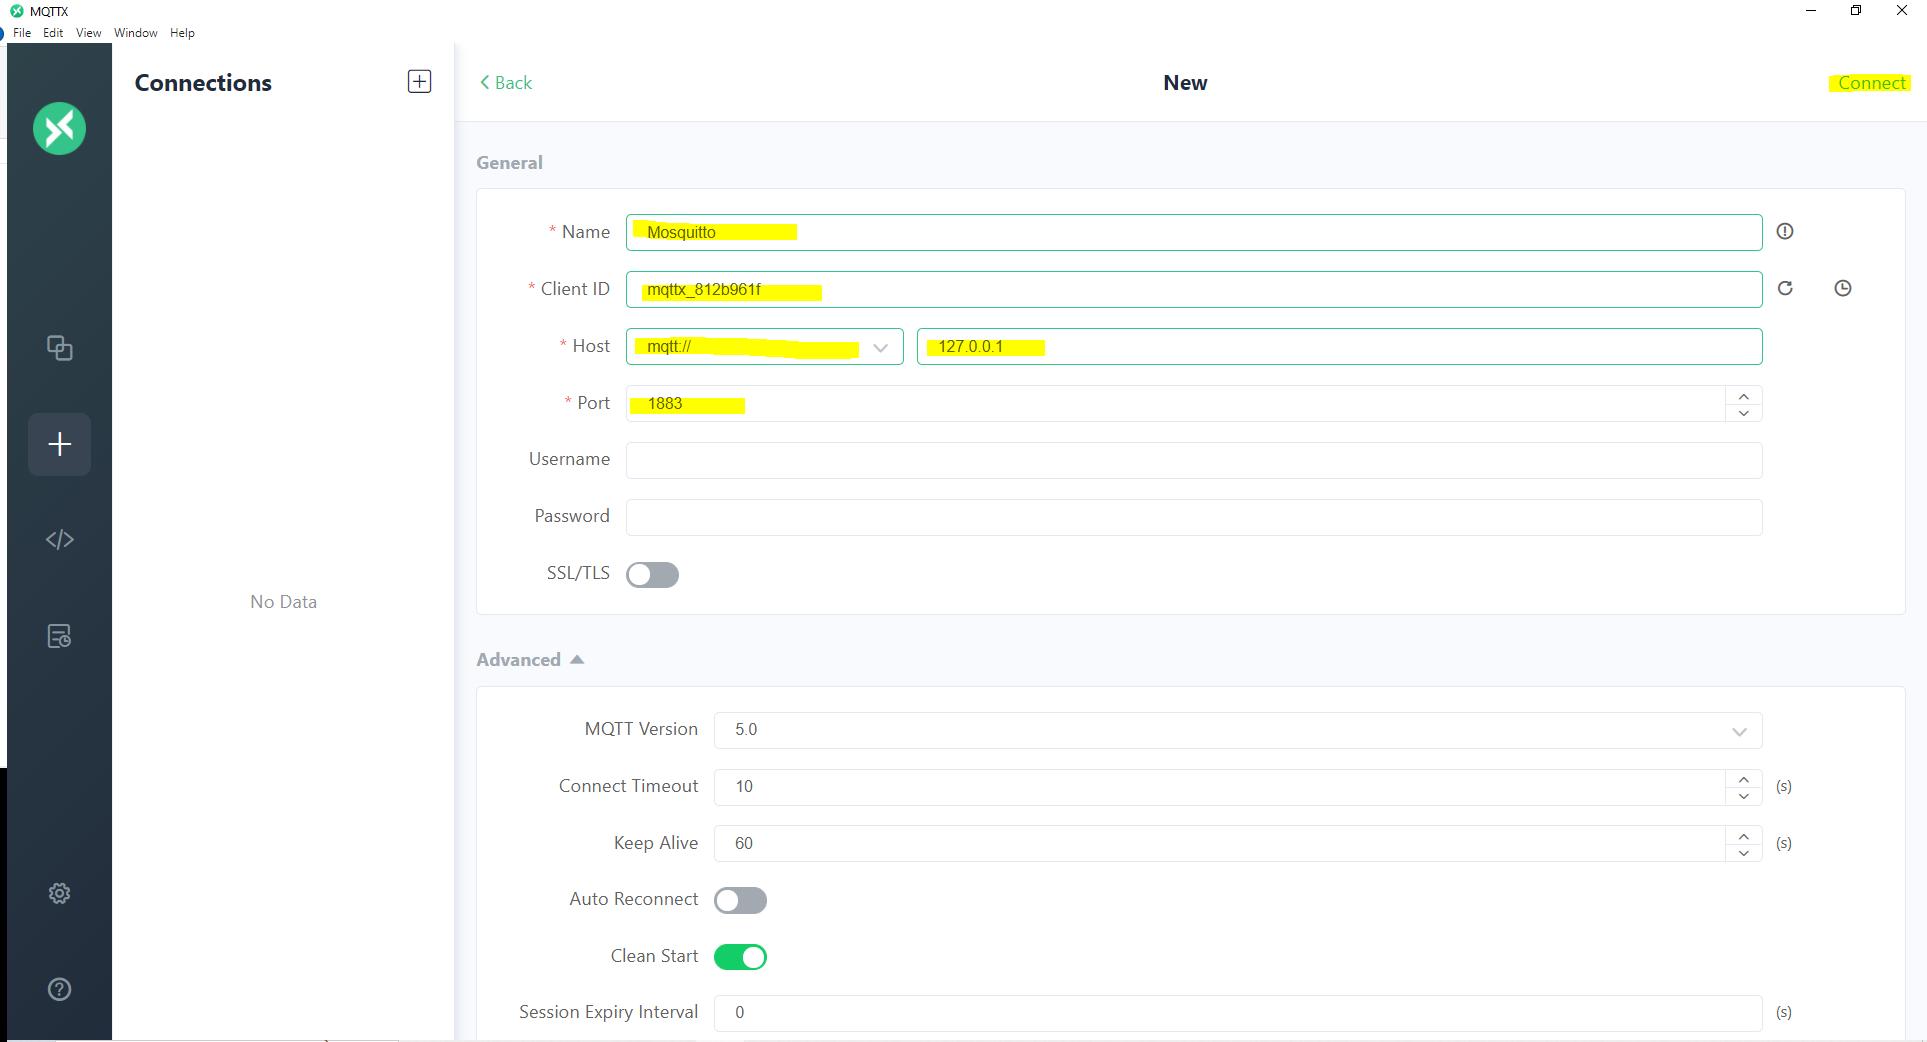
Open your MQTTX application and create a connection to your MQTT broker. In my case, I am using a local Mosquitto broker so I am setting the following connection details.
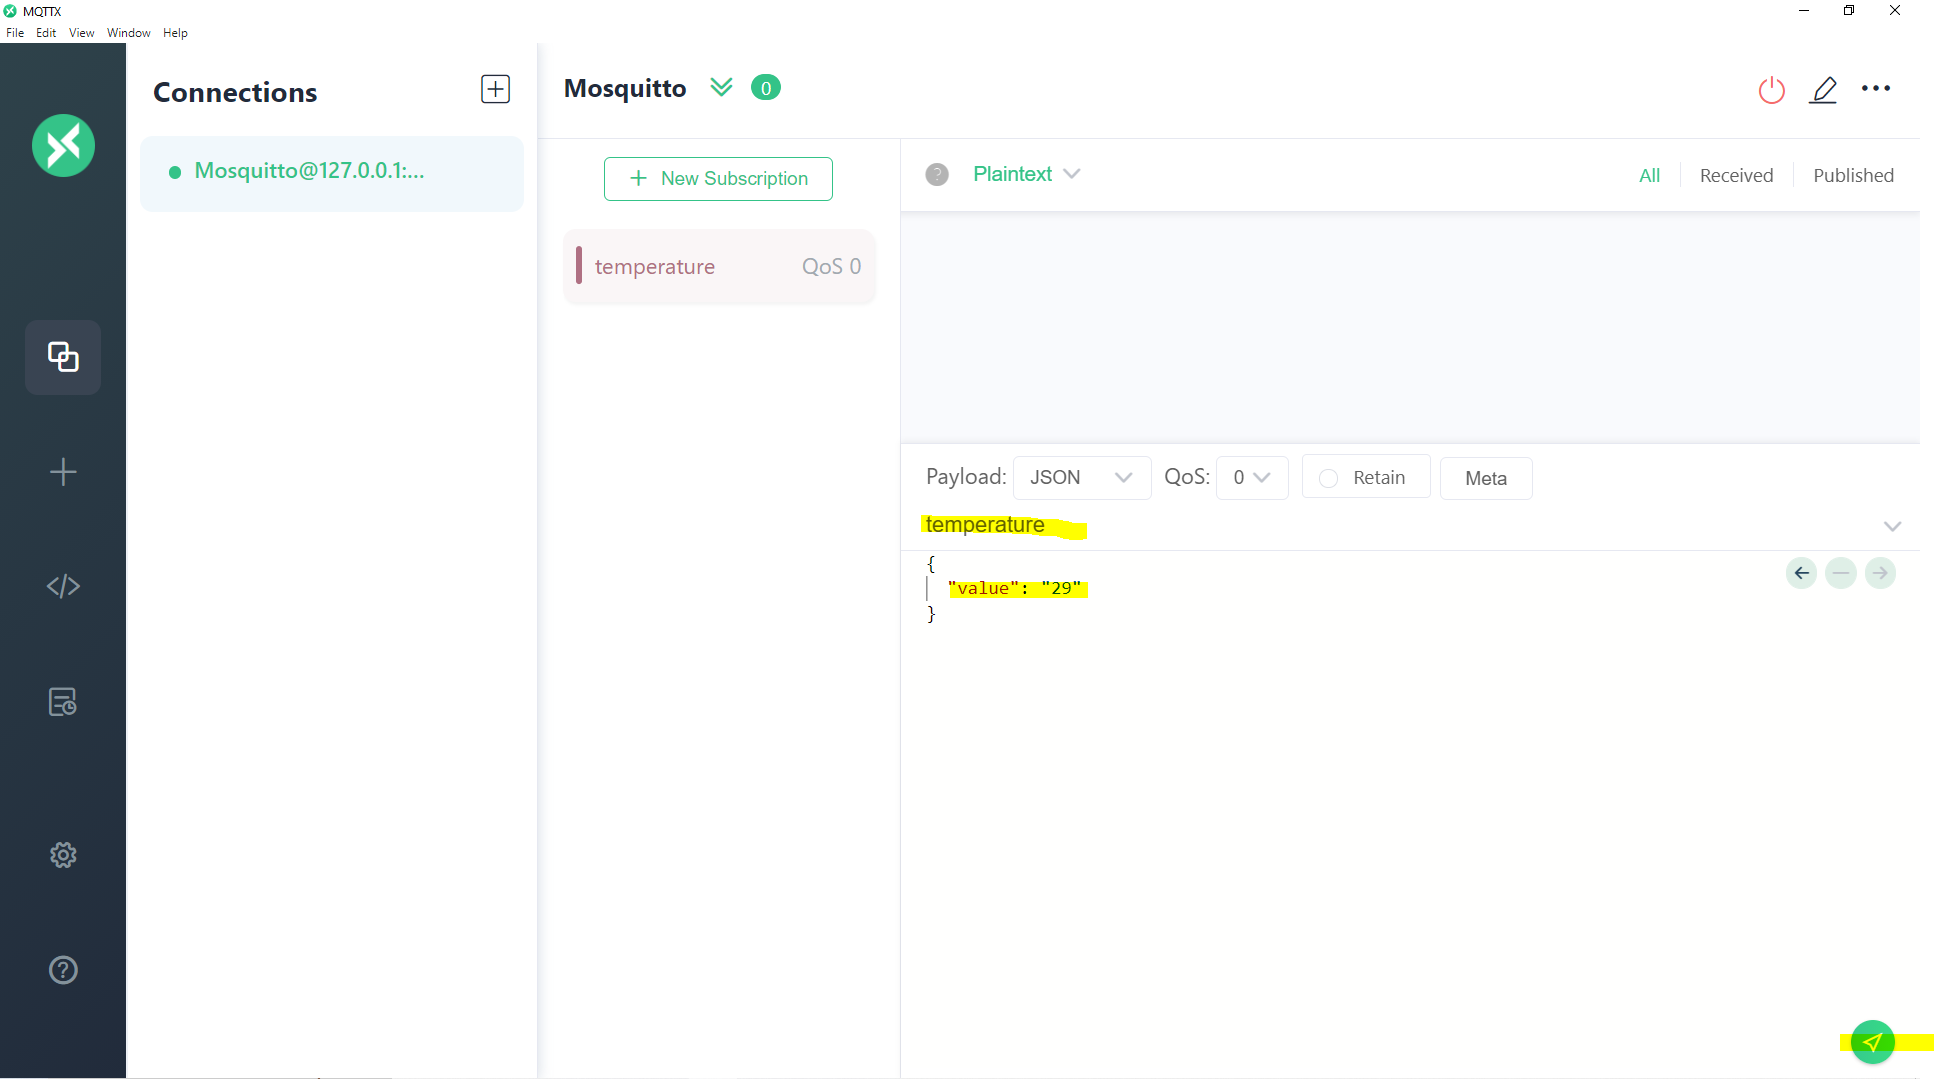
Create a new subscription and listen to the “temperature” topic.

Publish a new message on the “temperature” topic. I am sending a JSON message with a value of “29”
You should see the following message displayed on your Thonny shell terminal.

MPY: soft reboot
Connecting to your wifi...
Connected! Network config: ('192.168.100.253', '255.255.255.0', '192.168.100.1', '192.168.100.1')
Connected to MQTT  Broker :: 192.168.100.22, and waiting for callback function to be called!
(b'temperature', b'{\n  "value": "29"\n}')
Test 2: Publish a message to a Topic
Keep your MQTTX application running as in what we did in Test 1.
Run the publisher.py script by executing the below command in your Thonny IDE shell terminal.
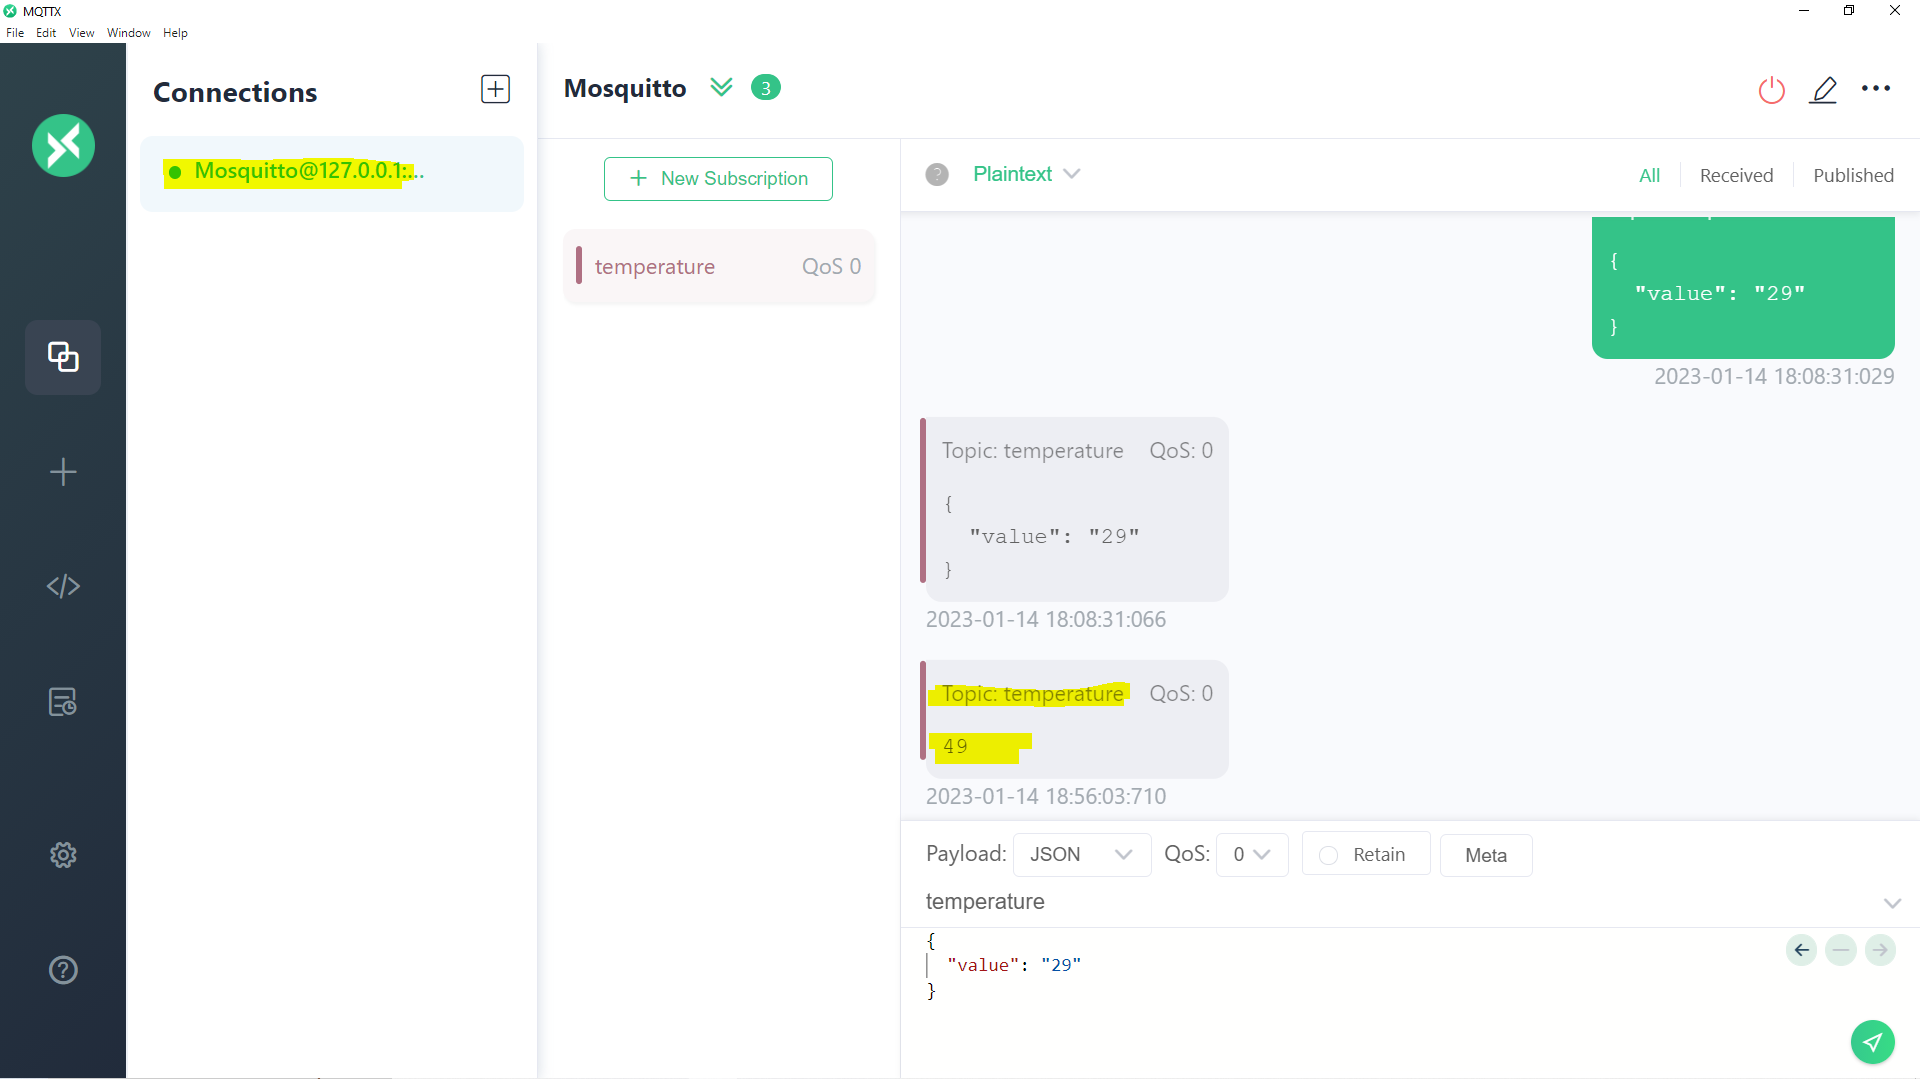
exec(open("publisher.py").read())Go back to your MQTTX application and make sure that it is connected by checking that there is a green circle on the left-hand side of your connection. If you see that there is a temperature with a value of “49” then it means that we were successful in publishing an MQTT message to our “temperature” topic.
Wrap Up
We have successfully communicated with our MQTT broker using MicroPython ESP32/ESP8266 device in this post. We were able to test the connecting, publishing, and subscribing to MQTT topics in this post.
I hope you learned something. Happy Exploring!
Leave a Reply