Introduction
This post will show you how to connect, publish, and subscribe to your MQTT broker using the “umqtt.simple” library in MicroPython. We will be using our Raspberry Pi Pico W which runs the latest MicroPython firmware in developing this project.
If you like to see a video demo presentation of this post then please see below or watch it in my YouTube channel.
Parts/Components Required
The following are the components needed to follow along with this post.
- Raspberry Pi Pico W – Amazon | AliExpress
- or an ESP32 – Amazon | AliExpress | Bangood
- or an ESP8266 – Amazon | AliExpress | Bangood
- Breadboard – Amazon | AliExpress | Bangood
Disclosure: These are affiliate links and I will earn small commissions to support my site when you buy through these links.
I have used Raspberry Pi Pico W in developing this project but an ESP32/ESP8266 board is also applicable. You just need to change one line of code which I will be discussing later.
Prerequisites
You should have installed the latest MicroPython firmware for your device. Check out the MicroPython download page if you are running the latest firmware.
Related Content:
How to Install MicroPython firmware on Raspberry Pi Pico?
How to install MicroPython on ESP32 and download firmware
I will be using the Thonny IDE as my development environment while working on this post.
Related Content:
MicroPython Development Using Thonny IDE
How to guides in Thonny IDE using MicroPython
I have the following versions of my different software components at the time of writing this tutorial.
Thonny IDE 4.0.2
MicroPython v1.19.1-841-g3446d440f on 2023-01-28; Raspberry Pi Pico W with RP2040
Also, you should have your own MQTT broker that you can connect to. Either a public cloud broker where you have access or you can set up your own using the Mosquitto MQTT broker.
Related Content:
Install Mosquitto MQTT Windows
MicroPython – MQTT Publish/Subscribe using ESP32/ESP8266
Wiring/Schematic
You only need to put your Raspberry Pi Pico W or ESP32 or ESP8266 on your breadboard and plug in the external USB power. No external components are needed to follow along with this post.
How to install umqtt.simple in Raspberry Pi Pico?
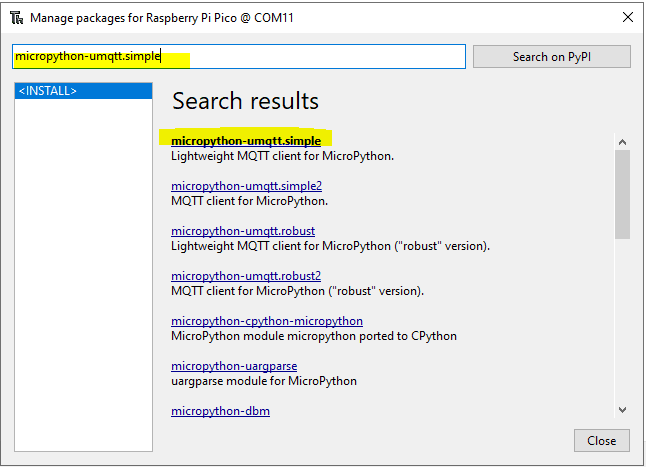
Open your Thonny IDE and click the Tools then Manage Packages option. Search for “micropython-umqtt.simple“ then click the first link and proceed by installing it.
How to verify if your umqtt.simple installation is ok? Open your device explorer in your Thonny IDE then you should be seeing it in the lib folder or type in the following code in the shell terminal. If no error was encountered then everything is okay.
from umqtt.simple import MQTTClient
How to install umqtt.simple in ESP32/ESP8266?
The ESP32/ESP8266 latest firmware by default contains the umqtt.simple and umqtt.robust packages when you installed it. You can type the following code in the Thonny IDE shell terminal to verify it.
help("modules")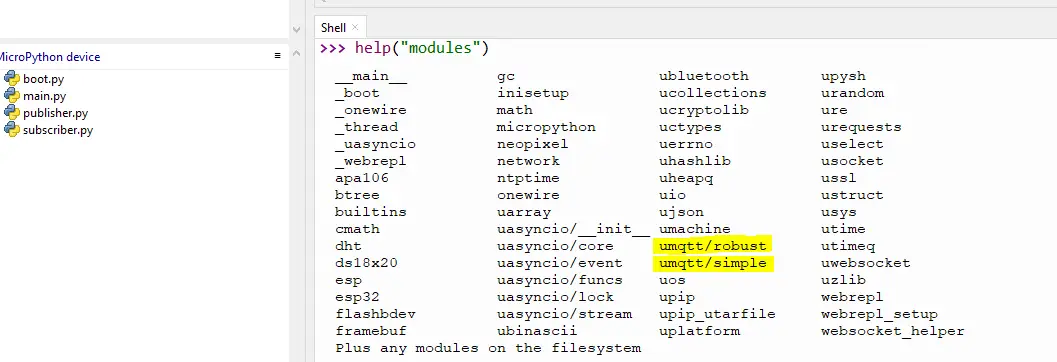
What are we going to do?
We are going to program our Raspberry Pi Pico W to do the following:
- Subscribed to the topic “led” and turn on or off the built-in LED by checking the message coming from our publisher.
- Publish a random temperature to the topic “temperature” every 5 seconds.
We will be using the umqtt.simple library in doing those two transactions.
Code
The complete code for this post is available in my GitHub repository. You can either download it as a zip file or clone it using Git using the below command.
git clone https://github.com/donskytech/micropython-raspberry-pi-pico.git
cd umqtt.simple
Open the following project in Thonny IDE afterward. Let us scan through what each line of the code does.
boot.py
The boot.py is the standard MicroPython file that gets executed first when your device reboots. In the case of our project, we are using it to connect to our Wifi network. Below is the code for the boot.py.
# boot.py -- run on boot-up
import network, utime, machine

# Replace the following with your WIFI Credentials
SSID = "<PLACE_YOUR_SSID_HERE>"
SSID_PASSWORD = "<PLACE_YOUR_WIFI_PASWORD_HERE>"


def do_connect():
    sta_if = network.WLAN(network.STA_IF)
    if not sta_if.isconnected():
        print('connecting to network...')
        sta_if.active(True)
        sta_if.connect(SSID, SSID_PASSWORD)
        while not sta_if.isconnected():
            print("Attempting to connect....")
            utime.sleep(1)
    print('Connected! Network config:', sta_if.ifconfig())

print("Connecting to your wifi...")
do_connect()
Let us go over what each line of the code does.
# boot.py -- run on boot-up
import network, utime, machine
Import the necessary packages needed to connect to your Wifi.
# Replace the following with your WIFI Credentials
SSID = "<PLACE_YOUR_SSID_HERE>"
SSID_PASSWORD = "<PLACE_YOUR_WIFI_PASWORD_HERE>"
Replace the two variables to match the credentials of your Wifi network.
def do_connect():
    sta_if = network.WLAN(network.STA_IF)
    if not sta_if.isconnected():
        print('connecting to network...')
        sta_if.active(True)
        sta_if.connect(SSID, SSID_PASSWORD)
        while not sta_if.isconnected():
            print("Attempting to connect....")
            utime.sleep(1)
    print('Connected! Network config:', sta_if.ifconfig())

print("Connecting to your wifi...")
do_connect()
This is the function that will connect to our Wifi until it is assigned an IP address.
main.py
import time
import ubinascii
from umqtt.simple import MQTTClient
import machine
import random

# Default  MQTT_BROKER to connect to
MQTT_BROKER = "192.168.100.22"
CLIENT_ID = ubinascii.hexlify(machine.unique_id())
SUBSCRIBE_TOPIC = b"led"
PUBLISH_TOPIC = b"temperature"

# Setup built in PICO LED as Output
led = machine.Pin("LED",machine.Pin.OUT)

# Publish MQTT messages after every set timeout
last_publish = time.time()
publish_interval = 5

# Received messages from subscriptions will be delivered to this callback
def sub_cb(topic, msg):
    print((topic, msg))
    if msg.decode() == "ON":
        led.value(1)
    else:
        led.value(0)


def reset():
    print("Resetting...")
    time.sleep(5)
    machine.reset()

# Generate dummy random temperature readings
def get_temperature_reading():
    return random.randint(20, 50)

def main():
    print(f"Begin connection with MQTT Broker :: {MQTT_BROKER}")
    mqttClient = MQTTClient(CLIENT_ID, MQTT_BROKER, keepalive=60)
    mqttClient.set_callback(sub_cb)
    mqttClient.connect()
    mqttClient.subscribe(SUBSCRIBE_TOPIC)
    print(f"Connected to MQTT  Broker :: {MQTT_BROKER}, and waiting for callback function to be called!")
    while True:
            # Non-blocking wait for message
            mqttClient.check_msg()
            global last_publish
            if (time.time() - last_publish) >= publish_interval:
                random_temp = get_temperature_reading()
                mqttClient.publish(PUBLISH_TOPIC, str(random_temp).encode())
                last_publish = time.time()
            time.sleep(1)


if __name__ == "__main__":
    while True:
        try:
            main()
        except OSError as e:
            print("Error: " + str(e))
            reset()
The above is the code that we will be using to connect, publish, and subscribe to our MQTT broker using the package umqtt.simple.
import time
import ubinascii
from umqtt.simple import MQTTClient
import machine
import random
Import the necessary packages needed to connect to our MQTT broker and other side packages.
# Default  MQTT_BROKER to connect to
MQTT_BROKER = "192.168.100.22"
CLIENT_ID = ubinascii.hexlify(machine.unique_id())
SUBSCRIBE_TOPIC = b"led"
PUBLISH_TOPIC = b"temperature"
Define the MQTT broker IP or DNS name here and create the client id, a topic that we will be subscribing to, and the topic that we will be publishing.
# Setup built in PICO LED as Output
led = machine.Pin("LED",machine.Pin.OUT)
Configure the built-in LED of the Raspberry Pi Pico W for output. If you are using an ESP32 or an ESP8266 then you can point this to the GPIO pin that you are using.
# Publish MQTT messages after every set timeout
last_publish = time.time()
publish_interval = 5
This will be our publish interval every 5 seconds.
# Received messages from subscriptions will be delivered to this callback
def sub_cb(topic, msg):
    print((topic, msg))
    if msg.decode() == "ON":
        led.value(1)
    else:
        led.value(0)


def reset():
    print("Resetting...")
    time.sleep(5)
    machine.reset()

# Generate dummy random temperature readings
def get_temperature_reading():
    return random.randint(20, 50)
We have the following 3 functions that do different things. First, the sub_cb() is our callback function that gets called whenever an MQTT message arrives from our broker. Since we are only subscribed to one topic then we just check the message if it is “ON” and then we turn on our built-in LED. Otherwise, we turn it off.
Next the reset() function will reset our MicroPython device in case an exception occurred by calling the machine.reset()
Lastly, the get_temperature_reading() is used to generate dummy sensor readings by creating a random number.
def main():
    print(f"Begin connection with MQTT Broker :: {MQTT_BROKER}")
    mqttClient = MQTTClient(CLIENT_ID, MQTT_BROKER, keepalive=60)
    mqttClient.set_callback(sub_cb)
    mqttClient.connect()
    mqttClient.subscribe(SUBSCRIBE_TOPIC)
    print(f"Connected to MQTT  Broker :: {MQTT_BROKER}, and waiting for callback function to be called!")
    while True:
            # Non-blocking wait for message
            mqttClient.check_msg()
            global last_publish
            if (time.time() - last_publish) >= publish_interval:
                random_temp = get_temperature_reading()
                mqttClient.publish(PUBLISH_TOPIC, str(random_temp).encode())
                last_publish = time.time()
            time.sleep(1)


if __name__ == "__main__":
    while True:
        try:
            main()
        except OSError as e:
            print("Error: " + str(e))
            reset()
This is the main entry point of our program where we connect to our MQTT broker using the umqtt.simple API. We also set the callback function when we subscribe to the topic “led”. In the loop, we check for MQTT messages from our broker and publish MQTT messages every 5 seconds to the topic“temperature”.
That is all how the code works.
How to perform MQTT Testing?
In order for us to test the MQTT message exchange between our Raspberry Pi Pico W running MicroPython then we need an application called MQTTX. Please see the link below if you are not familiar with MQTTX.
Related Content:
How to test MQTT using MQTTX?
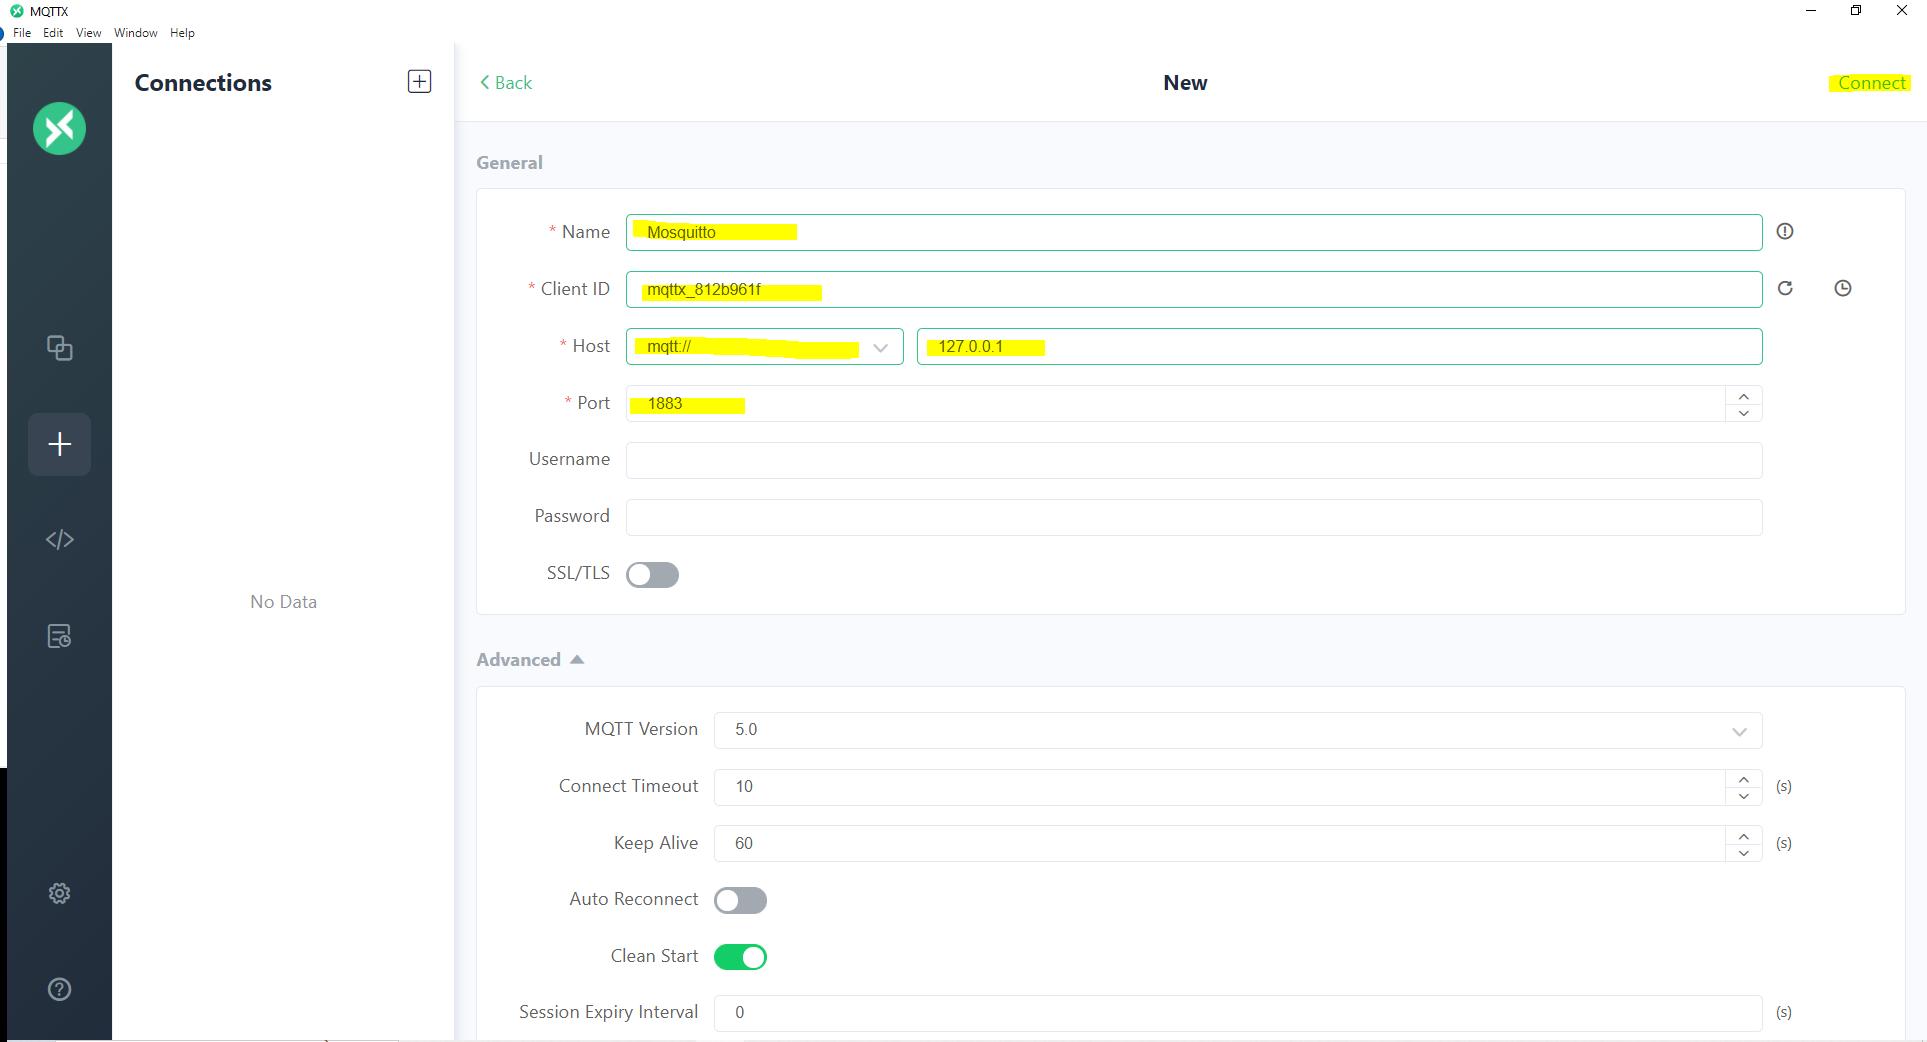
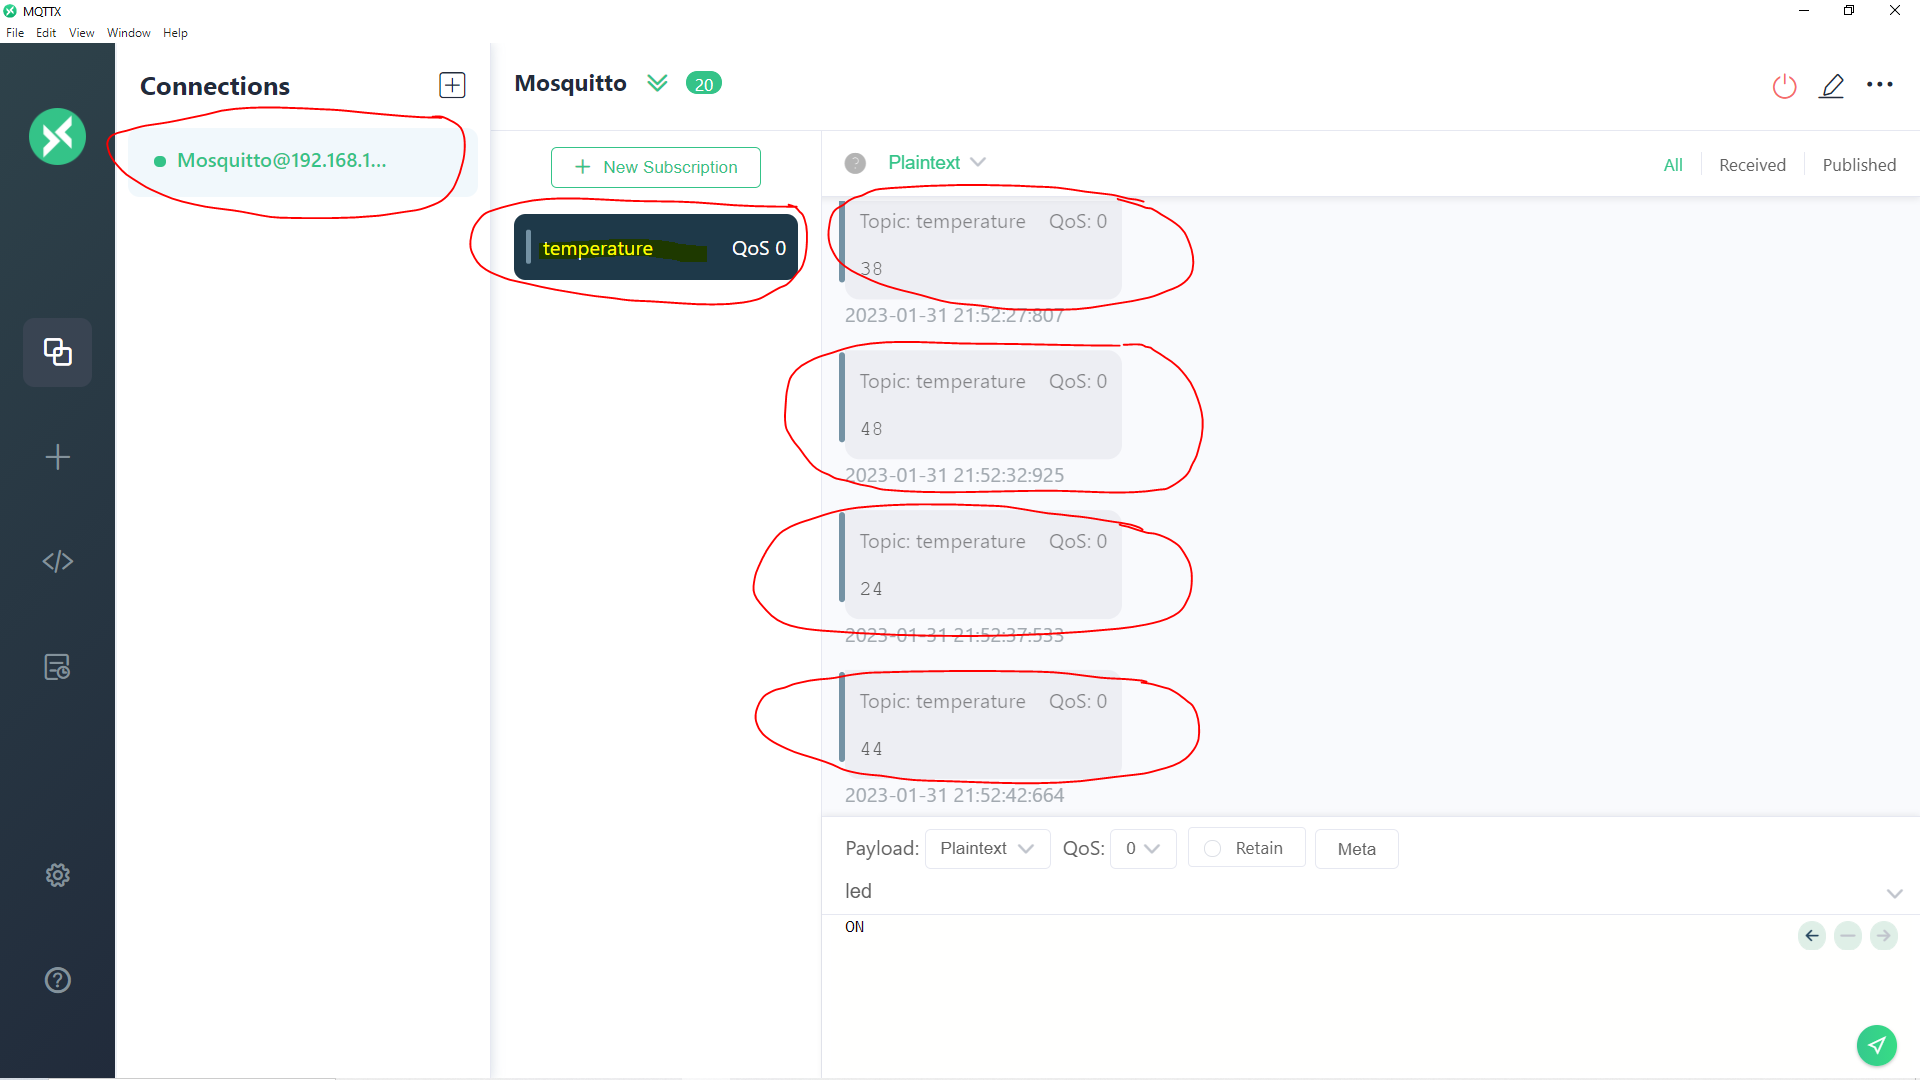
First, we create a connection to our Mosquitto MQTT broker.
Next, we create a subscription to the MQTT topic “temperature”.

Test: Publish to MQTT topic
Since we have configured our Raspberry Pi Pico W to publish an MQTT topic to the “temperature” topic every 5 seconds then we should be seeing the following display on our screen. This means that the messages coming from our Raspberry Pi Pico W is being received by our MQTT broker and we are able to received the same message since we are subscribed to the same topic.
Test: Subscribe to the MQTT topic
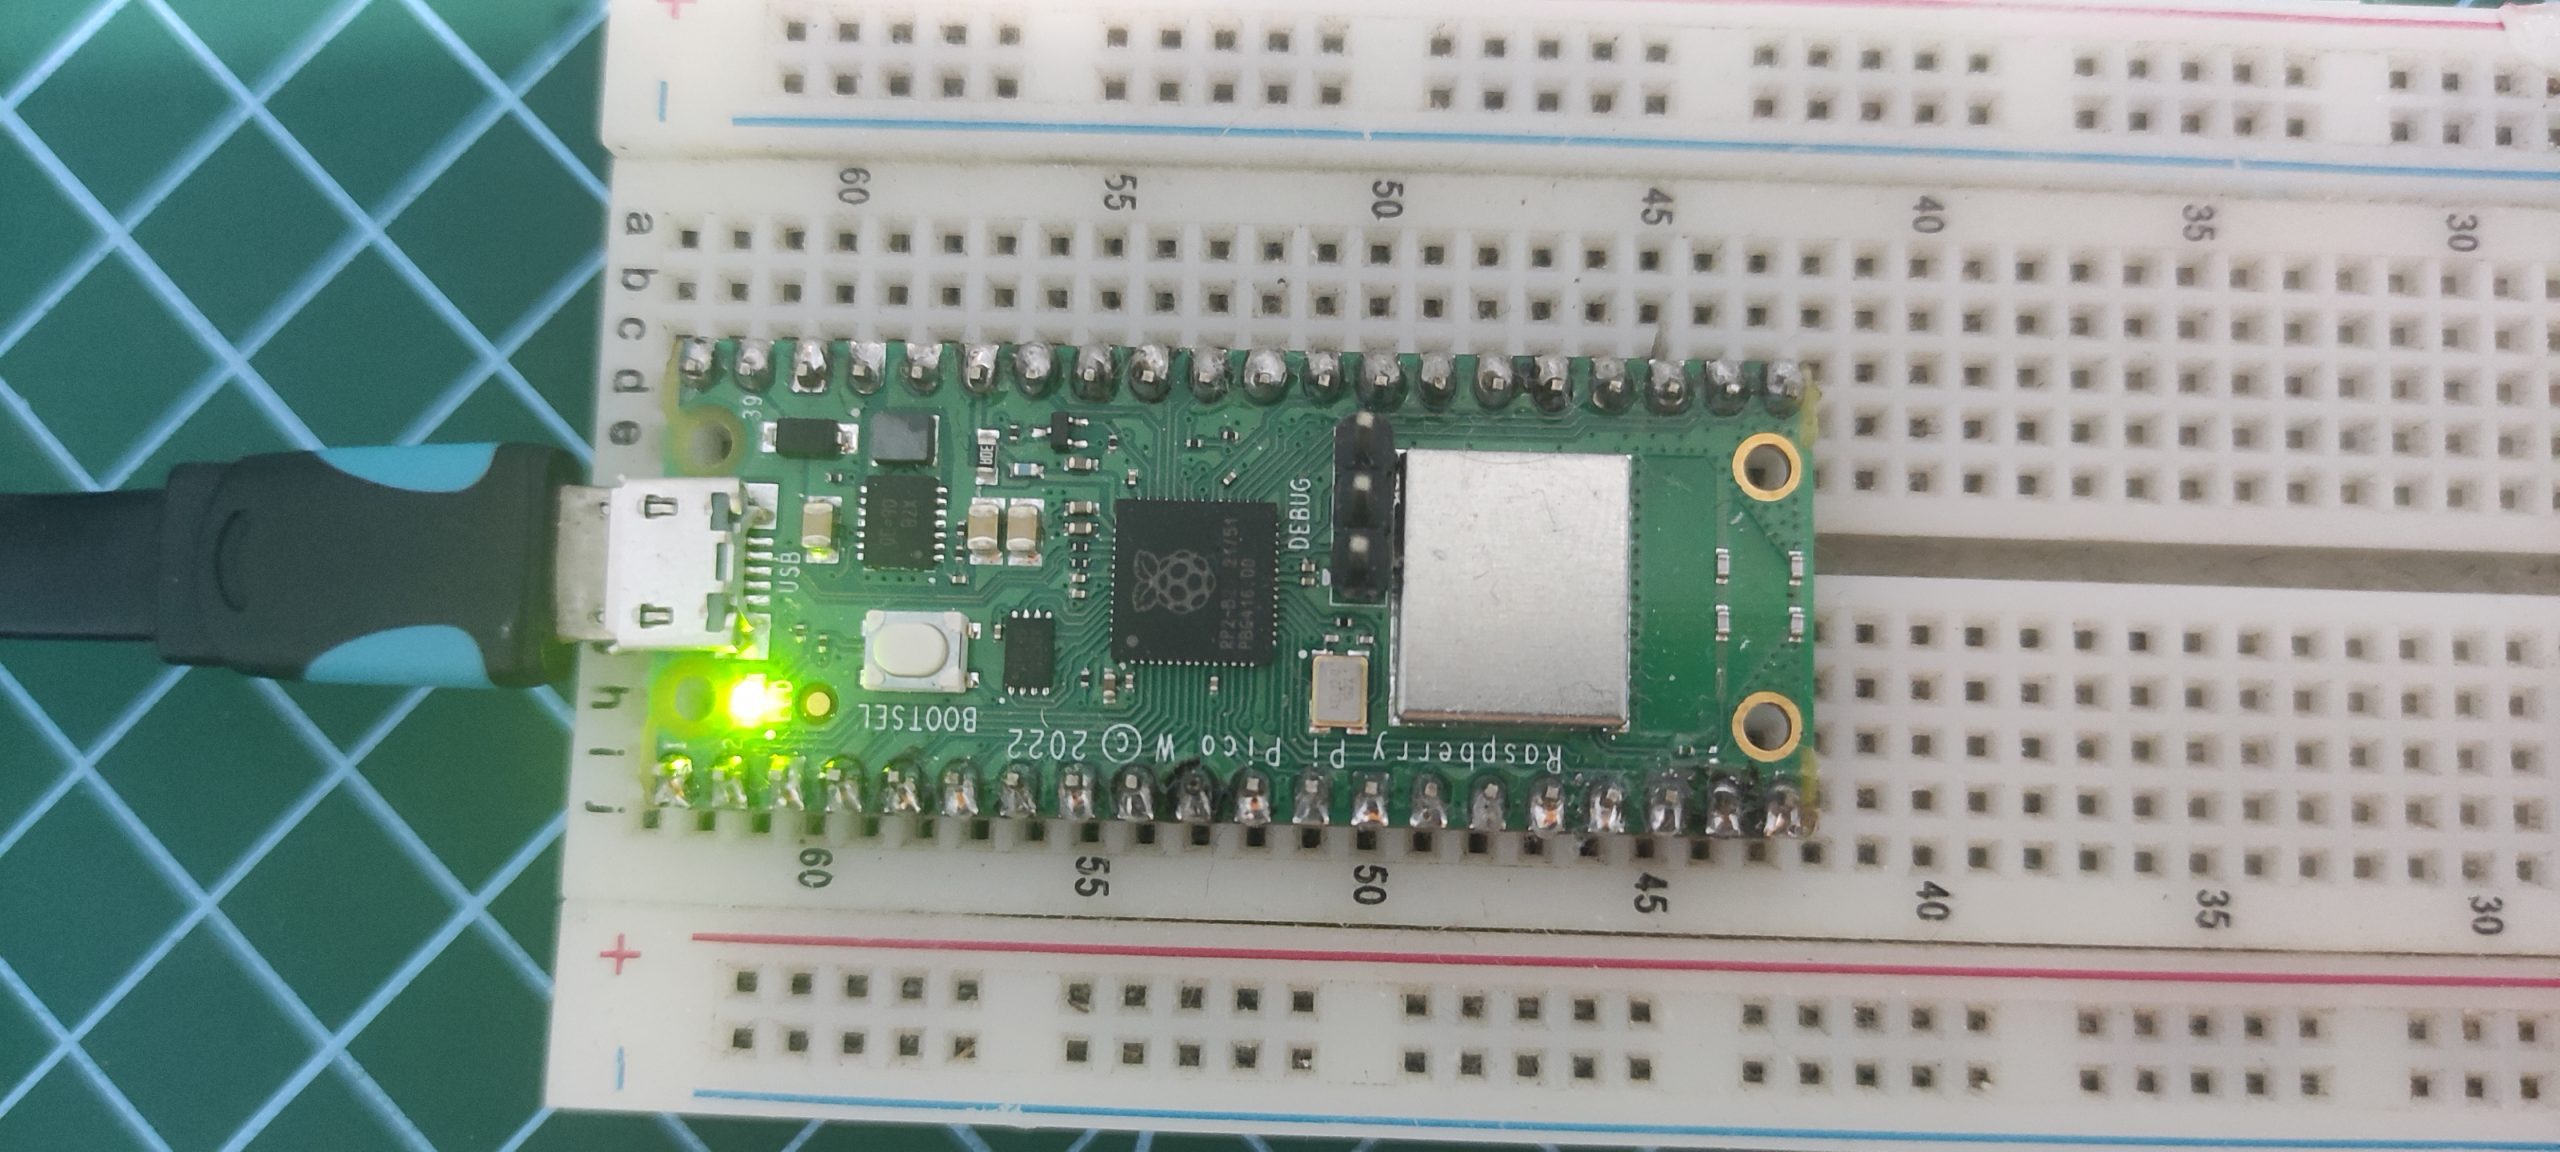
We have configured our Raspberry Pi Pico W to subscribe to the “led” MQTT topic so using MQTTX then we are going to publish an “ON” message to the same topic.

You should be seeing the built-in LED of your Raspberry Pi Pico W turning on.
Now, try sending an “OFF” message from MQTTX using the same topic (“led”).
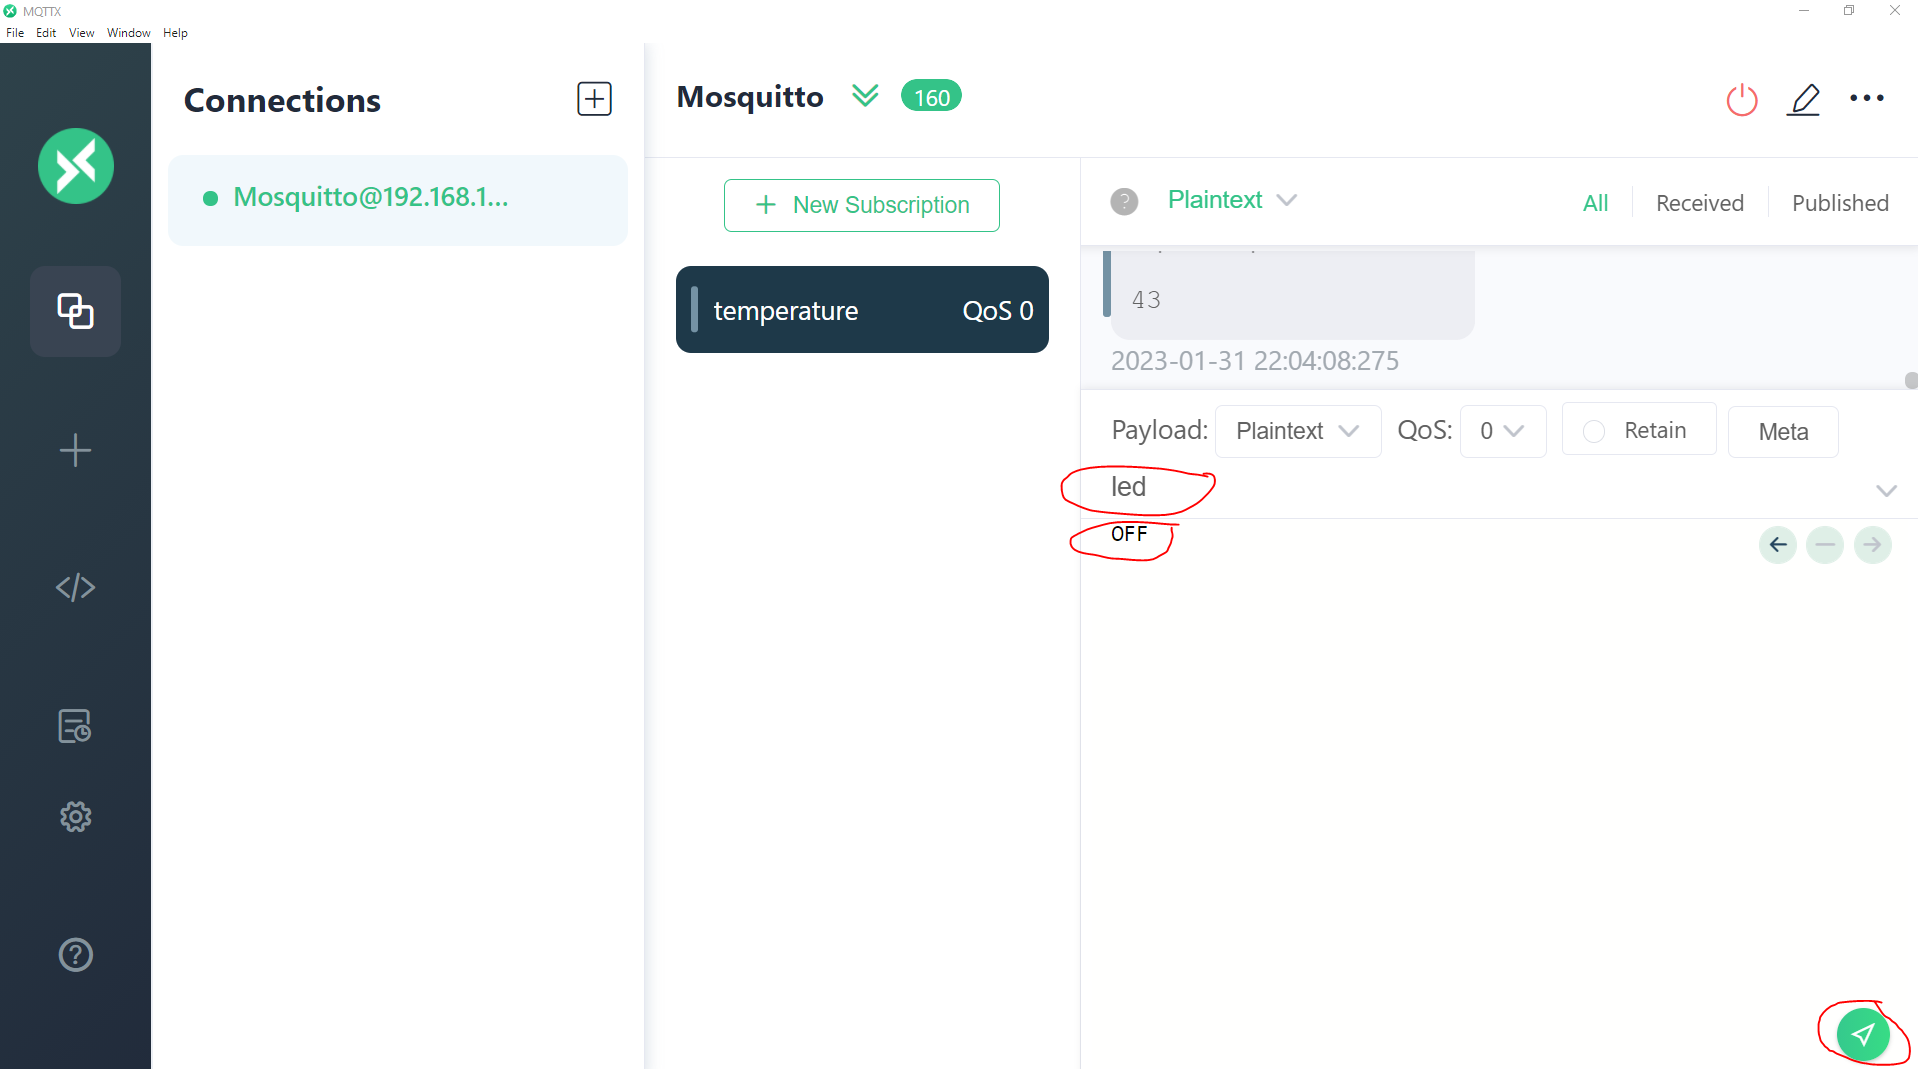
You should be seeing the built-in LED of your Raspberry Pi Pico W turning off.
If you were able to perform this test then congratulations!
Wrap up
We were able to connect, publish, and subscribe to our MQTT broker using the library “umqtt.simple” with our Raspberry Pi Pico W running MicroPython. We will use the same concept in a future Internet of Things (IoT) project.
I hope you learned something! Happy Exploring!
Leave a Reply