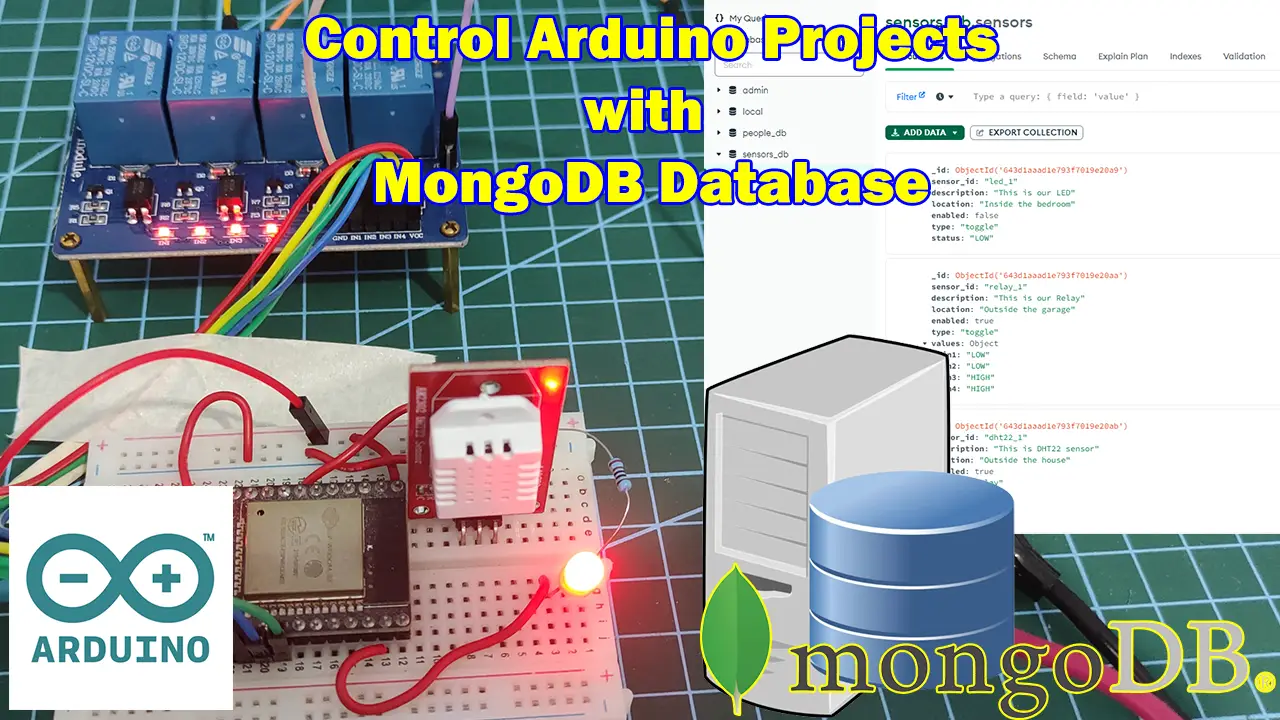
Introduction
Do you have an Internet of Things (IoT) project that uses a database to store your sensor data? And do you need to control your electronic circuit remotely such that you can turn on or off your electric devices by using your browser or your mobile device? This post will show you how I created my own IoT web application that controls my sensors or electronic components.
If you want to see a video demo presentation of this post or a demo of this project then please see the below video or watch it on my YouTube channel.
What is this post all about?
In the previous post about controlling your Arduino IoT projects with a MongoDB database, we were able to set up records of our sensors on our MongoDB database. By changing the values on our database then we have successfully controlled remotely our electronic components such as an LED and Relay.
However, changing values on the database directly may not be practical. Instead, I have mentioned in that post that creating an external web application that will directly alter our MongoDB database is the way to go. I will share with you my own personal solution on how you can control your electronic components using a custom IoT web application.
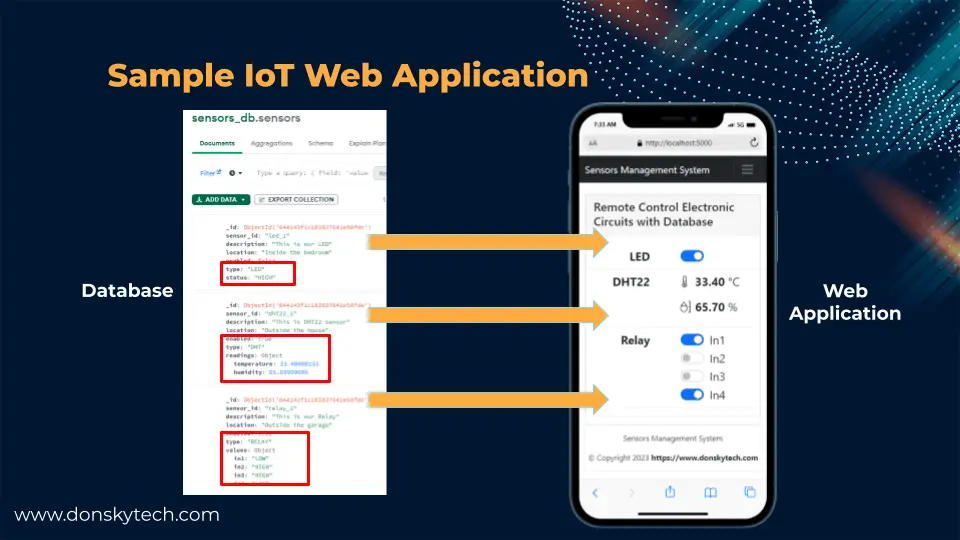
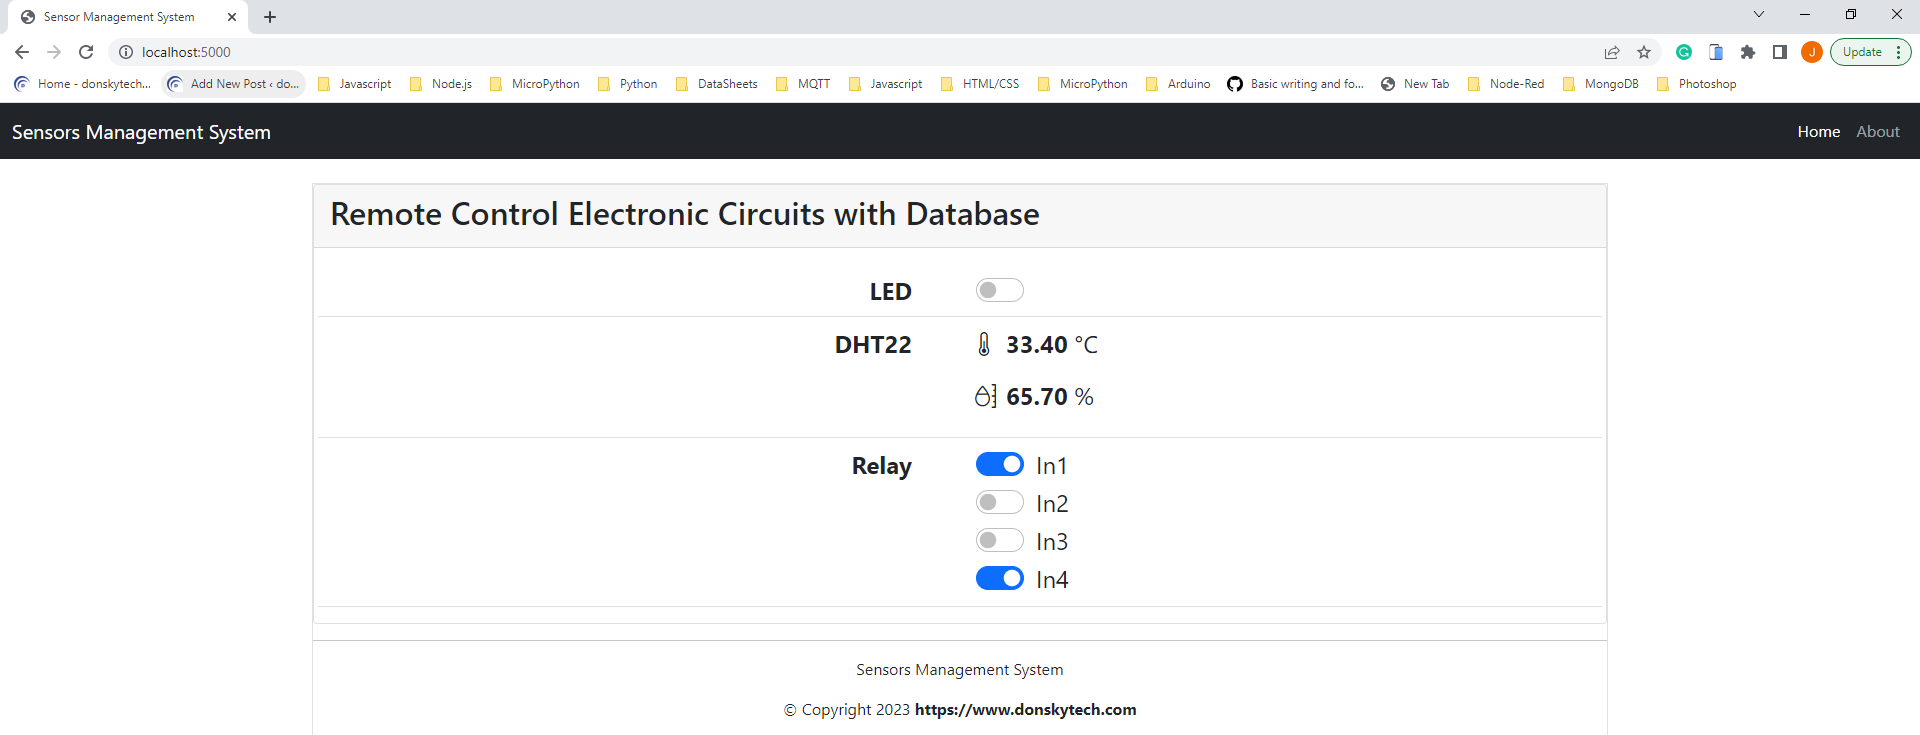
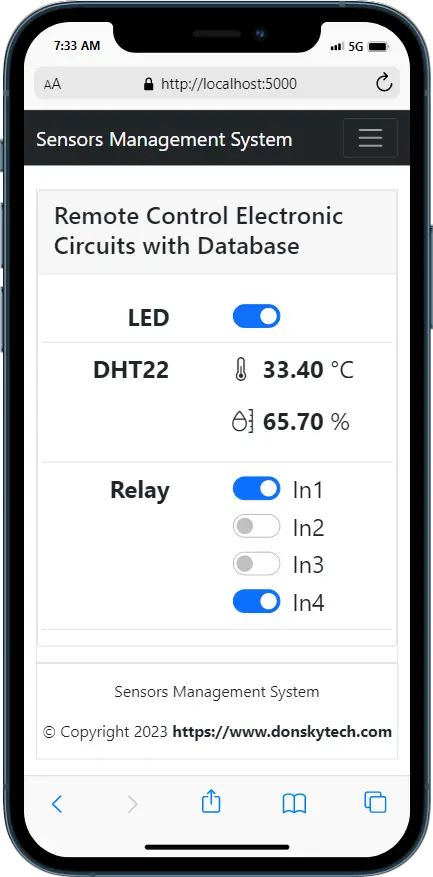
Below are the screenshots of the IoT web application that will control our electric circuits.
Design
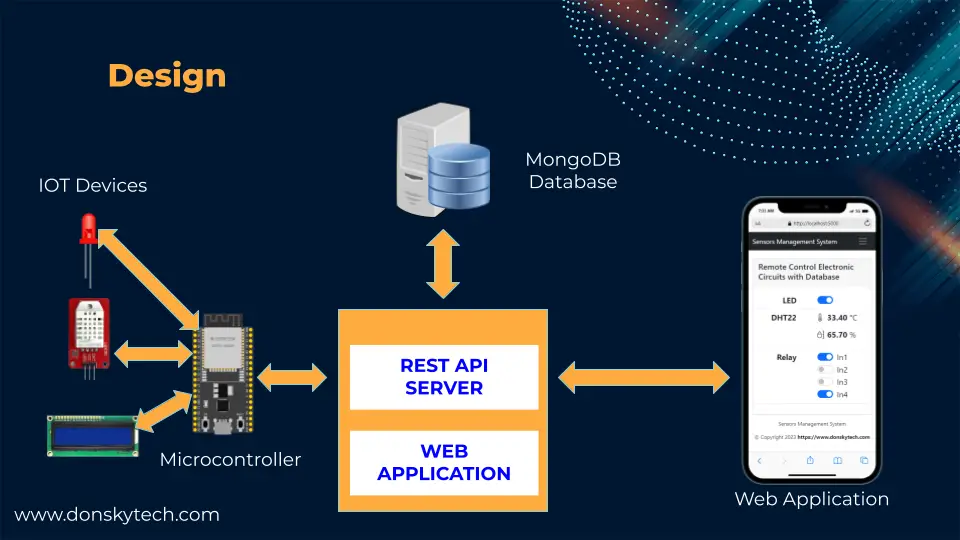
The following is how you could create your own simple IoT web application that would control your electronic circuits.
Your electronic circuits could be created with the following framework:
- Arduino framework
- Raspberry Pi Single Board Computers
- MicroPython
It doesn’t matter how you created your circuit as you can program it to anything that you are comfortable with as the REST API Server/IoT web application would remain the same.
Of course, creating a web application requires web development experience so you may need knowledge of HTML/CSS/Javascript. Your web application could be created inside your REST API server and it would access the same database.
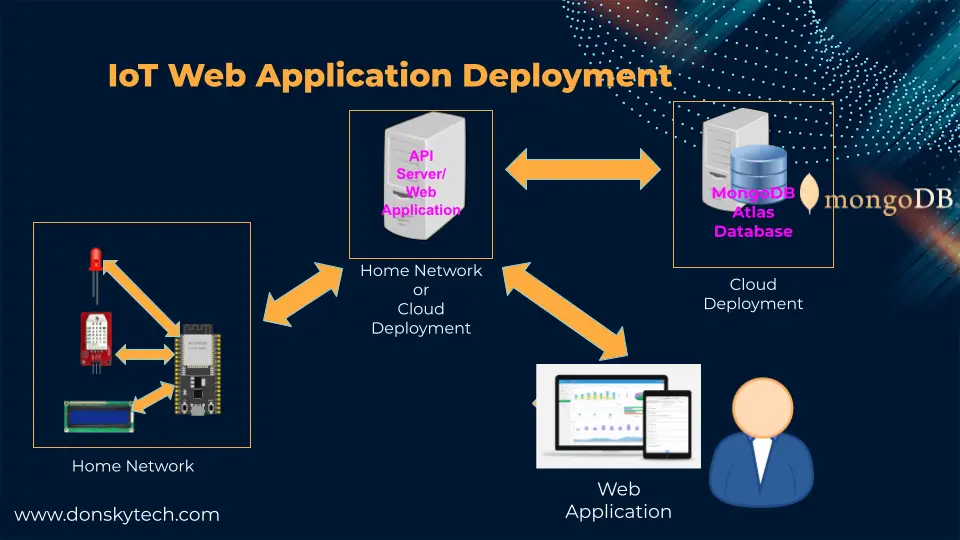
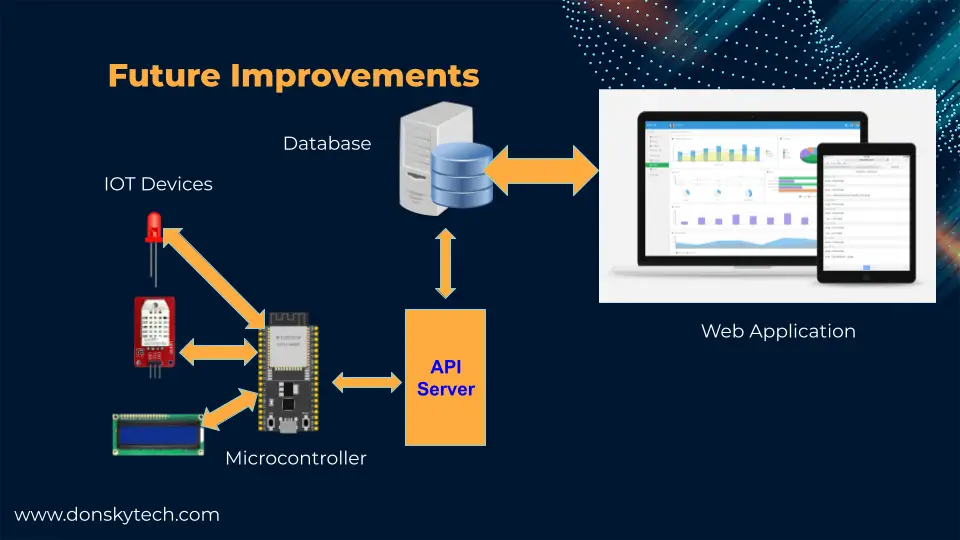
This image shows how you could deploy your IoT web application. Initially, your sensors, components, and circuits could be deployed inside your home network. You can create your own REST API server and Web Application inside your home network and store your sensor data using the cloud MongoDB Atlas database. You can then access the web application thru your browser or your mobile phone to control your circuit.
But if you want to control your circuit outside your home like if you wanted to turn off your lights then you could deploy your REST API server/Web Application on the cloud so that you could access it anywhere. Some of the popular cloud providers are Amazon AWS, Microsoft Azure, and Google Cloud.
Take note that we are not creating a web server to run our web application inside of our Microcontroller or Single Board Computer (SBC). You can only access that web server when you are near your Microcontroller or SBC. I have done plenty of posts about how you can set up your own web server inside your Microcontroller to control your circuits.
Related Content:
Using Arduino with BME280 plus a weather station project
Raspberry Pi Pico W: BME280 Weather Station Dashboard
Prerequisites
In order to create your own IoT web application then you need some knowledge of HTML/CSS/Javascript. As this series is oriented toward hardware IoT guys then I have used Python as the programming language. You can also use Javascript or any other programming language of your choice.
I have used the Flask web framework in developing this program and the Bootstrap CSS framework to make the web user interface. I am assuming that you have some knowledge regarding those technologies.
If you are not familiar with Flask then please see the below tutorials that I have written to get you started. Bootstrap is a CSS framework that is just used to beautify the web user interface and make it presentable on mobile devices.
Related Content:
Raspberry Pi and Flask Quickstart Guide
Create Flask Web Application in Raspberry Pi
MongoDB IoT Tutorial Series Roadmap
This series will teach you how to integrate a database particularly the MongoDB NoSQL database in your IoT projects. We will be using Arduino-based microcontrollers, Raspberry Pi Single Board Computers, and MicroPython devices.
The below list would tell you the different topics that we are going to discuss in this series.
- Part 1 – What is MongoDB database and why do we need it in our IoT projects?
- Part 2 – MongoDB Atlas: An Overview and How to get started
- Part 3 – Create a REST API Server with Python, Flask, and MongoDB
- Part 4 – Control your Arduino IoT projects with a MongoDB database
- Part 4.5 – Create your own Custom IoT Web Application
- Part 5 – Control your Raspberry Pi IoT projects with a MongoDB database
- Part 6 – Control your MicroPython IoT projects with a MongoDB database
- Part 7 – Arduino Data Logger using MongoDB Database
- Part 8 – Raspberry Pi Temperature Logger using MongoDB Database
- Part 9 – MicroPython Sensor Logger using MongoDB Database
This post is Part 4.5 of this series where I will show you how you can create your own IoT web application that will allow you to control your Arduino, Raspberry Pi, and MicroPython-based projects using a MongoDB database. I am using ESP32 and ESP8266 microcontroller boards in this post but you can use any other boards that have WiFi capability.
Note that you should have a good idea of what MongoDB is and have prepared your own MongoDB Atlas cluster as I will not be discussing those items anymore in this post. Please refer to the first 3 parts of this series for details.
Parts/Components Required
The following are the components required in order to follow along with this post.
- ESP32 (I used NodeMCU) – Amazon | AliExpress | Bangood
- or ESP8266 – Amazon | AliExpress | Bangood
- DHT22 – Amazon | AliExpress
- or DHT11 – Amazon | AliExpress | Bangood
- Relay – 4 Channel (12V – used in this project) – Amazon | AliExpress
- or Relay- 4 Channel (5V) – Amazon | AliExpress | Bangood
- Bench Power Supply – Amazon | AliExpress | Bangood
- LED – Amazon | AliExpress | Bangood
- Resistors (220 Ohms) – Amazon | AliExpress | Bangood
- Breadboard – Amazon | AliExpress | Bangood
- Connecting Wires – Amazon | AliExpress | Bangood
Disclosure: These are affiliate links and I will earn small commissions to support my site when you buy through these links.
Prepare our MongoDB Atlas Database
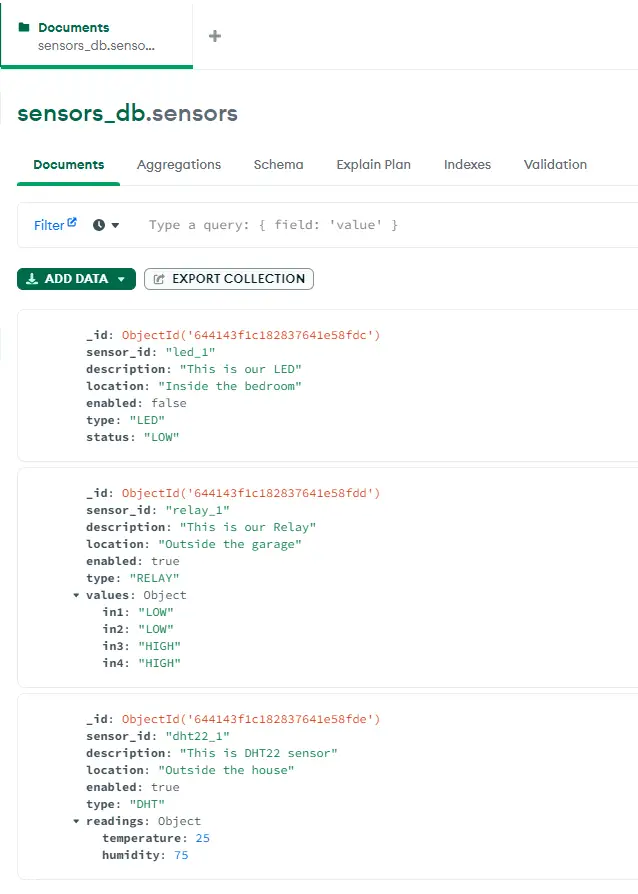
In Part 3 and Part 4 of this IoT MongoDB Tutorial Series, we have created our sensors_db database and a collection named sensors on our MongoDB Atlas cloud database. You can delete our previous records/documents and add below JSON sample records.
You can use MongoDB Compass to add the following documents to your collections.
[
{
"sensor_id": "led_1",
"description": "This is our LED",
"location": "Inside the bedroom",
"enabled": false,
"type": "LED",
"status": "LOW"
},
{
"sensor_id": "relay_1",
"description": "This is our Relay",
"location": "Outside the garage",
"enabled": true,
"type": "RELAY",
"values": {
"in1": "LOW",
"in2": "LOW",
"in3": "HIGH",
"in4": "HIGH"
}
},
{
"sensor_id": "dht22_1",
"description": "This is DHT22 sensor",
"location": "Outside the house",
"enabled": true,
"type": "DHT",
"readings": {
"temperature": 25,
"humidity": 75
}
}
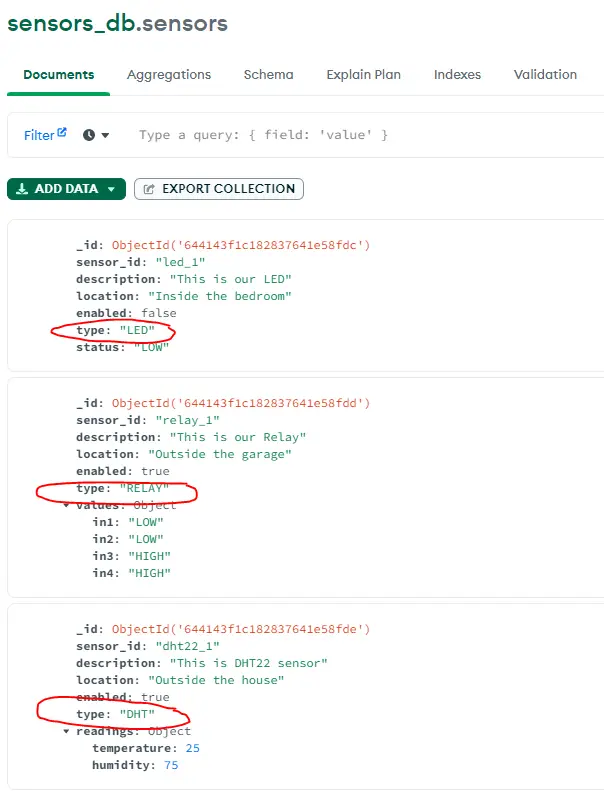
]Take note specifically of the type element on the following JSON array as it could be “LED“, “RELAY“, or “DHT“. We will be needing this info later when we draw our HTML user interface.
After you have added the above JSON then you should be seeing the following records/documents on your sensors collection.
Code
The code for this project is available on my GitHub repository and you can either download the project as a zip file or clone it using Git commands.
git clone https://github.com/donskytech/python-flask-mongodb-projects
cd rest-api-server-with-web-application
code . # Open in VSCode
Open it in Visual Studio Code and follow the steps on how to run this project in the Readme.md.
This project is a replica of the previous post Create a REST API Server with Python, Flask, and MongoDB as I have only added the IoT web application here. We will just add code to create our web application that will control our electronic circuits.
app.py
import os
from flask import Flask, Response, request, jsonify, make_response, render_template
from dotenv import load_dotenv
from pymongo import MongoClient
from bson.json_util import dumps
from bson.objectid import ObjectId

load_dotenv()

app = Flask(__name__)
mongo_db_url = os.environ.get("MONGO_DB_CONN_STRING")

client = MongoClient(mongo_db_url)
db = client["sensors_db"]

"""
Web Application
"""
@app.route("/")
def index():
    sensors = list(db.sensors.find({}))
    print(sensors)
    return render_template("home.html", sensors=sensors)


"""
REST API Codes
"""
@app.get("/api/sensors")
def get_sensors():
    sensor_id = request.args.get("sensor_id")
    filter = {} if sensor_id is None else {"sensor_id": sensor_id}
    sensors = list(db.sensors.find(filter))
    print(sensors)

    response = Response(
        response=dumps(sensors), status=200, mimetype="application/json"
    )
    return response


@app.post("/api/sensors")
def add_sensor():
    _json = request.json
    db.sensors.insert_one(_json)

    resp = jsonify({"message": "Sensor added successfully"})
    resp.status_code = 200
    return resp


@app.delete("/api/sensors/<id>")
def delete_sensor(id):
    db.sensors.delete_one({"_id": ObjectId(id)})

    resp = jsonify({"message": "Sensor deleted successfully"})
    resp.status_code = 200
    return resp


@app.put("/api/sensors/<id>")
def update_sensor(id):
    _json = request.json
    db.sensors.update_one({"_id": ObjectId(id)}, {"$set": _json})

    resp = jsonify({"message": "Sensor updated successfully"})
    resp.status_code = 200
    return resp


@app.errorhandler(400)
def handle_400_error(error):
    return make_response(
        jsonify(
            {
                "errorCode": error.code,
                "errorDescription": "Bad request!",
                "errorDetailedDescription": error.description,
                "errorName": error.name,
            }
        ),
        400,
    )


@app.errorhandler(404)
def handle_404_error(error):
    return make_response(
        jsonify(
            {
                "errorCode": error.code,
                "errorDescription": "Resource not found!",
                "errorDetailedDescription": error.description,
                "errorName": error.name,
            }
        ),
        404,
    )


@app.errorhandler(500)
def handle_500_error(error):
    return make_response(
        jsonify(
            {
                "errorCode": error.code,
                "errorDescription": "Internal Server Error",
                "errorDetailedDescription": error.description,
                "errorName": error.name,
            }
        ),
        500,
    )
The code is almost similar to the REST API server that we did in the third post of this series and the only difference is these lines of code.
"""
Web Application
"""
@app.route("/")
def index():
    sensors = list(db.sensors.find({}))
    print(sensors)
    return render_template("home.html", sensors=sensors)
The code above will render our template called home.html and will query our sensors stored on our MongoDB database. It is passed to the template so that it could be displayed dynamically.
templates/home.html
<!DOCTYPE html>
<html>
  <head>
    <meta charset="UTF-8" />
    <meta http-equiv="X-UA-Compatible" content="IE=edge" />
    <meta name="viewport" content="width=device-width, initial-scale=1.0" />
    <!-- Bootstrap CSS -->
    <link
      href="https://cdn.jsdelivr.net/npm/bootstrap@5.0.2/dist/css/bootstrap.min.css"
      rel="stylesheet"
      integrity="sha384-EVSTQN3/azprG1Anm3QDgpJLIm9Nao0Yz1ztcQTwFspd3yD65VohhpuuCOmLASjC"
      crossorigin="anonymous"
    />
    <link
      rel="stylesheet"
      href="https://cdn.jsdelivr.net/npm/bootstrap-icons@1.10.4/font/bootstrap-icons.css"
    />
    <title>Sensor Management System</title>
    <link
      rel="stylesheet"
      href="{{ url_for('static', filename='home.css') }}"
    />
  </head>
  <body>
    <nav class="navbar navbar-expand-lg navbar-dark bg-dark">
      <div class="container-fluid">
        <a href="#" class="navbar-brand">Sensors Management System</a>
        <button
          type="button"
          class="navbar-toggler"
          data-bs-toggle="collapse"
          data-bs-target="#navbarCollapse"
        >
          <span class="navbar-toggler-icon"></span>
        </button>
        <div class="collapse navbar-collapse" id="navbarCollapse">
          <div class="navbar-nav ms-auto">
            <a href="#" class="nav-item nav-link active">Home</a>
            <a href="#" class="nav-item nav-link">About</a>
          </div>
        </div>
      </div>
    </nav>
<div class="container">
<div class="col-sm-12 col-xs-12 mt-4 border">
<div class="card">
<div class="card-header">
<h2>Remote Control Electronic Circuits with Database</h2>
</div>
<div class="card-body">
{% for sensor in sensors %} {% if sensor.type == 'LED' %}
<div class="row border-bottom p-2">
<div class="form-row col-6 text-end form-labels pe-5">LED</div>
<div class="col-6">
<div class="ms-4">
<div class="form-check form-switch">
<input
class="form-check-input"
type="checkbox"
id="ledSwitch"
data-objectid="{{ sensor._id }}"
/>
</div>
</div>
</div>
</div>
{% elif sensor.type == 'RELAY' %}
<div class="row border-bottom p-2">
<div class="form-row col-6 text-end form-labels pe-5">Relay</div>
<div class="d-flex flex-column col-6">
{% for key, value in sensor["values"].items() %}
<div class="form-check form-switch ms-4">
<input class="form-check-input relay-switch" type="checkbox"
id="relay-switch-{{key}}" data-key="{{key}}" data-objectid="{{
sensor._id }}" {% if value == "LOW" %} checked {% endif %} />
<label
class="form-check-label relay-label"
for="flexSwitchCheckDefault"
>{{key.capitalize()}}</label
>
</div>
{% endfor %}
</div>
</div>
{% elif sensor.type == 'DHT' %}
<div class="row border-bottom p-2">
<div class="form-row col-6 text-end form-labels pe-5 text-nowrap">
DHT22
</div>
<div class="d-flex flex-column col-6">
<div class="d-flex dht-readings">
<i class="bi bi-thermometer-half readings-icon"></i>
<p class="readings-text">
<strong id="dht-temp-value">0</strong> ℃
</p>
</div>
<div class="d-flex dht-readings">
<i class="bi bi-moisture readings-icon"></i>
<p class="readings-text">
<strong id="dht-humidity-value">0</strong> %
</p>
</div>
</div>
</div>
{% else %}
<p>Sensor Not Found!</p>
{% endif %} {% endfor %}
</div>
</div>
<footer>
<hr />
<p class="text-center">Sensors Management System</p>
<p class="text-center">
© Copyright 2023 <strong>https://www.donskytech.com</strong>
</p>
</footer>
</div>
</div>
<!-- Bootstrap JS Bundle with Popper -->
<script
src="https://cdn.jsdelivr.net/npm/bootstrap@5.0.2/dist/js/bootstrap.bundle.min.js"
integrity="sha384-MrcW6ZMFYlzcLA8Nl+NtUVF0sA7MsXsP1UyJoMp4YLEuNSfAP+JcXn/tWtIaxVXM"
crossorigin="anonymous"
></script>
<script src="{{url_for('static', filename='index.js')}}"></script>
</body>
</html>
The code above is the HTML code for our IoT web application and it may look big and complex but it actually is easy. This HTML file is a Jinja2 template structure so you might be seeing some {{ }} or {% %} which are expressions or functions. The sensors object from our database which was passed by the app.py is resolved by this file.
Let us try to walk thru what each line of code does.
HEAD section
<!DOCTYPE html>
<html>
<head>
<meta charset="UTF-8" />
<meta http-equiv="X-UA-Compatible" content="IE=edge" />
<meta name="viewport" content="width=device-width, initial-scale=1.0" />
<!-- Bootstrap CSS -->
<link
href="https://cdn.jsdelivr.net/npm/bootstrap@5.0.2/dist/css/bootstrap.min.css"
rel="stylesheet"
integrity="sha384-EVSTQN3/azprG1Anm3QDgpJLIm9Nao0Yz1ztcQTwFspd3yD65VohhpuuCOmLASjC"
crossorigin="anonymous"
/>
<link
rel="stylesheet"
href="https://cdn.jsdelivr.net/npm/bootstrap-icons@1.10.4/font/bootstrap-icons.css"
/>
<title>Sensor Management System</title>
<link
rel="stylesheet"
href="{{ url_for('static', filename='home.css') }}"
/>
</head>The head tag contains some of our meta elements and import for our Bootstrap CSS and local stylesheets for beautification purposes.
Navigation
<body>
<nav class="navbar navbar-expand-lg navbar-dark bg-dark">
<div class="container-fluid">
<a href="#" class="navbar-brand">Sensors Management System</a>
<button
type="button"
class="navbar-toggler"
data-bs-toggle="collapse"
data-bs-target="#navbarCollapse"
>
<span class="navbar-toggler-icon"></span>
</button>
<div class="collapse navbar-collapse" id="navbarCollapse">
<div class="navbar-nav ms-auto">
<a href="#" class="nav-item nav-link active">Home</a>
<a href="#" class="nav-item nav-link">About</a>
</div>
</div>
</div>
</nav>This is the HTML code for the navigation bar at the top of our Web Application and it uses the Bootstrap navbar component.
Display switches and others
<div class="container-fluid bg-dark">
<div class="page-wrapper bg-dark p-t-100 p-b-50">
<div class="wrapper wrapper--w900 p-5">
<div class="card">
<div class="card-header">
<h2>Remote Control Electronic Circuits with Database</h2>
</div>
<div class="card-body">
{% for sensor in sensors %} {% if sensor.type == 'LED' %}
<div class="row border-bottom p-2">
<div
class="form-row col-6 text-end form-labels pe-5 text-nowrap"
>
LED
</div>
<div class="col-6">
<div class="ms-4">
<div class="form-check form-switch">
<input
class="form-check-input"
type="checkbox"
id="ledSwitch"
data-objectid="{{ sensor._id }}"
/>
</div>
</div>
</div>
</div>
{% elif sensor.type == 'RELAY' %}
<div class="row border-bottom p-2">
<div
class="form-row col-6 text-end form-labels pe-5 text-nowrap"
>
Relay
</div>
<div class="d-flex flex-column col-6">
{% for key, value in sensor["values"].items() %}
<div class="form-check form-switch ms-4">
<input class="form-check-input relay-switch" type="checkbox"
id="relay-switch-{{key}}" data-key="{{key}}"
data-objectid="{{ sensor._id }}" {% if value == "LOW" %}
checked {% endif %} />
<label
class="form-check-label relay-label text-nowrap"
for="flexSwitchCheckDefault"
>{{key.capitalize()}}</label
>
</div>
{% endfor %}
</div>
</div>
{% elif sensor.type == 'DHT' %}
<div class="row border-bottom p-2">
<div
class="form-row col-6 text-end form-labels pe-5 text-nowrap"
>
DHT22
</div>
<div class="d-flex flex-column col-6">
<div class="d-flex dht-readings">
<i class="bi bi-thermometer-half readings-icon"></i>
<p class="readings-text">
<strong id="dht-temp-value">0</strong> ℃
</p>
</div>
<div class="d-flex dht-readings">
<i class="bi bi-moisture readings-icon"></i>
<p class="readings-text">
<strong id="dht-humidity-value">0</strong> %
</p>
</div>
</div>
</div>
{% else %}
<p>Sensor Not Found!</p>
{% endif %} {% endfor %}
</div>
</div>
</div>Now this is the code that draws our user interface like the toggle switches or the one that displays our DHT22 sensor. It might seem a little bit complicated but to simplify how the code works then please see this image below.
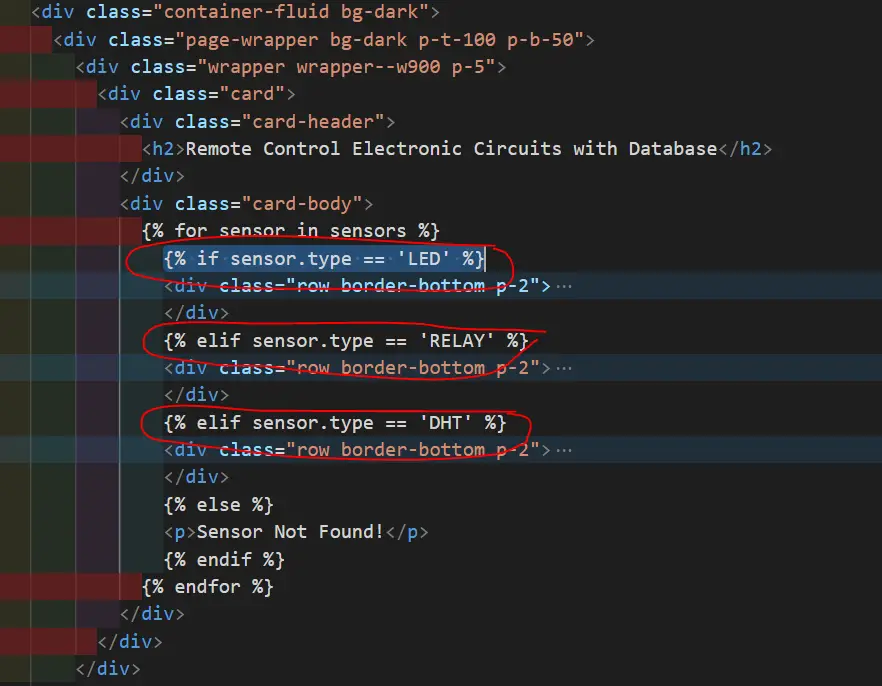
As you can see, we are looping thru our list of sensors that were passed by the app.py. For each sensor, we check the type property and draw the exact user interface for that. We only have three types of components here but you can add more if you want.
The following logic would draw the appropriate user interface for that component type. For example, a sensor with type LED is drawn like below which uses the bootstrap switch component. An important part of the code is the custom data attribute where we set the ObjectId of that particular element thru this code data-objectid="{{ sensor._id }}". When we click our toggle switch then that attribute is inspected in the Javascript function.
              {% if sensor.type == 'LED' %}
              <div class="row border-bottom p-2">
                <div
                  class="form-row col-6 text-end form-labels pe-5 text-nowrap"
                >
                  {{ sensor.description }}
                </div>
                <div class="col-6">
                  <div class="ms-4">
                    <div class="form-check form-switch">
                      <input
                        class="form-check-input"
                        type="checkbox"
                        id="ledSwitch"
                        data-objectid="{{ sensor._id }}"
                      />
                    </div>
                  </div>
                </div>
              </div>
Footer section
In the last sections of the home.html, it draws the footer at the bottom and imports the bootstrap javascript file and our custom index.js javascript file.
<footer>
<hr />
<p class="text-center">Sensors Management System</p>
<p class="text-center">
© Copyright 2023 <strong>https://www.donskytech.com</strong>
</p>
</footer>
</div>
</div>
<!-- Bootstrap JS Bundle with Popper -->
<script
src="https://cdn.jsdelivr.net/npm/bootstrap@5.0.2/dist/js/bootstrap.bundle.min.js"
integrity="sha384-MrcW6ZMFYlzcLA8Nl+NtUVF0sA7MsXsP1UyJoMp4YLEuNSfAP+JcXn/tWtIaxVXM"
crossorigin="anonymous"
></script>
<script src="{{url_for('static', filename='index.js')}}"></script>
</body>
</html>
static/index.js
var ledSwitch = document.querySelector("#ledSwitch");

ledSwitch.addEventListener("change", function () {
  var objectId = this.dataset.objectid;
  var commandStatus = this.checked ? "HIGH" : "LOW";

  // data to be sent to the PUT request
  let _data = {
    status: commandStatus,
  };
  let updateSensorURL =
    "http://" + window.location.host + "/api/sensors/" + objectId;

  fetch(updateSensorURL, {
    method: "PUT",
    body: JSON.stringify(_data),
    headers: { "Content-type": "application/json; charset=UTF-8" },
  })
    .then((response) => response.json())
    .then((json) => console.log(json))
    .catch((err) => console.log(err));
});

document.querySelectorAll(".relay-switch").forEach((relaySwitch) => {
  relaySwitch.addEventListener("change", (e) => {
    var objectId = e.target.dataset.objectid;

    // data to be sent to the PUT request
    let _data = {
      values: {},
    };
    document.querySelectorAll(".relay-switch").forEach((relayPin) => {
      var key = relayPin.dataset.key;
      _data.values[key] = relayPin.checked ? "LOW" : "HIGH";
    });
    let updateSensorURL =
      "http://" + window.location.host + "/api/sensors/" + objectId;

    fetch(updateSensorURL, {
      method: "PUT",
      body: JSON.stringify(_data),
      headers: { "Content-type": "application/json; charset=UTF-8" },
    })
      .then((response) => response.json())
      .then((json) => console.log(json))
      .catch((err) => console.log(err));
  });
});

function updateSensorReadings(jsonResponse) {
  var temperature = document.querySelector("#dht-temp-value");
  var humidity = document.querySelector("#dht-humidity-value");

  console.log(jsonResponse);
  if (jsonResponse) {
    temperature.innerHTML = jsonResponse[0].readings.temperature.toFixed(2);
    humidity.innerHTML = jsonResponse[0].readings.humidity.toFixed(2);
  }
}
function retrieveDHTReadings() {
  var dhtSensorId = "dht22_1";
  var url = `/api/sensors?sensor_id=${dhtSensorId}`;
  fetch(url)
    .then((response) => response.json())
    .then((jsonResponse) => {
      updateSensorReadings(jsonResponse);
    });
}

// Continuos loop that runs evry 5 seconds to update our web page with the latest sensor readings
(function loop() {
  setTimeout(() => {
    retrieveDHTReadings();
    loop();
  }, 5000);
})();
The index.js file adds functionality to our user interface and it calls our REST API server that will update our MongoDB database. Let us walk thru what each line of the code does.
LED toggle switch handling
var ledSwitch = document.querySelector("#ledSwitch");

ledSwitch.addEventListener("change", function () {
  var objectId = this.dataset.objectid;
  var commandStatus = this.checked ? "HIGH" : "LOW";

  // data to be sent to the PUT request
  let _data = {
    status: commandStatus,
  };
  let updateSensorURL =
    "http://" + window.location.host + "/api/sensors/" + objectId;

  fetch(updateSensorURL, {
    method: "PUT",
    body: JSON.stringify(_data),
    headers: { "Content-type": "application/json; charset=UTF-8" },
  })
    .then((response) => response.json())
    .then((json) => console.log(json))
    .catch((err) => console.log(err));
});
This part of the code adds an event listener to our LED switch. When you toggle your LED switch then we check its value and call our REST API server that updates our sensor records. We set the HTTP Method to PUT and set the ObjectId of the MongoDB LED row which we have extracted from the HTML page.
This will send the following JSON object which will update our status for the LED sensor.
let _data = {
    status: "HIGH"
};
Now lets us go over how we handle the relay inputs.
Relay toggle switch handling
document.querySelectorAll(".relay-switch").forEach((relaySwitch) => {
  relaySwitch.addEventListener("change", (e) => {
    var objectId = e.target.dataset.objectid;

    // data to be sent to the PUT request
    let _data = {
      values: {},
    };
    document.querySelectorAll(".relay-switch").forEach((relayPin) => {
      var key = relayPin.dataset.key;
      _data.values[key] = relayPin.checked ? "LOW" : "HIGH";
    });
    let updateSensorURL =
      "http://" + window.location.host + "/api/sensors/" + objectId;

    fetch(updateSensorURL, {
      method: "PUT",
      body: JSON.stringify(_data),
      headers: { "Content-type": "application/json; charset=UTF-8" },
    })
      .then((response) => response.json())
      .then((json) => console.log(json))
      .catch((err) => console.log(err));
  });
});
So the code above shows you that we have added an event listener for each relay toggle switch. When an event is raised then we query the current value of each relay input switch and create a JSON object like the one shown below.
let _data = {
    values: {
			in1 = "HIGH",
			in2 = "HIGH",
			in3 = "LOW",
			in4 = "LOW"
	}
};
We then call the same REST API server that would update the sensor configuration on our MongoDB database.
DHT display
function updateSensorReadings(jsonResponse) {
  var temperature = document.querySelector("#dht-temp-value");
  var humidity = document.querySelector("#dht-humidity-value");

  console.log(jsonResponse);
  if (jsonResponse) {
    temperature.innerHTML = jsonResponse[0].readings.temperature.toFixed(2);
    humidity.innerHTML = jsonResponse[0].readings.humidity.toFixed(2);
  }
}
function retrieveDHTReadings() {
  var dhtSensorId = "dht22_1";
  var url = `/api/sensors?sensor_id=${dhtSensorId}`;
  fetch(url)
    .then((response) => response.json())
    .then((jsonResponse) => {
      updateSensorReadings(jsonResponse);
    });
}

// Continuos loop that runs evry 5 seconds to update our web page with the latest sensor readings
(function loop() {
  setTimeout(() => {
    retrieveDHTReadings();
    loop();
  }, 5000);
})();
The DHT logic is different from the initial two objects (LED and RELAY) where there is no input but it only needs to display the current values on our database.
To retrieve the latest readings from our database then we would call our REST API server that reads the current content of our DHT22 document. Remember that our microcontroller or SBC would update this document/record at a fixed interval.
Upon the successful retrieval of the record for our DHT22 sensor then we update our user interface to display it. As you can see in the functionloop() we have set this to run every 5 seconds.
static/home.css
.page-wrapper {
  min-height: 100vh;
}
.wrapper--w900 {
  max-width: 900px;
}
.wrapper {
  margin: 0 auto;
}

.form-labels {
  font-size: 1.5rem;
  font-weight: bold;
}
.form-check-input {
  font-size: 1.5rem;
}
.relay-label {
  font-size: 1.2rem;
}

.readings-icon,
.readings-text {
  font-size: 1.5rem;
}
.readings-text {
  margin-left: 10px;
}
The home.css is our custom CSS stylesheet that will beautify our page.
That is all for the code and how you can create your own custom IoT web application.
Wrap Up
Knowing how to create an IoT web application that can control your electronic circuit can add another dimension to your IoT projects. In this post, I have shown you how I created my own using Python, Flask, and MongoDB. By using this project then we can control our electronic circuit remotely using our browser or our mobile phone.
An external IoT web application deployed outside your home network would allow you to control your project like a home automation system remotely. As usual, if something is not clear then send me a message here or on my YouTube channel.
I hope you learned something! Happy Exploring!
Leave a Reply