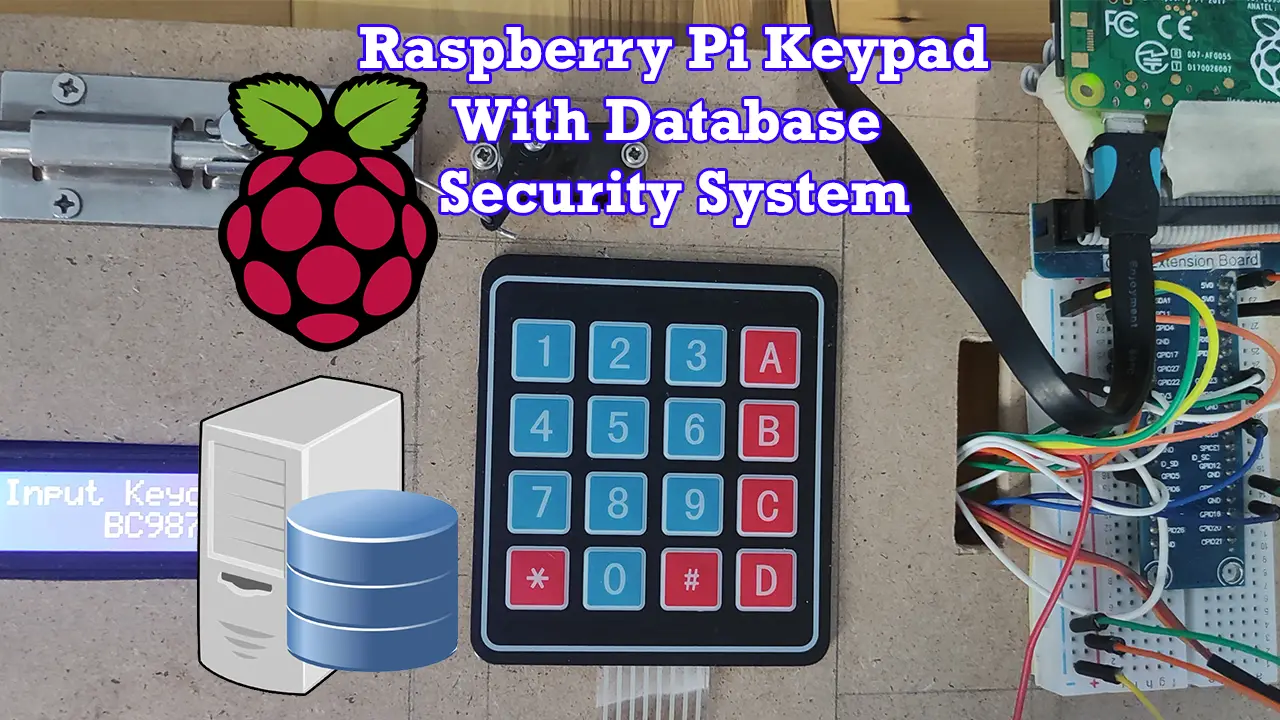
Introduction
We are building our own Keypad Security System with a database interface using our raspberry pi in this post. We are controlling our door lock by restricting users to enter only valid keycodes thru the keypad and this gets validated with our backend database.
In the previous post, we created a project using a keypad and a door lock that checks if the keycodes entered in the keypad are in our database of valid values. We have used the Arduino Framework and the Espressif ESP32 microcontroller in powering that project.
Using the same requirements, we are going to re-create the same project but this time we will use the Raspberry Pi and Python code. If you want to see this project in a video format then please see below. You can also watch this on my YouTube channel.
Design
High-Level Design
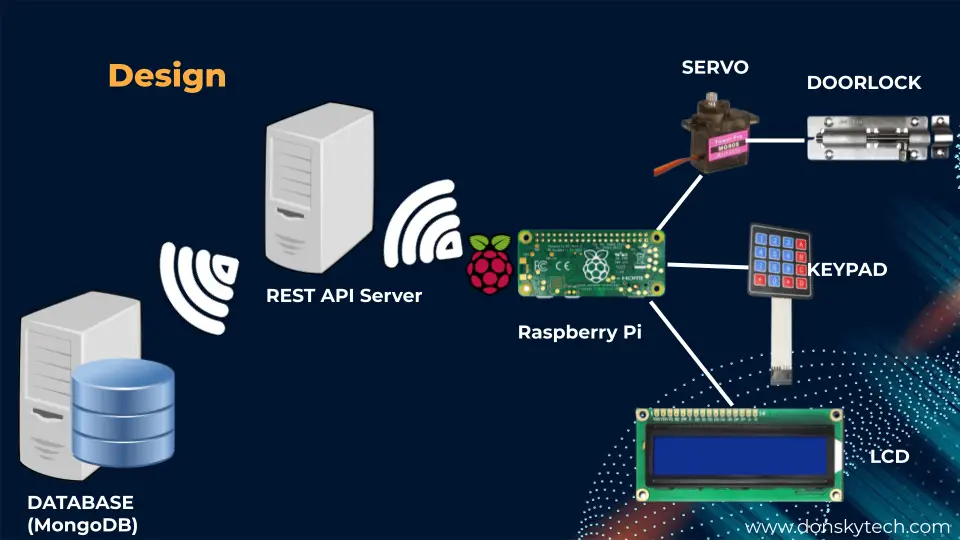
The following diagram illustrates the overall design of our Keypad with a Database Security System using Raspberry Pi.
There are three major components that we need to take a look at.
- Raspberry Pi and the hardware interfaces
- REST API Server
- MongoDB Database server
The Raspberry Pi and the Hardware Interfaces
The Raspberry Pi Single Board Computer (SBC) handles the bulk of the processing in this Internet of Things project. First, it connects to the hardware components needed to retrieve the keypad codes and then displays them thru the LCD. It then calls the REST API Server and then passes the inputted keycodes to validate if this is present in the database. From the result of the validation, it then handles the locking and opening of the door lock thru the servo mechanism.
The Raspberry Pi is connected with the following components.
- Keypad
- LCD Display
- Servo Motor
The keypad connection retrieves the keycodes inputted by the user. In this project,
- we are restricting the length of the keycodes to 6 and any combinations of letters and numbers are allowed.
- The “*” (asterisk) character is used to clear our input
- the “#” (pound) sign is used to validate our keycodes with that of our database.
The LCD is used to display information content to the user and also show the user the keycode that he/she entered.
The servo motor interfaces with our door lock mechanism. It handles the opening and the closing of the lock thru a simple linkage that we have used. By moving the servo to some distinct position then we are able to open or close the door lock.
The REST API Server
The REST API Server is a web service built using Node.js and it defines several endpoints that our Raspberry Pi can call to pass in the keycode entered by the user and then validate it if it is present in our database.
We have deployed this REST API server locally in our laptop workstation but we are able to deploy it thru other cloud solutions like AWS, Azure, etc.
MongoDB Database
The last component in our project is our database which stores the list of our valid keycodes. We are using MongoDB Atlas as our database here to store our list of keycodes.
MongoDB Atlas is a cloud database as a service database that is both known for its scalability and flexibility. MongoDB stores data in flexible, JSON-like documents and is free to use for small applications.
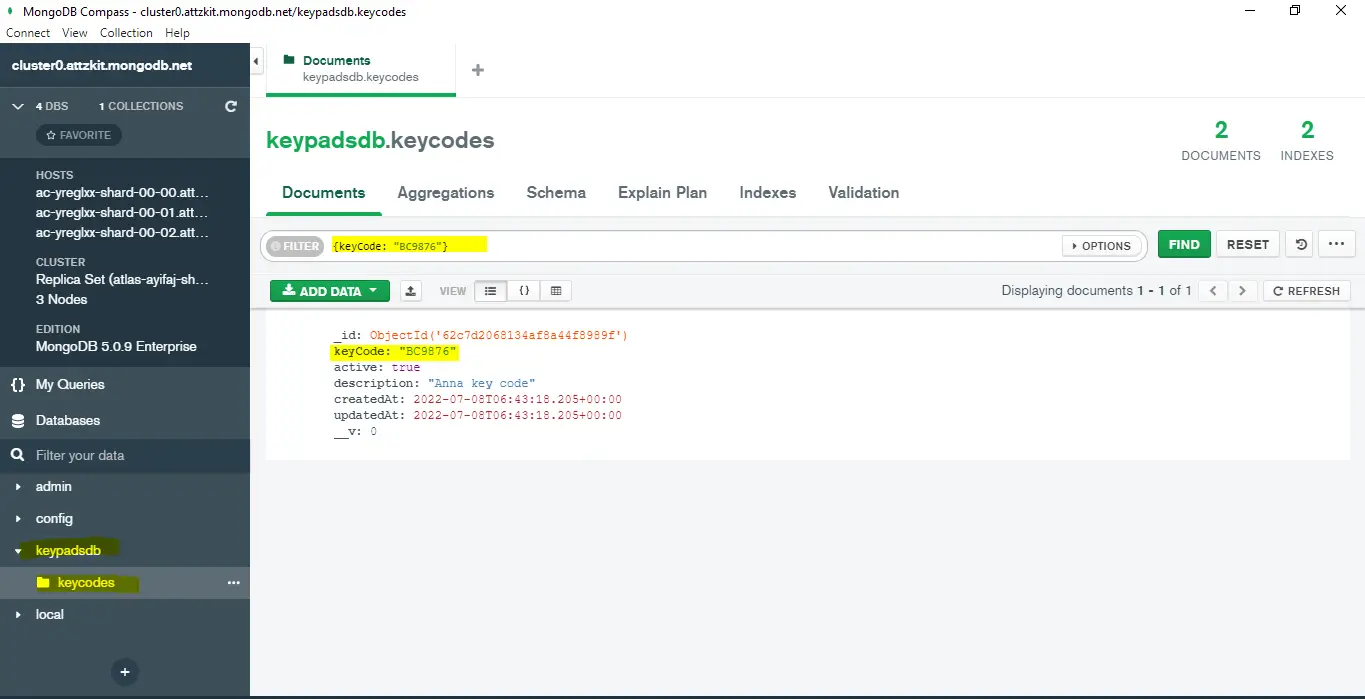
The image below is a sample of how our keycodes are stored in MongoDB Atlas. If you want to learn more and get started with MongoDB Atlas then click this post that I have written about it.
We will be creating two projects to be able to handle the design above. The first one is the REST API Server that will interact with our MongoDB database. The other one is the Raspberry Pi project which will interact with our hardware components.
Message Exchange
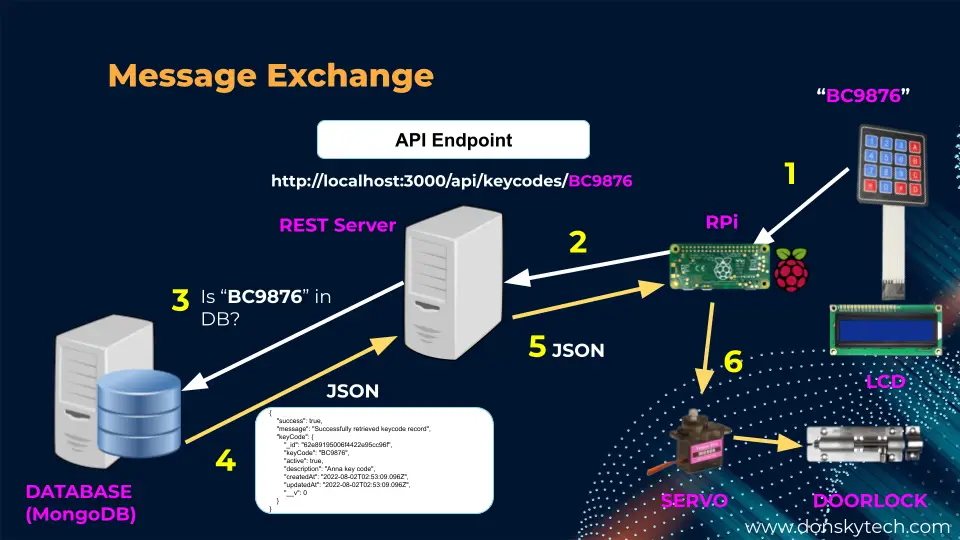
The illustration above will explain how messages flow thru the different components of our project starting from our keypad to our raspberry pi up to our database.
So the message flows something like this.
- User inputs a keycode thru the keypad
- Raspberry Pi receives the keycode and calls the REST API server endpoint passing in the key code
- The REST API Server queries the MongoDB database to check if that keycode is present in our database
- The MongoDB database returns a JSON response that includes the keycode details and sends it back to the REST API server
- The REST API server returns a response or error back to the Raspberry Pi
- The Raspberry Pi will parse the JSON response and will check if the keycode is allowed or not then it tells the servo to open or remain closed.
An example endpoint that our REST API server is exposing is like this and this is used to check if the keycode is valid or not.
http://localhost:3000/api/keyCodes/BC9876The endpoint above is an example of how we passed in a user inputted keycodes (e.g BC9876) and then our REST API server will query our MongoDB Database. The result which is usually in JSON format is then passed back to our Raspberry Pi SBC for processing.
There are several other API endpoints that are being exposed by our REST API server like how to add/edit/delete keycodes but in the case of our project, we are interested in querying the keycode only.
The following is the sample JSON result received by our Raspberry Pi SBC. If the success is “true” then the servo will open the door lock but if the success is “false” then it remains close.
{
    "success": true,
    "message": "Successfully retrieved keycode record",
    "keyCode": {
        "_id": "62e89195006f4422e95cc96f",
        "keyCode": "BC9876",
        "active": true,
        "description": "Anna key code",
        "createdAt": "2022-08-02T02:53:09.096Z",
        "updatedAt": "2022-08-02T02:53:09.096Z",
        "__v": 0
    }
}
Prerequisites
We will be coding two separate projects in this post so I am listing the prerequisites for each.
REST API Server
- Set up your MongoDB Atlas cluster. You can follow this MongoDB Atlas: An Overview and how to get started where I did this. Note: Take note of your connection string.
- Bootstrap the REST API Server. You have two options on how you can set up or re-create this project.
- If you know Javascript, Node.js, and Express and you would like to follow along on how I did this project from scratch then you can see this in my how to build rest API using node.js, express and MongoDB post,
- If you are not comfortable with Javascript and just would like to follow along with this post then please see this How to set up the REST API Server – Keycodes.
If you would like to see this REST API server project in action including the testing part then please refer to this video on my youtube channel.
Raspberry Pi project
Components/Tools
- Raspberry Pi (I used Raspberry Pi Zero W)
- Keypad
- I2C 16X2 LCD
- Servo Motor (either SG90 or MG90)
- Breadboard
- Connecting wires
- MDF board for project support
Set up the latest Raspberry Pi OS on your single board computer. You can follow my previous post on how I set up my raspberry pi in headless mode wherein no external keyboard or monitor is needed.
Wiring/Schematic
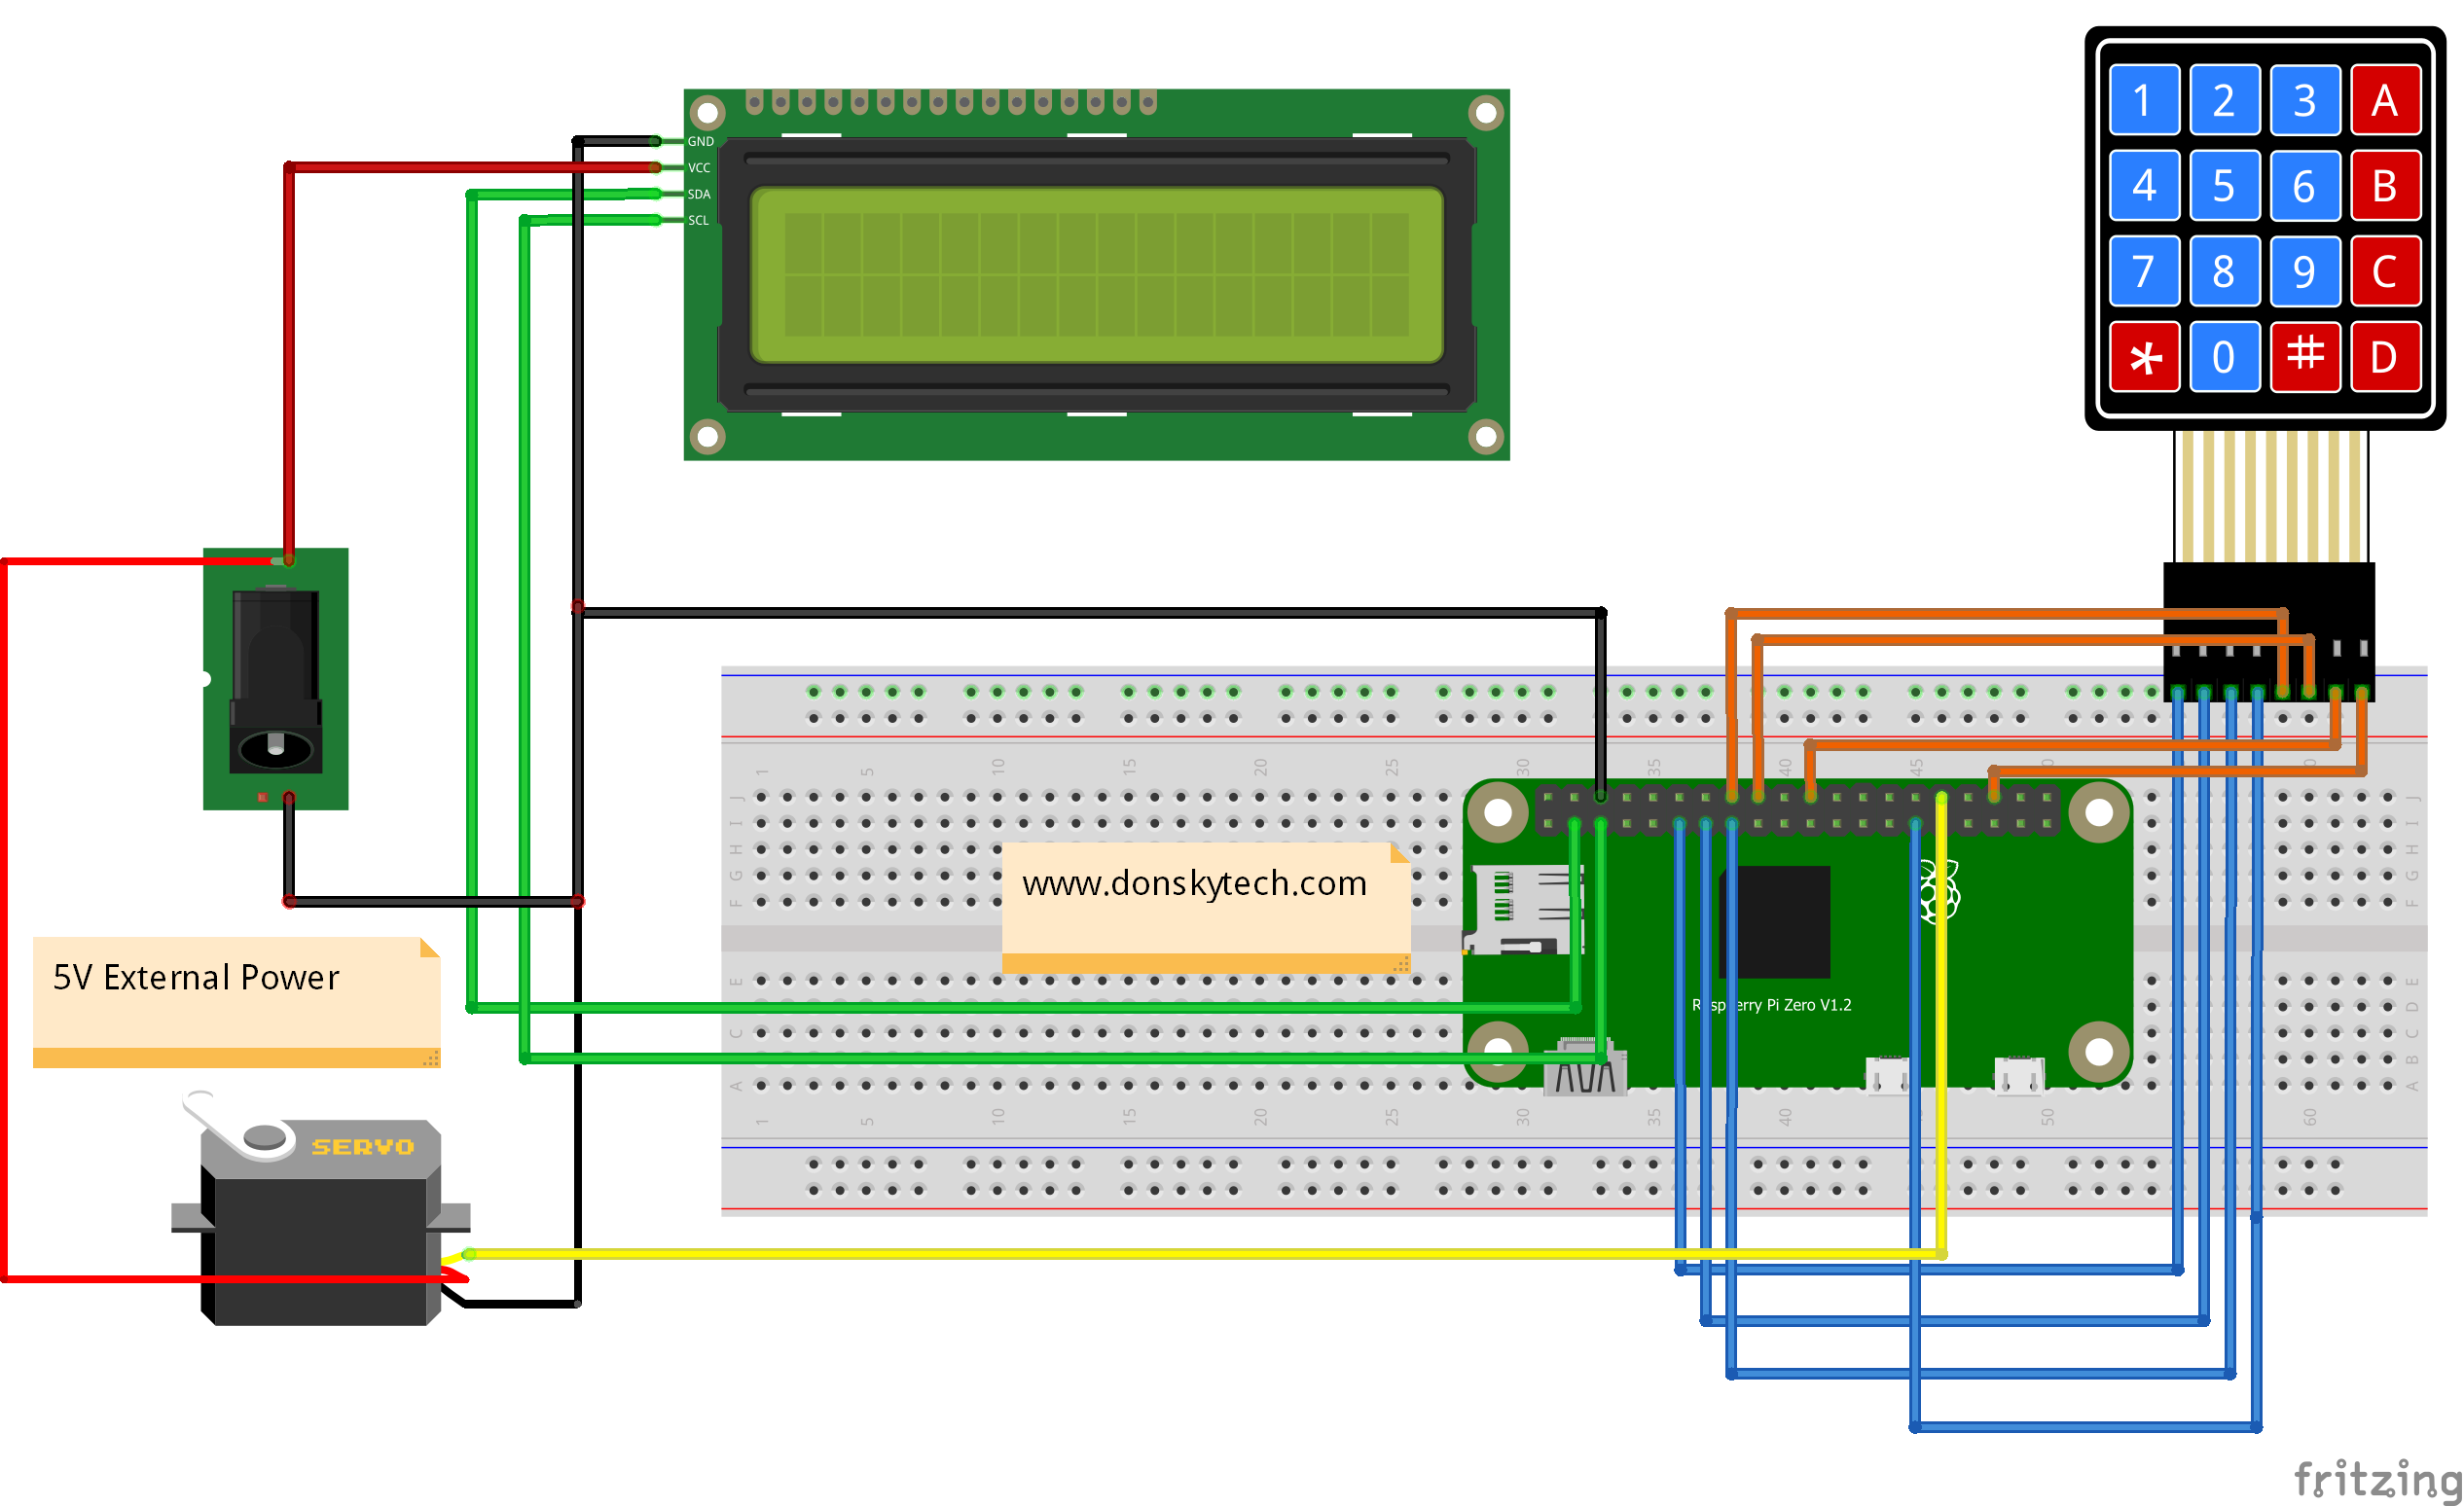
Keypad to Raspberry Pi
The following table is the wiring diagram between the raspberry pi and our keypad. If you are not familiar with how to interface your keypad with your raspberry pi then please see this Setup Keypad with Raspberry Pi
| Keypad | Raspberry Pi |
|---|---|
| R1 | GPIO17 |
| R2 | GPIO27 |
| R3 | GPIO22 |
| R4 | GPIO5 |
| C1 | GPIO23 |
| C2 | GPIO24 |
| C3 | GPIO25 |
| C4 | GPIO16 |
I2C LCD to Raspberry Pi
The following table is the wiring diagram between the raspberry pi and our I2C LCD. If you are not familiar with how to interface your I2C LCD with your raspberry pi then please see this Setup I2C LCD Using Raspberry Pi
| Raspberry Pi | I2C LCD |
|---|---|
| 5V (External Power) | VCC |
| GND | GND |
| SDA (GPIO2) | SDA |
| SCL (GPIO3) | SCL |
Servo to Raspberry Pi
The following table is the wiring diagram between the raspberry pi and our servo motor. If you are not familiar with how to interface your servo motor with your raspberry pi then please see this Servo Motor Control Using Raspberry Pi.
| Servo | Raspberry Pi |
|---|---|
| GND | GND |
| 5V (External Power) | Vin |
| Data or PWM Signal | GPIO12 |
At this point you can do the assembly of your project or if you want to follow my own assembly then you can watch this video. Once done then you can begin the wiring by following the wiring table above.
Code
Install the I2C LCD library and the Keypad Library
If you are not familiar on how to interface with an I2C LCD please follow my post about Setup I2C LCD Using Raspberry Pi. However, if you already know how to work with I2C LCD then just follow the install steps from this link.
If you are not familiar on how to interface with a Keypad then you can take a look at my Setup Keypad with Raspberry Pi. However, if you know already then just install the following package in your raspberry pi
pip install pad4piTo configure your servo motor properly then please take a look at my Servo Motor Control Using Raspberry Pi
Running the project
The code to power up this project is in my GitHub repository. You can either download or clone this repository.
Please follow the following steps to install this project on your raspberry pi.
- Connect with your Raspberry Pi either thru putty or terminal
login as: pi
pi@192.168.100.183's password:

pi@raspberrypi-zero-w:~ $
- Clone my raspberry pi project by using this command git clone
https://github.com/donskytech/raspberrypi-projects.git
pi@raspberrypi-zero-w:~ $ git clone https://github.com/donskytech/raspberrypi-projects.git
Cloning into 'raspberrypi-projects'...
remote: Enumerating objects: 196, done.
remote: Counting objects: 100% (196/196), done.
remote: Compressing objects: 100% (139/139), done.
remote: Total 196 (delta 89), reused 157 (delta 50), pack-reused 0
Receiving objects: 100% (196/196), 28.47 KiB | 156.00 KiB/s, done.
Resolving deltas: 100% (89/89), done.
- Change into my project directory
cd 'Raspberry Pi Keypad Database Security System'
pi@raspberrypi-zero-w:~/raspberrypi-projects $ cd 'Raspberry Pi Keypad Database Security System'
pi@raspberrypi-zero-w:~/raspberrypi-projects/Raspberry Pi Keypad Database Security System $
4. Now you would be able to see the main.py script. You can execute this script using the below command but first, change the IP address of your REST API server. Please see the code explanation section on how to do this.
sudo python main.pyYou can now begin interacting with the project by entering the keycodes that you have set up in your MongoDB Atlas database. Also, you can watch the video in the introduction section where I played around with entering valid and invalid keycodes.
Code explanation
The code for the main.py script is below and we will explain each section one by one in the following paragraphs.
import RPi.GPIO as GPIO
import time
import drivers
from pad4pi import rpi_gpio
import requests

#change this to the IP address of your REST API Server
API_SERVER = "192.168.100.22:3000"

KEYPAD = [
    [1, 2, 3, "A"],
    [4, 5, 6, "B"],
    [7, 8, 9, "C"],
    ["*", 0, "#", "D"]
]

ROW_PINS = [17, 27, 22, 5] # BCM numbering
COL_PINS = [23, 24, 25, 16] # BCM numbering

# setup RPi
GPIO.setwarnings(False)

#setup servo config
servo_pin = 12
GPIO.setmode(GPIO.BCM)
GPIO.setup(servo_pin,GPIO.OUT)

# Initialize pwm pin to 20 ms Period or 50HZ frequency
pwm = GPIO.PWM(servo_pin,50)
pwm.start(0)

display = drivers.Lcd()

# Constants
DEFAULT_INDENT = "     "
input_key_codes = DEFAULT_INDENT
DEFAULT_KEYCODE_LENGTH = 6

def open_lock():
    print("Opening lock...")
    pwm.ChangeDutyCycle(11)
    time.sleep(5)
    print("Closing lock after 5 secs...")
    close_lock()
    pwm.ChangeDutyCycle(0)  # prevent servo from jittering when not receiving any signal

def close_lock():
    print("Closing lock...")
    pwm.ChangeDutyCycle(2)
    time.sleep(1)

def cleanup():
    pwm.stop()
    GPIO.cleanup()
    display.lcd_clear()
    print("Releasing resources and stopping our Program...")

def display_to_lcd(data, position = 2, show_input_keycode = False, duration = 1):
    display.lcd_clear()

    if show_input_keycode:
        display.lcd_display_string("Input Keycode:", 1)
        display.lcd_display_string(input_key_codes, 2)
        time.sleep(0.1)

    if data is not None:
        display.lcd_display_string(data, position)
    if duration is not None:
        time.sleep(duration)

def init_keypad_driver():
    factory = rpi_gpio.KeypadFactory()
    keypad = factory.create_keypad(keypad=KEYPAD,row_pins=ROW_PINS, col_pins=COL_PINS, key_delay=100)

    keypad.registerKeyPressHandler(handle_keypad_press)

def handle_keypad_press(key):
    global input_key_codes

    if key == '*':
        print("Clearing input..")
        input_key_codes = DEFAULT_INDENT
        display_to_lcd(None, None, show_input_keycode = True)
    elif key == '#':
        if len(input_key_codes.strip()) < DEFAULT_KEYCODE_LENGTH:
            display_to_lcd("Incomplete!!!", 2, show_input_keycode = False, duration=1)
            display_to_lcd(None, None, show_input_keycode = True)
            return


        print("Connecting to REST API Server..")
        display_to_lcd("Checking......", 2, show_input_keycode = False)
        with_error, is_present = validate_keycode(input_key_codes)

        # If with error then do nothing as this will be displayed in the LCD
        if with_error:
            return

        if is_present:
            display_to_lcd("Valid Keycode!", 2, show_input_keycode = False, duration=1)
            input_key_codes = DEFAULT_INDENT
            open_lock()
            display_to_lcd(None, None, show_input_keycode = True)
        else:
            display_to_lcd("Invalid Keycode!", 2, show_input_keycode = False, duration=1)
            input_key_codes = DEFAULT_INDENT
            display_to_lcd(None, None, show_input_keycode = True)
    else:
        if len(input_key_codes.strip()) == DEFAULT_KEYCODE_LENGTH:
            display_to_lcd("Exceed Limit!!!", 2, show_input_keycode = False, duration=1)
            display_to_lcd(None, None, show_input_keycode = True)
            return
        input_key_codes += str(key)
        print(f"input_key_codes:: {input_key_codes}")
        display_to_lcd(None, None, show_input_keycode = True, duration=0.2)


def validate_keycode(keycode):
    with_error = False
    request_url = f"http://{API_SERVER}/api/keycodes/{keycode.strip()}"
    print(f"Validate using REST API Server :: {request_url}")

    try:
        response = requests.get(request_url, timeout=5)
    except requests.exceptions.RequestException as e:
        print(f"Error encountered calling REST API Server :: {e}")
        display_to_lcd("Server Error!!!", 2, show_input_keycode = False)
        with_error = True
        return with_error, False

    json_response = response.json()

    return with_error, json_response['success']


def main():
    print("Starting our RPi Keypad Database Security System..")

    display_to_lcd("Initializing..", 1)

    init_keypad_driver()

    display_to_lcd(None, None, show_input_keycode = True)

    print("Press buttons on your keypad. Ctrl+C to exit.")

if __name__ == "__main__":
    try:
        main()
        while True:
            time.sleep(1)
    except KeyboardInterrupt:
        pass
    finally:
        cleanup()
Let us go through each line of the code to explain what it does.
Importing the required packages.
import RPi.GPIO as GPIO
import time
import drivers
from pad4pi import rpi_gpio
import requests
You need to change this to point to the IP Address of where you installed the REST API Server. If you installed this on your laptop then it should point to the IP Address of your laptop.
#change this to the IP address of your REST API Server
API_SERVER = "192.168.100.22:3000"
These are the initial keypad settings and you can alter the GPIO pin assignments here if you want. Also, the Keypad setup can be configured if you have a different keypad membrane like a 3×4.
KEYPAD = [
    [1, 2, 3, "A"],
    [4, 5, 6, "B"],
    [7, 8, 9, "C"],
    ["*", 0, "#", "D"]
]

ROW_PINS = [17, 27, 22, 5] # BCM numbering
COL_PINS = [23, 24, 25, 16] # BCM numbering
We set up the RPi.gpio settings here and declare the LCD and PWM pin for the servo as well as starting the PWM at 50Hz frequency.
# setup RPi
GPIO.setwarnings(False)

#setup servo config
servo_pin = 12
GPIO.setmode(GPIO.BCM)
GPIO.setup(servo_pin,GPIO.OUT)

# Initialize pwm pin to 20 ms Period or 50HZ frequency
pwm = GPIO.PWM(servo_pin,50)
pwm.start(0)

display = drivers.Lcd()
These are the constants needed to display properly in the I2C LCD
# Constants
DEFAULT_INDENT = "     "
input_key_codes = DEFAULT_INDENT
DEFAULT_KEYCODE_LENGTH = 6
CLEAR_DISPLAY = "                " # 16 char blank character
The open_lock and close_lock functions are needed to open or close the lock. It works by changing the duty cycle of the servo motor.
def open_lock():
    print("Opening lock...")
    pwm.ChangeDutyCycle(11)
    time.sleep(5)
    print("Closing lock after 5 secs...")
    close_lock()
    pwm.ChangeDutyCycle(0)  # prevent servo from jittering when not receiving any signal

def close_lock():
    print("Closing lock...")
    pwm.ChangeDutyCycle(2)
    time.sleep(1)
The cleanup function is used to release resources when we exit our code.
def cleanup():
    pwm.stop()
    GPIO.cleanup()
    display.lcd_clear()
    print("Releasing resources and stopping our Program...")
The display_to_lcd function is used to display text in our LCD.
def display_to_lcd(data, position = 2, show_input_keycode = False, duration = 1):
    display.lcd_clear()

    if show_input_keycode:
        display.lcd_display_string("Input Keycode:", 1)
        display.lcd_display_string(input_key_codes, 2)
        time.sleep(0.1)

    if data is not None:
        display.lcd_display_string(data, position)
    if duration is not None:
        time.sleep(duration)
This init_keypad_driver function initializes our keypad driver and declares handle_keypad_press as our function callback whenever a key was pressed on the keypad.
def init_keypad_driver():
    factory = rpi_gpio.KeypadFactory()
    keypad = factory.create_keypad(keypad=KEYPAD,row_pins=ROW_PINS, col_pins=COL_PINS)

    keypad.registerKeyPressHandler(handle_keypad_press)
The handle_keypad_press handles the core processing of our project. This function does the following things:
- It reads the keys entered in our keypad and updates the variable input_key_codes
- It responds to special keys “*” or “#” that will clear the LCD display or call our REST API server to validate the inputted keycodes
- It does validation of keycodes and tells the user if an error occurs or if everything is successful or not by displaying it through the LCD.
- It opens and closes the door lock when the inputted keycodes are correct or not.
def handle_keypad_press(key):
    global input_key_codes

    if key == '*':
        print("Clearing input..")
        input_key_codes = DEFAULT_INDENT
        display_to_lcd(None, None, show_input_keycode = True)
    elif key == '#':
        if len(input_key_codes.strip()) < DEFAULT_KEYCODE_LENGTH:
            display_to_lcd("Incomplete!!!", 2, show_input_keycode = False, duration=1)
            display_to_lcd(None, None, show_input_keycode = True)
            return


        print("Connecting to REST API Server..")
        display_to_lcd("Checking......", 2, show_input_keycode = False)
        with_error, is_present = validate_keycode(input_key_codes)

        # If with error then do nothing as this will be displayed in the LCD
        if with_error:
            return

        if is_present:
            display_to_lcd("Valid Keycode!", 2, show_input_keycode = False, duration=1)
            input_key_codes = DEFAULT_INDENT
            open_lock()
            display_to_lcd(None, None, show_input_keycode = True)
        else:
            display_to_lcd("Invalid Keycode!", 2, show_input_keycode = False, duration=1)
            input_key_codes = DEFAULT_INDENT
            display_to_lcd(None, None, show_input_keycode = True)
    else:
        if len(input_key_codes.strip()) == DEFAULT_KEYCODE_LENGTH:
            display_to_lcd("Exceed Limit!!!", 2, show_input_keycode = False, duration=1)
            display_to_lcd(None, None, show_input_keycode = True)
            return
        input_key_codes += str(key)
        print(f"input_key_codes:: {input_key_codes}")
        display_to_lcd(None, None, show_input_keycode = True, duration=0.2)
This validate_keycode calls our REST API Server and processes the response. It handles the error as well.
def validate_keycode(keycode):
    with_error = False
    request_url = f"http://{API_SERVER}/api/keycodes/{keycode.strip()}"
    print(f"Validate using REST API Server :: {request_url}")

    try:
        response = requests.get(request_url, timeout=5)
    except requests.exceptions.RequestException as e:
        print(f"Error encountered calling REST API Server :: {e}")
        display_to_lcd("Server Error!!!", 2, show_input_keycode = False)
        with_error = True
        return with_error, False

    json_response = response.json()

    return with_error, json_response['success']
This is the main function of our project and this serves as the entry point of everything. it bootstraps all the necessary drivers for the LCD or the keypad or the servo.
def main():
    print("Starting our RPi Keypad Database Security System..")

    display_to_lcd("Initializing..", 1)

    init_keypad_driver()

    display_to_lcd(None, None, show_input_keycode = True)

    print("Press buttons on your keypad. Ctrl+C to exit.")
This function keeps our project running in the background.
if __name__ == "__main__":
    try:
        main()
        while True:
            time.sleep(1)
    except KeyboardInterrupt:
        pass
    finally:
        cleanup()
Wrap Up
We have covered a lot of stuff here but this is a fun project to do. We talk about interfacing with your I2C LCD, Keypad and Servo Motors and also connected with a database from our Raspberry Pi.
I hope you learned something from building this Raspberry Pi Keypad Database Security System. Send me a message or comment if something is not understandable to you.
That’s it! Happy Exploring!
Leave a Reply