Introduction
This post will show you how you can handle dynamic content in your MicroDot web server project. A typical scenario may arise wherein you need to control several sensors from your mobile phone but you wanted them stored in a database or configuration file. You may want a web application that could display all of this and be able to control it with your MicroPython device.
If you want to see a video demo presentation of this project then please see below or watch this on my YouTube channel.
What are we building?

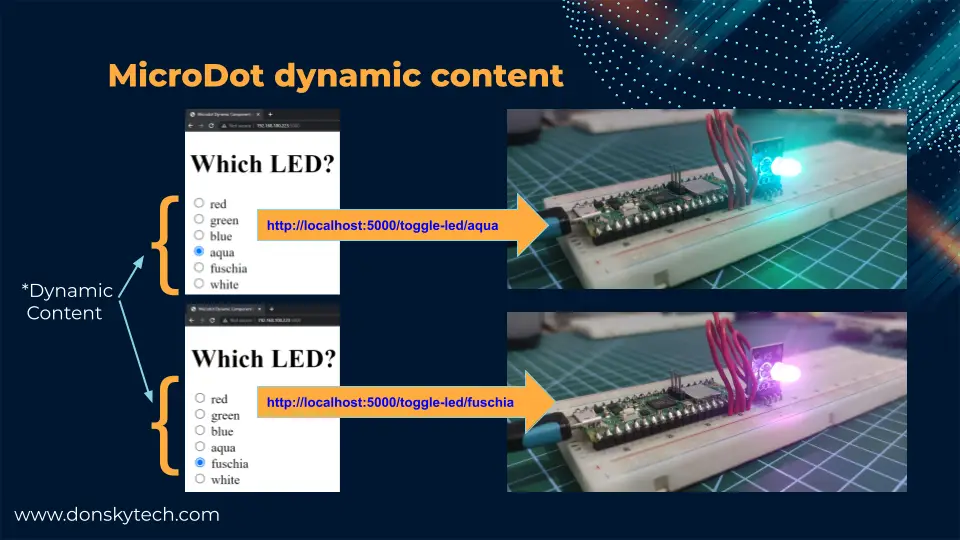
The image above is a sample MicroPython project that we are going to tackle. We are going to call this project “Dynamic RGB Module Display using MicroDot“. I would like to control the color being displayed by my RGB LED component. The number of colors should be dynamic so I would like it to be stored in either a text file or a database. I then would like to have an application that will display the colors (my dynamic content) that I have configured when I click a particular color then I want them to be displayed by my RGB LED module. Sounds exciting right?
Before I move on doing this project, I wanted you first to focus on the importance of a URL and a URL path as they are important to learn to come up with the solution to what we would like to do.
What is URL and URL Path?
URL stands for Uniform Resource Locator. A URL is nothing more than the address of a given unique resource on the Web. In theory, each valid URL points to a unique resource
Mozilla
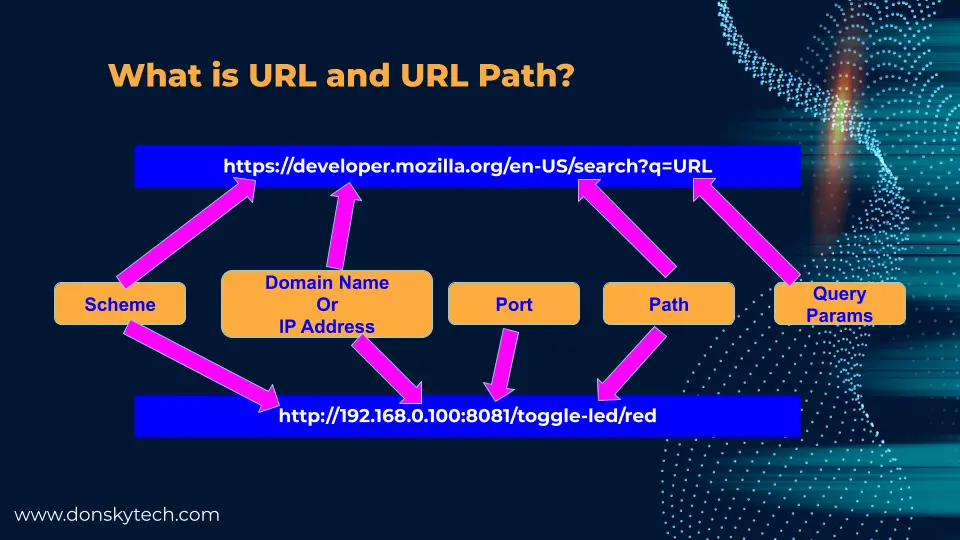
The image above shows the typical parts of the URL of an address that we type in at the top of our browser. Some of the parts are optional or implied but the two samples above represent some of the common things that you will encounter.
For this specific post, we are mostly concerned about the “path” part of the URL and how MicroDot will handle the dynamic components in our MicroPython application.
In the image above, our URL goes like the below
http://192.168.0.100:8081/toggle-led/redIt is important to remember that the path here is “/toggle-led/red“. This value can change into “/toggle-led/aqua” or “/toggle-led/blue“. Can you see what has changed in the path? This feature is what we call Dynamic Components in the URL Path in MicroDot
Parts/Components Required
The following are the components required to follow along with this post.
- Raspberry Pi Pico W – Amazon | AliExpress
- or ESP32 – Amazon | AliExpress | Bangood
- or ESP8266 – Amazon | AliExpress | Bangood
- RGB Module – Amazon | AliExpress | Bangood
- Breadboard – Amazon | AliExpress | Bangood
- Connecting Wires – Amazon | AliExpress | Bangood
Disclosure: These are affiliate links and I will earn small commissions to support my site when you buy through these links.
I am using a Raspberry Pi Pico W as my development board in this post but the code is also applicable for an ESP32/ESP8266 board and all you have to do is update the GPIO pin assignment.
Prerequisites
You should have installed the latest MicroPython firmware for your device.
Related Content:
How to Install MicroPython firmware on Raspberry Pi Pico?
How to install MicroPython on ESP32 and download firmware
You should be familiar with what is MicroDot and how to develop MicroPython applications using this library. If you don’t have an idea how this works then I highly suggest the posts that I have written about it.
Related Content:
Develop MicroPython Application using MicroDot
How to create a MicroPython Web Server the easy way!
I am using the Thonny IDE in developing this project.
Related Content:
MicroPython Development Using Thonny IDE
How to guides in Thonny IDE using MicroPython
Also, you should be familiar with how to interface with the RGB LED Module component in your MicroPython program. I suggest you read my earlier post about how are we going to control our RGB LED by using MicroPython.
Related Content:
Control RGB LED using MicroPython
Wiring/Schematic
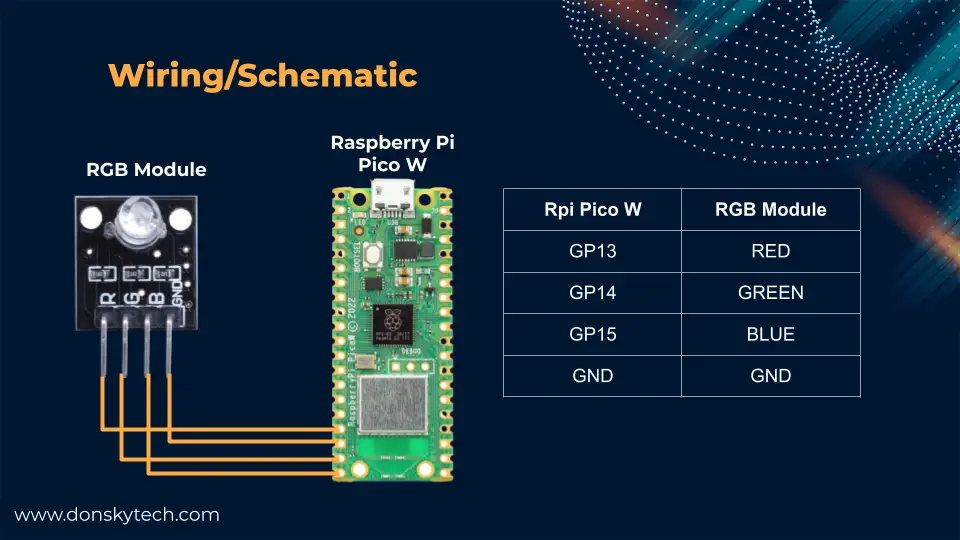
The above image is the wiring or schematic for this project. We only need the RGB LED module and our Raspberry Pi Pico W. We will install the MicroDot library inside our Pico W board so that we can display our dynamic content.
How does MicroDot handle the application URL?
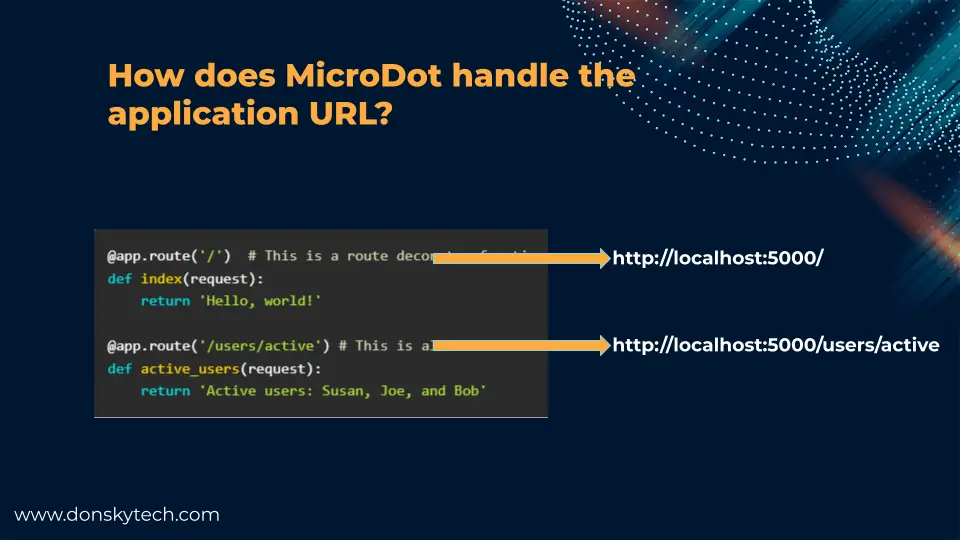
The MicroDot library handles the application URL thru the concept of Route.
@app.route('/')  # This is a route decorator function with the path = "/"
def index(request):
    return 'Hello, world!'

@app.route('/users/active') # This is also a route decorator function with path = "/users/active"
def active_users(request):
    return 'Active users: Susan, Joe, and Bob'
When the user types in the below URL in their browser then the index() function will handle its request and will return an appropriate response.
http://localhost:5000/However, if the user types in the below URL in their browser then the active_users() function will handle its request and will return an appropriate response.
http://localhost:5000/users/activeTake note that the URL should match the path that you supply in your Route object to that of what you put in your browser URL.
How does MicroDot handle dynamic data or content?
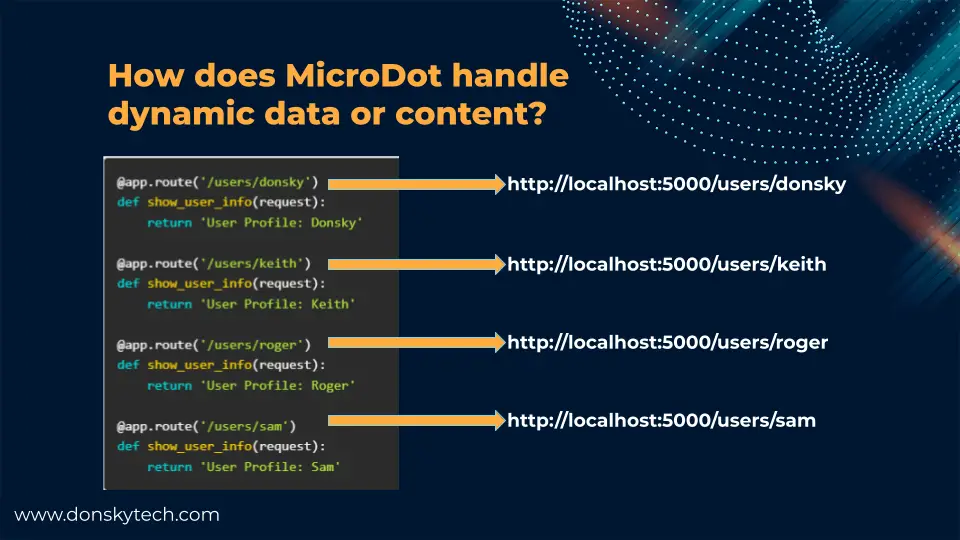
A typical scenario that might happen in your Internet of Things (IoT) project is to display information with different inputs. For example, I have a MicroDot application that I want to display information about a specific user and I want to display his/her information from data coming from the database.
I can create a Route that will look like this.
@app.route('/users/donsky')
def show_user_info(request):
    return 'User Profile: Donsky'
I would type in the below URL in my browser and I would be seeing the message “User Profile: Donsky” in my browser.
http://localhost:5000/users/donskyThis is well and good if you only have one user. But what if you have multiple like for “keith“, “roger“, or “sam“?
Are we going to add more routes in our project like this? And what if it is dynamic and you don’t know beforehand the number of unique names?
@app.route('/users/donsky')
def show_user_info(request):
    return 'User Profile: Donsky'

@app.route('/users/keith')
def show_user_info(request):
    return 'User Profile: Keith'

@app.route('/users/roger')
def show_user_info(request):
    return 'User Profile: Roger'

@app.route('/users/sam')
def show_user_info(request):
    return 'User Profile: Sam'
And have more URL Path like this to type?
http://localhost:5000/users/donsky
http://localhost:5000/users/keith
http://localhost:5000/users/roger
http://localhost:5000/users/sam
Yikes! Our code would be bloated and it would not be manageable. So how do we solve this? Enter the MicroDot dynamic component in the path.
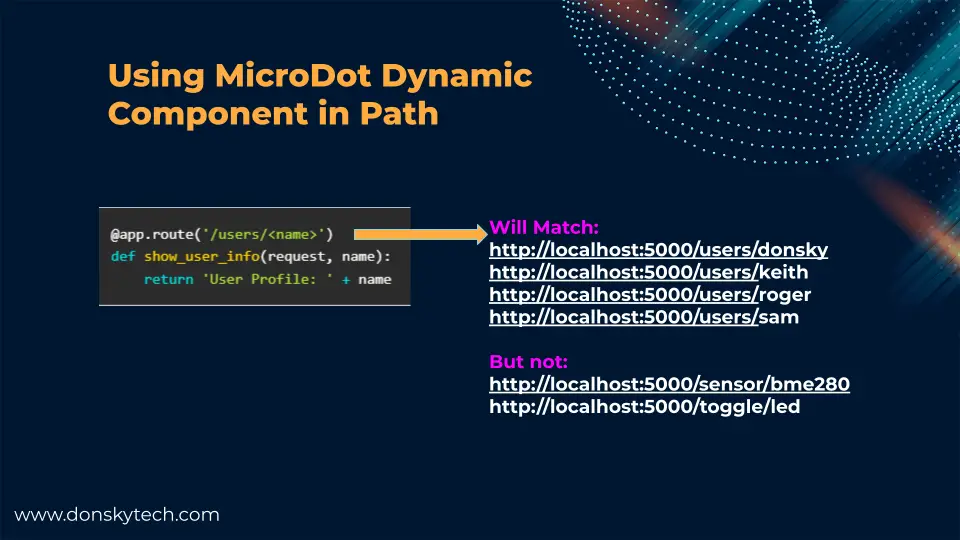
@app.route('/users/<name>')
def show_user_info(request, name):
    return 'User Profile: ' + name
Using this approach, we can have a dynamic “name” in our URL path and we still would be able to display different user information. Anything enclosed in <> (angle brackets) is considered a dynamic component.
Take note that the path that you put in our route should match the URL that you place in your browser. In the case of the route that we created in the image above.
// Will Match:
http://localhost:5000/users/donsky
http://localhost:5000/users/keith
http://localhost:5000/users/roger
http://localhost:5000/users/sam

//But not:
http://localhost:5000/sensor/bme280
http://localhost:5000/toggle/led
Well and good? Stop and meditate and make sure that you understood this concept before you move on.
I think I understood what you are saying but how can I take advantage of this nice feature in an actual IoT project? Read on for an actual IoT application.
Dynamic RGB Module Display using MicroDot
Project Files
The code for this MicroDot Dynamic Component in Path project using MicroPython is available in my GitHub repository and you can download it as a zip file or clone it if you know Git.
git clone https://github.com/donskytech/micropython-raspberry-pi-pico.git
cd microdot-dynamic-component-path
Open the project in Thonny IDE. You can now connect your MicroPython device thru the USB cable and upload the project files into the file system of your microcontroller board. Please check this How to upload files to your MicroPython Device using Thonny IDE? if you don’t know how this is done.
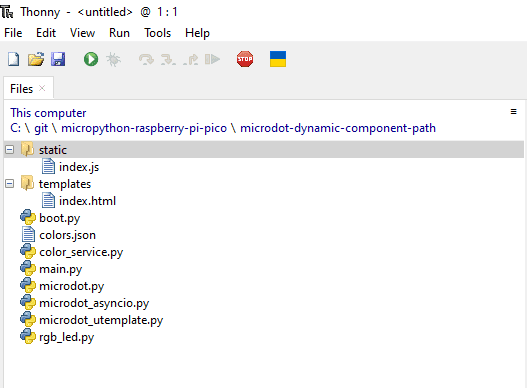
The followings are the files in this project and their roles:
- boot.py – connect to our Wifi network
- main.py – contains our MicroDot web application server
- rgb_led.py – our interface to the RGB LED component module
- colors.json – contains the dummy list of our colors that will be displayed on the user interface
- color_service.py – reads our colors.json
- microdot-* – microdot-specific project files
- templates/index.html – contains our index web HTML page
- static/index.js – javascript file to call our MicroDot route
Libraries needed for this project
You need to install the utemplate library needed by the MicroDot web framework using your Thonny IDE.
Code
Let us now run through what each line of our code does.
colors.json
{
	"colors": [
        {
		"name": "red",
			"rgb": [255, 0, 0]
		},
		{
			"name": "green",
			"rgb": [0, 255, 0]
		},
		{
			"name": "blue",
			"rgb": [0, 0, 255]
		},
		{
			"name": "aqua",
			"rgb": [0, 255, 255]
		},
		{
			"name": "fuschia",
			"rgb": [255, 0, 255]
		},
		{
			"name": "white",
			"rgb": [255, 255, 255]
		}
	]
}
This is the source of the color that we display on our web application. It contains the name of the color and its RGB representation. You can alter this file to add or remove entries that will be displayed in our web application.
color_service.py
import ujson

class ReadColorsService():
    def __init__(self):
        pass

    def read_colors(self):
        with open('colors.json', 'r') as f:
            colors_dict = ujson.load(f)
            return colors_dict["colors"]
This is the file that will read our colors.json and return a list of the colors that we will display in our web application.
rgb_led.py
import time
from machine import Pin,PWM

#RGB
RED = 0
GREEN = 1
BLUE = 2

# Class that wil interface with our RGB Module
class RGBLEDModule:
    def __init__(self, pwm_pins):
        self.pwms = [PWM(Pin(pwm_pins[RED])),PWM(Pin(pwm_pins[GREEN])),
                PWM(Pin(pwm_pins[BLUE]))]
        self.init_pwms()

    # Initialize PWM Pins
    def init_pwms(self):
        for pwm in self.pwms:
            pwm.freq(1000)

    # Deinitialize PWM fins
    def deinit_pwms(self):
        self.turn_off_rgb()
        for pwm in self.pwms:
            pwm.deinit()

    # Map RGB values from 0-255 to duty cycle 0-65535
    def map_range(self, x, in_min, in_max, out_min, out_max):
      return (x - in_min) * (out_max - out_min) // (in_max - in_min) + out_min

    # Turn off RGB
    def turn_off_rgb(self):
        self.pwms[RED].duty_u16(0)
        self.pwms[GREEN].duty_u16(0)
        self.pwms[BLUE].duty_u16(0)
        time.sleep(0.1)

    # Set RGB Color
    def set_rgb_color(self, color):
        red, green, blue = color

        self.turn_off_rgb()

        self.pwms[RED].duty_u16(self.map_range(red, 0, 255, 0, 65535))
        self.pwms[GREEN].duty_u16(self.map_range(green, 0, 255, 0, 65535))
        self.pwms[BLUE].duty_u16(self.map_range(blue, 0, 255, 0, 65535))
This is our interface to our RGB LED module component using the class RGBLEDModule. If you have read my earlier post about Control RGB LED using MicroPython then you would be familiar already with how this class work. I have added comments on what each line of the code does.
boot.py
# boot.py -- run on boot-up
import network

# Replace the following with your WIFI Credentials
SSID = "<PLACE_YOUR_SSID_HERE>"
SSI_PASSWORD = "<PLACE_YOUR_WIFI_PASWORD_HERE>"

def do_connect():
    import network
    sta_if = network.WLAN(network.STA_IF)
    if not sta_if.isconnected():
        print('connecting to network...')
        sta_if.active(True)
        sta_if.connect(SSID, SSI_PASSWORD)
        while not sta_if.isconnected():
            pass
    print('Connected! Network config:', sta_if.ifconfig())

print("Connecting to your wifi...")
do_connect()
This is the code that we will use to connect to our Wifi network.
# Replace the following with your WIFI Credentials
SSID = "<PLACE_YOUR_SSID_HERE>"
SSI_PASSWORD = "<PLACE_YOUR_WIFI_PASWORD_HERE>"
Remember to change the two variables above so that they would match your Wi-Fi network.
main.py
from microdot_asyncio import Microdot, Response, send_file
from microdot_utemplate import render_template
from color_service import ReadColorsService
from rgb_led import RGBLEDModule

# Initialize MicroDot
app = Microdot()
Response.default_content_type = 'text/html'

# Read the colors
color_service = ReadColorsService()
led_colors = color_service.read_colors()

# Set the GPIO pins
rgb_led_module = RGBLEDModule([13 , 14, 15])

# root route
@app.route('/')
async def index(request):
    return render_template('index.html', colors=led_colors)

# toggle RGB Module color
@app.route('/toggle-led/<color>')
async def index(request, color):
    for led_color in led_colors:
        if color == led_color['name']:
            rgb_led_module.set_rgb_color(led_color['rgb'])
            break
    return {"status": "OK"}

# Static CSS/JSS
@app.route("/static/<path:path>")
def static(request, path):
    if ".." in path:
        # directory traversal is not allowed
        return "Not found", 404
    return send_file("static/" + path)

# shutdown
@app.get('/shutdown')
def shutdown(request):
    rgb_led_module.deinit_pwms()
    request.app.shutdown()
    return 'The server is shutting down...'


if __name__ == "__main__":
    try:
        app.run()
    except KeyboardInterrupt:
        rgb_led_module.deinit_pwms()
This is the file that will contain our MicroDot web framework. It also defines the route with a dynamic component on our path. We also initialize the colors that we will be displayed to our users here and send messages to control the colors that will be displayed on our RGB LED module using MicroPython code.
from microdot_asyncio import Microdot, Response, send_file
from microdot_utemplate import render_template
from color_service import ReadColorsService
from rgb_led import RGBLEDModule
Import the necessary MicroDot object and also ReadColorsService and the RGBLEDModule classes from the color_service.py and the rgb_led.py module.
# Initialize MicroDot
app = Microdot()
Response.default_content_type = 'text/html'

# Read the colors
color_service = ReadColorsService()
led_colors = color_service.read_colors()

# Set the GPIO pins
rgb_led_module = RGBLEDModule([13 , 14, 15])
Next, we create an instance of our MicroDot web framework and read our colors.json file and place it in a Python list called led_colors. We then create an instance of ours RGBLEDModule and pass to it the GPIO pins where we have connected our RGB LED component.
# root route
@app.route('/')
async def index(request):
    return render_template('index.html', colors=led_colors)
This is our index route and will display our template index.html and pass to it the list of our led_colors.
# toggle RGB Module color
@app.route('/toggle-led/<color>')
async def index(request, color):
    for led_color in led_colors:
        if color == led_color['name']:
            rgb_led_module.set_rgb_color(led_color['rgb'])
            break
    return {"status": "OK"}
This is the route that will respond to the HTTP request “toggle-led/<color>“. It contains the dynamic part “color” which will contain the color that we want to display in our RGB LED component.
Once we received the color that we want to display then we loop thru all the colors in our led_colors variable and if we match the color then we call the rgb_led_module.set_rgb_color(led_color['rgb']) which contains the RGB model of that color in the form of a Python tuple. We then return a JSON response of {"status": "OK"}
# Static CSS/JSS
@app.route("/static/<path:path>")
def static(request, path):
    if ".." in path:
        # directory traversal is not allowed
        return "Not found", 404
    return send_file("static/" + path)

# shutdown
@app.get('/shutdown')
def shutdown(request):
    rgb_led_module.deinit_pwms()
    request.app.shutdown()
    return 'The server is shutting down...'


if __name__ == "__main__":
    try:
        app.run()
    except KeyboardInterrupt:
        rgb_led_module.deinit_pwms()
The static() function is what we used to return static files like our index.js. The shutdown() function is used to shut down our MicroDot web application and also deinitialize the PWM pins.
The app.run() is used to run our MicroDot web application.
templates/index.html
{% args colors %}
<!doctype html>
<html>
   <head>
      <title>Microdot Dynamic Component in Path</title>
   </head>
   <body>
      <h1>Which LED?</h1>
      <section>
         {% for color in colors %}
         <div>
            <input type="radio" name="led" id="{{color['name']}}" value="{{color['name']}}" onclick="toggleLED(this.value)">
            <label for="red">{{color['name']}}</label>
         </div>
         {% endfor %}
      </section>
      <script src="static/index.js"></script>
   </body>
</html>
This is the HTML template that we will be using to display the list of colors for users to select their desired color. I am rendering a dynamic radio type of HTML component by reading the colors that were passed from my main.py.
The onclick="toggleLED(this.value) attribute is needed so that we could call an HTTP request when we select a particular color. The value of the radio button that we click is passed along as a parameter to the function toggleLED which is loaded from the index.js javascript file.
static/index.js
function toggleLED(color){
  console.log(color);
    fetch(`/toggle-led/${color}`)
    .then(response => {
        console.log(response)
    })
    .catch(error => {
        console.log(error)
    });
}
This is the function that will call an asynchronous HTTP request from the background and will call our MicroDot route “/toggle-led” and pass along the color that we have clicked.
I have used the Fetch API in calling the HTTP request however you can use the XMLHTTPRequest or the JQuery library in doing this also.
Many of the websites that I am seeing are still using the XMLHttpRequest which goes like the below code
var xhttp = new XMLHttpRequest();
xhttp.onreadystatechange = function() {
    if (this.readyState == 4 && this.status == 200) {
       // Typical action to be performed when the document is ready:
       document.getElementById("demo").innerHTML = xhttp.responseText;
    }
};
xhttp.open("GET", "filename", true);
xhttp.send();
or the JQuery which requires an external Javascript library like the below code but they are a bit outdated and I like the simplicity of the Fetch API.
$("button").click(function(){
  $.get("demo_test.asp", function(data, status){
    alert("Data: " + data + "\nStatus: " + status);
  });
});
MicroDot-* specific files
These are MicroDot-specific files and I have just copied them from the project source.
That is basically how the program works and what each file is doing in this MicroDot application that displays dynamic content using the MicroPython firmware.
Wrap up
The project that I have shown you here might be simple but it is very useful in many situations especially if you need to display dynamic content from your MicroDot/MicroPython application.
I hope you learn something. Happy exploring!
Related Content:
Building a MicroPython Wifi Robot Car
Raspberry Pi Pico W: BME280 Weather Station Dashboard
Leave a Reply